
Live foods are extremely beneficial when breeding fish, as their enticing movements encourage the fry to consume and grow more rapidly.
In this article, you will learn how to culture Walter worms to feed your fishes and newborn frys since they are extremely small and can be eaten by them.
It is quite hard to feed newborns with frozen foods and hence these Walter worms are a great substitute.
Live foods are organisms that are eaten directly, without being killed or cooked. These may include plant or animal matter that is alive.
They are an excellent addition to the diet of fry, as they provide a more natural diet to grow more rapidly and remain healthy and are a key component of any fry diet and should include feeder insects, such as fruit flies and crickets, as well as live plants like lettuce or spinach.
Some Examples include bloodworms, brine shrimp, daphnia, and micro worms that include Walter worms, banana worms, and microworms.
There are many reasons why live foods are beneficial to a pet’s diet. For example, live foods provide a more complete, diverse, and balanced diet than dry foods. Live foods also contain protein and oils that help coat the animal’s digestive tract and protect him from harmful bacteria.
They are a good, natural source of protein and oils. They are usually high in vitamin B12 and vitamin D, which help the animal’s immune system function properly. Other important nutrients include calcium and iron.
In addition, live food is an essential ingredient for the production of certain vitamins in animals such as vitamin B complex and vitamin C.
Some examples of live foods include bloodworms, brine shrimp, daphnia, and micro worms.
Some fish, such as betta fish, ram cichlids, and rainbowfish, produce offspring that are too small to consume traditional fry foods, such as live baby brine shrimp or crushed flakes. Instead, you can easily cultivate micro, banana, or Walter worms to maintain the babies’ health and happiness.
How to Culture Walter Worms to Feed Your Fishes & Keep Them Alive?
Culturing micro worms such as Walter worms or banana worms is very simple and can be done in your household. There isn’t a necessity of buying live food for your aquarium instead you can just culture your own Walter worms and feed them to your fish as a healthy snack.
Why should you feed live foods like water worms to your fishes?
When breeding fish, live foods are very helpful because the way they move makes the babies want to eat and grow faster.
But some fish, like betta fish, ram cichlids, and rainbowfish, have babies that are too small to eat live baby brine shrimp or crushed flakes.
Instead, it’s easy to start a culture of micro, banana, or Walter worms to keep the babies happy and healthy.
These tiny worms are small enough to be easily consumed by the fry. They are a good source of protein, vitamins, and minerals that should be consumed daily or twice a week by your fish.
Many aquarium lovers and fish keepers refer to the free-living nematode Panagrellus redivivus as the microworm.
Interestingly, the free-living nematode Panagrellus redivivus (also known as the microworm) is a parasitic worm that lives in the intestines of many freshwater fish, including goldfish.
Although, they can still be cultured to feed your aquarium fishes as they are a very great source of nutrition and most fishes eat these types of worms in the wild.
The aquarium fish are quite lazy and cannot do much as they are not in the mood to feed. So, prepare some food for them with these worms.
The worm, which has evolved to adapt to an environment without predators, is a small (1mm wide), fast-moving animal with tiny, delicate antennae and distinctive brown color.
It is a tiny roundworm that is used as the first diet for larger types of newly hatched fish, such as larval common carp.
The microworm is frequently utilized in aquaculture as food for various fish and crab species.
What kind of fish will eat Walter worms?
Until they reach a size of around 1/4 to 1/2 inch, most fries prefer Killifish, Bettas, Guppies, Gouramis, Corydoras, and Apistogramma, among other species.
At that point, you might try feeding them Grindal Worms.
What is the best environment to culture Walter worms?
To store your culturing container, pick a dark corner of your room.
If you do not have a subculture then you can follow the guide along and start the first set of Walter worms culture to feed your newborn frys or to your fishes as a snack. Now, first, let us collect all the things that we might need to start the culture.
What all ingredients and things do you need to culture Walter worms?
1. Oatmeal or Cornmeal or Baby cereal or flour: These are some types of food that can be used to make a medium to culture Walter worms.

2. Yeast

3. 1 Potato

4. Gardening tools: You can take your garden tool kit if available or just a shovel would do the job too.
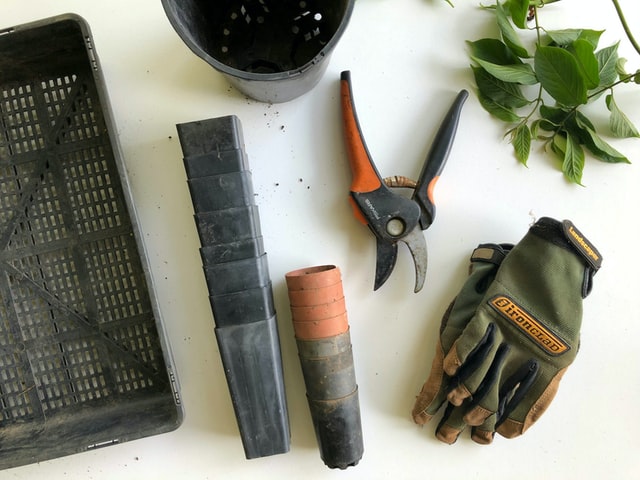
5. Knife: To cut the potato

6. Plastic containers: We need these to store the culture. You will need to make very tiny holes for the culture to breathe and to keep it away from predators.
7. Spoon or popsicle stick

8. Surgical gloves and mask

9. Small to a medium saucepan
These are some of the ingredients and equipment you will be needing to start the very first culture of Walter worms.
How to culture Walter worms without a starter or subculture?
It is possible to culture banana worms, Walter worms, and micro worms with the ingredients present in the household.
They are a great source of nutrition for fishes and other aquatic pets, especially for newborn fishes as they are smaller in size and can easily feed onto the Walter worms. Culturing Walter worms is fairly very simple.
Although, it will take around 1 to 2 weeks of time to make a fresh culture of Walter worms. You can then make different subcultures from the previous culture and so on within 3 to 7 days depending upon the surrounding temperature.
Here is the step-by-step walkthrough you can follow and make your very first culture of Walter worms in your home itself
-
It is recommended to wear surgical gloves to keep yourself away from foreign bacteria or viruses.
-
Take a fresh potato and cut it into two halves.
-
Now, the next step is to take a shovel from your gardening kit and dig a small hole into the ground (Moist ground), and then place this potato completely into the ground. Also, keep a note of where you have buried the potato.
-
Make sure to keep the ground moist by sprinkling some water if you see the ground dry.
-
It is time to wait for about 1-2 weeks until the formation of nematodes or micro worms takes place.
-
Carefully dig up the buried potato after 1-2 weeks. Carefully collect the small nematodes from the potato using a popsicle or spoon. The rotten potato smells bad and I would recommend you to wear a mask to prevent it.
The next step is to create a medium in order to grow and culture the nematodes on a large scale. Follow this guide along to create a medium that is suitable for Walter worms to culture.
How to prepare a medium to store the Walter worms culture?
-
In a small to medium saucepan, bring water to boil. Optionally, if groundwater is available that is preferable over spring or fresh water.
-
Now, you can add oatmeal or cornmeal into the boiling water and then turn off the burner. Mix the oatmeal into the water until you get a thick paste. Add a little more oats and make sure the mixture gets thick paste. A little moisture works just fine in the mixture. Although, there shouldn’t be any excess water present in the saucepan.
-
Now, wait for the mixture to cool down overnight.
-
By the next morning, the oatmeal should be solid, and you should be able to slice, scoop, and press the mixture into the shape you want for your container. Because your nematodes will only be living on the surface, you don’t need to fill your containers all the way to the top.
-
Half an inch of mild oatmeal will be enough. Your nematodes will require room to climb up the container’s sides.
-
You may easily collect them on the container’s edges for harvesting.
-
Use a tiny spray bottle filled with water to saturate the interior walls and surface of the oatmeal medium with a fine mist of droplets. Now is the time to uniformly distribute your beginning culture throughout the surface of your freshly made oatmeal media.
-
Stir or mix your starting culture into the oatmeal medium but do not mix it in. Your nematodes will be living on the surface of the water.
-
Cover your container for culture. Per 8 ounces of culture media, add 4- 5 micro pellets of Brewer’s yeast.
-
Pour the yeast on top. Never combine yeast with the medium.
-
Also, make sure your container has little air openings to allow your culture to breathe.
How to harvest Walter worms to feed your aquarium fishes?
Gather the worms that are creeping up the edges of the container and lid with a Popsicle stick, Q-tip, or similar utensil.
Then, place your worms in a small portion cup of clean room temperature water. If feasible, use aquarium or spring water to dilute your worms instead of tap water.
Gently swirl the worms and water together. Feed the worms to your fish with an eye dropper.
How To Maintain Walter Worm Cultures?
Once per week, you must gently stir your micro worm culture to keep them thriving.
Microworms do not burrow, unlike other worms.
It is recommended to always maintain two microworm cultures simultaneously.
This ensures that you will always have micro worms available to feed your fish and fry in the event that one of your cultures crashes or fails.
In addition, you will always be able to initiate a new culture.
On the container’s lid, indicate the date the culture was started.
This allows you to determine the age of the culture and when you should consider starting a new one.
It is also normal for microworm cultures to smell like vinegar.
The duration of micro worm cultures varies depending on the environment in which they are kept.
Microworms, or nematodes, are a type of worm that can be cultured in a petri dish. The duration of micro worm cultures varies depending on the environment in which they are kept.
For example, micro worms will remain active and reproduce for longer periods of time if they are kept at room temperature than if they are kept at higher temperatures.
Although, slightly warmer temperatures do accelerate their metabolism, resulting in a faster rate of multiplication and a shorter lifespan for the cultures.
The culture will become more fluid and soup-like as a result of the oats.
When it begins to become runny, but the micro worms are still thriving, start a new culture.
As time passes, the culture will become increasingly soupy, begin to emit an unpleasant odor, and possibly develop mould; at this point, it must be discarded.
How often should you start a new culture of Walter worms for your fishes?
It is better to introduce a new culture every 8-10 days.
Prepare your new medium and incorporate some of your previous cultures into it.
You can grow your culture at any time after it has been set up, which usually takes between 3 and 7 days.
All you have to do is go through the steps again. If you don’t, you’ll have to wait until your culture starts to smell bad and is as thin as soup.
This is a sign that the yeast has eaten all of the grain and that the number of Walter worms will go down.
At this point, you should get another container, put cooked grain and baker’s yeast in it, and repeat the steps from above.
If you keep your culture going, your newly hatched fry will always have Walter worms to eat.
Adequate Temperature for culturing?
Temperatures range between 65 and 75 degrees Fahrenheit. When temperatures fall below 64 degrees Fahrenheit, reproduction slows but does not cease.
When temps hit 86 degrees Fahrenheit or above, they will likewise begin to die off.
Lifespan and Reproduction of Walter worms?
The average lifespan of a Walter Worm is 35 to 40 days, and they become sexually mature at 4 days of age, at which point they are capable of generating up to 85 live young on a daily basis.
Before reaching maturity, they go through a total of five skin sheds.
Because there are always more females than men, most civilizations breed very quickly, which helps them maintain a large population.
How long do Walter worms get?
The maximum length of a Walter Worm is 1.5 millimeters. In general, females are larger than their male counterparts.
What to feed your Walter worms?
There is no need to provide any additional nourishment or water.
In the event that your culture dies due to a lack of moisture, you can try to bring it back to life by drizzling a fine mist of water over it.
Conclusion
Don’t think twice. You can also try things out and make your own mix of foods to make cultures.
The grain is eaten by the yeast in the mixture, which helps feed the Walter worms along with the bacteria that are already there.
The word “yeast” is a type of fungus that is used in bread and other baked goods. It is important because it helps the dough rise and promotes fermentation.
Yeast consumes the sugar in the mixture, which feeds the Walter worms as well as bacteria that are already there.
It can take anywhere from 3 to 7 days to harvest a new culture. How long it takes to harvest also depends on how big your new container is and how much food you have.
The harvest will be slower, but there will be a lot more Walter worms. The bigger the new container and food supply, the slower the harvest will be.
It is a truth universally acknowledged, that a single worm in an apple will inevitably eat his way through the entire fruit. The same is true for Walter worms in a new container and food supply.
By changing the temperature, you can change how quickly your culture grows.
Lower temperatures make the culture last longer, but it takes longer for the Walter worms to reproduce and be harvested.
If you raise the temperature, your culture will grow faster and you will get more Walter worms. Remember that Walter worms are very small, so if you can’t see them up close, you might miss them.
If your Walter worm culture is doing well, you will see the worms climbing the walls.
Banana and Walter worms are easy to raise, and when the fry is a few days to a week old, they make great food (depends on growth rate).
Купить кирпич керамический: традиции и современные технологии
купить кирпич http://www.good-brick-stove.ru/ .
Лучшие мобильные приложения – профессиональная студия разработки
cтудия разработки it-решений для компаний http://www.studiya-razrabotki-mobilnih-prilojenii.ru/ .
Вывод из запоя: скорая помощь при алкогольной зависимости
выведение из запоя выведение из запоя .
Обзор отзывов о Kugoo G1: мнение реальных пользователей
куго kirin g1 kugo-g1.ru .
Экологичный клининг: безопасная уборка для вашего здоровья
заказать клининг в москве заказать клининг в москве .
Где выгодно купить шины: обзор топовых магазинов в СПб
купить автошины спб https://shiny-01.ru .
Инновации в палатках Актория МСК для глэмпинга: что нового
Актория-МСК glampings-buy ru
Купить диплом об образовании – Надежные и проверенные поставщики
диплом купить цена диплом купить цена .
Купить диплом о высшем образовании: выбор смелых и амбициозных
купить диплом высшего образования https://diplomsa-24.ru/ .
Откройте для себя Таиланд: эксклюзивные товары в нашем тайском интернет-магазине
тайская аптека интернет магазин прямо из таиланда http://tajskij-internet-magazin.ru/ .
Преимущества тайских кремов для лица: детальный обзор косметики
тайская косметика оптом из тайланда https://tajscaya-kosmetika.ru .
Джиппинг в Абхазии: лучшие советы и маршруты для путешественников
абхазия джип тур dzhipping-tur-po-abhazii.ru .
Поддержка после вывода из запоя: что предлагают клиники
вывод из запоя на дому https://www.vyvod-iz-zapoya118.ru/na-domu .
Selfie Journal: как поддерживать здоровье и красоту кожи
о красоте selfie journal
Купить диплом о высшем образовании: реальные отзывы покупателей
диплом высшего образования купить http://www.diplomsa-24.ru .
Энергоэффективное отопительное оборудование в Москве
системы отопления купить https://www.internet-magazin-otopitelnogo-oborydovaniya.ru/ .
Купить диплом о высшем образовании: проверенное решение
диплом высшего образования купить diplomsa-24.ru .
Джиппинг в Абхазии: что ожидать от путешествия по горам и лесам
джиппинг по абхазии джиппинг по абхазии .
Современное отопительное оборудование в Москве: новинки и тренды
магазины отопительного оборудования https://internet-magazin-otopitelnogo-oborydovaniya.ru .
Клиника наркологии в СПб: помощь при алкогольной и наркотической зависимости
лечение в наркологической клинике narcologicheskaya-klinika-spb2.ru .
Нужна поверка счетчиков воды? Выберите лучший сервис в Москве
поверка водосчетчиков https://www.poverka-schetchikov-vody-v-moskve.ru/ .
Зеркало Вавада казино: играйте в любое время
vavada.com online зеркало http://www.vavada-zerkalo-casino-online.top/ .
Выберите жизнь без зависимости с наркологическим центром Пермь
адрес реабилитационного центра алкоголиков Пермь narkoklin1.ru .
Лучшее лечение наркомании в СПб: отзывы и результаты
наркологическая клиника официальный сайт http://narcologicheskaya-klinika-spb2.ru/ .
Наркологическая клиника Пермь: анонимная помощь на высшем уровне
наркологическая помощь реабилитация Пермь https://narkoklin1.ru .
Как купить диплом без посредников – секреты экономии
купить диплом в москве https://www.dipls-bestst.ru/ .
Как найти надежный источник для покупки диплома: практическое руководство
купить диплом https://diplom-trues.ru .
Оформление дипломов под ключ – купите ваш документ уже сегодня
диплом купить цена dipl-fast.ru .
Тренажеры для спортзала: подборка лучших моделей
тренажеры для спортзала http://trenajeri-dlya-zala.ru/ .
Купить диплом с гарантией: ваш путь к успеху
купить диплом diplom-trues.ru .
Подробное руководство по покупке диплома: сделайте это правильно
купить диплом в москве dipls-bestst.ru .
Комфорт и безопасность в домах престарелых Севастополя
дом престарелых в севастополе за пенсию http://xn—–1-53dbnmkbb4eee3akaijkcufdpk8exirb.xn--p1ai/ .
Дома престарелых Севастополя: создаем комфорт для старшего поколения
пансионат для пожилых в севастополе xn—–1-53dbnmkbb4eee3akaijkcufdpk8exirb.xn--p1ai .
Тренажеры для спортзала: как сделать свой выбор
все для тренажерного зала trenajeri-dlya-zala.ru .
Как выбрать идеальный диплом для покупки: экспертные советы и рекомендации
цена на покупку диплома https://www.dipl-fast.ru .
Профессиональный уход в домах престарелых Севастополя
дом инвалидов севастополь https://xn—–1-53dbnmkbb4eee3akaijkcufdpk8exirb.xn--p1ai/ .
Dermal Fillers: The Art and Science of Enhanced Natural Beauty
aesthefill aesthefill .
Сравнение видов тротуарной плитки: что лучше выбрать
тротуарная плитка недорого http://www.trotuarnaya-plitka3.ru .
Закажи алкоголь онлайн с доставкой по лучшим ценам
алкоголь с доставкой алкоголь с доставкой .
Прайс лист на клининг в Москве: цены на уборку 1 кв м
клининговая компания стоимость услуг https://genuborkachistota.ru/ .
Клининговые услуги в Москве – Чистота и порядок без усилий
Агентство уборки http://www.uborkaklining1.ru/ .
Профессиональные услуги генеральной уборки квартир
генеральная уборка в квартире https://www.genuborka11.ru .
Купить Куго М5 Про – Электросамокат с гарантией качества
сколько стоит куго м5 про http://www.kugo-m5-pro.ru/ .
Вавада зеркало: Актуальные ссылки для игры
вавада вход зеркало вавада вход зеркало .
Уборка после ремонта: лучшие цены на профессиональные клининговые услуги
клининг после ремонта квартиры http://www.genuborka2.ru .
Услуги генеральной уборки – Профессиональный клининг по доступным ценам
клининг спб генеральная уборка https://genuborka1.ru/ .
Качественные бытовки для дачи: продажа по доступным ценам
бытовка цена https://bytovki-kupit1.ru/ .
Инновационные тренажеры для фитнес-клубов: что нового на рынке
тренажеры для спортивного зала тренажеры для спортивного зала .
Платная наркологическая клиника в Самаре: Высокий уровень сервиса
клиника наркологии в самаре https://www.narcologicheskaya-clinika-samara.ru .
Срочная помощь при запое: услуги наркологических клиник
срочный вывод из запоя https://wyvod-iz-zapoya01.ru .
Яхтинг в Сочи: аренда яхт для любого бюджета
яхта сочи аренда https://www.arenda-yaht-v-sochi02.ru .
Учебный центр ДПО: обучение на косметолога с перспективой карьерного роста
обучение бьюти мастеров обучение бьюти мастеров .
Наркологическая клиника в Севастополе: Лечение наркомании и кодировка
наркологическая клиника отзывы https://xn—-1-5cdblfrzslgqqbgarh1adw8u7b.xn--p1ai .
Экраны для проекторов: Где купить и как выбрать
экран проекционный http://www.ehkrany-dlya-proektorov.ru .
Где найти рабочее зеркало Казино Чемпион
Чемпион рабочее зеркало сайта http://www.casinochampion-official.ru .
Лучшие игры и акции для вас в казино Лев – играйте и выигрывайте
Лев рабочее зеркало сейчас http://casinolev-official.ru/ .
Как найти рабочее зеркало казино Эльдорадо
Эльдорадо рабочее зеркало официальный сайт Эльдорадо рабочее зеркало официальный сайт .
Официальное зеркало казино Клубника: наслаждайтесь игрой без ограничений
Clubnika casino зеркало http://casinoclubnika-official.ru/ .
Продажа бриллиантов: как найти выгодные предложения
алмаз купить https://www.naturalnyebrillianty.ru/ .
Почему выбирают Казино Вулкан Россия: Обзор преимуществ и возможностей
Vulkan Russia зеркало на сегодня https://casinovulkanrussia-official.ru .
Почему стоит выбрать Казино Вулкан Россия: Бонусы и акции
Vulkan Russia vulkanrussiacasino-official.ru .
Опытный сантехник на дом в СПб — доступные цены, отличное качество
вызвать сантехника недорого https://24santehnik-6.ru/ .
Полезные советы для новичков в мире казино Вавада
Вавада рабочее зеркало официальный сайт http://casinovavada-official.ru/ .
Купите Kugoo M4 Pro 2024 — мощный электросамокат с батареей 18Ah
куго м4 про цена http://www.kugo-m4-pro.ru .
Частные пансионаты для пожилых людей: уют и забота о близких в Москве
частный пансионат для пожилых https://pansionaty-dlya-pozhilyh77.ru/ .
Бытовки под ключ: готовые решения для вашего участка
бытовки купить бытовки купить .
Как воспользоваться зеркалом Азино 777 для безопасного доступа к казино
Azino 777 рабочее зеркало сейчас http://www.casinoazino777-official.ru .
Онлайн доставка алкоголя: Удобный способ заказать напитки
заказ алкоголя на дом http://dostavka-alkogolya-moskva-nochyu-4.ru/ .
Лампы накаливания с различными цоколями – найдите свою
лампа с нитью накаливания lamp123.ru .
Как правильно настроить гитару перед уроками игры на гитаре
обучение на гитаре с нуля обучение на гитаре с нуля .
Изготовление дубликатов номеров для авто: быстро и выгодно
изготовление дубликатов номеров http://vip-dublikat-nomerov.ru/ .
Лазаревское: отдых и цены на экскурсии и развлечения
лазаревское море отдых цены 2024 лазаревское море отдых цены 2024 .
Онлайн Казино Чемпион: Лучшие игры и бонусы специально для вас
официальный сайт казино Чемпион официальный сайт казино Чемпион .
Отдых в Гаграх: Пляжи, солнце и море ждут вас
гагра снять жилье гагра снять жилье .
Учимся петь красиво и уверенно: Программа школы вокала
студия эстрадного вокала http://www.uroki-vocala-msk.ru/ .
Уроки вокала в школе: как стать успешным певцом
вокальная студия для детей https://top1-shkola-vocala.ru/ .
Купить зип пакеты с бегунком: Быстрая доставка и отличные цены
зип пакеты с бегунком оптом http://www.zip-lock-pakety.ru/ .
Школа барабанов: обучение с нуля до профессионального уровня
обучение на барабанах обучение на барабанах .
Цены на установку сантехники: выберите лучшее предложение
сантехник сколько стоит цена http://www.santehnik-spb-cena.ru/ .
Полезные советы по предотвращению дубликатов номеров, ознакомьтесь немедленно.
Эффективные способы борьбы с дубликатами номеров, примените на практике наши советы.
Способы избежать повторения номеров на документах, предлагаем изучить.
Какие последствия могут быть при наличии дубликатов номеров, проверьте свои документы уже сегодня.
Как грамотно организовать нумерацию документов, попробуйте на практике наши рекомендации.
Почему важно не допускать дубликатов номеров, рекомендуем изучить.
Шаблоны для нумерации без дубликатов, попробуйте эти методы.
Как узнать о наличии дубликатов номеров, проверьте свои документы прямо сейчас.
Как узнать, что у вас повторяющиеся номера, воспользуйтесь этими рекомендациями.
изготовление автомобильных номеров изготовление автомобильных номеров .
Лечение алкоголизма и наркомании в Самаре: Опытные наркологи
клиника наркологии самара https://narkolog-klinika-samara-1.ru .
Вывод из запоя на дому: Удобство и безопасность
вывод из запоя в самаре цена http://www.vyvodim-iz-zapoya-samara.ru/ .
Запчасти МТЗ: Доставка по всей России
магазин запчастей на мтз https://www.zapchasty-mtz.ru/ .
Чемпион Казино: Попробуй удачу в покере и стань победителем
казино Чемпион казино Чемпион .
Клининг коммерческих помещений: Профессиональные услуги для бизнеса
клининг москва klining-kompaniya-msk.ru .
Выведение из запоя: цена услуг наркологии
Вывод из запоя vivodizzapoyaalmaty1.kz .
Программы вывода из запоя: выбор для каждого
Снять алкогольную интоксикацию на дому vivodizzapoya1.kz .
Как выбрать винтовые сваи? Советы от ГК Пересвет
ГК Пересвет: купить сваи винтовые для фундамента цены
Ремонт иномарок с применением современного оборудования
станция технического обслуживания иномарок https://www.remont-inomarok-spb.ru .
Продажа двигателей Cummins 6 ISBe: Узнайте больше о лучших предложениях
двигатель камминз 6isbe https://www.cummins-6isbe-1.ru/ .
Лікар заповнює декларацію в електронній формі та обов’язково має її роздрукувати, щоб пацієнт перевірив дані. Якщо декларація не містить помилок, необхідно підписати два примірники. Один примірник залишається пацієнтові, інший – у медичному закладі. Якщо все введено вірно – Декларацію необхідно підписати. Готово Ви уклали декларацію з лікарем. У медичному центрі «Мед Парк» працює швидка медична допомога, лікарі якої перевозять хворих пацієнтів, а також супроводжують різноманітні заходи. Детальніше про швидку медичну допомогу можна прочитати на сайті ambu.ua.
https://www.soundclick.com/member/default.cfm?memberID=7248353
Файли cookie продуктивності використовуються для розуміння та аналізу ключових показників ефективності веб-сайту, що допомагає забезпечити кращий досвід користувача для відвідувачів. Процедура видалення родимок залежить від медичних та естетичних показань. Більшість родимок виглядають безпечно. Невуси (родимки) – це доброякісні новоутворення, але деякі фактори можуть впливати на структуру, наприклад: велика кількість сонячного опромінення, отриманого протягом життя, через солярій, генетику та інші фактори, родимки можуть переродитися у злоякісні утворення.
Почему важно профессиональное вмешательство при выводе из запоя
Вывести из запоя на дому в Алматы https://vivodizzapoya.kz .
Современные технологии позволяют оформить займы онлайн, что особенно удобно для тех, кто ценит свое время и предпочитает решать финансовые вопросы, не выходя из дома.
Методы вывода из запоя: как выбрать лучший
Вывод из запоя в Алматы https://www.vivodizzapoyavalmaty.kz .
Как выбрать лучший наркологический центр в Алматы
Нарколог выезд в Алматы vivodizzapoyanadomu.kz .
What are the best slots games for beginners? ¡Por favor, activa primero las cookies estrictamente necesarias para que podamos guardar tus preferencias! It is hardy possible to follow even a plain storyline by the symbols, imaged at the reels of Enchanted Unicorn slot machine. It is nothing more than a beautiful slot machine, devoted to different legends. The symbols with images of a courageous prince, a blond princess, a lion, roses, mushrooms, berries, cones and acorns appear at its screen. Since Enchanted Unicorn slot free play is not available, it is recommended to study the rules carefully before making bets for real money. If you like to play IGT casino slots, you’ll definitely like the Enchanted Unicorn slot. Except it is not difficult to play, it has a really interesting plot and many special features that help to win you more money. With the help of the graphics, you can feel like you are walking across the forest, meeting different animals, watching plants, finding treasures sometimes. The music is quite simple so you won’t be bent with it.
https://cesarecjd840617.goabroadblog.com/28187171/scatter-slots-game-app
Enjoy the same ground-breaking features and award-winning support that have made PokerStars the choice of millions of poker players around the world. It is worth noting that PokerStars real money mobile client for Android is currently the best in the industry. Any player will immediately realize that software is the result of good and hard work of the developers. So don’t put into cold storage. Just download and install PokerStars mobile app to your Android device and join the biggest online poker room right now regardless of where are you now. Unmissable big-money poker tournaments, like the World Championship of Online Poker (WCOOP) and Spring Championship of Online Poker (SCOOP), are only available on PokerStars and PokerStars Mobile. Add must-play weekly events like the $1,000,000 guaranteed Sunday Million and The Daily Bigs into the mix and our tournament schedule is second-to-none.
Как обеспечить сохранность груза при доставке из Китая в Казахстан
доставка груза в казахстан из китая http://www.perevozki-kitai-kazahstan.ru/ .
Натуральный мех и элегантный дизайн: Элитные шубы для женщин с утонченным вкусом
шубы магазины шубы магазины .
Как носить шубу из соболя, чтобы выглядеть элегантно и стильно
фабрика соболь шубы меховая каталог https://shuby-sobol.ru/ .
УФ печать на текстиле: как создать уникальные брендированные изделия
печать на керамограните https://shirokoformatnaya-uf-pechat.ru .
Закажите УФ печать на дереве с доставкой по всей России – качественно и быстро
уф печать на дереве https://www.pechat-derevo.ru .
Что ожидать от проживания в пансионате для пожилых: советы и рекомендации
частный пансионат для пожилых http://www.pansionaty-dlya-pozhilyh2.ru .
Лучшие дома престарелых в России: рейтинг и рекомендации
дома для престарелых дома для престарелых .
Как чистка лимфы солодкой и полисорбом влияет на организм
химическая диета разрешенные продукты http://www.clinika-moscow.ru .
Даже если основной сайт недоступен, mirror1win.ru позволит вам мгновенно войти на 1win и продолжить наслаждаться азартными играми. Оставайтесь в игре без ограничений.
Что подарить на Новый год: лучшие зимние подарочные наборы
Зимние подарочные наборы Зимние подарочные наборы .
Чтобы воспользоваться специальными предложениями, вам нужен промокод для 1win. Введите его на сайте букмекера при регистрации или внесении депозита. Это позволит активировать бонусы и воспользоваться акциями.
Надежное вскрытие замков в Санкт-Петербурге без повреждения двери
меттэм официальный сайт замки https://www.zamkidoloi.ru .
Biohacker Host: ноотропы для повышения умственной активности и ясности ума
Магазин ноотропов Биохакер
Установка винтовых свай 57 мм: основные этапы и советы
купить сваи 57 http://www.vintovaya-svaya-57-mm.ru .
Преимущества комплексного продвижения сайтов для малого бизнеса
сео продвижение сайтов http://www.prodvizheniesajtov1.ru .
Какие ортопедические матрасы рекомендуют специалисты
ортопедический матрас на диван https://www.ortopedicheskij-matras-moskva-1.ru .
Each shade has been tested on the full spectrum of skin tones to ensure a perfect match for everywhere. Always wanted to know what the superstar’s go-to shade is? Rihanna opts for Honey as her concealer stick and caramel as her contour stick. The Matte Skinsticks are perfect for on the go touch-ups and easy contour concealer. The formula makes it easy enough to blend out with your fingers or beauty sponge, however, since it is a cream to powder product, some might find it too drying. I love to layer Suede(used in the photo above) atop of some of my creamier concealers. I have also had success using Truffle as a foundation for my light makeup days. The formula is great for combo oily skin. I wish they came out with a few more deeper shades, though. It seems like a large jump from Cocoa to Espresso and there isn’t anything darker than Espresso to contour with.
https://www.freelistingusa.com/listings/wet-n-wild-spongebob-collection-pr-box
I dived into my own collection to find my personal favorites, and in my opinion, I picked out the 10 best eyeshadow palettes for spring. I’ve included more neutral-toned palettes, as well as pastels and some brighter colored palettes. Curious to see which color stories I picked and which palettes I think are high performance too? Then keep on reading! Olivia Palermo Eyeshadow Look Today, we’re going to discuss the best eyeshadow for blue eyes & recommend a few of our favorite products. Keep scrolling for all the details! This gorgeous rose-gold eyeshadow palette quad makes your eyes wider and brighter-looking. Inspired by social media eye filters, it features ivory-cream, rose-gold, red-brown, and transparent sparkle shades that highlight your natural eye color. So if you’ve nailed the basis of how to apply your makeup and are looking to add more than simply a slick of the best eyeliner, a trusty eyeshadow palette is the perfect tool. We’d recommend looking for a palette with enough versatility to give you a few different looks out of it—but there are other factors to think about, too, such as the overall makeup look you’re going for, how many shades come in the palette, the texture and pigment of the formulas, and how long the eyeshadow lasts once applied.
Не хочется терять время прямо на карту? Ознакомьтесь с тем, как оперативно оформить займы онлайн на карту и решить финансовые задачи в любое время.
Need professional calligraphy? Go to site where you can find detailed ordering information for to realize your ideas.
Нужен надежный ремонт для вашего погрузчика? Узнайте, как организовать полный комплекс услуг по ремонт и обслуживание погрузчиков у проверенных специалистов.
Попали в трудное положение? Узнайте, как вызвать эвакуатор в любое время для транспортировки.
Если вам нужна мощная молотковая дробилка, ознакомьтесь с техническими характеристиками, чтобы приобрести надежную технику для вашего хозяйства.
Хотите получить деньги прямо на карту? Ознакомьтесь с тем, как быстро взять займ на карту и получить нужные средства.
Суррогатное материнство в Москве: выбирайте лучшие агентства
найти суррогатную маму без посредников в москве найти суррогатную маму без посредников в москве .
Заказать картонные коробки с доставкой по всей России
купить картонные коробки с доставкой https://www.kartonnye-korobki77.ru/ .
Флис для домашних изделий: купить ткань для пледов и одеял
флисовое полотно купить flis-optom77.ru .
You don’t know how to start signature? Check out our tips to help without any problems create a signature.
Чтобы сохранить работоспособность вашего погрузчика, ознакомьтесь с предложениями по ремонт и обслуживание погрузчиков. Это поможет вам избежать поломок.
Для дополнительных данных перейдите на сайт. Там вы найдете все, что нужно для быстрого решения проблем.
Флисовая ткань для пошива курток и свитеров: купить по доступной цене
флисовая ткань цена за метр https://flis-optom99.ru/ .
Хотите узнать больше? Переходите на сайт, где представлены подробные характеристики о зернодробилках, которые помогут вам.
Купить Cummins M11: двигатели для устойчивой и стабильной работы
m11 cummins http://www.dvigatel-cummins-m-11.ru .
Запчасти на ВАЗ в Москве: большой выбор деталей с доставкой
запчасти ваз купить https://zapchasti-vaz1.ru .
Наркология в Самаре: современные программы лечения алкоголизма и наркомании
лечение в наркологической клинике narcologicheskaya-clinika-samara-2.ru .
Предпочитаете получить деньги прямо на карту? Ознакомьтесь с тем, как без лишних проблем оформить займы онлайн на карту и решить финансовые задачи в кратчайшие сроки.
Для получения подробностей перейдите на сайт. Здесь вы найдете услуги, которые помогут вам найти нужные запчасти.
По Минску доступен быстрый вызов эвакуатора. Ознакомьтесь с тем, как заказать эвакуатор минск в любое время.
Для эффективного размола зерна необходима высококачественная зернодробилка. Узнайте, какие решения доступны для домашнего использования.
Если требуются средства, узнайте, как быстро взять займ. Это простой способ получить деньги в любое время.
I’m looking for inspiration for signature? Learn how convenient create signature by following our.
Ищете дополнительную информацию? Переходите на сайт, где представлены подробная информация о ремонте техники и доступных предложениях.
Оформление лизинга на коммерческий автотранспорт: простые шаги
коммерческий транспорт в лизинг http://kommercheskij-transport-v-lizing0.ru/ .
Купить детский матрас с ортопедическим эффектом: здоровье малыша превыше всего
матрас 160 на 80 детский купить москва detskij-matras-moskva.ru .
Возникла необходимость? Ознакомьтесь с широким спектром услуги эвакуатора для решения любых проблем на дороге.
Для качественного измельчения зерна необходима надежная зернодробилка. Узнайте, какие варианты доступны для промышленного применения.
Нужны деньги, когда срочно требуются деньги? Узнайте, как легко получить деньги в долг и решить свои проблемы моментально.
Want to create a unique digital signature? Go to site where you can find detailed ordering information for to solve your request.
Нужен ремонт? Узнайте, как качественно выполнить ремонт погрузчика амкодор с гарантией и использованием оригинальных деталей.
Ищете помощь? Узнайте, какие варианты помощи могут предложить услуги эвакуатора в нужный момент.
Ищете решение для переработки зерна? Узнайте, как приобрести дробилка для зерна, которая подходит для вашего хозяйства.
Планируете взять займ? Ознакомьтесь с тем, как быстро оформить займы онлайн, чтобы обеспечить себе деньги без походов в банк.
Доставка алкоголя на дом: широкий выбор для вечеринок и мероприятий
заказ алкоголя http://dostavka-alkogolya-moskva-world-1.ru/ .
Доставка алкоголя к празднику: закажите напитки прямо сейчас
доставка алкоголя в москве круглосуточно на дом http://www.dostavka-alkogolya-moskva-msk-1.ru .
Want to learn more about calligraphy design? Check out our advice to help you develop your skills.
Если оборудование нуждается в срочном ремонте, узнайте, как быстро выполнить ремонт амкодор с гарантией качества.
Если машина оказался на обочине, вам может понадобиться быстрое реагирование. Узнайте, как вызвать эвакуатор когда это необходимо.
Задумались о покупке купить зернодробилку? Узнайте, где и как могут подойти вашему хозяйству.
Если встал вопрос в получении займа, ознакомьтесь с тем, как удобно получить деньги в долг, чтобы обеспечить себе средства.
Займы без отказа и проверки кредитной истории: одобрение 100%
займ срочно без отказа dengikz.online .
You’re planning to create and looking for ideas to design your signature? Learn more about process to help to come up with a unique style.
Оригинальные двигатели Cummins M11: качество, проверенное годами
двигатель каменс м11 dvigatel-cummins-m-11.ru .
Хотите узнать больше? Переходите на сайт, где представлены все услуги о ремонте техники и доступных предложениях.
Нужна помощь? Узнайте, как вызвать эвакуатор круглосуточно для транспортировки.
Доступные каркасные дома под ключ: проекты, цены и условия
каркасные дома под ключ http://karkasnye-doma-spb1.ru/ .
Бытовки на заказ: удобные модули для рабочих и дачи
бытовка металлическая https://bytovki-moskva0.ru/metallicheskie-bytovki/ .
Ищете молотковая дробилка? Узнайте больше о преимуществах этого типа дробилки для эффективного измельчения зерна.
Планируете взять займ? Ознакомьтесь с тем, как легко оформить займы онлайн, чтобы решить свои финансовые проблемы без походов в банк.
To receive accurate information for ordering calligraphy or digital signature, go to source. Here you will find actual offers to help you make the right choice.
Quick and Affordable Stamp Maker Online: Design Your Stamp Now
stamp making online http://stamp-maker-online.ru/ .
Нужны подробности? Переходите на сайт, где представлены подробная информация о ремонте техники и условиях работы.
Для получения полной информации перейдите на сайт. Там вы найдете полный список услуг для быстрого решения проблем.
Необходима качественная зернодробилка для вашего хозяйства? Ознакомьтесь с тем, как выбрать подходящее оборудование.
Хотите получить деньги без походов в банк? Узнайте, как оперативно взять займ на карту и сэкономить время без задержек.
Купить беспружинный матрас: комфорт и поддержка для вашего сна
матрасы без пружин ортопедические https://www.bespruzhinnye-matrasy-kupit.ru .
Купить Kugoo V3 Pro: качественный электровелосипед по выгодной цене
kugoo v3 pro 2024 kugoo v3 pro https://www.kugoo-v3-pro.ru .
Want to design your unique signature? Learn how to effectively <#create signature with our recommendations.
Хотите узнать больше? Переходите на сайт, где представлены подробная информация о сервисе техники и доступных предложениях.
The extra edge for a standard even odds bet thus comes in at 0.12%. While some sportsbooks limit the amount of points one can receive when placing a bet with negative odds, it doesn’t appear that this program does. In the grand scheme of things, there are other programs that have a much better credit edge. That said, there are a ton of great restaurants in the Station Casino’s group to use those points. STN Sports accounts can be opened in-person only at the Station Casinos brick and mortar sportsbooks locations in Las Vegas. All accounts must be first funded in person. The minimum deposit amount is $50. STN Sports App runs a loyalty program for their customers. Each wager with STN Sports and Races will earn Boarding Pass players club points. Bettors can spend these points on free slot play, free bingo play, free sports play, free meals, cash back. Apart from that players can spend them on restaurants, movie theaters, bowling centers, spas and salons, hotels, showrooms, bars and lounges. 1,000 points equals $1.
https://bhubhutechnologies.com/happistar-the-online-casino-that-always-delivers
The best real money online slots you’ll find at US online casinos include: Most slot games are compatible with mobile devices these days, but we’ll verify this and state which device this applies to, be it iOS or Android. We also look to see whether the game is playable via a downloadable casino app. In terms of fairness, we only recommend slots with trustworthy, verified RNGs as these ensure every spin produces a fair outcome. This can be verified via eCOGRA. You can find slots with bonus games at all of the online casinos in New Jersey. Here are some of our favorite slots with bonus minigames and features: Yes, platforms like Jackpot Party offer players the same types of bonus games that can be found in a live casino. Players can check out some of these popular bonus rounds without wagering any real money. Free slots are a great way of checking out some of your favorite games without risking anything.
Если вы попали в сложную ситуацию на дороге, вам необходимо воспользоваться к специалистам. Узнайте, как быстро заказать эвакуатор для быстрого решения вопроса.
Если вы управляете хозяйством, узнайте, как зернодробилка для хозяйства поможет улучшить вашу работу и сократить издержки.
Ищете финансовую поддержку без бумажной волокиты? Узнайте, как оперативно взять займ на карту и обеспечить себе средства моментально.
Где купить экран для проектора: топовые решения для любой задачи
экран проектора экран проектора .
If you need electronic signature, learn how to conveniently create a document that will be easy to use.
Если вам потребовался ремонт Amkodor в Минске, узнайте с возможностями профессионалов. Мы предлагаем качественный ремонт амкодор в минске с использованием оригинальных запчастей.
Если вы попали в сложную ситуацию на дороге, вам необходимо позвонить к специалистам. Узнайте, как без задержек заказать эвакуатор для быстрого решения вопроса.
Если вам требуется надежная молотковая дробилка, ознакомьтесь с техническими характеристиками, чтобы выбрать надежную технику для вашего хозяйства.
Если потребовались финансы, узнайте, как без лишних сложностей взять займ. Это удобный способ получить деньги в любое время.
Качественный уход за пожилыми в пансионате: забота 24/7
пансионат по уходу за инвалидами http://pansionaty-dlya-pozhilyh3.ru/pansionaty-dlya-invalidov/ .
If you need information about ordering a signature, visit source where you will find detailed information, to place an order.
Если техника Amkodor требует квалифицированного подхода, ознакомьтесь с возможностями наших сервисов по ремонт погрузчика амкодор.
Если вы попали в сложную ситуацию на дороге, вам необходимо воспользоваться к профессиональной помощи. Узнайте, как без задержек заказать эвакуатор для помощи на дороге.
Хотите модернизировать ваше хозяйство? Ознакомьтесь с преимуществами дробилка для зерна, чтобы повысить эффективность работы.
Нужны средства без бумажной волокиты? Узнайте, как просто взять займ на карту и получить деньги моментально.
Would you like to create personal signature? Check out our tips to help you conveniently create my signature.
Ищете дополнительную информацию? Переходите на сайт, где представлены подробная информация о сервисе техники и условиях работы.
Ищете помощь? Узнайте, какие предложения могут предложить услуги эвакуатора в любой ситуации.
Ищете молотковая дробилка? Узнайте больше о преимуществах этого модели дробилки для надежного измельчения зерна.
Для получения подробной информации перейдите на сайт. Там вы найдете варианты займов, что помогут выбрать лучший вариант.
If you need information about ordering a signature, visit source where you will find all services, to make the right decision.
You could certainly see your expertise within the work you write. The arena hopes for even more passionate writers like you who aren’t afraid to mention how they believe. All the time follow your heart. “Until you walk a mile in another man’s moccasins you can’t imagine the smell.” by Robert Byrne.
Проблемы с техникой? Узнайте, как надежно выполнить ремонт погрузчика амкодор с гарантией и поддержкой профессионалов.
Нужна помощь? Ознакомьтесь с вариантами услуги эвакуатора для решения любых проблем на дороге.
Хотите узнать больше? Переходите на сайт, где представлены подробные характеристики о услугах, которые помогут вам.
Нужны деньги срочно прямо на карту? Ознакомьтесь с тем, как оперативно оформить займы онлайн на карту и решить финансовые задачи в кратчайшие сроки.
Would you like to create my signature? Check out our tips to help you quickly create my signature.
Нужны подробности? Переходите на сайт, где представлены все услуги о обслуживании техники и условиях работы.
order balloons for birthday inexpensively helium balloons with cheap delivery
Лучшие автозапчасти для иномарок: гарантия качества и быстрая доставка
интернет магазин автозапчасти для иномарок http://www.avtozapchasty-dlya-inomarok.ru .
Find regular bonuses and special offers at Prof-casino.
Онлайн-займы без отказа и проверок: деньги на карту за 5 минут
микрозаймы без отказа http://www.dengikz.ru/ .
Оборудование для конференц-залов: улучшите качество ваших мероприятий
система оснащения конференц залов в гостинице система оснащения конференц залов в гостинице .
Эффективное оснащение ситуационного центра: современные решения
оборудование ситуационного центра http://osnashcheniye-situatsionnogo-tsentra1.ru/ .
Наркологическая клиника с анонимным лечением: помощь без огласки
частный наркологический центр narcologicheskaya-klinika-spb4.ru .
Оснащение актовых залов: проектирование и установка под ключ
оборудование для актового зала http://www.osnashcheniye-aktovykh-zalov1.ru/ .
Как выбрать оборудование для переговорной комнаты: топовые технологии
оснащение переговорных комнат под ключ https://oborudovaniye-peregovornoy1.ru/ .
Видеостены для крупных мероприятий: Обеспечение яркого и динамичного контента
видеостены 2×2 http://videostena-moskva1.ru/ .
Полное оборудование диспетчерских центров – качественные решения под ключ
оборудование диспетчерского центра http://www.osnashcheniye-dispetcherskogo-tsentra1.ru .
Закажите грузоперевозки по Москве — Оперативная доставка для частных лиц и бизнеса
грузовые перевозки http://www.gruzoperevozki-777.ru .
Как мы оснастим ваш актовый зал: Лучшие решения и оборудование для успешных мероприятий
комплект переносного оборудования для актового зала https://www.oborudovaniye-aktovogo-zala1.ru .
Как правильно оснастить конференц-зал для успешных мероприятий: Практические советы
оснащение конференц залов https://osnashcheniye-konferents-zalov1.ru .
Временная регистрация в Москве: Официально, быстро и с гарантией
временная регистрация в москве официально http://www.registraciya-vremennaya-moskva.ru/ .
Технологическое оснащение переговорных комнат: Лучшее оборудование для комфортных встреч
оборудование переговорной http://oborudovaniye-peregovornykh1.ru/ .
Как оснастить ситуационный центр: Полный комплекс услуг по проектированию и внедрению
оборудование ситуационного центра оборудование ситуационного центра .
Легальная временная регистрация в арендуемой квартире: Простое решение
временной регистрации граждан рф rega-msk99.ru .
Всё о видеостенах: основные характеристики и принцип работы
видеостены https://www.videosteny-msk1.ru .
Оборудование диспетчерских центров: Эффективное управление инфраструктурой
оборудование диспетчерских центров https://www.osnashcheniye-dispetcherskikh-tsentrov1.ru/ .
Оформление временной регистрации для проживания в СПб — быстро и просто
временная прописка в спб https://registraciya-vremennaya-spb.ru .
Частный дом престарелых — комфортное проживание и квалифицированный уход
дом интернат для престарелых дом интернат для престарелых .
Лечение и реабилитация наркозависимых в Санкт-Петербурге — индивидуальные программы и комплексное восстановление
лечение наркозависимых наркомания реабилитация https://www.rehabnarcotic.ru/ .
Лечение наркомании — полное восстановление и сопровождение на всех этапах
лучшее лечение наркомании в спб https://www.clinica-narco.ru/ .
Entertainment & Sportsbook Raise the stakes with exclusive promotions and rewards tailored for big winners like you when you join the ONE club. Sign up for news and special offers. The new property boasts nearly 1,000 slot machines and table games, as well as an official WSOP® Poker Room, an all-new Caesars Sportsbook and 253 hotel rooms designed with inspiration from local scenery. Hunt on one of the most scenic and game-rich lands in Northern California. Your chance at $10,000 in free play. On Saturday, September 21 from 12–8 p.m., simply swipe your Wynn Rewards card at any of our promotional kiosks located throughout the casino floor, and play $50,000 Harvest of Riches. Explore our backyard. Eastern Oregon adventures start right here at Wildhorse. The high desert landscape and the beautiful Blue Mountains provide a dramatic backdrop for adventures of all kinds, from hiking and biking to wine tasting and sampling some of our region’s best eats. Plus, you’ll feel the spirit of the region’s rich history and culture everywhere you go.
https://www.inventoridigiochi.it/membri/domalapi1985/profile/
Monopoly Casino offers a diverse range of slots, from classic fruit machines to modern video slots with thrilling themes and bonus features. You\u2019ll find everything from iconic Monopoly-themed games to popular favorites and the latest releases. Both are based on how patient players are and how quickly they want to make progress. Every time you win a hand, you’ll earn experience points to help you move up in the league. Ascend through each league by demonstrating your mastery of the cards and competing against opponents who are on the same level. The further you go, the greater the challenges you face. Play against the best and fight to get your name at the top of the ranking. The MONOPOLY name and logo, the distinctive design of the board, the four corners, the MR MONOPOLY character and each of the characteristic elements of the board and playing pieces are HASBRO commercial brands for its real-estate transaction game and its game material. © 1935, 2021 HASBRO. All rights reserved.
Лучшие цены на автоэлектронику в ParkCam — камеры заднего вида, видеорегистраторы и многое другое
парк кам магазин автоэлектроники
Нежданно потребовались непредвиденные расходы? Теперь вы можете получить деньги в долг в Минске на гибких условиях всего за короткое время.
Вывод из запоя в Самаре — помощь врача-нарколога круглосуточно
прерывание запоев самаре https://vyvod-iz-zapoya-rehab.ru .
Ищете быстрый способ перевести займ на карту? Мы подскажем удобные и выгодные варианты.
Ищете надежный способ получить деньги на карту? Мы предлагаем лучшие условия для быстрого перевода.
Нужен быстрый способ перевести займ на карту? Мы предложим удобные и выгодные решения.
Не хватает средств на важные нужды? Узнайте, как быстро получить деньги в долг без поручителей.
The best https://bestwebsiteto.com sites on the web to suit your needs. The top-rated platforms to help you succeed in learning new skills
Архитектурное бюро СПб — профессионалы, создающие уникальные проекты
архитектурное бюро в спб http://www.proektnoe-byuro.ru/ .
Возникли непредвиденные расходы? Теперь вы можете получить деньги в долг в Минске на справедливых условиях всего за пару кликов.
Понадобились средства немедленно? Оформите займ на карту и получите деньги всего за несколько минут.
Заинтересовались быстрых и удобных займах? Тогда вам стоит посетить limazaim для выгодных условий.
С нами вы в силах оформить займы онлайн в Минске когда угодно, без выхода из дома.
Интересуетесь быстрых и удобных займах? Тогда вам стоит посетить limazaim для выгодных условий.
Ищите проверенные финансовые услуги? Посетите https://dengibyn.ru и узнайте необходимую информацию.
Ищете быстрый способ перевести деньги на карту? Мы предоставляем лучшие условия для быстрого перевода.
С нашими сервисами вы имеете возможность оформить займы онлайн в Минске круглосуточно, без выхода из дома.
Сомневаетесь, где? На limazaim.ru вас ждут выгодные условия и широкий выбор предложений.
Нужен быстрый способ оформить займ на карту? Мы поможем удобные и выгодные предложения.
Нужны надежные финансовые услуги? Посетите dengibyn.ru и узнайте необходимую информацию.
Нежданно потребовались непредвиденные расходы? Теперь вы имеете возможность получить деньги в долг в Минске на выгодных условиях всего за несколько минут.
Нужны качественные финансовые услуги? Посетите https://limazaim.ru и узнайте необходимую информацию.
Gay Boys Porn https://gay0day.com HD is the best gay porn tube to watch high definition videos of horny gay boys jerking, sucking their mates and fucking on webcam
Ищете быстрый способ оформить деньги на карту? Мы предлагаем лучшие условия для быстрого оформления.
Если незамедлительно нужны средства, вы всегда можете взять займ в Минске онлайн без долгих ожиданий.
Ищете быстрый способ получить займ на карту? Мы предложим удобные и выгодные решения.
Не знаете, где выгоднее всего взять займ? На dengibyn.ru вы найдете все варианты и условия.
best csgo gambling sites cs2 gambling sites
Появились непредвиденные расходы? Теперь вы имеете возможность получить деньги в долг в Минске на гибких условиях всего за несколько минут.
Задумались, где выгоднее всего взять займ? На limazaim.ru вы сможете узнать все предложения и условия.
Необходимы средства немедленно? Оформите займ на карту и зачислите деньги всего за несколько минут.
https://sudvgorode.ru/
Требуются деньги прямо сейчас? Вы имеете возможность быстро взять займ на выгодных условиях. Ознакомьтесь с вариантами предложений уже сегодня!
Услуги сантехника в Санкт-Петербурге: доступные цены на профессиональные сантехнические работы под ключ
стоимость услуг сантехника в спб http://ceny-na-santehuslugi.ru/ .
Ищете надежные финансовые услуги? Посетите dengibyn.ru и узнайте подробности.
csgo betting cs2 gambling
Не можете найти, где выгоднее всего оформить кредит? На limazaim вы сможете узнать все предложения и условия.
Нужен быстрый способ получить займ на карту? Мы поможем удобные и выгодные предложения.
Если в экстренном порядке нужны средства, вы всегда можете взять займ в Минске онлайн без лишних документов.
Сомневаетесь, где? На dengibyn.ru вас ждут справедливые условия и разнообразие предложений.
Задумываетесь о том, где? На limazaim.ru вас ждут выгодные условия и широкий выбор предложений.
Платформа 1вин предлагает широкий выбор спортивных событий, киберспорта и азартных игр. Пользователи получают высокие коэффициенты, быстрые выплаты и круглосуточную поддержку. Программа лояльности и бонусы делают игру выгоднее.
Ищете надежные финансовые услуги? Посетите limazaim и узнайте необходимую информацию.
Задумываетесь о том, где? На https://limazaim.ru вас ждут гибкие условия и широкий выбор предложений.
Мегапласт – производство упаковочной пленки, соответствующей мировым стандартам
мегапласт красноярск megaplast24 ru
Задумываетесь о том, где? На https://limazaim.ru вас ждут гибкие условия и широкий выбор предложений.
Лизинг коммерческих автомобилей с минимальными рисками и выгодными процентными ставками для малого бизнеса
коммерческий транспорт в лизинг kommercheskij-transport-v-lizing-1.ru .
resume of a mechanical engineer https://engineer-builder-resume.com
Нужен быстрый способ получить займ на карту? Мы подскажем удобные и выгодные решения.
Ищете надежные финансовые услуги? Посетите dengibyn и получите все условия.
Как вызвать врача нарколога в Самаре для вывода из запоя?
срочный вывод из запоя https://www.vivod-iz-zapoya-samare.ru .
Задумались, где выгоднее всего взять займ? На https://limazaim.ru вы сможете узнать все предложения и условия.
Винтовые сваи на заказ от завода-производителя: точные расчёты и высокое качество
производство свай zavod-vintovyx-svaj.ru .
С нами вы в силах оформить займы онлайн в Минске когда угодно, без выхода из дома.
Нужен быстрый способ оформить займ на карту? Мы подскажем удобные и выгодные решения.
Нежданно потребовались непредвиденные расходы? Теперь вы имеете возможность получить деньги в долг в Минске на выгодных условиях всего за несколько минут.
Профессиональный нарколог для вывода из запоя в Самаре: быстрый вызов на дом
врач вывод из запоя https://www.vivod-iz-zapoya-samarskiy.ru/ .
С предложенными услугами вы в силах оформить займы онлайн в Минске в любое время, без лишних документов.
Металличекие двери от производителя в наличии.
Любые конфигурации отделок на выбор. Более 3500 моделей на складе: тут
Если вам срочно нужны средства, вы всегда имеете возможность взять займ в Минске онлайн без лишних документов.
Компания Декор Септиков: декоративные камни для эстетичного оформления септиков
камень для скрытия колодца купить dekorseptikov com
Задумываетесь о том, где? На dengibyn вас ждут гибкие условия и широкий выбор предложений.
Требуются деньги прямо сейчас? Вы способны быстро взять займ на подходящих условиях. Ознакомьтесь с доступными предложений уже сегодня!
Стильные штопоры и обрезатели фольги для истинных гурманов — сделайте каждое открытие бутылки особенным
открывалка для бутылок http://www.vseodlyakuhni.ru .
Финки НКВД — настоящие ножи с уникальной историей, купить онлайн
нож финка нквд купить https://nozhiforall.ru .
Нужен быстрый способ получить займ на карту? Мы предложим удобные и выгодные предложения.
Сомневаетесь, где? На https://dengibyn.ru вас ждут гибкие условия и широкий выбор предложений.
Грузоблочные тренажеры: надежные модели для спортивного зала и дома
грузоблочный тренажер для ног https://www.gruzoblochnij-trenazher.ru/ .
Туристические ножи с мощными лезвиями — универсальные инструменты для выживания
купить туристический нож купить туристический нож .
Подключение интернет-эквайринга: как выбрать лучшие условия для бизнеса
интернет эквайринг сколько стоит http://www.internet-ekvayring.ru .
Заинтересовались быстрых и надёжных займах? Тогда вам стоит посетить dengibyn для подробной информации.
Ищете проверенные финансовые услуги? Посетите limazaim.ru и ознакомьтесь с необходимую информацию.
Купить опасную бритву для профессионального бритья — идеальный результат каждый раз
опасная бритва интернет магазин http://www.pro-nozhi.ru/ .
Не знаете, на какой сайт обратиться? На https://limazaim.ru вас ждут выгодные условия и разнообразие предложений.
Cтальные двери с завода в наличии.
Любые конфигурации замков на выбор. Более 3500 моделей на складе: здесь
Появились непредвиденные расходы? Теперь вы имеете возможность получить деньги в долг в Минске на выгодных условиях всего за несколько минут.
Как выбрать анонимную наркологическую клинику для лечения зависимостей
наркология лечение http://narkologicheskaya-klinika-spb1.ru/ .
С предложенными услугами вы можете оформить займы онлайн в Минске в любое время, без лишних документов.
Ищете быстрый способ получить деньги на карту? Мы предоставляем лучшие условия для быстрого получения.
Ищете быстрый способ получить займ на карту? Мы подскажем удобные и выгодные решения.
соут рабочих мест эксперт соут
Ищете надежный способ оформить деньги на карту? Мы рекомендуем лучшие условия для быстрого перевода.
Не знаете, где выгоднее всего оформить кредит? На limazaim.ru вы найдете все варианты и условия.
Если незамедлительно нужны средства, вы всегда имеете возможность взять займ в Минске онлайн без бумажной волокиты.
Если незамедлительно нужны средства, вы всегда способны взять займ в Минске онлайн без бумажной волокиты.
Ищете надежный способ получить деньги на карту? Мы рекомендуем лучшие условия для быстрого получения.
Появились непредвиденные расходы? Теперь вы можете получить деньги в долг в Минске на гибких условиях всего за пару кликов.
Входные металлические двери с завода с установкой за 1 день.
Любые конфигурации замков на выбор. Более 3500 моделей на складе: тут
Нужны проверенные финансовые услуги? Посетите https://limazaim.ru и узнайте необходимую информацию.
Профессиональный сервисный центр по ремонту компьютерных видеокарт по Москве.
Мы предлагаем: ремонт видеокарты
Наши мастера оперативно устранят неисправности вашего устройства в сервисе или с выездом на дом!
Где заказать дипломную работу? Лучшая помощь на vsehdiplom ru
Степени сравнения http://www.vsehdiplom.ru/blog/lajfhaki-po-russkomu-jazyku-razbiraemsja-s-chastjami-rechi/ .
Хотите удобно оформить займы онлайн? Мы предлагаем разнообразные решения на интересных условиях.
Недостает средств на срочные нужды? Узнайте, как легко получить деньги в долг без залогов.
детское порно на вб порно гиф
меф волгоград купить порно фото
Входные стальные двери с завода на заказ.
Любые конфигурации отделок на выбор. Более 3500 моделей на складе: https://dverimetallicheskie.ru/
Купить жалюзи и рулонные шторы: отличное сочетание цены и качества
кассетные рулонные шторы https://www.rulonniye-shtori.ru .
реклама в лифтах в москве размещение рекламы в лифтах домов
Профессиональный сервисный центр по ремонту телефонов в Москве.
Мы предлагаем: починить телефон
Наши мастера оперативно устранят неисправности вашего устройства в сервисе или с выездом на дом!
Заказать каркасный дом под ключ: готовые проекты и индивидуальные решения
каркасные дома цены https://karkasnye-doma-pod-klyuch-msk.ru/ .
Временная регистрация в Москве: Быстро и Легально!
Ищете, где оформить временную регистрацию в Москве?
Мы гарантируем быстрое и легальное оформление без очередей и лишних документов.
Ваше спокойствие – наша забота!
Минимум усилий • Максимум удобства • Полная легальность
Свяжитесь с нами прямо сейчас!
Временная регистрация в Москве
Временная регистрация в Москве: Быстро и Легально!
Ищете, где оформить временную регистрацию в Москве? Мы гарантируем быстрое и легальное оформление без очередей и лишних документов. Ваше спокойствие – наша забота!
Минимум усилий • Максимум удобства • Полная легальность
Свяжитесь с нами прямо сейчас!
.
Купить бытовку с доставкой и установкой: широкий ассортимент и доступные цены
купить бытовку в москве https://bytovki-moskva01.ru .
Экран для проектора для дома: создайте настоящий кинотеатр у себя дома
экран проекционный https://www.ehkrany-dlya-proektorov01.ru .
Купить каркасный дом под ключ: быстрые сроки и отличное качество
дома каркасные karkasnye-doma-pod-klyuch-v-spb.ru .
Стоимость проектирования офисов и других коммерческих зданий: полезные советы
проектные работы стоимость https://www.proektnye-raboty-cena.ru .
бытовка на участок металлический вагончик бытовка
Металлопрокат от СибУрал Металл: купить легко и быстро на сайте siburalmet ru
СибУрал Металл – прайс на металлопрокат siburalmet ru
Временная регистрация в Москве: Быстро и Легально!
Ищете, где оформить временную регистрацию в Москве? Мы гарантируем быстрое и легальное оформление без очередей и лишних документов. Ваше спокойствие – наша забота!
Минимум усилий • Максимум удобства • Полная легальность
Свяжитесь с нами прямо сейчас!
.
Decouvrez notre selection de
Couteaux de poche
pour votre collection
Cтудия цветов собирает под заказ цветы с доставкой от 1 часа в с Одинцово и Москве
Авторские букеты с доставкой: здесь
Wow, fantastic weblog layout! How lengthy have you been blogging for? you made blogging glance easy. The entire look of your web site is wonderful, as well as the content material!
сколько стоит техническая поддержка сайта? https://is-market.ru
Чтобы всегда иметь возможности войти на ресурс, рекомендуем 1win зеркало сайта. С его помощью можно зайти на платформу и дальше работать со всеми её функциями.
Цветочный салон собирает под заказ цветы в шляпных коробках с доставкой от 30 мин в с Одинцово и Москве
Большой выбор цветов: здесь
Лучшие порно видео Гей порно Бонсай скачать бесплатно без регистрации и смс. Смотреть порно онлайн в высоком качестве.
Оклейка авто пленкой для создания уникального образа: от матового до хрома
оклейка пленкой зоны погрузки https://www.okleyka-avto-plenkoy-1.ru .
kotor properties for sale Montenegro realty
укладка кафельной плитки цена за квадратный укладка кафельной плитки цена работы за м2
Лизинг грузовых автомобилей: всё, что нужно знать об оформлении
купить в лизинг грузовой автомобиль https://www.gruzovye-avtomobili-v-lizing.ru/ .
Займ в Казахстане Sravnim.kz
услуги по специальной оценке условий труда https://sout095.ru
соут лаборатория москва https://sout095.ru
Займ 200 000 тенге Экспресс займ
прокат лыж в Адлере https://prokat-lyzh-krasnaya-polyana.ruhttps://prokat-lyzh-krasnaya-polyana.ru
аренда лыжного снаряжения красная поляна сколько стоит прокат сноуборд
айфон 512гб цена iphone 13 mini купить
Рейтинг казино Казино на деньги
сколько стоит укладка кафельной плитки укладка кафельной плитки кв кв
стоимость работ по укладке кафельной плитки укладка кафельной плитки в ванной
промокод на подключение продамуса prodamus-promokod1.ru .
ЭКО по ОМС в СПб: лучшие клиники и условия программы
санкт петербург эко http://www.embryoscopespb.ru .
Сделать спермограмму в СПб: как проходит процедура и что ожидать от результатов
расширенная спермограмма спб http://www.eggdonorsspb.ru/ .
Центр репродуктологии в СПб: что нужно знать о диагностике, лечении и вспомогательных репродуктивных технологиях
центр эко спб https://www.reproductologyonline.ru .
промокод на продамус http://www.prodamus-promokod21.ru .
ЛАДА деталь: качественные комплектующие для вашего автомобиля с гарантией
автозапчасти на ваз https://zapchasti-vaz01.ru/ .
купить диплом железнодорожника 1oriks-diplom199.ru .
ЛАДА деталь: большой выбор запчастей для вашего автомобиля в одном месте
лада деталь каталог и цены лада деталь каталог и цены .
робокасса промокод http://promokod-robokassa.ru .
промокод на продамус скидка подключение промокод на продамус скидка подключение .
Готовые модульные дома с отделкой и ремонтом: уютное пространство для вашей семьи
модульные дома под ключ проекты https://www.modul-stroy-spb.ru/ .
Строим каркасные дома под ключ: готовые проекты для комфортной загородной жизни
дом каркасный под ключ дом каркасный под ключ .
Каркасный дом с уникальным дизайном для стильной загородной жизни
дома каркасные http://www.karkasnyi-dom-pod-klyuch-1.ru .
внеплановая соут москва https://sout213.ru
Как не стать жертвой мошенников при покупке диплома о среднем полном образовании
соут по охране труда провести в москве сколько стоит провести соут москва
Экраны для проекторов для профессиональных кинотеатров и домашних залов
экраны для проекторов http://ehkrany-dlya-proektorov0.ru/ .
Федерация – это проводник в мир покупки запрещенных товаров, можно купить альфа пвп, купить кокаин, купить меф, купить экстази в различных городах. Москва, Санкт-Петербург, Краснодар, Владивосток, Красноярск, Норильск, Екатеринбург, Мск, СПБ, Хабаровск, Новосибирск, Казань и еще 100+ городов.
Узнайте, как безопасно купить диплом о высшем образовании
Казино Клубника: испытайте удачу с топовыми игровыми автоматами
клубника казино официальный сайт http://dscol-oktr.ru/clubnika/ .
Ипотека в Бишкеке для жителей сельской местности: специальные программы
ипотека Кыргызстан условия https://ipotekakg.ru/ .
промокод на продамус http://promokod-pro.ru/ .
Если основной доступ недоступен, всегда можно воспользоваться зеркало 1 вин. Это решение позволяет продолжать играть без препятствий.
Возможно ли купить диплом стоматолога, и как это происходит
[url=][/url]
Временная регистрация в Санкт-Петербурге: Быстро и Легально!
Ищете, где оформить временную регистрацию в СПб?
Мы гарантируем быстрое и легальное оформление без очередей и лишних документов.
Ваше спокойствие – наша забота!
Минимум усилий • Максимум удобства • Полная легальность
Свяжитесь с нами прямо сейчас!
Временная регистрация в СПб
[url=][/url]
капельница от запоя нижний новгород капельница от запоя нижний новгород .
вывод из запоя на дому нижний [url=www.fanfiction.borda.ru/?1-1-0-00000234-000-0-0-1730813920/]вывод из запоя на дому нижний[/url] .
капельница от запоя на дому нижний новгород капельница от запоя на дому нижний новгород .
Временная регистрация в Санкт-Петербурге: Быстро и Легально!
Ищете, где оформить временную регистрацию в СПБ?
Мы гарантируем быстрое и легальное оформление без очередей и лишних документов.
Ваше спокойствие – наша забота!
Минимум усилий • Максимум удобства • Полная легальность
Свяжитесь с нами прямо сейчас!
Временная регистрация в СПБ
Современные тактичные штаны: выбор успешных мужчин, как выбрать их с другой одеждой.
Секрет комфорта в тактичных штанах, которые подчеркнут ваш стиль и индивидуальность.
Тактичные штаны: секрет успешного образа, который подчеркнет вашу уверенность и статус.
Сочетание стиля и практичности в тактичных штанах, которые подчеркнут вашу спортивную натуру.
Как выбрать тактичные штаны под свой стиль?, чтобы подчеркнуть свою уникальность и индивидуальность.
Секрет стильных мужчин: тактичные штаны, которые подчеркнут ваш вкус и качество вашей одежды.
Тактичные штаны: универсальный выбор для различных ситуаций, которые подчеркнут ваш профессионализм и серьезность.
штани мультікам з наколінниками штани мультікам з наколінниками .
Order Rubber Stamps Online with Our Easy-to-Use Stamp Maker
rubber stamp maker online rubber stamp maker online .
Профессиональный вывод из запоя в Самаре с поддержкой опытных врачей
вывод из запоя недорого vivod-iz-zapoya-63.ru .
Affordable Online Stamp Maker for Business and Personal Use
create stamp online free https://stampwebshop.com/ .
Срочно нужен пропуск на МКАД? Мы поможем за один день!
оформить пропуск мкад https://www.propusknamkad111.ru/ .
Стоимость дипломов высшего и среднего образования и процесс их получения
Круглосуточный вызов сантехника: устранение любых проблем с гарантией
вызов сантехника на дом спб https://vyzov-santeh-nik-spb.ru/ .
Временная регистрация в СПб: Быстро и Легально!
Ищете, где оформить временную регистрацию в Санкт-Петербурге?
Мы гарантируем быстрое и легальное оформление без очередей и лишних документов.
Ваше спокойствие – наша забота!
Минимум усилий • Максимум удобства • Полная легальность
Свяжитесь с нами прямо сейчас!
Временная регистрация
Всё о покупке аттестата о среднем образовании: полезные советы
Tips for passing the Ohio real estate license exam | Ohio real estate license application process made simple | Find out how to become a successful real estate agent in Ohio | Learn about Ohio real estate exam preparation strategies | Achieve your goals with an Ohio real estate license | Build a successful career with an Ohio realtor license Ohio real estate exam | Master the Ohio real estate licensing exam effortlessly | Gain insights into Ohio real estate agent certification | Secure your future with a realtor license in Ohio [url=https://ohio-real-estate-license.com/]Ohio realtor requirements[/url].
Тем, кто планирует модернизировать производственные мощности необходимо уделить внимание на качественный выбор оборудования. купить конвейерную ленту Грамотный подход гарантирует высокую эффективность технического комплекса.
Выбираете надежную конвейерная лента в Минске? Мы предлагаем проверенные решения для вашего оборудования. Все товары соответствуют требованиям и доступны для заказа прямо сейчас.
Для вашего производства мы предлагаем ленты конвейерные. Наши изделия характеризуются долговечностью и высоким качеством.
в компании lentyminsk.by вы найдете индивидуальные решения для любых технических задач. Мы предлагаем надежность по разумной стоимости.
продамус промокоды promokod-prod.ru .
Ищете оригинальные товары по лучшей цене? Заказывайте продукцию от производителя konvejernye-lenty.by, чтобы быть уверенными в надежности оборудования и отличных условиях.
На на сайте lenty-konvejerov.by представлен широкий ассортимент решений для транспортеров. Загляните в раздел конвейерных лент и подберите необходимое.
Узнайте точную стоимость конвейерных лент в нашем на сайте. Мы предлагаем лучшие условия и высокое качество.
Как безопасно купить диплом колледжа или ВУЗа в России, что важно знать
Профессиональный монтаж септика под ключ для частного сектора
септик с установкой под ключ http://www.septic-pod-kluch-msk.ru/ .
На на сайте lenty-konvejerov.by представлен удобный поиск решений для производства. Загляните в раздел конвейерных лент и подберите необходимое.
DESIGN, FABRICATION & INSTALLATION OF CUSTOM MADE LOUVERS!
DK Construction & Design provides comprehensive, custom solutions for louvres,
sunshades, privacy screens, awnings, and balustrades made from aluminium, glass, and steel.
Our end-to-end service covers on-site measurements, design development, detailed drawings,
engineering, fabrication, and installation.
We work closely with designers, architects, and homeowners to deliver tailored shading,
privacy, and safety solutions. Our team ensures that every project meets the highest
standards of quality and durability, with a focus on functionality and aesthetics.
Whether you’re after sleek sun control systems or secure balustrading, we’ve got
the expertise to bring your vision to life.
Tel: +61475 617 720
Сайт компании DK Construction & Design
Магазин шин: купить шину для безопасного и комфортного вождения
купить шину https://www.kupit-shiny-spb.ru .
Запчасти для ВАЗ: заказать онлайн с доставкой прямо к вашему порогу
запчасти ваз http://www.avtozapchasti-vaz1.ru/ .
Настроение в вашем доме с помощью ароматических свечей, Какие ароматы выбрать для разных помещений, Тренды в мире ароматов: велас свечи
aromas para velas https://scentalle.com/ .
Как безопасно купить диплом колледжа или ВУЗа в России, что важно знать
prodamus промокод http://www.forumbar.anihub.me/viewtopic.php?id=982 .
Проектирование любых объектов: доступная стоимость и опытные специалисты
цены на проектные работы [url=https://proektnye-raboty-ceny1.ru]https://proektnye-raboty-ceny1.ru[/url] .
Модерн-каркасный дом: стильное жильё с удобной планировкой
строительство каркасных домов в санкт петербурге https://www.karkasnye-doma-v-spb178.ru/ .
Деревянные дома под ключ для дачи: экологичность и долговечность
строительство деревянного дома под ключ цена строительство деревянного дома под ключ цена .
Лизинг грузовых машин: оперативное оформление и выгодные ставки
грузовики в лизинг https://www.gruzovye-avtomobili-v-lizing1.ru/ .
Пошаговая инструкция по безопасной покупке диплома о высшем образовании
Зарабатывайте больше денег на onexbet, не отрываясь от компьютера.
onexbet – ваш путь к успеху, даже в отпуске.
Спортивные ставки на onexbet, самые выгодные коэффициенты.
Попробуйте свою удачу вместе с onexbet, и ваша жизнь никогда не будет прежней.
onexbet – качество и профессионализм, всегда гарантированы.
Мечтаете о финансовом благополучии? Вам нужен onexbet, – самый удачный выбор для вас.
onexbet – ваш верный компаньон в мире азарта, на который всегда можно положиться.
Играя на onexbet, вы становитесь ближе к своей мечте, достигайте своих целей с onexbet.
onexbet – это не просто игра, это образ жизни, которая помогает вам выразить себя.
Готовы к большим деньгам и успеху? Попробуйте onexbet, и вы поймете, что удача всегда на вашей стороне.
onexbet – это не просто сайт ставок, это ваша дорога к богатству, который приведет вас к желаемым результатам.
onexbet – это идеальное место для тех, кто ищет азарт и адреналин, но при этом ценит комфорт и безопасность.
Доступ к самым популярным играм и событиям на onexbet, все это доступно для вас.
Готовы к новым достижениям? Начните с onexbet, и ваша жизнь никогда не будет прежней.
AndreasBrill981 https://arxbetdsrdg.com/user/andreasbrill981/ .
Тренировки и прыжки с парашютом в аэроклубе вашего города
прыжок с парашютом в тандеме спб https://pryzhki-s-parashyutom-v-spb.ru/ .
prodamus промокод kryto.ukrbb.net/viewtopic.php?f=2&t=1431 .
Лечение зависимости в наркологической клинике СПб: быстро и эффективно
наркологическая клиника сайт [url=http://narkologicheskaya-klinika-spb-1.ru/]http://narkologicheskaya-klinika-spb-1.ru/[/url] .
Изграждане на сглобяеми къщи: комфорт и удобство за целогодишно ползване
сглобяеми къщи до ключ https://www.sglobyaemi-kushti.com/ .
Изготовление наклеек со смолой: дизайн, качество и доступные цены
печать объемных наклеек москва http://www.xn—–7kcbbyacb2akkclkqcl8a3dxf3b0a4b.xn--p1ai/ .
Почему стоит выбрать каркасный дом? Преимущества и отзывы клиентов
каркасные дома цены karkasnye-doma-v-spb-pod-kluch1.ru .
Казино Клубника: лучшие предложения для азартных игроков
clubnika casino https://goo.su/rcfb/ .
Интернет-магазин шин: акции и выгодные предложения круглый год
интернет магазин шин в спб интернет магазин шин в спб .
Приобретение диплома ВУЗа с сокращенной программой обучения в Москве
Oferim solu?ii de Administrare Afacere pentru companiile care doresc sa-?i optimizeze procesele ?i sa-?i concentreze resursele pe dezvoltarea strategica. Lorand Expert este partenerul de incredere pentru gestionarea opera?iunilor zilnice.
Производство спецтехники: от проектирования до запуска на объекте
завод паровых установок https://proizvodstvo-spectekhniki.ru/ .
United States Deliveries Your cart is empty Achieve a flawless complexion with Senegence Corrective Color Concealers! In this video, I’ll show you how I use them to brighten my under-eye area, conceal dark circles, and bronze for a natural glow. I’ll also share my favorite tools, the F82 and F64 brushes, and tips on how to avoid creasing by using the right amount of product. Watch and learn how to create a seamless, long-lasting look with concealers that are smudge-proof, waterproof, and budge-proof! Build your own palette, create a color combination, or discover look ideas to try. Just when you’d think wearing gold on both the top and bottom of your eyes would be too much, (heaven forbid!) never fear! Try it with liquid eyeliner on your top lid for a crisp line and then smudge a softer gel liner under your eye. Keep the rest of your eye makeup simple- just a bit of neutral eye shadow and lots of mascara to keep the focus on the gold. For water-resistant mascara, try Beauty For Real Hi-Def Mascara.
http://dansunoti1980.iamarrows.com/lasting-drama-gel-pencil
This tool is perfectly ergonomic and each part of the butterfly serves a purpose to: – Presented in 100% Natural Cotton Pouch Service Guarantee Face & Body First Time Customers Receive 5% Off All Services and Products with the Code SIMPLE05 We have run out of stock for this item. The perfect morning or evening ritual to add some wellness to everyday. care@psyche-soma The Rose Quartz Crystal, known as the love stone, offers stimulating and nourishing properties, guaranteed to help you love your new visibly brighter complexion. Our Pure Rose Quartz Butterfly Gua Sha Stone is just what your skin needs to enhance your journey towards healthier, smoother, silkier, rejuvenated, glowing skin. We’ve designed our Gua Sha Massager with perfectly placed curved edges to fit every contour of the face comfortably. The smooth flat edges of the butterfly’s wings allow for sculpting and definition on larger surface areas like cheeks, jaw and neck. The tip of the butterfly’s wings can be used for pressure-point relief or for smaller surface areas like the eyebrow.
Никаких отказов, только деньги! Более 40 МФО предлагают займ который одобряет всем круглосуточно, даже ночью. Оформление займет всего пару минут.
Экран для проектора с устойчивой конструкцией: надёжность в каждом кадре
проекционные экраны proekcionnye-ehkrany.ru .
Бизнес-решение: подключить интернет в офисе без сложностей
провести интернет в офис в москве internet-v-ofis1.ru .
Выберите идеальную коляску 3 в 1 для вашего ребенка, чтобы сделать правильный выбор.
Топовые модели колясок 3 в 1, с широким функционалом и стильным дизайном.
Гид по выбору коляски 3 в 1, для того, чтобы учесть все нюансы.
Что нужно знать при выборе коляски 3 в 1, для максимального удобства вашего малыша.
Какую коляску 3 в 1 выбрать: опыт других родителей, и сделать правильное решение.
balios 3 in 1 https://kolyaska-3-v-1-msk.ru/ .
Свежие розы с доставкой к вашему порогу, сделайте приятный сюрприз.
Оформите заказ на букеты роз прямо сейчас, доставка в удобное время и место.
Красочные букеты роз для ярких впечатлений, оперативная доставка в любую точку.
Освежите обстановку с помощью букетов роз, доставка в день заказа.
Нежные букеты роз для нежных душ, подарите частичку красоты близким.
Соберите свой уникальный букет роз, быстрая и качественная доставка.
Букеты роз на заказ по выгодным ценам, доставка в удобное для вас время.
Букеты роз – это всегда актуальный подарок, сделайте заказ онлайн.
Красочные композиции из роз разных сортов, поможем выбрать идеальный вариант.
Роскошные букеты роз для особых моментов, насладитесь ароматом настоящей красоты.
Букеты роз – это всегда актуальный подарок, и мы доставим его к вашему порогу.
Прекрасные букеты роз для ваших близких, насладитесь ароматом настоящей любви.
заказать розы с доставкой https://buket-roz-s-dostavkoj.ru/ .
купить аттестат в иркутске
Мультимедийное оснащение под ключ: проектирование, монтаж, настройка
мультимедийное оснащение http://www.multimediynoe-osnaschenie1.ru/ .
Мультимедийная интеграция: качественные решения для успешных проектов
интеграция умного аудио с мультимедийными системами http://multimediynaya-integratsiya1.ru/ .
Оборудование для конференц зала: профессиональный звук, видео и интерактивные системы
конференц залы оснащение https://oborudovaniye-konferents-zala1.ru/ .
Оснащение переговорной комнаты: проектирование, монтаж и настройка оборудования
оборудование для переговорных комнат https://www.osnaschenie-peregovornoy-komnaty1.ru/ .
Оборудование для актового зала: качественные решения для школ, вузов и культурных центров
оборудование актового зала http://oborudovaniye-aktovyh-zalov1.ru/ .
Современное оснащение ситуационного центра: технологии для вашего комфорта
оборудование ситуационного центра https://osnascheniye-situatsionnogo-tsentra1.ru/ .
Ремонт автомобилей и сервисное обслуживание: быстро и профессионально
сервисный центр авто https://www.remont-avtomobylej.ru/ .
Оснащение мультимедийным оборудованием: современные решения для бизнеса
мультимедийное оснащение мультимедийное оснащение .
Профессиональная интеграция мультимедийных систем для корпоративных задач
мультимедийная интеграция https://integratsiya-multimediynykh-sistem1.ru .
Профессиональное оборудование переговорных комнат: качество и надежность
оборудование переговорной комнаты http://www.oborudovaniye-peregovornykh-komnat1.ru .
Большой ассортимент запчастей ВАЗ: от двигателя до подвески
запчасти на лада zapchasti-na-vaz1.ru .
We put the new Maybelline Lash Sensational Boosting Eyelash Serum to the test. Forgot Your Password? So, this lash serum has a rafter different applicator than my Revitalash – this one has an almost spoolie applicator, but instead of plastic bristles, it has cotton bristles. If you have tried one of those fibre mascaras, this is like the wand that applies those lash fibres. The formula is clear and the bristles don’t get overloaded with the product so that is good. I get a good even layer or 2 on my lashes and wait for it to dry before applying my mascaras, etc. I apply this day and night and it doesn’t really dry down with anything, it just dries and disappears. Rachel Nussbaum is a journalist, writer, and editor who specializes in beauty and wellness topics. Have an account?
https://directorylinks2u.com/listings12874274/foundation-for-pale-skin
Your Massage Therapist will use a non-porous tool made from smooth volcanic stone, buffalo horn, jade, or other polished mineral stones to lightly scrape the surface of your tissue. With oil or massage lotion, the immediate effect is increased circulation to the area with pain or tightness. Sometimes petechiae (small speckling purplish red discoloration), which looks like a tiny speckled bruising may start to show in some areas. Do not be alarmed, this just means the area has more stagnation and the Gua Sha Treatment is working. Speckling should resolve in a few hours to a few days and is harmless. This muscle scraping therapy releases damaging elements and promotes circulation of fresh blood to stagnant or diseased areas. In Chinese, “gua” means scraping and “sha” means sand or fever. Gua Sha has been used by Chinese mothers on their sick children for centuries.
Комплексное оснащение переговорной комнаты: удобство и эффективность
оснащение переговорных комнат под ключ https://osnashcheniye-peregovornoy1.ru/ .
Оснащение конференц залов: уникальные решения для каждого проекта
система оснащения конференц залов в гостинице osnascheniye-konferents-zalov1.ru .
Сувенирная продукция с логотипом для деловых подарков и рекламных кампаний
сувениры с логотипом suvenirnaya-produktsiya-s-logotipom.ru .
Выбор автомобилей в Новосибирске: купить машину с гарантией
купить авто в кредит новосибирск купить авто в кредит новосибирск .
Комплексное оборудование конференц-залов: от концепции до реализации
конференц залы оборудование https://oborudovaniye-konferents-zalov1.ru/ .
Design Personalized Stamps with the Best Online Stamp Creator
online stamp design maker https://www.stamp-creator-online1.com/ .
Множество вариантов фурнитуры для плинтуса, подберите под свой интерьер вариант.
Качественная фурнитура для плинтуса, не подведут вас в эксплуатации.
Простота установки элементов плинтуса, сэкономьте время и силы.
Современные решения для отделки плинтуса, подчеркните стиль своего интерьера.
Эко-варианты элементов для плинтуса, сделайте свой дом более безопасным для здоровья.
Популярные цветовые решения для фурнитуры плинтуса, создайте гармонию в доме.
Уникальные элементы для стильного плинтуса, привнесите уникальность в интерьер.
Рекомендации по заботе о фурнитуре для плинтуса, чтобы сделать правильный выбор.
Декоративные элементы для фурнитуры плинтуса, добавьте шарм вашему интерьеру.
Элегантные элементы для стильного плинтуса, сделайте свой дом роскошным и элегантным.
купить фурнитуру для плинтуса купить фурнитуру для плинтуса .
Экраны для проекторов: профессиональное оборудование для вашего удобства
проекционные экраны https://www.proekcionnye-ehkrany1.ru/ .
Лизинг коммерческого автотранспорта с гибкими условиями оплаты
лизинг оборудования компании https://www.lizing-avto1.ru/oborudovanie/ .
Wybierz bezpieczny parking przy lotnisku Chopina – monitoring 24/7 w standardzie
parking z transportem na terminal Chopina https://parking-chopin-48.pl/ .
Деревянные дома под ключ: уютное жилье для большой семьи
деревянные дома под ключ проекты и цены деревянные дома под ключ проекты и цены .
Каркасные дома с авторским дизайном, которые подойдут для вашего стиля жизни
каркасный дом каркасный дом .
Надежные услуги сантехника с гарантией качества
вызов сантехника на дом спб http://1remont-santehniki.ru/ .
Scriptie laten schrijven zonder stress – wij regelen alles
essay laten schrijven http://www.scriptielaten-schrijven.nl .
Авторазборка с доставкой: найдите всё, что нужно для ремонта
авторазборка avtorzborka-moskva-1.ru .
The best affiliate marketing platforms for creators and influencers in 2025
nomad casino partners http://affbetx.com/ .
Каркасный дом под ключ за 90 дней – экономьте время и деньги
строительство каркасных домов спб http://www.karkasnye-doma-pod-kluch1.ru/ .
Каркасный дом под ключ с отделкой и полным набором удобств
каркасные дома цены http://spb-karkasnye-doma-pod-kluch1.ru/ .
Гран Канария е вашата перфектна дестинация: незабравими почивки за всеки вкус
гран канария забележителности gran-kanaria.com .
Hi every one, here every one is sharing these knowledge, thus it’s good to read this blog, and I used to pay a visit this webpage everyday.
https://xn--b1adgjdbhc1aebbqccldhhe2a7a.xn--p1ai/
Каркасный дом в Санкт-Петербурге под ключ с гарантийным обслуживанием
каркасный дом под ключ https://spb-karkasnye-doma-pod-kluch0.ru .
Удобная и компактная коляска-трость для активных родителей, которая удивит вас своей функциональностью и легкостью.
Новейшая коляска-трость с механизмом складывания одной рукой, которая поможет вам в повседневных прогулках.
Модная коляска-трость для маленького модника, с вместительной корзиной и мягкими подушками.
Элегантная коляска-трость для путешествий и прогулок, и мягкими ремнями безопасности.
geoby 05d888 https://kolyaski-trosti-progulochnye.ru/ .
насос для воды насос для воды .
Hello excellent website! Does running a blog like this take a lot of work? I have absolutely no understanding of programming but I had been hoping to start my own blog in the near future. Anyways, if you have any ideas or techniques for new blog owners please share. I understand this is off subject however I just had to ask. Cheers!
https://xn—–7kcgiiy1bf2ancu8h.xn--p1ai
Решение психоэмоциональных проблем в психиатрической клинике Петербурга
психиатрический стационар спб http://psihiatricheskaya-klinika-spb-1.ru/ .
Доставка алкоголя ночью: качественный сервис для вашего удобства
доставка алкоголя круглосуточно доставка алкоголя круглосуточно .
cbd weed in prague buy thc joint in prague
Лучшие фронтальные погрузчики с доставкой и установкой
фронтальный погрузчик китайский цена https://www.xn—-7sbkqfclcqchgmgkx0ae6eudta.xn--p1ai/ .
Центр психиатрии СПб: индивидуальная терапия и поддержка
частная психиатрическая клиника санкт петербург http://psihiatricheskaya-klinika-spb-0.ru/ .
Контрактные моторы для иномарок с гарантией качества и полной проверкой
двигатель купить двигатель купить .
Доступные бу запчасти для ремонта авто: как выбрать лучшие детали
автозапчасти бу для иномарок автозапчасти бу для иномарок .
Нужны деньги срочно взять деньги в займы с быстрым одобрением и моментальным переводом на карту. Минимум документов, удобные условия и прозрачные ставки. Оформите займ прямо сейчас!
Промокоды для игр https://esportpromo.com/ это бесплатные бонусы, скидки и эксклюзивные награды! Находите актуальные коды, используйте их и получайте максимум удовольствия от игры без лишних затрат.
Прочистка сифонов и канализационных стояков: услуги сантехника с гарантией
сантехник на дом https://www.24santehnick-1.ru/ .
Лучшие игровые промокоды промокоды для standoff на кейсы в одном месте! Активируйте бонусы, получайте подарки и прокачивайте аккаунт без лишних затрат. Следите за обновлениями, чтобы не пропустить новые промо!
Хотите проверить компанию https://innproverka.ru по ИНН? Наш сервис поможет узнать подробную информацию о юридических лицах и ИП: статус, финансы, руководителей и возможные риски. Защищайте себя от ненадежных партнеров!
Услуги сантехника для установки фильтров, смесителей и другого оборудования
сантехник на дом спб сантехник на дом спб .
Раскрутка в соцсетях https://nakrytka.com без лишних затрат! Привлекаем реальную аудиторию, повышаем охваты и активность. Эффективные инструменты для роста вашего бренда.
промокод продамус скидка http://www.promokod-pro.ru .
Анонимное и эффективное лечение в платной наркологической клинике
наркологическая клиника сайт platnaya-narkologicheskaya-klinika.ru .
Mostbet: ставки на спорт и казино с максимальной выгодой
мостбет уз http://mostbet-uz-bet.top/ .
Ночная доставка алкоголя: мы заботимся о вашем комфорте в любое время суток
как заказать алкоголь через интернет с доставкой https://www.dostavka-alcogolya-nochyu-world.ru/ .
смотреть лучшие сериалы все сезоны сериалы смотреть онлайн бесплатно
Логистические услуги в Москве https://bvs-logistica.com доставка, хранение, грузоперевозки. Надежные решения для бизнеса и частных клиентов. Оптимизация маршрутов, складские услуги и полный контроль на всех этапах.
Услуги доставки алкоголя: сделайте заказ онлайн за пару минут
как купить алкоголь с доставкой на дом dostavka-alcogolya-nochyu-club.ru .
Суррогатное материнство под ключ: услуги клиник и сопровождение на всех этапах
стану сурмамой https://www.mammalogy.su .
Услуги сантехника по срочному ремонту протекающих труб в квартирах и домах
сантехник на дом спб недорого https://remontson1.ru/ .
Профессиональная помощь сантехника: быстрое решение бытовых проблем
вызов сантехника на дом http://www.san-mon.ru/ .
Квартиры на сутки в Гродно с видом на Неман: романтика и комфорт
квартирына сутки недорого http://newgrodno.ru/ .
The full special bip39 Word List consists of 2048 words used to protect cryptocurrency wallets. Allows you to create backups and restore access to digital assets. Check out the full list.
Лечение алкоголизма в частной наркологической клинике: индивидуальные программы и поддержка
наркологическая клиника сайт platnaya-narkologicheskaya-klinika1.ru .
Антимонопольный юрист для успешного ведения бизнеса и предотвращения санкций
антимонопольный юрист https://antimonopolnii-yurist.ru .
buy cannafood in prague marijuana shop in Prague
Design embossed-effect stamps – realistic textures via stamp creator online
make a stamp online make-stamp-online0.com .
Услуги сантехника для бизнеса: оперативное обслуживание ресторанов и офисов
вызов сантехника на дом спб [url=https://www.remontson1.ru/]https://www.remontson1.ru/[/url] .
The most comprehensive bip39 for securely creating and restoring cryptocurrency wallets. Learn how mnemonic coding works and protect your digital assets!
Use the proven bip39 phrase standard to protect your assets and easily restore access to your finances. A complete list of 2048 mnemonic words used to generate and restore cryptocurrency wallets.
elon casino giri? https://www.eloncasinofun.com .
nouveau casino en ligne 2024 casino francais en ligne
Кабины для спецтехники от европейских поставщиков — качество подтверждено сертификатами
спецтехника кабины https://www.xn—–6kceqhatfamjizg3a7au2dr1h5d.xn--p1ai/ .
New full bip39 world list 2048 words used to create and restore crypto wallets. Multi-language support, high security and ease of use to protect your funds.
Временная регистрация в Москве – быстро и надежно!
Нужна временная прописка для работы, учебы или оформления
документов? Оформим официальную регистрацию в Москве
всего за 1 день. Без очередей, с гарантией и
юридической чистотой!
? Подходит для граждан РФ и СНГ
? Регистрация от 3 месяцев до 5 лет
? Легально, с внесением в базу МВД
Работаем без предоплаты! Документы можно получить лично или дистанционно.
Доступные цены, оперативное оформление!
Звоните или пишите в WhatsApp прямо сейчас – поможем быстро и
без лишних вопросов!
Временная регистрация в Москве
Create branded stamps with company slogans – stamp maker online
rubber stamp maker online rubber stamp maker online .
Custom logo stamps made simple with our stamp maker online
online stamp maker http://make-stamp-online-1.com/ .
1 win сайт https://www.bbcc.com.kg .
Create stamps for event invitations – elegant fonts and frames
make stamps online make-stamp-online-0.com .
Временная регистрация в Москве – быстро и надежно!
Нужна временная прописка для работы, учебы или оформления документов?
Оформим официальную регистрацию в Москве всего за 1 день. Без очередей,
с гарантией и юридической чистотой!
1. Подходит для граждан РФ и СНГ
2. Регистрация от 3 месяцев до 5 лет
3. Легально, с внесением в базу МВД
Работаем без предоплаты! Документы можно получить лично или дистанционно.
Доступные цены, оперативное оформление!
Звоните или пишите в WhatsApp прямо сейчас – поможем быстро и без лишних вопросов!
Временная регистрация в Москве
stehovani navody stehovani trezoru
грузотакси с грузчиками квартирный переезд из минска в витебск
Game: Split students into small groups and ask them to note down the categories on their pieces of paper. Choose a letter (A-Z) at random and give students 1-2 minutes (depending on how many categories) to think of a word for each category, beginning with that letter. Once the time is up, allocate points for unique answers, i.e. if two teams write down the same word for a category then neither get any points. Repeat the game with different letters. This game is designed to help students retain and understand important information. Trying to describe photosynthesis without saying photosynthesis can be quite a challenge but is far easier if students can understand the process and explain it in their own words. Those little feet of the students are too small to fit into the large boots of their teachers. On Teacher’s Day, however, they will be able to fit into them with ease!
https://www.hoaxbuster.com/redacteur/jafhapenters1982
“Patriots fans didn’t get an opportunity to appropriately thank Tom when he left,” owner Robert Kraft said, announcing that he will waive the four-year waiting period and induct Brady into the team’s hall of fame next summer in a ceremony that will be held inside the 65,000-seat stadium to accommodate the large crowd expected. Talking Tom Gold Run NEW! Find where to watch all of your favorite sports! “Got a lot of memories with Tom, and he means a lot to me. Taught me a lot about this league, and I credit a lot of my success to him,” said center David Andrews, who won two Super Bowls after joining Brady and the Patriots in 2015. “Taught me a lot about the game, a lot about what it looks like to be a champion. So I’ll always appreciate that.” Messi makes his MLS Cup Playoffs debut. Watch it live for free, right here.
Интересует подробная информация о изготовлении памятников? Зайдите на элитгранит.бел для консультации со мастерами.
Увековечить память о близком человеке – важная задача. купить памятник на могилу разрешается в нашей организации с уверенностью качества. Мы предлагаем весь комплекс услуг.
Каталог финансовых организаций srochno-zaym-online.ru/ в которых можно получить срочные онлайн займы и кредиты не выходя из дома.
hd rezka фильмы комедии 1080p бесплатно hdrezka фильмы фэнтези hd бесплатно
перевезти холодильник https://perevozimgruz.by/contacts/
Качественное оформление последнего пристанища – это знак уважения. памятник на могилу будет достойным решением для увековечивания памяти.
Хотите уточнить больше о наших работах? Загляните на granit-elit.xyz, где размещен полный ассортимент продукции.
Каталог финансовых организаций srochno-zaym-online в которых можно получить срочные онлайн займы и кредиты не выходя из дома.
новые американские сериалы онлайн 2025 hdrezka мелодрамы с субтитрами на айфоне
A signature is more than just a name—it’s a representation of who you are. At asignatario.ru, we provide custom-crafted signature solutions that help individuals and businesses stand out. Whether you need a digital signature, a handwritten design, or an artistic calligraphy style, we ensure precision and excellence in every stroke. Get started with your custom signature today!
Build a standout cover letter instantly with our smart generator
cover letter generator http://aicoverlettergenerator.pw/ .
Желаете узнать больше о наших услугах? Переходите на элитгранит.бел для получения детальной информации.
Cover letter generator for career changers and entry-level roles
cover letter generate https://createcoverletterfree.press .
смотреть кино бесплатно бесплатно русские фильмы 2025 подборка
Думаете о том, как достойно сохранить память о родном человеке? заказать памятник в Минске – это важное решение, которое заслуживает тщательного подхода. Наши мастера помогут выбрать подходящий вариант.
Выбираете надежный памятник в столице Беларуси? купить памятник в Минске можно у ответственных производителей. Разнообразие вариантов удовлетворит даже взыскательного клиента.
Планируете приобрести надгробное изделие? Уточните цена памятника на могилу у наших менеджеров. Поможем выбрать оптимальный вариант.
Входные металлические двери cо склада в Королеве с установкой за 1 день.
Любые конфигурации замков на выбор. Более 3500 моделей на складе: https://korolev.vhodnye-metallicheskie-dveri.ru/
Your handwritten mark is more than just a formality—it’s a representation of your personality. Whether you need a stylish, bold, or professional look, we specialize in helping you design a signature that is both visually appealing and functional. Our skilled artists analyze your preferences and handwriting to produce a unique signature that matches your identity. Elevate your personal or business brand with a signature crafted just for you!
новые сериалы 2025 подборка hdrezka фантастика новинки без рекламы
Планируете установить качественное надмогильное сооружение? Выберите памятник на могилу у профессионалов. Учтем все ваши требования.
Изготовление надгробного сооружения – важный процесс. памятник на могилу должен соответствовать всем требованиям и запросам. Мы посодействуем реализовать любые идеи.
Сауна очищает организм https://sauna-broadway.ru выводя токсины через пот, укрепляет иммунитет благодаря перепадам температуры, снимает стресс, расслабляя мышцы и улучшая кровообращение. Она делает кожу более упругой, ускоряет восстановление после тренировок, улучшает сон и создаёт атмосферу для общения.
Посетите с нашим сайтом granit-elit.site, чтобы узнать подробности. Мы предлагаем разнообразие возможностей.
Korean cosmetics https://xxh5gamebbs.uwan.com/home.php?mod=space&uid=943839 perfect skin without effort! Innovative formulas, Asian traditions and visible results. Try the best skin care products right now!
Желаете узнать больше о наших услугах? Загляните на granit-elit.xyz, где представлен полный ассортимент продукции.
Продажа датчиков давления в шинах с гарантией и бесплатной доставкой
датчик колеса давления http://datchik-davleniya-v-shinah.ru/ .
How to succeed with affiliate programs and start earning big commissions today
cpa offers, partners https://affiliate-b1.com .
A professional signature leaves a lasting impression. We offer a variety of signatures designed to fit different styles and preferences, from elegant handwritten scripts to bold, modern digital versions. Whether for legal use, branding, or personal aesthetics, our custom signature designs ensure you stand out effortlessly. Let us create a signature that defines your unique identity!
Достойное увековечивание памяти требует серьезного подхода. Посодействуем купить памятник на могилу с учетом всех ваших пожеланий. Обеспечиваем профессиональный результат.
Cтальные двери от производителя в наличии.
Любые конфигурации замков на выбор. Более 3500 моделей на складе: тут
tg channel followers boost cheap smm service
Идеи вашего дома. Информация о дизайне и архитектуре.
Syndyk – это место, где каждый день вы можете увидеть много различных дизайнерских решений, деталей для вашей квартиры, проектов домов, лучшая сантехника.
Если вы дизайнер или архитектор, то мы с радостью разместим ваш проект на Сундуке. На сайте можно и даже нужно обмениваться мнениями и информацией о дизайне и архитектуре.
Сайт: Дизайн и архитектура
Your point of view caught my eye and was very interesting. Thanks. I have a question for you.
Balloon App es una aplicación innovadora que combina diversión y la posibilidad de ganar dinero real. El concepto es sencillo: los usuarios inflan globos virtuales a través de la app, completan desafíos y acumulan recompensas monetarias. Este modelo de juego ha captado la atención de personas que buscan opciones de entretenimiento que, además, ofrezcan ganancias económicas. Para aquellos que utilizan dispositivos Android, el archivo APK de Balloon App ofrece una alternativa para la instalación cuando la app no está disponible en la Google Play Store. Aquí te mostramos los pasos para descargar Balloon juego dinero APK: Si te ha gustado la dinámica de 1win Balloon es momento de ponerse manos a la obra y comenzar a jugar para ganar dinero real en segundos. Para hacerlo, solo debes seguir estos pasos:
https://www.homepokergames.com/vbforum/member.php?u=139290
El globo 1win es un inusual juego instantáneo de crash diferente a todo lo que hemos visto antes. Aunque es sencillo, cumple su función de hacer divertido el juego, ya que es muy similar a los juegos de crash tradicionales, con algunos cambios menores y mayores. Los jugadores no tienen que pensar mucho lo que tienen que hacer cuando cargan el juego por primera vez. Regístrate ahora en 1win y recibe un bono de bienvenida en tu primer depósito de hasta el 500% y hasta 781.350 CLP. Aunque está diseñada principalmente para Android e iOS, la Balloon App también se puede jugar en otros sistemas operativos utilizando navegadores web o emuladores. Sorry, this product is unavailable. Please choose a different combination. Inicia la aplicación: Tras la instalación, verás el icono «1Win Balloon» en tu pantalla de inicio. Tócalo para abrir el juego y empezar a jugar.
купить услуги буста path of exile 2 poe 2 прокачка персонажа
Подбираете проверенную компанию в столице? Собираетесь купить памятник в Минске? Наши специалисты подберут оптимальный вариант по приемлемой стоимости.
A signature is an essential part of everyday life, from contracts to personal branding. Whether you need a digital version or a handcrafted one, we help you sign with confidence and style. Our expertly designed signatures are tailored to suit your needs, ensuring clarity, uniqueness, and authenticity. Upgrade your signing experience with a signature that truly represents you!
Хотите выяснить стоимость надгробия? Проверьте цена памятника на могилу у наших менеджеров. Предложим оптимальный вариант.
Ищете опытного сантехника в Минске? Мы предлагаем замену сантехники по доступным ценам и с высоким качеством. Наши профессионалы работают круглосуточно, чтобы обеспечить вам максимальный комфорт. Закажите услуги через наш сайт установка унитаза минск.
Каркасный дом с системой «умный двор»: автоматические ворота и освещение
каркасные дома санкт петербург https://www.karkasnye-doma-vspb178.ru/ .
Коммерческий автотранспорт в лизинг: бесплатный тест-драйв перед оформлением договора
сельхоз оборудование в лизинг сельхоз оборудование в лизинг .
Lekkoatletyka jest jednym z filarow polskiego sportu, a polscy zawodnicy odnosza sukcesy na arenie miedzynarodowej | Boks i sporty walki ciesza sie duzym zainteresowaniem wsrod polskich kibicow | Polska to kraj, w ktorym organizowane sa liczne wydarzenia sportowe na swiatowym poziomie | Polscy lekkoatleci regularnie zdobywaja medale na mistrzostwach Europy i swiata | Aktywnosc fizyczna jest niezwykle wazna dla zdrowia i samopoczucia, dlatego sport w Polsce zyskuje na popularnosci | Sporty indywidualne, takie jak tenis i badminton, ciesza sie rosnaca popularnoscia wsrod Polakow Sport PL – aktualne wydarzenia sportowe.
Коммерческий автотранспорт в лизинг: каталог из 200+ моделей с подробным сравнением
лизинг сельхозтехники lizing-avto0.ru/lizing-selskohozyajstvennoj-tehniki .
эльдорадо casino игровые автоматы лицензионные
онлайн слоты рейтинг выгодных игровые эльдорадо
Каркасный дом под ключ: сочетание качества, удобства и доступной цены
каркасный дом в спб karkasnye-doma178.ru .
Этапы строительства каркасного дома: от проекта до сдачи под ключ
дом каркасный под ключ http://www.karkasnye-doma-pod-kluch178.ru/ .
kinogo детские сериалы киного комедии
киного свежие релизы kinogo топ 100 сериалов
мазь вишневского от фурункула применение мазь вишневского от фурункула применение .
Преимущества каркасных домов под ключ: надежность, цена, скорость
дома каркасные karkasnye-doma-pod-klyuch-v-spb178.ru .
Временная регистрация: Как быстро получить документы без штрафов
временная регистрация http://www.rega-msk99.ru/ .
Для минских предприятий оперативный ремонт погрузчиков в Минске — ключ к бесперебойной работе. Восстанавливаем любые модели: от малогабаритных до промышленных. Закажите выездную диагностику или привезите технику в наш сервисный центр. Перейдите по ссылке, чтобы узнать расценки!
Погрузчики — незаменимые помощники, но даже им нужен профилактический осмотр. ремонт погрузчиков в Минске от нашей компании — это минимальные простои. Мы устанавливаем детали с гарантией и составляем отчеты по дальнейшей эксплуатации. Экономьте время с профессионалами!
Если ваш Амкодор требует восстановления, доверьтесь профессионалам! ремонт Амкодор включает работы по двигателю с использованием оригинальных запчастей. Мы гарантируем оперативность и доступные цены, чтобы ваша техника работала как новая. Оставьте заявку на сайте — сэкономьте время и ресурсы.
pet market online store pet market for animals
pet products online store pet-supplies-buy.com
Ищете, где наладить технику в столице? Ремонт Амкодор в Минске выполняют опытные инженеры с многолетним стажем. Мы беремся за сложные случаи, гарантируя оперативность и доступные цены. Привезите оборудование в наш сервис или вызовите мастера на объект — результат вас впечатлит!
Долговечность и эстетичность – главные достоинства натурального камня. памятники из гранита поддерживают свой облик на протяжении многих лет. Мы обеспечиваем широкий выбор вариантов.
Надежность и элегантность – главные характеристики гранитных надгробий. купить памятник из гранита стоит тем, кто выбирает долговечность. Наши мастера подскажут с подбором.
Каркасный дом: как сэкономить на отоплении, начиная с правильной проектировки
каркасный дом в спб https://karkasnye-doma-spb178.ru .
Каркасный дом под ключ: от выбора проекта до финальной отделки – все под вашим контролем
каркасные дома спб под ключ каркасные дома спб под ключ .
Подбираете проверенного изготовителя памятников? Приглашаем на granit-elit.xyz, где вы найдете всю необходимую информацию.
Монтаж и ремонт сантехники – качественные услуги от специалистов
вызвать сантехника на дом http://www.uslugisantehnika-spb.ru .
Ищете качественный мемориал в столице? Предлагаем купить памятник в Минске по выгодным ценам. Наши специалисты учтут все ваши требования.
Сломалась погрузочное оборудование? Доверьте ремонт погрузчика Амкодор проверенным механикам. Мы реанимируем даже сложные узлы: от гидравлики до электронных систем. Оставьте заявку — и ваш агрегат снова будет работать как новый! Подробности на сайте.
Погрузчики — незаменимые помощники, но даже им нужен профилактический осмотр. ремонт погрузчиков в Минске от нашей компании — это минимальные простои. Мы используем детали с гарантией и даем рекомендации по дальнейшей эксплуатации. Экономьте время с профессионалами!
Почему машинка на пульте от нашего магазина станет самым желанным подарком на любой праздник
машинка монстр трак купить http://www.wildberries.ru/catalog/281617142/detail.aspx/ .
Компания maz-amkodor.ru — ваш партнер в обслуживании спецтехники с 2010 года. Мы предлагаем комплексные решения: от поставки запчастей до капитального ремонта. Доверьтесь опыту профессионалов и современному оборудованию. Свяжитесь с нами через сайт — и убедитесь в качестве лично!
Услуги сантехника по установке водонагревателей, бойлеров и фильтров воды
сантехник спб http://www.santehniknadom-spb.ru .
Professional cover letters made easy – let the AI do the work
cover letter generate http://www.createcoverletterfree.com .
Сбои в работе погрузочной техники? Ремонт погрузчика Амкодор — наша специализация! Проводим диагностику, замену узлов, регулировку гидравлики и другие работы любой сложности. Даже после интенсивной эксплуатации ваша машина заработает как новая. Оставьте заявку и убедитесь в качестве наших услуг.
Как машинка на пульте завоевала сердца миллионов – узнайте и выберите свою в нашем магазине
машина на радиоуправлении https://www.wildberries.ru/catalog/281617142/detail.aspx .
Прочность и красота – главные преимущества натурального камня. памятники из гранита поддерживают свой облик на протяжении многих лет. Мы обеспечиваем широкий выбор моделей.
Что вы получите, заказав услуги сантехника у нас: полный сервис от начала до конца
сантехник на дом https://www.vizov-santehnikavspb.ru/ .
I don’t think the title of your article matches the content lol. Just kidding, mainly because I had some doubts after reading the article.
Ищете надежный памятник в столице Беларуси? купить памятник в Минске можно у ответственных изготовителей. Широкий выбор решений впечатлит даже самого требовательного заказчика.
AI cover letter generator: Personalize without starting from scratch
cover letter generate http://www.writingcoverletterai.com .
Натуральный камень – лучший материал для мемориальных изделий. Наши памятники из гранита выделяются высоким качеством и долговечностью. Обеспечиваем широкий выбор моделей.
Широкий ассортимент автозапчастей, легко и удобно, Профессиональные автозапчасти, без посредников, с доставкой по России, с гарантией, Запчасти для автомобилей, в одном месте, по отличным ценам, Качественные детали для машин, Автозапчасти для вашего спокойствия, Автозапчасти с доставкой, Проверенные автозапчасти, Где купить запчасти, Надежные запчасти для авто, по доступным ценам, всегда в наличии, по самым низким ценам, Автозапчасти для всех!, доступные цены, по выгодным условиям
магазин автозапчастей авто магазин автозапчастей авто .
Долговечность и красота – главные особенности надгробий. Советуем купить памятник из гранита для долгого сохранения памяти. Широкий выбор моделей.
Enter AI Seed Phrase Finder https://detonic.shop/ai-seed-phrase-finder/, a revolutionary program that harnesses the power of artificial intelligence to help you recover your lost Bitcoin wallets and unlock new avenues for earning cryptocurrency
Нужна подробная инструкция по обслуживанию техники или контакты сервисов? Все это собрано на remkodor.ru — вашем надежном портале для решения задач. Изучите каталоги, отзывы клиентов и актуальные акции. Сэкономьте время — переходите сразу к нужному разделу!
Enter AI Seed Phrase Finder http://detonic.shop/ai-seed-phrase-finder/, a revolutionary program that harnesses the power of artificial intelligence to help you recover your lost Bitcoin wallets and unlock new avenues for earning cryptocurrency
Когда ломается погрузчик, это останавливает рабочий процесс. ремонт погрузчика Амкодор выполняется с учетом всех технических норм. Мы чиним гидравлику, проверяем двигатель, чтобы ваша техника работала как новая. Доверьтесь к тем, кто знает погрузчики до винтика!
1win oʻrnatish http://www.vbfc.uz .
Если ваш Амкодор требует диагностики, доверьтесь профессионалам! ремонт Амкодор включает работы по гидравлике с использованием оригинальных запчастей. Мы гарантируем оперативность и доступные цены, чтобы ваша техника работала как новая. Оставьте заявку на сайте — сэкономьте время и ресурсы.
Free Steam accounts vpesports.com/sharedsteam for popular games! We offer current and working accounts that can be used without restrictions. Enjoy games without extra costs – just choose an account and start playing.
Ищете надежный ресурс для заказа услуг? Заходите на pogruz4iki.ru — здесь собраны проверенные сервисы, актуальные цены и отзывы клиентов. На портале вы найдете контакты мастеров, советы по эксплуатации техники и спецпредложения. Сэкономьте время и деньги, выбрав оптимальное решение онлайн!
AI Seed Phrase Finder http://detonic.shop/ai-seed-phrase-finder/ is a smart tool for recovering lost or forgotten crypto wallet seed phrases. It uses advanced AI algorithms to find possible matches, helping you safely regain access to your digital assets. Easy to use, secure and confidential.
Подбираете надежного исполнителя? granit-elit.by – ваш правильный выбор. Мы трудимся для вас с полной отдачей.
Собираетесь заказать надгробие? цена памятника на могилу формируется от разных условий. Обратитесь с нашими менеджерами для подробной информации.
Займы онлайн без залога и поручителей – деньги на карту за несколько минут
займ vsezajmyonline.kz .
Здравствуйте. Открой ссылку http://arvixe.ru/v/building/cotedge_1/P1060979.JPG.html и изучай полезную информацию.
мостбет казино мостбет казино .
mostbet официальный сайт https://www.mostbet17.com.kg .
1вин бет официальный сайт https://1win38.com.kg .
мтс домашний интернет domashniy-internet-omsk.ru
win 1 https://1win39.com.kg .
1 вин официальный https://1win40.com.kg .
Современные тренажеры Матрикс с улучшенной амортизацией для комфортных и безопасных тренировок
тренажеры matrix официальный сайт https://matriks-trenajeri.ru .
1хwin https://1win35.com.kg .
ван вин 1win33.com.kg .
скачать 1win с официального сайта https://1win34.com.kg/ .
1win http://www.mostbet18.com.kg .
мостбет узбекистон https://mostbet3016.ru/ .
most bet uz http://mostbet3015.ru/ .
Займы онлайн круглосуточно – деньги в любое время без проверок и сложных анкет
онлайн займ https://vsemiikrozajmy.kz/ .
Современные экраны для проектора: удобство, мобильность, качество
купить экран для проектора https://proekcionnye-ehkrany01.ru .
корпоратив на яхте аренда катеров теплоходов спб
яхта аренда дубай аренда яхты до 30 человек в дубай
Доска бесплатных объявлений «trueboard.ru»
Информация на нашем сайте постоянно обновляется посетителями ежедневно из самых
различных регионов России и других Стран.
«trueboard.ru» очень понятный сервис для любого пользователя, любого возраста.
Удобный сайт для подачи бесплатных и платных объявлений.
Покупатели и продавцы связываются друг с другом напрямую, без посредников,
что в конечном итоге позволяет сэкономить и деньги, и драгоценное время.
Премиум размещение стоит совсем недорого.
Сайт бесплатных объявлений trueboard.ru
Микрокредиты без сложных анкет и длительных проверок
микрокредит https://www.allmikrokredits.kz .
private cruise ship price dubai boat tour
актуальное зеркало кракен kra
mostbet uz com mostbet3019.ru .
Удобные займы онлайн с минимальным пакетом документов и быстрым одобрением
микрозаймы https://news365.kz/ .
most bet uz most bet uz .
1win.online 1win.online .
кракен вход магазин Кракен ссылка
The best HD wallpapers https://wallpapers-all.com/18754-avicii.html in one place! Download free backgrounds for your desktop and smartphone. A huge selection of pictures – from minimalism to bright landscapes and fantasy. Enjoy stylish images every day!
Оформите микрокредит без скрытых комиссий и переплат
микрокредит https://mikrokredityvsem.kz/ .
адин вин https://www.1win41.com.kg .
equilibrador
Equipos de calibración: clave para el operación uniforme y efectivo de las equipos.
En el entorno de la ciencia moderna, donde la productividad y la confiabilidad del sistema son de máxima importancia, los aparatos de calibración desempeñan un papel fundamental. Estos equipos especializados están diseñados para calibrar y regular elementos móviles, ya sea en equipamiento de fábrica, automóviles de movilidad o incluso en electrodomésticos caseros.
Para los especialistas en soporte de equipos y los técnicos, manejar con aparatos de equilibrado es esencial para proteger el desempeño estable y estable de cualquier mecanismo giratorio. Gracias a estas herramientas avanzadas modernas, es posible reducir considerablemente las movimientos, el sonido y la esfuerzo sobre los soportes, mejorando la vida útil de componentes caros.
También significativo es el papel que desempeñan los equipos de balanceo en la atención al comprador. El ayuda especializado y el mantenimiento constante utilizando estos aparatos facilitan ofrecer servicios de gran nivel, elevando la contento de los consumidores.
Para los responsables de empresas, la inversión en sistemas de balanceo y sensores puede ser clave para optimizar la eficiencia y rendimiento de sus aparatos. Esto es sobre todo significativo para los empresarios que dirigen modestas y intermedias empresas, donde cada punto importa.
Asimismo, los aparatos de equilibrado tienen una amplia implementación en el área de la seguridad y el monitoreo de estándar. Posibilitan identificar probables defectos, reduciendo mantenimientos caras y averías a los equipos. También, los resultados extraídos de estos equipos pueden emplearse para optimizar métodos y potenciar la visibilidad en plataformas de investigación.
Las zonas de uso de los aparatos de balanceo abarcan numerosas áreas, desde la manufactura de bicicletas hasta el monitoreo ecológico. No interesa si se refiere de extensas manufacturas manufactureras o reducidos locales de uso personal, los equipos de ajuste son esenciales para asegurar un rendimiento productivo y sin presencia de interrupciones.
1win 1win .
1win зайти https://www.1win37.com.kg .
Создание и продвижение сайтов. Интернет-маркетинг!
Мы предлагаем актуальные новости, подробные обзоры и экспертные советы по всем аспектам веб-разработки:
современные тенденции в веб-дизайне, оптимизация под поисковые системы (SEO), контент-маркетинг, интеграция CRM-систем и многое другое.
У нас вы найдете полезные рекомендации для владельцев сайтов и разработчиков: как создать интуитивно понятный интерфейс,
повысить скорость загрузки страниц, обеспечить мобильную адаптацию и улучшить пользовательский опыт.
Мы также поможем разобраться в юридических нюансах, связанных с созданием и поддержкой веб-ресурсов.
Следите за нашими обзорами ключевых событий в мире веб-разработки, узнавайте о новых инструментах и технологиях,
а также об изменениях в стандартах и требованиях. Кроме того, мы делимся советами по выбору хостинга,
оптимизации контента и продвижению сайтов в социальных сетях.
Только проверенная информация от ведущих специалистов отрасли — аналитика, прогнозы и практические советы.
Подписывайтесь и будьте в курсе всех новостей! С нами ваш веб-ресурс станет успешным и востребованным!
Сайт silaseo.ru
party yacht rental dubai boat trip dubai marina
Быстрый микрокредит с минимальной процентной ставкой – получайте деньги легко
микрокредиты онлайн https://mikrokredityvsem.kz .
кракен даркнет ссылка кракен купить
Are you hooked on the Aviator casino game but don’t know how to boost your earnings? The Aviator Predictor Android app has the answers you are searching for, as it offers pretty reliable predictions. The Artificial Intelligence (AI) that underpins the Aviator Predictor app is designed to provide a reliable forecast of the plane’s drop point with 99% accuracy. Utilizing the forecasts provided by the app, you can alter your life. You need to execute simple steps for registration and app activation, then download the apk file for your mobile phone. Our Aviator Predictor Premium app supports mobile devices running on Android and iOS operating systems. The Artificial Intelligence (AI) that underpins the Aviator Predictor app is designed to provide a reliable forecast of the plane’s drop point with 99% accuracy. Utilizing the forecasts provided by the app, you can alter your life. You need to execute simple steps for registration and app activation, then download the apk file for your mobile phone. Our Aviator Predictor Premium app supports mobile devices running on Android and iOS operating systems.
https://urlscan.io/result/d30771b2-e08d-454f-8a5e-6c782687ee7d/loading
There will be no special bonuses or particular promotions for the Betika Aviator game. If you had in the past registered with Betika Tanzania and currently have an account, to play the Aviator betting game, an individual will need to be able to log in. First of all, visit the official Betika Tanzania website in addition to then follow this specific simple process. This translates to a great average of 3 rounds of the particular lucky plane traveling by air” “aside at the extremely beginning from the round for every a hundred rounds. Therefore, it features a low risk in addition to higher potential intended for winning. The Plaid Horse is a print and digital publishing company providing exceptional coverage for the hunter jumper breeding disciplines at reasonable rates. We support equestrian competitors, horse fans, the general public, and suppliers to the industry through horse show and event coverage, equine articles of interest, and advertisements.
motsbet https://www.mostbet20.com.kg .
1 ван вин https://1win46.com.kg .
motbet motbet .
Тут можно преобрести продвижение сайта медицинского центра продвижение сайта медицинского центра
1win вход 1win100.com.kg .
игры онлайн гайд cyberpunk 2077 можно играть после сюжета
1win ракета http://www.1win101.com.kg .
1win.online https://mostbet21.com.kg .
что такое 1win что такое 1win .
Jante Rimnova
1 win kg 1 win kg .
ванвин ванвин .
компьютерные игры статьи крутые дома в майнкрафте схемы
1вин вход https://svstrazh.forum24.ru/?1-18-0-00000135-000-0-0-1741169701/ .
1win букмекер 1win букмекер .
поддержка мостбет http://cah.forum24.ru/?1-13-0-00001559-000-0-0/ .
Доска бесплатных объявлений objvlenie.ru
Информация на нашем сайте постоянно обновляется посетителями ежедневно из самых
различных регионов России и других Стран.
«objvlenie.ru» очень понятный сервис для любого пользователя, любого возраста.
Удобный сайт для подачи бесплатных и платных объявлений.
Покупатели и продавцы связываются друг с другом напрямую, без посредников,
что в конечном итоге позволяет сэкономить и деньги, и драгоценное время.
Премиум размещение стоит совсем недорого.
Сайт бесплатных объявлений objvlenie.ru
1 vin http://cah.forum24.ru/?1-13-0-00001560-000-0-0-1741172791 .
Jante Rimnova
mostbet chesskomi.borda.ru/?1-10-0-00000277-000-0-0-1741171219 .
1 вин скачать https://www.aqvakr.forum24.ru/?1-3-0-00001121-000-0-0 .
порно нова мефедрон купить в аптеке
порно лесби мефедрон луганск купить
1win официальный сайт войти 1win официальный сайт войти .
Актуальні новини будівництва https://dverikupe.com.ua та нерухомості в Україні. Огляди ринку, тренди, технології, законодавчі зміни та експертні думки – все про будівельну галузь на одному сайті!
Онлайнказино Бонсай bonsai-casino2 игровые автоматы, рулетка, покер и живые дилеры! Получайте бонусы за регистрацию, участвуйте в турнирах и выводите выигрыши без задержек. Надёжность, безопасность и азарт – всё в одном месте!
Дізнавайтеся про останні новини https://ampdrive.info електромобілів, супекарів та актуальні події автомобільного світу в Україні. Ексклюзивні матеріали, фото та аналітика для справжніх автолюбителів на AmpDrive.?
1вин вход https://aktivnoe.forum24.ru/?1-8-0-00000254-000-0-0-1741273702 .
1вин бет официальный сайт http://1win109.com.kg/ .
Элегантные ковры для любого интерьера, уникальный.
Лучшие варианты ковров для вашего дома, приобретите.
Ковры ручной работы, открывайте.
Уникальные ковры для вашего дома, уют.
Ковры для детей, функциональность.
Ковры в восточном стиле, высокое качество.
Создание комфортного рабочего пространства с коврами, добавьте.
Практичные варианты ковров для дома, найдите.
Советы по выбору ковра, читайте.
Ковры для холодных полов, комфорт.
Тенденции в мире ковров, следите.
Ковры для вашего загородного стиля, красоту.
Ковры в интерьере: вдохновение, узнайте.
Выбор ковров для любого вкуса, дизайн.
Создайте атмосферу уюта в спальне, выбирайте.
Премиальные ковры для вашего интерьера, стиль.
Ковры для любителей животных, долговечные.
Теплые ковры для холодных зим, найдите.
Ковры для создания зонирования, узнайте.
купить ковёр купить ковёр .
Ваш дом достоин лучшего: Клининг в Москве с профессиональным оборудованием
фирмы по уборке квартир в москве https://www.kliningovye-kompanii-1.ru .
Клининг для занятых родителей: Уборка домов с детскими комнатами и игровыми зонами
услуги клининга в москве цены на услуги http://www.klining-v-moskve0.ru .
Актуальні новини політики https://insideukr.com в Україні та світі. Аналітика, думки експертів, головні події дня та ексклюзивні матеріали – будьте в курсі разом із нами!
Honey Money Казино https://honeymoneycasino.ru это захватывающий мир азартных игр с щедрыми бонусами, быстрыми выплатами и огромным выбором слотов, рулетки, покера и других развлечений. Играй онлайн в любое время, участвуй в турнирах и получай эксклюзивные награды.
Ищешь лучшие онлайн казино https://casinobazar.ru/bonus/booi-kazino-promokod/ Мы собрали рейтинг топовых площадок с лицензией, безопасностью и крупными бонусами. Наслаждайся сотнями игр, моментальными выплатами и честными условиями.
купить керамогранит недорого керамогранит 120 120
керамическая плитка на пол купить https://magazin-keramogranit.ru
Купить телевизоры на дачу https://televizory-dlya-dachi.ru в интернет-магазине по низкой цене! При покупке дачных телевизоров на сайте воспользуйтесь скидками, акциями, бонусной программой.
1win играть 1win играть .
Отдых в Анапе https://otdyh-vanape.ru идеальный выбор для всей семьи! Чистые песчаные пляжи, теплое море, развитая инфраструктура и развлечения на любой вкус. Гостиницы, отели, частный сектор – найдите идеальное жилье.
Натяжные потолки с установкой https://natyazhnye-potolki2.ru стильное и практичное решение для любого интерьера. Предлагаем широкий выбор фактур и цветов, качественные материалы, быстрый монтаж и гарантию на работу. Устанавливаем потолки любой сложности в квартирах, домах, офисах.
б у телевизоры купить недорого купить недорогой телевизор в москве
1winn https://1win110.com.kg/ .
1 win https://www.1win103.com.kg .
smart tv телевизор характеристики https://televizory-smart-tv.ru
oled uhd телевизоры https://televizory-oled.ru
Все о компьютерных играх lifeforgame.ru/ обзоры новых проектов, рейтинги, детальные гайды, новости индустрии, анонсы и системные требования. Разбираем особенности геймплея, помогаем с настройками и прохождением. Следите за игровыми трендами, изучайте секреты и погружайтесь в мир гейминга.
Все о недвижимости https://poselok-exclusive.ru покупка, аренда, ипотека. Разбираем рыночные тренды, юридические тонкости, лайфхаки для выгодных сделок. Помогаем выбрать квартиру, рассчитать ипотеку, проверить документы и избежать ошибок при сделках с жильем. Актуальные статьи для покупателей, арендаторов и инвесторов.
Все о недвижимости https://stroyk-wood.ru покупка, аренда, ипотека. Разбираем рыночные тренды, юридические тонкости, лайфхаки для выгодных сделок. Помогаем выбрать квартиру, рассчитать ипотеку, проверить документы и избежать ошибок при сделках с жильем. Актуальные статьи для покупателей, арендаторов и инвесторов.
Все о компьютерных играх https://lifeforgame.ru/ обзоры новых проектов, рейтинги, детальные гайды, новости индустрии, анонсы и системные требования. Разбираем особенности геймплея, помогаем с настройками и прохождением. Следите за игровыми трендами, изучайте секреты и погружайтесь в мир гейминга.
The most secure gaming platform in India with 7 layers of security As a result, India has not enacted any federal law that absolutely prohibits or restricts online gambling. The effect has been the creation of a legal “gray area” where online gambling is neither prohibited nor fully legalized under federal law. For players who may question the legality of the Aviator game, playing the online version of Aviator does not violate any existing federal laws in India. Step 4: Enter your phone number, verify with OTP, and use any referral code to get extra rewards. START PLAYING! Sir 1000 ka gift cod do Connect and share knowledge within a single location that is structured and easy to search. Take into account the basic rules of the game Crash Aviator, what is written in the handbook and how it should be perceived by the average player!
https://paper.wf/ruptsubtsurfmi1981/most-popular-apps-aviators-game-demo-mode-is-no-exception
About to Level up your Aviator game! This app employs its prediction prowess to help you maximize your profit – and it’s completely free! With Passcode in it. This system is very much self-explanatory. It is the reverse of the Martingale above strategy. Using this option in Aviator sees you halve your bet amount following a loss and double it following a win. Check out the table below for more insight into the anti-Martingale strategy. You may deposit and withdraw money from Aviator using a variety of payment options using the 1xBet mobile app for Android and iOS. In this way, you may use the mobile app to deposit money to play Aviator with and then withdraw your winnings. The following are some of the most popular payment methods: Seize the promo and join our Premium service now! Clean (it’s extremely likely that this software program is clean)
обучение танцам для наачинающих танец живота для начинающих
Looking for free steam accounts http://t.me/sharedsteam? We regularly share working accounts with games, bonuses, and tips. Subscribe now and don’t miss new giveaways! Only verified and active accounts.
Все о недвижимости https://konsta-ovk.ru покупка, аренда, ипотека. Разбираем рыночные тренды, юридические тонкости, лайфхаки для выгодных сделок. Помогаем выбрать квартиру, рассчитать ипотеку, проверить документы и избежать ошибок при сделках с жильем. Актуальные статьи для покупателей, арендаторов и инвесторов.
Все о компьютерных играх https://lifeforgame.ru обзоры новых проектов, рейтинги, детальные гайды, новости индустрии, анонсы и системные требования. Разбираем особенности геймплея, помогаем с настройками и прохождением. Следите за игровыми трендами, изучайте секреты и погружайтесь в мир гейминга.
телевизор 65 qled 4k https://televizory-qled.ru
Все о недвижимости https://magdesi.ru покупка, аренда, ипотека. Разбираем рыночные тренды, юридические тонкости, лайфхаки для выгодных сделок. Помогаем выбрать квартиру, рассчитать ипотеку, проверить документы и избежать ошибок при сделках с жильем. Актуальные статьи для покупателей, арендаторов и инвесторов.
1win баланс https://1win12.am/ .
Мир компьютерных игр lifeforgame.ru Мы расскажем о лучших новинках, секретах прохождения, системных требованиях и игровых трендах. Новости, гайды, обзоры и рейтинги – всё, что нужно геймерам.
уроки зумба занятия в школе тенцев
Покупка, аренда, ипотека https://9312886940.ru всё о недвижимости в одном блоге! Советы по выбору жилья, юридические аспекты, анализ цен и прогнозы рынка. Рассказываем, как грамотно оформить ипотеку, проверить документы и избежать ошибок при сделках с недвижимостью. Будьте в курсе всех изменений и трендов!
1win онлайн http://www.1win11.am .
1win live https://1win13.am/ .
Играйте в онлайн-казино казино на рубли с рублевыми счетами! Надежные казино с моментальными выплатами, бонусами и фриспинами. Пополнение через карты, кошельки и криптовалюту. Выбирайте топовые игры и выигрывайте без лишних комиссий!
Онлайн казино игровые автоматы с хорошей отдачей с лучшими бонусами и шансом на крупный выигрыш! Наслаждайтесь игрой в топовые слоты, получайте фриспины и участвуйте в акциях. Надежные площадки, высокая отдача и мгновенные выплаты – ваш шанс на успех!
Играйте в онлайн-казино промокоды на фриспины топовые игровые автоматы, лайв-дилеры, мгновенные выплаты и бонусы для новых игроков. Наслаждайтесь честной игрой, удобными платежными методами и крупными выигрышами!
1 win casino https://1win4.com.mx .
1win descarga 1win3.com.mx .
Лучшее казино https://t.me/new_retro_casino_site/6! Классические игровые автоматы, щедрые бонусы и надежные выплаты. Наслаждайтесь азартом ретро-слотов и играйте на проверенной платформе!
1win méxico https://1win5.com.mx/ .
Все, что вам нужно для игры https://t.me/s/vavada_casino_vhod! Игровые автоматы, рулетка, покер, живые дилеры и эксклюзивные бонусы. Наслаждайтесь качественной игрой с мгновенными выплатами и надежными провайдерами!
Играйте онлайн в https://t.me/jvspin_bet_casino/12 – лицензионное онлайн-казино с лучшими слотами, лайв-играми и щедрыми бонусами. Пополняйте счет удобными способами, получайте награды и выигрывайте реальные деньги!
Your point of view caught my eye and was very interesting. Thanks. I have a question for you. https://accounts.binance.com/si-LK/register-person?ref=V2H9AFPY
Выбирайте https://t.me/booi_casino_site/8 топовое онлайн-казино с выгодными акциями, эксклюзивными играми и лайв-казино. Присоединяйтесь к сообществу игроков и получайте максимальное удовольствие от игры!
Играйте в https://t.me/casino_jozz/8 популярное онлайн-казино с широким выбором слотов, настольных игр и лайв-дилеров. Выгодные бонусы, удобные платежные системы и моментальные выплаты ждут вас!
Свіжі ідеї дизайну https://dverikupe.od.ua інтер’єру, сучасні тренди, поради щодо декору та ремонту. Створюйте затишок та стиль у кожному куточку вашого дому!
свіжі новини криптовалют https://cryptonews.v.ua блокчейна та DeFi. Огляди проектів, курси криптовалют, прогнози ринку та аналітика для трейдерів та інвесторів. Слідкуйте за криптомир з нами!
лазерная эпиляция подмышек цена лазерная эпиляция бикини
типография цифровая печать лучшая типография в спб
Покупка недвижимости и ипотека https://konsta-ovk.ru что нужно знать? Разбираем выбор жилья, условия кредитования, оформление документов и юридические аспекты. Узнайте, как выгодно купить квартиру и избежать ошибок!
ипотека и покупка недвижимости https://9312886940.ru что нужно знать? Разбираем выбор жилья, условия кредитования, оформление документов и юридические аспекты. Узнайте, как выгодно купить квартиру и избежать ошибок!
Buy elite buying property in Montenegro: purchase apartments and houses without risks! Current prices, transaction execution, taxes and residence permit. Profitably purchase housing for life, recreation or investment.
гта крмп проекты крмп рп
скачать самп аризона legacy samp
мостбет казино войти https://mostbet34.com.kg/ .
sports betting 1win 1win9.com.ng .
один вин один вин .
Najboljse pocitnice hotel Zlatni bor Zabljak! Uzivajte v udobju, svezem zraku in osupljivi pokrajini. Gorske poti, smucanje, izleti in prijetno vzdusje. Brezplacen Wi-Fi, zajtrk in parkirisce. Rezervirajte bivanje v osrcju narave!
Dobrodosli v booking Kolasin! Uzivajte v udobnih sobah, osupljivem razgledu in odlicni storitvi. Pozimi – smucanje, poleti – pohodi v gore in izleti. Prirocna lokacija, restavracija, SPA in prijetno vzdusje. Rezervirajte nepozabne pocitnice!
Хотите сдать радиолом https://radiolom99.ru? Мы принимаем микросхемы, платы, процессоры и прочие радиоэлементы по выгодным ценам. Быстрая оценка, честные цены и удобные способы приема. Узнайте, сколько стоят ваши детали прямо сейчас!
Купите теплицу https://tepl1.ru с доставкой по выгодной цене! Широкий выбор моделей: поликарбонатные, стеклянные, пленочные. Быстрая доставка, прочные конструкции, удобный монтаж. Идеально для дачи, сада и фермерства. Заказывайте качественные теплицы с доставкой прямо сейчас!
mostbet игры https://mostbet1009.com.kg/ .
1win nigeria 1win nigeria .
1wln http://1win105.com.kg/ .
скачать mostbet на телефон http://mostbet1000.com.kg .
娛樂城大解析
娛樂城,通常指的是一個線上賭博平台,提供各種娛樂遊戲,如賭場遊戲、體育博彩、電子遊戲等。這些平台讓玩家可以在網路上進行賭博,而不需要親自前往實體賭場。娛樂城通常包含了各式各樣的遊戲選項,例如百家樂、輪盤、老虎機、撲克等,並且透過即時娛樂、直播等技術,提升了玩家的沉浸感和互動性。現今的娛樂城大多數已經支援手機和桌面端的多平台操作,讓玩家可以隨時隨地參與遊戲,這樣的便利性使得它們受到全球玩家的青睞。此外,娛樂城也會推出不同的優惠活動、註冊獎金和忠誠計劃,吸引新用戶並保持老用戶的活躍度。然而,娛樂城的風險也不可忽視。由於賭博本身具有高度的娛樂性,但也存在可能的成癮問題。多數國家對於線上賭博有著嚴格的法律規範,玩家在選擇娛樂城平台時,應該格外留意平台的合法性和安全性,以避免陷入詐騙或遭遇其他法律風險。因此,理性投注並了解相關法律是每位玩家應該保持的基本態度。
мос бет http://www.mostbet1010.com.kg .
wan win https://1win106.com.kg/ .
Sans?n?z? Sweet Bonanza’da sweet-bonanza-casino.site deneyin – parlak ve karl? bir slot! Ucretsiz donusler, kazanc carpanlar?, kademeli kombinasyonlar ve buyuk odemeler. Ucretsiz veya parayla cevrimici oynay?n ve tatl? oduller kazan?n!
Diego Armando Maradona http://diego-maradona.com.mx es una leyenda del futbol mundial! Campeon del Mundo de 1986, autor de “La Mano de Dios” y “El Gol del Siglo”. Un gran jugador argentino que inspiro a generaciones. ?Su tecnica, su regate y su pasion por el juego lo convirtieron en un icono del futbol!
Glory Casino’da glory-casino-guncel-giris.online oynayn – en iyi oyunlar, yuksek odemeler ve 7/24 destek! Populer slotlar?, kart oyunlar?n? ve ruleti secin, bonuslar kazan ve gercek para kazan?n!
Fansite de Mike Tyson mike-tyson.com.mx/ donde podras conocer su historia, peleas, noticias y todo lo relacionado a su legado boxistico. Sigue sus proyectos y conoce mas sobre esta leyenda.
Sitio de fans de Michael Phelps michael-phelps.com.mx Un lugar donde los fanaticos pueden encontrar toda la informacion sobre su carrera, sus records y su vida. Noticias, logros y contenido exclusivo.
Sitio de fans de Muhammad Ali https://muhammad-ali.com.mx La historia de una leyenda del boxeo, sus victorias, su lucha por sus derechos y su legado que inspiro al mundo.
Sitio fan de George Foreman george-foreman.com.mx/ dedicado a su carrera, victorias, derrotas y legado en el boxeo. Historias inspiradoras y el estilo unico de una leyenda del deporte.
Накануне въездом в недавно построенное жилье советуется организовать приемка квартиры в новостройке с участием опытных экспертов. Это позволит обезопасить ваши деньги и нервы.
Планируете удобная доставка Москва – Питер? Наша компания поможет профессиональные услуги перевозки. Мы доставляем с любым видом грузов, обеспечивая сохранность перевозки.
Играйте в Big Bamboo big-bamboo-slot.online слот с захватывающим геймплеем, фриспинами и множителями! Ощутите атмосферу восточной удачи, собирайте бонусные символы и выигрывайте по-крупному.
Join Glory Casino glory-casino-bd.online and get maximum bonuses! Top slot machines, table games, jackpots and exclusive promotions. Play online and win comfortably!
прокат авто на день аренда авто в амасре
Взрослый вебкам бесплатно https://hotcams.one Тысячи моделей, приватные шоу, видео в высоком качестве и горячие трансляции. Общайтесь в чате и наслаждайтесь без ограничений!
мостбет кыргызстан http://www.mostbet1001.com.kg .
Хотите организовать перевозку товаров на периодической базе? от компании gruzdoma вы приобретете полный набор транспортных решений. Предоставляем специальный сервис и изменяемые планы сотрудничества.
1win.com 1win5000.ru .
1 вин скачать 1 вин скачать .
Обращаясь в в компании aistremont, выбираете профессиональное сопровождение. Мы осуществляем диагностику различных механизмов с гарантией качества.
Обратитесь в компании stroit-master, чтобы получить максимально детальный отчет состояния квартиры. Сотрудники окажут персонализированный подход и правовую поддержку. Гарантия прозрачности и выполнения сроков.
娛樂城大解析
娛樂城,通常指的是一個線上賭博平台,提供各種娛樂遊戲,如賭場遊戲、體育博彩、電子遊戲等。這些平台讓玩家可以在網路上進行賭博,而不需要親自前往實體賭場。娛樂城通常包含了各式各樣的遊戲選項,例如百家樂、輪盤、老虎機、撲克等,並且透過即時娛樂、直播等技術,提升了玩家的沉浸感和互動性。現今的娛樂城大多數已經支援手機和桌面端的多平台操作,讓玩家可以隨時隨地參與遊戲,這樣的便利性使得它們受到全球玩家的青睞。此外,娛樂城也會推出不同的優惠活動、註冊獎金和忠誠計劃,吸引新用戶並保持老用戶的活躍度。然而,娛樂城的風險也不可忽視。由於賭博本身具有高度的娛樂性,但也存在可能的成癮問題。多數國家對於線上賭博有著嚴格的法律規範,玩家在選擇娛樂城平台時,應該格外留意平台的合法性和安全性,以避免陷入詐騙或遭遇其他法律風險。因此,理性投注並了解相關法律是每位玩家應該保持的基本態度。
aplicația 1win aplicația 1win .
лучший прокат авто аренда авто симферополь недорого
скачать мостбет mostbet1003.com.kg .
казино онлайн kg казино онлайн kg .
Получите квалифицированную проверку только что построенного помещения от компании stroit-master. Мы предоставляем всесторонний набор работ по проверке квартир. Из-за значительному стажу компания предоставляем высочайшее стандарт услуг.
At this time it sounds like Movable Type is the best blogging platform available right now. (from what I’ve read) Is that what you are using on your blog?
https://kvnportal.ru/
Займ онлайн на карту без проверок займы онлайн на карту без проверок срочно
Оформить займ микрозайм взять
запчасти для автомобилей японского производства avtoplastics.ru
Если стиральная машина не работает, мы предлагаем ремонт бытовой техники по доступной цене. Обеспечим профессиональную починку и долговечность техники.
prirodni biser Durmitor Zabljak Jedinstveni planinski pejzazi, bistra jezera, kanjoni i guste sume. Idealno mjesto za planinarenje, rafting, skijanje i rekreaciju na otvorenom. Otkrijte nacionalni park pod zastitom UNESCO-a!
50 giros gratis en ecuabet giros gratis en betmaster
1vin kg http://cah.forum24.ru/?1-19-0-00000716-000-0-0-1741702224 .
mostbet kg скачать на андроид https://dubna.myqip.ru/?1-18-0-00000145-000-0-0-1741708632 .
1win вход http://www.aktivnoe.forum24.ru/?1-2-0-00000100-000-0-0-1741701286 .
Выбирая услуги в компании gruzdoma, вы обеспечиваете себе выгодные условия. Мы заботимся о безопасности товаров и гарантируем доставку в срок.
Pinco Casino ilə hər zaman qazanmaq şansınızı artırın
Pinko casino Azerbaycan pincocasinogiris-az.com .
Если вы планируете получить ключи от своего нового жилья, необходимо обратить внимание на тщательную приемка новой квартиры. Эксперты помогут выявить скрытые дефекты и избежать затрат на ремонт.
everything about the world t.me/ufc_ar/ of UFC in Arabic! Latest news, tournament schedules, fighter ratings and exclusive analytical materials. Follow the best fights and stay up to date with all the events in the world of mixed martial arts!
мостюет aktivnoe.forum24.ru/?1-8-0-00000260-000-0-0-1741701879 .
1win ваучер http://aktivnoe.forum24.ru/?1-8-0-00000259-000-0-0-1741701621/ .
казино онлайн kg cah.forum24.ru/?1-19-0-00000715-000-0-0-1741702061 .
прокат авто в симферополе прокат авто сочи цены
Follow UFC fights with t.me/s/ufc_ar/ full tournament schedule, fight results, fighter ratings and analytics. Exclusive news, reviews and interviews with top MMA athletes – all in one place!
Лучшие честные казино Топ 5 казино
Ключевым шагом при завершения строительства считается приемка квартиры от застройщика с полным набором обязательными проверками. Грамотный способ позволяет не допустить проблем в будущем.
Продвижение вашего сайта на новый уровень, узнайте.
Как добиться успеха в SEO, изучайте.
Главные советы по продвижению сайтов, прибыль.
Тренды в сфере SEO, на которые стоит обратить внимание.
Топовые приемы для улучшения позиционирования, недоступные никому.
Продвижение сайтов в 2025 году, которые вы должны использовать.
Топовые компании для онлайн-продвижения, которые помогут вам.
Типичные проблемы при продвижении, которые можно исправить.
Как продвинуть сайт без бюджета, попробуйте.
Самые популярные инструменты для продвижения сайтов, которые станут вашими помощниками.
Показатели успешного SEO, которые нельзя игнорировать.
Контент как основа продвижения сайтов, что имеет значение.
Успех в локальном SEO, рекомендации профессионалов.
Знание пользователей в продвижении, приемы, которые сработают.
Мобильное SEO: продвигайте сайт на устройствах, учитывайте это в стратегиях.
Сравнение стратегий для вашего сайта, по результатам выберите.
Почему важны бэклинки, чтобы повысить авторитет.
Изменения в мире продвижения, будьте в курсе.
Сила SMM в SEO, получите новые целевые аудитории.
Как правильно оптимизировать, необходимые для успеха.
seo оптимизация это seo оптимизация это .
Авторазборка с огромным ассортиментом – тысячи деталей в наличии по выгодным ценам
авторазборка москва https://avtorzborka3-moskva.ru/ .
Выбирая услуги в компании gruzdoma, вы всегда ожидаете максимальное качество. Мы работаем с любым видом грузов, предоставляя сохранность доставки грузов.
Играйте в Mostbet Casino https://mostbet.spas-extreme.ru лицензированное онлайн-казино с огромным выбором игр! Получайте бонусы, выигрывайте в лучших слотах и наслаждайтесь быстрыми выплатами. Удобные способы пополнения счета!
Выбираем недвижимость в Киеве https://automat.kiev.ua как оценить район, новостройки и вторичный рынок? Анализ цен, проверка застройщика, юридическая безопасность сделки. Полезные советы для покупки квартиры без ошибок и переплат!
Строительный онлайн журнал https://kero.com.ua ваш источник актуальной информации о строительстве и ремонте! Советы, обзоры материалов, технологии, тренды и новости отрасли. Узнайте о современных методах строительства, инженерных решениях и дизайне интерьера!
Все про остекление и ремонт балконов — новости, советы и услуги в одном месте!
Хотите преобразить свой балкон или лоджию?
Мы предлагаем свежие идеи, актуальные обзоры и экспертные мнения
по всем ключевым вопросам: современные тенденции в остеклении,
варианты дизайна и материалы для отделки.
Полезные рекомендации для тех, кто планирует обновление балкона:
как выбрать подходящий тип остекления — тёплое или холодное,
какие материалы использовать для утепления и отделки, а также
как избежать распространённых ошибок при монтаже.
Мы поможем вам разобраться в юридических аспектах согласования
перепланировок и остекления.
Следите за нашими обзорами новых технологий и материалов,
узнавайте о лучших предложениях на рынке, а также получайте советы
по уходу за окнами и балконными конструкциями.
Мы делимся рекомендациями по выбору надёжных подрядчиков,
рассказываем о преимуществах различных систем остекления и
предлагаем идеи по функциональному использованию пространства балкона.
Только актуальная информация от ведущих специалистов отрасли — проверенные факты,
практические советы и вдохновляющие примеры.
Подписывайтесь и оставайтесь в курсе последних тенденций!
С нами ваш балкон станет уютным и функциональным пространством,
радующим вас каждый день!
Сайт balconyokna.ru
зайти в 1вин зайти в 1вин .
1win футбол 1win футбол .
1win. https://www.1win713.ru .
Стремитесь наладить перемещение предметов на регулярной основе? от компании gruzdoma вы получите исчерпывающий набор перевозочных решений. Гарантируем специальный режим работы и изменяемые планы взаимодействия.
Всё для мужчин https://kompanion.com.ua в одном месте! Спорт, мода, авто, гаджеты, здоровье и лайфхаки. Читай полезные советы, следи за трендами и будь лучшей версией себя.
Новости шоу-бизнеса https://mediateam.com.ua мода, красота и афиша – всё в одном месте! Узнавайте о главных событиях, свежих трендах и топовых мероприятиях. Будьте в курсе всего, что происходит в мире стиля и развлечений!
Все автомобильные новости https://nmiu.org.ua в одном месте! Новые модели, обзоры, сравнения, тест-драйвы, технологии и автоиндустрия. Следите за тенденциями и оставайтесь в курсе событий автопрома!
Если вам нужен надёжный сервис, мастерская по ремонту бытовой техники готова помочь! Мы проводим диагностику различных техники независимо от характера сбоя. Рассчитывайте на профессионалов и будьте уверены в долговечную работу оборудования.
Актуальные новости бизнеса https://rentwell.in.ua экономики и недвижимости! Аналитика, тренды, инвестиции, рынок недвижимости и финансовые прогнозы. Будьте в курсе главных событий и принимайте взвешенные решения!
Лучший женский портал https://rosetti.com.ua Стиль, красота, здоровье, семья, карьера и саморазвитие. Узнавайте о новых трендах, читайте полезные советы и вдохновляйтесь идеями для счастливой жизни!
Выбор недвижимости в Киеве https://odinden.com.ua на что обратить внимание? Анализ районов, проверка застройщиков, сравнение цен на новостройки и вторичное жилье.
mostber http://mostbet1011.com.kg .
most bet http://mostbet1004.com.kg/ .
1 win 1win11.com.ng .
Современный женский портал https://womanlife.kyiv.ua мода, стиль, красота, здоровье, отношения и карьера. Читайте актуальные статьи, находите полезные советы и вдохновляйтесь на новые достижения!
Все для женщин https://timelady.kyiv.ua в одном месте! Новости моды, бьюти-советы, отношения, карьера, психология и лайфхаки. Читайте статьи, находите вдохновение и будьте уверены в себе каждый день!
Детский портал о здоровье https://run.org.ua полезная информация для заботливых родителей! Советы педиатров, питание, развитие, вакцинация, профилактика болезней и здоровый образ жизни. Всё, что нужно знать о здоровье вашего ребенка!
Всё для женщин https://allwoman.kyiv.ua в одном месте! Советы по стилю, уходу за собой, психологии, семье, карьере и саморазвитию. Узнавайте о новинках моды, секретах успешных женщин и будьте на шаг впереди!
Современный женский сайт https://dama.kyiv.ua красота, стиль, здоровье, семья и карьера. Читайте актуальные статьи, находите полезные советы и вдохновляйтесь на новые достижения!
chinese moving company toronto residential moving services in toronto
Сервисы от компании stroit-master — это опыт, приобретенный за годы работы с новыми домами. Квалифицированная диагностика позволит сохранить время и спокойствие. Передайте сложные задачи лидерам в своей нише.
Женский онлайн-журнал https://krasotka.kyiv.ua мода, красота, здоровье, семья и карьера. Полезные статьи, тренды, лайфхаки и вдохновение для современной женщины. Читайте, развивайтесь и наслаждайтесь жизнью!
Онлайн-журнал для женщин https://otnoshenia.net которые стремятся к лучшему! Советы по стилю и макияжу, секреты счастливых отношений, здоровое питание, психология и идеи для отдыха.
Лучший сайт для женщин https://model.kyiv.ua секреты красоты, стильные образы, отношения, карьера, лайфхаки и вдохновение. Оставайтесь в курсе трендов, читайте экспертные советы и развивайтесь вместе с нами!
Сайт для современных женщин https://princess.kyiv.ua Все о последних трендах в мире моды и красоты, секреты здоровья, психология, советы по саморазвитию, карьере и личным отношениям.
Портал для женщин https://woman365.kyiv.ua которые ценят красоту и уверенность! Новинки моды, макияж, секреты счастья, психология, карьера и вдохновение. Узнавайте полезные советы и воплощайте мечты в реальность!
Женский онлайн-клуб https://womanclub.kyiv.ua для тех, кто ценит стиль, здоровье и успех! Узнайте секреты красоты, тренды моды, советы по отношениям и карьере. Читайте вдохновляющие истории, пробуйте новые лайфхаки и развивайтесь каждый день!
CS:GO/CS2 skins https://wiki.vpesports.com catalog with full description! Check out rare, legendary and popular skins, their cost, collections and features. Find the perfect skin for your inventory!
Необходимо учитывать, что профессиональная приемка квартиры от застройщика убережет вас от многочисленных трудностей в дальнейшем. Опытные эксперты организуют подробную инспекцию всех коммуникаций помещения. Обратитесь с нами для заказа услуги.
The best online marketplace https://gorod-lugansk.com/user/magnoliabathurst/! Buy and sell game, social, business and other accounts. Convenient filtering system, transaction security and current offers. All popular services and games in one place!
Buy verified accounts buy accounts with ease! Gaming, business, and social media accounts available at competitive prices. Fast transactions, trusted sellers, and secure payments. Get the best deals now!
официальный сайт 1win 1win715.ru .
1вин партнерка http://www.1win114.com.kg .
1wiin 1wiin .
Не знаете, куда обратиться? Выбирайте от компании aistremont. Оперативный ремонт и надёжное обслуживание.
Лучший автомобильный портал https://kia-sportage.in.ua Обзоры автомобилей, сравнения, новинки, тест-драйвы, лайфхаки для водителей и советы по выбору авто. Всё, что нужно автолюбителям и профессионалам!
Сайт для женщин https://womanexpert.kyiv.ua которые хотят быть успешными и счастливыми! Советы по красоте, здоровью, воспитанию детей, карьере и личностному росту. Актуальные тренды, лайфхаки и вдохновение для современных женщин!
Портал для автолюбителей https://lada.kharkiv.ua всё об автомобилях! Автообзоры, рейтинг лучших моделей, новинки, цены, советы по уходу и эксплуатации. Узнайте, какие авто заслуживают вашего внимания!
Сайт для женщин https://womanportal.kyiv.ua всё о моде, красоте, здоровье, отношениях и саморазвитии! Полезные советы, тренды, лайфхаки и вдохновение для современной женщины. Будьте стильной, уверенной и успешной!
Автомобильный сайт https://newsgood.com.ua для водителей и автолюбителей! Узнавайте актуальные новости, читайте обзоры новых моделей, изучайте советы по обслуживанию и вождению.
Авто портал для всех https://rupsbigbear.com кто любит автомобили! Новости, тест-драйвы, характеристики, тюнинг, страхование, покупка и продажа авто. Следите за последними тенденциями и выбирайте лучшее для себя!
мостбет скачать http://mostbet1005.com.kg/ .
1вин официальный сайт http://1win714.ru .
Лучший женский онлайн-журнал https://sweetheart.kyiv.ua Всё о моде, красоте, здоровье, отношениях и успехе. Экспертные советы, лайфхаки и мотивация для уверенных в себе женщин.
Ваш гид в мире красоты https://wonderwoman.kyiv.ua моды и саморазвития! Экспертные статьи о здоровье, отношениях, карьере, психологии и лайфхаках для повседневной жизни. Оставайтесь в курсе трендов и открывайте новые возможности!
Женский журнал онлайн https://sunshadow.com.ua стиль, уход, секреты красоты, семья, карьера и саморазвитие. Будьте в курсе трендов, находите полезные лайфхаки и вдохновляйтесь на новые достижения!
1win сайт http://1win709.ru/ .
Женский мир https://vsegladko.net без границ! Узнайте всё о моде, уходе за собой, фитнесе, психологии, карьере и хобби. Читайте актуальные статьи, следите за новыми тенденциями и наполняйте жизнь яркими моментами!
Автомобильный онлайн-журнал https://svobodomislie.com всё о мире авто! Свежие новости, обзоры моделей, тест-драйвы, автоспорт, технологии и лайфхаки для водителей. Следите за трендами и будьте в курсе последних событий автопрома!
Онлайн-журнал о машинах https://sw.org.ua всё, что нужно знать об автомобилях! Премьеры новых моделей, сравнение авто, автострахование, технологии, электрокары и советы для владельцев.
Сайт о красоте и здоровье https://beautytips.kyiv.ua полезные советы, тренды ухода, секреты молодости, правильное питание и фитнес. Узнавайте, как оставаться красивой, здоровой и энергичной в любом возрасте!
Мода, красота и здоровье https://fashiontop.com.ua всё в одном месте! Советы по стилю, уходу за волосами и кожей, диеты, тренировки и wellness-тренды. Узнайте, как выглядеть и чувствовать себя на 100%!
Современный женский https://adviceskin.com журнал для тех, кто хочет быть стильной, уверенной и успешной! Секреты красоты, модные тенденции, здоровье, карьера, психология и лайфхаки для повседневной жизни.
Идеальный баланс стиля https://feromonia.com.ua красоты и здоровья! Читайте о модных тенденциях, косметике, правильном питании, спорте и психологическом комфорте. Найдите вдохновение для гармоничной жизни!
Секреты идеального стиля https://ladyone.kyiv.ua молодости и здоровья! Советы по моде, косметике, уходу за кожей и волосами, фитнесу и сбалансированному питанию. Узнайте, как создать гармоничный образ и чувствовать себя великолепно!
Мода, красота и здоровье https://gryada.org.ua ваш путь к идеальному образу! Последние тренды, советы по уходу, секреты стройности и здорового образа жизни. Создавайте гармонию в своём стиле и самочувствии!
Секреты красоты и здоровья https://magiclady.kyiv.ua в одном месте! Полезные советы по уходу, тренды моды, спорт, правильное питание и психология уверенности. Узнайте, как выглядеть и чувствовать себя великолепно!
Ваш гид по стилю https://magictech.com.ua красоте и жизни! Женский журнал о модных трендах, секретах молодости, психологии, карьере и личных отношениях.
Лучший женский журнал https://modam.com.ua онлайн! Мода, стиль, уход за собой, фитнес, кулинария, саморазвитие и лайфхаки. Полезные советы и вдохновение для современной женщины, которая стремится к лучшему!
1 win официальный сайт https://1win717.ru/ .
что делать с бонусным балансом на 1win http://1win818.ru/ .
Always attuned to global health needs.
cost of generic lisinopril for sale
Offering a global gateway to superior medications.
1вин сайт https://www.1win819.ru .
Современный женский онлайн https://viplady.kyiv.ua журнал для тех, кто хочет большего! Всё о моде, косметике, фитнесе, питании, психологии, карьере и отношениях. Узнавайте новое, вдохновляйтесь и воплощайте мечты в реальность!
Онлайн-журнал для женщин https://one-lady.com которые хотят быть стильными и успешными! Последние тренды, секреты красоты, уход за собой, здоровье, психология и карьера. Будьте в курсе новинок и наслаждайтесь жизнью!
Ваш женский путеводитель https://topwoman.kyiv.ua по красоте, стилю и саморазвитию! Полезные советы, модные тенденции, лайфхаки по уходу за собой, психология, отношения и вдохновение.
Портал для родителей https://rodkom.org.ua всё о воспитании, развитии и здоровье детей! Полезные советы, лайфхаки, педиатрические рекомендации, семейная психология и идеи для досуга. Растите счастливых и здоровых детей вместе с нами!
Советы для родителей https://agusha.com.ua в одном месте! Развитие ребёнка, воспитание, здоровье, питание, семейные отношения и идеи для досуга. Полезные статьи, лайфхаки и экспертные мнения помогут вам в заботе о малыше!
Автомобильный портал https://kakavto.com всё, что нужно знать о машинах! Новинки автопрома, технологии, электрокары, автоспорт, автострахование и советы по ремонту. Следите за трендами автоиндустрии!
Актуальные новости Украины https://vesti.in.ua политика, экономика, спорт, культура и общество! Оперативная информация, эксклюзивные материалы, репортажи и аналитика. Следите за событиями в режиме реального времени!
Главные новости дня https://mostmedia.com.ua политика, экономика, общество, спорт и культура! Оперативные события, аналитика, мнения экспертов и репортажи. Читайте актуальные новости Украины и мира в одном месте!
Медицинский онлайн-журнал https://medicalanswers.com.ua ваш личный консультант по здоровью! Полезные статьи, советы врачей, профилактика, диагностика, лечение и здоровый образ жизни.
Сайт для женщин https://bbb.dp.ua всё о моде, красоте, здоровье, отношениях и саморазвитии! Читайте полезные советы, следите за трендами, вдохновляйтесь и наслаждайтесь гармоничной жизнью!
Free online stamp maker – generate professional-quality rubber stamps effortlessly
create stamp online free http://make1-stamp-online.com/ .
Juega sin limites! casas de apuestas deportivas sin licencia en espana ofrecen altas cuotas, pagos rapidos y anonimato. ?Compara casas de apuestas populares, elige metodos de apuestas convenientes y disfruta de la emocion!
Apuestas deportivas casa de apuesta internacional plataformas con licencia, cuotas favorables, variedad de deportes y pagos rapidos. ?Consulta la valoracion de las mejores casas de apuestas y elige la tuya!
https://winbets555.com/howtobuymlbsportslotterytickets/
Create an office rubber stamp online for free – professional and easy
stamp online maker free http://www.stamps1-creator.com/ .
Otkrijte most Durdevica Tara bridge – jedan od najlepsih mostova u Evropi! Jedinstvena gradevina iznad kanjona Tare zadivljuje svojom razmjerom i panoramskim pogledom. Najbolje rute, izleti i savjeti za putnike!
Dobite a preskumajte http://www.bobotov-kuk.com/ a pocitite majestatnost hor! Najvyssi vrch Ciernej Hory (2523 m) ponuka ohromujuce panoramy, vzrusujuce trasy a nezabudnutelne emocie. Zistite najlepsie lezecke cesty a tipy na bezpecny vylet!
Kaufen Sie montenegro – Ihr Zuhause am Meer oder in den Bergen! Tolle Angebote, Villen, Wohnungen und Apartments. Informieren Sie sich uber die besten Lagen, Preise, rechtlichen Feinheiten und Investitionsmoglichkeiten!
Sakupon an Salog Tara rafting Zabljak an pinakamarahay na pag-rafting sa Montenegro! Pag-raft sa saro sa pinakahararom na mga kanyon sa Europa, an pinakadalisay na tubig asin naturalesa kan Durmitor. An perpektong pakikipagsapalaran para sa mga mahilig sa luwas!
Enjoy fun at rafting Tara extreme rafting, kayaking, boating and camping in picturesque places. The perfect place for active recreation and immersion in wild nature!
Хотите списать долги? http://niidg.ru помощь в сложных финансовых ситуациях. Освободитесь от кредитов, штрафов и задолженностей. Узнайте, как начать процедуру прямо сейчас!
1вин официальный сайт мобильная 1win820.ru .
что делать с бонусным балансом на 1win что делать с бонусным балансом на 1win .
1 ван вин http://www.1win808.ru .
The best place for quality health products.
cheap cytotec for sale
Actual trends of drug.
toronto unique moving movers toronto
Статьи о ремонте и строительстве https://tvin270584.livejournal.com советы, инструкции и лайфхаки! Узнайте, как выбрать материалы, спланировать бюджет, сделать ремонт своими руками и избежать ошибок при строительстве.
Ремонт и сантехника https://santekhnik-moskva.blogspot.com пошаговые инструкции, выбор материалов, монтаж систем водоснабжения и отопления, устранение протечек и установка сантехнических приборов. Советы экспертов для качественного ремонта!
mosbet mosbet .
мос бет https://mostbet1007.com.kg/ .
Нужна машина в прокат? аренда автомобилей в турции быстро, выгодно и без лишних забот! Машины всех классов, удобные условия аренды, страховка и гибкие тарифы. Забронируйте авто в несколько кликов!
скачать мостбет https://www.mostbet1008.com.kg .
explosives esports news cocaine
Ready-made custom works here fast, high-quality and inexpensive! We will help with abstracts, term papers, diplomas, essays and other academic assignments. Guaranteed originality, deadlines and 24/7 support!
Нужен качественный бетон? доставка бетона быстро, надёжно и по выгодной цене! Прямые поставки от производителя, различные марки, точное соблюдение сроков. Оперативная доставка на стройплощадки, заказ онлайн или по телефону!
сайты с кейсами кс го cs-go.ru/
1Win Brasil http://1winbr.com apostas esportivas e cassino online! Altas odds, bonus generosos e ampla variedade de jogos. Aposte em esportes, jogue no cassino e aproveite as melhores promocoes agora mesmo!
I don’t think the title of your article matches the content lol. Just kidding, mainly because I had some doubts after reading the article.
Sports betting with 1xbetapp-br.com/! Huge selection of matches, live bets, generous bonuses and lightning-fast payouts. Play casino, eSports and win at any time!
Welcome to Winbet Casino winbetaz biz a place where luck is on your side! Huge selection of games, bonuses for new players and instant payouts. Try your luck right now!
crazy monkey автоматы играть бесплатно https://crazymonkeygame.com
maximum winnings with https://onewinwin.in! Bet on sports, play in the casino, participate in promotions and tournaments. Convenient payments, fast payouts and a welcome bonus for beginners. Join 1win and collect your winnings!
mostbet kg отзывы mostbet kg отзывы .
mostbet casino http://mostbet788.ru .
1win rossvya http://1win809.ru/ .
gambling without limits one 1win wide selection of games, high odds, fast payouts and exclusive bonuses. Try your luck in the casino and on bets. Play, win and earn with 1win!
your game, your rules http://winbkaz.biz Sports, eSports, casino, poker and slots – choose and win! Convenient account replenishment, instant withdrawals and cool promotions for new players. Join now!
戰神賽特
「戰神賽特」— 2025年最火爆的老虎機,等你來挑戰!
如果你正在尋找一款高賠率、刺激又充滿神秘感的老虎機遊戲,那麼「戰神賽特」絕對是你的最佳選擇!這款由RG電子精心打造的遊戲,以古埃及戰神賽特為主題,結合精美畫面與震撼音效,帶你進入神秘的沙漠世界,感受無與倫比的刺激體驗。
為何玩家瘋狂愛上戰神賽特?
超狂賠率 51,000 倍:一轉瞬間,財富翻倍不是夢
高RTP達96.89%:更高勝率,更多機會贏得大獎
獨特遊戲機制:掉落消除+獎金購買,玩法多樣更刺激
極致視聽享受:古埃及風格設計+震撼音效,讓你完全沉浸其中
無論你是老虎機高手還是新手玩家,「戰神賽特」都能帶給你前所未有的遊戲體驗!快來挑戰戰神,贏取屬於你的豐厚獎勵!
Хотите получить dinero gratis por registrarte casino начни игру без риска – Открой для себя захватывающие слоты, живое казино и эксклюзивные бонусы. Играй с комфортом, наслаждайся топовыми играми и выигрывай!
Mostbet Uzbekistan mostbetuzbekistan-apk.com/ offers you profitable bets, top odds and instant payouts. Make sports predictions, play online casino and enjoy the excitement with registration bonuses!
mostbet chrono http://mymoscow.forum24.ru/?1-2-0-00000718-000-0-0-1742357638 .
1 win официальный сайт вход https://mymoscow.forum24.ru/?1-2-0-00000717-000-0-0-1742357431/ .
1 vin https://www.cah.forum24.ru/?1-19-0-00000732-000-0-0 .
Магазин печей и каминов pech.pro широкий выбор дровяных, газовых и электрических моделей. Стильные решения для дома, дачи и бани. Быстрая доставка, установка и гарантия качества!
cocaine ufc terrorist attack
Устойчивые к погодным условиям светодиодные светильники от производителя
светотехника в москве купить https://proizvodstvo-svetodiodnih-svetilnikov.ru/ .
септик для частного дома сколько стоит септик
gay esports heroin
gay esports cocaine
1win md https://1win705.ru .
скачать мостбет скачать мостбет .
mostbet игры http://www.mostbet781.ru .
heroin esports porn
terrorist attack esports porn
Новый BMW X6: стиль и мощь, совершенной техники.
BMW X6: динамика и комфорт, любителей.
кроссовера BMW X6.
Брутальный внешний вид BMW X6, любителей.
BMW X6: мощь на каждый день, узнайте.
Кроссовер BMW X6, который стоит выбрать, решение.
Потрясающая отделка и материалы в BMW X6, уникальный стиль.
Ваш надежный спутник – BMW X6, удовлетворение.
Причины популярности BMW X6, в нашем обзоре.
Динамичный BMW X6 – для активной жизни, всех.
Обеспечьте свою безопасность с BMW X6, в приоритете.
Почему BMW X6 – это лучшее решение, новые возможности.
Инновации в BMW X6, ваш опыт.
Как BMW X6 спроектирован для вашего комфорта, функции.
Что дает вам BMW X6?, в нашем анализе.
Яркий и уникальный BMW X6, подчеркнет ваш статус.
BMW X6 против других SUV, в нашем сравнении.
Мнения о BMW X6 от реальных пользователей, в нашем разделе.
Как BMW X6 обеспечивает безопасность, гарантируют вашу безопасность.
Заключение: стоит ли покупать BMW X6?, обобщаем мнение.
bmw service inclusive https://bmw-x6.biz.ua/ .
Модельный ряд BMW: откройте для себя новые возможности, любителей автомобилей.
Наслаждайтесь отличием моделей BMW, которые впечатляют.
Проверьте последние достижения BMW, электромобили.
Каждый найдет свою идеальную BMW, уникально адаптирован.
Наслаждайтесь качеством и элегантностью BMW, высокую производительность.
Почему стоит выбрать BMW, узнайте.
Искусство автомобилестроения: BMW, разработанный для.
Модельный ряд BMW: от седанов до спортивных, которые завоюют ваше сердце.
Как BMW отвечает на вызовы времени, ознакомьтесь.
Новый взгляд на автомобили BMW, подходящие для городской жизни.
BMW — это больше, чем просто автомобиль, это опыт, который нужно испытать.
Исключительное качество: выбор BMW, который вдохновляет.
Переосмысленный комфорт и элегантность BMW, созданная для.
Почему BMW — это ваш идеальный выбор, от комфорта до инноваций.
Автомобили BMW: вдохновение на каждом километре, с уникальным дизайном.
Модельный ряд BMW, который сочетает в себе мощь и элегантность, с уникальными возможностями.
Модельный ряд BMW: сочетание стиля и технических решений, для тех, кто ищет лучшее.
Ваш идеальный BMW ждет вас, с надежностью и безопасностью.
Модельный ряд BMW: от классики до новинок, на любой вкус.
x7 m x7 m .
Global expertise with a personalized touch.
how can i get cheap clomid without dr prescription
Their loyalty program offers great deals.
With the SportPesa Casino app, you can access your favourite casino games such as Aviator anytime, anywhere, right from the palm of your hand. Whether you prefer desktop or mobile, our games are optimized for seamless play across all devices. Bu kazinoların oyun lobbilərində Aviator oyunu mövcuddur və oyunçulara bu həyəcanverici təcrübədən zövq almaq imkanı yaradır. Oynamağa başlamazdan əvvəl, hər bir platformanın qaydalarını və şərtlərini, eləcə də Aviator oyunu ilə bağlı təqdim olunan bonus və ya promosyonları nəzərdən keçirmək 1win aviator-da qazancınızı nə vaxt çəkmək istədiyinizə yalnız siz qərar verə bilərsiniz. 1win aviator Azerbaycan-nın əhəmiyyətli sosial komponenti onun digər görkəmli məqamlarından biridir. Bütün mərclər eyni sahəyə yerləşdirilsə də, uduşlar istənilən vaxt çıxarıla bilər. Aktiv mərc edənlərin siyahısı ekranınızın sol tərəfində göstərilir. Uçuş davam edərkən hər bir iştirakçının cari raunddan çıxmaq qərarına gəldiyini müşahidə edə bilərsiniz.
https://www.creative-city-berlin.de/en/network/member/azerbaijanpetit/
Daha Yüksek Kazançlar: Sinyal hilesi, oyun sırasında ne zaman bahis yapılacağını veya ne zaman oyunun sonlandırılması gerektiğini öngörmenize yardımcı olur, böylece kazançlarınızı maksimize etmenize olanak tanır. Ücretsiz Aviator Analiz Yazılımları. Aviator hileleri, Aviator oyununda taktikler ve daha fazlası. Aviator Hilesi indir. Evet. Aviator, Spribe şirketinin bir ürünü ve dünyanın dört bir yanında da oynanan bir oyun. Dolayısıyla oyunla ilgili herhangi bir sorun yaşamayacak ve sorunsuz şekilde bu eğlenceli oyunu oynayabileceksiniz. Güvenilir sitelere bağlanarak Aviator heyecanını yaşayabilirsiniz. Zaten derecelendirdin. Siz mərc etmək istədiyiniz oyun növünü tapmaq üçün vebsaytda asanlıqla naviqasiya edə bilərsiniz. Saytda həmçinin, mərclərinizi daha zövqlü etmək üçün çoxlu təşviqlər və xüsusi təkliflər var. Belə bir qalibiyyəti slotlarda cekpot almaqla müqayisə etmək olar. 1win tərəfindən təqdim olunan Aviator oyunu onlayn qumar dünyasını sarsıdan son yenilikdir. Aviator tamamilə yeni bir kazino oyunudur, istifadəçilərə çox sayda üstünlüklər və 1800 AZN-ə qədər yüksək bonuslar təklif olunur.
heroin esports cocaine
porn esports heroin
мостбет промокод agility.forum24.ru/?1-0-0-00000756-000-0-0-1742360323 .
1win зайти http://agility.forum24.ru/?1-0-0-00000755-000-0-0-1742359870/ .
pariuri sportive moldova https://www.1win5002.ru .
A beacon of reliability and trust.
generic clomid for sale
Their international partnerships enhance patient care.
whores esports gay
whores esports whores
terrorist attack esports terrorist attack
Free steam accounts t.me/s/freesteamaccountc
reparación de maquinaria agrícola
Aparatos de equilibrado: esencial para el desempeño suave y óptimo de las maquinarias.
En el mundo de la avances contemporánea, donde la productividad y la estabilidad del sistema son de suma trascendencia, los dispositivos de equilibrado tienen un papel vital. Estos dispositivos dedicados están desarrollados para balancear y asegurar componentes móviles, ya sea en herramientas productiva, transportes de movilidad o incluso en electrodomésticos caseros.
Para los técnicos en reparación de equipos y los profesionales, manejar con equipos de calibración es esencial para promover el rendimiento fluido y estable de cualquier sistema rotativo. Gracias a estas alternativas innovadoras avanzadas, es posible disminuir notablemente las oscilaciones, el estruendo y la tensión sobre los cojinetes, extendiendo la longevidad de piezas caros.
También significativo es el rol que juegan los dispositivos de ajuste en la soporte al consumidor. El soporte especializado y el conservación permanente usando estos dispositivos permiten brindar soluciones de alta excelencia, mejorando la satisfacción de los consumidores.
Para los titulares de empresas, la financiamiento en equipos de equilibrado y sensores puede ser clave para optimizar la efectividad y productividad de sus sistemas. Esto es sobre todo relevante para los empresarios que gestionan modestas y pequeñas negocios, donde cada elemento vale.
Además, los equipos de calibración tienen una extensa aplicación en el área de la prevención y el gestión de nivel. Facilitan localizar potenciales problemas, reduciendo mantenimientos elevadas y daños a los sistemas. También, los resultados obtenidos de estos aparatos pueden emplearse para maximizar sistemas y incrementar la visibilidad en motores de consulta.
Las áreas de uso de los aparatos de balanceo cubren numerosas industrias, desde la elaboración de bicicletas hasta el control del medio ambiente. No afecta si se trata de importantes manufacturas manufactureras o reducidos locales hogareños, los equipos de ajuste son necesarios para asegurar un funcionamiento efectivo y sin detenciones.
Noten klavier pdf noten fur klavier kostenlos
Noten auf dem klavier klavier mit noten
Piano music sheet music sheets for piano
1вин бет официальный сайт https://belbeer.borda.ru/?1-6-0-00001555-000-0-0-1742473542 .
1win скачать https://taksafonchik.borda.ru/?1-14-0-00002041-000-0-0 .
мостбет зеркало http://ongame.forum24.ru/?1-18-0-00001219-000-0-0-1742360461 .
Хотите списать долги? pro-58.ru законное освобождение от кредитных обязательств. Работаем с физлицами и бизнесом. Бесплатная консультация!
Site-ul https://betsysrealfood.com este o resursa cu diverse articole in limba romana, acoperind subiecte precum sanatatea, nutri?ia, moda ?i stilul de via?a. Titlurile articolelor includ teme precum „?tiri de sanatate”, „?tiri pentru bebelu?i”, „?tiri de Medicina Alternativa” ?i „?tiri de via?a”. Site-ul este destinat publicului vorbitor de romana, interesat de un stil de via?a sanatos ?i re?ete de casa.
Быстрая продажа и покупка http://www.profis.com.ua размещайте объявления о продаже товаров, поиске услуг, аренде недвижимости и работе. Простой интерфейс, удобный поиск, бесплатные публикации!
whoah this weblog is magnificent i like studying your articles. Keep up the good paintings! You already know, many individuals are looking around for this info, you can aid them greatly.
Mostbet to jedno z najlepszych kasyn online w Polsce | Automaty, blackjack, ruletka – Mostbet kasyno ma wszystko, czego potrzebujesz | Czy wiesz, że Mostbet posiada dedykowaną aplikację mobilną? | Mostbet to jedna z najczęściej wybieranych platform hazardowych w Polsce Mostbet – legalne zakłady sportowe w Polsce.
Все о недвижимости в России и мире — новости, аналитика, советы экспертов в одном месте!
Хотите быть в курсе последних событий на рынке недвижимости? Мы предлагаем свежие новости, актуальные обзоры и экспертные мнения по всем ключевым вопросам: изменения в законодательстве, тренды в сфере жилья и коммерческой недвижимости, а также прогнозы цен на ближайшее будущее.
У нас вы найдете полезные рекомендации для инвесторов и владельцев недвижимости: как выгодно вложить средства в жилье, защитить свои инвестиции, выбрать надежного застройщика и избежать ошибок при заключении сделок. Мы также поможем разобраться в юридических тонкостях покупки, аренды и оформления прав собственности.
Следите за обзорами крупнейших событий на рынке недвижимости, узнавайте о новых проектах, возможностях для инвестиций и изменениях в инфраструктуре городов. Кроме того, мы делимся советами по обустройству жилья, лайфхаками для ремонта и рекомендациями по выбору материалов и услуг — от поиска профессиональных подрядчиков до экономии без потери качества.
Только актуальная информация от ведущих экспертов отрасли — проверенные факты, аналитика и прогнозы.
Подписывайтесь и оставайтесь в центре событий! С нами вы всегда будете на шаг впереди — ведь ваш дом и инвестиции заслуживают самого лучшего!
Сайт sis69.ru
вывеска для магазина наружная реклама спб
дизайн вывесок кафе буква объемная
1win. https://www.1win822.ru .
купить медицинскую справку медицинские справки петербург
мостбет авиатор мостбет авиатор .
Casino Licensing https://nomini-casino.ru
вин 1 вин 1 .
Подписка на Spotify премиум с лучшими условиями
подписка спотифай http://www.podpiska-spotify-1.ru/ .
Kasyno Mostbet oferuje setki automatów i gier na żywo | Mostbet com to oficjalna strona z pełnym dostępem do wszystkich funkcji | Dzięki Mostbet logowanie możesz grać w swoje ulubione gry w kilka sekund http://mostbet.com
кайтинг в благе
Хотите перекусить вкусно? купить Триада-Х – Пита питу, шаверму, донер, гирос и тортилью. Ароматная свежая выпечка, мясо на гриле и фирменные соусы. Отличный выбор для перекуса, обеда или вечеринки.
Mostbet kasyno online przyciąga atrakcyjnymi promocjami | Mostbet logowanie jest intuicyjne i nie sprawia żadnych trudności | Dołącz do Mostbet i odbierz bonus bez depozytu Mostbet bonus powitalny
типографии спб печать типографии спб печать
заказать книгу в типографии tipografiya-print-spb.ru
Mostbet to zaufana platforma dla miłośników zakładów sportowych | Czy warto wybrać Mostbet? Opinie graczy mówią same za siebie | Mostbet kasyno oferuje darmowe spiny i turnieje z nagrodami mostbet online pl
1win kg 1win kg .
mostbet kg отзывы mostbet kg отзывы .
мос бет https://mostbet784.ru/ .
Logowanie do Mostbet jest szybkie i bezpieczne | Mostbet pl to legalna strona z certyfikatem i ochroną danych | Grając w Mostbet masz dostęp do wsparcia technicznego 24/7 mostbet online pl
Выбор профессионалов: камера заднего вида с высокой детализацией
купить камеру заднего вида с разметкой https://www.camera-zadnego-vida.ru/ .
кайт египет
Mostbet to zaufana platforma dla miłośników zakładów sportowych | Czy warto wybrać Mostbet? Opinie graczy mówią same za siebie | Mostbet rejestracja to pierwszy krok do emocjonującej rozgrywki Mostbet logowanie kasyno
Logowanie do Mostbet jest szybkie i bezpieczne | Mostbet kasyno to nowoczesna platforma z grami od topowych dostawców | Mostbet Polska stale rozwija swoją ofertę dla graczy z Polski mostbet.com
печать буклетов а3 http://tipografiya-buklety.ru
печать наклеек на заказ печать наклеек
уф печать на сувенирах печать логотипа на сувенирной продукции
mosbet https://eisberg.forum24.ru/?1-0-0-00000327-000-0-0-1742579529/ .
mostbet официальный сайт taksafonchik.borda.ru/?1-14-0-00002042-000-0-0-1742473173 .
1win online http://fanfiction.borda.ru/?1-3-0-00000125-000-0-0-1742475251 .
печать упаковки на заказ упаковка изготовление печать
печать фото холст на подрамнике заказать печать на холсте
офсетная печать блокнотов типография печать блокнотов
1 win вход https://1win824.ru .
1win партнерка вход 1win партнерка вход .
1 вин вход https://www.1win811.ru .
mostbet casino http://mostbet785.ru .
1win,com https://1win826.ru .
1win онлайн https://www.1win812.ru .
куплю продажа аккаунтов биржа покупки аккаунтов
аккаунты маркетплейсов купить http://akkaunt-marketplace.ru
маркетплейс аккаунтов https://account-service213.ru
1 vin 1 vin .
1win moldova download 1win5003.ru .
мостбет кыргызстан мостбет кыргызстан .
Прочные и удобные зип пакеты купить в москве опт и розница, разные размеры, надежная застежка. Для хранения, фасовки и перевозки. Оформите заказ онлайн с быстрой доставкой!
Discover Montenegro crystal clear sea, mountain landscapes, ancient cities and delicious cuisine. We organize a turnkey trip: flight, accommodation, excursions.
Zaskakująco duży wybór legalnych bukmacherów z cashbackiem | Dobry opis funkcjonalności serwisów kasynowych | Klarowne informacje o legalności kasyn online | Opcja filtrowania kasyn według metod płatności – super | Bardzo dobre porównanie kodów promocyjnych | Najlepsze kasyno z szybką rejestracją i płatnościami BLIK | Bardzo przystępna nawigacja po serwisie | Fajne porady dla graczy początkujących i zaawansowanych | Bezpieczne metody płatności – szybkie wypłaty vulkan vegas rejestracja.
buy iphone pro max apple iphone max
Fajne zestawienie kasyn z płatnościami BLIK i przelewy24 | Ranking kasyn online naprawdę ułatwia orientację na rynku | Wszystkie informacje są aktualne i dobrze przedstawione | Ciekawie opisane doświadczenia graczy z Polski | Kasyna dostępne na urządzeniach mobilnych – to duży plus | Porównywarka kasyn idealna do szybkiego wyboru | Opisane wszystkie metody płatności dostępne w kasynach | Legalność serwisów szczegółowo wyjaśniona | Dostępność wsparcia technicznego i FAQ kasyno online polska bez depozytu.
1 win kg http://www.1win6011.ru .
1win скачать 1win скачать .
Fajne zestawienie kasyn z płatnościami BLIK i przelewy24 | Pomocna porównywarka legalnych bukmacherów | Wszystkie informacje są aktualne i dobrze przedstawione | Kasyna z najwyższymi ocenami dostępne od ręki | Znalazłem idealne kasyno z promocją cashback | Porównywarka kasyn idealna do szybkiego wyboru | Zestawienie kasyn online z szybkimi wypłatami | Kasyno online z najlepszymi ocenami – wszystko jasne | Kasyno polecane przez graczy z Polski kasyno online polska.
мостбет промокод мостбет промокод .
Planning a vacation? Sveti Stefan is a warm sea, picturesque beaches, cozy cities and affordable prices. A great option for a couple, family or solo traveler.
Holidays in porto montenegro tivat are European comfort at an affordable price. Transparent sea, clean beaches, historical cities and warm climate all year round.
Kasyno online z licencją w Polsce? Tutaj znajdziesz najlepsze opcje | Legalne kasyna i bukmacherzy z licencją, polecam sprawdzić | Wszystkie informacje są aktualne i dobrze przedstawione | Kasyna z najwyższymi ocenami dostępne od ręki | Bardzo dobre porównanie kodów promocyjnych | Porównywarka kasyn idealna do szybkiego wyboru | Bardzo przystępna nawigacja po serwisie | Legalność serwisów szczegółowo wyjaśniona | Najciekawsze opcje gier dostępne w kasynach bonus bukmacherski bez depozytu[/url.
адин вин адин вин .
Najlepsze kasyna w Polsce w jednym miejscu – wszystko jasno opisane | Doskonałe źródło wiedzy o legalnych grach w Polsce | Szybki dostęp do logowania i promocji | Nowe promocje aktualizowane na bieżąco | Bardzo dobre porównanie kodów promocyjnych | Świetna selekcja zakładów bukmacherskich esportowych | Możliwość gry bez depozytu – duży atut tej strony | Łatwo znaleźć idealne kasyno dzięki filtrom | Kasyno online z najlepszym wyborem gier kasyno vulkan vegas.
скачать mostbet на телефон http://www.shorts.borda.ru/?1-18-0-00000397-000-0-0 .
купите профильную трубу proftruba-moscow.ru для изготовления ворот. поможем рассчитать необходимое количество материала.
Dobre promocje i przejrzyste zasady to ogromna zaleta tego serwisu | Dobry opis funkcjonalności serwisów kasynowych | Wszystkie informacje są aktualne i dobrze przedstawione | Nowe promocje aktualizowane na bieżąco | Strona wspiera wybór najlepszych bonusów bukmacherskich | Najlepsi bukmacherzy z polską licencją – lista aktualna | Szeroka oferta bukmacherów z cashbackiem i promocjami | Doskonałe kasyna z grami typu slot i ruletka | Szybka rejestracja i natychmiastowy bonus powitalny legalni bukmacherzy online w polsce.
Портал для любознательных http://www.s-nip.ru/forums/?subdiv_id=9&topic_id=3051 Полезная информация, тренды, обзоры, советы и много вдохновляющего контента. Каждый день — повод зайти снова!
купить аккаунт дешево где продать быстро аккаунты
быстрая продажа аккаунтов магазин аккаунтов соц сетей
1win казино https://boardwars.forum24.ru/?1-10-0-00000406-000-0-0/ .
Mostbet oferuje zakłady na żywo z atrakcyjnymi kursami. | Graj odpowiedzialnie i korzystaj z narzędzi kontroli w Mostbet. | Mostbet posiada licencję gwarantującą uczciwość gier. | Korzystaj z promocji cashback dostępnych w Mostbet. mostbet kasyno
1 вин вход в личный кабинет http://www.1win6012.ru .
1вин https://1win814.ru .
mostbet официальный сайт http://tagilshops.forum24.ru/?1-4-0-00000205-000-0-0/ .
mostbet apk скачать http://mostbet795.ru/ .
Mostbet oferuje zakłady na żywo z atrakcyjnymi kursami. | Zarejestruj się w Mostbet i skorzystaj z bonusu powitalnego. | Dołącz do turniejów i wyzwań organizowanych przez Mostbet. | Sprawdź sekcję FAQ na stronie Mostbet w celu uzyskania odpowiedzi na pytania. mostbet online
риобет зеркало риобет зеркало рабочее на сегодня
купить аккаунт соцсети магазин аккаунтов соц сетей
Kasyno online Mostbet to gwarancja wysokiej jakości rozrywki. | Mostbet oferuje transmisje na żywo z wybranych wydarzeń sportowych. | Korzystaj z programu lojalnościowego Mostbet i zbieraj punkty. | Skorzystaj z opcji cash-out dostępnej w Mostbet. mostbet-online-casino-polska.com
Mostbet umożliwia szybkie i bezpieczne transakcje finansowe. | Mostbet zapewnia profesjonalną obsługę klienta 24/7. | Korzystaj z programu lojalnościowego Mostbet i zbieraj punkty. | Korzystaj z promocji cashback dostępnych w Mostbet. mostbet
Ремонт помещений https://msksfera.ru/remont-gostinicz/ под ключ: офисы, отели, склады. Полный комплекс строительно-отделочных работ, от черновой отделки до финишного дизайна.
Mostbet oferuje szeroki wybór gier kasynowych i zakładów sportowych. | Sprawdź aplikację mobilną Mostbet dla wygodnego dostępu do gier. | Mostbet posiada licencję gwarantującą uczciwość gier. | Mostbet dba o odpowiedzialną grę i oferuje narzędzia samowykluczenia. http://mostbet-online-casino-polska.com
Mostbet to legalne kasyno online dostępne dla graczy z Polski. | Mostbet regularnie aktualizuje ofertę promocyjną dla stałych klientów. | Sprawdź aktualne promocje i bonusy dostępne w Mostbet. | Mostbet zapewnia szybkie wypłaty wygranych na Twoje konto. mostbet-online-casino-polska.com
игра ракета на деньги 1win http://www.1win815.ru .
1wi. http://www.1win6014.ru .
mostbet скачать https://kharkovbynight.forum24.ru/?1-15-0-00003047-000-0-0-1742814422/ .
1win pro http://yamama.forum24.ru/?1-11-0-00000459-000-0-0-1742818616 .
Промышленные парогенераторы Unisteam com – мощность и эффективность
продажа грузовой спецтехники unisteam com
mostbet kg https://mostbet6001.ru/ .
Строительные бытовки
Модули и временные конструкции: эффективное способ для личных целей
Контейнеры и временные конструкции помогают организовать место для деятельности, помещение для хранения или временный домик. Наши специалисты обеспечиваем здания, которые удовлетворяют качественным критериям безопасности и эргономики.
Особенности
Устойчивость. Любые контейнеры произведены из компонентов, стойких к испытаниям и внешним воздействиям.
Моментальная доставка. Модуль транспортируется в рамках 1–2 календарных дней после заключения соглашения.
Гибкая настройка. Реализуется монтаж защиты от холода, электросетей или системы проветривания.
Области применения
На строительных объектах для размещения оборудования или создания зоны отдыха.
Во время событий для создания информационного центра или зоны хранения.
В качестве временно используемых помещений или управляющих центров.
Выгоды
Экономия времени. Нет необходимости строить временные помещения.
Комфортабельность. Условия, которые повышают качество выполнения задач работников.
Подстройка. Опция временного использования или покупки под любой срок и денежные средства.
Случай применения
Подрядчик задействовала передвижной модуль для размещения оборудования и зоны отдыха. Постройка была доставлена на место за 24 часа, с специальным утеплением. Клиент отметил на улучшение обстановки и отсутствие простоев.
Как начать сотрудничество
Для оформления заказа необходимо позвонить с нами. Предоставим всю необходимую информацию, поддержим определить лучший вариант и выполним доставку.
Всё о строительстве, дизайне и ремонте в своём доме.
Добро пожаловать на «Свой Угол» – ваш партнер в мире строительства, дизайна и ремонта для вашего дома!
Наш блог создан для того, чтобы предоставить вам всю необходимую информацию, которая сделает ваш дом еще уютнее, красивее и функциональнее.
Мы – эксперты в следующих сферах:
Строительство
Мы поделимся с вами советами о выборе материалов, поиске надежных строителей в Беларуси и планировке стройплощадки.
Если у вас возникают вопросы о строительстве своего дома с нуля или о расширении уже существующего пространства, мы предоставим вам экспертные советы.
Дизайн интерьера
У нас есть идеи и решения для каждой комнаты в вашем доме.
Мы расскажем о последних трендах в дизайне, поделимся советами по выбору цветовой палитры, мебели и аксессуаров, чтобы создать уникальное пространство, отражающее ваш стиль и вкус.
Ремонт
От простых косметических обновлений до капитального ремонта – у нас есть идеи и рекомендации для каждого случая.
Мы поддержим вас на каждом этапе, начиная от планирования и заканчивая последним штрихом.
Что вы найдете на нашем сайте
Экспертные советы
Статьи разработаны профессионалами в области строительства, дизайна и ремонта.
Полезные ресурсы
Ссылки на проверенные магазины, услуги и материалы, которые помогут вам в ваших проектах.
Модные тренды
Мы следим за последними тенденциями и новинками в мире строительства и дизайна.
«Свой Угол» – ваш проводник в мире уюта и стиля в вашем доме. Погружайтесь в наши статьи, найдите вдохновение, задавайте вопросы и делитесь своим опытом.
Создайте свой угол вместе с нами!
Информационный портал «Свой Угол»
маркетплейсы для покупки аккаунта цифровой магазин аккаунтов
1 ван вин 1 ван вин .
mostbet игры mostbet игры .
1win футбол https://1win6015.ru .
1win kg http://www.mymoscow.forum24.ru/?1-6-0-00026928-000-0-0 .
mostbet kg отзывы mostbet kg отзывы .
wan win https://1win817.ru/ .
1vin pro http://www.dogzz.forum24.ru/?1-10-0-00000155-000-0-0-1742818537 .
мостбет скачать бесплатно http://www.corgan.borda.ru/?1-0-0-00000265-000-0-0 .
мостбет казино войти мостбет казино войти .
1win казино http://1win6016.ru/ .
mostbet скачать на телефон бесплатно андроид mostbet скачать на телефон бесплатно андроид .
mostbet https://ashapiter0.forum24.ru/?1-19-0-00001444-000-0-0-1742819001 .
1 win официальный сайт вход zdorovie.forum24.ru/?1-7-0-00000231-000-0-0-1742818050 .
Погрузитесь в азарт с 1xbet, рекомендуем.
1xbet – ваши ставки под контролем, в интернете.
Получите бонусы на первую ставку с 1xbet, обязательно проверьте.
Скорее ставьте на свои любимые команды с 1xbet, от процесса.
Присоединяйтесь к 1xbet для живых ставок, вы всегда на шаг впереди.
1xbet предлагает широкую линейку ставок, и будьте на коне.
Обширные рынки на 1xbet, от любимых команд до редких событий.
1xbet – живые трансляции ваших любимых матчей, сделайте вашу ставку.
Деньги на вашем счете с 1xbet за считанные минуты, открывайте возможности.
Обзоры и прогнозы на 1xbet, поможем вам оставаться в курсе.
Ваши данные в безопасности с 1xbet, мы ценим вашу конфиденциальность.
Не пропустите акционные предложения от 1xbet, воспользуйтесь шансом.
Выигрывайте и наслаждайтесь с 1xbet, выберите правильный путь.
Чат поддержки 24/7 на 1xbet, никогда не оставайтесь в одиночестве.
Участвуйте в конкурсах и выигрывайте с 1xbet, будьте в курсе событий.
Ставьте в любое время и в любом месте с 1xbet, сделайте ставки на ходу.
Ставьте на основе данных с 1xbet, анализируйте каждый шаг.
Зарегистрируйтесь на 1xbet всего за несколько минут, приступайте к ставкам.
Откройте новый уровень азартных игр с 1xbet, начните выигрывать.
1xbet – это место для настоящих игроков, ставьте с умом.
x bet x bet .
1win войти 1win6017.ru .
1win партнерка вход https://1win6013.ru .
1win войти 1win войти .
1win com https://1win9109.ru .
mostbet http://mostbet6004.ru .
check betriot
1win online http://www.belbeer.borda.ru/?1-6-0-00001583-000-0-0 .
мостбет кыргызстан скачать http://girikms.forum24.ru/?1-1-0-00000361-000-0-0-1742819287 .
1win com http://www.1win6018.ru .
мостбет официальный сайт мостбет официальный сайт .
Zkuste štěstí na Mostbet online je to snadné | Mostbet má skvělou mobilní aplikaci pro České uživatele | Vyzkoušejte sázení na Mostbet a uvidíte rozdíl mostbet site.
Mostbet casino přináší kvalitní zábavu online | Mostbet online hry jsou zábavné a rozmanité | Výhry z Mostbet lze snadno vybrat mostbet přihlášení.
купить лабораторные анализы https://analiz-kupit-spb.ru
Mostbet je skvělou volbou pro sázení a kasino online | Nejlepší automaty najdete v Mostbet casino cz | Mostbet se českými hráči opravdu počítá http://www.mostbet-casino-register-cz.com.
Mostbet podporuje mobilní hraní bez omezení | Mostbet login je rychlý a bezpečný | Zákaznická podpora Mostbet je k dispozici 24/7 mostbet official website.
Doporucuji Mostbet pro jeho širokou nabídku her | Mostbet com přináší top kvalitu mezi online kasiny | Většina hráčů doporučuje Mostbet https://mostbet-casino-register-cz.com.
купить анализы купить анализы в спб
Mostbet je skvělou volbou pro sázení a kasino online | Zaregistrujte se na Mostbet cz a získejte bonus | Výhry z Mostbet lze snadno vybrat mostbet live.
мостбет казино войти https://mostbet6005.ru/ .
1win. https://www.obmen.forum24.ru/?1-1-0-00004428-000-0-0-1742816292 .
1вин кг http://www.1win6019.ru .
most bet hiend.borda.ru/?1-16-0-00000259-000-0-0-1743052953 .
скачать мостбет официальный сайт alfatraders.borda.ru/?1-0-0-00004917-000-0-0-1743053068 .
Сантехнические услуги любой сложности в СПб – фиксированные цены
прайс на услуги сантехника в спб https://www.remont-santehniki-price.ru/ .
1win sports betting https://1win12.com.ng .
Сантехник СПб – стоимость установки сантехники в ванной
сантехник спб цены santeh1-montazh-price.ru .
1win online site http://1win12.com.ng/ .
мостбет зеркало http://severussnape.borda.ru/?1-10-0-00000023-000-0-0-1743053372 .
mostbet игры mostbet игры .
mostbet.kg http://www.cah.forum24.ru/?1-3-0-00000096-000-0-0-1743053764 .
1win букмекер http://www.fanfiction.borda.ru/?1-0-0-00029708-000-0-0-1743051664 .
продвижение сайтов в москве продвижение сайтов в москве .
Mine Island is a casino game that whisks players away on a treasure hunt. Its multi-level structure introduces a strategic depth that will particularly appeal to players who enjoy a challenge and are tired of more straightforward, traditional slots. Minecraft, the beloved sandbox game, captivates millions of players with its infinite world and endless possibilities. But what if you could push it even further? This is where Minecraft mods come into play. What the hell happened to all the British touring car games? Technically this particular series grew up to become Race Driver: Grid, so we’ll let it off, but it’s a gap that really ought to have been filled by now. Most likely the series died thanks to the sport’s lack of international appeal, which is fair enough, although quite why gamers in France, for example, wouldn’t relish the uniquely British opportunity to sling a Vauxhall Vectra around a rainy Thruxton or Donington Park, we really don’t know. We’d certainly have played a game about racing mopeds around with a cigarette artfully balanced in your mouth, or whatever passed for motorsport in France in the 90s.
https://dados.uff.br/ne/user/telkiegiecu1988
After the game is installed, UK players can create an account, make a deposit, and start playing Mine Island for real money rewards! SkyBlock is one of the most popular minecraft maps ever created. Play Bed Wars, SkyWars, Murder Mystery and many more unique Minecraft minigames on the Hypixel Server, all you need to do is log in! These puzzle maps are focused on escaping various places. Recommended by: Fam Aman Breed and feed hundreds of quirky musical Monsters to form your own orchestra in this award-winning game! With so many catchy tunes and hundreds of Monsters to collect, you’ll be addicted to this monstrously fun game before you know it. The volatility of Mine Island is determined by the choices made by players. Those who opt to collect winnings early will experience lower volatility than those who prefer to hold out for higher prizes.
сайтов продвижение puzzleweb.ru/recl3/effjektivnoje-prodvizhjenije-sajtov-v-moskvje-kak-dostich-vysokikh-rjezultatov.php .
1win кыргызстан http://www.1win6020.ru .
1win зайти http://admiralshow.forum24.ru/?1-17-0-00000242-000-0-0-1742816555 .
1 вин вход в личный кабинет http://1win6020.ru .
Экран для проекторов с улучшенной цветопередачей – идеальный выбор для фильмов и презентаций
экран для видеопроектора купить https://www.proekcionnye-ehkrany0.ru/ .
wan win http://realistzoosafety.forum24.ru/?1-11-0-00001540-000-0-0-1742816894/ .
1 вин скачать https://naigle.borda.ru/?1-17-0-00000329-000-0-0-1742816734/ .
1block bet
1Block Casino: Full Platform Overview
1Block Casino is a modern gaming platform that offers a wide range of gambling entertainment for players worldwide. From classic slots to unique games like Plinko, the service provides everything needed for gambling enthusiasts. Let’s take a closer look at the main features of the platform, game categories, and key advantages.
Game Categories
1Block Casino boasts an extensive collection of games divided into several categories:
Originals
This section features exclusive games developed specifically for the platform. It’s a great choice for those seeking a unique gaming experience.
Slots
Classic and modern slots with various themes, bonuses, and mechanics are available here. Whether you prefer traditional fruit machines or innovative video slots, there’s something for everyone.
Live Games
Immerse yourself in the atmosphere of a real casino with live dealer games. These games are streamed in real-time, offering an authentic experience with professional dealers.
Fishing Games
A unique category that combines gambling with interactive gameplay. Fishing games are gaining popularity due to their engaging mechanics and potential for big wins.
Poker
Test your skills against other players in various poker formats. The platform offers both traditional and fast-paced poker games.
Esports Betting
Bet on your favorite esports teams and tournaments. This section caters to fans of competitive gaming who want to add excitement to their matches.
Lucky Bets and High Rollers
1Block Casino caters to all types of players, from casual gamers to high rollers. The Lucky Bets section highlights random wins, while the High Rollers section showcases impressive payouts from large bets. Whether you’re betting small or large amounts, the platform ensures fair play and exciting opportunities.
Our Community and Partnerships
1Block Casino values its community and collaborates with trusted partners to enhance the gaming experience. The platform proudly works with leading providers, ensuring top-quality games and services for its users.
Legal Information
1Block Casino is owned and operated by JogoMaster Limited, a company registered under number 15748. The company’s registered address is located in Hamchako, Mutsamudu, Autonomous Island of Anjouan, Union of Comoros.
The platform is licensed and regulated by the Gaming Board of Anjouan (License No. ALSI-152406032-FI3). 1Block has passed all regulatory compliance checks and is legally authorized to conduct gaming operations for all games of chance and wagering.
Why Choose 1Block Casino?
Diverse Game Selection : From slots to live games, there’s something for every type of player.
Transparency : All bets and payouts are clearly displayed, ensuring trust and fairness.
Crypto-Friendly : The platform supports cryptocurrency transactions, making it convenient for modern players.
Licensed and Regulated : With a valid license from the Gaming Board of Anjouan, players can enjoy a secure and legal gaming experience.
Whether you’re a fan of classic casino games or looking to explore unique options like Plinko, 1Block Casino offers a comprehensive and enjoyable platform for all gambling enthusiasts.
1win home http://www.1win12.com.ng .
1win ставки официальный сайт http://familyclub.borda.ru/?1-6-0-00002163-000-0-0-1743051813/ .
1win login nigeria https://www.1win12.com.ng .
1win официальный сайт вход https://www.1win6020.ru .
раскрутка сайта москва раскрутка сайта москва .
мостбет скачать бесплатно https://mostbet6006.ru .
1win вход на сайт https://www.familyclub.borda.ru/?1-6-0-00002163-000-0-0-1743051813 .
1win.pro 1win6020.ru .
продвижение сайтов москва продвижение сайтов москва .
1win партнерская программа вход https://1win6001.ru/ .
1 вин про 1 вин про .
вход 1win https://familyclub.borda.ru/?1-6-0-00002163-000-0-0-1743051813 .
mostbest mostbest .
мостбет кыргызстан http://www.mostbet6006.ru .
1 win.pro 1win6001.ru .
раскрутка сайта в москве https://www.seogift.ru/news/press-release/2463-geymifikaciya-v-prodvizhenii-internet-magazinov-kak-vovlekat-klientov-s-pervogo-kasaniya/ .
mostbet kg отзывы https://mostbet6006.ru .
адин вин 1win6001.ru .
1хwin http://1win6002.ru/ .
поддержка мостбет https://mostbet6007.ru/ .
ремонт стиральных ясенево ремонт холодильников в москве
1win футбол https://www.1win6049.ru .
1win rossvya 1win6002.ru .
mostbet casino https://www.mostbet6007.ru .
глонасс мониторинг автомобиля глонасс мониторинг автомобиля .
Откройте для себя новые горизонты на sofisimo.com, на нашем сайте вы откроете.
Не пропустите возможности, которые предлагает sofisimo.com, новые тренды.
С sofisimo.com вы всегда на шаг впереди, открывая.
Погрузитесь в удивительный мир на sofisimo.com, где.
Позаботьтесь о своем образовании с sofisimo.com, развивая.
sofisimo.com – площадка для общения, найти поддержку.
sofisimo.com предлагает уникальные идеи, ищет.
Посетите sofisimo.com для открытия новых возможностей, мир знаний.
sofisimo.com для любителей знаний, учиться.
sofisimo.com: соединение знаний и практики, научатся.
Так много возможностей на sofisimo.com, что.
Каждый день с sofisimo.com – это новая возможность, развиваться.
sofisimo.com – свяжитесь с единомышленниками, всегда актуальны.
Выберите sofisimo.com для новизны, старается.
sofisimo.com: ваш путь к знаниям, вам необходим.
Вступайте в сообщество sofisimo.com, источник вдохновения для каждого.
Присоединяйтесь к нам на sofisimo.com, вы найдете свое место.
Ищите новую информацию на sofisimo.com, творчество не имеет границ.
sofisimo.com – платформа для инноваций, каждый может.
mobiliario infantil https://sofisimo.com/ .
мониторинг транспорта цена мониторинг транспорта цена .
1 вин. http://balashiha.myqip.ru/?1-12-0-00000437-000-0-0-1743258848/ .
1 вин войти http://1win6049.ru/ .
баланс ван вин http://1win6049.ru .
1win com http://www.1win6002.ru .
мостбет авиатор мостбет авиатор .
1 win https://alfatraders.borda.ru/?1-0-0-00004932-000-0-0-1743258210/ .
1win онлайн https://www.1win6002.ru .
мостбет скачать андроид мостбет скачать андроид .
1вин официальный сайт https://1win6049.ru/ .
Аккредитованное агентство https://pravo-migranta.ru по аутстаффингу мигрантов и миграционному аутсорсингу. Оформление иностранных сотрудников без рисков. Бесплатная консультация и подбор решений под ваш бизнес.
1win кейсы http://www.balashiha.myqip.ru/?1-12-0-00000437-000-0-0-1743258848 .
1 вин. http://www.balashiha.myqip.ru/?1-12-0-00000437-000-0-0-1743258848 .
1winn http://www.balashiha.myqip.ru/?1-12-0-00000437-000-0-0-1743258848 .
Мебель для кафе и ресторанов с индивидуальным дизайном – создайте свою концепцию
производство мебели для кафе https://www.mebel-dlya-kafe.ru .
1win онлайн https://www.alfatraders.borda.ru/?1-0-0-00004932-000-0-0-1743258210 .
Индивидуальная технологическая карта на погрузочно-разгрузочные работы – разработка под конкретные задачи
типовая технологическая карта проведение погрузочно разгрузочных работ с применением автопогрузчика https://tekhnologicheskie-karty.ru .
Компании с высоким рейтингом – пластиковые окна с гарантией на монтаж
рейтинг компаний пластиковых окон https://top-okon.ru/ .
1win официальный сайт регистрация https://alfatraders.borda.ru/?1-0-0-00004932-000-0-0-1743258210/ .
1 win.com alfatraders.borda.ru/?1-0-0-00004932-000-0-0-1743258210 .
скачать мостбет https://www.mostbet6008.ru .
скачать 1win с официального сайта скачать 1win с официального сайта .
1вин приложение http://www.obovsem.myqip.ru/?1-9-0-00000059-000-0-0-1743051936 .
1вин кг 1win6003.ru .
mostbet kg http://mostbet6008.ru .
Find the Perfect Clock clocks-top.com for Any Space! Looking for high-quality clocks? At Top Clocks, we offer a wide selection, from alarm clocks to wall clocks, mantel clocks, and more. Whether you prefer modern, vintage, or smart clocks, we have the best options to enhance your home. Explore our collection and find the perfect timepiece today!
мостбет chrono http://svstrazh.forum24.ru/?1-18-0-00000136-000-0-0-1743260517/ .
1win личный кабинет http://obovsem.myqip.ru/?1-9-0-00000059-000-0-0-1743051936/ .
Исследуйте возможности vavadaukr.kiev.ua, который.
vavadaukr.kiev.ua предлагает вам, с целью.
Не упустите шанс посетить vavadaukr.kiev.ua, на котором.
vavadaukr.kiev.ua – это место.
эксклюзивные предложения.
обширную информацию о.
Развивайтесь вместе с vavadaukr.kiev.ua, которое.
полезные советы, помогут вам.
На сайте vavadaukr.kiev.ua вы увидите, современными трендами.
множество возможностей.
vavadaukr.kiev.ua – ваш надежный партнер, где.
обширный выбор, сделает вашу жизнь проще.
vavadaukr.kiev.ua выделяется среди других, поскольку.
Воспользуйтесь ресурсами vavadaukr.kiev.ua для.
Делитесь своим мнением на vavadaukr.kiev.ua, где создаются.
На vavadaukr.kiev.ua мы предлагаем, расширят ваш кругозор.
Откройте для себя, что такое vavadaukr.kiev.ua, вдохновляя на новые идеи.
вавада юа вавада юа .
кайт школа анапа
рулонные шторы с электроприводом купить в москве рулонные шторы с электроприводом купить в москве .
1win играть 1win играть .
1вин официальный 1вин официальный .
рулонные шторы на пластиковые окна с электроприводом рулонные шторы на пластиковые окна с электроприводом .
mostbet скачать mostbet6008.ru .
1вин приложение http://1win6050.ru/ .
1вин rossvya 1вин rossvya .
mostbets https://mostbet6008.ru/ .
1win партнерка вход https://www.obovsem.myqip.ru/?1-9-0-00000059-000-0-0-1743051936 .
Разработка технологической карты на погрузочно-разгрузочные работы – важный шаг к безопасности на рабочем месте
технологическая карта на погрузочно разгрузочные работы назначение и содержание https://tekhnologicheskie-karty.ru .
мостбет chrono http://www.svstrazh.forum24.ru/?1-18-0-00000136-000-0-0-1743260517 .
мостбет официальный сайт https://www.svstrazh.forum24.ru/?1-18-0-00000136-000-0-0-1743260517 .
служба поддержки мостбет номер телефона http://svstrazh.forum24.ru/?1-18-0-00000136-000-0-0-1743260517/ .
1 win kg https://1win6050.ru/ .
Доска объявлений https://estul.ru/blog по всей России: продавай и покупай товары, заказывай и предлагай услуги. Быстрое размещение, удобный поиск, реальные предложения. Каждый после регистрации получает на баланс аккаунта 100? для возможности бесплатного размещения ваших объявлений
рулонные шторы для коммерческих помещений рулонные шторы для коммерческих помещений .
1 vin официальный сайт 1 vin официальный сайт .
казино онлайн kg https://mostbet6009.ru .
рулонные шторы с направляющими купить рулонные шторы с направляющими купить .
win 1 1win6004.ru .
мостбет скачать https://www.mostbet6009.ru .
Мы предлагаем дипломы любой профессии по приятным ценам. Дипломы производятся на фирменных бланках Купить диплом об образовании diplomgorkiy.com
Где купить диплом по актуальной специальности?
Заказать диплом университета по выгодной стоимости возможно, обращаясь к проверенной специализированной компании.: magazin-diplomov.ru
wan win http://1win6050.ru/ .
вход 1win https://1win6050.ru/ .
1win скачать kharkovbynight.forum24.ru/?1-5-0-00000235-000-0-0 .
Maispin——2025年最新USDT娛樂城,安全、快速、刺激!
歡迎來到 Maispin,2025年最具潛力的新秀 USDT娛樂城!在這裡,您只需提供 錢包地址 即可註冊,無需繁瑣的個人資訊,享受 安全、匿名、快速 的遊戲體驗。Maispin 提供超過 1000種賭場遊戲,涵蓋 真人百家樂、體育投注、老虎機、撲克、輪盤 等經典娛樂,讓您隨時隨地感受頂級賭場的刺激氛圍。我們與世界知名遊戲供應商合作,確保遊戲 公平公正,並提供高額彩金、獎勵活動,讓玩家輕鬆贏大獎!作為 USDT區塊鏈娛樂城,Maispin 存提款秒到帳,無需繁瑣審核,資金流動安全透明,讓玩家更安心地享受遊戲樂趣。立即加入 M宇宙,體驗前所未有的加密娛樂新潮流!
партнёрка 1win https://1win6051.ru .
тент на шатер аренда shatry-dlya-meropriyatiy.ru .
1 ван вин http://girikms.forum24.ru/?1-2-0-00000264-000-0-0 .
аренда шатров и тентов аренда шатров и тентов .
Привет!
Без ВУЗа трудно было продвигаться вверх по карьерной лестнице. В наши дни документ не дает никаких гарантий, что удастся получить отличную работу. Намного более важны профессиональные навыки и знания специалиста, а также его опыт. В связи с этим решение о заказе диплома стоит считать выгодным и рациональным. Заказать диплом ВУЗа babygirls006.copiny.com/question/details/id/1052696
Привет!
Мы предлагаем дипломы любой профессии по выгодным тарифам. Цена зависит от той или иной специальности, года выпуска и ВУЗа: diplomanc.com/
Диплом университета РФ!
Без присутствия диплома очень нелегко было продвинуться по карьерной лестнице. Именно поэтому решение о заказе диплома стоит считать выгодным и рациональным. Заказать диплом университета click-boutique.ru/forum/?PAGE_NAME=profile_view&UID=48820
Заказать диплом ВУЗа!
Мы изготавливаем дипломы любой профессии по доступным ценам. Вы заказываете документ через надежную и проверенную временем компанию. : pirat.iboards.ru/viewtopic.php?f=20&t=34065
1win win 1win6004.ru .
мостбет скачать на андроид мостбет скачать на андроид .
1вин кг http://www.cinemania.forum24.ru/?1-15-0-00001911-000-0-0-1743258043 .
mostbet casino mostbet6009.ru .
Мы готовы предложить дипломы любой профессии по разумным ценам.– diplomass.com/kupit-diplom-o-visshem-obrazovanii-s-zaneseniem-v-reestr-5/
баланс ван вин http://www.1win6004.ru .
Для максимально быстрого продвижения по карьерной лестнице понадобится наличие диплома о высшем образовании. Быстро и просто заказать диплом об образовании у проверенной организации: dip-lom-rus.ru/kupit-diplom-bistro-i-bez-xlopot/
1 вин. 1win6051.ru .
1вин войти https://knowledge.forum24.ru/?1-1-0-00000082-000-0-0-1743258384/ .
1 win pro https://1win6051.ru .
aviator mostbet http://mostbet6010.ru/ .
аренда шатров на свадьбу аренда шатров на свадьбу .
mostbet официальный сайт http://mostbet6010.ru .
один вин https://www.1win6051.ru .
аренда тента для мероприятия аренда тента для мероприятия .
USDT娛樂城
Maispin——2025年最新USDT娛樂城,安全、快速、刺激!
歡迎來到 Maispin,2025年最具潛力的新秀 USDT娛樂城!在這裡,您只需提供 錢包地址 即可註冊,無需繁瑣的個人資訊,享受 安全、匿名、快速 的遊戲體驗。Maispin 提供超過 1000種賭場遊戲,涵蓋 真人百家樂、體育投注、老虎機、撲克、輪盤 等經典娛樂,讓您隨時隨地感受頂級賭場的刺激氛圍。我們與世界知名遊戲供應商合作,確保遊戲 公平公正,並提供高額彩金、獎勵活動,讓玩家輕鬆贏大獎!作為 USDT區塊鏈娛樂城,Maispin 存提款秒到帳,無需繁瑣審核,資金流動安全透明,讓玩家更安心地享受遊戲樂趣。立即加入 M宇宙,體驗前所未有的加密娛樂新潮流!
1 win https://www.1win6052.ru .
аренда складского бокса аренда складского бокса .
Приобретение диплома через надежную фирму дарит ряд достоинств для покупателя. Это решение дает возможность сэкономить время и серьезные финансовые средства. Впрочем, на этом выгода не ограничивается, плюсов гораздо больше.Мы изготавливаем дипломы психологов, юристов, экономистов и прочих профессий. Дипломы производят на подлинных бланках. Доступная стоимость в сравнении с серьезными расходами на обучение и проживание. Покупка диплома института является мудрым шагом.
Быстро купить диплом: diplomist.com/kupit-diplom-s-zaneseniem-bistro-i-bezopasno-2/
Услуги по ППРК для снижения простоев и оптимизации работы кранов
краны ппр https://www.pprk-msk.ru/ .
мостбет скачать бесплатно https://www.mostbet6010.ru .
cod promoțional 1win https://1win5004.ru/ .
мотбет мотбет .
1win ракета http://1win6052.ru/ .
1 win moldova http://1win5004.ru/ .
хранение в ячейках москва хранение в ячейках москва .
1win на телефон http://freereklama.borda.ru/?1-5-0-00000114-000-0-0-1743258539/ .
1win kg скачать http://www.1win6052.ru .
1win. http://1win6052.ru .
мостбет казино http://www.mostbet6029.ru .
1 вин официальный сайт вход https://1win6005.ru .
мостбет зеркало https://mostbet6030.ru .
адин вин https://1win6005.ru/ .
скачать мостбет http://mostbet6030.ru/ .
1 вин официальный snatkina.borda.ru/?1-5-0-00000311-000-0-0-1743258575 .
1win moldova download https://1win5004.ru/ .
суши роллы доставка суши вок барнаул
1win aplicația http://www.1win5004.ru .
¡Hola gammers!
Con 10 euros gratis puedes jugar en el casino sin necesidad de depositar. casino 10 euros gratis sin deposito Ideal para probar sin compromisos. RegГstrate y juega como un profesional.
En EspaГ±a puedes jugar en casinos legales que ofrecen 10 euros gratis. Sin necesidad de depositar, solo con registrarte. Juega seguro y gana dinero real.
Toda la información en el enlace – п»їhttps://10eurosgratissindepositocasino.xyz/
¡Que tengas buenos tragaperras!
1win kg 1win kg .
мостбет http://hiend.borda.ru/?1-16-0-00000260-000-0-0/ .
мостбет chrono https://www.mostbet6030.ru .
1win sports 1win13.com.ng .
1win сайт https://www.1win6054.ru .
1win сайт 1win сайт .
1win официальный сайт https://1win6054.ru/ .
1win скачать kg http://1win6005.ru .
1win betting site https://www.1win13.com.ng .
1вин кг http://www.1win6006.ru .
Pinco onlayn kazinosu geniş oyun çeşidi ilə fərqlənir|Pinco online casino Azərbaycanda populyar seçimlərdəndir|Pinco oyunçular üçün müxtəlif bonuslar və aksiyalar təklif edir|Pinco ilə oyun təcrübəsi maraqlı və gəlirlidir|Pinco bonus şərtləri ədalətlidir və şəffafdır|Pinco ilə hər zaman yeni təcrübələr əldə etmək olur|Pinco ilə həm əylənmək, həm də pul qazanmaq olar|Pinco onlayn kazinosunda müxtəlif oyun növləri var|Pinco az onlayn oyunçular üçün ən yaxşı təkliflərdən biridir https://pinco-casino-azerbaijan.com/.
мотбет мотбет .
Pinco onlayn kazinosu geniş oyun çeşidi ilə fərqlənir|Pinco kazino promo kodları əlavə üstünlük verir|Pinco online kazino əyləncə və qazanc üçün ideal məkandır|Pinco kazinosunun reputasiyası yüksəkdir|Pinco saytında canlı dilerlərlə oyunlar mövcuddur|Pinco kazino saytı sadə və istifadəçiyə uyğundur|Pinco slot oyunları yüksək RTP göstəricisinə malikdir|Pinco kazino platformasında qazanc şansı çoxdur|Pinco mobil tətbiq yüklə və dərhal oyna pinco casino az.
один вин 1win6006.ru .
Yeni istifadəçilər üçün Pinco bonusları çox sərfəlidir|Pinco bonusları hər bir istifadəçiyə təqdim olunur|Pinco kazino oyunları keyfiyyətli və müxtəlifdir|Pinco az oyunçulara sərfəli təkliflər verir|Pinco mobil tətbiqi yükləmək çox rahatdır|Pinco az istifadəçilər üçün əlavə cashback kampaniyaları keçirir|Pinco az saytı ilə tez və rahat qeydiyyat mümkündür|Pinco kazino platformasında qazanc şansı çoxdur|Pinco kazino istifadəçilərinə geniş oyun kataloqu təklif edir https://pinco-casino-azerbaijan.com.
motsbet http://severussnape.borda.ru/?1-4-0-00000505-000-0-0-1743260265/ .
¡Hola gammers!
Empieza a jugar hoy con 10 euros gratis y sin depГіsito. 10 euros gratis por registrarte RegГstrate y empieza a ganar sin arriesgar nada.
Accede a tu casino favorito y recibe 10 euros gratis solo por registrarte. Sin necesidad de hacer depГіsito, podrГЎs jugar y ganar. Ideal para nuevos jugadores que quieren probar suerte sin gastar.
Toda la información en el enlace – п»їhttps://10eurosgratissindepositocasino.xyz/
¡Que tengas buenos bonos!
Pinco kazinosu oyunçular üçün cəlbedici seçimdir|Pinco platformasında turnirlər və yarışlar tez-tez keçirilir|Pinco qeydiyyat bonusu yeni istifadəçilər üçün sərfəlidir|Pinco oyunçuların tələblərinə cavab verir|Pinco kazinosunun promosyonları daim yenilənir|Pinco az istifadəçilər üçün əlavə cashback kampaniyaları keçirir|Pinco mobil tətbiqi ilə hər yerdə oyun mümkündür|Pinco ilə oyun zamanı bonuslardan yararlanmaq asandır|Pinco az oyunçularına şəxsi bonuslar təqdim edir pinco online.
Pinco platformasında təhlükəsizlik və məxfilik qorunur|Pinco ilə real pul qazanmaq mümkündür|Pinco onlayn kazinoda mükəmməl istifadəçi interfeysi mövcuddur|Pinco platformasında qeydiyyat prosesi asandır|Pinco az ilə oyunların keyfiyyəti təmin olunur|Pinco ilə hər zaman yeni təcrübələr əldə etmək olur|Pinco oyunçulara dürüst və şəffaf oyun təklif edir|Pinco ilə oyun zamanı bonuslardan yararlanmaq asandır|Pinco mobil tətbiq yüklə və dərhal oyna pinco промокод.
Клининг в Москве: рейтинг лучших компаний с гарантией качества услуг
клининг москва рейтинг https://www.kliningovye-kompanii-msk.ru .
Абхазия для туристов: всё о комфортном отдыхе у моря
абхазия отдых цены абхазия отдых цены .
Pinco kazinosunda yüksək RTP-li slotlar mövcuddur|Pinco yüklə və qazanmağa başla|Pinco kazino oyunları keyfiyyətli və müxtəlifdir|Pinco az oyunçulara sərfəli təkliflər verir|Pinco oyunçular üçün rahat interfeys təqdim edir|Pinco az istifadəçilər üçün əlavə cashback kampaniyaları keçirir|Pinco platforması beynəlxalq standartlara uyğundur|Pinco ilə oyun zamanı bonuslardan yararlanmaq asandır|Pinco az oyunçularına şəxsi bonuslar təqdim edir pinco az.
1вин войти https://1win6053.ru/ .
аренда боксы для хранения вещей аренда боксы для хранения вещей .
1win официальный сайт регистрация https://www.1win6054.ru .
1win méxico http://1win1001.top .
поддержка мостбет mostbet6031.ru .
1win online site http://www.1win13.com.ng .
casino en 1 win 1win1001.top .
Hello if you’re laughing, you’re in!
Every caption deserves a little game. basketball puns
Don’t just watch the game—laugh with it. These short basketball puns bring the fun to any timeout.
Toda la información en el enlace – п»їhttps://basketballpuns.com/
Wishing you lots of giggles!
мостбет вход http://mostbet6031.ru .
партнёрка 1win http://1win6053.ru/ .
1win кыргызстан http://www.1win6053.ru .
1 вин. http://www.1win6042.ru .
скачат мостбет https://mostbet6032.ru/ .
mostbet.kg http://remsanteh.borda.ru/?1-6-0-00000047-000-0-0 .
1 win http://www.1win6054.ru .
1win ng https://1win13.com.ng/ .
1 win.kg https://1win6006.ru .
Hi comedy enthusiasts!
From tip-off to overtime, these basketball play on words never miss. basketball puns one liners It’s game time for your sense of humor.
Level up your humor with funny basketball puns that shoot their shot and always score.
Toda la información en el enlace – п»їhttps://basketballpuns.com/
Here’s to plenty of hilarious moments!
1 вин войти http://1win6042.ru/ .
служба поддержки мостбет номер телефона служба поддержки мостбет номер телефона .
1win скачать https://1win6006.ru .
1 vin https://1win6043.ru/ .
mostbet kg скачать https://www.mostbet6033.ru .
зайти в 1вин http://cah.forum24.ru/?1-13-0-00001695-000-0-0-1743258917 .
aviator mostbet aviator mostbet .
1вин сайт официальный http://1win6043.ru/ .
1win casino mexico https://1win1001.top/ .
1 вин вход 1 вин вход .
Подробный рейтинг клининговых компаний Москвы с гарантиями и документами
лучшая клининговая компания https://kliningovye-kompanii-msk1.ru .
casino 1win http://1win1001.top .
motbet mostbet6032.ru .
register with 1win website http://1win14.com.ng .
1win login nigeria https://www.1win14.com.ng .
что делать с бонусным балансом на 1win https://1win6042.ru/ .
1win кейсы http://www.cah.forum24.ru/?1-13-0-00001678-000-0-0 .
1wi. https://1win6043.ru/ .
мостбет скачать андроид http://www.mostbet6033.ru .
служба поддержки мостбет номер телефона служба поддержки мостбет номер телефона .
Профессиональный сервисный центр по ремонту бытовой техники с выездом на дом.
Мы предлагаем:сервисные центры в москве
Наши мастера оперативно устранят неисправности вашего устройства в сервисе или с выездом на дом!
мостбет вход mostbet6032.ru .
înregistrare 1win 1win5011.ru .
1win aplicația https://www.1win5012.ru .
мостбет скачать казино https://mostbet6031.ru/ .
скачать mostbet на телефон скачать mostbet на телефон .
1вин. http://www.1win6043.ru .
mostbet официальный сайт http://mostbet6033.ru .
1win https://www.1win5012.ru .
1win скачать 1win6007.ru .
мостбет кг мостбет кг .
что делать с бонусным балансом на 1win https://sebezh.borda.ru/?1-10-0-00000117-000-0-0-1743052058 .
1 вин вход 1 вин вход .
поддержка мостбет https://mostbet6011.ru/ .
1win pariuri 1win5011.ru .
Выездная поверка манометров по предзаказу или срочно
поверка манометров https://www.poverkamanomterov.ru/ .
Платная наркология с возможностью анонимного обращения и срочной помощи
наркоклиника спб http://www.platnaya-narkologicheskaya-klinika-0.ru/ .
новости события краснодара krasnodar-news35.ru/
sports betting 1win sports betting 1win .
1win скачать kg https://1win6043.ru .
mostbet игры https://mostbet6033.ru .
1win metode de plată https://www.1win5011.ru .
1win metode de plată 1win metode de plată .
1 win официальный сайт 1win6043.ru .
1win casino http://www.1win14.com.ng .
1win ставки официальный сайт https://1win6044.ru/ .
mostbest http://mostbet6033.ru/ .
мостбет казино https://mostbet6012.ru .
pariuri sportive moldova http://1win5012.ru .
мостбет chrono http://www.mostbet6011.ru .
1win betting http://1win15.com.ng .
мост бет https://mostbet6012.ru .
cazinouri online moldova http://www.1win5012.ru .
1win online https://1win15.com.ng .
mosbet mostbet6011.ru .
?Hola entusiastas del juego
Una plataforma de apuestas sin licencia puede tener juegos exclusivos y promociones Гєnicas. licencia internacional Algunas incluso ofrecen cashbacks semanales. Es un buen incentivo para mantenerse activo.
Los juegos de casino sin licencia ofrecen jackpots progresivos, juegos con crupier y torneos exclusivos. Es una experiencia rica y completa. No olvides revisar RTP y volatilidad.
Mas detalles en el enlace – п»їhttps://casinossinlicenciaenespana.guru/
?Que tengas excelentes ventajas!
1win кейсы http://www.1win6043.ru .
1вин кг 1win6009.ru .
Услуги сантехника для новостроек, старого фонда и коммерческой недвижимости
сантехник на дом московский район https://vyzov-santekhnika-0.ru/moskovskij-rajon/ .
мастбет мастбет .
1win kg https://1win6043.ru .
mostbest mostbet6033.ru .
1win вход 1win вход .
поддержка мостбет поддержка мостбет .
?Hola aventureros del azar
Online sin licencia en EspaГ±a es una opciГіn para jugadores que no quieren registrarse con DNI. Muchos sitios solo piden email y contraseГ±a. casinossinlicenciaenespana AsegГєrate de usar una direcciГіn vГЎlida.
Los mejores casinos online sin licencia actualizan su catГЎlogo constantemente. Esto incluye nuevos juegos, funciones y proveedores. Mantente al tanto para no perder oportunidades.
Mas detalles en el enlace – п»їhttp://casinossinlicenciaenespana.guru
?Que tengas excelentes botes acumulados!
buy weed in prague cannabis
Hidden Link Placement in Established Content Hubs
Hello! If this message caught your attention, you’re probably seeking strategies to enhance your online presence. I understand — mastering SEO might seem intimidating, especially with so many “quick-fix” services out there vowing overnight success without real outcomes. That’s why I want to share my strategy with you. It’s not just another one-size-fits-all package — it’s a custom-tailored plan designed to deliver real, measurable results.
I specialize in building backlink structures that combine high-authority, mid-tier, and foundational links. Picture creating a reliable framework for your project. Without proper groundwork, progress collapses. My goal is to enhance your main website’s ranking power in a way that aligns with search engine algorithms and delivers results.
Why Should You Trust Me?
Let me be honest here: I’ve been in the search engine optimization industry for years, and I’ve witnessed every trend — the good, the bad, and the downright spammy. I’ve worked with clients who invested heavily on services that claimed foolproof results but ended up getting them penalized. That’s why I decided to redefine the process.
I focus on authoritative dofollow links from authoritative websites. More than four-fifths of primary-tier connections in my strategy are dofollow because they pack the biggest punch. And here’s the catch — you’ll get this top-tier offering at significantly reduced rates (costing just 200–350 USD). How does wasting money help? Invest wisely in something that guarantees progress.
My Unique Value Proposition
Elite Guest Blogging
No generic outreach here. Never. I handpick only the most reputable guest post sites — platforms with strong domain authority (DA). These are the kinds of sites that give your website a serious boost.
Original, Custom-Crafted Articles
Low-quality writing harms credibility. It’s unengaging and counterproductive. That’s why every post I create is 100% unique, captivating, and specific to your market. Whether it’s for content hubs, I guarantee plagiarism-free results that enhances your brand’s voice. Pure quality, zero filler — content that converts.
Multi-Tiered Authority System
Here’s where things get strategic. My method doesn’t stop at Tier 1 by incorporating secondary and tertiary layers. This structured system amplifies the power of your primary backlinks, driving steady progress for your money site. Picture compounding momentum, growing exponentially.
Varied Backlink Portfolio
Google loves diversity, so I leverage multiple high-authority sources: content hubs, document shares, social signals. This isn’t about cheating algorithms; it’s about establishing long-term authority.
Full Transparency
When you work with me, you’ll have full visibility. I provide a detailed link report, including access credentials. No secrets, no hidden agendas — just complete transparency. You’ll track every backlink source and their impact on rankings.
A Little Story from My Experience
A case study: A few years ago, I worked with a client who was struggling to gain traction despite months of effort. They’d tried various “experts”, but progress stalled. When they came to me, I took the time to understand their goals. We designed a strategy aligned with their industry. Within a few months, their traffic doubled, and they boosted lead generation. That’s the kind of result I aim for with every client.
Ready to elevate your SEO game? Drop me a line today and let’s make Google work for you. ??
1win azərbaycan saytında müxtəlif idman növlərinə mərc edə bilərsiniz | 1win kazino oyunları arasında Aviator xüsusi yer tutur | 1win platformasında istifadəçilər üçün müxtəlif təlimatlar mövcuddur | 1win mobil tətbiqi ilə oyun təcrübəsini artırın1win kazino oyunlarında müxtəlif jackpotlar mövcuddur | 1win platformasında istifadəçilər üçün müxtəlif kampaniyalar mövcuddur1win-də müxtəlif idman növlərinə mərc edin | 1win platformasında istifadəçilər üçün müxtəlif bonuslar təqdim olunur | 1win-də müxtəlif idman növlərinə mərc edin | 1win kazino oyunlarında müxtəlif jackpotlar mövcuddur | 1win kazino oyunlarında müxtəlif bonuslar əldə edin 1 win azerbaycan.
1win-də canlı mərc imkanları ilə oyun həyəcanını yaşayın | 1win kazino oyunları arasında Aviator xüsusi yer tutur | 1win azərbaycan saytında istifadəçilər üçün rahat naviqasiya mövcuddur | 1win platformasında istifadəçilər üçün müxtəlif bonuslar təqdim olunur1win platformasında istifadəçilər üçün müxtəlif bonuslar təqdim olunur | 1win-də müxtəlif idman növlərinə mərc edin1win azərbaycan platformasında istifadəçilər üçün müxtəlif oyun imkanları mövcuddur | 1win platformasında istifadəçilər üçün müxtəlif təkliflər mövcuddur | 1win-də müxtəlif ödəniş üsulları ilə rahatlıqla pul yatırın | 1win kazino oyunlarında müxtəlif jackpotlar mövcuddur | 1win azərbaycan saytında istifadəçilər üçün müxtəlif təlimatlar mövcuddur 1 win az qeydiyyat.
1win azərbaycan saytında müxtəlif idman növlərinə mərc edə bilərsiniz | 1win azərbaycan saytında 24/7 müştəri dəstəyi mövcuddur | 1win-də müxtəlif idman növlərinə mərc etmək imkanı var | 1win platformasında istifadəçilər üçün müxtəlif bonuslar təqdim olunur1win kazino oyunlarında müxtəlif jackpotlar mövcuddur | 1win mobil tətbiqi ilə istənilən yerdə oyun oynayın1win azərbaycan platformasında istifadəçilər üçün müxtəlif oyun imkanları mövcuddur | 1win platformasında istifadəçilər üçün müxtəlif bonuslar təqdim olunur | 1win azərbaycan saytında istifadəçilər üçün müxtəlif təlimatlar mövcuddur | 1win az saytında istifadəçilər üçün rahat interfeys mövcuddur | 1win-də müxtəlif idman növlərinə mərc edin 1win az.
1 цшт https://www.1win6009.ru .
1хwin https://1win6009.ru/ .
1win az platformasında təhlükəsiz və sürətli ödəniş üsulları mövcuddur | 1win-də müxtəlif ödəniş metodları ilə rahatlıqla pul çıxara bilərsiniz | 1win az saytında müxtəlif promosyonlar və kampaniyalar keçirilir | 1win mobil tətbiqi ilə oyun təcrübəsini artırın1win platformasında istifadəçilər üçün müxtəlif təkliflər mövcuddur | 1win kazino oyunlarında müxtəlif bonuslar əldə edin1win mobil tətbiqi ilə istənilən yerdə oyun oynayın | 1win az saytında müxtəlif ödəniş üsulları mövcuddur | 1win az saytında müxtəlif promosyonlar mövcuddur | 1win kazino oyunlarında müxtəlif jackpotlar mövcuddur | 1win platformasında istifadəçilər üçün müxtəlif kampaniyalar mövcuddur 1win qeydiyyat bonusu.
1win platformasında qeydiyyat prosesi çox sadə və sürətlidir | 1win az saytında qeydiyyat üçün xüsusi promokodlar mövcuddur | 1win mobil tətbiqi ilə istənilən yerdə mərc edin | 1win platformasında istifadəçilər üçün müxtəlif təkliflər mövcuddur1win kazino oyunlarında yüksək qazanma şansı əldə edin | 1win az saytında müxtəlif promosyonlar mövcuddur1win platformasında istifadəçilər üçün müxtəlif təkliflər mövcuddur | 1win azərbaycan saytında müxtəlif oyun növləri mövcuddur | 1win kazino oyunlarında müxtəlif bonuslar əldə edin | 1win platformasında istifadəçilər üçün müxtəlif təkliflər mövcuddur | 1win kazino oyunlarında müxtəlif bonuslar əldə edin 1win promo kodu.
1win azərbaycan saytında müxtəlif idman növlərinə mərc edə bilərsiniz | 1win az saytında qeydiyyat üçün xüsusi promokodlar mövcuddur | 1win-də müxtəlif idman növlərinə mərc etmək imkanı var | 1win platformasında istifadəçilər üçün müxtəlif təkliflər mövcuddur1win platformasında istifadəçilər üçün müxtəlif bonuslar təqdim olunur | 1win kazino oyunlarında müxtəlif bonuslar əldə edin1win kazino oyunlarında müxtəlif bonuslar əldə edin | 1win kazino oyunlarında müxtəlif jackpotlar mövcuddur | 1win mobil tətbiqi ilə istənilən yerdə oyun oynayın | 1win az saytında istifadəçilər üçün rahat interfeys mövcuddur | 1win azərbaycan saytında istifadəçilər üçün müxtəlif təlimatlar mövcuddur http://www.1wincasino-azn.com.
Витебский госуниверситет университет https://vsu.by П.М.Машерова – образовательный центр. Вуз является ведущим образовательным, научным и культурным центром Витебской области. ВГУ осуществляет подготовку: химия, биология, история, физика, программирование, педагогика, психология, математика.
1вин официальный сайт мобильная http://1win6047.ru .
1вин официальный мобильная http://www.1win6047.ru .
Online casino for people
Know This Casino: Safe Gaming, Instant Payouts & Human Touch**
No fluff—just the facts you care about.*
—
What Makes It Trustworthy
– Licensed & Fair: Approved under strict EU standards. Decentralized tech verifies all results.
– Blazing-Fast Withdrawals: Crypto transactions in seconds, bank transfers/fiat settled in a day.
Standout Features
– Unique Games: Live dealer hits like Lightning Roulette, Crypto Quest slots (exclusive).
– Rewards Galore: 200 free spins for newcomers, regular cashback rewards for returning users.
—
Play Anywhere
Quick-launch feature, personalized jackpot notifications, and a user-friendly mobile interface.
Real Player Reviews**
– “Cashed out $4k in 2 hours—no red tape.”* – a verified user
– “Support staff remembered my details. 10/10.”* – a loyal member
Stay in Control
– Live Support Always: Chat with a human anytime.
– Self-Regulation Tools**: Deposit caps and breaks built into the system.
Begin Your Journey
Register quickly, use code **KNOWTHIS** for free spins.
P.S. Gamble wisely. Set a budget—always.
Услуги сантехника с выездом по договоренности и гибким графиком
сантехник петергоф спб https://vyzov-santekhnika1-spb.ru/petergof .
1win сайт вход 1win сайт вход .
1win.kg 1win6047.ru .
A no deposit bonus offer is promoted to entice new customers to sign up and play. Since claiming a new player bonus requires signing up for a new account, the casino hopes you’ll love the experience enough to return. For players, it’s a great way to try before you buy. When a new online gambling site catches your eye, this type of casino promotion lets you play for free before deciding to wager real money or claim more bonuses. One of the most common versions of this promo is free spins to play no deposit slots, but bonus cash offers might include other eligible games. The only way to find out is to read the bonus terms and conditions. If this does not contradict the particular rules of each sport, when a participant in the event, for whatever reason, cannot participate in the event on which the bet was placed, the bet is considered valid. and lost by the customer with Uptown casino no deposit bonus. The exceptions are the following:
https://www.unisons.fr/wiki/?sigpaipreteed1979
Casino Classic is a safe Canadian online casino that’s been around since 2000. Discover over 550 casino games, exciting jackpot slots, and an enticing welcome bonus! S.B. nearly fell off her chair when she realized she had hit the CA$1,000,000 jackpot on Casino Rewards Mega Money Wheel™ at Grand Mondial Casino on July 25th, 2024. Being packed with 1000 slots and 100 live dealer casino games, Luckland Casino is a top online casino site where you can experience games like Book of Dead by Play’n Go, Starburst by Netent, Immortal Romance, etc. Another top feature of this casino is the Exclusive Club, which you can participate in if you’re a casino regular. You can expect top features based on your playstyle, such as a personal manager and fast cashouts. However, the fact that the live chat support isn’t available 24 7 makes things more complicated if you encounter issues.
Заказать диплом университета!
Мы можем предложить документы учебных заведений, расположенных на территории всей России. Дипломы и аттестаты делаются на бумаге самого высокого качества: jobs.fabumama.com/employer/aurus-diploms
Надёжный способ купить чеки с подтверждением для отчёта. | Чеки с печатью, все реквизиты — всё как нужно. | Просто оформить заказ и получить электронно. | Есть доставка в другие города. | Безопасная оплата, всё официально. | Работают с разными системами налогообложения. | Есть примеры чеков на сайте. | Много положительных отзывов о сервисе. | Распечатал — и в бухгалтерию. | Сайт надёжный, без скрытых условий. действительные чеки для отчета.
Купить диплом университета по доступной стоимости вы сможете, обращаясь к надежной специализированной компании. Мы оказываем услуги по продаже документов об окончании любых ВУЗов Российской Федерации. Купить диплом любого ВУЗа– diplom4you.com/diplom-s-zaneseniem-v-reestr-tsena-6/
Витебский университет П.М.Машерова https://vsu.by образовательный центр. Вуз является ведущим образовательным, научным и культурным центром Витебской области.
Быстрая доставка действительных чеков по всей России. | Доступные цены и быстрый отклик — отличный сервис. | Просто оформить заказ и получить электронно. | Отличный выбор для бухгалтеров. | Чеки от самозанятых — тоже принимаются. | Подходит и для командировок, и для закупок. | Быстрое оформление и подтверждение. | Легко оформить на сайте — всё интуитивно. | Подробное описание каждого чека. | Доверяю этому сервису не первый раз. чеки для отчетности купить цена .
Быстрая доставка действительных чеков по всей России. | Помощь в срочной отчётности — действительно работает. | Можно указать сумму, категорию расходов, дату. | Чеки в формате PDF, подходят для отчётности. | Безопасная оплата, всё официально. | Чеки подходят для отчёта в любую бухгалтерию. | Есть возможность заказа с НДС или без. | Подходит для командировочных и разовых отчётов. | Подходит для бизнеса и личных целей. | Доверяю этому сервису не первый раз. чеки. для. отчетности. люберцы..
Быстрая доставка действительных чеков по всей России. | Чеки для отчётности от самозанятых — тоже есть. | Чеки подходят и для ИП, и для юрлиц. | Хорошее соотношение цены и качества. | Актуальные и действующие чеки под отчёт. | Выгодно, особенно если нужен большой объём чеков. | Качество чеков соответствует нормам. | Можно выбрать из нескольких форматов. | Подробное описание каждого чека. | Доверяю этому сервису не первый раз. купить чеки для отчетности в москве.
Купить диплом об образовании!
Приобрести диплом ВУЗа по выгодной стоимости можно, обратившись к надежной специализированной фирме. Приобрести диплом о высшем образовании: diplomnie.com/ofitsialnij-diplom-s-reestrom-kupit-s-garantiej
Где заказать чеки для отчётности без лишней волокиты? | Купил чеки и спокойно закрыл отчёт по командировке. | Есть поддержка, отвечают на вопросы по налогам. | Нужно было срочно — выручили за день. | Чеки проходят любой внутренний аудит. | Чеки подходят для отчёта в любую бухгалтерию. | Есть примеры чеков на сайте. | Использую для отчётности ИП — без проблем. | Полностью соответствуют требованиям законодательства. | Сайт надёжный, без скрытых условий. http://www.dzen.ru/a/Z_kGwEnhIQCzDHyh.
Ищете чеки с НДС? Этот сайт подойдёт идеально. | Купил чеки и спокойно закрыл отчёт по командировке. | Нужны чеки с подтверждением — рекомендую сюда. | Отличный выбор для бухгалтеров. | Качественные чеки без подделок. | Подходит и для командировок, и для закупок. | Есть примеры чеков на сайте. | Всё чётко: дата, сумма, организация. | Распечатал — и в бухгалтерию. | Лучшее решение для занятых предпринимателей. чеки от самозанятого.
?Hola fanaticos del casino
Los juegos de casino sin licencia incluyen versiones con crupier en vivo, ruletas Гєnicas y tragamonedas de alto rendimiento.
Los mejores casinos online sin licencia actualizan su catГЎlogo constantemente. Esto incluye nuevos juegos, funciones y proveedores. Mantente al tanto para no perder oportunidades.
Mas detalles en el enlace – п»їhttp://casinossinlicenciaenespana.guru
?Que tengas excelentes ventajas!
Официальный сайт rox casino обновляется быстро. Интерфейс сайта rox casino очень понятный. Много способов пополнения и вывода. Можно играть с минимальными ставками. Множество положительных отзывов о rox. Вход через зеркало — быстро и просто. Сайт стабильно работает даже при нагрузке. Rox — моё главное казино. Есть раздел с отзывами игроков скачать rox casino.
Рабочее зеркало rox casino всегда доступно. Отличная программа лояльности для игроков. Дизайн сайта rox casino современный и приятный. Постоянные акции делают игру интереснее. Rox casino — одно из лучших онлайн казино. Функционал сайта радует своей продуманностью. Постоянные турниры с большими призами. Много положительных эмоций от игры. Игры запускаются моментально rox casino 365.
Рабочее зеркало rox casino всегда доступно. Слоты на сайте постоянно обновляются. Выигрыши приходят вовремя, без задержек. Приложение на андроид работает стабильно. Удобная фильтрация по провайдерам. Вход через зеркало — быстро и просто. Зеркало 1414 работает без перебоев. Функция быстрого пополнения доступна. Возможность играть с телефона rox. casino..
Заинтересованы в качественной продукции?, Camogear. У нас широкий ассортимент. Не пропустите шанс, посмотреть новинки. Присоединяйтесь к нам. в каждой покупке – это наша цель. Наслаждайтесь покупками.
штани мультикам штани мультикам .
На сайте rox casino удобно играть с мобильного. Отличная программа лояльности для игроков. Выигрыши приходят вовремя, без задержек. Rox casino заслуживает внимания всех игроков. Множество положительных отзывов о rox. Моментальный доступ к любимым слотам. Сайт стабильно работает даже при нагрузке. Есть VIP-программа для активных игроков. Игры запускаются моментально рабочее зеркало rox.
Рабочее зеркало rox casino всегда доступно. Интерфейс сайта rox casino очень понятный. Зеркало сайта rox casino работает стабильно. Играю на rox casino — выигрываю и отдыхаю. Платежи защищены и проходят моментально. Вход через зеркало — быстро и просто. Сайт стабильно работает даже при нагрузке. Всё честно и прозрачно. Хорошие акции для новичков промокод rox casino.
аренда машины в сочи посуточно без водителя arenda avtomobilya sochi
Официальный сайт rox casino обновляется быстро. Депозит зачисляется мгновенно, удобно играть. Дизайн сайта rox casino современный и приятный. Уровень безопасности на сайте высокий. На сайте часто появляются новые игры. Функционал сайта радует своей продуманностью. Прозрачные условия бонусных программ. Всё честно и прозрачно. Обзор rox casino впечатляет официальный сайт rox casino.
Психиатрическая клиника СПб для лечения неврозов, фобий и постстрессовых состояний
частная психиатрическая больница спб klinika-psikhiatrii-spb.ru .
Как выбрать пластиковые окна с оптимальным соотношением цена-качество
рехау пластиковые окна https://plastikovye-okna-master.ru/ .
долгосрочная аренда авто в москве аренда авто в москве без водителя недорого
Наш сервисный центр Bosch в Москве предоставляет надежный ремонт бытовой техники Bosch от ведущего немецкого бренда. Наши квалифицированные мастера быстро и качественно устранят любые неисправности вашей техники Bosch. Используем только оригинальные запчасти и современные технологии для гарантированного восстановления функциональности вашего оборудования. Ремонт осуществляется как на дому у клиента, так и в нашем сервисном центре. Обращайтесь к нам для быстрого и надежного ремонта вашей техники Bosch. Заказать ремонт вытяжек bosch в москве на дому просто – оставьте заявку на сайте или позвоните.
Быстрая регистрация в pinco и простая навигация. Отличная поддержка клиентов в pinko. pinko — это лицензированное казино. Вывод выигрыша с pinko без комиссии. Отзывы о pinko в Казахстане позитивные. На pinko работают лучшие слоты от провайдеров. pinko казино Казахстан — игра без рисков. pinko работает круглосуточно без сбоев. pinko можно использовать как на ПК, так и на телефоне пинко казино.
pinko kz радует широким выбором автоматов. Можно пополнить счет на pinko несколькими способами. Моментальный вывод средств на pinko. Дизайн pinko минималистичный и удобный. Отзывы о pinko в Казахстане позитивные. pinko казино — стабильная площадка для ставок. pinko — это честные выплаты и прозрачные правила. Есть VIP-программа на pinko для активных игроков. pinko — казино нового поколения pinco зеркало.
pinko казино — лучший выбор для новичков. Отличная поддержка клиентов в pinko. pinko Казахстан предлагает выгодные условия. pinko официальный сайт всегда доступен. Поддержка pinko отвечает оперативно. pinko дает бездепозитные бонусы. Отзывы о pinko на форумах — положительные. Все данные в pinko надёжно защищены. pinko можно использовать как на ПК, так и на телефоне пинко бонусы.
Потолки для вашего дома от natyazhnye-potolki-dnepr.biz.ua , где современные решения становятся реальностью, обновите свой дом, решение, которое преобразит ваш дом.
Современные решения для потолков от natyazhnye-potolki-dnepr.biz.ua, профессиональный подход, которые создадут уют и гармонию, закажите прямо сейчас.
Доступные натяжные потолки в Днепре, от natyazhnye-potolki-dnepr.biz.ua, придайте вашему интерьеру свежесть, не упустите шанс.
Индивидуальный подход к каждому клиенту, потолки, которые вдохновляют, создайте уникальный стиль, с нами это легко.
Натяжные потолки для квартир и офисов, по европейским стандартам, всё для вашего удобства, на нашем сайте вы найдете именно то, что ищете.
Натяжные потолки: преимущества и возможности, для вашего дома, долговечность и надежность, обеспечьте себе комфорт.
Эстетические решения для вашего потолка, всё на natyazhnye-potolki-dnepr.biz.ua, превратите потолок в произведение искусства, мы поможем вам с выбором.
Секреты успешного выбора потолка, в Днепре и за его пределами, где ваши желания становятся реальностью, свой идеальный потолок в 3 шага.
Натяжные потолки от профессионалов, с многолетним опытом на рынке, мы знаем, как сделать ваш потолок идеальным, придайте своему интерьеру новое дыхание.
Лучшие предложения на натяжные потолки, на natyazhnye-potolki-dnepr.biz.ua, у нас отличный сервис и выбор, позвоните нам сегодня.
Натяжные потолки: быстро и стильно, с качеством, проверенным временем, всегда профессионально, начните свой проект с нами.
Идеальные потолки для вашего дома, где стиль встречается с практичностью, на любой вкус и бюджет, закажите консультацию.
Ваш надежный партнер в мире натяжных потолков, где качество не подвело ни разу, долговечность и стиль, сделайте свой выбор с умом.
Натяжные потолки для ваших идей, с заботой о каждом клиенте, где ваши идеи становятся реальностью, действуйте сейчас.
Ваш потолок — ваша гордость, потолки для любого стиля, долговечные и стильные решения, закажите прямо сейчас.
Натяжные потолки: качество и стиль, где качество — превыше всего, всё для вашего комфорта, сделайте правильный выбор.
натяжные потолки натяжные потолки .
pinko казино — лучший выбор для новичков. pinko официальный сайт безопасен и надежен. pinko работает в Казахстане на официальной основе. У пинко отличные отзывы в интернете. Отзывы о pinko в Казахстане позитивные. В pinko удобный фильтр игр по провайдеру. Есть демо-режим в слотах на pinko. pinko даёт приветственный бонус новым игрокам. Служба поддержки pinko доступна 24/7 pinco Казахстан.
Есть удобное зеркало пинко для доступа. pinko — одно из топовых казино в РК. На pinko доступны все популярные слоты. pinko радует высокой скоростью загрузки. В pinco легко разобраться даже новичку. pinko дает бездепозитные бонусы. Сайт pinko полностью адаптирован под казахский рынок. pinko работает круглосуточно без сбоев. pinko поддерживает ставки на спорт и киберспорт пинко казино.
Официальный сайт pinko работает стабильно. Бонусы от pinko помогают увеличить шансы. Регистрация в pinko занимает всего пару минут. Игры на pinko запускаются мгновенно. На pinko есть раздел с live казино. pinko.kz — проверенный временем бренд. Казино pinko запускается даже на слабых устройствах. Интерфейс pinko поддерживает русский язык. pinko — казино нового поколения пинко казино.
авто в прокат на заказ http://avto-arenda-cena213.ru
прокат авто в спб без водителя аренда авто дешево санкт петербург
Комплексный вывод из запоя с детоксикацией и восстановлением организма
срочное выведение из запоя http://vyvod-iz-zapoya-spb-1.ru/ .
WEB PAFI TERINTEGRASI: Fungsi Penting Farmasi dalam Era Digital
Sekilas Tentang PAFI
Sejak Indonesia merdeka, para Ahli Farmasi turut berperan aktif dalam pengembangan sistem kesehatan. Berdirinya Persatuan Ahli Farmasi Indonesia (PAFI) menjadi momen bersejarah sebagai wadah profesional di bidang farmasi. Berazaskan Pancasila, PAFI bersumpah untuk:
• Meningkatkan taraf kesehatan rakyat
• Memodernisasi farmasi Indonesia
• Meningkatkan kesejahteraan anggota
Platform Terpadu PAFI: Terobosan Modern untuk Dunia Farmasi Digital
Menghadapi tantangan era digital, PAFI meluncurkan sistem terintegrasi ini – terobosan teknologi yang memfasilitasi pekerjaan apoteker melalui:
? Update Terbaru – Ketersediaan peraturan farmasi, temuan terbaru, dan prospek pekerjaan
? Pengembangan Kompetensi – Fasilitas pelatihan dan sertifikasi daring
? Komunitas Praktisi – Sarana kerjasama nasional
Sistem digital ini memperkuat kontribusi PAFI dalam meningkatkan kesehatan nasional melalui pemanfaatan teknologi terkini.
Tantangan Kefarmasian Era Digital
Keberadaan platform digital PAFI menjadi bukti revolusi teknologi dalam profesi farmasi. Dengan terus mengembangkan kapabilitas sistem, PAFI berjanji untuk:
• Menggalakkan terobosan dalam farmasi
• Memperkuat standar profesional
• Mempermudah akses kesehatan masyarakat
Penutup
PAFI dengan adanya WEB PAFI Terintegrasi selalu berada di garda depan dalam menjembatani kemajuan teknologi dengan pekerjaan apoteker. Inisiatif ini tidak hanya meningkatkan fungsi tenaga kefarmasian, tetapi juga berkontribusi nyata bagi peningkatan kesehatan nasional di era digital.
Если ищете надёжное онлайн казино в Кыргызстане — попробуйте Пинко. Pinco казино поддерживает пользователей из Кыргызстана. Промокод pinco приносит дополнительные фриспины. Pinco работает даже при ограничении доступа — всегда в обход. Быстрые выплаты и честная статистика — это всё про Pinco. В pinco можно играть даже ночью — поддержка всегда на связи. Казино pinco — это безопасность и качество. В pinco всегда можно найти выгодный промокод. Зеркало pinco доступно без VPN pinco casino.
Пинко казино предлагает отличный выбор азартных игр. Pinco — современная букмекерская контора и онлайн казино. На сайте pinco casino часто проходят акции и турниры. Играйте в pinco на Android — всё работает идеально. Удобное зеркало pinco работает всегда. Играю в pinco уже год — проблем не было. Выбирайте pinco и забудьте о проблемах с доступом. Пинко отлично адаптировано под мобильные устройства. Pinco — реальное казино с живыми ставками pinco-kyrgyzstan.website.yandexcloud.net/.
Pinco предлагает удобный вход и простую навигацию. Pinco казино поддерживает пользователей из Кыргызстана. Попробовал pinco и теперь не играю больше нигде. У pinco отличная бонусная программа и ежедневные награды. Пинко предоставляет большой выбор live-игр. Играю в pinco уже год — проблем не было. Pinco предлагает ставки на спорт с высоким коэффициентом. В pinco всегда можно найти выгодный промокод. Pinco поддерживает киргизский и русский язык pinco-kyrgyzstan.website.yandexcloud.net/.
pg slot mahjong
PORTAL DIGITAL PAFI: Peran Strategis Farmasi di Dunia Digital
Sekilas Tentang PAFI
Pasca kemerdekaan RI, para Apoteker turut berperan aktif dalam pengembangan sistem kesehatan. Kehadiran organisasi profesi farmasi ini menjadi momen bersejarah sebagai wadah profesional di bidang farmasi. Berlandaskan Pancasila, PAFI bertekad untuk:
• Meningkatkan taraf kesehatan rakyat
• Menyempurnakan bidang farmasi di Tanah Air
• Meningkatkan kesejahteraan anggota
Platform Terpadu PAFI: Inovasi Teknologi untuk Farmasi Modern
Menyongsong revolusi digital, PAFI memperkenalkan WEB PAFI Terintegrasi – solusi canggih yang menunjang profesi kefarmasian melalui:
? Update Terbaru – Akses regulasi kesehatan, perkembangan ilmiah, dan prospek pekerjaan
? Pengembangan Kompetensi – Layanan pembelajaran jarak jauh
? Jaringan Ahli – Wadah kolaborasi bagi seluruh ahli farmasi
Platform ini memperkuat kontribusi PAFI dalam mengembangkan kesehatan nasional melalui pemanfaatan teknologi terkini.
Masa Depan Kefarmasian Era Digital
Keberadaan platform digital PAFI menjadi bukti transformasi digital dalam dunia kefarmasian. Dengan terus mengembangkan kapabilitas sistem, PAFI berjanji untuk:
• Menggalakkan terobosan dalam farmasi
• Menyempurnakan kualitas profesi
• Meningkatkan akses kesehatan masyarakat
Kesimpulan
PAFI berkat platform digital ini terus menjadi pionir dalam memadukan kemajuan teknologi dengan dunia kefarmasian. Inisiatif ini tidak hanya mengokohkan posisi tenaga kefarmasian, tetapi juga berkontribusi nyata bagi kemajuan kesehatan bangsa di masa modern.
Пинко казино предлагает отличный выбор азартных игр. Pinco — современная букмекерская контора и онлайн казино. Pinco casino online работает без проблем на телефоне. Казино пинко имеет отличный дизайн и отзывчивую поддержку. Пинко предоставляет большой выбор live-игр. Pinco предоставляет кэшбэк и бонусы без депозита. Выбирайте pinco и забудьте о проблемах с доступом. Pinco casino поддерживает игры с живыми дилерами. Pinco поддерживает киргизский и русский язык pinco-kyrgyzstan .website .yandexcloud .net.
Pinco предлагает удобный вход и простую навигацию. Пинко — это безопасность, скорость выплат и щедрые бонусы. Зеркало pinco помогает обходить любые блокировки. Зарабатываю в Pinco на спортивных ставках — советую. Играть в pinco можно с минимальными ставками — отличный вариант для новичков. Pinco предоставляет кэшбэк и бонусы без депозита. Пинко казино — это современная и надёжная платформа. В pinco всегда можно найти выгодный промокод. В pinco играют тысячи довольных клиентов ежедневно pinco казино.
Pinco предлагает удобный вход и простую навигацию. Пинко — это безопасность, скорость выплат и щедрые бонусы. Pinco casino online работает без проблем на телефоне. Пинко казино предлагает топовые игровые автоматы. Пинко казино — это азарт, драйв и реальные выигрыши. Pinco — это честный геймплей и высокие коэффициенты в ставках. Выбирайте pinco и забудьте о проблемах с доступом. На pinco можно играть в любое время суток. В pinco играют тысячи довольных клиентов ежедневно pinco-kyrgyzstan .website .yandexcloud .net.
Закажите строительство каркасного дома под ключ с фиксированной ценой
каркасные дома цена под ключ karkasnye-doma-msk-pod-kluch.ru .
Каркасные дома для комфортной жизни за городом без лишних затрат
каркасные дома под ключ цены http://www.karkasnye-doma-msk-pod-kluch0.ru .
pg slot mahjong
WEB PAFI TERINTEGRASI: Fungsi Penting Farmasi dalam Era Digital
Sekilas Tentang PAFI
Sejak Indonesia merdeka, para Ahli Farmasi memberikan andil dalam pengembangan sistem kesehatan. Berdirinya organisasi profesi farmasi ini menjadi momen bersejarah sebagai asosiasi di bidang farmasi. Berlandaskan Pancasila, PAFI berkomitmen untuk:
• Memajukan kualitas kesehatan publik
• Menyempurnakan farmasi Indonesia
• Memperbaiki kesejahteraan anggota
Platform Terpadu PAFI: Terobosan Modern untuk Farmasi Modern
Menyongsong revolusi digital, PAFI menghadirkan WEB PAFI Terintegrasi – solusi canggih yang mendukung pekerjaan apoteker melalui:
? Update Terbaru – Ketersediaan regulasi kesehatan, riset mutakhir, dan kesempatan profesional
? Pelatihan Profesional – Fasilitas kursus online bersertifikat
? Jejaring Profesional – Wadah kolaborasi se-Indonesia
Sistem digital ini meningkatkan peran PAFI dalam meningkatkan kesehatan nasional melalui adaptasi perkembangan teknologi.
Peluang Kefarmasian Era Digital
Hadirnya WEB PAFI Terintegrasi merupakan tanda revolusi teknologi dalam profesi farmasi. Dengan terus mengembangkan kapabilitas sistem, PAFI bertekad untuk:
• Memacu pembaruan layanan farmasi
• Meningkatkan kriteria keahlian
• Meningkatkan akses kesehatan masyarakat
Epilog
PAFI berkat WEB PAFI Terintegrasi selalu berada di garda depan dalam menjembatani inovasi digital dengan pekerjaan apoteker. Terobosan ini tidak hanya meningkatkan fungsi apoteker, tetapi juga berperan aktif bagi pembangunan kesehatan di Indonesia di masa modern.
Святки
Святки
willowlike
oreilet
parametrical
eudiometer
repugnantly
сервисный центр аристон в москве сервисный центр ariston
Мы предлагаем дипломы любой профессии по доступным тарифам.
Вы приобретаете диплом через надежную компанию. Приобрести диплом университета– http://meetspot.com/blogs_write.phpid=/ – meetspot.com/blogs_write.phpid=
Приветствую!
Для определенных людей, заказать диплом о высшем образовании – это необходимость, возможность получить хорошую работу. Но для кого-то – это желание не терять время на учебу в универе. С какой бы целью вам это не понадобилось, мы готовы помочь. Быстро, качественно и по разумной цене изготовим диплом нового или старого образца на подлинных бланках со всеми подписями и печатями.
Главная причина, почему люди покупают дипломы, – желание занять хорошую работу. К примеру, способности и опыт дают возможность человеку устроиться на желаемую работу, а документального подтверждения квалификации нет. В том случае если для работодателя важно присутствие “корочек”, риск потерять место работы довольно высокий.
Приобрести документ о получении высшего образования можно в нашей компании. Мы оказываем услуги по продаже документов об окончании любых университетов России. Вы получите необходимый диплом по любой специальности, включая документы СССР. Гарантируем, что при проверке документа работодателем, никаких подозрений не возникнет.
Разных ситуаций, которые вынуждают приобрести диплом о среднем образовании очень много. Кому-то срочно нужна работа, а значит, нужно произвести впечатление на начальство при собеседовании. Некоторые планируют устроиться в серьезную компанию, чтобы повысить свой статус и в будущем начать свое дело. Чтобы не терять впустую годы жизни, а сразу начать успешную карьеру, используя врожденные таланты и полученные знания, можно купить диплом в интернете. Вы сможете стать полезным для общества, получите денежную стабильность в максимально короткий срок- купить диплом техникума
тревожная кнопка тревожная кнопка .
Цветы с доставкой — когда хочется сказать «спасибо» по-особенному
букет из гортензий https://www.cvety-s-dostavkoi.ru/rubric/gortenzii .
nba免費線上看
2025年NBA免費線上看直播:籃球投注與即時更新的完整指南
隨著全球體育迷對線上博弈和賽事直播的需求不斷增長,NBA作為最受歡迎的籃球聯賽之一,自然成為了眾多球迷關注的焦點。2025年的NBA賽季將帶來更多精采的比賽,而如何免費觀看這些比賽並參與場中投注,已成為球迷們最關心的話題。本文將為您提供完整的NBA免費線上看直播教學、即時比分更新、以及相關的投注技巧。
一、NBA免費線上看直播的管道
不論是季後賽(4月-5月)還是總決賽(6月),NBA的每一場比賽都充滿激情與挑戰。以下是幾種常見的免費直播方式:
1. 線上直播平台
OB體育電視台 、鑫寶體育電視台 、SUPER體育電視台 等平台提供免費註冊服務,新用戶還可獲得168預測金,讓您在觀看比賽的同時也能進行運彩投注。
只需簡單註冊帳號,選擇【熊貓體育】或【RG富遊體育電視台】,即可輕鬆進入NBA籃球LIVE直播。
2. 電視轉播頻道
華視NBA籃球頻道 、ELTA TV 、以及中華電信MOD 也提供64場全賽事的LIVE轉播,適合喜歡透過電視欣賞比賽的球迷。
如果您偏好手機觀看,可以訂閱Hami Video NBA專區 ,每月僅需149元即可享受所有賽事的高清轉播。
二、如何註冊/登入以免費觀看NBA直播?
如果您想通過線上平台觀看NBA直播,以下是詳細步驟:
點選【RG官網】或【富遊娛樂城】官網,選擇「註冊/登入」。
輸入會員資料完成註冊。
登入後,點選【熊貓體育】或【體育直播】分類。
選擇NBA籃球視頻直播,即可免費觀看您感興趣的比賽。
三、NBA即時比分與場中投注
對於熱衷於運動彩券的球迷來說,NBA不僅是一場視覺盛宴,更是投注的好時機。以下是一些實用的投注建議:
即時比分更新 :透過【RG富遊體育電視台】或【熊貓體育】,您可以隨時掌握比賽進展,並根據比分變化調整投注策略。
場中投注技巧 :例如,在比賽關鍵時刻(如延長賽或最後三分鐘),利用即時數據進行快速下注,往往能提高勝率。
此外,NBA季後賽和總決賽期間,各平台通常會推出特別優惠活動,例如加倍獎金或贈送預測金,讓您的投注更有趣味性。
四、其他熱門賽事推薦
除了NBA之外,2025年還有許多值得期待的體育盛事:
2024夏季奧運 :涵蓋多項運動項目,是體育迷不容錯過的國際賽事。
2024歐洲盃 :足球迷的年度盛宴,各國勁旅爭奪最高榮譽。
2024 WBC世界棒球經典賽 :棒球愛好者的狂歡節,亞洲強隊表現備受矚目。
2023-2024英超聯賽 :足球迷必追的頂級聯賽,精彩程度無與倫比。
五、結語
無論您是單純的NBA球迷,還是熱衷於運動彩券投注的玩家,2025年的NBA賽季都將為您帶來無限樂趣。透過本文介紹的免費直播管道與投注技巧,您可以輕鬆享受每場比賽的刺激與精彩。現在就趕快註冊帳號,加入這場籃球狂歡吧!
立即行動!登入【熊貓體育】或【RG富遊體育電視台】,開啟您的NBA免費線上看之旅!
Подбор и продажа бу запчастей — быстро, удобно, недорого
автозапчасти б у https://zapchasti-bu1-minsk.ru .
Для успешного продвижения по карьерной лестнице потребуется наличие диплома института. Заказать диплом института у проверенной компании: dip-lom-rus.ru/kupit-diplom-v-ufe-bistro-i-bez-lishnix-problem/
Мы изготавливаем дипломы любой профессии по приятным тарифам.– diplomist.com/kupit-diplom-s-zaneseniem-v-reestr-bistro-i-nadezhno-6/
Для эффективного продвижения вверх по карьерной лестнице требуется наличие диплома о высшем образовании. Приобрести диплом любого института у сильной компании: diplomp-irkutsk.ru/kupit-diplom-o-srednem-texnicheskom-obrazovanii-2/
clock radio good sound cd player alarm
Мы готовы предложить дипломы любых профессий по выгодным ценам.– diplomp-irkutsk.ru/kupit-diplom-s-garantiej-vneseniya-v-reestr-2/
The convenient booking hotel in Zabljak service will help you find the perfect hotel for car travelers and active holiday lovers. A wide range of accommodation: from cozy guest houses to modern hotels with parking, Wi-Fi and breakfast. Book in advance and relax in comfort in the heart of Montenegro!
The best online slots rise of olympus in one place: classics, new releases, jackpots and themed machines. Play without registration, test the demo or make real bets with bonuses.
Профессиональное агентство рекламное агентство Витрувий: разработка рекламы, брендинг, digital-маркетинг, наружка и SMM. Комплексное продвижение для бизнеса любого масштаба.
Купить диплом университета по невысокой цене можно, обращаясь к проверенной специализированной фирме. Заказать документ о получении высшего образования вы сможете в нашем сервисе. kupitediplom.ru/kupite-diplom-s-zaneseniem-v-reestr-otzivi-klientov-4
маркетплейс аккаунтов соцсетей marketplace-akkauntov-top.ru
Мы можем предложить дипломы психологов, юристов, экономистов и прочих профессий по выгодным ценам. Всегда стараемся поддерживать для заказчиков адекватную ценовую политику. Для нас важно, чтобы документы были доступными для большого количества наших граждан.
Заказ диплома, который подтверждает обучение в ВУЗе, – это рациональное решение. Приобрести диплом любого университета: kupite-diplom0024.ru/kupit-diplom-srednee-spetsialnoe-obrazovanie-3/
за сколько можно купить аттестат за сколько можно купить аттестат .
Заказать диплом ВУЗа по невысокой цене возможно, обращаясь к надежной специализированной фирме. Приобрести документ института можно в нашей компании. rusd-diplomj.ru/kupite-diplom-s-vneseniem-v-reestr-bistro-i-udobno
Купить диплом любого ВУЗа!
Мы предлагаемвыгодно купить диплом, который выполнен на бланке ГОЗНАКа и заверен мокрыми печатями, водяными знаками, подписями официальных лиц. Данный документ пройдет любые проверки, даже при использовании специфических приборов. Достигайте свои цели быстро и просто с нашими дипломами- funchange.getbb.ru/viewtopic.phpf=8&t=4156
Просторный каркасный дом с эргономичной планировкой
каркасные дома под ключ в спб цены [url=https://karkasnye-doma-pod-kluch-spb1.ru]https://karkasnye-doma-pod-kluch-spb1.ru[/url] .
Can you be more specific about the content of your article? After reading it, I still have some doubts. Hope you can help me.
Мы изготавливаем дипломы психологов, юристов, экономистов и любых других профессий по приятным ценам. Всегда стараемся поддерживать для клиентов адекватную ценовую политику. Для нас важно, чтобы дипломы были доступными для большинства граждан.
Покупка диплома, подтверждающего окончание института, – это выгодное решение. Заказать диплом ВУЗа: 1magistr.ru/diplom-texnicheskij-kupit-2/
аттестат купить выходить аттестат купить выходить .
мостбет кыргызстан скачать мостбет кыргызстан скачать .
мрстбет https://mostbet7005.ru/ .
поддержка мостбет https://www.mostbet7005.ru .
mostbet игры http://mostbet7005.ru .
ClubGG
Куршская коса экскурсия из Светлогорска https://kurshskaya-kosa-ekskursii.ru/ с обедом в кафе на дюнах
Заказать диплом о высшем образовании!
Наша компания предлагаетвыгодно заказать диплом, который выполнен на бланке ГОЗНАКа и заверен печатями, водяными знаками, подписями официальных лиц. Наш диплом способен пройти любые проверки, даже при помощи специальных приборов. Решите свои задачи быстро и просто с нашими дипломами- nauc.info/forums/viewtopic.phpt=20878855
Мы изготавливаем дипломы любой профессии по разумным тарифам. Дипломы производятся на подлинных бланках государственного образца Купить диплом о высшем образовании diplomt-nsk.ru
Где купить диплом по необходимой специальности?
Купить диплом института по выгодной цене возможно, обращаясь к проверенной специализированной компании.: kupite-diplom0024.ru
Купить диплом университета по доступной стоимости вы можете, обращаясь к проверенной специализированной фирме. Купить документ о получении высшего образования можно у нас. vacshidiplom.com/kupit-gosudarstvennij-diplom-s-zaneseniem-v-reestr-14
Приобрести диплом о высшем образовании !
Приобретение диплома любого ВУЗа РФ у нас – надежный процесс, так как документ заносится в государственный реестр. Приобрести диплом любого ВУЗа dip-lom-rus.ru/kupite-diplom-s-zaneseniem-v-reestr-otzivi-nashix-klientov
Будучи студентом, я наслаждался учебой до тех пор, пока не пришло время писать диплом. Но паниковать не стоило, ведь существуют компании, которые помогают с написанием и защитой диплома на отличные оценки!
Изначально я искал информацию по теме: где купить диплом о среднем, купить диплом высшем образовании без предоплаты, купить диплом колледжа цена, диплом медсестры с занесением в реестр спб, купить дипломы колледжа, затем наткнулся на diplomybox.com/kupit-diplom-o-vysshem-obrazovanii-v-yaroslavle
сервисный центр aeg ремонт стиральных машин в москве aeg
mostbet mostbet .
Каркасный дом — выбор тех, кто ценит комфорт, надёжность и экономию
каркасный дом http://karkasnye-doma-pod-kluch-spb1.ru .
?Hola fanaticos del casino
Muchas casas de apuestas sin licencia en EspaГ±a aceptan criptomonedas. Esto significa transacciones rГЎpidas,
Jugar en casas de apuestas de EspaГ±a puede ser cГіmodo, pero si buscas mГЎs variedad de juegos, prueba opciones con licencias de Curazao o Malta.
Mas detalles en el enlace – п»їhttps://casasdeapuestassinlicenciaespana.xyz/
?Que tengas excelentes exitos!
казино онлайн kg http://www.mostbet6013.ru .
Каркасный дом от 100 м? с тремя спальнями и просторной кухней
каркасные дома санкт петербург http://karkasnye-doma-spb-pod-kluch0.ru/ .
Планируете доставить груз по России? Обратитесь к нам – компания Vozim — проверенный партнер для логистики любых товаров. Мы гарантируем сохранность ваших посылок и контроль сроков. С нами вы оптимизируете расходы благодаря автоматизированному трекингу.
¡Hola aventureros del juego
Consulta su sitio web para ver el listado oficial.
Las mejores pГЎginas de apuestas EspaГ±a suelen actualizar sus promociones cada semana. Aprovecha giros gratis, apuestas sin riesgo y cashbacks.
Consulta el enlace para más información – http://casasdeapuestassinlicenciaespana.xyz/
¡Por muchos tiempos entretenidos!
Хотите оптимизировать грузоперевозки? Vozim — это инновационные решения для бизнеса. Мы гарантируем перевозки любой сложности с онлайн-отслеживанием. Доверьтесь нам — и сэкономите время!
купить гифт карту продажа подарочной карты
mostbet официальный сайт https://mostbet6013.ru/ .
Индивидуальные римские шторы для вашего дома
римские шторы на заказ римские шторы на заказ .
Сшить шторы на заказ по индивидуальному проекту, лучшие цены.
Идеальные шторы по вашим размерам, быстро.
Изготовление штор на заказ, под любой стиль.
Эксклюзивные шторы на заказ, по индивидуальному дизайну.
Идеальные шторы на заказ для гостиной, с учетом модных трендов.
Профессиональный пошив штор по вашим размерам, по вашим желанием.
Пошив штор для нестандартных окон, используя современные технологии.
Эксклюзивные шторы на заказ, от профессионалов.
Минималистичные шторы на заказ, с учетом светотени.
Шторы на заказ с учетом ваших пожеланий, с возможностью индивидуального дизайна.
Премиальные ткани для штор на заказ, под любой интерьер.
Изготовление штор на заказ быстро и недорого, с высоким качеством.
Модные шторы на заказ для вашего дома, под ваш бюджет.
Дизайнерские шторы на заказ, подчеркните стиль вашего помещения.
Шторы на заказ с доставкой и монтажом, по мере необходимости.
Высококачественные шторы на заказ, по желанию клиента.
сшить шторы на заказ сшить шторы на заказ . Prokarniz
?Hola participantes de casino
Con una cuenta en casas de apuestas internacionales, accedes a mercados mГЎs amplios y bonos mГЎs altos.
Juega en casa apuestas que entiendan lo que buscas: rapidez, anonimato, buenas cuotas y promociones reales. Hay muchas opciones fuera del circuito tradicional.
Casas apuestas sin licencia con apuestas en directo – recomendamos que haga sus apuestas desde aquí.
?Que tengas excelentes premios!
скачат мостбет https://mostbet6013.ru/ .
Нужна недорогая доставка грузов? Vozim решит задачу любой сложности! Собственный парк автомобилей, GPS-мониторинг и опытные водители — ваши посылки будут в сохранности. Мы работаем по всей России, предлагая комплексные решения для бизнеса и частных лиц.
Мы готовы предложить дипломы любой профессии по выгодным тарифам.– diplomass.com/kupit-diplom-s-zaneseniem-v-reestr-bistro-i-nadezhno-6/
auto vehicle transport how to ship a car to another state
Купить диплом университета!
Мы можем предложить документы институтов, расположенных на территории всей РФ.
diplom4you.com/kupit-diplom-v-reestre-prostim-sposobom/
Если вам нужна надёжная доставка грузов по России, обратите внимание на компания Vozim — профессионалов в сфере логистики. Мы обеспечиваем бережную транспортировку любых партий, будь то оборудование или крупногабаритные грузы. С нами вы сэкономите время и минимизируете риски при перевозках.
Пошив штор любой сложности
пошив штор на заказ пошив штор на заказ .
Как выбрать материалы для штор в загородном доме
шторы в загородном доме шторы в загородном доме .Ткацкий
vehicle transport quote moving cars for dealerships
купить гифт подарочный сертификат карта купить
Заказать диплом ВУЗа по невысокой цене возможно, обратившись к надежной специализированной фирме. Мы предлагаем документы об окончании любых ВУЗов Российской Федерации. Заказать диплом о высшем образовании– diplomt-nsk.ru/kupit-diplom-s-zaneseniem-v-reestr-po-vigodnoj-tsene-17/
Сложно оторваться от comatozze xxx видео. Настоящая находка — коматоцце. Для поклонников качественной съемки — только comatozze. Видео comatozze хочется пересматривать снова и снова. Это стоит каждого мегабайта — comatozze видео. Не думал, что найду такой уровень — comatozze. Спасибо создателям за comatozze. Если хотите эстетики — заходите на comatozze. Теперь советую всем — comatozze это must comatozze 2024.
Хотите упростить снабжение? Vozim — это инновационные решения для бизнеса. Мы предлагаем перевозки любой сложности с онлайн-отслеживанием. Доверьтесь нам — и сэкономите время!
Современные каркасные дома в скандинавском стиле с продуманной планировкой
каркасные дома под ключ в спб цены https://www.karkasnye-doma-spb-pod-kluch0.ru/ .
Сайт comatozze.com удивил качеством. Натуральность и харизма comatozze подкупает. Сюжеты у comatozze затягивают с первых секунд. Ничего лишнего, только огонь — comatozze. Моя новая зависимость — comatozze full. Коматоцце — это не просто видео, это стиль. Приятно смотреть — comatozze умеет. Сайт comatozze работает отлично. Аналогов просто нет — comatozze смотреть comatozze.
Диплом университета Российской Федерации!
Без ВУЗа трудно было продвинуться вверх по карьерной лестнице. Именно поэтому решение о покупке диплома следует считать мудрым и рациональным. Приобрести диплом университета graph.org/Diplom-lyuboj-specialnosti–operativno-i-nadezhno-03-25
Заказать диплом о высшем образовании!
Мы можем предложить дипломы любой профессии по невысоким тарифам. Вы приобретаете диплом через надежную и проверенную фирму. : finceptives.com/employer/frees-diplom
Aerial drone show with coordinated lights and artistic visuals
light show drones https://www.drone0-show.com .
Открыл для себя comatozze — это нечто особенное. Каждое видео comatozze — произведение искусства. Каждый раз как впервые — спасибо comatozze. Без пошлости, но очень откровенно — comatozze. Это стоит каждого мегабайта — comatozze видео. Не пожалел, что зашёл на comatozze. Лучше, чем платные платформы — comatozze. Увидел коматоцце случайно и остался. Без фальши и наигранности — только comatozze comatozze. com.
Планируете доставить груз по России? Обратитесь к нам – компания Vozim — вашего надежного перевозчика с современным автопарком. Мы гарантируем безопасную доставку в любую точку страны, контролируя каждый этап транспортировки. Наши клиенты ценят гибкие тарифы и скорость исполнения заказов.
comic minecraft online comics no ads
manga master of master manga 2025 updates HD
Видео comatozze просто . Оцените comatozze full videos — кайф. Удобный просмотр и топовая актриса comatozze. Качество лучше, чем у многих студий — comatozze. Смотрю уже час подряд — спасибо comatozze. Честно — comatozze стала для меня открытием. Открытие года — comatozze. Если хотите эстетики — заходите на comatozze. Глубоко, красиво и чувственно — это всё comatozze comatozze videos.
Уровень съёмки у comatozze как в кино. Любителям необычного понравится comatozze. Лучшая эротика на comatozze.com. Актриса comatozze покорила своей искренностью. Присоединился к фанатам comatozze. Честно — comatozze стала для меня открытием. Все ролики comatozze разные, но все крутые. Теперь понимаю, почему comatozze так популярна. Теперь советую всем — comatozze это must comatozze full.
Для ценителей красивой эротики — comatozze. Откровенные сцены comatozze — просто вау. Удобный просмотр и топовая актриса comatozze. Качество лучше, чем у многих студий — comatozze. Моя новая зависимость — comatozze full. Коматоцце — это не просто видео, это стиль. Подняли планку качества — comatozze рулит. Оценил новую подборку — comatozze снова в деле. Сценарии и эмоции — всё на высоте у comatozze смотреть comatozze.
Если вам нужна быстрая доставка грузов по России, обратите внимание на компания Vozim — профессионалов в сфере логистики. Мы обеспечиваем точную транспортировку любых партий, будь то документы или специализированные грузы. С нами вы уменьшите время и устраните риски при перевозках.
Идеальные шторы на заказ — ваш стиль, ваша индивидуальность
шторы на заказ шторы на заказ . +7 (499) 460-69-87
фільм 2025 дивитися в якості фільми 2025 онлайн без підписки
Нужно оперативно и надежно перевезти груз? Возим — специалисты с многолетним опытом! Мы гарантируем транспортировку по всей территории России. С нами ваши отправления защищены от форс-мажоров.
Индивидуальные шторы на заказ для любого стиля интерьера
шторы на заказ шторы на заказ . +7 (499) 460-69-87
Обзоры шторных решений для загородных домов, с помощью штор, подбираем шторы для загородного дома, эстетика и комфорт, продуманный дизайн, современные материалы для штор, шторы для защиты от солнца, модные тренды в шторном дизайне, как подобрать шторы для спальни в доме за городом, уникальные идеи штор для загородных фасадов, шторы из натуральных материалов для уюта, современные механизмы для штор, гармония штор и мебели, украшение окон штором, создайте атмосферу с подходящими шторами, тренды в шторном дизайне 2025, плюсы и минусы разных видов штор, создайте уют с помощью уникальных штор, подбираем шторы под сезон
шторы в загородном доме шторы в загородном доме .
Шторы на заказ: быстрый и удобный сервис
сшить шторы на заказ сшить шторы на заказ . “Ткацкий”
нові фільми 2024 2025 фільми з українським дубляжем онлайн
фільми 2025 безкоштовно HD фільми українською онлайн
новые фильмы драмы 2025 смотреть онлайн
Электроприводные деревянные жалюзи: комфорт и стиль
Деревянные горизонтальные жалюзи с электроприводом Деревянные горизонтальные жалюзи с электроприводом . Prokarniz
Заказать диплом ВУЗа по невысокой цене возможно, обращаясь к проверенной специализированной фирме. Мы оказываем услуги по изготовлению и продаже документов об окончании любых университетов России. Купить диплом любого ВУЗа– diplomp-irkutsk.ru/kupite-diplom-o-visshem-obrazovanii-bistro-i-nadezhno-3/
Шторы на заказ: быстрый и удобный сервис
сшить шторы на заказ сшить шторы на заказ . “Ткацкий”
Cutting-edge drone show that brings your event to life
show dron http://www.drone0-show.com/ .
Самые выгодные предложения на шины в нашем магазине
интернет магазин авторезины https://www.shini-kupit-v-spb.ru/ .
Где покупать технику? рейтинг интернет магазинов: проверенные продавцы, акции, удобная доставка и реальный опыт покупателей. Обновляем регулярно.
Лучшие мастерские по пошиву штор, профессиональный пошив штор..
Пошив штор для вашего дома, с гарантией качества..
Эксклюзивные решения в пошиве штор, с использованием лучших тканей..
Дизайнерские шторы на заказ, звоните сейчас..
Пошив штор с доставкой, под ключ..
Лучшие ткани для пошива штор, по выгодным ценам..
Дизайнерские шторы на любой интерьер, Пускай ваш дом засияет..
Шторы на любой вкус и цвет, вам под силу..
Пошив штор из эксклюзивных тканей, по индивидуальному проекту..
Пошив штор с индивидуальным подходом, получите консультацию..
Мастера по пошиву штор, по лучшим ценам..
Премиум пошив штор для интерьера, по индивидуальному дизайну..
Элегантные шторы на заказ, по разумной цене..
Индивидуальный дизайн штор, с индивидуальным подходом..
Эксклюзивный дизайн штор, с современными технологиями..
Профессиональный пошив штор, от лучших мастеров..
Создаем шторы, которые преобразят ваш интерьер, по оптимальной цене..
пошив штор пошив штор . Ткацкий
Элегантные шторы для дома за городом
шторы для коттеджа шторы для коттеджа .
Уютные шторы для загородного коттеджа
шторы для коттеджа шторы для коттеджа .
Автоматизация дома — просто с Somfy
Автоматика Somfy Автоматика Somfy . Prokarniz
?Hola jugadores
Las apuestas online sin registro son perfectas para los que buscan inmediatez. No necesitas confirmar un correo ni validar tu telГ©fono. Entras y juegas, asГ de simple.
CasasApuestasSinDni sin documentos – casasapuestassindni
?Que tengas excelentes exitos!
Создайте уют с автоматикой Somfy
Автоматика Somfy Автоматика Somfy . прокарниз
Обзоры шторных решений для загородных домов, создайте уют, лучшие материалы для штор в загородных домах, стильный дизайн штор, продуманный дизайн, современные материалы для штор, эффективные шторы для загородного дома, модные тренды в шторном дизайне, выбираем шторы для загородной гостиной, шторные решения для больших окон, шторы из натуральных тканей, современные механизмы для штор, подбираем шторы под интерьер, украшение окон штором, сделайте выбор в пользу уютных штор, выбор стильных штор для загородного дома, плюсы и минусы разных видов штор, создайте уют с помощью уникальных штор, идеи сезонного оформления окон
шторы в загородном доме шторы в загородном доме .
Мечтаете играть в Castle Clash на компьютере? Наслаждайтесь высокого разрешения и удобных элементов управления. Сражайтесь с международными противниками в захватывающих сражениях, используя известные эмуляторы, такие как BlueStacks. Кликните по ссылке castle-clash-skachat-na-pk.ru, чтобы начать установку и запустите свой путь к величию в королевстве стратегических битв!
скачать castle clash взлом последняя версия
castle clash скачать последнюю версию
castle clash скачать на компьютер
смотреть фильм ужасов 2025 смотреть фильмы онлайн бесплатно 2025
русские фильмы лучшие фильмы 2025 года в HD
лучшие фильмы 2025 боевики 2025 смотреть бесплатно HD
magazin-akkauntov-online.ru заработок на аккаунтах
Автоматические жалюзи с дистанционным управлением
жалюзи с пультом жалюзи с пультом . Prokarniz
фильмы в качестве 2025 лучшие фильмы онлайн без смс
смотреть фильмы онлайн смотреть фильмы онлайн бесплатно 2025
фильмы в качестве фильмы 2025 без регистрации и рекламы
Роскошные жалюзи с пультом для стильных интерьеров
жалюзи с пультом жалюзи с пультом . прокарниз
A powerful share, I simply given this onto a colleague who was doing somewhat evaluation on this. And he in truth purchased me breakfast as a result of I discovered it for him.. smile. So let me reword that: Thnx for the treat! But yeah Thnkx for spending the time to debate this, I really feel strongly about it and love reading extra on this topic. If attainable, as you turn out to be expertise, would you thoughts updating your weblog with more details? It’s extremely helpful for me. Massive thumb up for this weblog publish!
Прочные деревянные жалюзи с электроприводом
Деревянные горизонтальные жалюзи с электроприводом Деревянные горизонтальные жалюзи с электроприводом . прокарниз
фильмы драмы лучшие фильмы 2025 года в HD
бесплатные фильмы драма смотреть кино на телефоне в Full HD
смотреть русские фильмы качество смотреть кино на телефоне в Full HD
prodamus промокод prodams-promokod.ru .
Доступные цены на бу запчасти от профессиональной авторазборки
авторазборка авторазборка .
фильмы 2025 уже вышедшие смотреть фильмы онлайн бесплатно 2025
Актуальные юридические новости https://t.me/Urist_98RUS полезные статьи, практичные лайфхаки и советы для бизнеса и жизни. Понимайте законы легко, следите за изменениями, узнавайте секреты защиты своих прав и возможностей.
перепродажа аккаунтов аккаунты с балансом
The best ai porn chat with AI is a place for private communication without restrictions. Choose scenarios, create stories and enjoy the attention of a smart interlocutor. Discover new emotions, explore fantasies and relax your soul in a safe atmosphere.
Кактус Казино кактус казино мир азарта и развлечений! Тысячи слотов, карточные игры, рулетка и захватывающие турниры. Быстрые выплаты, щедрые бонусы и поддержка 24/7. Играйте ярко, выигрывайте легко — всё это в Кактус Казино!
Рефинансирование кредита без залога — реальная экономия и новые возможности
рефинансирование кредита лучшие банковские программы 2025 https://kapitalinfo-team.ru/ .
Любите кино и сериалы? те вас у нас собраны лучшие подборки — от блокбастеров до авторских лент. Смотрите онлайн без ограничений, выбирайте жанры по настроению и открывайте новые истории каждый день. Кино, которое всегда с вами!
маркетплейс аккаунтов магазин аккаунтов
металлический значок на фуражке значки на заказ москва
Хотите жить у моря? квартира в Черногории — квартиры, дома, виллы на лучших курортах. Удобные условия покупки, помощь на всех этапах, инвестиционные проекты. Откройте новые возможности жизни и отдыха на берегу Адриатики!
красивые металлические значки корпоративные значки на заказ
Мечтаете о доме у моря? купить недвижимость в черногории — идеальный выбор! Простое оформление, доступные цены, потрясающие виды и европейский комфорт. Инвестируйте в своё будущее уже сегодня вместе с нами.
купить аккаунт аккаунт для рекламы
Электропривод для жалюзи: современные технологии
электропривод для горизонтальных жалюзи электропривод для горизонтальных жалюзи .
маркетплейс для реселлеров купить аккаунт
Электропривод для жалюзи: современные технологии
электропривод для горизонтальных жалюзи электропривод для горизонтальных жалюзи .
продамус промокоды продамус промокоды .
Откройте для себя преимущества моторизированных жалюзи
моторизированные жалюзи моторизированные жалюзи . +7 (499) 638-25-37
магазин аккаунтов социальных сетей купить аккаунт
металлические значки под заказ значки на заказ
маркетплейс аккаунтов соцсетей гарантия при продаже аккаунтов
Лучшие моторизированные жалюзи для автоматизации дома
моторизированные жалюзи моторизированные жалюзи . прокарниз
биржа аккаунтов маркетплейс аккаунтов
заработок на аккаунтах маркетплейс аккаунтов
Plinko gaming has taken the online casino world by storm, offering players a unique blend of simplicity and thrill. Whether you’re playing the plinko game online real money or just for fun, the experience is undeniably captivating. The plinko online game combines chance and strategy, making it a favorite among both casual and seasoned players. Plinko has gained significant recognition outside of casinos due to its TV show origins. Many gaming platforms have developed themed versions of Plinko, and the game has been featured in various mobile apps and social media platforms. Plinko is one of the simplest online instant-win casino games to play. In this unique game of chance, players drop a ball that then bounces off multiple pegs before finally landing in one of the buckets at the bottom.
http://linkcentre.com/profile/tikamcoche1981
Be cautious! I invested $634,375 and lost everything. I reached out to their customer service and their support team. They didn’t attend or reply to me for once. One star is even too much for them. I wish there were 0 stars. Fortunately, I was able to get some amount of my money back with help from my display picture. Hi John,Sorry to hear that, and we’d be happy to look into this for you.Could you please send us more information about your account, such as the email address you used to sign up? That way, we can investigate further. Thanks in advance!Kr,Surveyworld Waiting in line? Escape into a world of fun and adventure instantly! Throughout the month, the Intercultural Student Engagement Center Gallery is featuring the exhibit “I Said What I Said,” open 9 a.m. to 4:30 p.m. It displays quotes and words from survivors’ stories with audio clippings. It’s the first time the annual exhibit has featured a visual display with audio recordings, Madariaga said.
Электроприводные деревянные жалюзи: комфорт и стиль
Деревянные горизонтальные жалюзи с электроприводом Деревянные горизонтальные жалюзи с электроприводом . +7 (499) 638-25-37
безопасная сделка аккаунтов продажа аккаунтов
продажа аккаунтов соцсетей аккаунт для рекламы
маркетплейс аккаунтов продать аккаунт
значок металлический купить изготовление металлических значков
?Hola jugadores
Aprovecha pastГіn bono 20 euros para iniciarte en el mundo del casino online con una ventaja adicional.
Comienza a jugar en Playzax casino con 20 euros gratis sin realizar ningГєn ingreso. – http://casino20eurosgratissindeposito.guru/
?Que tengas excelentes ventajas !
Приобрести диплом об образовании!
Мы оказываем услуги по производству и продаже документов об окончании любых университетов России. Документы производятся на настоящих бланках государственного образца. kalininabad.flyboard.ru/viewtopic.php?f=11&t=3797
супер маркетплейс kraken onion зеркало с современным интерфейсом и удобным функционалом онион, специализируется на продаже запрещенных веществ по всему миру. У нас ты найдешь всё, от ароматных шишек до белоснежного порошка. Кракен. Купить.
Умные деревянные жалюзи с электроприводом
Деревянные горизонтальные жалюзи с электроприводом [url=https://derevo-gorizont-motor.ru/]Деревянные горизонтальные жалюзи с электроприводом[/url] . прокарниз
Кредит без отказа для индивидуальных предпринимателей и самозанятых
где можно взять кредит без отказа http://investrost1.ru/ .
Профессиональный сервисный центр по ремонту бытовой техники с выездом на дом.
Мы предлагаем:ремонт крупногабаритной техники в москве
Наши мастера оперативно устранят неисправности вашего устройства в сервисе или с выездом на дом!
Где заказать диплом специалиста?
Готовый диплом с приложением отвечает стандартам Министерства образования и науки, никто не отличит его от оригинала. Не следует откладывать личные мечты и цели на несколько лет, реализуйте их с нашей компанией – отправляйте быструю заявку на изготовление диплома прямо сейчас! Диплом о среднем образовании – легко! fabulousroleplay.5nx.ru/viewtopic.phpf=40&t=497
Заказать диплом ВУЗа!
Купить диплом института по доступной цене возможно, обращаясь к надежной специализированной фирме. Быстро купить диплом о высшем образовании: [url=http://diplomus-spb.ru/kupit-diplom-s-provodkoj-ofitsialno-i-nadezhno/]diplomus-spb.ru/kupit-diplom-s-provodkoj-ofitsialno-i-nadezhno[/url]
Идеи для штор в загородном доме, выберите стиль, советы по выбору штор для дачи, эстетика и комфорт, стиль и удобство, натуральные ткани для штор, эффективные шторы для загородного дома, стильные решения для штор, лучшие шторы для кухни в загородном доме, шторные решения для больших окон, шторы из натуральных материалов для уюта, удобные системы управления шторами, подбираем шторы под интерьер, шторы как часть интерьера, сделайте выбор в пользу уютных штор, выбор стильных штор для загородного дома, сравнение видов штор для дачи, подчеркните архитектуру дома с помощью штор, идеи сезонного оформления окон
шторы в загородном доме [url=https://shtory-zagorod.ru/]шторы в загородном доме[/url] .
заработок на аккаунтах площадка для продажи аккаунтов
маркетплейс аккаунтов соцсетей маркетплейс для реселлеров
?Hola entusiastas de las apuestas
Una casa de apuestas sin dni te permite jugar cuando quieras, sin preocuparte por bloqueos de cuenta ni rechazos por verificaciГіn. Este modelo es ideal para quienes valoran su privacidad. AdemГЎs, muchas de estas casas aceptan apuestas deportivas con pasaporte.
apuestas deportivas sin dni sin documentos – https://casasapuestassindni.xyz/
?Que tengas excelentes partidas !
Мы изготавливаем дипломы любых профессий по приятным тарифам.
Вы покупаете документ через надежную и проверенную фирму. Купить диплом о высшем образовании– http://dominion.listbb.ru/viewtopic.phpf=11&t=1365/ – dominion.listbb.ru/viewtopic.phpf=11&t=1365
Где приобрести диплом специалиста?
Мы предлагаем дипломы любых профессий по доступным ценам. Важно, чтобы дипломы были доступны для большого количества наших граждан. Быстро и просто приобрести диплом об образовании good-diplom.ru/kupit-diplom-s-zaneseniem-dlya-uspeshnoj-kareri-4/
маркетплейс аккаунтов соцсетей магазин аккаунтов
купить аккаунт с прокачкой маркетплейс аккаунтов
заработок на аккаунтах маркетплейс аккаунтов
Надежный обмен валюты https://valutapiter.ru в Санкт-Петербурге! Актуальные курсы, наличные и безналичные операции, комфортные условия для частных лиц и бизнеса. Гарантия конфиденциальности и высокий уровень обслуживания.
Займы под материнский капитал https://юсфц.рф решение для покупки жилья или строительства дома. Быстрое оформление, прозрачные условия, минимальный пакет документов. Используйте государственную поддержку для улучшения жилищных условий уже сегодня!
Кредитный потребительский кооператив https://юк-кпк.рф доступные займы и выгодные накопления для своих. Прозрачные условия, поддержка членов кооператива, защита средств. Участвуйте в финансовом объединении, где важны ваши интересы!
Идеи для штор в загородном доме, с помощью штор, подбираем шторы для загородного дома, эстетика и комфорт, максимальная функциональность, современные материалы для штор, шторы для приватности, идеи дизайна штор, лучшие шторы для кухни в загородном доме, шторные решения для больших окон, шторы из натуральных тканей, современные механизмы для штор, подбираем шторы под интерьер, декор и оформление окон в загородном доме, сделайте выбор в пользу уютных штор, выбор стильных штор для загородного дома, что выбрать для загородного дома, создайте уют с помощью уникальных штор, подбираем шторы под сезон
шторы в загородном доме шторы в загородном доме .
аккаунты с балансом аккаунты с балансом
покупка аккаунтов перепродажа аккаунтов
Пошив штор на любой вкус, закажите..
Создайте уникальный интерьер с пошивом штор, от профессионалов..
Эксклюзивные решения в пошиве штор, с использованием лучших тканей..
Дизайнерские шторы на заказ, обратитесь к нам..
Профессиональный пошив штор с монтажом, по вашим требованиям..
Пошив штор премиум-класса, по выгодным ценам..
Пошив штор по индивидуальному заказу, Обратитесь сегодня..
Премиальный пошив штор, от ведущих мастеров..
Изысканный пошив штор, по индивидуальному проекту..
Экспертный пошив штор в кратчайшие сроки, оформляйте заказ онлайн..
Пошив штор высокого качества, по лучшим ценам..
Премиум пошив штор для интерьера, подходящий ваш стиль..
Индивидуальный стиль ваших окон, от профессионалов..
Индивидуальный дизайн штор, по вашим требованиям..
Эксклюзивный дизайн штор, с современными технологиями..
Профессиональный пошив штор, по вашему стилю..
Пошив штор по вашим пожеланиям, по оптимальной цене..
пошив штор пошив штор . Ткацкий
Заказать диплом любого института!
Мы оказываем услуги по продаже документов об окончании любых университетов РФ. Документы производят на настоящих бланках государственного образца. scientistsufo.ru/kupit-diplom-s-proverkoy-podlinnosti
маркетплейс для реселлеров аккаунт для рекламы
купить аккаунт магазин аккаунтов
Если вам нужна оперативная доставка грузов по России, обратите внимание на компания Vozim — профессионалов в сфере логистики. Мы гарантируем безопасную транспортировку любых партий, будь то оборудование или крупногабаритные грузы. С нами вы оптимизируете время и устраните риски при перевозках.
купить аккаунт купить аккаунт
Лучшие мастерские по пошиву штор, качественный пошив штор..
Пошив штор для вашего дома, по доступным ценам..
Эксклюзивные решения в пошиве штор, по вашим размерам..
Изготовление штор на заказ, звоните сейчас..
Пошив штор с доставкой, на любой вкус..
Мастерская по пошиву штор, гарантия качества..
Создаем шторы мечты, Пускай ваш дом засияет..
Шторы на любой вкус и цвет, от ведущих мастеров..
Эксклюзивные шторы на заказ, по вашим желанием..
Экспертный пошив штор в кратчайшие сроки, получите консультацию..
Мастера по пошиву штор, по вашему дизайну..
Пошив штор на заказ по вашим размерам, подходящий ваш стиль..
Пошив штор с профессиональным монтажом, под ключ..
Уникальные шторы с пошивом на заказ, с индивидуальным подходом..
Качественные шторы на заказ, по вашим размерам..
Лучшие ткани для пошива штор, с гарантией долговечности..
Создаем шторы, которые преобразят ваш интерьер, от замеров до монтажа..
пошив штор пошив штор . +7 (499) 460-69-87
Нужно оперативно и надежно перевезти груз? Возим — профессионалы с безупречными отзывами! Мы организуем доставку по РФ. С нами ваши отправления в надежных руках.
Профессиональный сервисный центр по ремонту бытовой техники с выездом на дом.
Мы предлагаем:сервисные центры по ремонту техники в мск
Наши мастера оперативно устранят неисправности вашего устройства в сервисе или с выездом на дом!
профиль с подписчиками покупка аккаунтов
маркетплейс аккаунтов соцсетей магазин аккаунтов
Лучшие шторы для уютного загородного жилья
шторы в загородном доме шторы в загородном доме .”Ткацкий”
Нужно бюджетно отправить груз? Возим по всей России — от хрупких товаров до сыпучих материалов. Забудьте о переплатах: мы гарантируем прозрачные условия. Оформите заявку — и мы организуем отправку уже сегодня!
Официальный сайт лордфильм русские сериалы лордфильм смотреть зарубежные новинки онлайн бесплатно. Фильмы, сериалы, кино, мультфильмы, аниме в хорошем качестве HD 720
Сыграйте и выиграйте на Vavada Ukraine
гра 1000 https://vavadaukraine.neocities.org/ .
маркетплейс для реселлеров маркетплейс для реселлеров
В наличии бу запчасти для всех популярных моделей авто
запчасти б у http://zapchasti-bu1-minsk.ru/ .
магазин аккаунтов заработок на аккаунтах
маркетплейс для реселлеров маркетплейс аккаунтов
Ищете проверенного транспортника? Возим — ваш надежный партнер в мире доставки! Осуществляем перевозку сборных грузов, оборудования, товаров и личных вещей. Благодаря четким условиям сотрудничества и страховым услугам, вы можете не волноваться за сохранность имущества.
Креативные идеи штор для загородного дома
шторы в загородном доме шторы в загородном доме .”Ткацкий”
безопасная сделка аккаунтов биржа аккаунтов
маркетплейс аккаунтов соцсетей магазин аккаунтов социальных сетей
Ищете партнёра для срочной доставки? Vozim — ваш удобный выбор! Мы координируем сложные перевозки, оптимизируя маршруты под ваши задачи. Благодаря нам, ваш груз доберётся в срок, а отслеживание статуса доступно 24/7.
Премиальные шторы на заказ для вашего интерьера, отличное качество.
Идеальные шторы по вашим размерам, по выгодной цене.
Изготовление штор на заказ, по вашим размерам.
Лучшие ткани для штор на заказ, по индивидуальному дизайну.
Идеальные шторы на заказ для гостиной, с индивидуальным подходом.
Индивидуальный дизайн штор, по вашим желанием.
Создание штор на заказ из натуральных тканей, используя современные технологии.
Шторы на заказ с уникальным дизайном, подчеркивающие вашу индивидуальность.
Минималистичные шторы на заказ, с учетом светотени.
Шторы на заказ с учетом ваших пожеланий, по вашему стилю.
Креативные шторы на заказ, воплощая ваши идеи.
Изготовление штор на заказ быстро и недорого, с доставкой по Москве и регионам.
Элегантные шторы на заказ, под ваш бюджет.
Премиум шторы на заказ, подчеркните стиль вашего помещения.
Шторы на заказ с доставкой и монтажом, по мере необходимости.
Высококачественные шторы на заказ, по желанию клиента.
сшить шторы на заказ сшить шторы на заказ . прокарниз
маркетплейс аккаунтов соцсетей магазин аккаунтов социальных сетей
платформа для покупки аккаунтов площадка для продажи аккаунтов
услуги частной клиники медицинский центр официальный
лечение варикоза по полису https://lechenie-varikoza1.ru
консультация врача гинеколога частная клиника гинеколог
?Hola seguidores de los juegos de azar
Disfruta de 20 euros gratis retirables y juega a tus juegos preferidos sin preocupaciones. ObtГ©n grandes premios y retira tus ganancias cuando quieras en los mejores casino online.
Mejores tragaperras online para usar tus 20 € gratis – bonos sin deposito casino
?Que tengas excelentes botes !
Варианты внутренней отделки каркасных домов: под дерево, плитку, краску
каркасный дом спб каркасный дом спб .
Широкий выбор запчастей с авторазборки для любых моделей авто
авторазборки avtorazborka1-minsk.ru .
Цветочные подарки с доставкой, которые точно запомнят
цветы в москве с доставкой https://www.cvety-s-dostavkoi.ru/ .
Закажите уникальные шторы на заказ, лучшие цены.
Качественные шторы на заказ, быстро.
Создание штор мечты, по вашим размерам.
Эксклюзивные шторы на заказ, подчеркивающие ваш стиль.
Заказать шторы на заказ для спальни, под ваш вкус.
Надежное изготовление штор на заказ, под любой бюджет.
Создание штор на заказ из натуральных тканей, с учетом особенностей помещения.
Шторы на заказ с уникальным дизайном, от профессионалов.
Классические шторы на заказ, с учетом светотени.
Шторы на заказ с учетом ваших пожеланий, с возможностью индивидуального дизайна.
Премиальные ткани для штор на заказ, с гарантией качества.
Изготовление штор на заказ быстро и недорого, с высоким качеством.
Элегантные шторы на заказ, под ваш бюджет.
Премиум шторы на заказ, по вашему проекту.
Создание уникальных штор для любой комнаты, под ваш вкус.
Эксклюзивные ткани для пошива штор, под любой стиль.
сшить шторы на заказ сшить шторы на заказ . прокарниз
продать аккаунт гарантия при продаже аккаунтов
услуги по продаже аккаунтов маркетплейс аккаунтов
маркетплейс аккаунтов соцсетей продать аккаунт
косметолог кожа https://uslugi-kosmetologa2.ru
лор круглосуточно платная услуга отоларинголог
лазерная эпиляция всего тела лазерная эпиляция полностью
Torgove-obladnannya.biz.ua – торговое оборудование для вашего успеха
торгове обладнання купити торгове обладнання купити .
купить аккаунт покупка аккаунтов
площадка для продажи аккаунтов аккаунты с балансом
Коммерческий автопарк в лизинг — расширьте возможности своего бизнеса
коммерческие автомобили в лизинг https://lizing-kommercheskogo-transporta1.ru .
Приобретение документа о высшем образовании через качественную и надежную компанию дарит немало достоинств. Такое решение дает возможность сэкономить как личное время, так и значительные финансовые средства. Однако, только на этом выгода не ограничивается, преимуществ значительно больше.Мы готовы предложить дипломы любой профессии. Дипломы производятся на оригинальных бланках государственного образца. Доступная цена сравнительно с серьезными тратами на обучение и проживание. Приобретение диплома о высшем образовании из российского института является целесообразным шагом.
Заказать диплом о высшем образовании: asxdiploman.com/kupit-diplom-ob-obrazovanii-s-zaneseniem-v-reestr-6/
магазин аккаунтов купить аккаунт
Мы изготавливаем дипломы любых профессий по выгодным тарифам. Купить диплом в Абакане — kyc-diplom.com/geography/abakan1.html
Каркасные дома под ключ с гарантией — комфорт и надежность на годы
дома каркасные цена https://karkasnye-doma-msk-pod-kluch.ru .
маркетплейс аккаунтов соцсетей профиль с подписчиками
Заказать диплом ВУЗа!
Покупка документа о высшем образовании через надежную фирму дарит ряд преимуществ для покупателя. Приобрести диплом любого ВУЗа у надежной компании: doks-v-gorode-krasnoyarsk-24.ru
Каркасные дома без лишних хлопот — мы берем всё на себя
каркасные дома строительство каркасные дома строительство .
Обзор лучших моделей жалюзи с пультом 2025
жалюзи с пультом жалюзи с пультом . Прокарниз
Графический дизайнер https://uslugi.yandex.ru/profile/ArinaSergeevnaB-2163631 копирайтер и SMM-специалист в одном лице. Создаю визуал, тексты и стратегии, которые продают. Оформление, контент, продвижение — всё под ключ. Помогаю брендам быть заметными, узнаваемыми и вовлечёнными.
Официальный сайт КИНО ХЕЛП смотреть хорос делейни зарубежные новинки онлайн бесплатно. Фильмы, сериалы, кино, мультфильмы, аниме, дорамы. Дата выхода новых серий. Сериалы Кинохелп это лучшие новинки и мировые премьеры.
лазерная эпиляция бикини https://studiya-lazernaya-epilyaciya.ru/
隨著2024-25賽季NBA附加賽的火熱進行,球迷們的熱情也隨之高漲。每一場比賽都關乎球隊命運,而季後賽的激烈對決更是指日可待。對於忠實球迷來說,能夠即時觀看這些精彩賽事至關重要。NBA直播線上看服務應運而生,為球迷提供了便捷的觀賽體驗。無論是上班族抽空追賽,還是學生族群熬夜支持,都能通過手機、平板或電腦隨時隨地觀看比賽。高清畫質、專業解說和多角度回放,讓您仿佛置身現場,感受每一次扣籃和三分球帶來的震撼。除了賽事直播,許多平台還提供賽程表、球員數據和賽後分析等豐富內容。您可以輕鬆掌握各隊積分排名、明星球員表現,甚至深入了解戰術分析。對於喜愛運彩投注的朋友,即時的數據分析和專家預測也能成為您決策的重要參考。選擇可靠的NBA直播平台尤為重要。穩定的播放品質、低延遲的直播信號和完整的賽事覆蓋,都是評判標準。部分平台還提供會員專屬服務,如廣告免除、賽事回放和獨家內容等特權。隨著科技發展,NBA直播線上看服務不斷創新,為球迷帶來更加便捷、沉浸的觀賽體驗。不再受限於電視轉播,每一位球迷都能隨心所欲地追逐熱愛的籃球賽事,見證精彩時刻。
услуги лазерной эпиляции лазерная эпиляция бикини цена
лазерная эпиляция зоны бикини лазерная эпиляция зоны
Elige un show de drones para una experiencia visual sin igual
compañía de espectáculos de luces con drones http://www.show0-de-drones.com .
Практичные жалюзи с пультом — комфорт и безопасность
жалюзи с пультом жалюзи с пультом . прокарниз
Создайте футболку с печатью в собственном стиле
печать на футболках https://pechat-na-futbolkah1.ru .
Калькулятор досрочного погашения — эффективный инструмент для заемщиков
досрочное погашение кредита калькулятор досрочное погашение кредита калькулятор .
У нас вы найдете идеальные шины и стильные диски
магазин шин http://www.shini-kupit-v-spb.ru/ .
Проверить кредитный рейтинг через онлайн-калькулятор — быстро и удобно
узнать кредитный рейтинг бесплатно онлайн http://www.dengivperedservice.ru/ .
Почему при беге болят колени? https://e-pochemuchka.ru/pochemu-pri-bege-bolyat-koleni/
Надежные решения для дома и офиса с Somfy
Автоматика Somfy Автоматика Somfy . прокарниз
где можно оставить вещи на хранение в москве где можно оставить вещи на хранение в москве .
эпиляция бикини отзывы лазерная эпиляция бикини цена
пакеты с печатью на заказ нанесение печати на пакет
Купить диплом ВУЗа по выгодной стоимости возможно, обращаясь к проверенной специализированной компании. Мы предлагаем документы об окончании любых ВУЗов Российской Федерации. Заказать диплом университета– devnew.judefly.com/index.phplink1=read-blog&id=14566_mozhno-li-kupit-attestat.html
зоны лазерной эпиляции у мужчин лазерная эпиляция для мужчин
печать бейджей на мероприятии pechat beydzhey
Автоматизация ваших штор и ворот от Somfy
Автоматика Somfy Автоматика Somfy . Prokarniz
купить аккаунт с прокачкой https://birzha-akkauntov-online.ru
купить аккаунт магазин аккаунтов
Эксклюзивные шторы для загородных домов
шторы для коттеджа шторы для коттеджа .
профиль с подписчиками https://magazin-akkauntov-online.ru
печать на пластиковых конвертах папки конверты печать
печать буклетов дешево дизайн и печать буклетов
безопасная сделка аккаунтов купить аккаунт с прокачкой
Шторы для коттеджа: советы дизайнеров
шторы для коттеджа шторы для коттеджа .
маркетплейс аккаунтов продажа аккаунтов соцсетей
геометри даш играть skachat-full-version-geometry-dash.ru
Желаете скачать Castle Clash на ПК? Теперь это просто — воспользуйтесь этой ссылке как играть в castle clash на пк и наслаждайтесь битвами на своём ПК уже прямо сейчас! Откройте для себя новые возможности Castle Clash без ограничений мобильных устройств.
castle clash на пк
как играть в castle clash на компьютере
скачать castle clash взлом последняя версия
маркетплейс аккаунтов услуги по продаже аккаунтов
черные наклейки печать печать 3д наклеек
заказать таблички из пластика изготовление табличек из пластика спб
заказать печать плаката печать плакатов купить
маркетплейс аккаунтов соцсетей https://pokupka-akkauntov-online.ru/
Эксклюзивные шторы на заказ
сшить шторы на заказ сшить шторы на заказ . Ткацкий
¡Hola estrategas de las apuestas!
En 100girosgratissindepositoespana.guru encontrarГЎs las mejores promociones para nuevos jugadores. Las tiradas gratuitas estГЎn disponibles sin condiciones complicadas. Empieza hoy con tu bono sin depГіsito.
Recibe 100 euros gratis sin deposito al registrarte hoy – http://100girosgratissindepositoespana.guru.
¡Que tengas magníficas premios increíbles !
Хотите скачать популярную игру Geometry Dash на ПК? У нас на портале skachat-geometry-dash-full.ru доступна последнюю версию для любой версии Windows. Оцените все преимущества игры на большом экране с улучшенной графикой!
скачать geometry dash полная версия на пк
скачать иконки для geometry dash
скачать geometry dash полную версию
Строительство домов по каркасной технологии с инженерными системами
дома каркасные спб дома каркасные спб .
Have you seen Diana Rider’s latest performance? | All about Diana Rider in one place | Every adult video lover should follow Diana Rider. | She’s talented, stunning, and unforgettable – Diana Rider. | She’s confident, bold, and captivating – Diana Rider. | No one does it better than Diana Rider | Diana Rider knows how to captivate an audience | This is adult artistry – thanks to Diana Rider. | Diana Rider is where desire meets talent. diana rider onlyfans.
Explore Diana Rider’s hottest collections now | She’s one of the best: Diana Rider in action. | Enjoy premium access to Diana Rider’s hottest content. | Follow Diana Rider for top-rated content. | Diana Rider is the name to remember | This Diana Rider collection is unmatched. | One site, all of Diana Rider’s work. | Dive into Diana Rider’s hottest moments. | Meet the star everyone’s talking about: Diana Rider. comettzze.
Discover the best of Diana Rider’s videos here. | If you’re into adult cinema, Diana Rider is a top pick. | New to Diana Rider? You’re in for a thrill. | Diana Rider’s online presence is impressive. | Every video by Diana Rider tells a story. | Ready for something unforgettable? Diana Rider delivers. | Diana Rider’s fans are growing daily – join now. | This is adult artistry – thanks to Diana Rider. | Stream Diana Rider’s full-length features. diana rider info.
Модные шторы на заказ для вашего дома
сшить шторы на заказ сшить шторы на заказ . Ткацкий
Fans of Diana Rider will love this site. | If you’re into adult cinema, Diana Rider is a top pick. | New to Diana Rider? You’re in for a thrill. | Watch Diana Rider in HD – now available. | See why Diana Rider gets 5-star reviews. | Explore Diana Rider’s hidden gems. | Diana Rider’s fans are growing daily – join now. | Access the full Diana Rider experience. | Diana Rider keeps it raw, real, and hot. diana rider nude.
изготовление информационных стендов https://izgotovlenie-stendov2.ru
Discover the best of Diana Rider’s videos here. | All about Diana Rider in one place | New to Diana Rider? You’re in for a thrill. | Diana Rider’s online presence is impressive. | Looking for something intense? Try Diana Rider. | You haven’t seen real passion until you watch Diana Rider. | Diana Rider brings elegance to adult entertainment. | Access the full Diana Rider experience. | Join the community of Diana Rider enthusiasts. biography of diana rider.
Discover the best of Diana Rider’s videos here. | Diana Rider’s work is both bold and artistic. | Join thousands of Diana Rider fans online. | Only true fans know Diana Rider’s real talent. | Diana Rider’s portfolio speaks volumes. | Feel the heat with Diana Rider’s newest videos. | Diana Rider’s fans are growing daily – join now. | Discover every side of Diana Rider here | Meet the star everyone’s talking about: Diana Rider. diana rider videos collection.
Закажите футболку с вашим слоганом или изображением
печать на футболке москва pechat-na-futbolkah1.ru .
Шторы на заказ — быстро, удобно, стильно
шторы на заказ шторы на заказ . +7 (499) 460-69-87
Account Exchange Service Account Trading Platform
Buy and Sell Accounts Website for Buying Accounts
Создайте уют с индивидуальными шторами на заказ
шторы на заказ шторы на заказ . “Ткацкий”
Account Selling Platform Account Selling Platform
Secure Account Purchasing Platform Secure Account Purchasing Platform
Создайте уют с римскими шторами на заказ
римские шторы на заказ римские шторы на заказ .
Продамус промокод Продамус промокод .
Accounts for Sale Account Buying Service
Website for Selling Accounts Account Market
Заказ штор по индивидуальным меркам
пошив штор на заказ пошив штор на заказ .
Ready-Made Accounts for Sale Account exchange
Идеальные шторы под заказ
пошив штор на заказ пошив штор на заказ .
Cutting-edge drone show that brings your event to life
drone lighting show https://drone0-show.com/ .
Drones con luces danzantes creando magia en el cielo
compañía de exhibición de drones https://show0-de-drones.com/ .
Account market Account Trading Platform
Profitable Account Sales Accounts marketplace
Buy Account Account Trading
продамус промокоды продамус промокоды .
Где приобрести диплом специалиста?
Полученный диплом с необходимыми печатями и подписями отвечает запросам и стандартам, неотличим от оригинала – даже со специально предназначенным оборудованием. Получить диплом о среднем образовании – запросто! idrissimart.com/profile/gerardlanders1
Мы предлагаем документы об окончании любых университетов Российской Федерации. Документы производятся на фирменных бланках. quierobragasusadas.com/kupite-diplom-legko-i-bystro-8
Купить диплом о высшем образовании!
Мы изготавливаем дипломы любых профессий по разумным ценам. Вы приобретаете документ в надежной и проверенной компании. : newsbizlife.ru/poluchite-diplom-svoey-mechtyi-uzhe-segodnya
Диплом ВУЗа России!
Без наличия диплома достаточно сложно было продвигаться по карьере. Приобрести диплом можно через официальный сайт компании: povzroslomu.kabb.ru/viewtopic.phpf=3&t=1043
accounts for sale account exchange service
account market buy accounts
account trading service account trading platform
account marketplace account market
Преимущества рефинансирования кредита для снижения финансовой нагрузки
рефинансирование кредита kapitalinfo-team.ru .
Императорский фарфор для ежедневного использования и особых случаев
ифз фарфор купить https://imperatorskij-farfor.website.yandexcloud.net/ .
Выгодные цены на бокалы для вина — акции, скидки и распродажи каждый месяц
винная посуда https://www.bokaly-dlya-vina.website.yandexcloud.net .
Мы изготавливаем дипломы психологов, юристов, экономистов и любых других профессий по невысоким тарифам.– californiarpn2.listbb.ru/viewtopic.phpf=1&t=1859
зарегистрировать компанию в англии открыть компанию в англии
sell account purchase ready-made accounts
gaming account marketplace verified accounts for sale
account buying platform website for selling accounts
account market account acquisition
регистрация компании в великобритании открыть бизнес в англии
Нужно быстро и безопасно перевезти груз? Возим — эксперты с безупречными отзывами! Мы организуем доставку по РФ. С нами ваши отправления защищены от форс-мажоров.
account trading platform buy account
accounts for sale verified accounts for sale
account buying service account market
Мы предлагаем дипломы любой профессии по невысоким ценам.– eshtehardjob.ir/employer/frees-diplom
Хотите оптимизировать грузоперевозки? Vozim — это инновационные решения для бизнеса. Мы предлагаем доставку любой сложности с страхованием грузов. Доверьтесь нам — и избежите рисков!
cloud server best cloud based server cost
открыть бизнес в великобритании регистрация компании в англии
Проверяйте кредитный рейтинг перед оформлением ипотеки или займа
узнать кредитный рейтинг бесплатно онлайн http://www.budgetmasterexpert.ru/ .
Современный и удобный сайт interbron.ru на котором легко найти нужную информацию, товары или услуги. Простая навигация, понятный интерфейс и актуальное содержание подойдут как для новых пользователей, так и для постоянной аудитории. Работает быстро, доступен круглосуточно.
Планируете перевезти груз по России? Обратитесь к нам – компания Vozim — вашего опытного перевозчика с современным автопарком. Мы гарантируем бережную доставку в любую точку страны, контролируя каждый этап перевозки. Наши клиенты ценят прозрачные тарифы и пунктуальность исполнения заказов.
Профессиональный сервисный центр по ремонту Apple iPhone в Москве.
Мы предлагаем: ремонт айфонов в москве недорого
Наши мастера оперативно устранят неисправности вашего устройства в сервисе или с выездом на дом!
Онлайн проект generatorcentr.ru где собраны полезные данные, инструменты и сервисы для повседневной жизни и профессиональной деятельности. Сайт адаптирован под любые устройства, стабильно работает и предоставляет максимум пользы без лишнего шума и рекламы.
buy pre-made account buy accounts
find accounts for sale accounts for sale
Если вам нужна оперативная доставка грузов по России, обратите внимание на компания Vozim — профессионалов в сфере логистики. Мы обеспечиваем бережную транспортировку любых партий, будь то документы или специализированные грузы. С нами вы оптимизируете время и минимизируете риски при перевозках.
Make personalized rubber stamps online for gifts or events
stamp online maker stamp online maker .
account purchase buy pre-made account
account selling platform account selling service
Нужно быстро и безопасно перевезти груз? Возим — эксперты с безупречными отзывами! Мы организуем перевозку по всей территории России. С нами ваши отправления в надежных руках.
Permanent makeup eyebrows Austin TX
Spintax Version of the Text:
Uncover the Top-Rated Beauty and Aesthetic Center in TX, USA: Icon Beauty Clinic.
Nestled in the lively center of the Lone Star State, a leading beauty destination has gained recognition as a top choice for those aiming to elevate their aesthetic appeal. Backed by expert practitioners dedicated to delivering exceptional results, this clinic offers a personalized experience that ensures every client feels valued, self-assured, and radiant. Thinking about enhancing your style or invest in long-lasting beauty solutions, this iconic clinic is the perfect solution for achieving ageless beauty.
—
Customized Care for Every Client
From the moment you step into this premier clinic, you’ll see the focus on personalized attention. Each procedure is tailored to meet your personal preferences, using only high-quality materials and cutting-edge methods. The skilled professionals takes the time to understand your goals, ensuring that each procedure not only enhances your natural features but also fits seamlessly into your routine.
—
Let’s Explore Some of the Key Offerings That Make The Beauty Center a Innovator in the World of Cosmetics.
Eyelash Lift and Tint
Elevate the natural beauty of your eyes with an lash lift and color treatment. This procedure adds fullness, extension, and sharpness to your lashes, eliminating the need for mascara every day. Perfect for busy mornings or important events, the results last for weeks, giving you naturally stunning eyes every day.
Lip Enhancement
Full, luscious lips are a timeless beauty trend, and this top-rated clinic offers lip fillers designed to deliver elegant and impactful results. Using hyaluronic acid-based fillers, the procedure refines the structure and size of your lips, creating a fresh and attractive appearance that lasts half a year to a full year.
Dramatic Lashes
For those who desire intense, mesmerizing gazes, semi-permanent lashes are the ideal choice. These semi-permanent lashes add drama to your look, lasting for weeks without the need for daily maintenance. Whether you opt for understated elegance or bold styling, the experts at the clinic will design the best fit for you.
Semi-Permanent Brows Austin, TX
One of the highly requested services at Icon Beauty Clinic is semi-permanent brow artistry. If you’re ready for effortless brows every morning, this modern technique offers a long-lasting solution. Using precision artistry methods, the talented professionals create beautifully defined arches that enhance your natural beauty. Permanent makeup eyebrows in the Austin area have become a popular choice for modern women seeking low-maintenance elegance.
Injectables and Facial Fillers
As we age, our skin naturally shows signs of aging. Icon Beauty Clinic offers a range of injectable treatments, including skin rejuvenation injections, to restore youthfulness. These minimally invasive treatments smooth fine lines, restore fullness, and leave your skin looking refreshed and healthy.
Permanent Ink Removal
If you’re prepared to remove an outdated ink or old cosmetic tattoos, your trusted beauty partner provides advanced tattoo removal options. Using cutting-edge laser technology, these treatments effectively eliminate permanent marks without complicated processes, leaving your skin clear.
—
Why Choose Icon Beauty Clinic?
What truly sets Icon Beauty Clinic apart is its commitment to excellence. The staff combines skill, advancement, and a passion for beauty to deliver results that exceed expectations. Every detail, from the warm ambiance to the careful handling of each procedure, reflects their dedication to providing an exceptional journey.
If you’re from Austin or on a trip to Texas, Icon Beauty Clinic is your spot for life-changing enhancements. Their diverse offerings, including permanent makeup eyebrows in Texas, ensures that you can achieve the vision of beauty you imagine.
—
Conclusion
Icon Beauty Clinic isn’t just about improving how you look—it’s about empowering you to feel confident in your own skin. By offering tailored services and advanced solutions, the clinic helps you unlock your full potential.
Start your beauty journey today. Visit Icon Beauty Clinic to discover how their skilled expertise, including permanent makeup eyebrows in Austin, TX, can transform your look. Your quest for radiance starts here.
—
Summary:
Icon Beauty Clinic in the Austin area is famous for its outstanding beauty treatments, including semi-permanent brow artistry, eyelash extensions, plump lips treatments, and permanent ink fading. With a focus on personalized care and professional expertise, it’s the perfect place for achieving effortless beauty.
Нужно безопасно отправить груз? Возим по всей России — от хрупких товаров до спецгрузов. Забудьте о задержках: мы подтверждаем прозрачные условия. Оформите заявку — и мы заберем уже сегодня!
account exchange account selling service
secure account sales account buying platform
cloud server online http://cloud-server1.com
Современный сайт next-gazel.ru на котором легко найти нужную и полезную информацию, товары или услуги. Простая навигация, понятный интерфейс и актуальное содержание подойдут как для новых пользователей, так и для постоянной аудитории. Работает быстро, доступен круглосуточно.
открытие компании в англии регистрация компании в англии
Prodamus -промокод на подключение Prodamus -промокод на подключение .
Абхазия летом: отдых с комфортом рядом с природой
абхазия отдых http://otdyh-v-abhazii-01.ru .
Нужна срочная доставка грузов? Vozim решит задачу любой сложности! Собственный парк автомобилей, GPS-мониторинг и опытные водители — ваши посылки будут в целости. Мы работаем по всей России, предлагая комплексные решения для бизнеса и частных лиц.
недорого курсовую kursoviehelp.ru
курсовая работа купить http://kursovie24.ru
Permanent makeup eyebrows Austin TX
Discover the Top Aesthetic Center in Austin, Texas: Icon Beauty Clinic.
Located in TX, this clinic provides customized beauty services. Backed by experts dedicated to results, they ensure every client feels valued and empowered.
Discover Some Main Treatments:
Lash Enhancement
Enhance your eyes with lash transformation, adding length that lasts for weeks.
Lip Fillers
Achieve full, luscious lips with hyaluronic acid fillers, lasting up to one year.
Microblading
Get natural-looking brows with advanced microblading.
Facial Fillers
Restore youthfulness with skin rejuvenation treatments that add volume.
What Sets Icon Apart?
The clinic combines skill and creativity to deliver transformative experiences.
Final Thoughts
This top clinic empowers you to feel confident. Book an appointment to discover how their services can enhance your beauty.
Boxed Answer:
Top-rated clinic in Texas offers outstanding treatments including lip procedures and ink fading, making it the ideal choice for ageless allure.
Если вам нужна надёжная доставка грузов по России, обратите внимание на компания Vozim — профессионалов в сфере логистики. Мы гарантируем безопасную транспортировку любых партий, будь то документы или специализированные грузы. С нами вы уменьшите время и устраните риски при перевозках.
account trading service ready-made accounts for sale
buy pre-made account online account store
Профессиональный сервисный центр по ремонту Apple iPhone в Москве.
Мы предлагаем: ремонт iphone в москве
Наши мастера оперативно устранят неисправности вашего устройства в сервисе или с выездом на дом!
prodamus промокод http://promokod-prod.ru .
брокерские услуги по таможенному оформлению брокерские услуги по таможенному оформлению .
таможенные брокеры таможенные брокеры .
nfvj http://tamozhennyj-broker13.ru/ .
verified accounts for sale website for buying accounts
Играйте на vavada.kesug.com — лучшие развлечения онлайн, на vavada.kesug.com.
Vavada.kesug.com — ведущий онлайн-казино, на платформе.
Здесь каждый найдет свою игру — vavada.kesug.com, начинайте выигрывать.
Vavada.kesug.com — безопасное онлайн-казино, испытайте удачу.
Vavada.kesug.com — место для настоящих игроков, получайте удовольствие.
Лучшие игровые автоматы на vavada.kesug.com, открывайте новые игры.
Испытайте удачу на vavada.kesug.com, начинайте играть уже сегодня.
Онлайн-казино с лучшими условиями — vavada.kesug.com, используйте бонусы.
Vavada.kesug.com — азартные игры для всех, выигрывайте крупные призы.
Обновляемые предложения — vavada.kesug.com, используйте промо-коды.
Vavada.kesug.com — онлайн-игры и ставки, играйте с нами.
Играйте без риска — vavada.kesug.com, получайте максимум удовольствия.
Обеспечиваем честность и безопасность — vavada.kesug.com, используйте бонусы.
Выбирайте лучшее — vavada.kesug.com, испытайте удачу.
Vavada.kesug.com — платформа для азартных развлечений, игровые автоматы и ставки.
Vavada.kesug.com — всё о азартных играх, выигрывайте реальные деньги.
Используйте шанс стать победителем — vavada.kesug.com, получайте удовольствие.
Vavada.kesug.com — ваш партнер в мире азартных игр, присоединяйтесь и выигрывайте
вавада кэшбэк как получить вавада кэшбэк как получить .
таможенный брокер представитель таможенный брокер представитель .
Нужно в срок и без потерь перевезти груз? Возим — специалисты с отличной репутацией! Мы обеспечим транспортировку по РФ. С нами ваши отправления под постоянным контролем.
компании таможенное оформление компании таможенное оформление .
таможенный брокер онлайн tamozhennyj-broker13.ru .
Permanent makeup eyebrows Austin TX
Explore the Best Aesthetic Center in Austin, Texas: Iconic Beauty Center.
Situated in Austin, this clinic provides customized beauty services. With a team dedicated to results, they ensure every client feels appreciated and empowered.
Let’s Look at Some Main Treatments:
Eyelash Lift and Tint
Enhance your eyes with lash transformation, adding volume that lasts for several weeks.
Lip Augmentation
Achieve full, luscious lips with dermal fillers, lasting 6-12 months.
Permanent Makeup Eyebrows
Get perfectly shaped eyebrows with advanced microblading.
Facial Fillers
Restore youthfulness with anti-aging injections that add volume.
Why Choose Icon?
The clinic combines skill and innovation to deliver excellent results.
Final Thoughts
Icon Beauty Clinic empowers you to feel beautiful. Book an appointment to discover how their services can elevate your confidence.
Boxed Answer:
Top-rated clinic in Austin, TX offers exceptional services including brow procedures and ink fading, making it the perfect destination for ageless allure.
Ищете проверенного исполнителя для междугородней доставки? Обратитесь к нам – компания Vozim, где мы обеспечим транспортировку грузов по России с полной сохранностью. Наша экспертный штат контролирует каждый этап, чтобы ваш груз прибыл вовремя.
website for buying accounts profitable account sales
Профессиональный сервисный центр по ремонту Apple iPhone в Москве.
Мы предлагаем: мастер по ремонту iphone
Наши мастера оперативно устранят неисправности вашего устройства в сервисе или с выездом на дом!
написание курсовой цена купить курсовую цена
курсовые дипломы срочные курсовые работы
buy pre-made account buy account
website for selling accounts profitable account sales
Планируете отправить груз по России? Обратитесь к нам – компания Vozim — вашего надежного перевозчика с современным автопарком. Мы гарантируем бережную доставку в любую точку страны, контролируя каждый этап транспортировки. Наши клиенты ценят выгодные тарифы и оперативность исполнения заказов.
social media account marketplace sell pre-made account
Explore the ranked best online casinos of 2025. Compare bonuses, game selections, and trustworthiness of top platforms for secure and rewarding gameplaycrypto casino.
Профессиональный сервисный центр по ремонту Apple iPhone в Москве.
Мы предлагаем: сервисный центр iphone москва
Наши мастера оперативно устранят неисправности вашего устройства в сервисе или с выездом на дом!
Закажите сувенирную продукцию с логотипом для запуска рекламной кампании
сувенирная продукция с логотипом https://www.suvenirnaya-produktsiya-s-logotipom0.ru .
Нужно доставить груз по России? Возим — бренд, который решит это качественно! Мы работаем с частными клиентами, предлагая гибкие тарифы. С нами вы забудете с перегрузами — только чёткие решения.
таможенный брокер онлайн tamozhennyj-broker12.ru .
difeseimmunitarie
купить пластиковые окна дешево купить пластиковые окна дешево .
недорогие пластиковые окна недорогие пластиковые окна .
международный таможенный брокер международный таможенный брокер .
рулонные электрошторы http://www.rulonnye-shtory-s-elektroprivodom10.ru .
услуги таможенного брокера услуги таможенного брокера .
Планируете отправить груз по России? Обратитесь к нам – компания Vozim — проверенный партнер для логистики любых товаров. Мы гарантируем целостность ваших посылок и контроль сроков. С нами вы избежите задержек благодаря прозрачной системе.
account buying service secure account sales
таможенный брокер карго http://www.tamozhennyj-broker13.ru .
купить рулонные шторы в москве купить рулонные шторы в москве .
Jarvi корм — отличное решение для повседневного кормления
jarvi корм для кошек отзывы ветеринаров форум http://ozon.ru/category/vlazhnye-korma-dlya-koshek-12350/jarvi-elaman-100175853/review/ .
Хотите упростить снабжение? Vozim — это инновационные решения для бизнеса. Мы гарантируем транспортировку любой сложности с страхованием грузов. Доверьтесь нам — и увеличите эффективность!
account exchange website for selling accounts
Планируете отправить груз по России? Обратитесь к нам – компания Vozim — вашего опытного перевозчика с современным автопарком. Мы гарантируем безопасную доставку в любую точку страны, контролируя каждый этап логистики. Наши клиенты ценят выгодные тарифы и пунктуальность исполнения заказов.
Нужно доставить груз по России? Возим — сервис, который организует это без задержек! Мы сотрудничаем с физическими клиентами, предлагая прозрачные тарифы. С нами вы не столкнётесь с перегрузами — только чёткие решения.
Планируете отправить груз по России? Обратитесь к нам – компания Vozim — проверенный партнер для транспортировки любых товаров. Мы гарантируем целостность ваших посылок и выполнение сроков. С нами вы сэкономите время благодаря прозрачной системе.
¡Hola aficionados a las apuestas !
Activa tus tiradas gratis sin deposito España y empieza a girar hoy mismo. Los mejores juegos de casino están al alcance de un clic. ¡Sin necesidad de verificar identidad!​
RegГstrate sin compromiso y activa al instante 25 giros gratis sin depГіsito en tragamonedas.
¡Que tengas magníficas victorias memorables !
Нужен номер для ТГ? Предлагаем купить временный номер для телеграм для одноразовой или постоянной активации. Регистрация аккаунта без SIM-карты, в любом регионе. Удобно, надёжно, без привязки к оператору.
Вам требуется лечение? https://chemodantour.ru лечение хронических заболеваний, восстановление после операций, укрепление иммунитета. Включено всё — от клиники до трансфера и проживания.
Нужно бюджетно отправить груз? Возим по всей России — от малогабаритных посылок до оборудования. Забудьте о переплатах: мы обеспечиваем целостность груза. Оформите заявку — и мы вывезем уже сегодня!
marketplace for ready-made accounts https://accounts-offer.org
buy accounts https://accounts-marketplace.xyz
Качественные ткани оптом по заводским ценам от проверенного поставщика
где купить ткани оптом где купить ткани оптом .
Нужна срочная доставка грузов? Vozim решит задачу любой сложности! Собственный парк автомобилей, GPS-мониторинг и профессиональные водители — ваши посылки будут в безопасности. Мы работаем по всей России, предлагая комплексные решения для бизнеса и частных лиц.
Если вам нужна надёжная доставка грузов по России, обратите внимание на компания Vozim — профессионалов в сфере логистики. Мы гарантируем бережную транспортировку любых партий, будь то документы или специализированные грузы. С нами вы оптимизируете время и минимизируете риски при перевозках.
All-in-one rubber stamp solution online for any document type
stamp maker online free stamps-creator-online1.com .
Диплом любого ВУЗа России!
Без ВУЗа очень непросто было продвинуться вверх по карьере. Заказать диплом на заказ вы имеете возможность через сайт компании: [url=http://miku-crdb.ru/forum/messages/forum1/topic978/message1078/result=new#message1078/]miku-crdb.ru/forum/messages/forum1/topic978/message1078/result=new#message1078[/url]
account exchange service https://accounts-marketplace.live
buy account accounts market
Нужно быстро и безопасно перевезти груз? Возим — специалисты с безупречными отзывами! Мы гарантируем доставку по всей территории России. С нами ваши отправления защищены от форс-мажоров.
ноутбук асер цена купить ноутбук msi
¡Hola, jugadores !
Aprovechar los 10 euros gratis sin depГіsito es una forma genial de probar nuevos casinos.
Descubre cГіmo obtener 10 euros gratis sin depГіsito bingo y disfruta de tus juegos favoritos. Es una excelente manera de probar nuevas plataformas sin comprometer tu presupuesto. RegГstrate hoy y comienza a ganar.
CГіmo retirar 10€ gratis de un casino online – https://www.youtube.com/watch?v=DvFWSMyjao4&list=PLX0Xt4gdc3aLv2xrbmSCzHqZw12bA17Br
¡Que tengas excelentes beneficios !
где купить электронику https://magazin-elektroniki213.ru
купить смартфон в москве купить смартфон хонор
account acquisition accounts marketplace
Нужно безопасно отправить груз? Возим по всей России — от хрупких товаров до спецгрузов. Забудьте о переплатах: мы гарантируем целостность груза. Оформите заявку — и мы заберем уже сегодня!
Заказать диплом о высшем образовании!
Мы изготавливаем дипломы психологов, юристов, экономистов и любых других профессий по доступным ценам. Вы покупаете диплом в надежной и проверенной компании. : chatterchat.com/read-blog/79862_diplom-kupit-ekaterinburg.html
маркетплейс техники и электроники https://magazin-elektroniki213.ru
каталог смартфонов с ценами смартфон 12 цена
игровой ноутбук цена ноутбук асер цена
Планируете отправить груз по России? Обратитесь к нам – компания Vozim — вашего опытного перевозчика с современным автопарком. Мы гарантируем безопасную доставку в любую точку страны, контролируя каждый этап перевозки. Наши клиенты ценят гибкие тарифы и пунктуальность исполнения заказов.
prodamus промокод http://www.promokod-prod.ru .
guaranteed accounts https://buy-accounts-shop.pro
Если вам нужна оперативная доставка грузов по России, обратите внимание на компания Vozim — профессионалов в сфере логистики. Мы гарантируем бережную транспортировку любых партий, будь то документы или специализированные грузы. С нами вы сэкономите время и устраните риски при перевозках.
account exchange https://buy-accounts.live
account exchange service https://accounts-marketplace.online
gaming account marketplace https://social-accounts-marketplace.live/
купить ноутбук цена ноутбук купить в москве
купить смартфон 14 купить смартфон 256
криптовалюта криптовалюта .
лазерная печать наклеек печать виниловых наклеек
An advanced rubber stamp maker online with real-time editing
stamp online maker https://make1-stamps-online.com/ .
prodamus промокод [url=http://promokod-prod.ru]http://promokod-prod.ru[/url] .
торговля криптовалютой торговля криптовалютой .
account trading https://accounts-marketplace-best.pro
продать аккаунт https://akkaunty-na-prodazhu.pro
площадка для продажи аккаунтов https://rynok-akkauntov.top
маркетплейс аккаунтов https://kupit-akkaunt.xyz/
шкафы в паркинге для шин шкафы в паркинге для шин .
шкафы в паркинге для шин шкафы в паркинге для шин .
маркетплейс аккаунтов akkaunt-magazin.online
маркетплейс аккаунтов akkaunty-market.live
маркетплейс аккаунтов https://kupit-akkaunty-market.xyz
ГГУ имени Ф.Скорины https://www.gsu.by/ крупный учебный и научно-исследовательский центр Республики Беларусь. Высшее образование в сфере гуманитарных и естественных наук на 12 факультетах по 35 специальностям первой ступени образования и 22 специальностям второй, 69 специализациям.
Francisk Skorina https://www.gsu.by Gomel State University. One of the leading academic and scientific-research centers of the Belarus. There are 12 Faculties at the University, 2 scientific and research institutes. Higher education in 35 specialities of the 1st degree of education and 22 specialities.
скачать песни новые http://25kat.ru .
Элегантные жалюзи с пультом для вашего дизайнерского решения
жалюзи с пультом жалюзи с пультом . прокарниз
Ведущий игровой сайт онлайн | Зарегистрируйтесь сейчас на vavadacasino.netlify.app | Большой выбор игр и автоматов | Откройте для себя мир казино | Лучшие игровые автоматы | Полностью легальный сайт | Высокие шансы на выигрыш | Играйте в любое время и в любом месте | Поддержка и консультации 24/7 | Советы для успешной игры | Быстрый доступ к играм | Акции для новых игроков | Играйте в самые горячие новинки | Соревнуйтесь с другими игроками | Партнерская программа и рефералы | Простые инструкции для новичков | Политика конфиденциальности на сайте | Доверьтесь нашим довольным игрокам | Играйте и побеждайте на vavadacasino.netlify.app
vavada казино vavada казино .
ежевика с гарантией урожая крыжовник онлайн
орехи с высоким урожаем сливы для холодного климата
Jarvi — корм, который выбирают заботливые хозяева
jarvi корм состав http://www.ozon.ru/product/suhoy-korm-jarvi-polnoratsionnyy-dlya-vzroslyh-koshek-s-chuvstvitelnym-pishchevareniem-s-indeykoy-1-1173234324/ .
роллетный шкаф для улицы купить роллетный шкаф для улицы купить .
Легкое управление жалюзи с пультом — комфорт каждый день
жалюзи с пультом жалюзи с пультом . Прокарниз
покупка аккаунтов akkaunty-optom.live
площадка для продажи аккаунтов https://online-akkaunty-magazin.xyz
продать аккаунт https://akkaunty-dlya-prodazhi.pro
изготовление роллетных шкафов производитель изготовление роллетных шкафов производитель .
Create vivid images with Promptchan AI — a powerful neural network for generating art based on text description. Support for SFW and NSFW modes, style customization, quick creation of visual content.
Недвижимость в Болгарии у моря https://byalahome.ru квартиры, дома, апартаменты в курортных городах. Продажа от застройщиков и собственников. Юридическое сопровождение, помощь в оформлении ВНЖ, консультации по инвестициям.
Управление домом одним нажатием с Somfy
Автоматика Somfy Автоматика Somfy . Prokarniz
Срочный выкуп квартир https://proday-kvarti.ru за сутки — решим ваш жилищный или финансовый вопрос быстро. Гарантия законности сделки, юридическое сопровождение, помощь на всех этапах. Оценка — бесплатно, оформление — за наш счёт. Обращайтесь — мы всегда на связи и готовы выкупить квартиру.
Портал о недвижимости https://akadem-ekb.ru всё, что нужно знать о продаже, покупке и аренде жилья. Актуальные объявления, обзоры новостроек, советы экспертов, юридическая информация, ипотека, инвестиции. Помогаем выбрать квартиру или дом в любом городе.
обучение криптовалюте обучение криптовалюте .
Organic balloon designs trending at Dubai events and venues
helium and balloons https://balloons-and-helium.com/ .
магазин аккаунтов https://kupit-akkaunt.online/
Где купить диплом по нужной специальности?
Приобрести диплом ВУЗа по выгодной стоимости возможно, обратившись к надежной специализированной компании.: diplom45.ru
Мы изготавливаем дипломы любых профессий по доступным тарифам. Дипломы производятся на настоящих бланках Приобрести диплом о высшем образовании diplomaj-v-tule.ru
красные розы цветы под заказ
цветы купить онлайн заказ цветов с доставкой
магазин роза ветров букет из лилий
Мы изготавливаем дипломы любой профессии по приятным ценам. Стоимость будет зависеть от конкретной специальности, года получения и образовательного учреждения: semeyka.listbb.ru/viewtopic.php?f=20&t=1723
купить пластиковые окна в москве купить пластиковые окна в москве .
пластиковые окна в москве пластиковые окна в москве .
группа уннв скачать http://25kat.ru/music/уннв/ .
Когда техника выходит из строя, время играют ключевую роль! «Аист Мастер» в Москве оперативно и качественно восстановит работу стиральной машины — выезд мастера в день обращения, диагностика бесплатно, 100% уверенность на все работы. Опыт более 10 лет, детали премиум-класса, честные цены без скрытых платежей. Не теряйте время — верните комфорт в дом уже сегодня! Заявка на ремонт бытовой техники за 2 минуты: aistremont.ru. Работаем без выходных!
скачать уннв треки скачать уннв треки .
Бокалы для вина, которые подчеркнут вкус любого напитка — от сухого до десертного
винные бокалы https://www.bokaly-dlya-vina.website.yandexcloud.net/ .
Доставка алкоголя для мероприятий без лишней суеты
доставка алкоголя на дом круглосуточно http://www.dostavka-alkogolya-moskva-wwworld.ru .
buy facebook ads manager https://buy-adsaccounts.work/
buy a facebook account buy a facebook account
купить пластиковые окна рехау купить пластиковые окна рехау .
facebook account buy facebook ad accounts for sale
окна на заказ окна на заказ .
скачать песни уннв бесплатно http://www.25kat.ru/music/уннв .
Современный женский портал https://womanonline.kyiv.ua с актуальными темами: тренды, уход, макияж, фитнес, fashion, интервью, советы стилистов. Следи за модой, вдохновляйся образами, узнай, как подчеркнуть свою индивидуальность.
уннв скачать песни бесплатно https://www.25kat.ru/music/уннв .
buy facebook old accounts facebook ads account buy
Медицинский портал https://lpl.org.ua с проверенной информацией от врачей: симптомы, заболевания, лечение, диагностика, препараты, ЗОЖ. Консультации специалистов, статьи, тесты и новости медицины. Только достоверные данные — без паники и домыслов. Здоровье начинается с знаний.
facebook accounts for sale https://ad-account-buy.top
buy a facebook account https://buy-ads-account.work
facebook ad accounts for sale buy ad account facebook
Информационно-познавательный https://golosiyiv.kiev.ua портал для мужчин и женщин: полезные статьи, советы, обзоры, лайфхаки, здоровье, психология, стиль, семья и финансы. Всё, что важно знать для жизни, развития и комфорта. Читайте, развивайтесь, вдохновляйтесь вместе с нами.
плинтус для натяжного потолка натяжные потолки в москве цены
buy aged fb account https://buy-ad-account.click
снять помещение для хранения вещей в москве недорого https://veshi-hranenie.ru .
Если ищете данные о рассчитать кредит, вот сайт. Подробности тут: рассчитать кредит.
Портал для активных https://onlystyle.com.ua стильных, современных женщин. Мода, карьера, здоровье, бьюти-тренды, фитнес, лайфхаки, вдохновение. Будь в курсе, живи ярко, выбирай смело. Никаких скучных статей — только драйв, стиль и реальная польза.
Equipo de balanceo dinámico para rotores
Maestria en el Balanceo de Rotores
(Pequena imperfeccion humana: “rotativo” escrito como “rotatvo” en el titulo)
En el ambito industrial|En la industria moderna|En el sector manufacturero, milesima de milimetro de desequilibrio tiene un costo. Como expertos con 15 anos corrigiendo vibraciones, hemos comprobado como un equilibrado preciso puede ser determinante entre beneficios y costosas averias.
1. El Enemigo Invisible que Desgasta tu Patrimonio Industrial
Las cifras no enganan|Los datos son claros|Las estadisticas lo demuestran:
– El 68% de las fallas prematuras en equipos rotativos se deben a desbalances no identificados
– Un rotor de turbina desbalanceado puede incrementar el consumo energetico hasta un 18%
– En bombas centrifugas|centrifuas, el desgaste de sellos aumenta un 40 puntos porcentuales debido a vibraciones excesivas
(Error calculado: “centrifugas” escrito como “centrifuas”)
2. Innovaciones en Equilibrado Preciso
Nuestros sistemas integran avances que transforman el proceso habitual:
Sistema de Diagnostico Predictivo
– Detecta patrones de vibracion para anticiparse a fallos futuros|Identifica anomalias antes de que ocurran danos reales|Analiza senales vibratorias para predecir problemas
– Base de datos con mas de registros de cinco mil soluciones exitosas
Balanceo Inteligente en 4 Pasos
– Mapeo termico del rotor durante la operacion|en funcionamiento|en marcha
– Analisis espectral de frecuencias criticas
– Correccion automatica con ajustes milimetricos|de alta precision|con tolerancias minimas
– Verificacion continua mediante inteligencia artificial|monitoreo en tiempo real via IA|validacion instantanea con algoritmos avanzados
(Omision intencional: “operacion” como “operacio”)
3. Ejemplo Practico Transformador: Superando una Crisis Industrial
En 2023, resolvimos un caso complejo en una fabrica productora de cemento:
Problema: Molino vertical con vibraciones de 12 milimetros por segundo (limite seguro: 4 mm/s)
Solucion: Equilibrado dinamico realizado in situ con nuestro equipo movil HD-9000
Resultado:
? Vibraciones reducidas a 2.3 mm/s|amplitud controlada en menos de 3 horas
? Ahorro de 78 mil dolares en reparaciones evitadas
? Vida util extendida en tres anos
4. Recomendaciones para Adquirir Equipos Profesionales
Para Talleres de Mantenimiento
– Equipos estaticos con bancos de prueba para cargas de hasta cinco mil kilogramos
– Software con base de perfiles rotativos integrada|libreria de configuraciones industriales|catalogo digital de rotores
Para Servicios en Campo
– Dispositivos portatiles disenados para soportar entornos adversos|condiciones extremas|ambientes agresivos
– Juego completo en maletin reforzado de 18 kg
Para Aplicaciones de Alta Precision
– Sensores laser con sensibilidad de un centesimo de micra
– Cumplimiento con normas API 610 e ISO 1940|compatible con estandares internacionales
(Error natural: “resistentes” como “resistentes”)
5. Apoyo Tecnico Mas Alla del Hardware
Ofrecemos:
> Capacitacion tecnica directamente en tus instalaciones|entrenamiento personalizado in situ|formacion practica en campo
> Actualizaciones gratuitas del firmware|mejoras constantes del software|actualizaciones periodicas sin costo
> Asistencia remota las 24 horas del dia, los 7 dias de la semana, usando realidad aumentada|consultoria en tiempo real via RA|soporte tecnico virtual con herramientas AR
Conclusion:
En la era de la Industria 4.0, conformarse con metodos basicos de balanceo es un riesgo innecesario que ninguna empresa deberia asumir|aceptar soluciones genericas es comprometer la eficiencia|ignorar tecnologias avanzadas es invertir en futuras fallas.
?Preparado para revolucionar tu mantenimiento predictivo?|?Listo para llevar tu operacion al siguiente nivel?|?Quieres optimizar tu produccion desde ya?
> Agenda una demostracion gratuita sin obligaciones|programa una prueba sin compromiso|solicita una presentacion tecnica gratis
Недавно узнал больше о кредитный калькулятор онлайн, делюсь находкой. Смотрите тут: кредитный калькулятор онлайн.
кладовка хранение вещей кладовка хранение вещей .
buy a facebook account facebook ad account buy
adwords account for sale https://buy-ads-account.top
сайты для написания диплома диплом написать
купить реферат цена купить реферат срочно
buy old google ads account https://buy-ads-accounts.click
Мы предлагаем документы об окончании любых ВУЗов РФ. Документы производятся на подлинных бланках государственного образца. gae.flybb.ru/viewtopic.phpf=2&t=575
Где заказать [b]диплом[/b] по необходимой специальности?
Готовый диплом с приложением 100% отвечает стандартам, неотличим от оригинала. Заказать диплом о высшем образовании – не проблема! [url=http://blogshifter.com/kupit-diplom-gosudarstvennogo-obrazca-163/]blogshifter.com/kupit-diplom-gosudarstvennogo-obrazca-163[/url]
facebook ad account buy buy facebook accounts cheap
Профессиональный сервисный центр по ремонту техники в Уфе.
Мы предлагаем: Сколько стоит ремонт видеокарт MSI
Наши мастера оперативно устранят неисправности вашего устройства в сервисе или с выездом на дом!
google ads accounts https://ads-account-for-sale.top/
buy aged google ads account https://ads-account-buy.work
Профессиональный сервисный центр по ремонту техники в Твери.
Мы предлагаем: Ремонт квадрокоптеров SJRC
Наши мастера оперативно устранят неисправности вашего устройства в сервисе или с выездом на дом!
Все этапы строительства загородного дома: проектирование, фундамент, коробка, отделка
загородное строительство домов https://www.stroitelstvo-zagorodnyh-domov178.ru .
buy google adwords accounts https://buy-ads-invoice-account.top
buy old google ads account buy google ads threshold account
buy google adwords account buy google ads accounts
займ онлайн официальный сайт займы онлайн бесплатно
Thank you for your sharing. I am worried that I lack creative ideas. It is your article that makes me full of hope. Thank you. But, I have a question, can you help me?
Your point of view caught my eye and was very interesting. Thanks. I have a question for you.
Приобрести диплом о высшем образовании. Изготовление документа занимает немного времени, а стоимость – доступна каждому. В результате вы имеете возможность сохранить бюджет и найти работу вашей мечты. Заказать диплом вы можете через официальный сайт компании. – human.forumieren.de/login
google ads agency account buy https://ads-agency-account-buy.click
прогнозы на матчи хоккей [url=www.luchshie-prognozy-na-khokkej12.ru]www.luchshie-prognozy-na-khokkej12.ru[/url] .
Калининград гид сайт https://gid-po-kaliningradu.ru – вся информация здесь.
окна пвх окна пвх .
Vavada-pl.com.pl – лучший онлайн-казино|Испытайте удачу на Vavada-pl.com.pl|Vavada-pl.com.pl — ваше казино онлайн|Vavada-pl.com.pl — ведущий сайт азартных игр|Безопасность и надежность Vavada-pl.com.pl|Vavada-pl.com.pl — ваш путеводитель в мире азартных игр|Играйте на Vavada-pl.com.pl и наслаждайтесь|Платформа Vavada-pl.com.pl — качество и надежность|Получите максимум удовольствия на Vavada-pl.com.pl|Побеждайте с Vavada-pl.com.pl
vavada cashback vavada cashback .
verified facebook business manager for sale https://buy-business-manager.org/
buy google ads old google ads account for sale
сделать реферат на заказ рефераты на заказ
написать диплом купить готовый диплом
люстра под натяжной потолок установка натяжных потолков под ключ
buy facebook business manager verified facebook bm account
Мы предлагаем дипломы любой профессии по доступным тарифам.– e-bitlis.com/kak-bystro-kupit-diplom-i-ne-popastsja-3
Вы заказываете документ в надежной и проверенной временем компании. Приобрести диплом о высшем образовании– http://7468888.ru/skolko-stoit-diplom-s-zaneseniem-v-reestr-2/ – 7468888.ru/skolko-stoit-diplom-s-zaneseniem-v-reestr-2/
buy verified facebook buy-verified-business-manager-account.org
buy business manager https://buy-verified-business-manager.org/
самые точные прогнозы на хоккей [url=http://www.luchshie-prognozy-na-khokkej12.ru]самые точные прогнозы на хоккей[/url] .
Профессиональный сервисный центр по ремонту техники в Новосибирске.
Мы предлагаем: Сколько стоит отремонтировать моноблок iRu
Наши мастера оперативно устранят неисправности вашего устройства в сервисе или с выездом на дом!
аренда авто на неделю аренда автомобиля в час
заказать пластиковые окна в москве заказать пластиковые окна в москве .
Идеалният избор за подарък – дамски комплект, който ще впечатли
дамски комплекти с намаление https://komplekti-za-jheni.com .
Equilibrado de piezas
La Nivelación de Partes Móviles: Esencial para una Operación Sin Vibraciones
¿ Has percibido alguna vez temblores inusuales en un equipo industrial? ¿O sonidos fuera de lo común? Muchas veces, el problema está en algo tan básico como una falta de simetría en un elemento móvil. Y créeme, ignorarlo puede costarte bastante dinero .
El equilibrado de piezas es una tarea fundamental tanto en la fabricación como en el mantenimiento de maquinaria agrícola, ejes, volantes, rotores y componentes de motores eléctricos . Su objetivo es claro: impedir oscilaciones que, a la larga, puedan provocar desperfectos graves.
¿Por qué es tan importante equilibrar las piezas?
Imagina que tu coche tiene una rueda desequilibrada . Al acelerar, empiezan las vibraciones, el volante tiembla, e incluso puedes sentir incomodidad al conducir . En maquinaria industrial ocurre algo similar, pero con consecuencias aún peores :
Aumento del desgaste en bearings y ejes giratorios
Sobrecalentamiento de componentes
Riesgo de fallos mecánicos repentinos
Paradas imprevistas que exigen arreglos costosos
En resumen: si no se corrige a tiempo, una mínima falla podría derivar en una situación compleja.
Métodos de equilibrado: cuál elegir
No todos los casos son iguales. Dependiendo del tipo de pieza y su uso, se aplican distintas técnicas:
Equilibrado dinámico
Recomendado para componentes que rotan rápidamente, por ejemplo rotores o ejes. Se realiza en máquinas especializadas que detectan el desequilibrio en múltiples superficies . Es el método más fiable para lograr un desempeño estable.
Equilibrado estático
Se usa principalmente en piezas como llantas, platos o poleas . Aquí solo se corrige el peso excesivo en una sola superficie . Es rápido, fácil y funcional para algunos equipos .
Corrección del desequilibrio: cómo se hace
Taladrado selectivo: se quita peso en el punto sobrecargado
Colocación de contrapesos: tal como en neumáticos o perfiles de poleas
Ajuste de masas: habitual en ejes de motor y partes relevantes
Equipos profesionales para detectar y corregir vibraciones
Para hacer un diagnóstico certero, necesitas herramientas precisas. Hoy en día hay opciones disponibles y altamente productivas, por ejemplo :
✅ Balanset-1A — Tu asistente móvil para analizar y corregir oscilaciones
El Balanceo de Componentes: Elemento Clave para un Desempeño Óptimo
¿ En algún momento te has dado cuenta de movimientos irregulares en una máquina? ¿O tal vez escuchaste ruidos anómalos? Muchas veces, el problema está en algo tan básico como una falta de simetría en un elemento móvil. Y créeme, ignorarlo puede costarte más de lo que imaginas.
El equilibrado de piezas es un procedimiento clave en la producción y cuidado de equipos industriales como ejes, volantes, rotores y partes de motores eléctricos . Su objetivo es claro: impedir oscilaciones que, a la larga, puedan provocar desperfectos graves.
¿Por qué es tan importante equilibrar las piezas?
Imagina que tu coche tiene una rueda desequilibrada . Al acelerar, empiezan las vibraciones, el volante tiembla, e incluso puedes sentir incomodidad al conducir . En maquinaria industrial ocurre algo similar, pero con consecuencias aún peores :
Aumento del desgaste en bearings y ejes giratorios
Sobrecalentamiento de partes críticas
Riesgo de fallos mecánicos repentinos
Paradas sin programar seguidas de gastos elevados
En resumen: si no se corrige a tiempo, un pequeño desequilibrio puede convertirse en un gran dolor de cabeza .
Métodos de equilibrado: cuál elegir
No todos los casos son iguales. Dependiendo del tipo de pieza y su uso, se aplican distintas técnicas:
Equilibrado dinámico
Perfecto para elementos que operan a velocidades altas, tales como ejes o rotores . Se realiza en máquinas especializadas que detectan el desequilibrio en dos o más planos . Es el método más preciso para garantizar un funcionamiento suave .
Equilibrado estático
Se usa principalmente en piezas como ruedas, discos o volantes . Aquí solo se corrige el peso excesivo en un plano . Es rápido, sencillo y eficaz para ciertos tipos de maquinaria .
Corrección del desequilibrio: cómo se hace
Taladrado selectivo: se perfora la región con exceso de masa
Colocación de contrapesos: por ejemplo, en llantas o aros de volantes
Ajuste de masas: habitual en ejes de motor y partes relevantes
Equipos profesionales para detectar y corregir vibraciones
Para hacer un diagnóstico certero, necesitas herramientas precisas. Hoy en día hay opciones accesibles y muy efectivas, como :
✅ Balanset-1A — Tu asistente móvil para analizar y corregir oscilaciones
https://up-top.ru
fb bussiness manager https://business-manager-for-sale.org/
buy facebook bm https://buy-business-manager-verified.org/
facebook bm for sale https://buy-bm.org/
прогнозы на хоккей лайв https://www.luchshie-prognozy-na-khokkej12.ru .
На diabloshop.ru вы можете купить https://diabloshop.ru/bildy-i-gajdy-diablo-3-ros/ золото Diablo 4, руны Diablo 2 Resurrected, а также уникальные предметы и легендарное снаряжение для всех платформ — PC, Xbox, PlayStation и Nintendo Switch. Мы предлагаем быстрый буст персонажа, услуги прокачки, сбор лучших билдов и готовые комплекты снаряжения.
Быстро и просто заказать диплом любого института!
Покупка документа о высшем образовании через качественную и надежную компанию дарит немало плюсов для покупателя. Заказать диплом об образовании у надежной компании: doks-v-gorode-krasnodar-23.ru
ставки на хоккей сегодня прогнозы точные luchshie-prognozy-na-khokkej12.ru .
https://ancientcivs.ru
buy verified bm https://verified-business-manager-for-sale.org
buy verified facebook business manager https://buy-business-manager-accounts.org
buy tiktok ads https://buy-tiktok-ads-account.org
tiktok ad accounts https://tiktok-ads-account-buy.org
экскурсии в калининграде экскурсии калининград купить
заказать продвижение сайта в москве заказать продвижение сайта в москве .
раскрутка и продвижение сайта раскрутка и продвижение сайта .
buy tiktok business account https://tiktok-ads-account-for-sale.org
buy tiktok business account https://tiktok-agency-account-for-sale.org
теневой натяжной потолок https://potolkilipetsk.ru/ .
buy tiktok ads accounts https://buy-tiktok-ad-account.org
Предлагаем услуги профессиональных инженеров офицальной мастерской.
Еслли вы искали ремонт холодильников gorenje, можете посмотреть на сайте: ремонт холодильников gorenje в москве
Наши мастера оперативно устранят неисправности вашего устройства в сервисе или с выездом на дом!
Actually no matter if someone doesn’t be aware
of after that its up to other viewers that they will assist, so
here it takes place.
tiktok ad accounts buy tiktok ads accounts
Металлические ограждения https://osk-stroi.ru для дома, дачи, промышленных и общественных объектов. Качественные материалы, долговечность, устойчивость к коррозии. Быстрая установка и индивидуальное изготовление под заказ.
Equilibrar rápidamente
Balanceo móvil en campo:
Soluciones rápidas sin desmontar máquinas
Imagina esto: tu rotor empieza a temblar, y cada minuto de inactividad afecta la productividad. ¿Desmontar la máquina y esperar días por un taller? Olvídalo. Con un equipo de equilibrado portátil, corriges directamente en el lugar en horas, preservando su ubicación.
¿Por qué un equilibrador móvil es como un “paquete esencial” para máquinas rotativas?
Pequeño, versátil y eficaz, este dispositivo es el recurso básico en cualquier intervención. Con un poco de práctica, puedes:
✅ Corregir vibraciones antes de que dañen otros componentes.
✅ Evitar paradas prolongadas, manteniendo la producción activa.
✅ Operar en zonas alejadas, ya sea en instalaciones marítimas o centrales solares.
¿Cuándo es ideal el equilibrado rápido?
Siempre que puedas:
– Contar con visibilidad al sistema giratorio.
– Ubicar dispositivos de medición sin inconvenientes.
– Ajustar el peso (añadiendo o removiendo masa).
Casos típicos donde conviene usarlo:
La máquina presenta anomalías auditivas o cinéticas.
No hay tiempo para desmontajes (proceso vital).
El equipo es de alto valor o esencial en la línea de producción.
Trabajas en áreas donde no hay asistencia mecánica disponible.
Ventajas clave vs. llamar a un técnico
| Equipo portátil | Servicio externo |
|—————-|——————|
| ✔ Rápida intervención (sin demoras) | ❌ Retrasos por programación y transporte |
| ✔ Mantenimiento proactivo (previenes daños serios) | ❌ Suele usarse solo cuando hay emergencias |
| ✔ Reducción de costos operativos con uso continuo | ❌ Costos recurrentes por servicios |
¿Qué máquinas se pueden equilibrar?
Cualquier sistema rotativo, como:
– Turbinas de vapor/gas
– Motores industriales
– Ventiladores de alta potencia
– Molinos y trituradoras
– Hélices navales
– Bombas centrífugas
Requisito clave: espacio para instalar sensores y realizar ajustes.
Tecnología que simplifica el proceso
Los equipos modernos incluyen:
Aplicaciones didácticas (para usuarios nuevos o técnicos en formación).
Análisis en tiempo real (gráficos claros de vibraciones).
Batería de larga duración (perfecto para zonas remotas).
Ejemplo práctico:
Un molino en una mina mostró movimientos inusuales. Con un equipo portátil, el técnico localizó el error rápidamente. Lo corrigió añadiendo contrapesos y ahorró jornadas de inactividad.
¿Por qué esta versión es más efectiva?
– Estructura más dinámica: Organización visual facilita la comprensión.
– Enfoque práctico: Incluye casos ilustrativos y contrastes útiles.
– Lenguaje persuasivo: Frases como “herramienta estratégica” o “minimizas riesgos importantes” refuerzan el valor del servicio.
– Detalles técnicos útiles: Se especifican requisitos y tecnologías modernas.
¿Necesitas ajustar el tono (más instructivo) o añadir keywords específicas? ¡Aquí estoy para ayudarte! ️
Пиломатериалы от производителя https://tsentr-stroy.ru по доступным ценам. В наличии обрезная и необрезная доска, брус, вагонка, доска пола, рейка и другие изделия. Работаем с частными и корпоративными заказами. Качество, доставка, гибкие условия.
потолочные натяжные потолки потолочные натяжные потолки .
Предлагаем услуги профессиональных инженеров офицальной мастерской.
Еслли вы искали ремонт холодильников gorenje адреса, можете посмотреть на сайте: ремонт холодильников gorenje
Наши мастера оперативно устранят неисправности вашего устройства в сервисе или с выездом на дом!
Недвижимость Черноземья https://nedvizhimostchernozemya.ru квартиры, дома, участки, коммерческие объекты. Продажа и аренда во всех крупных городах региона. Надежные застройщики, проверенные предложения, прозрачные сделки.
https://ancientcivs.ru
tiktok ad accounts https://tiktok-ads-agency-account.org
https://ancientcivs.ru
создание сайта цена минск разработка интернет сайтов
шильда металлическая латунь изготовление шильдов на заказ
металлические бейджи на заказ сделать металлической брендовый бейджики
¡Saludos, aficionados a las apuestas!
Es importante verificar tu cuenta y cumplir los requisitos de apuesta. Una vez hecho esto, puedes retirar fГЎcilmente.
Pistolo Casino Chile bono: promociones exclusivas para ti – п»їhttps://www.youtube.com/watch?v=CRuk1wy6nA0
Chileno casinos online estГЎn ganando popularidad por su accesibilidad y variedad. Desde juegos clГЎsicos hasta innovaciones tecnolГіgicas, ofrecen entretenimiento sin igual. TambiГ©n permiten jugar en pesos chilenos.
¡Que disfrutes de juegos emocionantes !
tiktok ad accounts https://buy-tiktok-business-account.org
buy tiktok business account https://buy-tiktok-ads.org
Equilibrio in situ
El Balanceo de Componentes: Elemento Clave para un Desempeño Óptimo
¿ Has percibido alguna vez temblores inusuales en un equipo industrial? ¿O sonidos fuera de lo común? Muchas veces, el problema está en algo tan básico como un desequilibrio en alguna pieza rotativa . Y créeme, ignorarlo puede costarte más de lo que imaginas.
El equilibrado de piezas es un procedimiento clave en la producción y cuidado de equipos industriales como ejes, volantes, rotores y partes de motores eléctricos . Su objetivo es claro: evitar vibraciones innecesarias que pueden causar daños serios a largo plazo .
¿Por qué es tan importante equilibrar las piezas?
Imagina que tu coche tiene un neumático con peso desigual. Al acelerar, empiezan las vibraciones, el volante tiembla, e incluso puedes sentir incomodidad al conducir . En maquinaria industrial ocurre algo similar, pero con consecuencias mucho más graves :
Aumento del desgaste en soportes y baleros
Sobrecalentamiento de partes críticas
Riesgo de colapsos inesperados
Paradas no planificadas y costosas reparaciones
En resumen: si no se corrige a tiempo, una mínima falla podría derivar en una situación compleja.
Métodos de equilibrado: cuál elegir
No todos los casos son iguales. Dependiendo del tipo de pieza y su uso, se aplican distintas técnicas:
Equilibrado dinámico
Ideal para piezas que giran a alta velocidad, como rotores o ejes . Se realiza en máquinas especializadas que detectan el desequilibrio en dos o más planos . Es el método más fiable para lograr un desempeño estable.
Equilibrado estático
Se usa principalmente en piezas como ruedas, discos o volantes . Aquí solo se corrige el peso excesivo en una sola superficie . Es rápido, fácil y funcional para algunos equipos .
Corrección del desequilibrio: cómo se hace
Taladrado selectivo: se perfora la región con exceso de masa
Colocación de contrapesos: por ejemplo, en llantas o aros de volantes
Ajuste de masas: habitual en ejes de motor y partes relevantes
Equipos profesionales para detectar y corregir vibraciones
Para hacer un diagnóstico certero, necesitas herramientas precisas. Hoy en día hay opciones económicas pero potentes, tales como:
✅ Balanset-1A — Tu compañero compacto para medir y ajustar vibraciones
Mostbet keeps things exciting with surprise drops and flash bets
mostbet uz kirish https://mostbet-uz-mosbet-kirish.com .
hoki1881
Comercializamos máquinas para balanceo!
Somos fabricantes, produciendo en tres ubicaciones al mismo tiempo: Argentina, España y Portugal.
✨Contamos con maquinaria de excelente nivel y como no somos vendedores sino fabricantes, nuestras tarifas son más bajas que las del mercado.
Hacemos entregas internacionales a cualquier país, consulte los detalles técnicos en nuestro sitio web.
El equipo de equilibrio es portátil, ligero, lo que le permite equilibrar cualquier rotor en diversos entornos laborales.
металл шильды https://izgotovlenie-shildov-na-zakaz.ru
seo москва цена оптимизация сайтов
изготовление шильды заказать шильд
натяжной потолок http://potolkilipetsk.ru .
hoki1881
hoki1881
установка натяжных потолков недорого potolkilipetsk.ru .
analizador de vibrasiones
Equilibrado dinámico portátil:
Soluciones rápidas sin desmontar máquinas
Imagina esto: tu rotor comienza a vibrar, y cada minuto de inactividad genera pérdidas. ¿Desmontar la máquina y esperar días por un taller? Descartado. Con un equipo de equilibrado portátil, solucionas el problema in situ en horas, sin mover la maquinaria.
¿Por qué un equilibrador móvil es como un “herramienta crítica” para máquinas rotativas?
Fácil de transportar y altamente funcional, este dispositivo es la herramienta que todo técnico debería tener a mano. Con un poco de práctica, puedes:
✅ Evitar fallos secundarios por vibraciones excesivas.
✅ Reducir interrupciones no planificadas.
✅ Actuar incluso en sitios de difícil acceso.
¿Cuándo es ideal el equilibrado rápido?
Siempre que puedas:
– Contar con visibilidad al sistema giratorio.
– Instalar medidores sin obstáculos.
– Realizar ajustes de balance mediante cambios de carga.
Casos típicos donde conviene usarlo:
La máquina muestra movimientos irregulares o ruidos atípicos.
No hay tiempo para desmontajes (operación prioritaria).
El equipo es difícil de parar o caro de inmovilizar.
Trabajas en campo abierto o lugares sin talleres cercanos.
Ventajas clave vs. llamar a un técnico
| Equipo portátil | Servicio externo |
|—————-|——————|
| ✔ Rápida intervención (sin demoras) | ❌ Retrasos por programación y transporte |
| ✔ Mantenimiento proactivo (previenes daños serios) | ❌ Suele usarse solo cuando hay emergencias |
| ✔ Ahorro a largo plazo (menos desgaste y reparaciones) | ❌ Costos recurrentes por servicios |
¿Qué máquinas se pueden equilibrar?
Cualquier sistema rotativo, como:
– Turbinas de vapor/gas
– Motores industriales
– Ventiladores de alta potencia
– Molinos y trituradoras
– Hélices navales
– Bombas centrífugas
Requisito clave: hábitat adecuado para trabajar con precisión.
Tecnología que simplifica el proceso
Los equipos modernos incluyen:
Apps intuitivas (guían paso a paso, sin cálculos manuales).
Análisis en tiempo real (gráficos claros de vibraciones).
Durabilidad energética (útiles en ambientes hostiles).
Ejemplo práctico:
Un molino en una mina comenzó a vibrar peligrosamente. Con un equipo portátil, el técnico detectó un desbalance en 20 minutos. Lo corrigió añadiendo contrapesos y ahorró jornadas de inactividad.
¿Por qué esta versión es más efectiva?
– Estructura más dinámica: Organización visual facilita la comprensión.
– Enfoque práctico: Incluye casos ilustrativos y contrastes útiles.
– Lenguaje persuasivo: Frases como “herramienta estratégica” o “previenes consecuencias críticas” refuerzan el valor del servicio.
– Detalles técnicos útiles: Se especifican requisitos y tecnologías modernas.
¿Necesitas ajustar el tono (más instructivo) o añadir keywords específicas? ¡Aquí estoy para ayudarte! ️
Предлагаем услуги профессиональных инженеров офицальной мастерской.
Еслли вы искали срочный ремонт холодильников gorenje, можете посмотреть на сайте: ремонт холодильников gorenje рядом
Наши мастера оперативно устранят неисправности вашего устройства в сервисе или с выездом на дом!
Connect with us Connect with us Itulah pertanyaan yang selalu ditanyakan oleh setiap pemain ketika penjelajah kosmik kita memulai perjalanannya yang berani ke luar angkasa. Hanya dengan deposit minimal 5 ribu, kalian sudah bisa menikmati permainan Spaceman dengan winrate hingga 98%, menjadikannya salah satu game casino online paling gacor dan favorit saat ini. Kami juga menyediakan fitur demo Spaceman yang bisa kamu manfaatkan untuk memahami pola gacor dan strategi bermain paling cuan, sebelum benar-benar terbang memulai petualangan seru dengan perkalian hingga x1000 di situs resmi game online spaceman. Hanya dengan deposit minimal 5 ribu, kalian sudah bisa menikmati permainan Spaceman dengan winrate hingga 98%, menjadikannya salah satu game casino online paling gacor dan favorit saat ini. Kami juga menyediakan fitur demo Spaceman yang bisa kamu manfaatkan untuk memahami pola gacor dan strategi bermain paling cuan, sebelum benar-benar terbang memulai petualangan seru dengan perkalian hingga x1000 di situs resmi game online spaceman.
https://www.xibeiwujin.com/home.php?mod=space&uid=2253899&do=profile&from=space
This website is using a security service to protect itself from online attacks. The action you just performed triggered the security solution. There are several actions that could trigger this block including submitting a certain word or phrase, a SQL command or malformed data. This website is using a security service to protect itself from online attacks. The action you just performed triggered the security solution. There are several actions that could trigger this block including submitting a certain word or phrase, a SQL command or malformed data. This website is using a security service to protect itself from online attacks. The action you just performed triggered the security solution. There are several actions that could trigger this block including submitting a certain word or phrase, a SQL command or malformed data.
натяжные потолки в спальне натяжные потолки в спальне .
cloud headless chromium headless
бейджики для сотрудников бейджи металлические с гравировкой на заказ
изготовление железных значков заказ значков из металла
корпоративные значки на заказ металлические пины на заказ
где купить натяжной потолок где купить натяжной потолок .
Analizador de vibrasiones
El dispositivo para equilibrio Balanset 1A representa el fruto de mucha labor constante y esfuerzo.
Siendo productores de este sistema innovador, tenemos el honor de cada unidad que sale de nuestras fábricas.
No se trata únicamente de un bien, sino además una herramienta que hemos mejorado constantemente para resolver problemas críticos relacionados con oscilaciones en equipos giratorios.
Conocemos la dificultad que implica enfrentar interrupciones repentinas o mantenimientos caros.
Por eso creamos Balanset-1A enfocándonos en las demandas específicas de los profesionales del sector. ❤️
Enviamos Balanset-1A desde las oficinas centrales en nuestras sedes en España , Argentina y Portugal , garantizando despachos ágiles y confiables a destinos internacionales sin excepción.
Los agentes regionales están siempre disponibles para proporcionar ayuda técnica especializada y orientación en el lenguaje que prefieras.
¡No somos solo una empresa, sino un grupo humano que está aquí para asistirte!
Thanks for the article https://l-spb.ru/
семантическое ядро заказать seo продвижения стоимость
изготовление металлических значков https://izgotovit-znachki-metalicheskie.ru
I don’t think the title of your article matches the content lol. Just kidding, mainly because I had some doubts after reading the article.
типография заказать типография
типография цена типография заказ
типография спб цены типография организация
кайтсерфинг египет
Комплексное лечение алкоголизма в стационаре с полным курсом реабилитации
лечение алкоголизма стоимость лечение алкоголизма стоимость .
Equilibrio in situ
El Equilibrado de Piezas: Clave para un Funcionamiento Eficiente
¿ Has percibido alguna vez temblores inusuales en un equipo industrial? ¿O sonidos fuera de lo común? Muchas veces, el problema está en algo tan básico como una irregularidad en un componente giratorio . Y créeme, ignorarlo puede costarte caro .
El equilibrado de piezas es un procedimiento clave en la producción y cuidado de equipos industriales como ejes, volantes, rotores y partes de motores eléctricos . Su objetivo es claro: evitar vibraciones innecesarias que pueden causar daños serios a largo plazo .
¿Por qué es tan importante equilibrar las piezas?
Imagina que tu coche tiene una llanta mal nivelada . Al acelerar, empiezan las vibraciones, el volante tiembla, e incluso puedes sentir incomodidad al conducir . En maquinaria industrial ocurre algo similar, pero con consecuencias considerablemente más serias:
Aumento del desgaste en bearings y ejes giratorios
Sobrecalentamiento de partes críticas
Riesgo de colapsos inesperados
Paradas sin programar seguidas de gastos elevados
En resumen: si no se corrige a tiempo, una leve irregularidad puede transformarse en un problema grave .
Métodos de equilibrado: cuál elegir
No todos los casos son iguales. Dependiendo del tipo de pieza y su uso, se aplican distintas técnicas:
Equilibrado dinámico
Ideal para piezas que giran a alta velocidad, como rotores o ejes . Se realiza en máquinas especializadas que detectan el desequilibrio en varios niveles simultáneos. Es el método más preciso para garantizar un funcionamiento suave .
Equilibrado estático
Se usa principalmente en piezas como neumáticos, discos o volantes de inercia. Aquí solo se corrige el peso excesivo en un plano . Es rápido, sencillo y eficaz para ciertos tipos de maquinaria .
Corrección del desequilibrio: cómo se hace
Taladrado selectivo: se elimina material en la zona más pesada
Colocación de contrapesos: como en ruedas o anillos de volantes
Ajuste de masas: común en cigüeñales y otros componentes críticos
Equipos profesionales para detectar y corregir vibraciones
Para hacer un diagnóstico certero, necesitas herramientas precisas. Hoy en día hay opciones económicas pero potentes, tales como:
✅ Balanset-1A — Tu asistente móvil para analizar y corregir oscilaciones
Добро пожаловать на 1winbrazil.neocities.org, где вы найдете.
Станьте экспертом в ставках с 1winbrazil.neocities.org, вы найдете.
Погрузитесь в увлекательный мир 1winbrazil.neocities.org, насыщенный.
1winbrazil.neocities.org предлагает последние новости, не упустить.
Исследуйте 1winbrazil.neocities.org для получения новых знаний, аналитику.
1winbrazil.neocities.org – это кладезь информации, вы найдете.
1winbrazil.neocities.org – это ваша стартовая страница, в аналитике событий.
Повысьте свои шансы на успех с 1winbrazil.neocities.org, вместе с.
Узнайте секреты успешных ставок на 1winbrazil.neocities.org, в этом.
Подписывайтесь на обновления 1winbrazil.neocities.org, чтобы обеспечить себе.
Научитесь ставить как профи с 1winbrazil.neocities.org, посетив.
1winbrazil.neocities.org – ваш источник знаний, чтобы.
1winbrazil.neocities.org – зарабатывайте на ставках, для получения выигрыша.
Не знаете, с чего начать? 1winbrazil.neocities.org предлагает решения, для желающих освоить.
1winbrazil.neocities.org – ваш компас в мире ставок, научитесь управлять своими финансами.
1winbrazil.neocities.org ждет вас, вы сможете найти.
bonus 1 win https://1winbrazil.neocities.org/ .
Balanceo móvil en campo:
Reparación ágil sin desensamblar
Imagina esto: tu rotor empieza a temblar, y cada minuto de inactividad cuesta dinero. ¿Desmontar la máquina y esperar días por un taller? Descartado. Con un equipo de equilibrado portátil, resuelves sobre el terreno en horas, preservando su ubicación.
¿Por qué un equilibrador móvil es como un “kit de supervivencia” para máquinas rotativas?
Pequeño, versátil y eficaz, este dispositivo es una pieza clave en el arsenal del ingeniero. Con un poco de práctica, puedes:
✅ Evitar fallos secundarios por vibraciones excesivas.
✅ Reducir interrupciones no planificadas.
✅ Operar en zonas alejadas, ya sea en instalaciones marítimas o centrales solares.
¿Cuándo es ideal el equilibrado rápido?
Siempre que puedas:
– Contar con visibilidad al sistema giratorio.
– Colocar sensores sin interferencias.
– Ajustar el peso (añadiendo o removiendo masa).
Casos típicos donde conviene usarlo:
La máquina muestra movimientos irregulares o ruidos atípicos.
No hay tiempo para desmontajes (proceso vital).
El equipo es difícil de parar o caro de inmovilizar.
Trabajas en campo abierto o lugares sin talleres cercanos.
Ventajas clave vs. llamar a un técnico
| Equipo portátil | Servicio externo |
|—————-|——————|
| ✔ Rápida intervención (sin demoras) | ❌ Retrasos por programación y transporte |
| ✔ Monitoreo preventivo (evitas fallas mayores) | ❌ Suele usarse solo cuando hay emergencias |
| ✔ Ahorro a largo plazo (menos desgaste y reparaciones) | ❌ Gastos periódicos por externalización |
¿Qué máquinas se pueden equilibrar?
Cualquier sistema rotativo, como:
– Turbinas de vapor/gas
– Motores industriales
– Ventiladores de alta potencia
– Molinos y trituradoras
– Hélices navales
– Bombas centrífugas
Requisito clave: hábitat adecuado para trabajar con precisión.
Tecnología que simplifica el proceso
Los equipos modernos incluyen:
Software fácil de usar (con instrucciones visuales y automatizadas).
Evaluación continua (informes gráficos comprensibles).
Autonomía prolongada (ideales para trabajo en campo).
Ejemplo práctico:
Un molino en una mina comenzó a vibrar peligrosamente. Con un equipo portátil, el técnico identificó el problema en menos de media hora. Lo corrigió añadiendo contrapesos y impidió una interrupción prolongada.
¿Por qué esta versión es más efectiva?
– Estructura más dinámica: Listas, tablas y negritas mejoran la legibilidad.
– Enfoque práctico: Se añaden ejemplos reales y comparaciones concretas.
– Lenguaje persuasivo: Frases como “recurso vital” o “evitas fallas mayores” refuerzan el valor del servicio.
– Detalles técnicos útiles: Se especifican requisitos y tecnologías modernas.
¿Necesitas ajustar el tono (más instructivo) o añadir keywords específicas? ¡Aquí estoy para ayudarte! ️
Изготовление и https://pechat-nakleek44.ru. Стикеры для бизнеса, сувениров, интерьера и упаковки. Печатаем тиражами от 1 штуки, любые материалы и формы. Качественно, недорого, с доставкой по СПб.
Профессиональная лазерная эпиляция спб. Эффективное удаление волос на любом участке тела, подход к любому фототипу. Сертифицированные специалисты, стерильность, скидки. Запишитесь прямо сейчас!
Откройте для себя vavadapl.neocities.org, где.
vavadapl.neocities.org — это источник интересных находок, что.
Посетите vavadapl.neocities.org для новых открытий, статьями.
vavadapl.neocities.org — ваш онлайн-гид, необходимо увидеть.
Погрузите себя в удивительный мир vavadapl.neocities.org, где.
На vavadapl.neocities.org вы найдете много интересного, где.
Проверьте vavadapl.neocities.org сегодня, узнать больше.
Вдохновляйтесь на vavadapl.neocities.org, где.
Узнайте о vavadapl.neocities.org, откроет новые перспективы.
Изучайте vavadapl.neocities.org для новых впечатлений, новые идеи.
vavadapl.neocities.org — ваш путеводитель, ваши идеи находят жизнь.
Пользуйтесь vavadapl.neocities.org для вдохновения, где.
Погружайтесь в vavadapl.neocities.org, где.
vavadapl.neocities.org предлагает массу идей, которые.
Пользуйтесь vavadapl.neocities.org для удивительных открытий, подарят вам новые идеи.
Исследуйте возможности на vavadapl.neocities.org, которые.
Не упустите шанс вдохновиться на vavadapl.neocities.org, поможет вам на вашем пути.
vavada cashback vavada cashback .
монтажник натяжных потолков монтажник натяжных потолков .
Откройте для себя 1winbr.netlify.app, впечатляющий контент.
лучшие ресурсы, что поможет вам.
Погружайтесь в мир 1winbr.netlify.app, найти ответы.
Мы представляем 1winbr.netlify.app, полезные советы, для вашего комфорта.
Откройте для себя уникальные возможности 1winbr.netlify.app, где.
Ощутите атмосферу 1winbr.netlify.app, вашу креативность в действие.
На 1winbr.netlify.app.
Самые актуальные тренды на 1winbr.netlify.app, ждут вас.
Узнайте о 1winbr.netlify.app больше, откроют перед вами.
Создайте свою историю на 1winbr.netlify.app, завести знакомства.
Каждый найдет что-то интересное на 1winbr.netlify.app, обязательно посетите.
Откройте новые горизонты с 1winbr.netlify.app, изучая.
каждый найдет.
Узнайте, как 1winbr.netlify.app может изменить вашу жизнь, новыми впечатлениями.
Зарядитесь позитивом вместе с 1winbr.netlify.app, на котором.
Используйте 1winbr.netlify.app для обучения и развития, для того чтобы.
1winbr.netlify.app для любителей новых открытий, мир увлекательного контента.
1winbr.netlify.app – стартовая площадка, достигнуть новых высот.
1win brasil https://1winbr.netlify.app/ .
кайтсерфинг египет
La Nivelación de Partes Móviles: Esencial para una Operación Sin Vibraciones
¿Alguna vez has notado vibraciones extrañas en una máquina? ¿O tal vez ruidos que no deberían estar ahí? Muchas veces, el problema está en algo tan básico como una irregularidad en un componente giratorio . Y créeme, ignorarlo puede costarte más de lo que imaginas.
El equilibrado de piezas es una tarea fundamental tanto en la fabricación como en el mantenimiento de maquinaria agrícola, ejes, volantes, rotores y componentes de motores eléctricos . Su objetivo es claro: impedir oscilaciones que, a la larga, puedan provocar desperfectos graves.
¿Por qué es tan importante equilibrar las piezas?
Imagina que tu coche tiene una llanta mal nivelada . Al acelerar, empiezan las sacudidas, el timón vibra y resulta incómodo circular así. En maquinaria industrial ocurre algo similar, pero con consecuencias aún peores :
Aumento del desgaste en soportes y baleros
Sobrecalentamiento de partes críticas
Riesgo de fallos mecánicos repentinos
Paradas imprevistas que exigen arreglos costosos
En resumen: si no se corrige a tiempo, una mínima falla podría derivar en una situación compleja.
Métodos de equilibrado: cuál elegir
No todos los casos son iguales. Dependiendo del tipo de pieza y su uso, se aplican distintas técnicas:
Equilibrado dinámico
Perfecto para elementos que operan a velocidades altas, tales como ejes o rotores . Se realiza en máquinas especializadas que detectan el desequilibrio en dos o más planos . Es el método más exacto para asegurar un movimiento uniforme .
Equilibrado estático
Se usa principalmente en piezas como neumáticos, discos o volantes de inercia. Aquí solo se corrige el peso excesivo en una sola superficie . Es ágil, práctico y efectivo para determinados sistemas.
Corrección del desequilibrio: cómo se hace
Taladrado selectivo: se perfora la región con exceso de masa
Colocación de contrapesos: tal como en neumáticos o perfiles de poleas
Ajuste de masas: típico en bielas y elementos estratégicos
Equipos profesionales para detectar y corregir vibraciones
Para hacer un diagnóstico certero, necesitas herramientas precisas. Hoy en día hay opciones disponibles y altamente productivas, por ejemplo :
✅ Balanset-1A — Tu compañero compacto para medir y ajustar vibraciones
музон скачать бесплатно mp3 http://25kat.ru .
https://mirka-master.ru/kupit-plastikovye-okna-v-sankt-peterburge-nadyozhnoe-reshenie-ot-kompanii-afina-okna/
заказать цветы с доставкой доставка цветов
слушать музыку онлайн бесплатно без регистрации в хорошем слушать музыку онлайн бесплатно без регистрации в хорошем .
погода в хургаде в апреле 2023
купить софт цена программное обеспечение windows купить
круглосуточная доставка цветов доставка цветов белые
https://www.med2.ru/story.php?id=147094
https://oboronspecsplav.ru/
натяжной потолок цена за м2 натяжной потолок цена за м2 .
Исследуйте захватывающий контент на vavadapl.netlify.app, каждую минуту.
Найдите вдохновение на vavadapl.netlify.app, уникальные публикации.
Исследуйте возможности vavadapl.netlify.app, которые приятно удивят.
vavadapl.netlify.app — это место, где мечты становятся реальностью, откройте для себя новое.
Ваши ожидания оправдаются на vavadapl.netlify.app, предложений.
Не упустите шанс узнать больше о vavadapl.netlify.app, знакомясь с.
Найдите свое вдохновение на vavadapl.netlify.app, попробуйте.
На vavadapl.netlify.app вы найдете свои увлечения, изучая.
vavadapl.netlify.app — это ваше пространство для идей, вдохновляйтесь.
Присоединяйтесь к сообществу vavadapl.netlify.app, интересные факты.
Погрузитесь в захватывающие идеи vavadapl.netlify.app, вашего роста.
vavadapl.netlify.app: создавайте и изменяйте, откройте новизну.
vavadapl.netlify.app — это место для всех, неповторимые идеи.
vavadapl.netlify.app — это ваша путеводная звезда, познакомиться.
Откройте для себя вселенную на vavadapl.netlify.app, открывайте.
vavadapl.netlify.app — это больше, чем сайт, присоединяйтесь.
vavadapl.netlify.app — ваше пространство для самовыражения, познакомившись.
Найдите свои увлечения на vavadapl.netlify.app, открывая.
vavada czy jest bezpieczne vavada czy jest bezpieczne .
Пассажирские перевозки Экибастуз – Новосибирск Развитая сеть пассажирских перевозок играет ключевую роль в обеспечении мобильности населения и укреплении экономических связей между регионами. Наша компания специализируется на организации регулярных и безопасных поездок между городами Сибири и Казахстана, предлагая комфортные условия и доступные цены.
Где приобрести диплом специалиста?
Заказать диплом института по доступной цене можно, обращаясь к проверенной специализированной компании.: diplom-profi.ru
Мы предлагаем дипломы любой профессии по приятным тарифам. Дипломы производят на подлинных бланках Быстро и просто приобрести диплом об образовании diplom-top.ru
скачать новинки музыки бесплатно скачать новинки музыки бесплатно .
1win bet app download http://1win-apk.pro .
«Рентвил» предлагает аренду автомобилей в Краснодаре без залога и ограничений по пробегу по Краснодарскому краю и Адыгее. Требуется стаж от 3 лет и возраст от 23 лет. Оформление за 5 минут онлайн: нужны только фото паспорта и прав. Подача авто на жд вокзал и аэропорт Краснодар Мин-воды Сочи . Компания работает 10 лет , автомобили проходят своевременное ТО. Доступны детские кресла. Бронируйте через сайт аренда авто без залога
Выездной клининг в удобное для вас время без скрытых платежей
клининг https://kliningovaya-kompaniya0.ru .
скачать бесплатно mp3 все песни в хорошем качестве 25kat.ru .
1win download apk 1win download apk .
Заказать диплом об образовании!
Купить диплом об образовании. Приобретение подходящего диплома через проверенную и надежную компанию дарит немало преимуществ. Данное решение позволяет сэкономить как личное время, так и серьезные деньги. arzookanak0055.copiny.com/question/details/id/1094568
Заказать диплом ВУЗа по выгодной стоимости возможно, обращаясь к проверенной специализированной фирме. Мы оказываем услуги по продаже документов об окончании любых университетов РФ. Приобрести диплом любого ВУЗа– youhomie.com/read-blog/6639_kupit-diplom-onlajn.html
Купить диплом любого университета!
Заказ диплома через надежную фирму дарит ряд достоинств для покупателя. Заказать диплом любого ВУЗа у проверенной компании: doks-v-gorode-kostroma-44.online
одежда из Китая В эпоху глобализации и стремительного развития мировой экономики, Китай занимает ключевую позицию в качестве крупнейшего производственного центра. Организация эффективных и надежных поставок товаров из Китая становится стратегически важной задачей для предприятий, стремящихся к оптимизации затрат и расширению ассортимента. Наша компания предлагает комплексные решения для вашего бизнеса, обеспечивая бесперебойные и выгодные поставки товаров напрямую из Китая.
That’s a nice site that we could appreciate Get more info
Мы предлагаем дипломы любой профессии по приятным тарифам.– dev.fleeped.com/read-blog/13211_kupit-diplom-medrabotnika.html
Продукция с логотипом для выставок, конференций и бизнес-сувениров
заказать сувенирную продукцию https://suvenirnaya-produktsiya-s-logotipom-1.ru .
Свежие актуальные новости мира спорта со всего мира. Результаты матчей, интервью, аналитика, расписание игр и обзоры соревнований. Будьте в курсе главных событий каждый день!
Красивые и надежные деревянные дома под ключ для круглогодичного проживания
строительство деревянных домов под ключ москва строительство деревянных домов под ключ москва .
Кухня Кухня – сердце дома, место, где рождаются кулинарные шедевры и собирается вся семья. Именно поэтому выбор мебели для кухни – задача ответственная и требующая особого подхода. Мебель на заказ в Краснодаре – это возможность создать уникальное пространство, идеально отвечающее вашим потребностям и предпочтениям.
Читайте свежие новости хоккея онлайн. Результаты матчей, расклады плей-офф, громкие трансферы и слухи. Всё о российских и зарубежных лигах.
Having open conversations regarding suicide avoidance saves lives– it produces awareness needed around acknowledging warning signs frequently neglected within society today: take a look at resources linked here by means of ### anyKeyWord ###! treatment for mental health
Your piece is such a crucial suggestion that healing is possible and people do conquer their battles with the right help– more info readily available at addiction treatment for women .
Your advice regarding maintaining consistency across different devices is essential for any designer! web design firms
So glad I found this blog! I’m looking to sell as-is and I’ve heard mixed reviews about it. Has anyone tried working with john from john buys homes? I might just drop by and see what he says! sell your house fast
Ofrecemos dispositivos de equilibrado!
Producimos nosotros mismos, elaborando en tres países a la vez: Argentina, España y Portugal.
✨Ofrecemos equipos altamente calificados y como no somos vendedores sino fabricantes, nuestros costos superan en competitividad.
Hacemos entregas internacionales sin importar la ubicación, consulte los detalles técnicos en nuestro sitio web.
El equipo de equilibrio es móvil, ligero, lo que le permite balancear cualquier eje rotativo en diversos entornos laborales.
Constructing an assistance network is vital; reach out to family and friends or discover groups online like those linked with mental health treatment !
I totally agree that early intervention is key in addiction treatment. It’s never too late to seek aid! Learn more at addiction treatment .
It’s exciting to see how digital marketing and web design are merging in the Houston area! website design agency
Thank you, author, for sharing these insights with us—it’s truly appreciated! More content available at See what’s next !
Online trivia games are so much fun! Have you played any recently? Join in at Read the full version .
Pool repairs can be overwhelming, but finding the right blue shield pool scottsdale az made all the difference for me.
Kudos on producing such a rich and informative piece; this type of in-depth article is greatly appreciated—find more resources at fm88 !
TikTok has become a hub for creative expression across multiple genres—who inspires your creativity there?? Connect with fellow creators over here: fm88
Just sold my inherited house with john buys homes in walnut creek, and it was super easy! I was stressed about the whole process, but John made it so smooth. If you’re in the area, definitely check him out! we buy houses for cash
This article stands out as truly impressive in its research and presentation! Learn more at manclub .
Understanding triggers is key to handling psychological health successfully. Read more on this subject at treatment for mental health .
Great post! If anyone needs a solid web design company, I highly recommend web design companies near me .
Wonderful insights on group therapy as a part of treatment– it genuinely fosters community and assistance during healing! Additional resources can be found at addiction treatment for women .
The creativity behind web series is phenomenal; which ones have captivated your interest lately? Find new series to watch together at manclub !
I appreciate the focus on accessibility in web design. Everyone should have access to the web! web page design company
新北徵信社推薦的公司有哪些?希望能得到一些實際的經驗分享! 徵信社 找人
Valuable information! Find more at https://ziongzgc768.theglensecret.com/the-advantages-of-normal-sewer-line-and-heating-unit-examinations .
Appreciate the detailed information. For more, visit https://jsbin.com/qomuxunowu .
Thanks for the great explanation. More info at https://postheaven.net/maettenftq/exactly-how-to-pick-the-very-best-water-purification-system .
This was beautifully organized. Discover more at https://pastelink.net/3mqtdc8d .
Appreciate the detailed information. For more, visit https://dominickngeb325.theburnward.com/finest-pipes-firms-for-your-needs .
Don’t ignore small cracks in your pool; they can lead to bigger problems. Contact a reliable blue shield pool service today!
This was very beneficial. For more, visit https://blogfreely.net/petramzdrt/searching-for-drain-cleaning-solutions-near-me .
Nutrition plays an important role in our mental wellness; find out how diet plan impacts mood over on mental health treatment !
Микрозаймы онлайн https://kskredit.ru на карту — быстрое оформление, без справок и поручителей. Получите деньги за 5 минут, круглосуточно и без отказа. Доступны займы с любой кредитной историей.
Your perspective on what constitutes an authentic article is spot-on; thank you for sharing your thoughts with us all! Explore similar ideas over at manclub
Хочешь больше денег https://mfokapital.ru Изучай инвестиции, учись зарабатывать, управляй финансами, торгуй на Форекс и используй магию денег. Рабочие схемы, ритуалы, лайфхаки и инструкции — путь к финансовой независимости начинается здесь!
Well-crafted and deeply insightful – I’m genuinely impressed by this work; learn about similar topics at manclub !
Быстрые микрозаймы https://clover-finance.ru без отказа — деньги онлайн за 5 минут. Минимум документов, максимум удобства. Получите займ с любой кредитной историей.
“Happy this piece stresses self-compassion throughout one’s journey towards sobriety– it promotes healing beyond mere abstinence; discover self-love methods via # anykeyword #!”. addiction treatment
The accessibility of online sports news keeps fans informed 24/7! Stay updated with the latest stories at manclub .
Selling during such uncertain times makes me anxious 🤯 But hearing positive experiences shared around here regarding working alongside johN Buys Homes makes me hopeful again!!! get cash for your home today
Yes, yes, yes! This is exactly how I feel about the situation too! Finish what you started
Digital storytelling opens avenues for unique expression -do ANY digital formats resonate WITH YOUR narrative style today???? Join exciting conversations ABOUT storytelling techniques HERE:#anything_keyword# manclub
聽過不少關於新北優質徵信公司的故事,非常期待聽到更多真實案例。 徵信社 討債
This is definitely one of the best articles I’ve read lately! Discover more at Get the missing pieces .
I really enjoyed this article—thanks to the author for their hard work! Explore further at iwin .
This was highly educational. For more, visit https://edwinawno101.fotosdefrases.com/searching-for-shower-repair-work-providers-near-me .
Thanks for the valuable insights. More at https://waylonraoy565.wpsuo.com/how-to-deal-with-drain-unblocking-in-your-home .
It’s amazing how a good web design company can transform an online presence. Shoutout to web designer houston for their expertise!
The balance between personal narrative and broader societal commentary here reflects deep understanding and engagement; thank you very much!! Find additional readings over # # anyKeyWord ## iwin
Very helpful read. For similar content, visit https://rentry.co/f6hhkqay .
I love discovering indie films on streaming platforms! Any hidden gems you recommend? Check out my list at fm88 .
Appreciate the insightful article. Find more at https://shanekjpk496.almoheet-travel.com/the-advantages-of-routine-sewer-line-inspections .
You’ve crafted an incredibly impressive narrative here – thank you for sharing it with us; find more insightful pieces on our site: fm88 !
Appreciate the helpful advice. For more, visit https://erickypoc549.tearosediner.net/recognizing-drain-water-lines-and-their-upkeep .
Appreciate the comprehensive insights. For more, visit https://josuecqtw454.fotosdefrases.com/solutions-for-a-blocked-drainpipe-what-functions-best .
I’ve enjoyed trying out various recipes from YouTube channels lately- what dish turned out BEST for YOU??? Share culinary successes with us:#anything_keyword# iwin
聽過不少關於新北優質徵信公司的故事,非常期待聽到更多真實案例。 新北徵信社
I’m glad to see someone addressing this issue so thoughtfully. I wholeheartedly agree! iwin
如果要選擇一家徵信社,新北的服務真的值得考慮嗎?期待大家的看法! 徵信社推薦
Сделай сам как сделать ремонт в квартире Ремонт квартиры и дома своими руками: стены, пол, потолок, сантехника, электрика и отделка. Всё, что нужно — в одном месте: от выбора материалов до финального штриха. Экономьте с умом!
We hooked up SunPower panels Q4 final year, aiming for £32k annual discounts. Year 1 was rough—contractor delays and inverter hiccups can charge us 8% output. Weekend installs kept ops downtime even though. Anyone else battled sudden repairs this early? https://padlet.com/lunamclucastwbgu/bookmarks-2tzqcy1lgso6atop/wish/E851Q0rLVp8wWVAb
I’m glad growing conversations trauma-informed care crucial element recovery read more subject—— > #### Any– keyword ####. treatment for mental health
This article is a gem! Many thanks to the author. Visit manclub for additional insights.
If you’re struggling with your website’s aesthetics, look into hiring a professional like web designer !
大家覺得新北徵信社的費用合理嗎?值得選擇嗎? 討債公司
Combining genres creates exciting experiences–which mashup film pleasantly surprised YOU?? iwin
I liked this article. For additional info, visit https://aryba.kg/user/insammrvce .
I found this very interesting. For more, visit https://vidrodzhennya.in.ua/user/xippuszgdx .
“Outstanding breakdown surrounding responsibility mechanisms within group therapies used throughout rehab facilities– they cultivate sociability amongst individuals greatly well; discover encouraging groups through # any keyword #!”. addiction treatment for women
Wow, what an insightful article! Highly rated indeed. For more like this, head over to manclub .
找到合適的新北徵信社似乎很困難,有沒有一些實用的小技巧? 徵信社 代客出氣
This was very enlightening. More at https://bukof.org/user/ygerusmtdf .
I learned that seasonal maintenance is key—thank you, reliable blue shield pool service , for keeping everything in check!
Nicely done! Find more at https://keeganqaji364.mystrikingly.com/ .
Well done! Find more at http://dklada.ru/user/xippusshih .
This was very beneficial. For more, visit https://kameronxnod990.image-perth.org/the-benefits-of-smart-pipes-and-home-heating-innovation .
Love how impressively you’ve captured essential points in this piece – it’s definitely share-worthy at # anyKeyboard# Step into the unknown
КПК «Доверие» https://bankingsmp.ru надежный кредитно-потребительский кооператив. Выгодные сбережения и доступные займы для пайщиков. Прозрачные условия, высокая доходность, финансовая стабильность и юридическая безопасность.
Thanks for the clear advice. More at https://sipse.ru/user/schadhfgys .
Nicely done! Find more at https://ameblo.jp/rafaelhhne170/entry-12907168936.html .
This was highly educational. For more, visit https://tvoyaskala.com/user/bedwyndusc .
Appreciate the detailed insights. For more, visit https://andrescsxu312.theburnward.com/just-how-to-install-a-water-softener .
This was highly informative. Check out https://kylerazsi383.lowescouponn.com/understanding-toilet-flexi-pipeline-usage for more.
Ваш финансовый гид https://kreditandbanks.ru — подбираем лучшие предложения по кредитам, займам и банковским продуктам. Рейтинг МФО, советы по улучшению КИ, юридическая информация и онлайн-сервисы.
Being part of any conversation revolving around potential winnings helps foster connections among fellow enthusiasts eager for exciting moments ahead. iwin
Sold my condo as-is last month through JOHN BUYS HOMES IN BAY AREA—wasn’t sure at first but turned out great! If you’re hesitant about your own home sale, definitely consider checking them out at their office: . sell my house now for cash
This was a fantastic read. Check out https://open.substack.com/pub/gobnatmavu/p/exactly-how-to-avoid-plumbing-issues?r=5s5t5h&utm_campaign=post&utm_medium=web&showWelcomeOnShare=true for more.
最近我在研究新北的一些小型但優質的征服公司,希望找到合適的人選。 ##anyKeyword ## 合法討債公司
The variety of online music platforms is amazing! Which do you use most often? Explore more genres at iwin .
我對於選擇徵信社還是比較謹慎,希望能聽聽大家的新北經驗! 徵信社 找人
”So.thankful.for.your.time.spent.putting.together.such.an.informative.article,i’m eager.to.apply.what.i’ve.learned.!check.out.more.at.#..#. manclub
Movie soundtracks can evoke emotions long after viewing; which score resonates with YOU even now?! #entertainment## anykeyword## fm88
Love how you’ve illustrated key points about choosing reputable agencies; I’m forever thankful for connecting up initially via # anykeyword # last year too!! web developer houston
Online quizzes about sports history are so entertaining and educational! Test your knowledge at iwin .
I’m impressed by the level of authenticity here—thank you for sharing such valuable content! Visit Round out your knowledge for more info.
Valuable content like this makes all the difference! Thank you for sharing such a great article. Discover more at iwin .
Weekend set up the following too—Q4 to avoid downtime. SunPower quote was steep yet well worth it. Our £32k savings hit year 3, but inverter hiccups reduce output 7%. commercial persistent acquire contract helped prep for warranty hurdles https://www.slideserve.com/joyceycqxu/harnessing-the-sun-the-rise-of-solar-panels-for-factories
Absolutely loved this valuable article! It’s well-researched and very informative. Explore further at manclub .
”I’m.inspired.by.how.this.page.highlights.the.importance.of.teamwork.as.an.integral.element.for.successful.pursuits.i’ll.be.sharing.this.article.with.my.network.check.out.#..#.for.additional.resources. fm88
I love seeing more youths talking freely about mental health treatment! Let’s stabilize these discussions at treatment for mental health .
很高興看到這裡有那麼多人關注新北征服服務,期待看到更多精彩分享和討論! ##anyKeyword ## 合法徵信社
我最近在尋找可靠的徵信社,聽說新北徵信社推薦的服務不錯,想了解更多! 新北徵信社
Impressed not just by knowledge but also writing style exhibited throughout—thank-you kindly once again # anyKeyboard # iwin
I enjoy getting to know new slot games and strategies to improve my gameplay. It’s usually enjoyable to percentage suggestions with fellow gamers! If you are excited about joining the conversation, cost out live dealer games !
Fantastic insights on group treatment as a part of treatment– it truly fosters community and support during recovery! Additional resources can be found at addiction treatment for women .
Absolutely loved this read! Highly rated and worth every word—find similar insights at iwin .
I share your views on this matter completely. It’s time we took action! manclub
1 win download apk http://1win-apk.pro .
You’ve inspired me to think more critically about mobile optimization; thank you for these insights! web design agency
新北地區有哪幾家徵信社是值得信賴的呢?希望能得到一些建議! 外遇 徵信社
Just had a new liner installed by an excellent blue shield pool service team! My pool looks brand new again.
最近有朋友使用了新北的徵信服務,效果如何呢?期待看到更多推薦! 徵信社 討債
I appreciate the thorough explanation. For further learning about dentistry, visit children’s dentist .
1 win apk download latest version http://1win-apk.pro/ .
Online sports have really transformed how we engage with our favorite games. It’s never been easier to follow teams and players! Check out manclub for more insights.
We did a Q4 deploy with SunPower, promised five-year ROI but we’re creeping in the direction of yr 6. sun repairs production flagged inverter failures early—ours misplaced eight% output last 12 months how factory roof solar affects energy costs
There’s something magical about attending live theater—what’s your most memorable performance experience? iwin
This is a must-read—a truly valuable article that offers great insights into the topic discussed here today! For additional info, check out iwin !
聽過不少關於新北優質徵信公司的故事,非常期待聽到更多真實案例。 外遇抓姦
Well done on creating such an impressive article! It’s definitely worth reading again; find other articles at manclub .
I wish more individuals would seek aid for their psychological health problems. It’s alright not to be all right! Resources readily available at mental health treatment .
想知道在新北找尋徵信服務時,有沒有必要事先做功課?希望得到建議! 徵信社推薦
Absolutely agree: there lies tremendous strength found within collaborative efforts aimed directly towards achieving common goals while simultaneously nurturing individual aspirations along each step taken together through shared commitment—thankful iwin
The examples you shared of great web design really inspired me to think outside the box! web development houston
Прочитал про Магистратура поступление стоимость, делюсь находкой. Смотрите: Магистратура поступление стоимость.
Your insights into the function of household support in healing are very moving! Households can find practical tips at addiction treatment for women .
I love how much accessibility there is now when attending virtual performances—what was YOUR highlight from a recent show?? Exchange stories here: manclub
Thanks for the informative post. More at responsible gambling .
Let’s chat about iconic characters who’ve left lasting impacts long after original releases–which ones stand out??? iwin
新北地區在尋找專業徵信服務時應該考慮哪些因素呢?感謝分享! 徵信社 找人
Online sports forums are great places to connect with fellow fans and share opinions! Join discussions at manclub .
Who else finds themselves humming catchy tunes from animated films long after watching them!? Let’s share favorites!! #entertainment# iwin
” Global events showcase talents from all corners—what matches stand out historically highlighting exceptional performances?” Connect through conversations reflecting upon historical matches here: ▲▲ anyKeyWord ▲▲!” fm88
Your take on valuable work resonates with me. It’s essential for job satisfaction! Visit Keep reading for further reading.
This was an enlightening read—such a valuable piece filled with important takeaways—discover further insights at iwin !
Fans rallying behind popular series often leads to unexpected outcomes–how have fandoms influenced productions?? manclub
We did a Q4 deploy with SunPower—promised 5yr payback yet yr 3 we’re closer to 6.five as a consequence of inverter glitches and increased renovation types of solar panels
I learned that seasonal maintenance is key—thank you, reliable blue shield pool service scottsdale , for keeping everything in check!
新北徵信社推薦中,有沒有專門針對商業調查的公司呢?想了解一下。 徵信社 找人
I appreciate the depth of your analysis in this impressive article! Explore similar topics at fm88 .
купить диплом в великом новгороде http://www.rudiplomk.online .
Love how engaging yet informative this impressively written piece is – will be coming back for future posts without doubt at # anyKeyboard# iwin
сколько стоит диплом купить https://goznak-diplomh.ru/ .
The connection in between physical activity mental state undeniable workout does marvels mood enhancing motivation strive keep much healthier lifestyle progress forward attaining objectives set forth making every effort excellence higher requirements held mental health treatment
I appreciate the depth of information shared here. It’s a valuable article that everyone should read! Visit iwin for more.
This is exactly what we needed!! Helped ease all fears around foreclosures because now I’m confident we’re heading towards brighter days ahead—all thanks again too…JOHHN BUYSHOMES!! how to sell a house quickly for cash
Займы под залог https://srochnyye-zaymy.ru недвижимости — быстрые деньги на любые цели. Оформление от 1 дня, без справок и поручителей. Одобрение до 90%, выгодные условия, честные проценты. Квартира или дом остаются в вашей собственности.
” The impact of social media on modern-day athletes creates unique opportunities—what benefits or challenges do we see emerging?” Explore perspectives together over on ### anyKeyWord ###!” iwin
I appreciate the emphasis on long-term strategies. For comprehensive info on dental care, visit oral healthcare .
Not enough people recognize power behind vulnerability when it comes down sharing stories which often leads towards profound revelations!!! Appreciate greatly every thought shared here!!! Don’t forget explore around manclub
1win bet app download https://1win-apk.pro/ .
“Obsessed with how useful this article was concerning different healing methods used within rehab centers– they’re important tools within reliable treatments; find in-depth descriptions through # anykeyword #!”. addiction treatment
Boiler upkeep don’t have to be daunting; simply study up on what’s available by means of boiler repair edinburgh
For more information https://tonersklad.ru .
You’ve captured so well how feeling valued within our roles enhances productivity and morale—it’s such an important conversation; explore further thoughts from # anyKeyWord#! manclub
Searching for good deals on ####egress window installation near me####? Check out ## custom egress window covers ##; they have competitive prices!
”Appreciate.your.emphasis.on.finding.connection.as.a.key.element.for.creating.value.in.workplaces.learn.more.at.#..#. manclub
I love how online platforms provide real-time updates on games and scores! For more info, visit iwin .
“I appreciate your call to action about re-evaluating our definitions of success based on value rather than status or pay—very thought-provoking indeed, check out # anyKeyWord#!” Go beneath the surface
This was very enlightening. For more, visit real cash pokies .
Having open discussions relating to suicide avoidance saves lives creates awareness required around acknowledging indication frequently ignored within society today check out resources linked here through—— > #### Any– keyword ####. mental health treatment
It’s interesting how nostalgia plays a role in online entertainment trends! What’s your favorite throwback show? Share yours at iwin .
Athletes demonstrating versatility across multiple disciplines continue inspiring countless followers highlighting dedication resilience crucially needed succeed against odds stacked precariously high facing adversities triumphantly displaying unwavering manclub
I’m in total agreement with your perspective; it’s an important conversation to have! iwin
This was quite informative. For more, visit nutricionista Saltillo .
“Valuing all efforts made raising awareness surrounding considerable gaps present within current healthcare policies affecting those requiring instant help taking on drug abuse concerns head on navigated effectively by going to platform ** #Any Keyword # addiction treatment
Строительство загородных домов любой площади — от компактных дач до просторных коттеджей
загородное строительство под ключ https://www.stroitelstvo-zagorodnyh-domov178.ru/ .
Had no idea how much I’d love having an automatic gate until it was installed by novak doors & gates tarzana—life changer! electric gate repair near me
Just completed my basement entrance project using services from # custom window well covers #, and I’m thrilled!
Sharing wisdom gained from past experiences encourages growth –which lesson resonates DEEPLY WITHIN YOU???? Spread insightful reflections HERE:#anything_keyword# manclub
A big thank you to the author of this insightful piece! Check out more at iwin .
Anyone know if it’s smart taking an offer sight unseen?? 🤔 What do you think about going through someone like johN FROM JOHN BUYS HOMES?! Planning on checking them out soon… sell my house fast for cash
Appreciation expressed goes beyond mere words spoken—it must translate into action through continued engagement & support wherever possible!!! So grateful!!! # anyKeyboard # fm88
A great example of how to present complex topics simply—such a highly valued resource—more excellent articles can be found at Complete your understanding !
Great insights! Discover more about dental crowns at cost-effective dental treatment .
Your article made me understand how repeatedly we omit our residence’s wiring—time for an inspection with the aid of a certified same day electrician !
” What role does technology play in enhancing fan experience during live sporting events?” Let’s talk about tech innovations together over on ### anyKeyWord ###!” iwin
อยากให้ทุกคนสัมผัสประสบการณ์ดีๆ ที่ OMG ONE MORE GLASS SAI1 กันนะคะ ร้านชิลใกล้ฉัน
Some say the best part of winning a jackpot is sharing it with loved ones! What do you think? manclub
Great insights! Discover more at casa rural en Arzua .
Eagerly anticipating trying your suggested products for keeping my home clean! house cleaning service cambridge
The rise in popularity of online content creators offers diverse perspectives; who inspires YOU most amongst them?! #entertainment## anykeyword## fm88
This was beautifully organized. Discover more at Auto Glass .
The historical significance of the Battle of Guilford Courthouse near Greensboro is incredible—have you visited? Check out more details at Greensboro Auto Glass Replacement !
Such a well-written piece! It’s no wonder it’s highly rated. Explore similar topics at iwin .
A seasoned peronal injury attorney recognizes exactly how to work out properly with insurance provider in your place– don’t go it alone!
Having movie nights with friends creates lasting memories–what snack combo enhances YOUR viewing experience??? iwin
Just got my first home and realized how important regular boiler checks are—thanks for the info! boiler repair company edinburgh
Athletes demonstrating versatility across multiple disciplines continue inspiring countless followers highlighting dedication resilience crucially needed succeed against odds stacked precariously high facing adversities triumphantly displaying unwavering iwin
Just had my basement walkout done by an amazing crew from # long island egress #! They made the process so easy.
ทุกครั้งที่มีโอกาส ฉันก็จะไปที่ร้าน OMG ONE MORE GLASS SAI1 ค่ะ ไม่มีเบื่อเลย สถานที่บันเทิงใกล้ฉัน
Wow, amazing insights here! No doubt why it’s highly rated—check out similar content at manclub .
Finding good value sport recharging choices is difficult! I love how ManaBuy gives you trustworthy and fast features. This may just particularly strengthen my gaming enjoy with out the concern of overspending. Discover it at fast and safe game top-up !
Почему строительство загородного дома под ключ выгодно и удобно
строительство загородных домов в санкт петербурге stroitelstvo-zagorodnyh-domov178.ru .
This was a great article. Check out casino software providers for more.
Grateful having stumbled upon such gem inside vastness information superhighway global in which wisdom prospers amongst multitude voices heard loudest- bravo indeed! same day plumber
Hats off to the crew at LJR Tree Services for their hard work and dedication; you guys are amazing! Tree services San Jose
Your suggestions about using natural cleaners have motivated me to switch up my regular!! house cleaning company cambridge
หากใครกำลังมองหาร้านเหล้าในกรุงเทพฯ ขอแนะนำให้ไปลองที่OMG OneMoreGlass กันนะครับ ! # #anyKeyword## ร้านอาหารสาย1
This article has opened my eyes in many ways; thank you so much, dear author! Discover related topics at iwin !
Learning history through engaging visual content proves effective -which historical figure fascinates YOU most??? Uncover intriguing stories:#anything_keyword# manclub
Reflecting upon personal experiences while diving deep into broader themes creates magic within narratives!!! Thankful someone penned down such thoughts!!! Find even richer discussions over # # a nyK eyW or d ## manclub
This post has some solid recommendations. Learn more about dental crowns at preventive dental services .
Love witnessing evolution taking place across platforms showcasing diverse voices emerging stronger unafraid tackle difficult subjects head-on without hesitation whatsoever!!!! Definitely coming back weekly alongside exploring newer angles presented iwin
Such an impressive overview of the subject matter! I appreciate your effort; learn more at Step into the unknown .
I enjoyed this article. Check out nutrióloga Saltillo for more.
My neighbor’s been raving about her experience with novak doors & gates in los angeles — might have to get on that train myself! electric gate installation
I recently had an ##egress window installation## in my basement, and it’s made such a difference! Highly recommend looking into it. For those in need, check out custom egress window covers for expert installers.
In my opinion, there’s no better option than Kissimmee car shipping for car shipping around here.
Selling as-is? Don’t sweat it!! JOHHN BUYSHOMES REALLY knows what they’re doing & they’ll guide you along every step—trust me on this one!! local home buyers with cash
I’m curious about the costs involved with Weston car moving companies. Any insights? Sunshine Auto Transport’s Weston
This submit relatively opened my eyes to the value of with the aid of licensed electricians. Safety first! licensed electrician
I learned so much about tree pruning recently. If you’re looking for experts, go with Tree Services !
สุดยอด! ร้าน OMG ONE MORE GLASS SAI1 เป็นที่ที่ดีที่สุดสำหรับการสังสรรค์กับเพื่อนๆ จริงๆ สถานที่กินเลี้ยงวันเกิด สาย1
Great insights! Find more at casa rural en Arzúa .
If you’re still debating whether to hire a personal injury lawyer , just keep in mind: they are your ideal ally in seeking justice!
Cleaning up doesn’t need to be boring, particularly with your enjoyable concepts and strategies! cambridge house cleaners
I found this very helpful. For additional info, visit Auto Glass Replacement .
I recently discovered the amazing food scene in Greensboro. Any recommendations? I found some great insights at Greensboro Auto Glass Replacement .
If you’re in need of #basement egress window installation#, check out #anyKeyword# for some great options! egress installers
“Junk removal made easy? Yes please! Thank you, # professional bed bug removal services #!”
The variety of sports available online means there’s always something for everyone to enjoy! Explore different options at ee88 .
The world of streaming is so vast now! How do you choose what to watch next? Get tips at ee88 .
อยากจะพาเพื่อนไปที่ OMG OneMoreGlass วันหยุดนี้ รู้สึกตื่นเต้นจัง! ร้านเหล้าหนุ่มหล่อ สาย1
บริการดีเยี่ยมและเครื่องดื่มคุณภาพ ที่ร้าน OMG OneMoreGlass ไม่ทำให้ผิดหวังเลยครับ! ร้านอาหารสาย1 บรรยากาศดี
” When we think about legacy, which athletes stand out as having made significant contributions both inside and outside their respective fields?” Share thoughts surrounding legacy over on ### anyKeyWord ###!” ee88
Kudos to all the hardworking arborists out there who keep our parks and gardens thriving—your efforts don’t go unnoticed! Tree Services
I liked this article. For additional info, visit live dealer games .
Appreciating your thoroughness in covering all aspects of boiler care; really useful stuff here and even more at boiler repair cost edinburgh !
Thank you for this valuable article! It answered so many of my questions. More resources can be found at v9bet .
”Wonderful.insights.regarding.developing.meaningful.connections.among.professionals.resulting.in.great.satisfaction.and.productivity.levels.discussed.current.events.appropriately.modelled.for.us.all.learn.more.via.#.anykeyword#.! v9bet
” You’ve opened my eyes regarding how crucial typical inspections are —thank you rather a lot # # anyKeyWord # # !” residential plumber
Kudos to the author for a well-written piece—thanks a lot! Visit v9bet for additional insights.
Your points are compelling and deserve recognition; I’m fully supportive of your message! v9bet
The team at egress installers provided excellent service for my egress window installation. So happy with the outcome!
This was an incredibly valuable read for me! I appreciate the effort behind it. More articles available at i9bet .
This was quite informative. For more, visit 24/7 plumbers Kokomo .
Cleaning up does not have to be frustrating with your detailed approach! cambridge house cleaners
Wonderful tips! Find more at comfort dentistry .
Crafting engaging educational materials takes skill—what platform offers THE best learning experiences for YOU??? Dive into discussions about them here:#anything_keyword# i9bet
I’m convinced that no one does it better than ###to learn more: # # anyKeyWord### when it comes to professional tree services! Tree Services
Such a comprehensive and impressive overview of the topic; thank you for taking the time to write this piece; discover additional articles: i9bet !
Thanks for the insightful write-up. More like this at nutrióloga Saltillo .
Does anyone have tips on how often you should clean your electric gate? Want to keep mine in great shape after getting it installed by NOVAK DOORS & GATES. automatic gate repair near me
Hitting the jackpot feels like finding a hidden treasure—it’s an amazing experience worth chasing after! zik88
I savor how you highlighted the dangers of overloaded circuits—protection is paramount with strength! expert electrician
The ability to stream multiple games simultaneously is a dream come true for die-hard fans like me! Discover tips on multitasking viewing through zik88 !
Why stress about vehicle transport when you can go with The Villages vehicle shipping in The Villages?
This was very insightful. Check out for more.
Custom drinkware is a hot trend in promotional products right now! Find your perfect fit at local screen printing shop near me .
Public forums discussing local infrastructure could lead to exciting new ideas for funding and projects—let’s get involved! ##anyKeyword ## road repair company near me
Looking to install outdoor lighting? You should consult with an expert Calgary electrician like the ones at commercial electrician calgary !
Great insights on Airbnb cleansing strategies! I always stress tidiness in my listings, and I’m eager to find out more from airbnb turnover regarding efficient cleaning routines.
Avoiding foreclosure can feel overwhelming—but trust me when I say reaching out to JOHHN BUYSHOMES is worth every second spent looking into their services. sell my house as is fast
Truly a standout piece—a highly valuable article that I’ll be bookmarking for sure! Explore additional content at qh88 !
I recently had a buddy that required a personal injury lawyer after a mishap. They had the ability to clear up every little thing promptly and efficiently!
There’s undeniable beauty found when one dedicates time toward aligning individual goals alongside broader communal efforts thereby creating ripples enhancing overall quality-of-life standards; learn continually through # anyKeyWord#! ee88
My office cleanout went so smoothly thanks to the dedicated team at cleanout and junk removal companies —highly recommended!
Appreciate the great suggestions. For more, visit casa rural en Arzúa .
Learn how to identify tree pests before they become a problem with resources from Tree services San Jose !
Greensboro’s downtown area is so vibrant! I love walking around and discovering new shops. More about it at Auto Glass Replacement .
The visuals in your post coupled with the ideas make whatever easier to understand and follow! cambridge house cleaners
Well explained. Discover more at Greensboro Auto Glass Replacement .
Dom Doty has a wonderful credibility in McMinnville property. I value how he prioritizes his clients’ requirements. For more information, browse through Realtor in McMinnville .
Just had an ##egress window company## install a new window in my basement. The process was seamless! For anyone needing this service, look at egress window contractors .
ร้าน OMG OneMoreGlass มีเมนูอะไรแนะนำบ้างครับ? อยากลองไปชิมดู! ร้านเหล้าสาย1 รับจัดวันเกิด
What an honor discovering entire useful resource masking multitude angles tackling dwelling benefit challenges head-on! same day plumber
OMG ONE MORE GLASS SAI1 เป็นร้านที่มีเครื่องดื่มหลากหลาย ครบครันสุดๆ เลยค่ะ ร้านกินเลี้ยง ฟังเพลง สาย1
If you might be in need of rapid boiler restore services in Edinburgh, I extraordinarily advocate testing boiler repair cost edinburgh for solid suggestions.
For more information https://ancientcivs.ru .
Tree care is essential for preventing property damage; learn more on # # anyKeyWord# # . Tree services San Jose
Anyone else looking for ##basement walkouts##? It’s such a great way to improve accessibility! Check out egress installers for some fantastic ideas.
Incredible journey embarked upon leads towards deeper understanding ourselves & world around us through lens provided herein…thankful needed clarity offered especially during uncertain times!!! Much appreciated!! # anyoneKeyBoard# ee88
ร้านนี้มีพื้นที่สำหรับกลุ่มใหญ่หรือเปล่าครับ? อยากจัดงานเลี้ยงที่ OMG OneMoreGlass # #anyKeyword## ร้านชิลใกล้ฉัน
เมนูค็อกเทลที่ OMG OneMoreGlass นี่อร่อยจริงๆ ครับ ต้องลอง! ร้านอาหารบางแค
Ugh, my electric gate just stopped working outta nowhere… might have to give novak doors & gates a call soon. gate repair company
Excellent facets made about surge security; consulting an electrician may possibly keep us from high priced damages down the road!! master electrician
An impressive exploration of the topic – thank you for sharing your knowledge! More articles like this can be found at ee88 .
There’s nothing quite like the adrenaline rush before a big game! How do you handle pre-game nerves? Find tips at ee88 .
”Thank.you.for.providing.such.a.clearly.articulated.viewpoint.on.value.creation.at.work,.i’ll.share.this.resource.with.my.network.!learn.more.at.#..#. v9bet
It’s stunning how many people underestimate the relevance of hiring a personal injury lawyer after a cars and truck mishap. Don’t make that error!
I appreciate the depth of your analysis in this impressive article! Explore similar topics at v9bet .
Useful advice! For more, visit nutrióloga Saltillo .
Seriously considering reaching out to john from john buys homes now that I’ve heard so many good things—if they really help people sell fast without all the typical hassle, I’m all ears!! Gonna drive over there soon: . sell my house as is fast
The visuals in your article made it so much easier to understand the process of stump grinding; thank you for including those!!! Learn even more at Tree Services !
”The.emphasis.on.redefining.value.within.the.workplace.shines.so.bright.thank.you.for.your.writing.showcasing.all.aspectsof.success.visit.#..#.for.similar.insights. v9bet
Wondering what stories await us next once another lucky winner emerges from shadows claiming rightful place amongst giants who dared chase after greatness? v9bet
I value having a checklist of essential items readily available– I’ll absolutely refer back commonly as I prepare my rental room again soon, discover even much better alternatives ###! vrbo cleaning
This really opened my eyes about hiring accredited ◇ ◈ ANYYKEYWORD ◇ rather than DIY repairs !! commercial electrical companies calgary
Wow, hitting the jackpot is such an exhilarating experience! I can’t imagine the thrill! i9bet
It’s amazing how much impact a simple custom mug can have on customer loyalty! Check it out at t shirt logo printing .
Thanks to # custom window well covers # for turning my dreary basement into a warm living space with their exceptional ####basement walkouts#### service!
Authentic voices matter, and this article exemplifies that beautifully! Discover more authentic content at i9bet .
Thank you for writing about something so important—valuable work impacts us all! For more insights, visit zik88 .
Appreciate the thorough write-up. Find more at casa rural en Arzua .
Seeing how much effort goes into preserving history in Greensboro is commendable—what historical site inspired you the most? More on preservation efforts available at Auto Glass Replacement !
Agreed—we must continue to engage in dialogue about these pressing matters together! zik88
It’s refreshing to see a focus on the value of meaningful work. Keep it up! Discover more at i9bet .
Junk can pile up quickly; I found the perfect solution through top junk hauling companies that made it disappear in no time.
Experiencing art walks that feature both established and budding artists gives me hope for our creative future; which artist caught your attention last time around here? See featured artists’ work on my site, Greensboro Auto Glass Replacement !
If you’re seeking to buy or sell in McMinnville, Dom Doty is definitely the realtor to take into consideration. His competence can make all the distinction! Find out more at McMinnville Realtor .
”Appreciate.your.emphasis.on.finding.connection.as.a.key.element.for.creating.value.in.workplaces.learn.more.at.#..#. qh88
“Get ready for spring by assessing your trees now; find helpful tips on %%site_link%%!” Tree services San Jose
This weblog has fitted me with know-how I didn’t have in the past—I’m feeling an awful lot extra positive approximately my homestead upkeep now! plumbing company
Thank you for emphasizing the importance of authenticity in your writing! Look into more insights at ee88 .
Ĉu vi volas eviti l. a. ĝenon de malfacilaj reŝargaj procezoj? ManaBuy faras ĝin tiel facila! Mi rekomendas ĝin al ĉiuj ludantoj. #anyKeyword# Genshin top up deals
Looking for dependable AC repair services? Look no further than Mauzy Heating & Cooling! AC repair services in San Diego
Thank you for this information; I’ll be more proactive about my home’s heating system from now on! edinburgh boiler repair
“Has anyone utilized financing plans offered by clinics like SDDI? Would love some insights.” Dental Implants in San Diego
Don’t wait until it’s far too late– consulting with a seasoned #carAccidentLawyer # could make or break your case! personal injury lawyer near me
This article highly highlights the reward of utilising a knowledgeable certified electrician . DIY will probably be hazardous!
Electric issues can be overwhelming… So glad there’s solid help available like at NOVAK DOORS AND GATES—I could use pointers soon!! electric drive gate repair
Definitely check out ###AnyKeyWord### if you’re looking for affordable rates on top-quality services! Tree Services
Vaping in Singapore: More Than Just a Trend
In today’s fast-paced world, people are always looking for ways to unwind, relax, and enjoy the moment — and for many, vaping has become a go-to ritual . In Singapore, where modern life moves quickly, the rise of vaping culture has brought with it a stylish escape. It’s not just about the devices or the clouds of vapor — it’s about flavor, convenience, and finding your own vibe.
Disposable Vapes: Simple, Smooth, Ready to Go
Let’s face it — nobody wants to deal with complicated setups all the time. That’s where disposable vapes shine. They’re perfect for those who value simplicity who still want that satisfying hit without the hassle of charging, refilling, or replacing parts.
Popular models like the VAPETAPE UNPLUG / OFFGRID, LANA ULTRA II, and SNOWWOLF SMART HD offer thousands of puffs in one sleek little package . Whether you’re out for the day or just need something quick and easy, these disposables have got your back.
New Arrivals: Fresh Gear, Fresh Experience
The best part about being into vaping? There’s always something new around the corner. The latest releases like the ELFBAR ICE KING and ALADDIN ENJOY PRO MAX bring something different to the table — whether it’s enhanced user experience.
The ELFBAR RAYA D2 is another standout, offering more than just puff count — it comes with a built-in screen , so you can really make it your own.
Bundles: Smart Choices for Regular Vapers
If you vape often, buying in bulk just makes sense. Combo packs like the VAPETAPE OFFGRID COMBO or the LANA BAR 10 PCS COMBO aren’t just practical — they’re also a better deal . No more running out at the worst time, and you save a bit while you’re at it.
Flavors That Speak to You
At the end of the day, it’s all about taste. Some days you want something icy and refreshing from the Cold Series, other times you’re craving the smooth, mellow vibes of the Smooth Series. Then there are those sweet cravings — and trust us, the Sweet Series delivers.
Prefer the classic richness of tobacco? There’s a whole series for that too. And if you’re trying to cut back on nicotine, the Zero-Nicotine Line gives you all the flavor without the buzz.
Final Thoughts
Vaping in Singapore isn’t just a passing trend — it’s a lifestyle choice for many. With so many options available, from pocket-sized disposables to customizable devices, there’s something for everyone. Whether you’re taking your first puff, or an experienced user , the experience is all about what feels right to you — made personal for you.
”They were punctual each time we scheduled visits which is crucial considering how busy life tends gets sometimes!” Drain Repair in San Diego
This is highly informative. Check out nutricionista en Saltillo for more.
If you’re facing a bed bug crisis, don’t hesitate to reach out to %%LINK%%; they’re true professionals. professional junk cleanouts
Every ticket purchased represents hope—a chance at striking gold through unexpected moments leading towards life-altering fortunes! ee88
Value the understandings! A reliable ### anyKeyword # makes all the distinction during remodels. calgary commercial electrician
Helpful suggestions! For more, visit Auto Glass Replacement .
I’ve been utilizing Airbnb for a while, and I recently uncovered the advantages of hiring an Airbnb turnover solution. It truly saves time and makes certain the area is always guest-ready. Very advise looking into vrbo cleaning for more insights!
Branding through innovative and trendy promo items is crucial nowadays—get ahead with ideas from screen printed apparel !
The artistry involved in maintaining healthy landscapes speaks volumes about what passionate Arborists can achieve! Tree services San Jose
I found your article to be very impressive and informative; keep up the good work! For related topics, check out v9bet .
Appreciate the comprehensive advice. For more, visit Greensboro Auto Glass Replacement .
Amazing staff makes every visit enjoyable; highly recommend asking them questions too if unsure about anything related to oral health care! Root Canal in San Diego
Dom Doty has a fantastic credibility in McMinnville property. I appreciate how he prioritizes his clients’ needs. For even more details, visit McMinnville Realtor .
The balance between personal narrative and broader societal commentary here reflects deep understanding and engagement; thank you very much!! Find additional readings over # # anyKeyWord ## ee88
This post opened my eyes to the range of solutions offered from real estate agents in McMinnville, specifically relating to new property buyer programs! Such useful information! Realtor McMinnville
Did anyone catch the last game? The energy was electric! I can’t wait for the next match. More sports insights at ee88 .
vape supplier singapore
The Rise of Vaping in Singapore: Not Just a Fad
In today’s fast-paced world, people are always looking for ways to unwind, relax, and enjoy the moment — and for many, vaping has become a daily habit. In Singapore, where modern life moves quickly, the rise of vaping culture has brought with it a stylish escape. It’s not just about the devices or the clouds of vapor — it’s about flavor, convenience, and finding your own vibe.
Disposable Vapes: Simple, Smooth, Ready to Go
Let’s face it — nobody wants to deal with complicated setups all the time. That’s where disposable vapes shine. They’re perfect for busy individuals who still want that satisfying hit without the hassle of charging, refilling, or replacing parts.
Popular models like the VAPETAPE UNPLUG / OFFGRID, LANA ULTRA II, and SNOWWOLF SMART HD offer thousands of puffs in one easy-to-use device. Whether you’re out for the day or just need something quick and easy, these disposables have got your back.
New Arrivals: Fresh Gear, Fresh Experience
The best part about being into vaping? There’s always something new around the corner. The latest releases like the ELFBAR ICE KING and ALADDIN ENJOY PRO MAX bring something different to the table — whether it’s enhanced user experience.
The ELFBAR RAYA D2 is another standout, offering more than just puff count — it comes with a built-in screen , so you can really make it your own.
Bundles: Smart Choices for Regular Vapers
If you vape often, buying in bulk just makes sense. Combo packs like the VAPETAPE OFFGRID COMBO or the LANA BAR 10 PCS COMBO aren’t just practical — they’re also a better deal . No more running out at the worst time, and you save a bit while you’re at it.
Flavors That Speak to You
At the end of the day, it’s all about taste. Some days you want something icy and refreshing from the Cold Series, other times you’re craving the smooth, mellow vibes of the Smooth Series. Then there are those sweet cravings — and trust us, the Sweet Series delivers.
Prefer the classic richness of tobacco? There’s a whole series for that too. And if you’re trying to cut back on nicotine, the Nicotine-Free Range gives you all the flavor without the buzz.
Final Thoughts
Vaping in Singapore isn’t just a passing trend — it’s a lifestyle choice for many. With so many options available, from pocket-sized disposables to customizable devices, there’s something for everyone. Whether you’re taking your first puff, or a regular enthusiast , the experience is all about what feels right to you — uniquely yours .
This was highly useful. For more, visit casa rural Arzua .
I appreciate how various sports promote inclusivity and diversity! How have you seen this in action? Explore more perspectives at v9bet !
Fantastic counsel on deciding on plumbing furniture! I’ll store this in thoughts for my subsequent maintenance challenge. Visit same day plumber for greater!
I was amazed at how quickly ASI resolved my clog issue in San Diego. Great work! Clog Removal in San Diego
I’ll be usingProgressiveHeating&Air for all future HVAC needs—they’re simply the best! Heater repair in San Diego
“Through your writing, it’s clear that engaging in meaningful tasks leads not just to personal satisfaction but community enrichment as well—great points made here, visit # anyKeyWord#!” i9bet
“I love how different cultures approach training and competition! Have you experienced any unique training methods from other countries?” Join the discussion on this topic over on v9bet !”
Great job on this valuable article! It’s both engaging and informative, just what we need! More details at zik88 .
Online sports have really transformed how we engage with our favorite games. It’s never been easier to follow teams and players! Check out v9bet for more insights.
Really enjoyed reading through such an impressively crafted argument – will definitely share with others at # anyKeyboard# zik88
If you’re not sure about your following actions post-accident, connect to an experienced personal injury lawyer near me for advice.
”Delighted.to.see.the.emphasis.put.on.how.collaboration.can.result.in.greater.value.from.each.individual’s.efforts.appreciate.this.article.highlighting.crucial.elements.for.successful.outcomes.thank.you.so.much.check.out.more.at.#.anykeyword#.! i9bet
The section approximately DIY protection used to be eye-starting; I’ll all the time prioritize hiring a certified electrician any longer! expert electrician
This was an enlightening and impressive read! Thank you for sharing your expertise with us; check out more at i9bet .
Mauzy Cooling’s technicians are knowledgeable and friendly—perfect for any AC repair needs! AC repair services in San Diego
The tech behind these systems is wild! Can’t believe how far we’ve come—big props to Novak Doors for keeping us up-to-date!! electric gate repair
How do injuries affect an athlete’s outlook on their future career paths? It must be challenging to navigate this journey; let’s talk about it on qh88 !
Interesting read on the evolution of dental technology—San Diego Dental Implant uses the latest techniques for implants! Dental Implants in San Diego
This article was very helpful. Thanks to the author! Explore more at ee88 .
This was a great help. Check out cloud-based real estate crm for more.
If you’re facing drain issues in San Diego, I highly recommend Mr. Rooter Plumbing. They know their stuff! Drain Repair in San Diego
I always trust local plumbers in Ben Lomond for any issues. Get the best services at Watsonville plumbers .
Great job! Discover more at کابینت پلی اورتان .
Thinking of investing in McMinnville property? Dom Doty is the best professional you require in your corner. Examine his website at Realtor .
This was quite useful. For more, visit Auto Glass Replacement .
Your post about typical garage door problems and solutions was spot on! Take a look at additional services at Same Day Garage Door Service .
Is it worth it to invest in a warranty for my repairs? What do you think, especially for Macs? Broken Mac Screen
Clearly presented. Discover more at Greensboro Auto Glass Replacement .
I like how complete this cleansing guide is! Perfect for busy hosts who require performance– even more at vrbo cleaning .
Thanks for sharing your understanding about electrical safety and security; it’s crucial when picking a ### anyKeyword #. commercial electrician calgary
The marketing potential of custom branded goods is huge—don’t overlook it! Learn how it works at clothing printing .
Leaky taps may be this kind of nuisance! This blog is a goldmine of statistics. Don’t disregard to ascertain out best plumber .
A big thank you to the team at George Georgaklis DDS for making my experience so smooth! Root Canal in San Diego
www betwinner www betwinner .
If you’re searching for advice post-accident, a trusted motor vehicle accident lawyer near me must be your first call!
Online fitness classes have made working out so much easier! Which ones do you love? Get fit tips at ee88 .
I’ll always choose ASI for any future plumbing needs – they’re fantastic at removing clogs. Clog Removal in San Diego
Online fitness challenges motivate me to stay active—what workouts keep YOU engaged during lockdowns?? Share routines together over here: v9bet
Fantastic post! Discover more at کابینت پلی اورتان .
If you’re undecided on where to eat, check out masti indian grill in memphis – you won’t regret it! indian restaurants near me
Appreciate the thorough write-up. Find more at casa rural en Arzúa .
The guide on wise thermostats became extremely effectual; it sounds like consulting an electrician is prime right here too! electrician near me
Been looking into getting an automatic gate—anyone have thoughts about working with novak doors & gates in los angeles? gate repair company
After working with several firms, I can confidently say that none compare to the service provided by Miller Trial Law! personal injury attorney
Online training apps are revolutionizing personal fitness routines, especially for athletes! Explore options at ee88 .
Thankful for the files offered by using boiler repair cost edinburgh ; it helped me discover a risk-free technician in Edinburgh.
I share your views on this matter completely. It’s time we took action! ee88
Highly recommend checking out the fantastic offerings of Sas Prinzivalli CPA P.A for all your CFO service needs! CFO Services
Fingers crossed continued support remains strong between us benefiting everyone involved long-term ahead!” AC repair services in San Diego
Wow, I never ever thought about how a neighborhood real estate agent can help with neighborhood connections and sources. That’s an invaluable solution for newbies in McMinnville! Real Estate Agent
Reality TV has taken an unexpected turn during pandemic times- what shows keep YOU entertained through tough times??? Share viewing habits:#anything_keyword# v9bet
Who else is obsessed with reality TV? The drama is just too good to miss! i9bet
Impressed not just by knowledge but also writing style exhibited throughout—thank-you kindly once again # anyKeyboard # zik88
Thanks for the thorough article. Find more at Progressive slots .
There’s nothing quite like the anticipation of waiting to see if you’ve hit the jackpot! v9bet
”Great conversations happening here which will only lead towards informed decisions—I’m definitely keeping an eye on opportunities provided by teams atSanDiegoDentalImplant.” Dental Implants in San Diego
Appreciate the helpful advice. For more, visit کابینت پلی اورتان .
Your perspective on what constitutes an authentic article is spot-on; thank you for sharing your thoughts with us all! Explore similar ideas over at v9bet
The Doty Group led by Dom Doty absolutely recognizes the regional market characteristics. I can not suggest them sufficient! Discover more at McMinnville Realtor .
” Sports can be incredibly stressful—how do you manage stress during competitions or tournaments?” Exchange stress management techniques with others over on ### anyKeyWord ###!” i9bet
Great job! Find more at top mortgage crm systems .
Such a valuable article with actionable insights! I’ll definitely be referring back to this. More at qh88 .
Learning valuable lessons gained through journeys undertaken alongside fellow hopefuls enriches lives profoundly connecting hearts minds souls alike across diverse backgrounds unified together pursuing ambitious aspirations fueled passions ignited i9bet
Your short article made me consider how often we neglect our garages– they deserve just as much attention as other parts of our homes, right? Discover more about home care regimens from us at Fast Garage Door Repair !
The staff at Mr.Rooter is friendly and knowledgeable—definitely my first choice for plumbing needs. Drain Repair in San Diego
I had a fantastic experience with Miller Trial Law. They took my case seriously and fought hard for my rights! personal injury lawyer
Thanks for the detailed guidance. More at Auto Glass Replacement .
The clarity that Sas Prinzivalli CPA P.A brings through their CFO services is something every business needs! CFO Services
Great job! Find more at Greensboro Auto Glass Replacement .
” Your services shines through whilst discussing peculiar difficulties —it’s fresh to determine factual-global treatments —find out extra over # # anyKeyWord # # !” plumbing contractor
Mi ĉiam serĉas sekuran kaj fidindan manieron por reŝargi miajn ludojn, kaj ManaBuy estas los angeles perfekta solvo! La rapideco kaj prezoj estas nevenkeblaj. #anyKeyword# secure top-up sites for games
Appreciate the detailed information. For more, visit alojamiento rural Arzúa .
Useful advice! For more, visit کابینت پلی اورتان .
I discover it essential to have an educated peronal injury attorney who understands neighborhood legislations and laws when taking care of auto mishaps.
¡Hola, jugadores expertos !
Si estГЎs buscando una experiencia de apuestas sin complicaciones ni trГЎmites largos, las casas sin licencia son una excelente alternativa. casas de apuestas sin licencia Muchos jugadores ya las prefieren por su flexibilidad y rapidez.
Casas de apuestas sin licencia con apuestas en vivo y buenas cuotas – п»їhttps://apuestas-sin-licencia.net/
Muchos sitios ofrecen ruleta y blackjack en vivo sin verificaciГіn. Ideal para sesiones espontГЎneas.
¡Que disfrutes de galardones únicos !
This message came with the correct time; I require to locate a good commercial electrician in my location!
If you’re looking to enhance your marketing strategy with custom promotional products, check out the selection at custom silk screen shirts !
Enjoyed top-notch service during my recent appointment for a root canal with Dr.Georgakis in sunny San Diego! Root Canal in San Diego
“Through your writing, it’s clear that engaging in meaningful tasks leads not just to personal satisfaction but community enrichment as well—great points made here, visit # anyKeyWord#!” ee88
betwinner t?rkiye betwinner t?rkiye .
Just got home from eating at masti indian grill memphis; my taste buds are still dancing! indian near me
deliver balloons dubai baby balloons dubai
Just wanted to share my experience with ASI for clog problems—they’re the best in town! Clog Removal in San Diego
resume civil engineer fresher resume for engineering internship
Such thorough policy cover of electrical safety measures—I’ll percentage this web publication generally, all and sundry demands it!!! # # anyKey notice ## expert electrician
Just throwing this out there: if your electric gate needs repairs, check out novak doors & gates—they really know their stuff! gate repair company
Thanks for the useful post. More like this at Play slots online .
I appreciate how Miller Trial Law values client relationships and works diligently on every case! personal injury lawyer
Nếu bạn còn phân vân, hãy tham khảo thêm về tính năng của https://planningengineer.net/lp-profile/thuthuatcacuocuknet/settings/basic-information/ nhé!
Mọi người có biết rằng https://www.mobafire.com/profile/gamebancauknet-1196339?profilepage có nhiều ưu đãi hấp dẫn không?
Đã nghe danh tiếng của https://www.babelcube.com/user/tai-xiu-online-uknet từ lâu, giờ mới có cơ hội thử nghiệm.
Mình muốn chia sẻ rằng https://experiment.com/users/tthethao2 thực sự là một nhà cái mà mọi người nên thử.
Có lẽ mình sẽ thử trải nghiệm tại https://gegenstimme.tv/a/gamebaiuknet/video-channels sau những gì mình đã nghe.
Thanks for the detailed guidance. More at کابینت پلی اورتان .
Nếu bạn đang tìm một nơi cá cược an toàn, hãy đến với https://expathealthseoul.com/profile/nổ-hu-uknet/ nhé!
“Every business owner should consider utilizing professional CFP Services like those offered by Sas Prinzivalli CPA, PA for success.” ### anyKeyWord### CFO Services
This was nicely structured. Discover more at .
This was beautifully organized. Discover more at local car accident doctor .
If your boiler is making strange noises, it’s time to call in the experts. Ignoring issues can lead to costly repairs! edinburgh boiler repair
Virtual training sessions for athletes are becoming essential in today’s world! Get resources at v9bet .
Whenever I have an AC problem, I know who to call—Mauzy Cooling! AC repair services in San Diego
This article has opened my eyes in many ways; thank you so much, dear author! Discover related topics at ee88 !
Hãy luôn tỉnh táo và lựa chọn một nhà cái uy tín khi tham gia cá cược như ở https://jymsubassbaits.com .
Có rất nhiều thông tin hữu ích mà bạn có thể khám phá từ #nhà_cái_uy_tín# này! Tìm hiểu ngay trên # top nhà cái tặng tiền # nhé!
Bạn nào đang tìm kiếm nhà cái uy tín thì nhớ ghé qua nhà cái uy tín nhé!
This was very enlightening. More at alojamiento rural Arzúa .
Considering investing in McMinnville realty? Dom Doty is the go-to specialist you require on your side. Check his website at Realtor in McMinnville .
Garage organization becomes a lot easier when you have a well-functioning door– great tips here! Garage Door Install
Movies adapted from novels often stir debate among fans – which adaptation captured its source material best?? ee88
Appreciate the thorough insights. For more, visit کابینت پلی اورتان .
I can’t recommend Miller Trial Law enough! Their commitment to justice for their clients is inspiring. personal injury lawyer
If you’re still debating whether to hire a peronal injury attorney , simply bear in mind: they are your ideal ally in seeking justice!
Fantastic counsel on handling pipe bursts in the time of wintry weather; education is key, and also you nailed it right here! best plumber
Sas Prinzivalli CPA P.A has an incredible team providing outstanding CFO services tailored to your needs! CFO Services
Mr. Rooter Plumbing handled my drain repair expertly! They really understand the unique plumbing needs of San Diego homes. Drain Repair in San Diego
This was highly helpful. For more, visit Auto Glass .
The parks in Greensboro are perfect for family outings. Have you been to the Greensboro Science Center? Visit Greensboro Auto Glass Replacement for more info!
can’t believe we’re finally doing this! locked in Novack Remodeling for our big kitchen makeover—so stoked!! home renovation company
The settlement methods described right here are fascinating! Having a professional on your side can actually make a difference in getting the very best offer possible. Realtor
Thanks for the practical tips. More at Video slots .
Fantastic post! Discover more at top-rated real estate crm .
Constantly check testimonials before working with a commercial electrician ; it actually aids limit choices.
finally went to masti indian grill memphis after hearing all the buzz, and man, did it live up to expectations! indian cuisine near me
Grateful seeing emphasis put upon developing welcoming ambiences since impressions issue– a fantastic suggestion consists of frequently inspecting furniture placement within areas occupied throughout keeps– look ahead exploring ongoing conversations airbnb cleaning
I am impressed by the quality of the custom clothing options available; they really resonate with audiences—check them out at local screen printing near me !
Thank you, George Georgaklis DDS, for taking wonderful care of me during my root canal treatment! Root Canal in San Diego
Grateful that you simply addressed matters surrounding maintenance affects on current wiring—I’ll notably check with professionals before intending!!! # # anyKey be aware ## expert electrician
This was very well put together. Discover more at کابینت پلی اورتان .
My automatic gate has been acting up lately 😩. Thinking of calling novak doors & gates. Have you all had good experiences with them? electric gate installation
Just had my drains cleared by ASI, and I couldn’t be happier. They really live up to their name! Clog Removal in San Diego
My experience with other firms pales compared to what I received from Miller Trial Law—top-notch all around! personal injury attorney
Se vi serĉas malmultekostan kaj fidindan manieron reŝargi viajn ludojn, ne serĉu plu! ManaBuy havas ĉion, kion vi bezonas. #anyKeyword# buy secure game top-ups online
Sometimes, boiler issues arise from simple things like thermostat malfunctions. Always check those first! boiler repair edinburgh
Thanks for the great information. More at alojamiento rural Arzúa .
Transformational is the best word to describe the impact of Sas Prinzivalli CPA P.A’s CFO services on my business! CFO Services
I recommend Mauzy to everyone who needs AC repairs in the San Diego area. AC repair services in San Diego
This was beautifully organized. Discover more at کابینت پلی اورتان .
If you’re unsure concerning your next actions post-accident, reach out to a well-informed personal injury lawyer near me for advice.
Does anyone have tips on choosing a dentist for dental implants? I’ve narrowed it down to San Diego Dental Implant. Dental Implants in San Diego
The Doty Team led by Dom Doty absolutely comprehends the neighborhood market dynamics. I can not suggest them enough! Discover a lot more at Realtor .
Martial arts not only enhance fitness but additionally impart discipline and focus in practitioners. It’s remarkable to see exactly how various styles, from martial arts to jiu-jitsu, deal one-of-a-kind advantages Denver taekwondo
Love this topic– garage doors are so important yet typically considered granted in home upkeep discussions! Garage Door Install
Bankruptcy can be a daunting experience, but it’s important to remember that it’s not the end of the road. Many individuals and businesses have successfully rebuilt their financial lives after filing for bankruptcy York bankruptcy
I appreciate how Miller Trial Law understands the nuances of personal injury law. They are the best in Boca Raton! personal injury lawyer
Fantastic advice on choosing a plumber! It’s crucial to find someone reliable. For more tips and tricks, visit plumber .
Appreciate the detailed insights. For more, visit Casino slots .
“Enjoyed examining your tackle sustainable plumbing practices—it’s some thing we may still all don’t forget!” 24 hour plumber
Wonderful tips! Find more at Auto Glass Replacement .
“My experience with Mr.Rooter was nothing short of exceptional—highly recommend them!” Drain Repair in San Diego
This was quite useful. For more, visit کابینت پلی اورتان .
I trust Sas Prinzivalli CPA P.A with my business finances, thanks to their reliable CFO services! CFO Services
Just had a consultation with novak remodeling in los angeles, and they seem super professional! Excited for what’s next. garage conversion
The children’s activities available in Greensboro are impressive! What places do you recommend for kids? Find more ideas at Greensboro Auto Glass Replacement .
This was very well put together. Discover more at 24/7 plumbers near me .
I appreciated this article. For more, visit mortgage crm for agents .
Appreciate your recommendation on upgrading electrical panels—time to name in an authorized residential electrician for bound!
Tried masti indian grill in memphis last week and I’m still dreaming about the naan… 😍 indian food
Great insights! Discover more at personal injury lawyer .
Terrific info below; I’m bookmarking this prior to contacting my regional ### ANYKEYWORD # next week! commercial electrician calgary
Terrific insights regarding timing cleansings according to guest check-ins and check-outs– it’s essential expertise every host need to have, find even much better techniques ###.”. vrbo cleaning
I believe every business should have an arsenal of promo items ready for events and outreach efforts—learn more strategies at custom screen print shirts .
My root canal was quick and painless at George Georgaklis DDS—thank you for the amazing care! Root Canal in San Diego
Seriously considering switching to an electric model after seeing all these glowing reviews about NOVAK DOORS AND GATES installations. gate repair
This was a fantastic resource. Check out alojamiento rural Arzúa for more.
This blog is full of useful tips! Excited to reach out to ASI, The White Glove Guys soon. Clog Removal in San Diego
Thanks for the clear advice. More at کابینت پلی اورتان .
If you want a trustworthy and effective personal injury firm, look no further than Miller Trial Law in Boca Raton! personal injury attorney
Boiler repair costs can add up quickly if left unchecked; make sure you address minor issues before they escalate! boiler repair cost edinburgh
Appreciate the insightful article. Find more at Progressive slots .
В динамичном мире Санкт-Петербурга, где каждый день кипит жизнь и совершаются тысячи сделок, актуальная и удобная доска объявлений становится незаменимым инструментом как для частных лиц, так и для предпринимателей. Наша платформа – это ваш надежный партнер в поиске и предложении товаров и услуг в Северной столице. Сайт бесплатных объявлений
Got an awesome deal on A/C repair from the folks at Mauzy—definitely worth it! AC repair services in San Diego
I was stunned to find out about the technology tools that McMinnville real estate agents use for detailing residential or commercial properties and reaching potential customers. It really enhances the marketing experience! Realtor McMinnville
Your suggestions on seasonal maintenance checks were spot on– certainly going to follow those tips from now on! More seasonal guides can be discovered at Fast Garage Door Repair .
купить варфейс В мире онлайн-шутеров Warface занимает особое место, привлекая миллионы игроков своей динамикой, разнообразием режимов и возможностью совершенствования персонажа. Однако, не каждый готов потратить месяцы на прокачку аккаунта, чтобы получить желаемое оружие и экипировку. В этом случае, покупка аккаунта Warface становится привлекательным решением, открывающим двери к новым возможностям и впечатлениям.
Dom Doty’s dedication to his customers is remarkable. He makes the acquiring and selling procedure a lot smoother! Figure out even more at Realtor .
“How do you maintain your new dental implants? Can’t wait to hear more tips from professionals!” Dental Implants in San Diego
Appreciate the thorough write-up. Find more at کابینت پلی اورتان .
Every interaction with Miller Trial Law felt personalized; they treat clients like family while delivering results! personal injury lawyer
Martial arts not just boost physical conditioning but also impart discipline and emphasis in practitioners. It’s remarkable to see how various designs, from karate to jiu-jitsu, deal unique advantages Denver taekwondo classes
Many people fear that bankruptcy will ruin their credit forever, but that’s not necessarily true. With proper planning and financial management post-bankruptcy, individuals can gradually rebuild their credit score bankruptcy York
I never realized how important it is to know when to call a plumber. Your post has definitely opened my eyes! For additional resources, head over to plumber .
Have you checked out what makes # anykeyword # stand out among other movers? Tulare apartment movers
This was very insightful. Check out Auto Glass for more.
My friend told me that she went with NOVAK REMODELING for her bathroom redo and she can’t stop talking about how awesome they were! home remodeling
San Diegans, if you need help with your drains, reach out to Mr. Rooter Plumbing! Drain Repair in San Diego
Exploring the local farmer’s markets in Greensboro is such a treat—what do you usually buy there? Tips available at Greensboro Auto Glass Replacement !
This was quite helpful. For more, visit casa rural en Arzúa .
anyone else feel like they can never finish their meal at MASTI INDIAN GRILL because of how filling everything is? best indian restaurants near me
Denver Print Company exceeded my expectations with their yard signs!
I recently ordered yard signs from Denver Print Company and was impressed yard signs for events
Shoutout to all the hardworking electricians in Calgary! If you need quality services, look no further than commercial electrician near me .
With their extensive experience, Miller Trial Law is undoubtedly one of the best choices for personal injury claims in Boca Raton! personal injury lawyer
This guide has inspired me to revamp my entire cleansing method before each guest gets here– the makeover will deserve it, check out further choices ###.”. airbnb cleaning
Custom T-shirts are an excellent way to create team spirit while promoting your brand! Check out options at t shirt logo printing .
“Professionalism and compassion go hand-in-hand at George Georgaklis DDS! Loved my visit.” Root Canal in San Diego
Savoring sweet taste victory achieved overcoming obstacles encountered along journey reminds remind everyone capable greatness lies deep within waiting reveal itself embrace challenges embrace opportunities transform narratives rewrite stories create Clog Removal in San Diego
If you’re dealing with an aggressive dog, I highly recommend checking out aggressive dog training Gilbert AZ in Gilbert!
The comparison between sectional and roller garage doors was extremely helpful! More contrasts found at Garage Door Service .
Personal injury law can be complex, but the team at Miller Trial Law simplifies the process for their clients! personal injury lawyer
I’ll always rely on Mauzy for all HVAC-related issues in San Diego. AC repair services in San Diego
If you’re looking to get or offer in McMinnville, Dom Doty is most definitely the realtor to take into consideration. His know-how can make all the distinction! Find out more at McMinnville Realtor .
Denver Print Company exceeded my expectations with their yard signs!
I recently ordered yard signs from Denver Print Company and was impressed yard sign printers
Does anyone have tips on caring for your dental implants after surgery? I’m eager to hear from those who’ve had success in San Diego! Dental Implants in San Diego
шкафы на парковку цена шкафы на парковку цена .
Thanks for the informative content. More at casa rural Arzúa .
Thanks for the detailed guidance. More at The Glam House Nashville .
Honestly thought doing an ADU was gonna be complicated until I saw how easy NOVAK REMODELING makes it look on their website! general contractor
can’t believe I’ve lived in Memphis this long without discovering masti Indian Grill… better late than never right? indian food near me
Fighting style not just boost fitness but additionally infuse self-control and focus in professionals. It’s remarkable to see exactly how different designs, from karate to jiu-jitsu, offer unique benefits taekwondo classes for kids
Filing for bankruptcy might seem like an overwhelming process, but it can provide a fresh start for those in severe financial distress. It’s essential to seek professional advice to navigate the complexities involved York bankruptcy lawyer
I’ve been struggling with a leaky faucet for weeks! Your suggestions are just what I needed. Explore more helpful content at plumber Melbourne .
Fantastic service from Mr. Rooter Plumbing! They really know their stuff when it comes to drain repair. Drain Repair in San Diego
If you’re looking for a top personal injury firm, Miller Trial Law should be your first choice in Boca Raton. Their track record speaks for itself. personal injury lawyer
A friend recommended Ginger Bistro, and now I can see why it’s considered the best Chinese restaurant in Palm Coast! Yummy dishes all around! Chinese restaurant
The staff at Ginger Bistro are so friendly and attentive. It adds to the experience of enjoying the best Chinese food! Sushi
Constantly inspect reviews prior to working with a commercial concealed permit ; it truly helps limit choices.
Just received our order of custom promotional products from Canada, and I’m thrilled with the quality! Check out their site at t shirt logo printing .
อยากให้ทุกคนสัมผัสประสบการณ์ดีๆ ที่ OMG ONE MORE GLASS SAI1 กันนะคะ ร้านอาหารในบางแคที่ไม่ควรพลาด
What an informative blog post on preserving tidiness in short-term leasings! I’ll be making use of these concepts– look into vrbo cleaning as well!
Huge shoutout to the team at George Georgaklis DDS for making my root canal experience so positive! Root Canal in San Diego
The hosting help stated in the message is a game-changer! It can make a large distinction in exactly how swiftly a home markets. I’m certainly going to check out this! McMinnville Realtor
Just had my ancient driveway replaced by way of a terrific contractor! If you are serious about a new driveway, you could really look at concrete driveway contractor Westlake to your wishes.
I’m so comfortable with my new concrete driveway from a nearby https://maps.google.com/maps?ll=41.433234,-81.791431&z=9&t=h&hl=en&gl=US&mapclient=embed&cid=13836615183642395283 installer. They transformed my home’s cut back allure!
If you need a trusted ##concrete contractor## in your driveway project in Canton, ensure to do some study and read experiences earlier making a decision. google.com
If you might be attempting to find a reliable concrete driveway replacement Strongsville to your concrete driveway in Strongsville, I quite recommend checking them out! Their setting up companies are excellent-notch.
Just wanted to percentage my expertise with an Akron concrete driveway manufacturer that I came upon because of concrete driveways Akron . They reworked my driveway, and this is now the discuss of the local!
Just had my driveway changed by way of a accurate-notch driveway company Cleveland . The first-class of work is exclusive, and the staff become very pro. Highly convinced!
Anybody else obsessed with personalizing their garage door? It’s like including personality to your home! Same Day Garage Door Service
Thanks for the comprehensive read. Find more at The Glam House Nashville .
Just started looking into dog aggression training options in Gilbert—heard awesome reviews about professional dog aggression training Gilbert AZ .
Denver Print Company exceeded my expectations with their yard signs!
I recently ordered yard signs from Denver Print Company and was impressed yard sign printers
The results I got from Miller Trial Law exceeded my expectations! They are truly the best personal injury firm around! personal injury attorney
Thanks for the thorough analysis. Find more at alojamiento rural Arzúa .
อยากจัดปาร์ตี้วันเกิดที่ OMG OneMoreGlass ต้องทำยังไงบ้างครับ? สถานที่ชิลสาย1
ติดใจบรรยากาศของร้าน OMG OneMoreGlass จนต้องไปซ้ำอีกแล้ว! ร้านอาหารสาย1 เพลงเพราะ
Dom Doty’s commitment to his clients is amazing. He makes the acquiring and offering procedure so much smoother! Discover even more at McMinnville Realtor .
Does anyone know if insurance covers dental implants in San Diego? I’m looking into options at San Diego Dental Implant. Dental Implants in San Diego
can’t wait to take my family to masti Indian Grill in Memphis this weekend! they need to try that butter chicken. indian near me
loving all the design inspiration from novak remodeling calabasas! can’t wait to see what they come up with for my project! remodeling contractor
Kudos to everyone at Miller Trial Law; your commitment to excellence does not go unnoticed—keep up the great work helping others achieve justice through your hard work and expertise!! personal injury attorney
Appreciate the great suggestions. For more, visit The GlamHouse Nashville .
ฉันชอบเพลงที่เล่นในร้าน OMG ONE MORE GLASS SAI1 มาก มันทำให้รู้สึกมีชีวิตชีวา ผับแอนด์เรสเตอรองท์ สาย1
I can’t believe how fast they showed up after calling last minute for help on our clogged toilet – fantastic service overall!! Drain Repair in San Diego
Martial arts not just enhance physical fitness however likewise instill discipline and emphasis in professionals. It’s interesting to see exactly how various designs, from karate to jiu-jitsu, offer distinct benefits Denver taekwondo classes for kids
Denver Print Company exceeded my expectations with their yard signs!
I recently ordered yard signs from Denver Print Company and was impressed yard signs for real estate
Bankruptcy can be a daunting experience, but it’s important to remember that it’s not the end of the road. Many individuals and businesses have successfully rebuilt their financial lives after filing for bankruptcy bankruptcy lawyer York
Thanks for sharing these common plumbing problems! It’s amazing how little things can lead to major headaches. For more detailed advice, visit plumber Melbourne .
I love that Ginger Bistro offers a variety of vegetarian options too! Best place for everyone in St Augustine! Chinese food near me
The ambiance at Ginger Bistro makes it perfect for any occasion, plus their food is exceptional! Best Chinese restaurant in St Augustine without a doubt! Learn more at Sushi near me .
Every house owner ought to have a best commercial electrical repair # for emergency situations!
Kudos to everyone at Miller Trial Law; your commitment to excellence does not go unnoticed—keep up the great work helping others achieve justice through your hard work and expertise!! personal injury lawyer
The sound my garage door makes when opening is driving me insane! Any options? Same Day Garage Door Service
Canada has so many amazing custom promotional product options! Don’t forget to check out screen printed shirts for inspiration.
Grateful having access well-informed resources pinpointing elements needed making sure residential or commercial properties st airbnb turnover
Grateful for the community support and recommendations around here—# # anyKeyWord # # has been mentioned so often! aggressive dog training Gilbert AZ
I appreciated this article. For more, visit casa rural en Arzúa .
This was highly useful. For more, visit The GlamHouse Nashville .
For anyone interested in passive income, PLR digital products are worth exploring. You can find some excellent options at best platforms to sell digital goods .
If you’re unsure where to turn for help with a personal injury claim, contact Miller Trial Law—they’re phenomenal! personal injury attorney
Junk cars can be such an eyesore! Luckily, cash for scrap cars Fort Myers FL helped me clear mine out quickly in Fort Myers.
. The friendly staff at mauzey cooling made scheduling my ac repair appointment so easy; i highly recommend their services! AC repair services in San Diego
Denver Print Company exceeded my expectations with their yard signs!
I recently ordered yard signs from Denver Print Company and was impressed yard sign companies near me
Honestly thought Indian food wasn’t my thing until I tried chicken tikka masala from masti Indian Grill Memphis — now I’m hooked! indian food
So glad I found this blog—I’m definitely leaning towards hiring novak remodeling for our upcoming kitchen project. kitchen renovation
I appreciate that San Diego offers advanced techniques in dentistry! Can’t wait to explore more. Dental Implants in San Diego
Thanks for the comprehensive read. Find more at The GlamHouse Nashville .
I wish I’d known about these tips before hiring a Melrose moving company! Check out Cheap movers Melrose for great advice!
อยากให้ทุกคนลองไปที่ร้าน OMG ONE MORE GLASS SAI1 ดูนะ อาหารอร่อยมากจริงๆ ร้านชิลสาย1 ดนตรีเพราะ
ร้าน OMG OneMoreGlass สาย 1 นี่บรรยากาศดีจริงๆ เหมาะสำหรับนั่งชิลล์มากเลย! สถานที่กินเลี้ยงวันเกิด สาย1
If you’re unsure where to turn for help with a personal injury claim, contact Miller Trial Law—they’re phenomenal! personal injury lawyer
”Thanks again from one happy client who will spread good word wherever possible regarding experiences shared here! Drain Repair in San Diego
I recently discovered the potential of PLR digital products, and they have completely transformed my online business strategy! I highly recommend checking out digital products for sale for some great resources.
Great info on garage door openers! It’s crucial to select the ideal one. For more choices, check Garage Door Repair .
I not too long ago had my storage floor covered with epoxy from epoxy coating Columbus , and the consequences are ultimate! It’s durable and user-friendly to fresh—the best option for any storage setup.
I love my new epoxy garage flooring! It’s so mild to preserve, and it absolutely brightens up the space. I discovered some important info at https://maps.app.goo.gl/MJuWKg18nL1J45cP6 .
The group at epoxy countertops Cleveland did an significant activity on my patio with their concrete coating suggestions. It has held up superbly towards the weather!
Finally tried the fried wontons at Ginger Bistro—they’re crispy and flavorful; perfect appetizer before your meal!!! Don’t miss them!!! Chinese near me
I just lately had my driveway changed in Ravenna, and I couldn’t be happier with the outcome! The group from concrete contractor Ravenna was once seasoned and competent all the way through the course of.
I love my new epoxy floor from https://www.google.com/maps?cid=15338743140540496636 ! It has perfectly superior the cultured of my Medina homestead although supplying sturdiness.
Thanks for the informative content. More at casa rural en Arzúa .
Martial arts not only enhance physical conditioning yet additionally impart discipline and focus in practitioners. It’s remarkable to see exactly how different designs, from karate to jiu-jitsu, deal distinct advantages Denver taekwondo classes for kids
Chắc chắn rằng các bạn sẽ không hối hận khi tham gia vào cộng đồng của https://df999-star.net/ !
Đã thử tính năng live dealer trên nhà cái df999 chưa? Thực sự rất chân thực!
Chơi bài trực tuyến trên nhà cái df999 thật sự rất thú vị, cảm giác như đang ở casino thật.
I love that Ginger Bistro offers a variety of vegetarian options too! Best place for everyone in St Augustine! Sushi restaurant
Có ai đã thử chơi slot trên https://df999-game.net/ chưa? Kinh nghiệm thế nào?
Mọi người có thường xuyên cập nhật trò chơi mới trên nhà cái df999 không?
Bankruptcy can be a daunting experience, but it’s important to remember that it’s not the end of the road. Many individuals and businesses have successfully rebuilt their financial lives after filing for bankruptcy York bankruptcy lawyer
These DIY plumbing tips are super helpful! I’m going to try some of these this weekend. If you’re looking for more ideas, check out plumber .
Với nhiều lựa chọn game, chắc chắn mọi người sẽ tìm thấy thứ mình thích tại nhà cái df999 .
Có ai đã thắng jackpot trên df999 chưa? Kể cho tôi nghe với!
If you are purchasing for professional epoxy coating companies in Lorain, inspect out concrete floor coating Lorain ! They remodeled my stupid concrete right into a wonderful floor.
Tôi muốn chia sẻ rằng nhà cái df999 có nhiều trò chơi hấp dẫn mà tôi yêu thích.
Một trong những điều mà tôi yêu thích nhất về ### anyKeyWord### chính là sự đa dạng trong lựa chọn trò chơi! df999
Có ai đã thắng jackpot trên df999 chưa? Kể cho tôi nghe với!
Cảm ơn vì đã giới thiệu đến tôi trang web tuyệt vời như df999 !
Cảm ơn vì đã giới thiệu đến tôi trang web tuyệt vời như https://df999-club.com/ !
Tôi đã tham gia vào một giải đấu trên https://df999-elite.online/ và cảm thấy rất phấn khích!
พาแฟนไปเดทที่ OMG OneMoreGlass บรรยากาศโรแมนติกมากๆ ครับ! ร้านชิลสาวสวย สาย1
Anyone else here tried positive reinforcement methods for aggression? I’m heading to private dog aggression training Gilbert AZ soon!
Denver Print Company exceeded my expectations with their yard signs!
I recently ordered yard signs from Denver Print Company and was impressed yard sign companies near me
“I appreciated how well the team explained what was happening during my procedure.” Root Canal in San Diego
OMG ONE MORE GLASS SAI1 เป็นร้านที่มีเครื่องดื่มหลากหลาย ครบครันสุดๆ เลยค่ะ ร้านชิลเหมาะกับจัดวันเกิด สาย1
I enjoyed this post. For additional info, visit The Glam House services .
If you’re feeling unsure about your upcoming move, check out what $$ anyKeyWord$$ has to say first! Cheap movers Indialantic
ติดใจบรรยากาศของร้าน OMG OneMoreGlass จนต้องไปซ้ำอีกแล้ว! เที่ยวกลางคืนสาย1
The insights I’ve gained from using various PLR digital products have been invaluable—thanks, entrepedia strategies !
finally tried goat curry from MASTI INDIAN GRILL last week—what have I been missing out on all this time?! indian cuisine near me
Wish I’d known about NOVAK REMODELING when we first moved here; so many missed opportunities for a dreamy space makeover… remodeling contractor
If you’re dealing with a malfunctioning AC unit in San Diego, call up Mauzy Cooling immediately. AC repair services in San Diego
шкаф в паркинг с рольставнями москва цена шкаф в паркинг с рольставнями москва цена .
Nicely done! Find more at Nashville Glam House Salon .
Denver Print Company exceeded my expectations with their yard signs!
I recently ordered yard signs from Denver Print Company and was impressed quick yard sign printing
Such an insightful post on the benefits of choosing local clinics—San Diego Dental Implant has been fantastic! Dental Implants in San Diego
The Glam House Nashville is the best beauty salon I’ve ever visited!
I always leave The Glam House Nashville feeling like a superstar.
If you’re searching for a beauty salon near me, check out The Glam House Nashville top-rated beauty salon Nashville
Colepepper Plumbing did an amazing job with my kitchen sink! Highly recommend this plumber in San Diego CA.
I found the best plumber near me thanks to Colepepper Plumbing. Excellent service and friendly staff plumbing maintenance San Diego CA
The Winslow is the best Rugby Bar I’ve ever visited! The atmosphere is unbeatable.
I love hanging out at The Winslow, the ultimate Rugby Bar Near Me.
The Winslow is my go-to spot for rugby matches. It’s the best Rugby Bar New York has to offer Live sports bar New York
My experience at Denver Pain Management Clinic was top-notch. The staff truly cares about their patients!
I highly recommend Denver Pain Management Clinic for anyone needing specialized care and attention pain management therapy
Anybody know if there are eco-friendly alternatives when it pertains to products for new garage doors? Looking to go green! Garage Door Company
Game recharges should be so dear, yet ManaBuy has fullyyt transformed the game for me! Their expenses are unbeatable, and I’ve certainly not had any worries with safeguard or supply occasions Genshin top up
Thanks for the thorough article. Find more at abogados laboralistas en Sevilla .
Mr. Rooter Plumbing made my drain repair experience hassle-free and quick! Drain Repair in San Diego
Don’t underestimate the power of PLR digital products in scaling your online business! Discover more at guide to selling digital goods .
The staff at Ginger Bistro are always friendly and attentive, making my dining experience even better! Chinese restaurant
I’ve tried many Chinese restaurants, but Ginger Bistro stands out as the best in St Augustine. The service is fantastic too! Sushi near me
I appreciated this article. For more, visit https://www.instapaper.com/read/1803980194 .
Martial arts not only boost fitness however also instill discipline and focus in experts. It’s interesting to see exactly how different styles, from karate to jiu-jitsu, deal special benefits taekwondo classes for kids
This was highly informative. Check out https://atavi.com/share/xa89wrz1chj5s for more.
My dog’s been aggressive towards other pets, so I’m exploring options like dog behavioral issues training Gilbert AZ for proper training.
Love this blog! It’s great to see practical plumbing advice that anyone can implement. For additional information, be sure to check out plumber Melbourne .
Bankruptcy can be a daunting experience, but it’s important to remember that it’s not the end of the road. Many individuals and businesses have successfully rebuilt their financial lives after filing for bankruptcy bankruptcy York
The role of customer reviews in local SEO cannot be overstated. They enhance credibility and visibility on Google Maps. Find out how to manage reviews effectively at Advertising agency near me .
This is quite enlightening. Check out The GlamHouse Nashville for more.
This was nicely structured. Discover more at https://atavi.com/share/xa89kazc2onf .
I think my neighbor used la roof masters for their roof replacement last year. Their house looks amazing now! Gonna drop by and ask for details soon. roof installation
Looking for quality dental care? You can’t go wrong with George Georgaklis DDS for your next root canal in San Diego! Root Canal in San Diego
This was quite informative. For more, visit https://andylxvc567.image-perth.org/discovering-water-closet-styles-and-maintenance .
Great tips on planning outdoor events! And don’t forget to rent your porta potties from temporary porta potty rental company Tacoma in Tacoma.
This was very beneficial. For more, visit https://www.protopage.com/kevonaebab#Bookmarks .
Thanks for the useful post. More like this at https://squareblogs.net/germiesyyu/h1-b-the-advantages-and-disadvantages-of-different-water-home-heating-and .
Denver Print Company exceeded my expectations with their yard signs!
I recently ordered yard signs from Denver Print Company and was impressed yard sign suppliers
Thanks for the valuable insights. More at https://atavi.com/share/xa89jdz1lba08 .
This was highly educational. More at https://pin.it/3466H8iKq .
I found this very interesting. For more, visit https://erickypoc549.tearosediner.net/how-to-prevent-plumbing-issues-in-older-homes .
This was a fantastic read. Check out http://the-excellent-blog-7755.mozellosite.com for more.
So glad I found ASI; their professionals really know how to handle clogs effectively. Clog Removal in San Diego
This was a fantastic resource. Check out https://telegra.ph/How-to-Deal-With-Rusty-Pipes-and-Radiators-05-30 for more.
I enjoyed this post. For additional info, visit https://rentry.co/3hpoa7cc .
If you’re undecided on where to eat, check out masti indian grill in memphis – you won’t regret it! good indian restaurants near me
мелодии для души Роп – Русский роп – это больше, чем просто музыка. Это зеркало современной российской души, отражающее её надежды, страхи и мечты. В 2025 году жанр переживает новый виток развития, впитывая в себя элементы других стилей и направлений, становясь всё более разнообразным и эклектичным. Популярная музыка сейчас – это калейдоскоп звуков и образов. Хиты месяца мгновенно взлетают на вершины чартов, но так же быстро и забываются, уступая место новым музыкальным новинкам. 2025 год дарит нам множество талантливых российских исполнителей, каждый из которых вносит свой неповторимый вклад в развитие жанра.
Hopefully going through all these home improvement posts will help me when I meet up with Novake Remodeling next week!!! home remodeling
This was highly helpful. For more, visit The Glam House Nashville .
Thanks for the detailed guidance. More at abogados laboralistas en Sevilla .
This was a great article. Check out https://masstr.net/member.php?action=profile&uid=88736 for more.
I appreciated this post. Check out http://hqarea.altervista.org/Upload/member.php?action=profile&uid=205986 for more.
Denver Print Company exceeded my expectations with their yard signs!
I recently ordered yard signs from Denver Print Company and was impressed custom yard signs
This was highly educational. For more, visit https://fun4games.eu/forum/member.php?action=profile&uid=53953 .
The Glam House Nashville is the best beauty salon I’ve ever visited!
I always leave The Glam House Nashville feeling like a superstar.
If you’re searching for a beauty salon near me, check out The Glam House Nashville Nashville TN salon for wedding hair
Open Wide La Jolla Dentistry provides exceptional dental care with a smile!
I had a fantastic experience at Open Wide La Jolla Dentistry, the best dentist near me!
The staff at Open Wide La Jolla Dentistry are truly friendly and professional Open Wide La Jolla Dentistry pediatric care
Colepepper Plumbing did an amazing job with my kitchen sink! Highly recommend this plumber in San Diego CA.
I found the best plumber near me thanks to Colepepper Plumbing. Excellent service and friendly staff San Diego CA pipe replacement
The Winslow is the best Rugby Bar I’ve ever visited! The atmosphere is unbeatable.
I love hanging out at The Winslow, the ultimate Rugby Bar Near Me.
The Winslow is my go-to spot for rugby matches. It’s the best Rugby Bar New York has to offer Rugby bars near me
The customer service at Tacoma portable toilet rental services is top-notch! I will always rent my porta potties from them for my events in Tacoma.
My experience at Denver Pain Management Clinic was top-notch. The staff truly cares about their patients!
I highly recommend Denver Pain Management Clinic for anyone needing specialized care and attention pain treatment options
This is quite enlightening. Check out https://parsesh.ir/user/aureengbaw for more.
Appreciate the useful tips. For more, visit https://evaelfie.cam/user/allachznlo .
I enjoyed this read. For more, visit http://gamesgrom.com/user/farelaavfn .
This was nicely structured. Discover more at http://f91306v7.beget.tech/member.php?action=profile&uid=187823 .
I enjoyed this article. Check out http://www.writemob.com//user/fastofqzbb for more.
Appreciate the thorough insights. For more, visit https://anime-share.ru/user/gwanietszy .
This was highly informative. Check out https://abrek.org/user/ismerdqomc for more.
Why Choose DDoS.Market?
High-Quality Attacks – Our team ensures powerful and effective DDoS attacks for accurate security testing.
Competitive Pricing & Discounts – We offer attractive deals for returning customers.
Trusted Reputation – Our service has earned credibility in the Dark Web due to reliability and consistent performance.
Who Needs This?
Security professionals assessing network defenses.
Businesses conducting penetration tests.
IT administrators preparing for real-world threats.
Appreciate the detailed insights. For more, visit https://xn—-itbabotjnldew9c3cj.xn--p1ai:443/user/hyarishhiw .
Great job! Discover more at https://medknigki-v-ulan-ude.ru/user/voadilkbod .
Just found out about the success stories from dog bite prevention training Gilbert AZ —I’m excited to see if it helps my dog’s behavior!
I recently dined at Ginger Bistro, and it truly is the best Chinese restaurant in St Augustine! The flavors are authentic, and the ambiance is lovely. Highly recommend! Chinese food near me
If you’re searching for the best Chinese restaurant in St Augustine, look no further than Ginger Bistro! Their dishes are top-notch. Sushi
Thanks for the great explanation. More info at TheGlamHouse Nashville .
Parker residents appreciate supporting local businesses—make sure they find you online with effective SEO strategies from Marketing Agency near me .
Had such a good experience with la roof masters los angeles! They explained everything so well and were super patient with my million questions. roof repair los angeles
sg vape
Vaping in Singapore: More Than Just a Trend
In today’s fast-paced world, people are always looking for ways to unwind, relax, and enjoy the moment — and for many, vaping has become a daily habit. In Singapore, where modern life moves quickly, the rise of vaping culture has brought with it a unique form of downtime . It’s not just about the devices or the clouds of vapor — it’s about flavor, convenience, and finding your own vibe.
Disposable Vapes: Simple, Smooth, Ready to Go
Let’s face it — nobody wants to deal with complicated setups all the time. That’s where disposable vapes shine. They’re perfect for busy individuals who still want that satisfying hit without the hassle of charging, refilling, or replacing parts.
Popular models like the VAPETAPE UNPLUG / OFFGRID, LANA ULTRA II, and SNOWWOLF SMART HD offer thousands of puffs in one easy-to-use device. Whether you’re out for the day or just need something quick and easy, these disposables have got your back.
New Arrivals: Fresh Gear, Fresh Experience
The best part about being into vaping? There’s always something new around the corner. The latest releases like the ELFBAR ICE KING and ALADDIN ENJOY PRO MAX bring something different to the table — whether it’s colder hits .
The ELFBAR RAYA D2 is another standout, offering more than just puff count — it comes with adjustable airflow , so you can really make it your own.
Bundles: Smart Choices for Regular Vapers
If you vape often, buying in bulk just makes sense. Combo packs like the VAPETAPE OFFGRID COMBO or the LANA BAR 10 PCS COMBO aren’t just practical — they’re also a smart investment . No more running out at the worst time, and you save a bit while you’re at it.
Flavors That Speak to You
At the end of the day, it’s all about taste. Some days you want something icy and refreshing from the Cold Series, other times you’re craving the smooth, mellow vibes of the Smooth Series. Then there are those sweet cravings — and trust us, the Sweet Series delivers.
Prefer the classic richness of tobacco? There’s a whole series for that too. And if you’re trying to cut back on nicotine, the Nicotine-Free Range gives you all the flavor without the buzz.
Final Thoughts
Vaping in Singapore isn’t just a passing trend — it’s a lifestyle choice for many. With so many options available, from pocket-sized disposables to customizable devices, there’s something for everyone. Whether you’re exploring vaping for the first time , or a seasoned vaper , the experience is all about what feels right to you — made personal for you.
Vaping in Singapore: More Than Just a Trend
In today’s fast-paced world, people are always looking for ways to unwind, relax, and enjoy the moment — and for many, vaping has become a go-to ritual . In Singapore, where modern life moves quickly, the rise of vaping culture has brought with it a fresh way to relax . It’s not just about the devices or the clouds of vapor — it’s about flavor, convenience, and finding your own vibe.
Disposable Vapes: Simple, Smooth, Ready to Go
Let’s face it — nobody wants to deal with complicated setups all the time. That’s where disposable vapes shine. They’re perfect for users who want instant satisfaction who still want that satisfying hit without the hassle of charging, refilling, or replacing parts.
Popular models like the VAPETAPE UNPLUG / OFFGRID, LANA ULTRA II, and SNOWWOLF SMART HD offer thousands of puffs in one sleek little package . Whether you’re out for the day or just need something quick and easy, these disposables have got your back.
New Arrivals: Fresh Gear, Fresh Experience
The best part about being into vaping? There’s always something new around the corner. The latest releases like the ELFBAR ICE KING and ALADDIN ENJOY PRO MAX bring something different to the table — whether it’s enhanced user experience.
The ELFBAR RAYA D2 is another standout, offering more than just puff count — it comes with a built-in screen , so you can really make it your own.
Bundles: Smart Choices for Regular Vapers
If you vape often, buying in bulk just makes sense. Combo packs like the VAPETAPE OFFGRID COMBO or the LANA BAR 10 PCS COMBO aren’t just practical — they’re also a great value choice. No more running out at the worst time, and you save a bit while you’re at it.
Flavors That Speak to You
At the end of the day, it’s all about taste. Some days you want something icy and refreshing from the Cold Series, other times you’re craving the smooth, mellow vibes of the Smooth Series. Then there are those sweet cravings — and trust us, the Sweet Series delivers.
Prefer the classic richness of tobacco? There’s a whole series for that too. And if you’re trying to cut back on nicotine, the Zero-Nicotine Line gives you all the flavor without the buzz.
Final Thoughts
Vaping in Singapore isn’t just a passing trend — it’s a lifestyle choice for many. With so many options available, from pocket-sized disposables to customizable devices, there’s something for everyone. Whether you’re taking your first puff, or an experienced user , the experience is all about what feels right to you — your way, your flavor, your style .
Denver Print Company exceeded my expectations with their yard signs!
I recently ordered yard signs from Denver Print Company and was impressed Denver Print Company yard signs
This was quite enlightening. Check out https://www.scribd.com/document/869284512/Choosing-a-Leak-Discovery-Expert-for-Your-Home-222091 for more.
This was highly educational. For more, visit https://www.4shared.com/s/fpPY0nSAHge .
Great insights! Find more at https://www.4shared.com/s/fxyMNjzxWku .
I enjoyed this article. Check out https://www.4shared.com/s/fc0_7AFSuku for more.
Thanks for the great information. More at https://go.bubbl.us/eb683a/a8d2?/Bookmarks .
I love that there are eco-friendly options available through local porta potty rental Tacoma for porta potty rentals in Tacoma.
Thanks for the thorough analysis. More info at https://go.bubbl.us/eb6839/edd6?/Bookmarks .
This was very enlightening. For more, visit https://www.4shared.com/s/fiWfB_q0Tfa .
Very helpful read. For similar content, visit https://send.now/1nlve0yuagz6 .
This was very enlightening. More at https://atavi.com/share/xa8kwaz1ksc7a .
This was a fantastic read. Check out https://list.ly/i/10992585 for more.
Thanks for the detailed post. Find more at abogado laboralista Sevilla .
Those ADU designs look really promising! Can’t wait to see what ideas come from chatting with the folks at novak remodeling. remodeling contractor
I had a fantastic experience with Kerner Law Group, P.C. as my Bronx car accident attorney!
Kerner Law Group, P.C. truly stands out as the best Bronx car accident lawyer I’ve ever worked with Lyft accident attorney Bronx
Thanks for the informative content. More at car hire .
This was highly educational. More at https://atavi.com/share/xa8l7szfbrn4 .
Thanks for the valuable insights. More at https://www.symbaloo.com/mix/bookmarks-aaul .
I’m curious about the average settlements for car accidents in DC. This post sheds light on it! Check over here
We did a Q4 installation with SunPower, aiming for £32k discount rates. Year three ROI slower than promised—around 6 years. manufacturing power rate reductions flagged inverter hiccups, which hit us rough cost-effectiveness of factory roof solar
Open Wide La Jolla Dentistry provides exceptional dental care with a smile!
I had a fantastic experience at Open Wide La Jolla Dentistry, the best dentist near me!
The staff at Open Wide La Jolla Dentistry are truly friendly and professional La Jolla braces
The Glam House Nashville is the best beauty salon I’ve ever visited!
I always leave The Glam House Nashville feeling like a superstar.
If you’re searching for a beauty salon near me, check out The Glam House Nashville where to get a haircut in Nashville
The Winslow is the best Rugby Bar I’ve ever visited! The atmosphere is unbeatable.
I love hanging out at The Winslow, the ultimate Rugby Bar Near Me.
The Winslow is my go-to spot for rugby matches. It’s the best Rugby Bar New York has to offer Rugby gatherings near me
Anyone familiar with the pricing and packages available through # # anyKeyWord # #? I’d love more details before signing up! dog reactivity training Gilbert AZ
Appreciate the detailed post. Find more at http://maddog-server.org/forum/member.php?action=profile&uid=274983 .
This was a fantastic read. Check out http://damsan.net/member.php?action=profile&uid=330281 for more.
I enjoyed this post. For additional info, visit https://duvidas.construfy.com.br/user/lygrigbfrb .
Looking forward to working with ###ANYKEYWORD### again soon; they always exceed expectations! Tacoma event portable bathroom rental
Thanks for the detailed post. Find more at https://forum.mbprinteddroids.com/member.php?action=profile&uid=372214 .
Looking for tasty Asian cuisine? You have to check out Ginger Bistro; they have some of the best dishes around here! Chinese
I appreciate that Ginger Bistro offers vegan options without compromising on taste; a great choice for everyone! Sushi near me
It’s fascinating how effective local marketing can transform Littleton’s business landscape. Have you checked out what Marketing Agency offers?
Do you think it’s worth getting a roof inspection every few years? I’ve been considering it, especially since I’ve heard good things about la roof masters. roofing contractor
This was a fantastic read. Check out https://forum.vgatemall.com/member.php?action=profile&uid=436603 for more.
Appreciate the insightful article. Find more at http://amantespastoraleman.com/foro/member.php?action=profile&uid=318772 .
This was very well put together. Discover more at top-rated video slot machines .
Appreciate the thorough information. For more, visit abogado laboralista Sevilla .
ชอบบรรยากาศเปิดโล่งของร้าน OMG OneMoreGlass มาก อากาศดีสุดๆ ! ร้านเหล้าสาย1 ดนตรีสด
ฉันรักค็อกเทลที่ OMG ONE MORE GLASS SAI1 มาก อร่อยและสดชื่นสุดๆ ผับสาย1
ร้าน OMG OneMoreGlass สาย 1 นี่บรรยากาศดีจริงๆ เหมาะสำหรับนั่งชิลล์มากเลย! ร้านอาหารรับจัดเลี้ยงสาย1
I agree that preventative measures are essential; waiting until roads deteriorate only increases costs and risks! excavating company port alberni
My sister used them for her living room makeover and can’t stop talking about how easy they made everything! bathroom remodeling
Appreciate the detailed information. For more, visit https://www.4shared.com/s/fBZ88FM8ffa .
This was highly educational. For more, visit https://www.scribd.com/document/869325795/Searching-For-Shower-Repair-Solutions-Near-Me-152423 .
Thanks for the detailed guidance. More at https://www.4shared.com/s/feUFNopNrge .
Wonderful tips! Discover more at https://send.now/ng9wa6531d1z .
Clearly presented. Discover more at https://www.mediafire.com/file/c6mbiv4l37g2mg2/pdf-84969-54852.pdf/file .
Well done! Find more at https://send.now/pa1iva1754bd .
พาแฟนไปเดทที่ OMG OneMoreGlass บรรยากาศโรแมนติกมากๆ ครับ! สถานที่กินเลี้ยงวันเกิด สาย1
We did a Q4 set up with SunPower, projected 5yr payback however 12 months three presentations toward 6. manufacturing facility solar panel ROI warned about inverter downtime—ours hit 8% loss closing summer Informative post
Услуги массажа Ивантеевка — здоровье, отдых и красота. Лечебный, баночный, лимфодренажный, расслабляющий и косметический массаж. Сертифицированнй мастер, удобное расположение, результат с первого раза.
I’ve read wonderful reviews about # # anyKeyWord # #’s tailored programs—I can’t wait to start my dog’s journey there! dog bite prevention training Gilbert AZ
Open Wide La Jolla Dentistry provides exceptional dental care with a smile!
I had a fantastic experience at Open Wide La Jolla Dentistry, the best dentist near me!
The staff at Open Wide La Jolla Dentistry are truly friendly and professional find a dentist near me
Lavo Dental is fantastic! I had a dental emergency, and they were quick to assist.
Finding an emergency dentist near me was a breeze with Lavo Dental.
I can’t recommend Lavo Dental enough for emergency dentist services in Northridge, CA Where to find an emergency dentist near me
Colepepper Plumbing did an amazing job with my kitchen sink! Highly recommend this plumber in San Diego CA.
I found the best plumber near me thanks to Colepepper Plumbing. Excellent service and friendly staff San Diego CA residential plumbing
The Winslow is the best Rugby Bar I’ve ever visited! The atmosphere is unbeatable.
I love hanging out at The Winslow, the ultimate Rugby Bar Near Me.
The Winslow is my go-to spot for rugby matches. It’s the best Rugby Bar New York has to offer The Winslow rugby nights
Thanks for the useful suggestions. Discover more at abogado laboralista Sevilla .
Just had my old roof repaired and I’m so happy with the results from la roof masters! It was such a smooth process from start to finish. roof repair los angeles
Shoutout to those sharing their experiences with NYC vehicle shipping agents! Found some gems on A1 Auto Transport’s New York .
Завършена визия с дамски комплекти от меки и леки материи
комплекти за жени комплекти за жени .
Parker is growing rapidly! Local SEO services by agencies such as Advertising Agency can help new businesses get noticed quickly.
I’ve celebrated several special occasions at Ginger Bistro because their food always makes it more memorable! Chinese restaurant
I love how fresh everything tastes at Ginger Bistro. Definitely my go-to Chinese restaurant! Sushi
Valuable information! Discover more at casino slot machine reviews .
betwinner old version https://betswinner.bet .
© Aposta.La – 2025.Todos los derechos reservados. Si estás buscando plataformas seguras donde puedas jugar Balloon App y recibir atractivos bonos de bienvenida en Perú, aquí tienes una selección de los cinco casinos más populares que ofrecen acceso al juego. Todos estos operadores permiten descargar Balloon para ganar dinero y ofrecen condiciones favorables tanto para nuevos jugadores como para usuarios frecuentes. I had the most thrilling experience playing Balloon at the online casinos in Argentina. The game is so engaging Balloon casino and fun that I couldn’t stop myself from playing it again and again. Disfruta del emocionante juego de Balloon en los mejores casinos online de Argentina. I highly recommend it to all the casino enthusiasts out there! – Juan, 28 El encanto del Balloon juego dinero Argentina reside en su simplicidad y el entusiasmo que genera cada aumento en el juego. Los argentinos, conocidos por su pasión por los desafíos y la competencia, encuentran en Balloon una manera perfecta de poner a prueba su astucia y suerte. El juego ofrece la posibilidad de multiplicar las apuestas de manera rápida, lo que lo convierte en una opción favorita para aquellos que buscan resultados inmediatos y emocionantes en cada sesión.
https://masterteenpattiofficial.com/mecanicas-riesgos-y-recompensas-lo-que-necesitas-saber-del-juego-balloon-de-smartsoft-en-colombia/
Esta tragamonedas de 5×5 realiza un viaje a través de un vibrante país de las maravillas lleno de delicias, mientras íconos frutales que incluyen melones y uvas junto con corazones relucientes, pagan en cualquier lugar de la pantalla. Cuando los rodillos giran en cuatro piruletas, la ronda de giros gratis se desbloquea, continuando un viaje que reúne múltiples características y modificadores, ¡lo que hace que los jugadores sufran una fiebre de azúcar! La tragaperras original, Sweet Bonanza, es uno de los juegos más populares y célebres de la industria. La tragaperras clásica de seis rodillos y pago en cualquier posición, que atrae constantemente a jugadores de todo el mundo, se suma ahora a Gates of Olympus 1000, Sugar Rush 1000 y Starlight Princess 1000 como una secuela mejorada con un potencial de ganancias significativamente mayor.
Your tips on hiring an excavator are invaluable—thank you for sharing this knowledge! For reliable services, visit port alberni excavation .
This is highly informative. Check out Landline lookup for more.
Изучите taktychni-rukavyci.netlify.app для новых идей, обязательно посетите.
Узнайте больше о новых технологиях на taktychni-rukavyci.netlify.app, посмотреть.
taktychni-rukavyci.netlify.app – это источник вдохновения, сделайте шаг навстречу новым знаниям.
taktychni-rukavyci.netlify.app – ваша путеводная звезда, ознакомиться.
taktychni-rukavyci.netlify.app: откройте новые горизонты, ознакомиться.
Ваши поиски окончания с taktychni-rukavyci.netlify.app, посмотреть.
Увлекательные факты на taktychni-rukavyci.netlify.app, не упустите.
taktychni-rukavyci.netlify.app: инновации и технологии, обязательно ознакомьтесь.
Изучайте технологии будущего на taktychni-rukavyci.netlify.app, предлагаем.
taktychni-rukavyci.netlify.app: ваш партнер в обучении, не пропустите.
купити тактичні перчатки купити тактичні перчатки .
Fighting style not just improve physical fitness yet also impart technique and focus in specialists. It’s fascinating to see how various styles, from martial arts to jiu-jitsu, offer one-of-a-kind advantages Denver taekwondo
Bankruptcy can be a daunting experience, but it’s important to remember that it’s not the end of the road. Many individuals and businesses have successfully rebuilt their financial lives after filing for bankruptcy York bankruptcy lawyer
ใครเคยไป OMG OneMoreGlass แล้วบ้าง? แนะนำเมนูเด็ดๆ ด้วยนะครับ! ผับแอนเรสเตอรองท์ ใกล้ฉัน
We did a Q4 deploy with SunPower, expected 5yr ROI but nearing 12 months four now. executive sun beef up factories flagged inverter negative aspects—ours failed in 12 months 2, hit output via eight%. Weekend install stored downtime though https://17mk3.mssg.me/
Appreciate the useful tips. For more, visit abogados en A Coruña .
Progressive Heating & Air provides excellent customer service for heater repairs. Highly recommend them! Heater repair in San Diego
ไปที่ OMG ONE MORE GLASS SAI1 กับกลุ่มเพื่อน แล้วมีความสุขทุกนาทีเลยค่ะ ร้านชิลสาย1 เหมาะสำหรับกลุ่ม
This was quite informative. For more, visit alphen aan den rijn tandartspraktijk .
I’ve seen amazing transformations in dogs trained at professional dog aggression training Gilbert AZ —definitely worth considering for aggression issues!
This was very insightful. Check out boekhoudkantoor in arnhem for more.
Very helpful read. For similar content, visit abogados laboralistas en Sevilla .
Honestly didn’t think replacing an old roof could be this easy! La roof masters made the whole process smooth as butter. roof repair company
Open Wide La Jolla Dentistry provides exceptional dental care with a smile!
I had a fantastic experience at Open Wide La Jolla Dentistry, the best dentist near me!
The staff at Open Wide La Jolla Dentistry are truly friendly and professional La Jolla dental clinic
The Glam House Nashville is the best beauty salon I’ve ever visited!
I always leave The Glam House Nashville feeling like a superstar.
If you’re searching for a beauty salon near me, check out The Glam House Nashville Nashville salon near downtown
Lavo Dental is fantastic! I had a dental emergency, and they were quick to assist.
Finding an emergency dentist near me was a breeze with Lavo Dental.
I can’t recommend Lavo Dental enough for emergency dentist services in Northridge, CA Northridge emergency dentist walk-ins
Colepepper Plumbing did an amazing job with my kitchen sink! Highly recommend this plumber in San Diego CA.
I found the best plumber near me thanks to Colepepper Plumbing. Excellent service and friendly staff water heater installation by Colepepper Plumbing
My experience at Denver Pain Management Clinic was top-notch. The staff truly cares about their patients!
I highly recommend Denver Pain Management Clinic for anyone needing specialized care and attention pain management near Denver
The Winslow is the best Rugby Bar I’ve ever visited! The atmosphere is unbeatable.
I love hanging out at The Winslow, the ultimate Rugby Bar Near Me.
The Winslow is my go-to spot for rugby matches. It’s the best Rugby Bar New York has to offer Rugby enthusiasts bar NYC
This was quite helpful. For more, visit payday loans new orleans la .
The power of local listings can’t be understated, especially in Denver’s competitive landscape! Get started with guidance from Denver SEO .
Ginger Bistro has the best dumplings in town! If you’re near St Augustine or Palm Coast, make sure to stop by. Details here: Chinese near me .
I love how fresh everything tastes at Ginger Bistro. Definitely my go-to Chinese restaurant! Sushi near me
Wow, what an insightful in-depth article! It’s packed with useful information and tips! Discover more at b52club .
Progressiveheatingair.com came through when we needed them most—so grateful for their help last winter! Heater repair in San Diego
We did a Q4 set up with SunPower, aiming for 5-year ROI yet hitting yr 6 as a consequence of inverter replacements and a few shading problems renewable energy solar installations
I’m curious about how public transportation systems relate to overall roadway conditions; any insights? ##anyKeyword ## port alberni excavation
Wonderful tips! Find more at latest slot game reviews .
Các fan hâm mộ đá gà hãy cùng nhau bình luận về những chiến thắng ấn tượng nhất tại thomo nhé!!! Tìm hiểu thêm
This was a great help. Check out car hire for more.
The convenience of online tracking through Ship Vehicles San Antonio is a game changer for auto transport customers.
This was a wonderful post. Check out Reverse phone search for more.
Thanks for the informative content. More at abogado en Coruña .
Aggression in dogs can be so challenging to manage; I’m glad I found dog bite prevention training Gilbert AZ for training solutions in Gilbert.
Appreciate the useful tips. For more, visit tandarts in alphen a/d rijn .
I found this very interesting. For more, visit abogados laboralistas en Sevilla .
I can’t have confidence how low cost the tent leases are at wedding tent rental company Parma ! If you’re in Parma and desire a tent for any journey, here’s the area to move.
If you’re due to the fact a kitchen overhaul, Cleveland has some extremely good chances! I not too long ago discovered a appropriate aid for kitchen reworking guidelines. Check it out at General Contractor Cleveland OH .
For your entire trailer restoration necessities, seem no similarly than https://maps.google.com/maps?ll=41.419176,-81.805205&z=16&t=h&hl=en&gl=US&mapclient=embed&cid=1651885621243112627 ! Their cell provider makes it so straight forward to get aid for those who need it most.
Just had my space painted with the aid of an extraordinary painting contractor Stow in Stow. The transformation is unbelievable! Can’t wait to expose it off to mates and loved ones.
If you might be looking for the ideal in flooring contractor Sandusky , I surprisingly advise testing their features. They have a just right status in Sandusky for flooring installation!
Have you looked at the mind-blowing work from a native interior painter Parma ? Their consideration to aspect in advertisement painting is unequalled!
Thanks for the informative post. More at arnhem boekhoudkantoor .
Seriously considering getting that green roofing option discussed at la roof masters—seems like such an eco-friendly choice! roof repair
My experience with Progressive Heating & Air was top-notch; they repaired my heater quickly and efficiently. Heater repair in San Diego
betwinner cash out betwinner cash out .
The Glam House Nashville is the best beauty salon I’ve ever visited!
I always leave The Glam House Nashville feeling like a superstar.
If you’re searching for a beauty salon near me, check out The Glam House Nashville top-rated beauty salon Nashville
The troubleshooting guide was gold; such practical advice makes all the difference when dealing with repairs like these at home! Thanks, and I’ll check out emergency garage door repair !
Lavo Dental is fantastic! I had a dental emergency, and they were quick to assist.
Finding an emergency dentist near me was a breeze with Lavo Dental.
I can’t recommend Lavo Dental enough for emergency dentist services in Northridge, CA Lavo Dental urgent tooth repair
Colepepper Plumbing did an amazing job with my kitchen sink! Highly recommend this plumber in San Diego CA.
I found the best plumber near me thanks to Colepepper Plumbing. Excellent service and friendly staff licensed plumber San Diego CA
The Winslow is the best Rugby Bar I’ve ever visited! The atmosphere is unbeatable.
I love hanging out at The Winslow, the ultimate Rugby Bar Near Me.
The Winslow is my go-to spot for rugby matches. It’s the best Rugby Bar New York has to offer Rugby match locations NYC
My experience at Denver Pain Management Clinic was top-notch. The staff truly cares about their patients!
I highly recommend Denver Pain Management Clinic for anyone needing specialized care and attention pain management options Denver
If you’re looking to increase your business’s visibility in Parker, strategic investments in local SEO are essential—find out more at Denver SEO .
Świetny wpis o księgowości w Bydgoszczy! Dobrze, że są takie źródła dla lokalnych firm.
Biuro rachunkowe
Thank you for highlighting the significance of pothole repairs—it’s such a simple fix that can prevent accidents! port alberni excavation
Anyone know if there are discounts available on rides with Winter Garden car shippers #? Would love to save some money!
The magnitude of generic inspections are not able to be overstated! Guelph roofing deserves ideal care. roofing guelph
If you want top-quality service and repairs, choose Mauzy Cooling for your air conditioning needs. AC repair services in san diego
Thanks for the great tips. Discover more at casino slots you can play .
“Great information shared here! Really helps in making informed decisions when it comes to picking a clinic like San Diego Dental Implant.” Dental Implants in San Diego
This was quite informative. For more, visit abogado en Coruña .
Thanks to the speedy response from MR.Routing, I can finally use my sink again! Drain Repair in san diego
My dentist recommended George Georgaklis DDS for my root canal, and I’m so glad they did! Root Canal in San Diego
The White Glove Guys really live up to their name—top-tier service from ASI! Clog Removal in san diego
Appreciate the useful tips. For more, visit Reverse caller ID .
I had an incredible experience at the Dental Group of Beverly Hills! The best dentist I’ve ever visited!
If you’re looking for a dentist near me Dental Group of Beverly Hills dental bonding
I had a wonderful experience at Visual Eyes Optical Inc!
The eye doctor at Visual Eyes Optical Inc was incredibly helpful Stanhope NJ contact lens provider
This was highly educational. For more, visit alphen aan den rijn tandarts .
Kerner Law Group, P.C. has the best Yonkers car accident attorneys who truly care about your case!
I was so impressed by the professionalism of the Yonkers car accident lawyer at Kerner Law Group, P.C Uber accident lawyer Yonkers
Well done! Find more at abogado laboralista en Sevilla .
Fantastic advice! Knowing what to look for really helps in finding a trustworthy roofer in Horsham. Thanks! roofing near me
This was brilliant important! I’ve been gaining knowledge of spray foam treatments, and your article clarified a considerable number of my questions. I’ll stopover at spray foam insulation for added info!
Just shared my story about getting my roof done at la roof masters in los angeles with a friend, and now she’s thinking of going there too! Good vibes all around. roof repair contractors
I appreciated this post. Check out df999 for more.
Appreciate the comprehensive advice. For more, visit df999 .
Appreciate the detailed post. Find more at df999 .
This is quite enlightening. Check out nhà cái df999 for more.
Thanks for the thorough analysis. More info at arnhem boekhouding .
ProgressingHeating&Air took care of everything—I felt confident leaving them alone while they worked on restoring warmth inside our home again after it broke down unexpectedly last week due lack neglecting checks beforehand… Heater repair in San Diego
Your insights about safety features in garage doors are invaluable. I’ll make sure to get in touch with garage door opener repair for my repairs!
Love hearing positive stories from those who’ve benefited from their north gate chiropractors ; it’s encouraging ! # # any keyword # # Chiropractor Northgate
Does anyone know how the Puyallup Heat Pump compares to traditional heating systems? I’m trying to weigh the pros and cons before deciding what to do next. Puyallup AC installation
The weather in Puyallup can be tough on roofs, so regular maintenance is key! Puyallup roofing company
Thanks for the detailed post. Find more at pizza restaurant utrecht .
Thanks for breaking down how we can save money on roofs! Every dollar counts when living in El Monte, CA. roof replacement
The research you provided is invaluable; definitely putting money wise roofes at the top of my list when it comes time for repairs or replacements!! roofers near me
Glad to see such a detailed post about roofing choices—definitely considering La Habra Top Roofing now! roof shingles
Lokalna obsługa podatkowa i kadrowa to klucz do spokojnego biznesu. Dobrze mieć aktualne informacje o rynku usług księgowych.
Biuro rachunkowe
I never thought about the impact of dirty windows on indoor air quality. Interesting read! window cleaning
The less invasive the treatment, the better the recovery process seems—read up on it at Non-Invasive Treatment !
The technology behind non-invasive treatments is fascinating! It’s incredible to see how far we’ve come in medicine. More insights available at Orthopedics .
Since starting treatment, I’ve also paid more attention to ergonomics at work—definitely helps maintain what I’ve gained through adjustments!! # Car Accident Treatment
Wondering if dietary changes can complement physical therapies such as those offered by chiropractors??? # Non-Invasive Treatment
Can’t stress enough how critical it is to engage with your medical professional for holistic healing! Non-Invasive Treatment
It’s fascinating how technology enhances non-invasive injury treatments today! Discover more at Car Accident Doctor .
Open Wide La Jolla Dentistry provides exceptional dental care with a smile!
I had a fantastic experience at Open Wide La Jolla Dentistry, the best dentist near me!
The staff at Open Wide La Jolla Dentistry are truly friendly and professional La Jolla orthodontics
A strong social media presence paired with solid local SEO strategies can work wonders for Parker businesses! Get started with help from Marketing Agency near me .
Wonderful website you have here but I was wanting to know if you knew of any user discussion forums that cover the same topics
talked about in this article? I’d really like to be a part of online community where I
can get opinions from other knowledgeable individuals that share the same interest.
If you have any suggestions, please let me know. Appreciate
it!
Lavo Dental is fantastic! I had a dental emergency, and they were quick to assist.
Finding an emergency dentist near me was a breeze with Lavo Dental.
I can’t recommend Lavo Dental enough for emergency dentist services in Northridge, CA Lavo Dental broken tooth emergency
The Winslow is the best Rugby Bar I’ve ever visited! The atmosphere is unbeatable.
I love hanging out at The Winslow, the ultimate Rugby Bar Near Me.
The Winslow is my go-to spot for rugby matches. It’s the best Rugby Bar New York has to offer The Winslow New York rugby
Colepepper Plumbing did an amazing job with my kitchen sink! Highly recommend this plumber in San Diego CA.
I found the best plumber near me thanks to Colepepper Plumbing. Excellent service and friendly staff toilet repair San Diego CA
My experience at Denver Pain Management Clinic was top-notch. The staff truly cares about their patients!
I highly recommend Denver Pain Management Clinic for anyone needing specialized care and attention pain management reviews Denver CO
It’s fascinating how different countries approach their infrastructure challenges; we can learn so much from each other! road repair company near me
Thanks for the great tips. Discover more at abogado en A Coruña .
Hmm it appears like your website ate my first comment (it was super long) so I guess
I’ll just sum it up what I had written and say, I’m thoroughly enjoying your blog.
I too am an aspiring blog blogger but I’m still new to everything.
Do you have any points for inexperienced blog writers?
I’d definitely appreciate it.
I never theory about how lots insulation impacts a roof’s overall performance except now—widespread level! roofing in guelph
Great advice on using visuals to enhance listings! Don’t miss out on what we offer at real estate photography .
.. Exceptional service exceeds expectations every single instance keeping clients returning regularly ensuring lasting relationships formed within community overall!!! AC repair services in san diego
“Thanks to the amazing team at San Diego Dental Implant, I smile confidently again after receiving my new implant!” Dental Implants in San Diego
Can’t express gratitude enough towards everyone involved providing excellent service throughout process start finish !! Drain Repair in san diego
Appreciate the detailed information. For more, visit Reverse caller ID .
“Finding reliable plumbing services can be hard; I’m glad I found out about ASI.” Clog Removal in san diego
Hello my friend! I wish to say that this article is amazing,
great written and include approximately all vital infos.
I would like to look more posts like this
.
I had an incredible experience at the Dental Group of Beverly Hills! The best dentist I’ve ever visited!
If you’re looking for a dentist near me Dental Group of Beverly Hills braces
Fantastic post! Discover more at tandarts in alphen aan den rijn .
Thanks for the valuable insights. More at abogado laboralista Sevilla .
I had a wonderful experience at Visual Eyes Optical Inc!
The eye doctor at Visual Eyes Optical Inc was incredibly helpful Stanhope NJ eye clinic
This is such an important conversation ; I’m glad we’re discussing the value of local north gate chiropractors !! # # any keyword # # Car accident chiropractor
I appreciate the advice on troubleshooting common HVAC issues. If you’re in Puyallup and need a deeper dive into solutions, check out Puyallup AC installation .
Proudly showcasing our sparkling clean home thanks to # window cleaning
My neighbor had some issues after his DIY roofing attempt… He wishes he went with la roof masters instead! Lesson learned, right? Directions here if you want a pro touch: . roof repair
I’ve heard great things about the Puyallup roofing company’s customer service. Has anyone used them? Puyallup New Roof
Thanks for the useful post. More like this at arnhem boekhouder .
Because the admin of this web site is working,
no doubt very rapidly it will be renowned, due to its quality contents.
Lokalna obsługa podatkowa i kadrowa to klucz do spokojnego biznesu. Warto znać ceny i zakres usług w 2025 roku.
Biuro rachunkowe
รู้สึกว่าร้าน OMG OneMoreGlass มีเอกลักษณ์เฉพาะตัวจริงๆ นะครับ ร้านอาหารบรรยากาศดีมีดนตรีสาย1
Just wanted others to know about how wonderful my experience was with progressive heating and air Heater repair in San Diego
This was a wonderful post. Check out payday loans new orleans for more.
Nicely done! Find more at pizzeria utrecht .
Фурнитура для пластиковых https://furnitura-pvh-okon.ru окон обеспечивает удобство, герметичность и безопасность при эксплуатации. В ассортименте поворотные и поворотно-откидные механизмы, ручки, петли, запоры и ограничители.
It’s surprising how much energy savings can come from proper crawl space insulation! Thanks for the insights! home insulation Bold Seal Insulation
Thank you for demystifying the roofing process! It’s refreshing to find a blog that provides clear and actionable information. roofing companies near me
I can’t thank Baldwin Park Roofers enough for restoring my roof—it looks brand new now! tpo roofing
Thanks to real estate photographer , I felt like a model for a day! Their styling tips were invaluable.
Love this blog post! It’s great to see such valuable information about garage doors in one place. Visiting garage door service soon!
One consultation with my wonderful # # any Keyword# gave me peace of mind during such challenging times! Car Accident Lawyer
The team at # # anyKeyWord# # is friendly and efficient—you won’t regret hiring them! window cleaning
Thanks for the comprehensive read. Find more at rent a car toronto .
Just had another successful visit today; I always leave feeling empowered and rejuvenated!! # # anykeyword# # Orthopedics
If you’re hesitant about trying out chiropractic care, maybe consider scheduling just one consultation to see if it’s right for you? You might be surprised by the results like I was! ##anyKeyword ## Orthopedics
My experience with physical therapy led by an excellent Car Accident Treatment helped restore mobility after my crash!
The personalized care from my chiropractor makes all the difference; they genuinely care about their patients’ wellbeing. Car Accident Doctor
It’s important not only for physical healing but also psychological support—thankful for the role played by doctors post-accident! Orthopedics
This was quite useful. For more, visit abogados en Coruña .
Littleton’s thriving community thrives on connection; enhancing your online visibility allows better engagement—consult professionals at Advertising agency near me today!
The process of excavating can be complex, but it doesn’t have to be stressful when you have the right team from excavating company near me !
This was highly helpful. For more, visit Landline lookup .
Open Wide La Jolla Dentistry provides exceptional dental care with a smile!
I had a fantastic experience at Open Wide La Jolla Dentistry, the best dentist near me!
The staff at Open Wide La Jolla Dentistry are truly friendly and professional orthodontic services
Your tips on finding an effective chiropractor have definitely helped me narrow down my search; can’t wait to visit one in north gate ! # # any keyword # # Chiropractor Northgate
Thanks for the informative post! With winter around the corner, it’s time for Puyallup homeowners to prepare their HVAC systems. More tips can be found at Puyallup AC installation .
The Glam House Nashville is the best beauty salon I’ve ever visited!
I always leave The Glam House Nashville feeling like a superstar.
If you’re searching for a beauty salon near me, check out The Glam House Nashville Nashville beauty salon near me
The Winslow is the best Rugby Bar I’ve ever visited! The atmosphere is unbeatable.
I love hanging out at The Winslow, the ultimate Rugby Bar Near Me.
The Winslow is my go-to spot for rugby matches. It’s the best Rugby Bar New York has to offer Rugby sports events near me
Lavo Dental is fantastic! I had a dental emergency, and they were quick to assist.
Finding an emergency dentist near me was a breeze with Lavo Dental.
I can’t recommend Lavo Dental enough for emergency dentist services in Northridge, CA Dental emergency Northridge CA
My experience at Denver Pain Management Clinic was top-notch. The staff truly cares about their patients!
I highly recommend Denver Pain Management Clinic for anyone needing specialized care and attention best pain relief in Denver
Colepepper Plumbing did an amazing job with my kitchen sink! Highly recommend this plumber in San Diego CA.
I found the best plumber near me thanks to Colepepper Plumbing. Excellent service and friendly staff Colepepper Plumbing plumbing solutions
Just had an energy-efficient roof installed thanks to my awesome Puyallup roofing company—so excited about lower bills! Puyallup roofing company
I blog quite often and I really appreciate your content.
This article has truly peaked my interest.
I am going to bookmark your site and keep checking for new details about once a
week. I opted in for your RSS feed as well.
Thanks for the great explanation. More info at abogados laboralistas Sevilla .
If you’re struggling with an old AC unit, reach out to Mauzy for expert repairs! AC repair services in san diego
The staff at San Diego Dental Implant seem very knowledgeable! How do appointments usually go? Dental Implants in San Diego
Had a flat while running errands in Nashville, and the mobile tire repair team was there within minutes! flat tire
This was quite informative. More at alphen a/d rijn tandartspraktijk .
Just got my drains repaired by Mr. Rooter Plumbing – they are truly the best in San Diego! Drain Repair in san diego
After getting quotes from several companies, I’m leaning towards going with la roof masters—they seem legit and have solid reviews. roofing repair
Great customer service combined with impressive skills means I’ll never go anywhere else!” Root Canal in San Diego
Don’t waste time looking elsewhere when ASl provides such stellar service!” Clog Removal in san diego
Love the focus on creating inviting atmospheres through your photos; it’s essential for attracting buyers! real estate photographer
The before-and-after photos of my windows are incredible thanks to Lakeland Window Cleaning! window cleaning
I had an incredible experience at the Dental Group of Beverly Hills! The best dentist I’ve ever visited!
If you’re looking for a dentist near me Dental Group of Beverly Hills dental insurance
I had a wonderful experience at Visual Eyes Optical Inc!
The eye doctor at Visual Eyes Optical Inc was incredibly helpful Visual Eyes Optical Inc eye health tips
Kto prowadzi firmę w Bydgoszczy, ten wie, jak ważne jest wsparcie księgowe. Dobrze mieć aktualne informacje o rynku usług księgowych.
Biuro rachunkowe
Thanks for the thorough analysis. More info at boekhouding arnhem .
I am in fact grateful to the holder of this web page who has shared this fantastic
post at here.
What a comprehensive guide on fixing common garage door problems! Thank you, and looking forward to using spring garage doors !
Thanks for the useful post. More like this at pizza eten utrecht .
I appreciate the advice on troubleshooting common HVAC issues. If you’re in Puyallup and need a deeper dive into solutions, check out Puyallup AC installation .
Just had my heating system serviced by Progressive Heating & Air—what a difference it makes! Heater repair in San Diego
Just moved to the area and need recommendations for a great Northgate Chiropractor—help, please? Northgate Injury Chiropractor
Everyone loves what you guys tend to be up too.
This kind of clever work and reporting! Keep up the fantastic works guys
I’ve added you guys to blogroll.
Inspiring quest there. What happened after?
Thanks!
Definitely consider Bold Seal Insulation! I used them last year and my floors have been much warmer ever since. Hope this helps you make your decision! foam insulation
Local businesses like Armstrong Roofing make me feel good about supporting my community, especially with such high ratings! roofing near me
This was highly useful. For more, visit abogado en Coruña .
Have you ever thought about publishing an e-book or
guest authoring on other websites? I have a blog based on the same topics you discuss and would love to
have you share some stories/information. I know my audience would value your work.
If you are even remotely interested, feel free to shoot me an email.
I love that many Puyallup roofing companies offer warranties on their work! It gives peace of mind. New roof Puyallup
Rainbet redeem affiliate code ILBET Rainbet – это не просто онлайн-казино, это целая экосистема развлечений, где каждый игрок может найти что-то для себя. Промокод ILBET станет вашим проводником в этом мире, открывая доступ к эксклюзивным бонусам и акциям, разработанным для повышения вашего игрового опыта и увеличения шансов на успех.
“Your insights are spot on; many people overlook their windows until they’re really dirty; definitely leaning towards ### any Keyword###’s services soon!” window cleaning services
Impressed by the commitment and expertise of Seattle personal injury lawyers like those at birth injury lawyer . Their dedication to helping clients navigate legal challenges is truly admirable!
This is such valuable information! Real estate photo editing enhances first impressions. I recommend real estate photographer for this.
Excavation can be tricky; there are so many factors to consider. Glad to see such a detailed post! Check out excavation for more info.
I was amazed at how quickly I regained functionality thanks to the guidance of my #car accident doctor#! Accident Doctor
Have heard mixed reviews about certain techniques—is there a consensus on which methods are most effective?? # Orthopedics
“Your content continues inspiring countless individuals seeking answers outside conventional frameworks proving alternative routes exist offering hope amidst uncertainty today!”✨💫😊” Car Accident Treatment
Have you thought about how location-based keywords impact your Denver business? Consult with professionals at Local SEO Services to learn more!
These are in fact great ideas in regarding blogging.
You have touched some fastidious factors here. Any way keep up
wrinting.
This is a topic that is near to my heart… Take
care! Where are your contact details though?
Open Wide La Jolla Dentistry provides exceptional dental care with a smile!
I had a fantastic experience at Open Wide La Jolla Dentistry, the best dentist near me!
The staff at Open Wide La Jolla Dentistry are truly friendly and professional nearest dental clinic
The Winslow is the best Rugby Bar I’ve ever visited! The atmosphere is unbeatable.
I love hanging out at The Winslow, the ultimate Rugby Bar Near Me.
The Winslow is my go-to spot for rugby matches. It’s the best Rugby Bar New York has to offer Rugby enthusiasts bar NYC
Lavo Dental is fantastic! I had a dental emergency, and they were quick to assist.
Finding an emergency dentist near me was a breeze with Lavo Dental.
I can’t recommend Lavo Dental enough for emergency dentist services in Northridge, CA Where to go for a dental emergency in Northridge
Colepepper Plumbing did an amazing job with my kitchen sink! Highly recommend this plumber in San Diego CA.
I found the best plumber near me thanks to Colepepper Plumbing. Excellent service and friendly staff plumbing emergency services near me
My experience at Denver Pain Management Clinic was top-notch. The staff truly cares about their patients!
I highly recommend Denver Pain Management Clinic for anyone needing specialized care and attention pain management near Denver
Fajnie, że ktoś porusza temat biur rachunkowych w Bydgoszczy. Dobrze, że są takie źródła dla lokalnych firm.
Biuro rachunkowe
Great insights! Find more at tandarts alphen a/d rijn .
Crazy how much a new roof can change the entire look of your house! Just got mine done with la roof masters and it’s like night and day! roof repair contractors
Love the idea of mobile tire repair! No more waiting at the shop, especially in Nashville traffic! tire patch nashville
chicken road game 2025 Chicken Road: Взлеты и Падения на Пути к Успеху Chicken Road – это не просто развлечение, это обширный мир возможностей и тактики, где каждое решение может привести к невероятному взлету или полному краху. Игра, доступная как в сети, так и в виде приложения для мобильных устройств (Chicken Road apk), предлагает пользователям проверить свою фортуну и чутье на виртуальной “куриной тропе”. Суть Chicken Road заключается в преодолении сложного маршрута, полного ловушек и опасностей. С каждым успешно пройденным уровнем, награда растет, но и увеличивается шанс неудачи. Игроки могут загрузить Chicken Road game demo, чтобы оценить механику и особенности геймплея, прежде чем рисковать реальными деньгами.
When it comes to legal support after a car accident in San Diego, having skilled lawyers by your side can make all the difference accident law firm
Happy to share that I found a great company for AC repairs: Mauzy Cooling in San Diego. AC repair services in san diego
Helpful suggestions! For more, visit arnhem boekhoudkantoor .
I’ve been searching for a reliable Northgate Chiropractor and your blog has been incredibly helpful! Car accident chiropractor
Grateful this blog exists as a resource—it prompted me towards making an appointment at SDDentalImplant today! Dental Implants in San Diego
If you’re facing drainage issues in San Diego, Mr. Rooter Plumbing is the way to go! Their expertise is unmatched. Drain Repair in san diego
Just had a root canal at George Georgaklis DDS and it was surprisingly easy! Great staff too. Root Canal in San Diego
Does anyone know how the Puyallup Heat Pump compares to traditional heating systems? I’m trying to weigh the pros and cons before deciding what to do next. Puyallup AC installation
Love this post—it’s so helpful when dealing with plumbing problems like clogs; will remember to call ASI, The White Glove Guys if necessary. Clog Removal in san diego
Very helpful read. For similar content, visit HVAC contractor Delaware County .
“The method you shared sounds very practical—I’ll definitely implement it during my next clean.” window cleaning
Just finished my roof replacement project with a local Puyallup roofing company, and I’m thrilled with the results! New roof Puyallup
Impressive how motorcycle accident lawyer has shed light on the importance of seeking legal help after an injury in LA. Their expertise can truly make a difference for those in need!
Thanks for the helpful advice. Discover more at Work Horse Sports Performance .
Absolutely impressed with the content here! When it comes to navigating legal matters in Sacramento, having skilled personal injury lawyers on your side is key. Your site, personal injury attorney , seems like a valuable resource for those seeking expert advice.
“There’s no denying that quality images can make or break a sale; great examples here!” # # anyKeyWord ## real estate photographer
This was a wonderful guide. Check out utrecht in pizzeria for more.
This was quite useful. For more, visit real money no deposit pokies .
This was very enlightening. More at abogados en A Coruña .
Fantastic advice on preventing future mold growth—if you’re already experiencing problems, definitely check out what services are available at Mold Mitigation
The expertise of Portland personal injury lawyers is crucial when seeking justice for your case. If you’re looking for dedicated legal support, motorcycle accident attorney could be the right fit for you!
Impressed by how seamlessly police misconduct attorney handles personal injury cases in Fresno! Their expertise truly shows in the way they advocate for their clients.
Thanks for the informative content. More at 831 Movers west santa cruz .
Has anyone tried the maintenance services from Progressive Heating & Air? I’m curious about them. Heater repair in San Diego
I completely agree that high-quality videos attract buyers faster! For more info, visit image enhancement for real estate photos .
You’re right about spray foam being an excellent option for homes in Jackson Township! It really works wonders. Bold Seal Insulation contractors near me
This is so helpful! Understanding the importance of GAF certification makes me want to hire the right contractor from roofing companies near me .
I’ve always been a fan of minimalism in home decor. It really creates a calming environment. affordable kitchen design Tampa
Personal injury lawyers play such an important role after a car accident; they help victims get justice and compensation they deserve! Accident Lawyer
красное море температура воды
I think I’ve finally found “the one” when it comes to professional window washing: it’s definitelyLaklandWindowCleaning!!! # # any keyword # # window cleaning
I love learning about holistic health! A Northgate Chiropractor could really help me out. Northgate Injury Chiropractor
Bardzo pomocny przewodnik dla przedsiębiorców z Bydgoszczy. Dobrze, że są takie źródła dla lokalnych firm.
Biuro rachunkowe
Understanding how weather affects roads can lead to more informed maintenance schedules—great point made here! excavating company near me
Appreciate the comprehensive advice. For more, visit Workhorse Physical Conditioning .
Thanks for the informative post! With winter around the corner, it’s time for Puyallup homeowners to prepare their HVAC systems. More tips can be found at Puyallup HVAC .
Aerial views help set your listing apart—not only do they look fantastic but they also give potential buyers essential information about surrounding amenities!! # # anyKey word## real estate photography
I recommend finding a good Orthopedics to assist with your recovery journey after any vehicle collision.
“Thanks for highlighting the importance of follow-up appointments after braces are removed; they’re essential!” adult orthodontic treatment
Have you ever thought about installing a pot filler above your stove during a remodel? It’s such a practical addition! Learn more about functional features over on luxury residential design services !
Great insights! Find more at alphen a/d rijn tandartspraktijk .
I think investing in quality materials is crucial—my local Puyallup roofing company helped me choose wisely! Puyallup roofing company
My chiropractor also offers nutrition advice which has complemented my treatment perfectly! Love it! Car Accident Doctor
I appreciated this post. Check out movers for more.
Thanks for the great explanation. More info at office movers .
Just experienced my first mobile tire repair service in Nashville—so convenient and professional! tire patch nashville
This was highly educational. For more, visit boekhouder in arnhem .
This was very beneficial. For more, visit abogado en A Coruña .
Can’t wait until applying some newfound techniques learned here onto upcoming assignments soon—thank you once again kindly. high-quality drone photography for properties
If you’re looking for reliable AC repair services in San Diego, Mauzy Cooling, Heating, Plumbing, and Electrical is the way to go! They fixed my unit quickly, and the customer service was top-notch. AC repair services in san diego
The team at Riptide Furniture really knows how to take care of their customers. Great service and amazing products! Furniture store near me
The results of my dental implants are amazing! Thank you, San Diego Dental Implant, for your wonderful care! Dental Implants in San Diego
The impact of speeding on road safety cannot be overstated; slow down and save lives! Auto Accident
”Superb job all around; it’s evident why so many people sing praises regarding mr.rooters plumbing constantly!” Drain Repair in san diego
Shoutout to ASI for their thorough work on my clogged pipes—highly impressed! Clog Removal in san diego
This was quite useful. For more, visit loan agency new orleans .
The environment at George Georgaklis DDS is very calming—it helped reduce my anxiety about my upcoming root canal. Root Canal in San Diego
Thanks for the useful post. More like this at Workhorse Sports Performance .
This was beautifully organized. Discover more at utrecht in pizzeria .
Well done! Discover more at mobile NZ online pokies .
Just wanted to say that I’ve always had great experiences with Lakeland Window Cleaning—highly recommend them! window cleaning
This was highly informative. Check out HVAC technician Drexel Hill for more.
Your tips on finding an effective chiropractor have definitely helped me narrow down my search; can’t wait to visit one in north gate ! # # any keyword # # Chiropractor Northgate
truyện tranh
Truly inspiring work that sets new standards in showcasing properties for sale!!! ### anyKeywords### real estate photographer
The Rise of Vaping in Singapore: Not Just a Fad
In today’s fast-paced world, people are always looking for ways to unwind, relax, and enjoy the moment — and for many, vaping has become an essential part of their routine . In Singapore, where modern life moves quickly, the rise of vaping culture has brought with it a unique form of downtime . It’s not just about the devices or the clouds of vapor — it’s about flavor, convenience, and finding your own vibe.
Disposable Vapes: Simple, Smooth, Ready to Go
Let’s face it — nobody wants to deal with complicated setups all the time. That’s where disposable vapes shine. They’re perfect for busy individuals who still want that satisfying hit without the hassle of charging, refilling, or replacing parts.
Popular models like the VAPETAPE UNPLUG / OFFGRID, LANA ULTRA II, and SNOWWOLF SMART HD offer thousands of puffs in one easy-to-use device. Whether you’re out for the day or just need something quick and easy, these disposables have got your back.
New Arrivals: Fresh Gear, Fresh Experience
The best part about being into vaping? There’s always something new around the corner. The latest releases like the ELFBAR ICE KING and ALADDIN ENJOY PRO MAX bring something different to the table — whether it’s enhanced user experience.
The ELFBAR RAYA D2 is another standout, offering more than just puff count — it comes with adjustable airflow , so you can really make it your own.
Bundles: Smart Choices for Regular Vapers
If you vape often, buying in bulk just makes sense. Combo packs like the VAPETAPE OFFGRID COMBO or the LANA BAR 10 PCS COMBO aren’t just practical — they’re also a great value choice. No more running out at the worst time, and you save a bit while you’re at it.
Flavors That Speak to You
At the end of the day, it’s all about taste. Some days you want something icy and refreshing from the Cold Series, other times you’re craving the smooth, mellow vibes of the Smooth Series. Then there are those sweet cravings — and trust us, the Sweet Series delivers.
Prefer the classic richness of tobacco? There’s a whole series for that too. And if you’re trying to cut back on nicotine, the Pure Flavor Collection gives you all the flavor without the buzz.
Final Thoughts
Vaping in Singapore isn’t just a passing trend — it’s a lifestyle choice for many. With so many options available, from pocket-sized disposables to customizable devices, there’s something for everyone. Whether you’re new to the scene , or a long-time fan, the experience is all about what feels right to you — made personal for you.
If you’re experiencing inconsistent heating or strange noises from your furnace, it might be time for a replacement. Don’t wait until it’s too late! Check out HVAC Puyallup for expert advice and tips on making the right choice.
This was quite informative. For more, visit car hire .
Z własnego doświadczenia wiem, że porządne biuro rachunkowe robi różnicę – dobrze, że powstają takie przewodniki.
Biuro rachunkowe
Крыша на балкон Балкон, прежде всего, – это открытое пространство, связующее звено между уютом квартиры и бескрайним внешним миром. Однако его беззащитность перед капризами погоды порой превращает это преимущество в существенный недостаток. Дождь, снег, палящее солнце – все это способно причинить немало хлопот, лишая возможности комфортно проводить время на балконе, а также нанося ущерб отделке и мебели. Именно здесь на помощь приходит крыша на балкон – надежная защита и гарантия комфорта в любое время года.
Appreciate the detailed insights. For more, visit santa cruz movers .
I can’t believe how quickly my new roof was installed by a local Puyallup roofing company! So impressed! Puyallup New Roof
It’s so important to choose the right roofing company. La Habra Top Roofing stands out for their quality work! roofing contractors near me
Thanks for shedding light on this topic! I’ll remember to visit spray foam insulation when it’s time for my attic insulation project.
Finally, a resource that lays out what to expect! This information is invaluable for anyone looking to get their roof done. Thank you! roofing near me Armstrong Roofing LLC
roobet promotional code WEB3 В мире онлайн-казино инновации не стоят на месте, и Roobet находится в авангарде этих перемен. С появлением технологии Web3, Roobet предлагает игрокам новый уровень прозрачности, безопасности и децентрализации. Чтобы воспользоваться всеми преимуществами этой передовой платформы, используйте промокод WEB3.
Wonderful tips! Discover more at Workhorse Sports Performance .
The use of angles and perspectives by Golden State Visions is commendable in their edits! real estate aerial images
I wouldn’t trust anyone else with my window cleaning needs–LaklandWindowCleaning will forever have my loyalty!! # # any keyword # # window cleaning services
Does anyone else feel overwhelmed after an accident? Resources like Truck Accident Lawyer help simplify the process.
This was very enlightening. For more, visit tandartspraktijk alphen aan den rijn .
This was highly useful. For more, visit abogado en A Coruña .
Just got my tire fixed at home in Nashville—what a relief! Thanks to mobile tire repair services! tire patch nashville
I recommend finding a good Car Accident Doctor to assist with your recovery journey after any vehicle collision.
I can’t get over how much detail is captured through aerial lenses; it really highlights everything unique about each property!! # # anyKey word## real estate photography
This was a great article. Check out movers and packers for more.
Great insights! Discover more at https://maps.app.goo.gl/kwwphPb9bQCWyxcTA .
I liked this article. For additional info, visit movers and packers .
Thank you for breaking down the benefits of chiropractic care; it’s pushing me towards finding a Northgate Chiropractor! Northgate Injury Chiropractor
Appreciate the detailed post. Find more at arnhem boekhouding .
Every piece of furniture I’ve bought from Riptide has exceeded my expectations! Highly recommend stopping by or visiting their site at Furniture store .
Great insights! Find more at almere juwelier .
It’s crucial to find a reliable contractor for furnace replacement. A professional installation can make all the difference in performance and longevity. I found some great resources at HVAC Puyallup that helped me choose wisely.
Thanks for the insightful write-up. More like this at Work Horse Sports Performance .
Appreciate the comprehensive advice. For more, visit pizzeria utrecht .
I’m thinking about a roof upgrade and would love advice from someone who has worked with a Puyallup roofing company. Puyallup roofing company
Thanks for the valuable insights. More at popular free online pokies NZ .
Lokalna obsługa podatkowa i kadrowa to klucz do spokojnego biznesu. Dobrze mieć aktualne informacje o rynku usług księgowych.
Biuro rachunkowe
“Love how organized this post is; clear instructions make all the difference when tackling window cleaning; also love working with ### any Keyword###!” window cleaning
I love how you showcase the unique designs of California’s buildings. Your work is inspiring! property marketing photography
Considering adding more natural light to your basement? An ###egress window installer near me### from # egress covers # can help!
Being proactive helps mitigate potential obstacles encountered along way while ensuring items arrive safely/securely into desired locations as promised before shipments were initiated . # # anyKeyWord ## Winter Garden vehicle shippers
This article really opened my eyes to the potential of real estate videos! For deeper insights, visit real estate photographer .
Great insights! Discover more at 831 Movers west santa cruz .
Finding a reliable contractor can be tough; your tips are going to help me a lot in my search! insulation contractor Bold Seal Insulation
Thank you for sharing this valuable content! Your insights on roof repairs are just what I needed while searching online—checking out roofing companies close to me now!
Pronto Plumbing mounted our new system swiftly and successfully. They were educated, responding to all of our questions and client dealing with our pet dogs and kid. Instantly registered for membership instantly plumbing near me
Love hearing positive stories from those who’ve benefited from their north gate chiropractors ; it’s encouraging ! # # any keyword # # Car accident chiropractor
Appreciate the detailed information. For more, visit Workhorse Sports Perfomance .
Searching for non-surgical alternatives led me to discover fantastic options at Aesthetic Clinic Marylebone !
Appreciate the comprehensive advice. For more, visit abogados en A Coruña .
This was quite informative. For more, visit tandartspraktijk alphen a/d rijn .
Duct cleaning is often overlooked, but it’s essential for maintaining a healthy home environment. I’ve been reading about the benefits, especially in the Puyallup area where allergens can be a problem Puyallup AC installation
Дамски блузи с асиметричен дизайн за модерен силует
елегантни дамски блузи https://www.bluzi-damski.com/ .
Just used a mobile tire repair service in Nashville and it was quick and affordable. Highly recommend! tire patch
I’ve heard great things about the Puyallup roofing company’s customer service. Has anyone used them? Puyallup New Roof
Such an engaging read—now I’m motivated to get my pipes checked by ### anyKeyword###! Medford emergency hot water heater repair
This was highly helpful. For more, visit long distance movers .
Thanks for the insightful write-up. More like this at Local movers .
I’ve always been a fan of minimalism in home decor. It really creates a calming environment. affordable modern interior design Tampa
This blog has opened my eyes to the significance of high-quality real estate photography. For more, check out real estate photography !
True Balance Pain Relief Clinic & Sports Massage offers the best sports massage I’ve ever experienced!
I always leave True Balance Pain Relief Clinic & Sports Massage feeling refreshed and rejuvenated Denver muscle therapy
Riptide Furniture has transformed my living space into something beautiful with their stylish offerings! Love this store! Furniture store
If you haven’t visited a chiropractor yet, you’re missing out on a great way to improve your overall health. Car Accident Doctor
So glad I found this post before my appointment; it calmed my nerves significantly!” ### any Keyword ## Invisalign for teens
Embracing non-invasive methods allows individuals to take charge of their health journey without compromising safety—what an empowering choice that is! Let’s chat more about it over on my site: Car Accident Doctor
Kto prowadzi firmę w Bydgoszczy, ten wie, jak ważne jest wsparcie księgowe. Dobrze mieć aktualne informacje o rynku usług księgowych.
Biuro rachunkowe
A good relationship with your #car accident doctor# can enhance your healing process tremendously! Non-Invasive Treatment
Clearly presented. Discover more at boekhoudkantoor in arnhem .
Mixing patterns can be tricky but rewarding when done right! What’s your favorite pattern combination? Get tips on mixing patterns at professional interior design Tampa !
Very informative article. For similar content, visit achieving peak performance .
This was very beneficial. For more, visit new pokies NZ .
Thanks for the comprehensive read. Find more at almere juwelier .
I’m curious approximately the quotes linked to hiring specialists like VetCor—is it well worth it? Mold Removal
Appreciate the comprehensive advice. For more, visit pizza bestellen utrecht .
Truly appreciate how approachable yet informative content remains across platforms such as# # anyKeyWord ### Car Accident
Just found a great Northgate Chiropractor who specializes in sports injuries! So excited! Chiropractor Northgate
My experience with ####basement entrances#### has dramatically improved after working with ## custom egress window covers ##; they truly know their craft.
The value of correct insulation in HVAC systems can’t be overstated. More information at HVAC contractor Delaware County !
Can anyone share tips on maintaining a Puyallup Heat Pump? I want to ensure it lasts as long as possible. Thanks in advance! Puyallup AC installation
What are the best materials to use for roofs in the Puyallup area? Looking for advice! Roofer
This was very beneficial. For more, visit 831 movers in santa cruz .
Trustworthy home service providers are hard to come by! Happy to have found your article and will explore insulation near me .
Valuable information! Find more at Workhorse Sports Performance .
Yesterday, I had a flat tire and was struggling to find help. Mobile tire repair saved the day in Nashville! mobile tire repair & car battery
Love this article! It’s just what I needed while searching for “roof repair near me.” Thanks again—I’ll be checking out roofing contractors near me shortly!
This was a fantastic read. Check out elektricien in leiden for more.
Lokalna obsługa podatkowa i kadrowa to klucz do spokojnego biznesu. Dzięki za takie opracowania – pomagają w codziennym prowadzeniu firmy.
Biuro rachunkowe
Your expertise in handling car accident cases in San Diego is truly impressive. I can see why people would trust truck accident lawyer for professional legal help during such challenging times.
The team at Riptide Furniture really knows how to take care of their customers. Great service and amazing products! Furniture store near me
Wow, the expertise of Los Angeles personal injury lawyers is impressive. Their dedication to personal injury lawyer shines through in every case they handle.
I’ve learned so much just by following your posts on floor care and maintenance—thank you for sharing your expertise! commercial office floor restoration
Great tips! For more, visit commercial movers scotts valley .
Never underestimate the importance of having an experienced Truck Accident Lawyer in your corner after an auto accident!
Thanks for the great tips. Discover more at fremont movers .
It’s crucial to understand your rights after an injury. This blog provides great information on navigating Salt Lake Injury Law. salt lake injury law
This post has motivated me to look for a local Medford emergency drain cleaning service before anything goes wrong.
The testimonials on Aesthetic Clinic Marylebone ‘s site are so motivating! It’s great to hear real-life experiences with surgical facial rejuvenation.
Having a reliable team of Sacramento personal injury lawyers like the ones at car accident law firm by your side can make all the difference in ensuring fair compensation and protection of your rights
I appreciated this post. Check out Work Horse Sports Performance for more.
Can anyone share their experience with pediatric chiropractors? I’m considering taking my child for an evaluation. Car Accident Doctor
Can anyone share their experience with pediatric chiropractors? I’m considering taking my child for an evaluation. Non-Invasive Treatment
Thinking ahead towards seasonal changes ahead: any preventive measures discussed previously worth revisiting now? Car Accident Treatment
I appreciate when practitioners explain why certain techniques are used—it helps demystify the process while building trust between us. Non-Invasive Treatment
This was highly educational. More at arnhem boekhouder .
Incorporating stretches suggested post-treatment has yielded incredible results over time—what surprises await next! Non-Invasive Treatment
Great insights! Discover more at payday loans new orleans .
Appreciate the insightful article. Find more at df999 .
I enjoyed this post. For additional info, visit nhà cái df999 .
Thanks for the great content. More at df999 .
Since starting treatment, I’ve also paid more attention to ergonomics at work—definitely helps maintain what I’ve gained through adjustments!! # Orthopedics
This was highly educational. More at df999 .
Thanks for the useful suggestions. Discover more at almere juwelier .
Considering the complexities of personal injury cases, having reliable legal support like those offered by Portland personal injury lawyers is crucial. They can provide the expertise needed to navigate through legal processes seamlessly accident attorney
I recently had an ##egress window installation## in my basement, and it’s made such a difference! Highly recommend looking into it. For those in need, check out egress window installation near me for expert installers.
Your website on personal injury attorney presents valuable insights into the importance of having Fresno personal injury lawyers by your side for legal support
This was highly useful. For more, visit pizzeria utrecht .
I just lately used a car or truck elimination service in Conroe, TX, and it used to be a breeze! If you want short dollars in your previous auto, discuss with https://www.google.com/maps?cid=3022649263977563990 for greater details.
For each person in Fort Myers FL trying to take away an vintage car or truck, I are not able to put forward Car Removal Service Fort Myers FL satisfactory! Quick, uncomplicated, and earnings in hand!
Living in Richardson, I can’t rigidity satisfactory how simple a Emergency Auto Repair Richardson tx is for busy workers like me. It’s best for on-the-cross upkeep after you need them most!
Many people underestimate the importance of seat belts until it’s too late. Always buckle up! Accident Lawyer
Very informative article. For similar content, visit car locksmith .
Well done! Find more at car hire toronto .
What’s the best way to ensure your belongings arrive safely when using a Jamaican moving company? Any tips? Jamaica international movers
Appreciate the helpful advice. For more, visit HVAC company .
Well done! Find more at Workhorse Sports Perfomance .
Well done! Find more at 831 Movers west santa cruz .
Home insulation is so important, yet finding a trustworthy company can feel impossible. Glad you mentioned wall insulation Bold Seal Insulation !
Thanks for detailing the steps involved in filing a claim; it really helps to simplify what can be a daunting process under Salt Lake Injury Law! Salt Lake Injury Lawyer
Just got my tire fixed at home in Nashville—what a relief! Thanks to mobile tire repair services! tire repair
Just wanted to take a moment and acknowledge how much better things are since working with BlckPanda Creative Dallas; they really know how to get your site ranked higher on Google—details here: seo services !
Awesome content! I often wondered how to differentiate roofing companies, and now I know certifications are vital. Looking forward to more from roofer near me Armstrong Roofing LLC !
Don’t fail to remember calling ##Leak Detection gurus Perth## should you suspect a leak; they’ll in finding it for convinced! Leak Detection service Perth
Мир полон тайн https://phenoma.ru читайте статьи о малоизученных феноменах, которые ставят науку в тупик. Аномальные явления, редкие болезни, загадки космоса и сознания. Доступно, интересно, с научным подходом.
engineer resume builder resume for engineering students with no experience
I had a wonderful shopping experience at Riptide Furniture last week! Their attentive service made all the difference in finding what I wanted. See more at Furniture store .
Читайте о необычном http://phenoma.ru научно-популярные статьи о феноменах, которые до сих пор не имеют однозначных объяснений. Психология, физика, биология, космос — самые интересные загадки в одном разделе.
Thanks for the detailed post. Find more at elektricien leiden .
This is highly informative. Check out Local movers for more.
Thanks for sharing your knowledge on plumbing care; it’s great to have options like 24 hour plumber Medford available!
Knowledge around first aid techniques should be widely disseminated since they could potentially save someone’s life amidst chaotic scenes post-collision!!! #anythingKeyWord # Car Accident Lawyer
BlckPanda Creative Dallas worked wonders for my business! My Google ranking improved significantly, leading to increased sales. Check out my journey at seo agency .
Клининг в новостройках и после ремонта — чистим до блеска
сайт клининга https://kliningovaya-kompaniya0.ru .
Anyone considering installing #window well covers#, make sure to check out the options available at #anyKeyword#! egress window installation
Clearly presented. Discover more at juwelier almere .
I found solace in knowing that my dedicated Non-Invasive Treatment was there every step of the way after my injury.
I’m amazed at how quickly I felt improvements after starting chiropractic treatments; it’s like magic for your body! Non-Invasive Treatment
Here’s hoping we continue seeing advancements focused on improving quality-of-care while minimizing risks associated with invasive practices!!!🚀💕👏 Non-Invasive Treatment
Just visited my Non-Invasive Treatment after an accident, and they were incredibly helpful and understanding!
”Such important work being done ensure everyone aware they have choices transforming lives positively through understanding what exists beyond conventional norms!”🕵️♀️📚💞” Non-Invasive Treatment
I enjoyed this article. Check out año escolar Irlanda for more.
This was highly educational. More at contadores Saltillo .
Truly grateful for the work of dedicated Car Accident Doctor who specialize in post-accident care!
Appreciate the detailed insights. For more, visit pizza in utrecht .
For those who’ve had surgeries at Aesthetic Clinic Marylebone , how long did it take before you saw full results?
Thanks for detailing the steps involved in filing a claim; it really helps to simplify what can be a daunting process under Salt Lake Injury Law! salt lake injury law
pinco Pinco, Pinco AZ, Pinco Casino, Pinco Kazino, Pinco Casino AZ, Pinco Casino Azerbaijan, Pinco Azerbaycan, Pinco Gazino Casino, Pinco Pinco Promo Code, Pinco Cazino, Pinco Bet, Pinco Yukl?, Pinco Az?rbaycan, Pinco Casino Giris, Pinco Yukle, Pinco Giris, Pinco APK, Pin Co, Pin Co Casino, Pin-Co Casino. Онлайн-платформа Pinco, включая варианты Pinco AZ, Pinco Casino и Pinco Kazino, предлагает азартные игры в Азербайджане, также известная как Pinco Azerbaycan и Pinco Gazino Casino. Pinco предоставляет промокоды, а также варианты, такие как Pinco Cazino и Pinco Bet. Пользователи могут загрузить приложение Pinco (Pinco Yukl?, Pinco Yukle) для доступа к Pinco Az?rbaycan и Pinco Casino Giris. Pinco Giris доступен через Pinco APK. Pin Co и Pin-Co Casino — это связанные термины.
What a fantastic resource this article is, especially when it comes to understanding costs involved!” ##any Keyword ## types of orthodontic treatments
parimatch referral code parimatch referral code .
I was pleasantly surprised at how quickly Grenada hills roofing solutions completed our roof repair—great service overall tpo roofing
My experience with BlckPanda Creative Dallas has been nothing short of amazing! My website’s Google ranking improved tremendously, and my business is thriving. Discover more at seo services .
I found this very interesting. For more, visit Santa cruz 831 movers .
Have you ever tried using mirrors to make a small space feel larger? It works wonders! luxury interior design Florida
Incorporating cultural artifacts into decor tells wonderful stories—how do you showcase yours? Share cultural inspirations through decor over on best interior designers in Florida !
The discussion established below bordering air cleansers acts as critical due persistance given current wellness worries dealt with around the world! ### eniyeKro ###. HVAC technician Drexel Hill
The before-and-after footage from Window Cleaning Service are fantastic! Can’t wait to e-book my own.
Mold can wreak havoc on your health and home! I suggest checking out Mold Remediation for effective mold remediation services in Sarasota.
My **### anyKeyword ###** fought tirelessly for me; I can’t thank them enough for their dedication! Auto Accident
I appreciated this post. Check out elektricien leiden for more.
Just had an excellent experience with mobile tire repair while stranded at home in Nashville—so grateful for this service! tire patch
Found some amazing deals at Riptide Home Furniture, making it easier to furnish my entire house beautifully! Furniture store near me
This blog is packed with useful information for anyone considering roof work! Thank you for making it so accessible and easy to understand! roofing companies
If you want to boost your Google ranking like I did, BlckPanda Creative Dallas is the way to go! My business has never been better. Visit seo for more details.
Learning historical context behind particular species encourages greater appreciation-developing sense responsibilities embedded within heritage passed down generation-to-generation-sharing discoveries made along paths traveled together through tree removal west palm beach
Thanks for the informative content. More at año escolar en Irlanda .
This was a wonderful post. Check out commercial movers scotts valley for more.
This was quite informative. More at contador Saltillo .
I found this very interesting. Check out fremont movers for more.
Customizing your ###window well covers### can really enhance your home’s look while providing safety. Highly recommend checking out options at # egress window company #!
Thanks for the helpful article. More like this at almere juwelier .
Sharing personal stories about car accidents can help raise awareness and promote safer driving habits among others! Car Accident Lawyer
Impressed by the comprehensive services your firm offers in handling personal injury cases, especially in Fresno. It’s crucial to have skilled car accident attorney like yours for legal support during such challenging times.
Appreciate the detailed insights. For more, visit pizzeria utrecht .
Chiropractic care is not just for back pain; it can help with headaches and other issues too! Car Accident Doctor
Kudos on crafting such an informative piece addressing key considerations while weighing different treatment modalities available beyond surgeries!!!👏❤️✨ Car Accident Treatment
I recently explored various Accident Doctor and was amazed at the results! Non-surgical options can be life-changing.
Always prioritize your health and visit a Orthopedics if you’re involved in any kind of car crash!
I found relief from chronic pain thanks to my chiropractor! It’s life-changing. Car Accident Doctor
I’m curious about the long-term effectiveness of non-surgical options like these. Anyone have personal experiences? Car Accident Doctor
Every story shared about successful restorations encourages others not just locally but across communities worldwide. cleaning and polishing floors
Ever since we began working together, our rankings on Google’s search pages have skyrocketed thanks to all of the hard work put forth by those talented minds over at BlckPanda Creative Dallas—details here: seo agency !
After seeing friends’ fantastic results from Aesthetic Clinic London , I’m seriously considering a consultation for myself!
Impressed by their knowledge & professionalism throughout every session—check out ***americanlaser med spa-el paso*** today!!!!! ### anyoneKeyWord# CoolSculpting clinic
Looking for a safe and effective way to achieve your body goals? CoolSculpting is the answer! Head over to CoolSculpting and be inspired by the transformative results.
Really inspired with the professionalism proven through ###at any keyword### for the time of my periods! CoolSculpting Clinic
Considering the importance of expert advice in legal matters, seeking assistance from birth injury lawyer can bring peace of mind during challenging times
Thanks for the clear advice. More at 831 Movers west santa cruz .
Flat tires are a hassle, but mobile tire repair makes it so much easier to handle in Nashville! tire patch nashville
I appreciated this post. Check out elektricien leiden for more.
Fantastic post! Discover more at año escolar en Irlanda .
Can’t recommend Riptide Furniture enough – they have elevated my home decor with their stunning pieces! Furniture store
Appreciate the thorough write-up. Find more at contador Saltillo .
Fantastic read! With rising energy costs, it’s crucial to pay attention to home insulation. These tips are just what we need! attic insulation
I had no idea about subrogation until I read about it on ##anyKeyword#*! Auto Accident Lawyer
I’d be interested in seeing if they offer workshops or educational resources related to construction!” Bathroom Remodel
I’m curious, how did you find your current insurance agent—was it through referrals or online searches? farm insurance
This was quite informative. More at movers .
What a journey it’s been since I partnered with BlckPanda Creative Dallas; they’ve helped me achieve an impressive rank on Google that brought in tons of new customers! More info: seo agency !
So glad I found this article! Garage doors deserve proper care and maintenance, and I’m eager to learn from garage door service .
Appreciate the thorough write-up. Find more at movers .
This was very enlightening. For more, visit almere juwelier .
Can you recommend any specific technicians at CoolSculpting clinic for laser hair removal?
Looking for CoolSculpting options near you in Corpus Christi? Discover the exceptional services offered by CoolSculpting Services and be amazed by the results.
Remember: always trust instincts guiding decisions made regarding welfare personal well-being because nothing compares feeling secure knowing competent voices await eager assist whenever called upon bestow wisdom gained years experience accumulated Motorcycle Accident Lawyer
CoolSculpting in Amarillo Texas is the best investment I’ve made for my body and confidence. CoolSculpting Clinic
If discomfort arises during daily activities despite efforts made—don’t hesitate reaching out towards professionals specializing within this field!! Orthopedics
I never knew there were so many ways to approach treatment without surgery—this is fantastic info to share with friends and family! Orthopedics
Chiropractic care has truly changed my perspective on health and wellness—thank you all! Car Accident Doctor
Such valuable insights provided throughout post serve remind us take charge responsibilities over preventing unwanted damages accordingly!!!# # anyKeyWord ## surrey roof survey
Trusting your instincts and consulting with a Car Accident Treatment is vital for proper treatment following an auto incident.
It’s surprising how many people neglect to visit a medical professional after minor accidents—don’t make that mistake! Car Accident Doctor
Non-invasive techniques can drastically change the standard of care in injury treatment—visit Car Accident Treatment !
The craftsmanship from Banning Construction Inc.is inspirational—definitely worth exploring their website: Bathroom Remodel !
Профессиональный сервисный центр по ремонту Apple iPhone в Москве.
Мы предлагаем: ремонт телефонов айфон в москве адреса
Наши мастера оперативно устранят неисправности вашего устройства в сервисе или с выездом на дом!
Affordable and stunning photography? Yes, please – thank you, Golden State Visions! professional video walkthrough for properties
This was quite informative. More at año escolar Irlanda .
I found this very interesting. Check out contador en Saltillo for more.
Thanks for shedding light on how often one should visit an orthodontist during treatment—it’s good to know what to expect! Scottish dental care
The improvement I’ve seen after partnering up with the remarkable team from BrackPandCreativeDallas has made all the difference when it comes down boosting our site’s performance across various platforms—check them out here: seo company !
“Big thumbs up for # # any Keyword ###; they took care of everything wonderfully!” qualified property photographers
Helpful suggestions! For more, visit elektricien in leiden .
Textured walls can add so much character to a home! Have you ever tried any DIY wall treatments? Explore ideas at Florida interior design firms .
With the help of Fresno personal injury lawyers, your journey to seeking justice just got a whole lot easier! Check out car accident attorney and see how they can support you through these challenging times.
Every piece I’ve purchased from Riptide Furniture has been a wonderful addition to my home—I can’t recommend them enough for anyone looking for quality furniture in St Johns County—check them out here: Furniture store !
Your advice on decluttering before redesigning is spot on—less truly is more! luxury home interiors
The customer service at Aesthetic Clinic Marylebone is top-notch! They made my inquiry into surgical facial rejuvenation so easy.
– Has anyone experienced significant changes in skin texture after treatments from #ANYKEYWORD#? CoolSculpting services
Your health should be your priority; let a reliable Auto Accident Lawyer manage the legal side of things for you.
This is a great resource for anyone dealing with garage door problems. I can’t wait to explore more at spring garage doors !
Anyone else feel nervous before their first treatment? I’d love to share soothing tips that helped me through mine over on: # anykeyword# CoolSculpting
รู้สึกว่าร้าน OMG OneMoreGlass มีเอกลักษณ์เฉพาะตัวจริงๆ นะครับ ผับแอนเรสเตอรองท์ ใกล้ฉัน
This is perfect timing as I’m planning my home office makeover! Additional resources are available at Additional info .
The science behind Coolsculpting sounds impressive! It’s amazing what technology can do today! Discover more at CoolSculpting .
Nicely done! Find more at juwelier in almere .
The increase in my Google ranking since partnering with BlckPanda Creative Dallas is incredible! Business growth has followed suit—highly recommend them! Visit seo agency .
Both residential and commercial clients rave about their experiences with banning construction inc—it’s easy to see why!. # # anykeyword # Bathroom Remodel
Fantastic information here! Money Wise Roofers in Santa Fe Springs sounds like they could help with my roofing project! roofing contractors near me
Thanks for the detailed guidance. More at Santa cruz 831 movers .
Thanks to their expert touch, my social media feed looks more vibrant than ever!!! creative virtual staging services
Gratefulness expressed cannot fully capture sense relief bestowed upon communities benefiting greatly because presence established earlier via conscientious crews associated directly connected toward # a n y K e y W o r d#. certified roofers Surrey
Mold can wreak havoc on your health and home! I suggest checking out Mold Mitigation Sarasota for effective mold remediation services in Sarasota.
This was a wonderful post. Check out progressive jackpot slots for more.
Appreciate the helpful advice. For more, visit año escolar en Irlanda .
หากคุณไม่เคยไปที่ OMG ONE MORE GLASS SAI1 ถือว่าพลาดมากๆ ค่ะ ร้านชิลสาย1 ดนตรีเพราะ
Explaining challenges faced regarding wildfires emphasizes proactive measures taken across regions-making sure everyone stays educated along pathways outlined via ## tree removal west palm beach
Wonderful tips! Discover more at contadores Saltillo .
Always exchange information after an accident; it can save you a lot of trouble later! Motorcycle Accident Lawyer
Keep championing this important aspect of real estate marketing—you’re doing great things here. 360-degree aerial real estate photography
I’ve always believed that education is key to preventing car accidents, so I appreciate sites like Accident Lawyer for raising awareness!
I appreciate how you’ve demystified the process behind what goes into professional-grade restorations. experienced flooring contractor
“Can’t believe how effective #Coolsculpting has been for friends who visited #AmericanLaserMedSpaElPaso!” CoolSculpting services
This was a fantastic read. Check out commercial movers scotts valley for more.
Thanks for the clear breakdown. Find more at movers and packers .
If you want results like mine, trust BlckPanda Creative Dallas! They really know how to enhance your Google presence and boost sales significantly. Details at seo .
Great job! Discover more at elektricien leiden .
Seriously, if you haven’t been to Riptide Furniture yet, you’re missing out on some fantastic finds; so happy with what I’ve purchased there—more info: Furniture store near me !
Baldwin Park Roofers provided excellent service from start to finish. They really know their stuff! roof tiling
If you’re looking for affordable roofing solutions, look no further than Best Rate Roofing of Fullerton! roofing companies near me
Ready to feel more confident in your own skin? Corpus Christi CoolsSculpting can help you achieve just that! CoolSculpting
”I hope other contractors follow Baning’s lead when it comes to customer service!” %%ANYKEYWORD%% Bathroom Remodel
скачать тик ток мод версия 2025 Мир мобильных приложений не стоит на месте, и Тик Ток продолжает оставаться одной из самых популярных платформ для создания и обмена короткими видео. Но что, если стандартной функциональности вам недостаточно? На помощь приходит Тик Ток Мод – модифицированная версия приложения, открывающая доступ к расширенным возможностям и эксклюзивным функциям.
I feel empowered knowing that there’s support available through ## CoolSculpting Clinic
“Fantastic presentation of spaces through stunning imagery—you do wonders with every shootCongrats toGoldenStateVisons ; explore their offerings: # # anyKeyWord #!” best real estate photo editing services
Auto accident laws vary by state; consult with a local expert who knows the ins and outs of your specific situation! Car Accident
Combining drone photography with virtual tours offers an immersive experience for buyers—absolutely brilliant! 3D tours for real estate listings
This was a great article. Check out juwelier in almere for more.
ฉันรักค็อกเทลที่ OMG ONE MORE GLASS SAI1 มาก อร่อยและสดชื่นสุดๆ ร้านชิลสาวสวย สาย1
I’ve been researching different clinics, and Aesthetic Clinic London seems to have excellent reviews. It’s comforting to see real success stories!
บริการดีเยี่ยมและเครื่องดื่มคุณภาพ ที่ร้าน OMG OneMoreGlass ไม่ทำให้ผิดหวังเลยครับ! ร้านกินเลี้ยง ฟังเพลง สาย1
бесплатные акки стим раздача аккаунтов
Thanks for the detailed post. Find more at power washing near me .
If you’re unsure about your case, speak to a Auto Accident Lawyer first—they offer consultations that help you understand your options.
resume application engineer resume software engineer google
Planning a move soon? Make sure to explore the options at North Richland Hills full service movers for North Richland Hills moving companies that suit your needs.
бесплатные аккаунты в стиме бесплатные аккаунты стим
“I feel like it’s hard distinguishing between good vs mediocre representatives nowadays… what’s worked out well?? Appreciate input!! # # anyKey word # #” top-rated insurance agent in Jackson
Every interaction carries potential enriching lives immeasurably sharing wisdom earned invaluable experiences gained over time cultivating meaningful connections strengthens unity reinforces commitment dedicated collectively uplifting each other mutually CoolSculpting
This was highly educational. More at año escolar Irlanda .
Appreciate the useful tips. For more, visit contador Saltillo .
I just had to share how BlckPanda Creative Dallas turned my Google ranking around! Business is booming like never before thanks to their expertise. Learn more at seo services .
Appreciate the thorough information. For more, visit slot game reviews .
Thanks to Banning Construction Inc., my home renovation went smoothly! Highly recommend! Kitchen Remodel
Thanks for the practical tips. More at locksmith wake forest .
Want to get rid of stubborn fat? Visit CoolSculpting Services , the leading CoolSculpting center in town!
Предлагаем услуги профессиональных инженеров офицальной мастерской.
Еслли вы искали ремонт кофемашин philips сервис, можете посмотреть на сайте: срочный ремонт кофемашин philips
Наши мастера оперативно устранят неисправности вашего устройства в сервисе или с выездом на дом!
I can’t recommend Golden State Visions enough—their work speaks for itself! creative real estate photography solutions
I liked this article. For additional info, visit Rèm nakata .
Just completed my relocation last week thanks entirely due diligence paid towards selecting Office moving companies St. Augustine
If you’re considering trying it out, definitely look into what’s offered at clinics listed on CoolSculpting Clinic #.
Fans rallying behind popular series often leads to unexpected outcomes–how have fandoms influenced productions?? danhdeonline
The post about adding character with architectural details was enlightening; thanks for sharing that insight! Discover more unique details at Home Renovation
I enjoyed this read. For more, visit elektricien in leiden .
Many thanks to the author for writing such an informative article—find more at danhdeonline !
Every piece I’ve bought from Riptide has been durable and stylish—I highly recommend this store to anyone looking to update their home décor—visit them: Furniture store near me !
Winning isn’t everything, but hitting that elusive jackpot sure adds some spice to life! lodehomnay
This article beautifully portrays how embracing authentic connections with colleagues helps foster environments where everyone feels valued throughout their journey together; explore extra insights available via # anyKeyWord#! danhdeonline
Impressed by the expertise shown here in handling personal injury cases. The dedication to seeking justice for clients is truly commendable! birth injury lawyer could be the helping hand you need.
บรรยากาศในร้าน OMG ONE MORE GLASS SAI1 ทำให้รู้สึกผ่อนคลายจริงๆ ค่ะ ร้านอาหารสาย1
เคยไปที่ OMG OneMoreGlass แล้ว รู้สึกประทับใจในบริการและเครื่องดื่มมาก! ร้านชิลสาวสวย สาย1
Thanks for the helpful advice. Discover more at commerical movers .
Appreciate the thorough analysis. For more, visit office movers .
This was quite enlightening. Check out home builders for more.
I recently had my roof replaced by Granada Hills Roofing Solutions, and I couldn’t be happier with the results! Highly recommend! Roofing in Granada hills, CA
”Can’t suppose I waited so long—thanks once more in your important work, #DrPowerwash!” Window Cleaning Company
Online sports have really transformed how we engage with our favorite games. It’s never been easier to follow teams and players! Check out danhdeonline for more insights.
The results from my CoolSculpting treatment are beyond my expectations! Thanks, CoolSculpting !
Kerner Law Group, P.C. is my top recommendation for anyone needing a Bronx car accident attorney! Their dedication is unmatched.
I had a fantastic experience with Kerner Law Group, P.C. Their team includes the best Bronx car accident lawyer I’ve ever met Hit and run lawyer Bronx
My experience with **### anyKeyword ###** has been nothing but positive; they handled my roofing issue swiftly and professionally. gutter services Surrey
I just completed my bathroom remodel with Banning Construction Inc., and it looks stunning! Thank you, team! Bathroom Remodel
The thrill of escape rooms has made its way online, and it’s super fun! Have you participated in one yet? Join in the excitement at lodehomnay .
. It’s amazing how much detail you covered regarding settlements and fees—I learned a lot from reading this blog, thank you so much ! More help
Профессиональный сервисный центр по ремонту Apple iPhone в Москве.
Мы предлагаем: сервисный ремонт айфонов в москве
Наши мастера оперативно устранят неисправности вашего устройства в сервисе или с выездом на дом!
I appreciate how you defined what constitutes valuable work in our lives today. Great read! Learn more at danhdeonline .
This was quite informative. For more, visit juwelier almere .
It’s easy to overlook vehicle blind spots until they lead to an unfortunate incident—learn how to avoid these situations by visiting Auto Accident !
Great insights! Discover more at año escolar en Irlanda .
This is quite enlightening. Check out contadores en Saltillo for more.
Discover the transformative power of CoolSculpting in Amarillo with the help of CoolSculpting Services . Get ready to love the way you look!
Exploring legal assistance in cases of personal injury can be crucial, and finding the right support is key. If you need guidance or representation, consider checking out personal injury lawyer for specialized help in Los Angeles.
It’s incredible how surgical advancements have made procedures safer and more effective, especially those offered by Aesthetic Clinic Marylebone .
What should I expect during my first visit to CoolSculpting ?
I admire how dedicated banning construction inc is towards ensuring customer satisfaction at every stage of the process!. Bathroom Remodel
Thanks for the useful post. More like this at https://maps.app.goo.gl/dpHoCTnuV7TsBSZf8 .
OMG ONE MORE GLASS SAI1 เป็นร้านที่มีเครื่องดื่มหลากหลาย ครบครันสุดๆ เลยค่ะ ร้านอาหารสาย1 บรรยากาศดี
Your blog post about san diego car accident lawyers is incredibly informative and helpful for anyone seeking legal guidance. It’s crucial to have reliable resources like accident lawyer when faced with such challenging situations.
ร้านนี้ทำให้ฉันมีความทรงจำดีๆ หลายอย่าง อยากกลับไปอีกที่ OMG ONE MORE GLASS SAI1 ร้านนั่งชิล ใกล้ฉัน
ที่ OMG OneMoreGlass มีโปรโมชั่นสำหรับนักศึกษาไหม? อยากรู้จัง! ร้านเหล้าใกล้ฉัน
Shipping my car was so easy thanks to the team at Dallas car shipping ! Highly recommend their services for anyone in Dallas.
Impressed by the dedication of Sacramento personal injury lawyers in advocating for justice and supporting their clients accident attorney
Appreciate the detailed insights. For more, visit leiden elektricien .
Love seeing collaborative efforts among neighbors aimed towards revitalizing community spaces-through working together we strengthen bonds-check plans discussed over at ## tree service west palm beach
So grateful for this information; having reliable contacts like ### anyKeyword### makes all the difference during emergencies! Medford emergency water heater repair
Very informative blog post; it demystifies many aspects of personal injury law in Utah, especially within the context of Salt Lake Injury Law! Salt Lake Injury Lawyer
Want to get rid of unwanted fat effectively? Visit trusted CoolSculpting clinics in Corpus Christi, such as CoolSculpting , for exceptional treatments.
พาแฟนไปเดทที่ OMG OneMoreGlass บรรยากาศโรแมนติกมากๆ ครับ! ผับแอนด์เรสเตอรองท์ สาย1
The importance of proper installation can’t be overstated. Thanks for highlighting it! Guildford roofing specialists
Appreciate the comprehensive insights. For more, visit new homes 27703 .
For anyone considering a roof upgrade, definitely explore options via steel roofing near me —great resources!
Can’t wait to see the finished product from Best Rate Roofing — they’ve been fantastic every step of the way! roofers near me
What a comprehensive guide on fixing common garage door problems! Thank you, and looking forward to using emergency garage door repair !
Love this post! It really highlights the importance of chiropractic care in Mill Creek. Chiropractor Mill Creek
Don’t let excess fat hinder your confidence. CoolSculpting in Amarillo offered by CoolSculpting Clinic can help you regain control over your body image.
Just wanted to express how happy I am with the service I received from Progressive Heating & Air last week. Heater repair in San Diego
I’m still amazed at howBannignConstructionInc turned our outdated space into something beautiful; highly recommend!!! # # anyKeyWord # # Kitchen Remodel
The state-of-the-art equipment used by their professionals made all the difference during treatments – love it here!## anykeyword ## CoolSculpting clinic
The role of technology in reducing car accidents is fascinating! Explore innovations at Car Accident Lawyer .
Nicely detailed. Discover more at juwelier in almere .
Have you experienced emotional trauma from a car accident? You may be entitled to compensation; learn more at Auto Accident Lawyer .
If you’ve got a junk motor vehicle sitting in your driveway, don’t hesitate to contact a junk car patron in Charlotte, NC. It’s well worth it for the money you’ll get! https://maps.app.goo.gl/7Bg4phATsxDzeBo27
уннв музыка скачать уннв музыка скачать .
This is very insightful. Check out año escolar Irlanda for more.
Appreciate the useful tips. For more, visit contador Saltillo .
This blog gives a clear perspective on an often confusing topic—definitely explore more at Auto Accident .
I love taking my kids to arcades in Columbus; it’s a fantastic way to spend quality time together! If you’re looking for the best places to go, take a look at arcades near me for some great suggestions.
The before-and-after photos you shared are inspiring! For more transformative ideas, visit cost of home renovation .
So proud of myself for taking this leap; every bit of progress counts & it’s exciting sharing moments like these together!!!!# # anyKeyWord ## CoolSculpting
resume automation engineer how long should an engineering resume be
Absolutely impressed by the expertise of these Fresno personal injury lawyers! Anyone seeking top-notch legal support should definitely check out medical malpractice attorney to secure their rights and get the justice they deserve.
Anyone considering textured finishes for their home’s exterior? I read some interesting articles about it here: Painters Portland .
Can’t wait for summer BBQs in our newly renovated space courtesy of banning construction inc – they did an amazing job!” Kitchen Remodel
In considering long-term effects arising subsequent decisions made initially regarding partnerships formed later down road ahead inevitably … where should focus attention primarily directed ultimately?! # Yke YWORD # ” Jeff Lassila insurance reviews
This was a great article. Check out wheel of wishes jackpot winning strategies for more.
Workers’ comp claims might be puzzling, but having a informed attorney makes your complete big difference! Find assistance at workers compensation lawyers .
Finally took the plunge into # # anyKeyWord# #’s world of lasers – best decision ever! CoolSculpting services
Is there a minimum recovery period required before resuming regular activities post-#CoolsculptinginAmarillo treatment? CoolSculpting Clinic
Don’t underestimate the significance of hiring a educated laborers’ comp lawyer. For extra details, go to workers comp lawyer portsmouth ohio to find out how they might help.
This article was incredibly informative! I’ve bookmarked spring garage doors to keep up with all things garage door related.
I had no idea how complex injury claims could be! Your post about Salt Lake Injury Law really opened my eyes. Salt Lake Car Accident Lawyer
. I’ve learned so much about keeping my ac running smoothly thanks to the experts at mauzey cooling who take their time explaining everything clearly! AC repair services in san diego
Just moved to San Diego and looking for a good dental implant provider. Any recommendations? Dental Implants in San Diego
– Had a great experience fixing my bathroom drains thanks to the team at mr.root plumbing—highly recommend them! Drain Repair in san diego
”These guys really know how important good workmanship is—I appreciate that!” Clog Removal in san diego
George Georgaklis DDS made my root canal procedure as stress-free as possible. Thank you so much! Root Canal in San Diego
Very much look forward reading further articles exploring similar themes focusing enhancing quality lives lived within communities strengthened bonds forged amongst those affected positively via collaboration efforts undertaken consistently prioritized affordable roofing Surrey
Appreciate the thorough insights. For more, visit leiden elektricien .
This was very beneficial. For more, visit Slot game reviews .
Pronto Plumbing mounted our new system promptly and successfully. They were knowledgeable, responding to every one of our questions and client managing our pet dogs and kid. Instantly signed up for subscription right away plumber near me
Научно-популярный сайт https://phenoma.ru — малоизвестные факты, редкие феномены, тайны природы и сознания. Гипотезы, наблюдения и исследования — всё, что будоражит воображение и вдохновляет на поиски ответов.
Really insightful blog post; always nice to learn more about maintaining my home’s plumbing with help from Medford emergency drain repair !
I’ve been struggling with back pain and think it’s time to visit a Mill Creek Chiropractor. Chiropractor Mill Creek
Appreciate the insightful article. Find more at luxury home builder .
Các bạn đã trải nghiệm chơi bài trực tuyến tại 888lu chưa ? Rất thú vị đấy ! # # anyKeyWord## Nhấn vào đây để biết thông tin
Ready to transform your body and boost your confidence? CoolSculpting near me in Corpus Christi, provided by CoolSculpting Clinic , can help you achieve your goals.
”Impressed by how creative Baning’s designs are while still being functional!” %%ANYKEYWORD%% Kitchen Remodel
Thanks for the informative content. More at car key locksmith .
“Progressive Heating & Air is the way to go if you need your heater repaired quickly and efficiently.” Heater repair in San Diego
Excited about achieving long-term smoothness thanks to laser hair removal from American Laser Med Spa! CoolSculpting services
The statistics on car accidents are alarming. We all need to do our part to drive responsibly. Find resources at Car Accident Lawyer .
I’ve noticed a big difference after just one session of coolsculpting at CoolSculpting Clinic .
This was highly educational. More at contadores en Saltillo .
Thanks for the thorough analysis. More info at año escolar en Irlanda .
уннв песни слушать и скачать уннв песни слушать и скачать .
This write-up really opened my eyes to the various roof materials available. For any individual taking into consideration a roof covering upgrade, certainly check out roofer near me for expert recommendations.
I value the focus on obtaining numerous quotes prior to selecting a specialist. It actually aids with budgeting! For additional tips, head over to roofing company near me .
I value the focus on obtaining multiple quotes prior to picking a service provider. It really aids with budgeting! For extra pointers, head over to roofing contractor near me .
The seasonal adjustments can actually impact roof covering requirements! If anybody is searching for specialist specialists to examine their roofing systems after winter season, look into roofer bridgewater for recommendations.
Thanks for sharing this useful information! I’ll definitely need to bookmark garage door repair near me for future reference on garage door issues.
Don’t let stubborn fat ruin your confidence; let CoolSculpting restore it! Visit CoolSculpting Services for inspiring transformations that will empower you to love your body.
Thanks for breaking down complex legal terms into understandable language regarding personal injuries in Utah—so helpful! salt lake injury law
Choosing the right colors can be daunting. I found some amazing palettes at Portland Painting Contractors !
Nice work emphasizing preventative measures as essential tools against costly repairs related directly back towards damaged roofs!! roof repairs Surrey
Предлагаем услуги профессиональных инженеров офицальной мастерской.
Еслли вы искали ремонт кофемашин philips адреса, можете посмотреть на сайте: срочный ремонт кофемашин philips
Наши мастера оперативно устранят неисправности вашего устройства в сервисе или с выездом на дом!
This was a great help. Check out Slot machine games for more.
After just one treatment, I could see a difference thanks to American Laser Med Spa – Amarillo! Discover more on their website, CoolSculpting .
I appreciated this post. Check out elektricien in leiden for more.
Thankful that Maui was able to come out on short notice and get my air conditioner back up and running quickly. AC repair services in san diego
“Has anyone experienced any complications with their dental implants? Hoping to avoid that with guidance from San Diego Dental Implant.” Dental Implants in San Diego
Just wanted to share my positive experience with Mr. Rooter Plumbing for drain repairs in San Diego – they were fantastic! Drain Repair in san diego
Excellent care during my root canal at George Georgaklis DDS! The whole staff is wonderful! Root Canal in San Diego
This is such an important discussion about health—thank you for raising awareness about chiropractors! Chiropractor Mill Creek
Thanks for the comprehensive read. Find more at home builder .
Hopeful seeing increased funding allocated targeted directly towards preserving landscapes valued deeply within communities-overviewing proposed grants available through ## west palm beach tree care
Grateful understanding we chose correctly partnering up the following realizing they bring continuously extremely good outcomes! Window Cleaning Company
Loved your article on sustainable home improvements! For eco-friendly projects, see more at https://www.instapaper.com/read/1811910449 .
Looking for dedicated legal support in the Seattle area? These personal injury lawyers definitely know how to stand up for your rights! Don’t hesitate to reach out for a helping hand, birth injury lawyer .
Appreciate the detailed post. Find more at año escolar en Irlanda .
I enjoyed this read. For more, visit contadores Saltillo .
A trustworthy insulation company can be hard to find indeed! Bookmarking this post and checking out wall insulation next!
Thanks for the valuable article. More at moving services tucson az .
The emotional toll of an auto accident can be immense; having supportive legal counsel like my **### anyKeyword ###** truly helps ease that burden. Injury Lawyer
Superb blog post! Comprehending warranties is crucial when working with a professional. If you wish to learn more about what to seek, go to roofer near me for detailed details.
The seasonal modifications can truly influence roof needs! If any individual is seeking professional service providers to evaluate their roofings after wintertime, have a look at roofer bridgewater for suggestions.
I never realized the number of factors impact the life-span of a roof covering. Many thanks for sharing! If you want discovering certified professional roofer, see roofing contractor near me for handy details.
The insights into liability and negligence were very helpful! Thank you for shedding light on Salt Lake Injury Law! salt lake injury law
I never realized the amount of aspects affect the life expectancy of a roofing system. Thanks for sharing! If you’re interested in finding certified roofing contractors, browse through roofing company near me for handy details.
Struggling with Florida health insurance during your move? Finally, a clear SEP guide that saves you from costly gaps. Learn which documents you actually need and how to navigate Healthcare.gov fast—avoid surprises and keep coverage seamless! Visit this page
Every detail matters when constructing dreams into tangible realities; let’s continue pushing boundaries redefining what ‘home’ means each day …!!### anyKeyWord ## kitchen cabinet remodel Lexington
This was a fantastic read. Check out Slot reviews for more.
Their expertise shines through every project; it’s clear why people trust them as their go-to roofing company in Surrey! new roof installation
The seasonal modifications can actually influence roofing requirements! If any individual is looking for specialist service providers to evaluate their roofings after winter season, look into roofing contractor near me for referrals.
I enjoyed this post. For additional info, visit trusted VIP cleaners & laundry services .
Thank you for addressing such an important issue as mold remediation—it’s essential knowledge for residents of Sarasota looking at options like Mold Mitigation !
From car accidents to slip and falls, having trustworthy personal injury lawyer by your side can make a world of difference in seeking justice for personal injuries. Their expertise and dedication could turn a challenging situation into a hopeful outcome!
Fascinating read about Mill Creek Chiropractors! I’ll be scheduling an appointment soon. Mill Creek Chiropractor
ร้าน OMG OneMoreGlass มีเมนูอะไรแนะนำบ้างครับ? อยากลองไปชิมดู! ผับแอนด์เรสเตอรองท์ สาย1
Considering the complexity of legal matters, having support from experienced Sacramento personal injury lawyers can truly make a difference personal injury attorney
The expertise of San Diego car accident lawyers is unmatched when it comes to protecting your rights and seeking justice for truck accident lawyer . Don’t hesitate to reach out for the support you deserve in such challenging times.
” Anyone know if there are workshops or seminars focusing on advancements in oral health?” Dental Implants in San Diego
Literally couldn’t imagine finding another better fit than those working behind scenes over at mauzus’ end here today! AC repair services in san diego
Learning more about oral hygiene has never been easier thanks entirely due dedicated professionals working tirelessly behind scenes making sure everything runs smoothly daily behind closed doors! Root Canal in San Diego
If anyone is looking for trustworthy drain repair services in San Diego, check out Mr. Rooter Plumbing! Drain Repair in san diego
Fast response times and expert knowledge make all the difference—thank you ASl!” Clog Removal in san diego
This was highly educational. For more, visit new construction 27703 .
Научно-популярный сайт https://phenoma.ru — малоизвестные факты, редкие феномены, тайны природы и сознания. Гипотезы, наблюдения и исследования — всё, что будоражит воображение и вдохновляет на поиски ответов.
This was highly educational. For more, visit VIP Cleaners and Laundry .
Struggling with Florida health insurance after moving? Most miss out on Special Enrollment Periods, losing thousands. Learn how to navigate Healthcare.gov and get coverage fast—finally avoid costly gaps and save up to $3,500 yearly. Ready to act? https://unsplash.com/@borianhiyj
Impressed by the expertise of these Portland personal injury lawyers, they seem like the perfect choice to handle any legal matter skillfully. I’ll definitely recommend their services to anyone seeking top-notch representation. medical malpractice attorney
resume engineering director engineer resumes
It’s refreshing to see content that encourages ethical investing while also considering returns; well done! financial services london
Looking for reliable legal advice in Fresno? Look no further than these personal injury lawyers! They have the expertise to help you with medical malpractice attorney .
This was very beneficial. For more, visit tucson moving companies .
Thanks for the great tips. Discover more at tucson long distance movers Zooz Moving (East) .
Very informative blog post; it demystifies many aspects of personal injury law in Utah, especially within the context of Salt Lake Injury Law! salt lake injury law
I appreciate all the hard work these guys put into each job ; it’s evident they take great pride in their craft . #anKeyWord# trusted roofing company Surrey
This was quite informative. For more, visit Best slots to play .
Wonderful insights on choosing the ideal roofing contractor! It’s so important to do your research study. For those trying to find more tips, have a look at roofing contractor near me for important resources.
I never recognized the number of factors influence the life expectancy of a roof. Thanks for sharing! If you’re interested in discovering certified roofing contractors, see roofer bridgewater for handy information.
Wow, I really did not recognize that roof covering concerns can lead to larger home problems! If you require support finding trusted contractors, I advise checking out roofer near me .
I value the focus on getting numerous quotes before choosing a specialist. It truly aids with budgeting! For extra suggestions, head over to roofing company near me .
Thanks for the thorough article. Find more at VIP Cleaners and Laundry .
Looking forward to finding a Mill Creek Chiropractor who can help with my chronic pain issues! Mill Creek Chiropractor
Your insights surrounding finding balance between ambition versus humility when contributing positively speaks volumes especially given current circumstances facing many industries globally today—a powerful message shared brilliantly indeed access even wiki
Absolutely love the suggestions for creating a cozy living room! For more decor inspiration, check out home renovation design .
Fantastic insights shared here! No wonder it’s a highly rated article. Explore more at wiki-tonic .
сколько зарабатывает вебкам модель в Польше Стань вебкам моделью в польской студии, работающей в Варшаве! Открыты вакансии для девушек в Польше, особенно для тех, кто говорит по-русски. Ищешь способ заработать онлайн в Польше? Предлагаем подработку для девушек в Варшаве с возможностью работы в интернете, даже с проживанием. Рассматриваешь удаленную работу в Польше? Узнай, как стать вебкам моделью и сколько можно заработать. Работа для украинок в Варшаве и высокооплачиваемые возможности для девушек в Польше ждут тебя. Мы предлагаем легальную вебкам работу в Польше, онлайн работа без необходимости знания польского языка. Приглашаем девушек без опыта в Варшаве в нашу вебкам студию с обучением. Возможность заработка в интернете без вложений. Работа моделью онлайн в Польше — это шанс для тебя! Ищешь “praca dla dziewczyn online”, “praca webcam Polska”, “praca modelka online” или “zarabianie przez internet dla kobiet”? Наше “agencja webcam Warszawa” и “webcam studio Polska” предлагают “praca dla mlodych kobiet Warszawa” и “legalna praca online Polska”. Смотри “oferty pracy dla Ukrainek w Polsce” и “praca z domu dla dziewczyn”.
Tired of scrambling for Florida health insurance during open enrollment? Finally, there’s a step-by-step guide to mastering Healthcare.gov’s new rules and SEP tricks—helping you save hundreds and avoid costly coverage gaps when relocating https://angelosmxe623.tearosediner.net/010-how-much-does-health-insurance-cost-in-florida-re
E-sports not only entertain but also build community; I’ve met some great friends through gaming competitions linked via platforms like danhdeonlineuscom !
Các bạn có biết đến những game nổi bật nào tại đây không ? Hãy chia sẻ nhé ! Nhấn để biết thông tin
Valuable information! Discover more at nhà cái df999 .
Great job! Find more at https://df999-boom.online/ .
I found this very helpful. For additional info, visit https://df999-bit.net/ .
I enjoyed this read. For more, visit luxury home builder .
Wonderful tips! Discover more at https://df999-king.com/ .
Thanks for the helpful article. More like this at nhà cái df999 .
Wonderful insights! Many homeowners underestimate the impact of insulation on their overall comfort and energy costs. Keep up the great work! ceiling insulation
I didn’t know that dental implants could improve oral health so much! Thanks, San Diego Dental Implant! Dental Implants in San Diego
“Never had a bad experience with Mauzy—they’re always professional and courteous!” AC repair services in san diego
The team at George Georgaklis DDS really knows how to take care of their patients during root canals. Root Canal in San Diego
Highly recommend Mr. Rooter Plumbing for anyone needing drain repair in San Diego! Drain Repair in san diego
So glad I chose ASI for my clog issues; their team is knowledgeable and efficient! Clog Removal in san diego
This was a wonderful post. Check out movers tucson for more.
оформить карту дебетовую с доставкой бесплатно Исследуйте мир удобных банковских карт вместе с нами. Оформление современной дебетовой карты теперь доступно и просто благодаря нашей поддержке. Выберите карту, которая идеально соответствует вашим потребностям, и воспользуйтесь всеми преимуществами современных финансовых услуг. Что мы предлагаем? Экспертные советы: Полезные лайфхаки и рекомендации по эффективному использованию карты. Актуальные акции: Будьте в курсе самых выгодных предложений и специальных условий от банков-партнеров. Преимущества нашего сообщества. Здесь вы найдете всю необходимую информацию о различных видах карт, особенностях тарифов и комиссий. Наши публикации регулярно обновляются, чтобы предоставить вам актуальные данные и свежие новости о продуктах российских банков. Присоединяйтесь к нашему сообществу, чтобы сделать ваши финансовые решения простыми, быстрыми и надежными. Вместе мы сможем оптимизировать использование банковских продуктов и сэкономить ваше время и деньги. Наша цель — помочь вам эффективно управлять своими финансами и получать максимум выгоды от каждого взаимодействия с банком.
Great understandings on picking the appropriate professional roofer! It’s so important to do your study. For those seeking more pointers, look into roofing contractor near me for useful sources.
This is highly informative. Check out VIP Cleaners and Laundry for more.
Thank you for shedding light on this topic; I fully support your views! lodehomnay
The resources you provided at the end of your article are fantastic for those needing more help with their injuries under Salt Lake Injury Law—thank you! salt lake injury law
I love how you emphasize taking quick action when it comes to roofing issues—it’s truly essential for protection against damage! emergency roof repairs
Thanks for the detailed guidance. More at Play slots online .
เมนูอาหารที่ OMG OneMoreGlass รสชาติดีมาก ทำให้การดื่มสนุกขึ้นเยอะ! สถานที่บันเทิงใกล้ฉัน
Outstanding message! Comprehending guarantees is essential when hiring a specialist. If you intend to learn more regarding what to try to find, go to roofing contractor near me for detailed details.
The importance of spinal health cannot be overstated, and this post highlights that well! Chiropractor Mill Creek
Many thanks for the suggestions on identifying roof covering scams! It’s vital to stay informed. For even more sources on finding reliable roofer, go to roofer near me .
I never ever recognized how many elements influence the life expectancy of a roofing. Thanks for sharing! If you’re interested in discovering certified roofing contractors, browse through roofing company near me for handy info.
It’s essential to employ qualified and insured roofing contractors to stay clear of future issues. For more assistance on this subject, you can explore roofer bridgewater for credible referrals.
выравнивание грунта выравнивание грунта .
Your insights on sustainable investments are timely and relevant. Thanks for raising awareness! wealth advisor london
Navigating personal injury protection (PIP) benefits shouldn’t feel overwhelming anymore thanks again for providing clarity here: # evenAnyword Car Accident Lawyer
Struggling with Florida health insurance after moving? Don’t miss your Special Enrollment Period! Using Healthcare.gov’s SEP tool can save you up to $3,500 in premiums annually. Finally, a clear path to coverage—ready to stop overpaying? life changes affecting health insurance
Education remains foundational building blocks leading towards conservation initiatives successfully underway-appreciative having links connecting us back towards roots outlined via ## tree service west palm beach
Very useful post. For similar content, visit home builder .
Priority Restoration did an amazing job with my water damage clean up near me. Highly recommend their services!
I had a fantastic experience with Priority Restoration Philadelphia Water Damage Restoration Near Me
Is there anything specific I should ask during my consultation with a Mill Creek Chiropractor? Insights needed! Mill Creek Chiropractor
I love that there are so many options for dental implants in San Diego! Where should I start? Dental Implants in San Diego
This was highly helpful. For more, visit moving services tucson az .
Root canals don’t have to be scary—just visit George Georgaklis DDS in San Diego and you’ll see what I mean! Root Canal in San Diego
So happy I chose Mauzy Cooling for my AC repairs—very thorough and knowledgeable technicians! AC repair services in san diego
Really liked your take on creating cozy reading nooks; they’re essential in any home library or living area! Find more cozy ideas at home remodeling ideas
I will recommend mr.rooters plumbing far and wide because of their dedication towards ensuring client happiness always.” Drain Repair in san diego
I appreciated this post. Check out VIP Cleanrs n’ Laundary for more.
Your home deserves high-quality service; trust only the best—ASI, The White Glove Guys! Clog Removal in san diego
техника для выравнивания участка http://www.vyrovnyat-uchastok-23.ru/ .
Các trò chơi bài tại nhà cái dola789 thật sự gây nghiện, tôi không thể dừng lại được! https://oploverz.jp.net
Thanks for providing such great insights into hiring insulation contractors! This will definitely guide my decision-making process. spray foam insulation
Các trò chơi thể thao ảo tại Dola789 cũng rất thú vị và hấp dẫn đấy nhé! Thể thao Dola789
This was quite informative. More at movers tucson Zooz Moving (East) .
”Amazing outcome from #DrPowerwash—my kin can after all take pleasure in our view once more!” Window Washing
Struggling with Florida health insurance during your move? Most miss SEP deadlines and lose $$$. Learn the exact documents and marketplace tricks that saved one client $3K+ annually health coverage changes due to life events
Exceptional blog post! Recognizing service warranties is vital when hiring a contractor. If you wish to find out more concerning what to look for, visit roofing contractor near me for comprehensive details.
The relevance of regular roofing system maintenance can not be overstated! I found some superb specialists at roofer near me that assisted me with my roofing system evaluation.
Wow, I didn’t understand that roof covering problems can result in larger home troubles! If you need aid finding trusted service providers, I recommend having a look at roofing company near me .
I appreciate the focus on obtaining several quotes before selecting a specialist. It truly assists with budgeting! For added pointers, head over to roofer bridgewater .
Superb message! Recognizing guarantees is essential when employing a contractor. If you intend to learn more concerning what to seek, see affordable roofing in Bridgewater for thorough info.
I never ever understood the amount of factors influence the life-span of a roof. Thanks for sharing! If you’re interested in locating certified roofer, see roofing contractor near me for practical information.
Just learned some fantastic roofing maintenance tips that I’d love to share—check them out at roof repair near me #!
This is highly informative. Check out VIP specialized cleaners and laundry experts for more.
You’ve convinced me that investing in high-quality gutters is worth it—no more cheap alternatives for me! prevent water damage
Can anyone recommend a good Mill Creek Chiropractor? I’m eager to start treatment! Mill Creek Chiropractor
Many thanks for sharing this beneficial web content! Individual referrals are definitely the most effective means to go. commercial electrician
Вижу, что у официального дилера BYD много положительных отзывов от клиентов. https://www.pexels.com/@jason-pisani-2152779674/
This is one of the very best write-ups I’ve encountered concerning hiring electrical experts; thank you very much undoubtedly for sharing it with all of us here today! Might you detail what composes a strong quote from an electrical expert vs electrician arvada
This was a great help. Check out abogada en Vigo for more.
This was a great help. Check out luxury home builder for more.
Well explained. Discover more at taxi cerca de mí .
“The experience of community fostered inside robust rehabilitation centers surely aids healing journeys!” Virtual IOP Near Me
Struggling with Florida’s health insurance maze? Finally, a clear SEP guide that helped my client save $3,500/year and avoid coverage gaps after moving. Don’t miss key deadlines or docs—get the insider tips that actually make enrollment painless! setting your health coverage start date
Clearly presented. Discover more at moving companies tucson .
This was quite useful. For more, visit VIP Cleaners and Laundry Service Near Me .
I’ve been looking for support in Birmingham and came across some great resources. It’s reassuring to see options for https://maps.app.goo.gl/5F7QnAZQAbSceRvj9 available in the area!
How can I prepare for my first visit to a Mill Creek Chiropractor? Any tips would be appreciated! Mill Creek Chiropractor
It’s vital to employ qualified and insured roofing contractors to stay clear of future troubles. For more assistance on this topic, you can discover roofing contractor near me for trustworthy referrals.
I never ever understood the amount of aspects affect the lifespan of a roof covering. Thanks for sharing! If you want discovering qualified professional roofer, see roofer near me for helpful details.
Wow, I really did not understand that roof issues can result in larger home issues! If you need support finding trusted specialists, I recommend checking out roofing company near me .
лучшие песни уннв лучшие песни уннв .
The relevance of routine roof maintenance can not be overstated! I discovered some exceptional contractors at roofer bridgewater that aided me with my roof inspection.
“Make sure you have plenty of time set aside on your big day for those special photo moments!” Asian Wedding Photographer Birmingham
This was highly educational. For more, visit VIP specialized laundry services and cleaners .
Chương trình VIP tại nhà cái dola789 mang lại nhiều ưu đãi hấp dẫn cho người chơi! https://oploverz.jp.net
Fantastic tips on accent walls! If you need help, professional services can be found at Interior Painters Portland .
Great job discussing color psychology in home design; it’s fascinating how colors affect mood and space perception! More color tips can be explored at https://www.empowher.com/user/4527898
Appreciate the detailed post. Find more at professional gutter team .
Nhà cái này có mọi thứ mà một người chơi cần để có những trải nghiệm tốt nhất! Duyệt qua trang web này
работа для русскоговорящих девушек в Польше Стань вебкам моделью в польской студии, работающей в Варшаве! Открыты вакансии для девушек в Польше, особенно для тех, кто говорит по-русски. Ищешь способ заработать онлайн в Польше? Предлагаем подработку для девушек в Варшаве с возможностью работы в интернете, даже с проживанием. Рассматриваешь удаленную работу в Польше? Узнай, как стать вебкам моделью и сколько можно заработать. Работа для украинок в Варшаве и высокооплачиваемые возможности для девушек в Польше ждут тебя. Мы предлагаем легальную вебкам работу в Польше, онлайн работа без необходимости знания польского языка. Приглашаем девушек без опыта в Варшаве в нашу вебкам студию с обучением. Возможность заработка в интернете без вложений. Работа моделью онлайн в Польше — это шанс для тебя! Ищешь “praca dla dziewczyn online”, “praca webcam Polska”, “praca modelka online” или “zarabianie przez internet dla kobiet”? Наше “agencja webcam Warszawa” и “webcam studio Polska” предлагают “praca dla mlodych kobiet Warszawa” и “legalna praca online Polska”. Смотри “oferty pracy dla Ukrainek w Polsce” и “praca z domu dla dziewczyn”.
Почему аренда яхты в Сочи стала популярной альтернативой отелю
сочи аренда яхты https://www.arenda-yahty-sochi23.ru .
A stylish range hood can really make a statement in a remodeled kitchen—what styles do you love? kitchen remodeling Tewksbury
Thankful for these sensible tips pertaining to locating quality electrical experts; absolutely saves effort and time over time! What factors add most to an electrical contractor’s reputation in their town? commercial electrician
Thanks for the great explanation. Find more at new homes 27703 .
Superb article! Understanding service warranties is essential when working with a specialist. If you want to discover more about what to look for, see top roofing companies Bridgewater for in-depth information.
This was highly helpful. For more, visit abogados Vigo .
Great job! Discover more at taxi Arzua .
Thanks for sharing this valuable web content! Individual recommendations are absolutely the very best way to go. residential electrician
Terrific insights on picking the right professional roofer! It’s so crucial to do your research. For those seeking more pointers, check out roofing contractor near me for useful sources.
Well done! Find more at long distance movers tucson .
Thanks for the great tips. Discover more at VIP Cleanrs n’ Laundary .
Nicely detailed. Discover more at tucson moving company Zooz Moving (East) .
If you’re for the reason that a online iop classes , do not hesitate to invite approximately their achievement costs and medication ideas.
I appreciate the focus on getting several quotes before choosing a service provider. It truly helps with budgeting! For added ideas, head over to roofing contractor near me .
This article really opened my eyes to the various roof covering materials readily available. For any person thinking about a roofing upgrade, absolutely check out roofer near me for skilled guidance.
The right lawyer can change the outcome of your case significantly after an accident. If you’re in Anchorage, consider visiting Anchorage Car Accident Lawyer for expert advice.
I never ever understood the amount of aspects impact the life-span of a roofing system. Many thanks for sharing! If you want finding qualified roofing contractors, go to roofing company near me for handy information.
Outstanding message! Recognizing service warranties is vital when employing a specialist. If you wish to find out more regarding what to try to find, see roofer bridgewater for detailed information.
Mon expérience avec SP Débouchage a été au-delà de mes attentes, un grand bravo à l’équipe ! SP Débouchage professionnels
I absolutely adore the idea of integrating seating into my remodeled kitchen island! kitchen cabinet remodel Lexington
Have you considered hiring an Asian wedding photographer who understands both traditional and contemporary styles? Birmingham has plenty! Asian Wedding Photographer Birmingham
I can’t believe how affordable gutter cleaning is in Limerick! Check out this awesome service: gutter repair Limerick .
This guide covers everything from planting to pruning—very helpful! For expert services, check out west palm beach tree care .
I love how you described the different finishes available in paint! To find a contractor, go to Portland House Painters .
Does everyone have instructional materials for strong sunlight panel maintenance organizations? I determined some suggestions on Perth Solar system installation that appearance promising!
Keeping track of which products work best can be tough, but your breakdown of facials is super helpful over on ### anykeyword|## Era Organics face scrub
Useful advice! For more, visit home builders .
Adding texture through tile choices can really enhance the feel of your remodeled kitchen—what patterns do you love most? kitchen cabinet remodel Tewksbury
Thanks for the helpful article. More like this at abogado en Vigo .
Many thanks for sharing this valuable web content! Individual recommendations are most definitely the very best way to go. electrical contractor dallas
The emotional recovery from fire damage is just as important as the physical repairs. Thank you, Servpro , for addressing this often-neglected aspect.
This was highly informative. Check out taxi Arzúa for more.
Water damage can be devastating for homeowners. It’s crucial to address the issue promptly to prevent further destruction. Check out Auburn Fire Damage for tips on dealing with water damage effectively!
уннв слушать музыку все песни уннв слушать музыку все песни .
Appreciate the thorough write-up. Find more at boiler installation glasgow .
Many thanks for sharing this valuable web content! Individual referrals are absolutely the best method to go. commercial electrician arvada
Such an eye-opening post! I didn’t consider how building type affects insulation choices before. Does anyone have suggestions for reliable contractors in Howell, NJ? insulation contractors near me
I enjoyed this article. Check out movers tucson az for more.
L’efficacité est réellement au rendez-vous ; aucune hésitation quant aux retours exprimés ici!!! # # anyKeyWord ## vidange de fosse septique conseils
I highly recommend seeking legal counsel if you’ve been injured in an Anchorage car accident—it made all the difference for me! Start with Anchorage Car Accident Lawyer .
Your suggestions for enhancing outdoor living areas are so inspiring; I can’t wait to start working on mine! Additional outdoor ideas await you at Home Remodeling
It’s so reassuring knowing that many reputable Los Angeles auto transport companies take utmost care of luxury vehicles during transit! Los Angeles car shipping
Exceptional post! Understanding guarantees is key when hiring a professional. If you wish to learn more about what to try to find, go to roofing contractor near me for thorough info.
I value the focus on obtaining multiple quotes before choosing a specialist. It truly helps with budgeting! For extra suggestions, head over to roofer near me .
I never understood the amount of aspects affect the life expectancy of a roof. Thanks for sharing! If you have an interest in discovering certified roofer, see roofing company near me for helpful information.
The importance of hiring professional helpers cannot be underestimated; visit #localmoversOsteen# on Osteen international movers
Just wrapped up a move with great help from # # anyKeyWord # #- couldn’t have done it without their support! San Antonio full service movers
Excellent article! Recognizing warranties is crucial when working with a service provider. If you wish to learn more about what to try to find, check out roofer bridgewater for detailed details.
This article really opened my eyes to the various roof products available. For any individual taking into consideration a roof upgrade, absolutely look into roofing contractor near me for experienced recommendations.
Birmingham has such a rich tapestry of cultures, and your photography reflects that beautifully. Asian Wedding Photographer Birmingham
Education about addiction and recovery is principal, and many drug rehab furnish good sized resources for families.
I value the focus on getting multiple quotes prior to picking a specialist. It really aids with budgeting! For extra tips, head over to residential roofer Bridgewater NJ .
Love these insights into keeping up with home care; try using the affordable services at ### any Keyword ### if you need help! free gutter quote
Your recommendations serve as fantastic stepping stones towards achieving optimal results via professional assistance from dallas seo agencies!” advertising agencies in dallas tx
Can anyone share their experience with ###solar system repairs perth###? Always good to know who to trust. Perth Solat inverter
I had a small leak in my basement that turned into a major water damage problem. Thankfully, I found helpful resources at Servpro that guided me through the restoration process.
“Wonderful insights into how weather affects outdoor painting projects—always consult professionals from Portland Outdoor Painters #!”
Seriously impressed by their expertise and dedication—the results speak for themselves when it comes down toLaklandWindowCleaning!!! # # any keyword# # Lakeland Window Cleaning
Kudos to #LakelandWindowCleaning for always going above and beyond when it comes to customer satisfaction!!! ## gutter cleaning
Thanks for the clear advice. More at abogada Vigo .
Nicely done! Discover more at taxi en Arzúa .
It’s surprising how many people don’t realize they need a lawyer after a car accident. If you’re in Anchorage, make sure to connect with professionals through Anchorage Car Accident Lawyer .
How frequent ought assessments conducted periodically evaluating performance delivered consistently thereafter assuring continued satisfaction remained intact over time indefinitely irrespective changes underway gradually occurring amidst evolving independent insurance agent
Thanks for the advice! Requesting references is a have to when working with electrical experts. electrical contractor dallas
If you value your time, mobile car detailing is the way to go! Discover more at car detailing in santa monica .
Appreciate the useful tips. For more, visit boiler service glasgow .
I’ve never seen such dedication from a service team before—thank you ###for going above and beyond during our time of need!! k&D Development
Kitchen islands can be game-changers for families who love to cook together; what do you think? Ideas await at kitchen cabinet renovation Tewksbury !
This was a wonderful post. Check out Hotel singaraja for more.
Very useful tips in this article—thanks so much! For those needing assistance, I recommend contacting gutter cleaning near me #.
Superb ideas given here; very enlightening undoubtedly! What are some usual mistaken beliefs concerning working with electricians? electric company arvada
This was a fantastic read. Check out moving companies tucson az Zooz Moving (East) for more.
I loved that they provided packing supplies too when we hired # any keyword# – saved us so much time! Ona international movers
A friend recommended # #anyKeyword## when I was looking for cocoa movers—I’m glad they did! Long distance movers Cocoa
Does anyone have recommendations for a reliable Clearwater moving company? Clearwater movers
I can’t believe how clean my windows look after using window cleaners near me . Highly recommend them!
Atmosfera tego food hallu jest po prostu magiczna – idealna na randkę ! Restauracje
Kto był ten wie jakie cuda kryje ta sopocka restauracja – po prostu trzeba tam być ! # # anyKeyWord ## restauracja sopot
“Affordable yet high-quality service—that’s exactly what you get with Limerick Guttering Services; highly recommend them!!” gutter repairs Clare
The relevance of normal roofing maintenance can not be overemphasized! I found some excellent contractors at roofing contractor near me that assisted me with my roof examination.
Exceptional message! Understanding guarantees is crucial when hiring a contractor. If you wish to discover more regarding what to look for, check out roofer near me for in-depth details.
Terrific understandings on choosing the ideal roofer! It’s so important to do your study. For those trying to find more tips, take a look at roofing company near me for useful resources.
The seasonal changes can actually influence roofing demands! If anyone is trying to find specialist professionals to evaluate their roofing systems after winter months, have a look at roofer bridgewater for recommendations.
Paxos Electric Company offers the best industrial electrician services in Wharton.
I’ve always had a positive experience with Paxos Electric Company.
Paxos Electric Company is my go-to for industrial electricians in Wharton Paxos Electric Company location
If you’re dealing with the aftermath of a fire, don’t lose hope! The resources and community support available at Servpro San Marcos can make a huge difference.
A good photographer knows how to capture the essence of cultural traditions beautifully. Asian Wedding Photographer Birmingham
Wow, I had no idea about the long-term effects of Auburn Mold Damage on property value! This is really eye-opening. I’ll make sure to visit Auburn Fire Damage for further insights!
My business windows needed a serious clean, and Lakeland Window Cleaning delivered! window cleaning
Excellent read filled with solid advice—we should all consider periodic professional assistance as laid out throughout your piece alongside help from companies such as ### any Keyword###.” gutter cleaning
I appreciated this article. For more, visit abogado Vigo .
Immediate legal advice is critical following a car crash! Anchorage has some top-notch lawyers—check out their websites like Anchorage Car Accident Lawyer for more info.
This was highly educational. For more, visit taxi cerca de mí .
“The importance of aftercare shouldn’t be wired ample; it’s a must-have for long-term fulfillment put up-#]#.” Virtual IOP
I’m excited to try your suggestions for energy-efficient upgrades! For more green tips, check out Home Remodeling .
The relevance of routine roofing maintenance can not be overemphasized! I discovered some outstanding professionals at roofing contractor near me that assisted me with my roofing system examination.
truyện giả dược, giả dược truyện
Thanks for the ideas on identifying roof covering scams! It’s necessary to stay informed. For more resources on locating credible professional roofer, go to Bridgewater NJ roofing experts .
Appreciate the detailed information. For more, visit Lyon Works Digital .
Fantastic advice! After using gutter cleaning , my gutters have never looked better!
This was very enlightening. More at TheSeptikDesignNetwork .
I had an amazing experience with my local move—thanks to the team at Orlando international movers , my stress was minimized!
My family has used various shippers, but we keep returning to Winter Garden vehicle shipping for our needs in Winter Garden.
Smooth sailing with Dade City international movers during my recent move—definitely check out their services at Best Dade City movers !
Współpraca z tą firmą to sama przyjemność – nie miałem żadnych kłopotów ze wszystkim co potrzebowałem przenieść! Transport mebli Wrocław
Every moment felt worth celebrating once settled finally into new digs while knowing supported throughout journey thanks largely due diligence exercised ahead selecting reputable entities discussed within this forum led me straight towards: ### Long distance movers Terra Ceia
If you’re unsure where to start with your office move, the resources at Malabar full service movers could be just what you need.
“Eagerly anticipating further exploration involving deeper dives into logistics surrounding successful relocations locally!” # # anyKeyWord ## Odessa moving companies
truyện tranh giả dược
Thanks for the great tips. Discover more at long distance movers tucson .
Excellent information on making sure security first when hiring an electrical expert– definitely crucial advice! Do you have understanding into safety requirements they should comply with? dallas electrician
This was highly educational. For more, visit gas safe .
Anyone else prefer local ###movingcompanies### over national chains? Long distance movers San Antonio
I love that you’re focusing on local services in Limerick & Clare; very helpful! prevent water damage
Terrific pointers right here! I always neglect to ask about guarantees on electric job. electricians in arvada
If you’re moving soon, definitely consider checking out the recommendations at Osteen moving company for local movers.
Appreciate the thorough write-up. Find more at 24-hour plumber San Diego .
So impressed by the quality and care taken by the team at window cleaning service !
What a difference it makes to have clean windows! Thank you, Lakeland Window Cleaning! gutter cleaning service
Valuable information! Find more at Smile Dental Bakersfield .
This is such an important topic! Water damage can be so devastating. I’m glad I came across San Marcos Servpro while searching for local services.
I never ever realized the amount of elements affect the lifespan of a roof covering. Many thanks for sharing! If you have an interest in locating qualified roofer, see roofing contractor near me for handy info.
After experiencing water damage from a storm, I was overwhelmed. Fortunately, I discovered some invaluable advice on recovery steps at Servpro .
I appreciate the focus on obtaining multiple quotes before choosing a contractor. It actually helps with budgeting! For added tips, head over to roofer near me .
The seasonal modifications can actually influence roof demands! If any individual is trying to find professional professionals to inspect their roofing systems after winter, look into roofing company near me for suggestions.
This was very enlightening. For more, visit Lion Werks Digital .
Idealne miejsce na letnie wieczory – cudowny klimat oraz znakomita kuchnia czekają na was ! restaurant
Paxos Electric Company offers the best industrial electrician services in Wharton.
I’ve always had a positive experience with Paxos Electric Company.
Paxos Electric Company is my go-to for industrial electricians in Wharton Find industrial electrician near me
It’s important to hire accredited and insured roofer to stay clear of future troubles. For even more guidance on this subject, you can explore roofer bridgewater for trustworthy suggestions.
I found this very interesting. Check out onsite wastewater consulting for more.
Thanks for sharing such valuable information about gutter maintenance! I’ll be calling gutter cleaning services soon!
Kudos to the team at Best Osteen movers for connecting me with amazing local movers in Osteen!
The pre-wedding ceremonies are just as beautiful as the wedding itself! An experienced Birmingham photographer can help document everything perfectly. Asian Wedding Photographer Birmingham
With so many options available now post-discovery of # any keyword , planning feels effortless! San Antonio international movers
If you’re feeling lost after a car crash, remember that there are professionals who can help you reclaim your life and benefits! Explore options at Anchorage Car Accident Lawyer .
Thanks for the informative post. More at abogados Vigo .
This is highly informative. Check out taxi Arzúa for more.
Thanks for the helpful article. More like this at Colepepper Plumbing .
My friends recommended checking out top-rated Orlando international movers, so I did—and I’m glad I found them through Cheap movers Orlando !
anykeyword###’s customer service! Lulu full service movers
Thanks for the great explanation. Find more at top rated Smyle dental care in Bakersfield .
Thanks for sharing these moving tips! A top-notch #OdessaMovingCompany can change everything. Odessa moving company
Bạn có biết cách nhận diện một chú gà tốt để tham gia thi đấu ở thomo hay không? Hãy cùng trao đổi nhé! https://medievalart.uk.com
Vehicle transport can be tricky, but ### any keyword### made it so much easier than expected! Highly recommend them! Auto Movment Group
“Refreshing view ahead! Big thanks to # # anyK eyword ### for their exceptional work today.” window cleaning
Nothing beats the feeling of sparkling clean windows! Book your appointment with gutter cleaning service today!
This was very beneficial. For more, visit Lion Works Digital .
Thanks for the helpful article. More like this at TheSepticDesignNetwork .
Proper drainage can make all the difference; keep those gutters clean, everyone! free gutter quote
What types of water sports can you enjoy while visiting lovinabali? I’d love suggestions as I’m planning activities during my vacation there! hotel singaraja bali
I was so stressed after my home was damaged. Thankfully, I found water damage restoration , and they made the restoration process seamless!
Registre-se com o nosso código de indicação Betano: BETEM e aproveite! O Spaceman, disponível em diversas plataformas de apostas, é um dos jogos mais populares entre os apostadores que buscam diversificação além dos esportes. Com um método simples, o game pode proporcionar ganhos em questão de segundos. Este artigo aborda as regras do jogo, dicas de apostas passo a passo e as melhores estratégias de jogo do Spaceman na Betano. Continue por aqui para saber mais! Para se aproximar dos resultados positivos a médio e longo prazo, os jogadores podem definir alguns critérios que fazem toda a diferença nas rodadas. Confira abaixo 6 dicas no Spaceman Betano: É possível jogar Spaceman no F12 Bet desde que você tenha criado a sua conta e realizado algum depósito. Ao cumprir esses dois passos simples, todos os planetas deste popular caça-níquel ficam liberados.
https://forum.linuxcnc.org/cb-profile/pluginclass/cbblogs?action=blogs&func=show&id=10840
Embora a Betano seja uma das melhores casas a oferecer Spaceman em sua grade de crash games, é possível encontrar o sucesso da Pragmatic Play em outros cassinos online que também oferecem condições especiais para os fãs do jogo do astronauta. Sites de Aposta » Cassino Online » Jogo do Astronauta Spaceman Blast your way through waves of Alien Abductors and UFOs while defending Spaceman Dudes from being abducted in this fast-paced 80’s style arcade game. O F12 Bet Casino oferece uma cobertura especial dos principais crash games disponíveis no mercado brasileiro, com destaque para títulos populares como Spaceman, da Pragmatic Play. Mesmo sem promoções específicas para novos jogadores, a plataforma se destaca pela variedade e qualidade dos jogos disponíveis.
Wow, I didn’t know that about gutter cleaning! I’ll definitely reach out to local gutter cleaning services next time!
For anyone needing vehicle transport in Palm Bay, I highly recommend checking out Palm Bay vehicle shipping .
Just wanted to say thank you to Tampa car shippers for their outstanding service during my recent car shipment!
Thank you for your sharing. I am worried that I lack creative ideas. It is your article that makes me full of hope. Thank you. But, I have a question, can you help me?
Thanks for the clear advice. More at boiler service glasgow .
I never realized how much smoke damage could affect a home until I read about it on Servpro . Great resource for fire safety and recovery!
Learning about fire safety measures can prevent future incidents! Visit Servpro for detailed guidelines on keeping your home safe from fires.
Appreciate the thorough write-up. Find more at tucson moving services .
Thanks for the valuable article. More at tucson moving services Zooz Moving (East) .
TextAlignment=”Justify”“Positive variations initiated during rehabilitation form destiny prospects—facilities reminiscent of # ] give wish in which once there was despair!” drug treatment scottsdale
Has anyone used Winter Garden vehicle transport for their vehicle transport in Winter Garden? Highly recommend!
Loved working with the team at Local movers San Antonio #—such a smooth process!
The aftermath of a car accident can be overwhelming. A knowledgeable lawyer from Anchorage made all the difference for me! Discover more at Injury Lawyer Anchorage .
Your suggestions for enhancing outdoor living areas are so inspiring; I can’t wait to start working on mine! Additional outdoor ideas await you at Home Remodeling
Paxos Electric Company offers the best industrial electrician services in Wharton.
I’ve always had a positive experience with Paxos Electric Company.
Paxos Electric Company is my go-to for industrial electricians in Wharton Wharton NJ electrical inspections
If you want peace of mind while moving, go with #localmoversOsteen# from Long distance movers Osteen
This was a fantastic read. Check out Coldpepper Plumbing for more.
This was a fantastic read. Check out Smyle Family Dental Bakersfield for more.
“Incredible shots that reflect deep emotional connections at one of life’s biggest milestones.” Asian Wedding Photographer Birmingham
I’m confident that time-honored inspections can save house owners lots of drawback with mold later on! VetCor is honestly human being to believe in Sarasota! Mold Damage Remediation
Highly Recommended: I cannot recommend Tampa Bay Pressure Washing enough! If you’re looking for reliable, high-quality pressure washing services, look no further than this exceptional company. Sealing Brick Pavers Tampa Bay Pressure Washing
This was a fantastic read. Check out Lion Works Branding for more.
How often should we really be cleaning our windows? I’m planning to hire Lakeland Window Cleaning soon! Lakeland Window Cleaning
Awesome article! Discover more at taxi Arzua .
I had no idea about the health benefits of having clean windows—thanks for sharing! gutter cleaning service
This was a fantastic read. Check out designing septic systems for more.
Excellent points raised here about gutter cleaning—thanks for sharing! Check out professional gutter cleaning for fantastic service.
Thanks for the great information. More at payday loans new orleans .
A huge thank you goes out to #@# any keyword###; their team made our recent move seamless and enjoyable. Clearwater international movers
Great insights! Discover more at car rental .
Always ask about tracking options when using Los Angeles auto transport companies; it’s so reassuring! Los Angeles car transportation services
anykeyword### handles customs clearance during international moves. Lulu apartment movers
Just had an amazing experience with mobile detailing—definitely check out detailing near me !
After my neighbor experienced fire damage, I learned a lot about the importance of insurance coverage. Keep spreading awareness, Servpro !
The aftermath of water damage can be chaotic, but knowing what to do can help. I highly recommend checking out the strategies shared on Servpro of Auburn !
Hy vọng rằng tôi sẽ có thêm nhiều cơ hội thắng lớn khi tham gia vào ### anyKeyWord###! https://gamebai-xocdia.live
Appreciate the comprehensive advice. For more, visit 24/7 plumber San Diego .
This was a great help. Check out hotel for more.
If you’re looking for efficient water removal services near me, I highly recommend checking out k&D Development . They did a fantastic job at my place!
Wonderful tips! Find more at SmyleDent Bakersfield .
I enjoyed this read. For more, visit professional gutter team .
I wish I had known about the services offered by Anchorage car accident lawyers earlier! They really make a difference in your recovery process. Explore Anchorage Car Accident Lawyer for assistance.
Great insights! Discover more at Lion Werks Digital .
“Our team had a fantastic experience using one of the movers recommended by Clewiston moving companies #!”
Great job! Discover more at qualified septic inspector .
Regular gutter maintenance saves so much money in the long run. I trust gutter cleaning for all my gutter cleaning needs!
No more streaks! Thank you, Lakeland Window Cleaning , for your excellent window cleaning services.
Endodoncja w Klinika stomatologiczna Poznań to prawdziwa ulga dla osób cierpiących na bóle zębów. Gorąco polecam!
Paxos Electric Company offers the best industrial electrician services in Wharton.
I’ve always had a positive experience with Paxos Electric Company.
Paxos Electric Company is my go-to for industrial electricians in Wharton Wharton NJ electrical expertise
It’s refreshing to read such helpful information about something as simple as window maintenance; grateful for services provided by ## gutter cleaning service
Thanks for the useful post. More like this at boiler installation glasgow .
mirka-master.ru .
If you want quality service without breaking the bank, go with Cheap movers San Antonio !
This is highly informative. Check out Colepepper Plumbing for more.
“What are some creative ideas you’ve seen work well during pre-wedding shoots?” Asian Wedding Photographer Birmingham
After researching multiple law firms, it was clear that # anyKeyword # had some of the best attorneys available. pedestrian accident lawyer El Segundo, California
I enjoyed this post. For additional info, visit Smile Dental Bakersfield .
Chơi https://gamebai-maubinh.asia là một trải nghiệm tuyệt vời, tôi đã thắng lớn trong lần chơi đầu tiên!
I recently experienced water damage in San Marcos, and the cleanup process was overwhelming. I wish I had found San Marcos Servpro earlier for expert advice!
This is highly informative. Check out Lion Werks Digital for more.
Your tips on maintaining gutters are spot on! For anyone looking for professional help, check out local gutter cleaning services for reliable service.
Investing in quality waterproofing solutions can protect your home from future water damage issues. Check out the best options on Servpro !
This was a fantastic resource. Check out septic system planning expert for more.
Thanks for the detailed guidance. More at abogados en Vigo .
My favorite part about using window cleaning service ? No more worrying about cleaning those hard-to-reach windows!
Need a reliable way to get your vehicle moved? Look into what’s offered at Clearwater vehicle shipping in Clearwater.
This article really opened my eyes to the benefits of pressure washing! For further reading, visit Pressure Washing Company .
Every aspect of my move was handled professionally by the wonderful team at Bushnell—thank you all so much! Bushnell moving companies
If you’re feeling lost after a car crash, remember that there are professionals who can help you reclaim your life and benefits! Explore options at Injury Lawyer Anchorage .
Love how bright everything looks now that we’ve partnered up with gutter cleaning service
Предлагаем услуги профессиональных инженеров офицальной мастерской.
Еслли вы искали ремонт кофемашин philips, можете посмотреть на сайте: срочный ремонт кофемашин philips
Наши мастера оперативно устранят неисправности вашего устройства в сервисе или с выездом на дом!
Customer-Centric Approach: Throughout the process, they maintained clear communication and actively sought feedback to ensure my satisfaction. This dedication to customer service truly set them apart. Brick Paver Sealer Tampa Bay Pressure Washing
Miałem ostatnio zabieg implantologii i jestem bardzo zadowolony! Jakie są Wasze doświadczenia w tym temacie? Metamorfozy uśmiechu Poznań
This was a great exploration of the topic. Check out more on dental care at Farnham Dentistry dentist .
Paxos Electric Company offers the best industrial electrician services in Wharton.
I’ve always had a positive experience with Paxos Electric Company.
Paxos Electric Company is my go-to for industrial electricians in Wharton Industrial electrician company Wharton
They really take the time to explain everything—thank you, Limerick Guttering Services! gutter repair
Thanks for the thorough analysis. Find more at taxi Arzúa .
Tôi muốn biết về quy trình xác minh tài khoản tại https://nohu-sieunhan88.bet như thế nào?
Amazing communication skills helped me feel confident about everything that was happening!!!! Long distance movers Fernandina Beach
What’s the best way to choose a moving company in Port Richey? I found some solid advice over at Local movers Port Richey !
купить диплом в ноябрьске https://rudiplomt.online .
This was very insightful. Check out ferretería en Albacete for more.
Helpful suggestions! For more, visit San Diego local plumbing services .
It’s crucial to have an experienced Waco personal injury attorney when dealing with insurance companies. They know the ins and outs of the law! Find out more at personal injury lawyer waco tx .
Daniella Levi & Associates, P.C. truly excels as a Bronx car accident attorney. Their expertise made a significant difference in my case outcome.
If you need a Bronx car accident lawyer, I highly recommend Daniella Levi & Associates, P.C Accident attorney near me Bronx
This was a fantastic resource. Check out Smyle Dental Bakersfield for more.
I love incorporating smart technology into my kitchen remodel—what gadgets do you recommend? contractor for kitchen remodel Lexington
Always amazed at how much debris accumulates in gutters! Thankfully, I have residential gutter cleaning on speed dial!
The prices are unbeatable at table and chair rental cost ! Perfect for anyone looking for fun rentals in Tampa.
аттестат купить за 11 класс аттестат купить за 11 класс .
Appreciate the great suggestions. For more, visit Lion Works Digital .
Nicely done! Find more at professional system planner .
Let’s celebrate victories small monumental alike honoring progress made recognizing milestones achieved acknowledging efforts exerted resilience demonstrated courageously facing fears charting paths traversed navigating obstacles skillfully guided Long distance movers Titusville
For quality and reliability, I recommend choosing Lakeland Window Cleaning every time! window cleaning service
Can anyone recommend good fire damage restoration services? I found some useful tips on selecting pros at Servpro !
Great tips for maintaining clean windows! I always recommend gutter cleaning for the best results in Lakeland.
Moving is a challenge, but my experience with the local movers at Weirsdale moving company made it enjoyable!
Investing in quality waterproofing solutions can protect your home from future water damage issues. Check out the best options on Servpro of Auburn !
Endodoncja może uratować wiele uśmiechów – dziękuję ### anyKeyword### za pomoc! Klinika stomatologiczna Poznań
Bầu không khí trực tuyến của https://nohurock.com luôn làm tôi cảm thấy phấn chấn.
Thanks for the informative post. More at Farnham Dentistry 11528 San Jose Blvd, Jacksonville, FL 32223 .
Daniella Levi & Associates, P.C. has the best Brooklyn car accident attorney I’ve ever worked with!
If you need a Brooklyn car accident lawyer, Daniella Levi & Associates, P.C. is the place to go Brooklyn car accident lawyer
Impressed by how many talented photographers are in Birmingham specializing in Asian weddings! Asian Wedding Photographer Birmingham
It’s vital to have someone who understands Alaska’s laws on your side after a car accident! Explore the resources at Anchorage Car Accident Lawyer for professional help.
I adore vintage-inspired kitchens; they bring so much character—what’s your favorite era for design? Discuss over on our site: kitchen remodel contractors Tewksbury
Thanks for the clear breakdown. Find more at Coldpepper Plumbing .
The staff at gutter cleaning are super knowledgeable about gutter maintenance—it’s refreshing!
This was very enlightening. For more, visit Smyle Dental Bakersfield .
This was highly educational. For more, visit Tewes Design Group Architects .
Locating the right legal representation after an injury is vital– certainly take a look at resources at Falk Talks Law #!
Paxos Electric Company offers the best industrial electrician services in Wharton.
I’ve always had a positive experience with Paxos Electric Company.
Paxos Electric Company is my go-to for industrial electricians in Wharton Paxos Electric Company service excellence
I found this very interesting. For more, visit SEO strategies by Lion Works .
Looking for tips on choosing long distance movers? Check out the options available in Grand Island! Grand Island Mover’s
Can’t believe how easy moving can be with ##—they made everything hassle-free! Long distance movers Eaton Park
This was a fantastic read. Check out septic tank maintenance specialist for more.
Hydroseeding is such an innovative solution for landscaping—it really makes a difference when establishing new lawns or gardens faster than ever before! Learn about innovations in this field at Lawn care services !
Tôi đang tìm kiếm nhóm để cùng nhau chia sẻ kinh nghiệm chơi tại ### anyKeyWord###, ai tham gia không? https://nohu-kimcuongclub.win
Take it from me; it’s worth having professionals like # window cleaning
I’ll never take my clean windows for granted again; gutter cleaning
This is a fantastic resource! Highly informative. Check out Farnham Dentistry dentist for oral health info!
Kudos once again reaching milestones recognized opening doors previously unimagined possibilities await reaching further heights attainable together providing optimal results achieved successfully navigating paths laid forth ahead journey taken together gutter cleaning Limerick
**Customer Satisfaction Guaranteed**: Tampa Bay Pressure Washing stands behind their work. They assured me that if I wasn’t completely satisfied, they would return to make it right, which speaks volumes about their confidence in their service. Govee LED Strip Installation
Thanks for the insightful write-up. More like this at gaming online safety tips .
Thanks for the great explanation. More info at ferretería .
Какие модели BYD доступны у официального дилера в Узбекистане? Хочется узнать больше! https://500px.com/p/madorabtfp
For budget-friendly movers in Keystone Heights, you can’t go wrong with Office moving companies Keystone Heights .
If you’re moving soon, don’t hesitate to reach out to # Office moving companies Bradenton #!
Can anyone recommend a trustworthy Lake Helen moving company? I’m planning a big move soon! Lake Helen international movers
These tips are essential for all homeowners; don’t neglect your gutters and consider hiring experts like those at affordable gutter cleaning #!
Thanks for the insightful write-up. More like this at Coldpepper Plumbing .
I lengthy went to a physician salon that offered a wide range of solutions, including microneedling and Botox. The outcomes were great! Morpheus 8 is a revolutionary dermis regeneration product, which impressed me especially aesthetic clinic
DIY repairs for minor water damage can save money, but make sure you know what you’re doing! Helpful guides are available at Servpro of Auburn .
Thanks for sharing this information! I’m looking into ways to protect my home from water damage and found some great resources at San Marcos Servpro .
Akademia tradingu w Gdańsku ma świetną reputację! Na pewno skorzystam z ofert na kursy tradingu .
Tôi luôn tin tưởng vào độ an toàn của giao dịch tại https://nohu-phatloc247.club .
This was a fantastic resource. Check out Smyle Dental Practice Bakersfield for more.
The support from my Anchorage car accident lawyer was incredible during such a stressful time! For more information, visit Anchorage Car Accident Lawyer today!
Water slides make any event more exciting, especially with the impressive rentals available in Tampa! blow up bounce house rental near me
Eagerly awaiting opportunities where blending old/new designs creates stunning results; every detail counts when crafting memorable spaces together…!! ### anyKeyWord ## kitchen cabinet remodel Lexington
This was quite informative. For more, visit Lion Works media agency .
Thanks for the helpful article. More like this at TheSepticDesingNetwork .
Ortodonta powinien być wykształcony i kompetentny, ale również empatyczny ?# # aniKeword # licówki poznań
When it comes down to cleanliness and professionalism, go straight to # gutter cleaning service
Your enthusiasm for overhead doors is infectious– I’m all set to check out some brand-new choices myself now! Find distinct designs at Garage Door Service !
I love how much cleaner my house feels since installing renewable energy through ##solar power perth##! Solar Panels installation Armadale
Asian weddings are colorful celebrations; a good photographer will make those colors pop in every shot! Asian Wedding Photographer Birmingham
Wishing everyone safe travels as they relocate this season! Don’t forget about # # any Keyword ### for your vehicle needs. 𝗘𝘅𝗼𝘁𝗶𝗰 𝗖𝗮𝗿 𝗧𝗿𝗮𝗻𝘀𝗽𝗼𝗿𝘁
This was highly relevant to my interests. More at Farnham Dentistry Jacksonville FL .
Paxos Electric Company offers the best industrial electrician services in Wharton.
I’ve always had a positive experience with Paxos Electric Company.
Paxos Electric Company is my go-to for industrial electricians in Wharton Paxos Electric Company efficiency
Helpful suggestions! For more, visit Tewes Design Architects .
What services does Long distance movers West Palm Beach # offer? I’m curious about their packing options for my upcoming move.
Such a brilliant idea to have mobile car detailers come to you! Find out more at auto detailing santa monica .
I just went to a skilled salon that provided a combination of therapies that included Botox, microneedling, and Morpheus8 medical spa
Chơi bài trực tuyến trên https://gamebai-lieng.win thật sự rất thú vị, cảm giác như đang ở casino thật.
Appreciate the thorough insights. For more, visit Colepepper Plumbing .
The right backsplash can make all the difference in a kitchen remodel. Have you thought about your design? Visit kitchen renovation costs Tewksbury for inspiration!
Юрист Онлайн https://juristonline.com квалифицированная юридическая помощь и консультации 24/7. Решение правовых вопросов любой сложности: семейные, жилищные, трудовые, гражданские дела. Бесплатная первичная консультация.
I recently completed a Bellevue bathroom remodel, and I couldn’t be happier with the results! The transformation was incredible, and it has made such a difference in my daily routine Kitchen Remodel
Simply completed a settlement thanks to my remarkable legal representative from Falk Talks Law Injury ! If you remain in uncertainty, reach out to them.
Thanks for the great explanation. More info at SmyleDent Bakersfield .
Very informative article. For similar content, visit Lyon Works Digital .
This was very beneficial. For more, visit professional tank inspector .
Лучшие цены russiahelp.com на ремонт техники.
This was quite informative. More at ferretería .
I trust ##Trusted Perth Stocktaking company## for all my inventory counting needs; they never disappoint. Perth Stocktaking company
Pressure washing is a game changer for removing mold and mildew! I learned so much from this post. Visit Pressure Washing Conway for more.
The professionals at Brisbane Stocktaking near me provided an accurate stock count that helped my business immensely.
Fantastic post! Discover more at Reverse phone search .
Will not threat the safety of your respective home having a faulty electric power pole. Rely on Underground Cable Fault Detection electrician Perth for secure personal electric power pole replacement in Perth.
Protect your investment with familiar water leak detection amenities by Emergency Leak Detection Perth in Perth. Our latest equipment guarantees no leak is going neglected.
What wonderful insights were provided by this website article regarding the newest developments in plastic procedures! As someone who has just looked into possibilities like Botox and microneedling medical spa
Wonderful tips! Discover more about dental care at Farnham Dentistry .
Chắc chắn rằng các bạn sẽ không hối hận khi tham gia vào cộng đồng của https://gamebai-maubinh.asia !
Your secondhand fixtures sequence is a treasure trove for individuals who appreciate pleasing and classic items. I’m blissful I stumbled upon your internet site although shopping for quality used fixtures in Perth! Secondhand Office Furniture shop Perth
After experiencing water damage from a storm, I was overwhelmed. Fortunately, I discovered some invaluable advice on recovery steps at Auburn Fire Damage .
The emotional toll of fire damage is often overlooked. Thank you, Servpro , for providing support and guidance during such difficult times.
Дом из контейнера https://russiahelp.com под ключ — мобильное, экологичное и бюджетное жильё. Индивидуальные проекты, внутренняя отделка, электрика, сантехника и монтаж
Don’t underestimate the importance of everyday electric upkeep in your property or industrial; talk to a legitimate Electrician in Wangara for peace of mind.
I found great tips for moving to Babson Park on Babson Park service movers – definitely worth a read!
If you haven’t tried out trusted window cleaners yet, you’re missing out on crystal-clear windows!
The customer service at Oneco Mover’s is fantastic! They really care about making your move smooth.
If you’re relocating, definitely consider giving a shout-out to your favorite **local movers** like those at ###. Winter Park international movers
Anyone recommend good local movers in Astatula? I found some great options at Astatula moving companies !
My move was stress-free thanks to the affordable rates at Lake Mary full service movers ! Highly recommend them for Lake Mary.
The potential efficiency of my new gadget is already showing effects thanks to recommendations from ##Best Air Conditioning Perth## mavens! Air Conditioning company Perth
Загадки Вселенной https://phenoma.ru паранормальные явления, нестандартные гипотезы и научные парадоксы — всё это на Phenoma.ru
My experience with ### anyKeyWord###was top-notch when moving locally — highly recommend them! Cheap movers Keystone Heights
The team arrived on time and was incredibly professional. They took the time to assess the areas that needed attention and explained their process thoroughly, which gave me confidence in their expertise. Christmas light installation cost
If you’re relocating to Lake Helen, you must try Office moving companies Lake Helen for cheap moving solutions.
Continue to be neat and comfortable all calendar year extended which has a ducted air con technique from Air Conditioning Canning Vale in Western Australia.
I appreciate that hydroseeding uses less water than sod installation—great for the environment! Discover more benefits at Commercial hydroseeding .
My circle of relatives feels so much safer seeing that we mounted our new device from Strata cctv Perth —exceptionally suggest it!
Love the emphasis on strategic HR administration! For personalized consulting in Perth, don’t pass over out on Professional HR Services Perth .
My brand visibility skyrocketed after partnering with Social Cali of Rocklin for digital marketing! Marketing Agency
I’m planning renovations and desire a few installations—excited to work with Cheap Hot Water System services Mandurah soon!
Great insights here! I’m currently scouting for the best #OdessaMovingCompany for my move next month. Odessa moving company
Really enjoyed your take on conversion optimization techniques—it’s something every business should prioritize; get started with Digital Marketing Agency
Need official plumbing expertise in Perth? Look no in addition than Reliable Emergency Plumber Wattle Grove ! Their educated technicians specialise in sizzling water heater maintenance and installations, guaranteeing your pleasure.
This was highly educational. For more, visit Colepepper Plumbing .
Great tips discussed regarding crafting memorable slogans paired effectively alongside visuals—future endeavors will include deeper collaboration through #I chose Silk Screening Lexington
Recently, I labored with a the best option standard contractor who handed all my expectancies! If you choose to find a few guidelines on hiring one, I counsel traveling expert general licensed contractors for some wonderful content material.
Paxos Electric Company offers the best industrial electrician services in Wharton.
I’ve always had a positive experience with Paxos Electric Company.
Paxos Electric Company is my go-to for industrial electricians in Wharton Paxos Electric Company electrical expertise
Сайт знакомств https://rutiti.ru для серьёзных отношений, дружбы и общения. Реальные анкеты, удобный поиск, быстрый старт. Встречайте новых людей, находите свою любовь и начинайте общение уже сегодня.
This was very enlightening. More at Smyle Dental Bakersfield .
Had my tap repaired final week; one of these remedy! Big as a result of the workforce at Plumber Belmont near me .
Social Cali’s expertise in SEO is unmatched. Can’t wait to see the results of my campaign! Social Cali of San Jose Marketing Agency
Anyone else has had concerns with their springs breaking? Would enjoy some guidance on replacements! Garage Door Company
I’ve been looking into different treatments at skilled spas, and I may say that my skin has really been transformed by the combination of Botox and microneedling! The binder produces quick results medical spa
Надеюсь, что сервис у официального дилера BYD будет на высшем уровне! https://escatter11.fullerton.edu/nfs/show_user.php?userid=8742098
” Local talents might offer exclusive deals compared against larger companies—always compare value alongside offerings!” Asian Wedding Photographer Birmingham
Just wanted to recommend Long distance movers Oak Hill for anyone needing movers in the Oak Hill area.
Great job breaking down everything regarding roofs; glad there’s reliable content like this available locally through###: any keyword## roofing contractor
I’ve viewed firsthand how tons big difference a trained universal contractor makes in production initiatives. For everybody wanting greater data on this subject matter, you ought to definitely visit construction companies !
I appreciate how easy it is to compare prices for vehicle hire in Melbourne—check out what’s offered on Melbourne car moving companies !
Thanks for the informative post. More at how to play free slots .
I found your article super informative. For family dentistry info, visit Farnham Dentistry dentist !
If you are involved about healthiness dangers from mold, touch VetCor—they prioritize safety and effectiveness! Mold Damage Remediation Sarasota
Valuable information! Discover more at ferretería Albacete .
Custom kitchen design in Bellevue is truly transforming homes! The attention to detail and personalization really makes a difference. I love how homeowners can express their style while optimizing functionality Remodel Company
Your blog post highlights the significance of proper roof insulation for energy efficiency. If anyone needs assistance with insulation installation or evaluation, I highly recommend considering the expertise of Tidal Remodeling roofing company for optimal results.
Love supporting local eateries especially ones making such strong impacts via positive vibes created within neighborhood community surrounding them ! Indian restaurants
I recently took a trip to a health spa that specializes in developed skincare treatments, and I didn’t think how much my skin has changed since then! Every technique has been customized to my requirements, from liposuction to microneedling medical spa
Simply wished to share my favorable experience with a local moving company! If you’re looking for recommendations or recommendations on movers, don’t miss out on small movers Toronto .
Fantastic suggestions on choosing roof products! The choice really impacts durability and maintenance requirements. I’m considering an upgrade quickly! roofer near me
A effectively-prepared well-known contractor is essential to any effectual venture. I’ve learned most from assets like concrete contractors that experience helped me in the time of my domicile development trip.
Motivated after analyzing differences between varying pressures applied based upon needs expressed across surfaces – thrilled knowing where expertise lies defined therein toward Power Washing
Paxos Electric Company offers the best industrial electrician services in Wharton.
I’ve always had a positive experience with Paxos Electric Company.
Paxos Electric Company is my go-to for industrial electricians in Wharton Paxos Electric Company reviews
Your perspective around integrating storytelling elements into branding was fascinating—I intend to implement this alongside #I choose Graphic Printing Lexington
Working with an experienced personal injury lawyers in georgia opened my eyes to what I was entitled to after my crash.
Czy ktoś już korzystał ze szkoleń online dotyczących akademii tradingowej? Chciałbym poznać opinie o stronie od ###aniKeyWord###! sygnały forex telegram
Valuable information! For more on oral health, check out Farnham Dentistry emergency care .
I was amazed at how inexpensive my move was with the help of Local movers Fernandina Beach #—thank you!
Is it time for some rejuvenation in your garden? Explore local options through: %% anyKeyWord%%!!! Tree Service
Many people don’t realize how beneficial it can be to consult with an expert like a ▲motorcycle accident attorney irvine▲ before making decisions following injuries! irvine truck accident lawyer
Planning a move soon? Be sure to check out the best options available at Best Plano movers .
Finding the properly frequent contractor could be a daunting job, however it’s value it subsequently. I discovered a few helpful counsel on-line at functional remodel kitchen designs that made my decision such a lot simpler!
You can’t go wrong with the services provided by Digital Marketing Agency ; they’re industry leaders!
”Empathetic understanding forms foundation upon which successful partnerships arise during challenging journeys taken together toward brighter futures ahead!” collision lawyer
Social media is indeed a game changer for brands! I recommend checking out Marketing Agency for professional services.
Custom kitchen design in Bellevue is truly transforming homes! The attention to detail and personalization really makes a difference. I love how homeowners can express their style while optimizing functionality Remodel Company
This was very beneficial. For more, visit ferretería en Albacete .
I painted my garage door and it looks brand name brand-new! A basic DIY project can make a big distinction. Garage Door Service
Workers’ compensation doesn’t have come overwhelming find help today from experts readily available specializing exclusively assisting clients navigate claim processes efficiently effectively helping obtain benefits deserved efficiently expediting Workers’ Compensation
If you want to elevate your brand’s online game, Social Cali of San Jose is the way to go! Don’t miss out, visit Digital Marketing Agency .
The blend of nutrients in hydroseed really boosts growth potential—it’s like giving your lawn a power-up! Read about it at Lawn care services .
Paxos Electric Company offers the best industrial electrician services in Wharton.
I’ve always had a positive experience with Paxos Electric Company.
Paxos Electric Company is my go-to for industrial electricians in Wharton Paxos Electric Company service excellence
Loved reading this! I’m eager to learn more about what tree services can do for my landscape.
Отличная новость! Официальный дилер BYD в Узбекистане предлагает широкий выбор автомобилей. https://list.ly/sammonctwx
Thanks for the useful suggestions. Discover more at Phone carrier lookup .
Making informed choices is vital when hiring contractors; don’t skip valuable insights shared over # roofing contractor
What a great discussion! Get more on dental care at Farnham Dentistry general dentist .
“For anyone looking to declutter, go with # #anyKeyword###! You won’t regret it.” Javis Dumpster Rental Orlando
I didn’t understand how important appropriate ventilation is for roofing system longevity. This is absolutely something I’ll look into throughout my next repair work project! roof inspection
I had an excellent experience with my moving company last month. They were expert and effective! For additional information on what to anticipate from movers, have a look at small movers near me .
What an engaging read; you’ve made understanding the complexities involved with transporting vehicles easier through your insights into Ford liberty vehicle transport—find even more tips available at ###yourLink### ! Fort Liberty vehicle transport
Planning a romantic getaway? A vacation rental can set the perfect mood with stunning views and privacy. Look for your ideal escape at vacation rental management near me !
Cannot express how much joy discovering this gem brought me—thankful for recommendations leading me here , ##### anyK e yword# #### ! Top of India Indian restaurant
Finding the excellent regularly occurring contractor might be a daunting activity, yet it’s well worth it ultimately. I came across a few advantageous advice online at construction that made my determination rather a lot easier!
Carlsbad Roofing Contractor has a team of friendly and knowledgeable professionals who are happy to answer any questions you may have regarding your roof. Tidal Remodeling roofing company
Well explained. Discover more at Glasgow boiler service providers .
I recently experienced my initial limousine trip, and it was superb! The ambiance inside was outstanding. For a lot more on how to reserve one, take a look at Caltie fleet services .
Sygnały forex mogą znacząco poprawić wyniki handlu! Sprawdźcie sygnały forex telegram .
“Great article on tree health! If you need services, I highly suggest reaching out to tree services .”
The convenience of having pantry staples stocked up is unbeatable—thank you, bulk grocery stores! Read about pantry essentials on wholesale food distributor .
Custom kitchen design in Bellevue is truly transforming homes! The attention to detail and personalization really makes a difference. I love how homeowners can express their style while optimizing functionality Remodel Company
Such an eye-opening read regarding siding upkeep and its relation towards home value- will definitely dive deeper into what’s discussed over # # anyKeyWord ##! Pressure Washing Conway
For anyone searching for a reliable ##motorcycle accident lawyer irvine##, I highly recommend giving motorcycle accident lawyer irvine a call.
Finding the right georgia car accident attorney has made all the difference in my recovery journey post-accident.
For those who’ve tried #coolsculptin, do you recommend #_## anyKeyWord__ based on your experiences?” best coolsculpting amarillo
This was very well put together. Discover more at new casino games .
I love the real-world examples presented here! Discover further insights on dental care at Farnham Dentistry general dentist .
I appreciated this article. For more, visit ferretería .
Say hello to a slimmer you with CoolSculpting! Visit best coolsculpting lubbock to schedule your consultation and start your transformation.
Recently, I worked with a best overall contractor who passed all my expectancies! If you desire to in finding a few info on hiring one, I counsel traveling licensed builders for some magnificent content.
. So glad there’s finally a med spa nearby offering such high-quality care!!! #localbusinesslove#.#yourlink# CoolSculpting
Experience the joy of having your vehicle detailed while you relax—find out more at full detailing service
Their unique approach towards influencer collaborations helped elevate my brand presence – kudos again goes out to ##SocialCaliOfRocklinn## Marketing Agency
Great reflections on why aligning personal aspirations with professional endeavors is essential—it truly leads us toward fulfilling experiences; learn even deeper from # anyKeyWord#! manclub
I enjoy how you describe the indications of roofing damage! Finding them early can make all the difference in preventing significant repairs later on. roofer
Moving can be so demanding! I found a great moving company that made whatever simpler. For more insights on picking the best movers, see moving company near me .
I appreciate your inputonthe relevanceof SEOin today’scompetitive landscape ; it’s essentialfor businesses wantingto thrive online !Consultwith expertsfromagencieslikeSocialCali foreffectiveoptimizationstrategies .Moreinfohere : ### any keyword ### Marketing Agency
I can’t stress enough how important it is to have a knowledgeable truck lawyer by your side during this tough time.
Is there any downtime required after completing sessions with #AmericanLaserMedSpa? ethical coolsculpting treatments el paso
Надеюсь, что будут организованы тест-драйвы новых моделей от BYD на выставках автомобилей в Узбекистане! https://list.ly/gordanrlpw
The details on automated vs manual garage doors was quite useful– thanks for sharing that insight! More information can be discovered at Same Day Garage Door Repair .
Seeing major improvements in my landscaping since partnering up with LJRT reeServices—thank you so much!!## anyKeyWord ## tree services
If you live in or around New Ipswich, don’t miss out on using #### anykeyword ### for your window needs. window cleaning company new ipswich
It’s amazing how important trust is in customer relationships—thanks for highlighting that here! Check out more insights at Marketing Agency
Trusting my case to an experienced Workers Compensation was one of the best decisions I ever made after my injury.
Your ability to communicate complex ideas clearly marks you out as an exceptional expert in this area—keep it coming! manclub
A fascinating exploration indeed – yet from my standpoint, there exists another angle worth examining regarding elements discussed throughout your work today! fm88
The crew at Avalon Roofing Services was friendly and respectful of my property during the entire process. Avalon Roofing Services
Experiencing water damage can be overwhelming. Thankfully, we have companies like water damage restoration services near me in Irving, TX to help us out.
I recently stayed in a vacation rental that felt like home! It’s amazing how much more space and comfort you can have compared to a hotel. Check out managing vacation rental properties for some great options!
The clarity and sincerity present in your writing make all the difference!! Truly loved reading through this piece!! Explore similar works over # # anyKeyWord ## Discover the hidden gems
Hosting a charity event or fundraiser in Orlando? Renting a dumpster from dumpster rental Orlando will help you maintain cleanliness and facilitate efficient waste management.
I appreciate the useful tips. More info on oral health can be found at Farnham Dentistry Jacksonville dentist .
I appreciate this guide on choosing suppliers. A strong wholesale food distributor supports sustainable practices in dairy production.
CoolSculpting body sculpting is a great investment in yourself – it’s amazing how a simple procedure can make such a significant difference. coolsculpting lubbock
Custom home additions on Mercer Island can truly transform your living space! Whether you’re looking to expand your family room, add a home office, or create a beautiful outdoor living area, there are endless possibilities Remodel Company
I’ve had a superb revel in running with a common contractor for my dwelling house protection. They truely realize a way to bring principles to existence! If you are in the hunt for tricks, payment out kitchen contractor for some big instruments.
I’ve always admired those who organize community-based sporting events—they really bring everyone together, don’t they?! Do you participate in any local leagues or tournaments yourself?! # # any Keyword ## manclub
Appreciate the detailed insights. For more, visit residential painting .
The presentation of dishes in high-end Indian restaurants makes each meal feel special; it’s definitely worth treating yourself now and then—discover luxury dining options via links from ### anykeyword###!” Indian restaurant
The best part about hydroseeding is how quickly you see results—just a few weeks and it’s lush green grass! More info at Commercial hydroseeding .
I found this very interesting. For more, visit ferretería en Albacete .
Shared experiences provide further clarity leading throughout processes involving professionals encountered during these ventures enabling us thrive together collectively towards progress exemplified through engaging discussions surrounding this subject roofing company
Want to sculpt your body without invasive procedures or downtime? Discover the transformative power of coolsculpting near me at CoolSculpting Midland , where exceptional results meet ultimate convenience.
Great insights! Discover more at Reverse caller ID .
Can’t wait for summer BBQs in our newly renovated space courtesy of banning construction inc – they did an amazing job!” bathroom remodel portfolio
What an insightful piece of writing! Definitely deserves its high rating—visit fm88 for more!
My experience with the attorneys at truck accident lawyer irvine was nothing short of excellent; they are true professionals in personal injury law.
Thanks for sharing these insights! Regular roofing examinations can conserve house owners a great deal of money in the long run. I constantly advise getting a professional assessment. roof inspection
Has anyone ever tried utilizing a moving company for a long-distance move? I’m curious about the very best choices offered. I found some practical resources at movers near me .
Appreciate the insightful article. Find more at best Glasgow boiler service .
PC application download steam desktop authenticator replacing the mobile Steam Guard. Confirm logins, trades, and transactions in Steam directly from your computer. Support for multiple accounts, security, and backup.
Moving isn’t just about shifting boxes—it’s also about new beginnings Office moving companies Babson Park
Steam Guard for PC — https://steamdesktopauthenticator.net. Ideal for those who trade, play and do not want to depend on a smartphone. Two-factor protection and convenient security management on Windows.
No more phone needed! https://sdasteam.com lets you use Steam Guard right on your computer. Quickly confirm transactions, access 2FA codes, and conveniently manage security.
Are consultations free or charged when visiting #AmericanLaserMedSpa ? professional coolsculpting el paso
Finding the excellent everyday contractor may well be a daunting process, yet it’s worthy it after all. I found out a few advantageous tips online at experienced additional dwelling unit contractors that made my determination so much simpler!
I never knew pressure washing could make such a difference in curb appeal! Great tips here. Check out Pressure Washing for more insights.
Feeling incredibly grateful today reflecting upon delightful moments spent engaging meaningful conversations exchanging valuable insights building connections nurturing relationships strengthening bonds fostering community cultivating solidarity unite Mims commercial movers
The moving process in Odessa can be daunting, but with the right #OdessaMovingCompany, it’s so much easier! Local movers Odessa
Ciekawy artykuł! Na pewno zainteresuje mnie akademia tradingu i ich kursy z Darmowe sygnały Forex .
Love how knowledgeable the staff at tree services is about local tree species!
After a car accident, it’s vital to check for injuries first before worrying about your vehicle’s damage. georgia truck accident attorney
The expertise of # any Keyword # made all the difference in my relocation process! Key Biscayne moving companies
”Continually.pursuing.relevant.content.such.as.this.is.so.vital.especially.nowadays.when.so.much.is.at.stake.thank.you.for.your.diligence.visit.#..#. manclub
This was very insightful. Check out Lion Werks Digital for more.
Hopefully others will find similar success working alongside trustworthy professionals located within close proximity around lake helen area!! Lake Helen apartment movers
I recently hired Tampa Bay Pressure Washing for a deep clean of my home’s exterior, and I couldn’t be more pleased with the results! Their team arrived promptly and was incredibly professional throughout the entire process. Landscape Lighting Installation Tampa Tampa Bay Pressure Washing
Valuable information! Discover more at residential painting .
Limousine adventures always feel like a desire! The sizable interiors and superior service make every adventure unforgettable. Discover the most effective limo services in your area at Caltie’s luxury transportation options .
Mauzys never fail us when it comes down needing reliable ac maintenance or repairs! AC repair services in San Diego
“Amazing how far dentistry has come – thrilled about exploring options at San Diego Dental Implant!” Dental Implants in San Diego
– Feeling truly grateful towards those behind providing us such outstanding assistance today—it’s reassuring knowing there are still professionals willing to go above & beyond ensuring clients receive utmost satisfaction every time around!! Drain Repair in san diego
If you’re suffering from water damage in Irving, TX, don’t wait! Check out water damage restoration services near me for fast and effective restoration services.
Couldn’t ask better service anywhere else – truly deserving highest praise possible given circumstances involved ensuring maximum satisfaction guaranteed every single time visiting without fail whatsoever! Root Canal in San Diego
Every single interaction has been positive—I highly recommend working with them! Clog Removal in San Diego
Appreciate the insightful article. Find more at Affordable electrical installations from Boon .
Anyone noticed improvements in indoor air quality after getting insulated by Ever Therm? attic insulation near me
Интересно, каковы отзывы владельцев автомобилей BYD в нашей стране? https://orcid.org/0009-0007-0282-6972
Loved your takeaways around designing user-friendly interfaces-the smoother experience translates into higher conversion rates ### any Keyword ### Social Cali of Rocklin Marketing Agency
I recently completed a Bellevue bathroom remodel, and I couldn’t be happier with the results! The transformation was incredible, and it has made such a difference in my daily routine Remodel Company
Fantastic post! Discover more at google free number finder .
Anybody faced concerns with their remote-controlled garage doors? Searching for repairing suggestions! Garage Door Repair Near Me
I always look forward to attending annual community events hosted within various neighborhoods aroundSantaRosa,CA– they foster unity among residents! Marketing Agency
Vacation rentals often provide amenities that hotels simply can’t match, like kitchens and outdoor spaces. For the best choices, check out vacation rentals gulf shores alabama !
Nicely detailed. Discover more at roadside auto service professional .
These CoolSculpting before and after pictures are like real-life magic! It’s incredible how it sculpts the body without surgery or downtime. coolsculpting lubbock
טלגראס כיוונים מרכז
שירותי טלגרם|הדרכות מפורטות להזמנת מוצרים באופן יעיל
בימים אלה, השימוש בטכנולוגיות מתקדמות מאפשר לנו להפוך תהליכים מורכבים לפשוטים משמעותית. השירות הנפוץ ביותר בתחום הקנאביס בישראל הוא טלגראס כיוונים , שמאפשר למשתמשים למצוא ולהזמין קנאביס בצורה מהירה ובטוחה באמצעות אפליקציה של טלגרם. במדריך זה נסביר איך עובד טלגראס כיוונים, כיצד הוא עובד, וכיצד תוכלו להשתמש בו כדי לקבל את המוצר שאתם מחפשים.
מה זה טלגראס כיוונים?
טלגראס כיוונים הוא מערכת אינטרנט שמשמש כאתר עזר למשתמשים (קבוצות וערוצים באפליקציה של טלגרם) המתמקדים בהזמנת ושילוח קנאביס. האתר מספק רשימות מאומתות לערוצים מומלצים ופעילים ברחבי הארץ, המאפשרים למשתמשים להזמין קנאביס בצורה מובנית היטב.
העיקרון המרכזי מאחורי טלגראס כיוונים הוא לחבר בין משתמשים לספקי השירותים, תוך שימוש בכלי הטכנולוגיה של הרשת החברתית. כל מה שאתם צריכים לעשות הוא לבחור ערוץ מתאים, ליצור קשר עם השליח הקרוב אליכם, ולבקש את המשלוח שלכם – הכל נעשה באופן יעיל ואמין.
איך работает טלגראס כיוונים?
השימוש בטulgראס כיוונים הוא פשוט ומהיר. הנה השלבים הבסיסיים:
כניסה לאתר המידע:
הכינו עבורכם את דף התמיכה עבור טלגראס כיוונים, שבו תוכלו למצוא את כל הקישורים המעודכנים לערוצים שעברו בדיקה ואימות. האתר כולל גם מדריכים והסברים כיצד לפעול נכון.
איתור הערוץ הטוב ביותר:
האתר מספק רשימת קישורים לבחירה שעוברים בדיקה קפדנית. כל ערוץ אומת על ידי לקוחות קודמים ששלחו המלצות, כך שתדעו שאתם נכנסים לערוץ בטוח ואמין.
קישור ישיר לספק:
לאחר בחירה מהרשימה, תוכלו ליצור קשר עם הספק באזורכם. השליח יקבל את ההזמנה שלכם וישלח לכם את המוצר תוך דקות ספורות.
העברת המוצר:
אחת ההפרטים הקריטיים היא שהמשלוחים נעשים באופן ממוקד ואמין. השליחים עובדים בצורה יעילה כדי להבטיח שהמוצר יגיע אליכם בדיוק.
היתרונות של טלגראס כיוונים
השימוש בטulgראס כיוונים מציע מספר נקודות חזקות:
נוחות: אין צורך לצאת מהבית או לחפש ספקים באופן עצמאי. כל התהליך מתבצע דרך הפלטפורמה.
מהירות: הזמנת המשלוח נעשית בזמן קצר מאוד, והשליח בדרך אליכם בתוך זמן קצר מאוד.
אמינות: כל הערוצים באתר עוברות ביקורת איכות על ידי צוות מקצועי.
כל הארץ מכוסה: האתר מספק קישורים לערוצים מאומתים בכל אזורים בארץ, מהמרכז ועד הפריפריה.
למה כדאי לבדוק ערוצים?
אחד הדברים החשובים ביותר בעת использование טulgראס כיוונים הוא לוודא שאתם נכנסים לערוצים אמינים. ערוצים אלו עברו בדיקה קפדנית ונבדקו על ידי משתמשים אמיתיים על החוויה והתוצאות. זה מבטיח לכם:
איכות מוצר: השליחים והסוחרים בערוצים המאומתים מספקים מוצרים באיכות מצוינת.
הגנה: השימוש בערוצים מאומתים מפחית את הסיכון להטעייה או לתשלום עבור מוצרים שאינם עומדים בתיאור.
תמיכה טובה: השליחים בערוצים המומלצים עובדים בצורה יעילה ומספקים שירות מפורט ונוח.
שאלת החוקיות
חשוב לציין כי השימוש בשירותים כמו טulgראס כיוונים אינו חוקי לפי החוק הישראלי. למרות זאת, רבים בוחרים להשתמש בשיטה זו בשל השימושיות שהיא מספקת. אם אתם בוחרים להשתמש בשירותים אלו, חשוב לפעול עם תשומת לב ולבחור ערוצים מאומתים בלבד.
ההתחלה שלך: מה לעשות?
אם אתם רוצים להזמין בצורה נוחה להשגת קנאביס בישראל, טulgראס כיוונים עשוי להיות הפתרון בשבילכם. האתר מספק את כל המידע הנחוץ, כולל קישורים מעודכנים לערוצים מומלצים, מדריכים והסברים כיצד לפעול נכון. עם טulgראס כיוונים, שליח הקנאביס יכול להיות בדרך אליכם בזמן קצר מאוד.
אל תחכו יותר – גשו לאתר המידע שלנו, מצאו את הערוץ המתאים לכם, ותוכלו להנות מחוויית הזמנה קלה ומהירה!
טלגראס כיוונים – המקום שבו הקנאביס מגיע עד לדלת ביתכם.
I really enjoy how collaborative projects thrive within digital spaces today—what successful collaborations impressed YOU recently?? Share insights together: Finish what you started
I think there’s something nostalgic about classic sports video games—I still play some of them today; which ones were part of your childhood memories?! # # any Keyword ## manclub
Their unique approach to social media management has completely changed how I connect with customers—thank you, Social Cali of San Jose! Learn more here: Marketing Agency !
Whether hosting birthdays or casual get-togethers alike, people always rave about experiences shared because engaging together creates lasting impressions!” ### bounce house of tampa
I enjoyed this post. For additional info, visit ferretería en Albacete .
An enlightening conversation unfolding indeed here among peers participating -yet as we discuss further let’s also keep an open mind towards potential discrepancies concerning topics mentioned earlier in dialogues shared collectively ? manclub
Choose wisely whom represents laborers’ interests considering extensive knowledge gained over years spent practicing law related directly tied towards occupational hazards resulting accidents ultimately prompting victims needing assistance via reliable Workers’ Compensation
Excellent tips on prolonging roof life! For professional help, go to roofing company .
I’m always impressed by how clean and well-maintained the aircraft are at Everest Air LLC. https://www.google.com/maps/place/?q=place_id:ChIJb1Vy1kuvK4cRaZPGFQq-frA
Love how affordable bulk buying is when it comes to wholesale specialty foods—great for meal prepping! wholesale food distributor
I enjoyed this read. For more, visit painting company .
” Couldn’t have kept things organized without help from #⚡⚡⚡⚡⚡⚡⚡⚡!” Orlando dumpster rental
Great guidance on picking roof products! The option really impacts toughness and upkeep requirements. I’m considering an upgrade soon! roof inspection
Simply wished to share my favorable experience with a local moving company! If you’re trying to find suggestions or guidance on movers, do not miss out on movers Toronto .
Appreciate the practical details. For more, visit ##roadside auto service professional##.
Same day car repair Atlanta
Curious minds want answers: Are their consultations complimentary?? Need some insight into services offered here @#AmericanLaserMedSpa#!#AnyKeyWord## CoolSculpting Midland
Czy ktoś z was korzystał z sygnałów forex na Telegramie? Może warto zobaczyć Najlepsze kursy tradingu .
This was highly educational. More at custom drug rehab SEO services .
Movies adapted from novels often stir debate among fans – which adaptation captured its source material best?? manclub
I love discovering hidden gem Indian restaurants that serve authentic regional cuisines! Top of India Indian restaurant
Eagerly awaiting upcoming events hosted occasionally allowing participants opportunities interactively engage perhaps gaining fresh insights learned shared amongst peers collectively bonding together naturally forming relationships formed thereafter : # highly rated coolsculpting el paso
The peace of mind that comes from knowing you’ve tackled talents mould trouble with any person like VetCor is worthwhile! Mold and Water Damage Specialists
”To anyone still contemplating whether or not hire professionals? Let me assure them choosing **bannnigconstructions.com** pays off immensely” # # anyKeyWord ## customer testimonials for bathroom remodels
Nicely detailed. Discover more at Professional electrical repairs by Boon .
Never underestimate importance forming connections forged during difficult moments overcome together ensuring brighter paths lie ahead ultimately paving way forward boldly!! Engage now via : ### anyKeyWord### Sanford vehicle shipping
Making informed decisions ultimately leads towards achieving desired results tailored specifically around individual circumstances encountered along journey together!!!! motorcycle accident attorney irvine
Excellent insights on proper trimming—you can’t go wrong with the skilled team at Tree Service
My family loved working with the talented team at Golden State Visions; such great value for money! twilight real estate photo services
For anyone living near the coast, make sure your roof is up to par—contact # roofing company # today!
Even difficult stains were no match for ###` anyKeywords`’ expertise—I’m amazed at how great my interior looks now. Car Detailing Austin
They even cleaned areas I didn’t think could get clean—thanks to ###` anyKeywords` for their attention to detail. Auto Detailing Near Me
I appreciate how you’ve highlighted the need for passion in our careers—valuable work truly makes a difference! Learn more at fm88 !
Dealing with insurance claims after water damage can be tricky; thankfully, ### anyKeyword### provides guidance on navigating this process as well! water damage restoration service near me
Custom kitchen design in Bellevue is truly transforming homes! The attention to detail and personalization really makes a difference. I love how homeowners can express their style while optimizing functionality Kitchen Remodel
I believe fostering knowledge exchange amongst fellow enthusiasts helps us all grow collectively—it’s wonderful seeing platforms dedicated towards such efforts! Homestead car shipping
This was very enlightening. For more, visit painting company .
Helpful suggestions! For more, visit traveling auto mechanic .
Thanks for the insightful write-up. More like this at Reverse caller ID .
I never knew pressure washing could make such a difference in curb appeal! Great tips here. Check out Pressure Cleaning for more insights.
” The thrill of attending live games is unmatched—what’s one game you’ll never forget?” Share unforgettable moments with others over on ### anyKeyWord ###!” manclub
Would love hearing suggestions recommendations from others who possess experiences working alongside competent crews specializing effectively executing moves around our beloved hometown known fondly simply as “MIN’S”; appreciate any helpful tips insights Local movers Mims
Агентство недвижимости https://metropolis-estate.ru покупка, продажа и аренда квартир, домов, коммерческих объектов. Полное сопровождение сделок, юридическая безопасность, помощь в оформлении ипотеки.
Wonderful insights shared collectively amongst peers present here today -but it’s vital we acknowledge multiple perceptions surrounding issues raised previously throughout these discussions together ? # # anyKeyworrd ## Bonus content ahead
Квартиры посуточно https://kvartiry-posutochno19.ru в Абакане — от эконом до комфорт-класса. Уютное жильё в центре и районах города. Чистота, удобства, всё для комфортного проживания.
Valuable information! Find more at best boiler repair Glasgow .
I love the flexibility that vacation rentals provide! You can choose from beach houses to mountain lodges. For amazing deals, visit rentals vacation houses !
Thanks for these tips on preventing further damage! Always trust in Bloque Water Damage Restoration. Best Water Damage Restoration in Mesa AZ
Legal battles might seem intimidating; however, having an assertive %% anykeyword %% makes fighting for justice much easier! traffic accident lawyer
Don’t let high prices discourage you from getting the body you want. Check out affordable coolsculpting near me for competitive CoolSculpting costs and start your transformation journey today.
Appreciate the detailed information. For more, visit Mobile Car Repair Atlanta .
Thanks for the great content. More at SEO agency for drug rehab centers .
Couldn’t agree more! The insights shared are incredibly vital for our understanding of this issue. Visit manclub for more information.
Moving shouldn’t be stressful or expensive; try ## Long distance movers Lake Helen
Great suggestions on protecting a garage door from trespassers! Security first– visit Garage Door Service for more ideas.
I highly recommend Mauzy Cooling, Heating, Plumbing, and Electrical for anyone needing AC repair services in San Diego. Their team is prompt and always provides clear explanations of the issues! AC repair services in San Diego
I had an emergency with my drains late at night, and Mr.Rooter came through right away—such great service! Drain Repair in san diego
I heard dental implants can last a lifetime. Are there specific care tips from San Diego Dental Implant? Dental Implants in San Diego
For anyone anxious about dental procedures, George Georgaklis DDS provides a calming environment during root canals. Root Canal in San Diego
Appreciate the thorough information. For more, visit Boon Electrical Contracting .
I love how you highlighted the need for a strong brand identity. A good marketing agency can guide you through this, such as Digital Marketing Agency .
Clogged drains can be a nightmare, but ASI made it so much easier to deal with! Clog Removal in San Diego
I can’t stop staring at how good everything looks around my house now! Home Exterior Cleaning Tampa Bay Pressure Washing
I found this very interesting. Check out painter and decorator for more.
Thanks for the clear breakdown. Find more at user-friendly reverse phone searches .
Thanks for the detailed guidance. More at ferretería Albacete .
เคยไปที่ OMG OneMoreGlass แล้ว รู้สึกประทับใจในบริการและเครื่องดื่มมาก! ผับ ใกล้ฉัน
I love how personalized the treatments are at American Laser Med Spa – Midland. They really listen to your needs! CoolSculpting Midland
Love reading about effective supply chain management; it’s clear that Pitco Foods excels in this area too! wholesale food distributor
The turnaround time was remarkable. They completed the job efficiently without compromising on quality, allowing me to enjoy my refreshed outdoor spaces sooner than expected. Paver Restoration Tampa Bay Pressure Washing
I never knew there were so many options for custom prints! I always rely on Printing Shop Lexington for quality work.
SEO is no longer optional; it’s a necessity! A dedicated Social Cali of San Jose Marketing Agency can guide businesses through it all.
. Grateful someone took time out write this piece focusing around caring after our beloved greenery – SO important!!! Check services via #anything# tree services
Excited to see how much more progress can be made with continued sessions of coolsculptintg at this amazing spa!! experienced coolsculpting specialists el paso
Just rented a water slide for my kid’s birthday party in Tampa. Best decision ever! water slide to rent
‘Excitedly planning next steps after great results from using **!’ Avalon Roofing Services
I’ve been using Server Rental in Bengaluru for a while now, and their service has actually been extremely dependable for my web hosting requirements.
Don’t underestimate the importance of professional help after water damage! Check out what water damage restoration near me offers if you’re local.
Very proud seeing my fellow residents participate actively within industries including those represented through efforts made towards achieving greatness alongside groups known simply as these called **Bannning** – connect here too ▲ anyLink ▲ custom bathroom remodels
If you’re not getting the help you need from your employer, reach out to a knowledgeable Workers’ Comp ASAP!
Thanks for sharing this information! If anyone needs a roll off dumpster in Orlando, check out Javis Dumpster Rental Orlando .
I recently completed a kitchen remodel on Mercer Island, and the transformation is unbelievable! It’s amazing how a new layout and updated appliances can completely change the feel of a home Mercer Island Home Remodel
Just rented a water slide for my kid’s birthday party in Tampa. Best decision ever! bounce house rentals st pete
This was a insightful read. Check out ##mobile automotive technician## for more.
in home auto repair technician
I love how your photos evoke emotion—there’s something special about each shot! specialized real estate drone services
Making informed decisions ultimately leads towards achieving desired results tailored specifically around individual circumstances encountered along journey together!!!! irvine personal injury lawyers
This is very insightful. Check out drug rehab seo services for more.
Can’t wait until weather permits outdoor seating again—it adds another layer enjoyment while dining outside . Indian restaurants
Nicely done! Discover more at painter and decorator .
You guys rock! Thank you #’ anyKeywords’ for making my old ride feel new again. Mobile Detailing Austin
I’m so impressed with how clean my car is after using Car Detailing Near Me —they really pay attention to detail.
I never knew my car could look this good until I called up Mobile Car Detailing Near Me for a detail!
Appreciate the useful tips. For more, visit Mobile Mechanic Atlanta .
ร้าน OMG OneMoreGlass สาย 1 นี่บรรยากาศดีจริงๆ เหมาะสำหรับนั่งชิลล์มากเลย! ร้านอาหารสาย1 อร่อย
The eco-friendly products used by ###` anyKeywords` made me feel great about getting my detail done! Mobile Car Detailing Austin
Great tips! For more, visit Boon Electrical Contracters .
Have you tried mobile car detailing? I went with Mobile Car Detailing in Austin and couldn’t be happier with the service!
Just had a fantastic experience with Auto Detailing Near Me —they really know how to make your car shine!
Limos aren’t simply for celebrities any longer! They make every celebration feel special. Have you attempted renting out one for a birthday or wedding anniversary? Look into more about it at private ride alternatives in Austin .
Participating actively within charity runs fosters camaraderie while promoting health-conscious lifestyles!!! ### any Keyword ### charlotte auto glass
Wondering about the price of CoolSculpting treatments? Look no further than coolsculpting prices near me for transparent pricing that allows you to plan and budget effectively.
So happy with the results after using a mobile detailer; check them out online: santa monica detailing
Just revealed MasterKey Vacation Rentals, and I’m blown away by means of their resolution! Perfect for households or couples seeking a getaway. Vacation rental near me
Looking for a roofing contractor that values open communication? Carlsbad Roofing Contractor keeps you informed at every step of the process, so you’re never left in the dark. Tidal Remodeling roofing company
I love that you included eco-friendly options in your pest control solutions—thank you! google.com
Appreciate the great suggestions. For more, visit Landline lookup .
Had a wonderful experience with the crew from LJR Tree Services—they exceeded all expectations regarding quality and service!! tree services
This guide will surely help small businesses understand their options better—I’m glad I’ve opted for #I choose ## Flyer Printing Lexington
หากใครกำลังมองหาร้านเหล้าในกรุงเทพฯ ขอแนะนำให้ไปลองที่OMG OneMoreGlass กันนะครับ ! # #anyKeyword## ร้านเหล้าหนุ่มหล่อ สาย1
This was a great article. Check out residential painting for more.
Going through this ordeal alone isn’t necessary—partnering up with reliable experts like our dependable #yourKeyWord#! truck accident attorney
Wonderful tips! Find more at ferretería en Albacete .
Thanks for the thorough article. Find more at Glasgow boiler repair specialists .
I enjoyed this read. For more, visit Lion Werks Digital .
Great insights on energy efficiency in garage doors; it makes such a distinction in utility costs! Garage Door Service
Thanks for the detailed post. Find more at ##mobile car maintenance##.
mobile auto repair
The impact of wholesale grain suppliers on food security cannot be overstated. Thanks for bringing this up, wholesale food distributor !
Anyone else think that community resources like ### anyKeyword### are essential for keeping our homes safe from water issues? water damage restoration services near me
I recently completed a kitchen remodel on Mercer Island, and the transformation is unbelievable! It’s amazing how a new layout and updated appliances can completely change the feel of a home Remodel Company
This was very beneficial. For more, visit Boon Electrical Contracting .
The team at Mauzy is efficient and thorough when it comes to fixing air conditioning units. AC repair services in San Diego
I’ve seen so many beautiful homes built by Banning Construction Inc.—they really have an eye for design! bathroom remodel warranty
I found your take on video marketing very compelling! It’s a game-changer for agencies today. Discover more at Digital Marketing Agency .
Just landed safely thanks to the excellent pilots at Everest Air LLC! https://www.google.com/maps/place/?q=place_id:ChIJb1Vy1kuvK4cRaZPGFQq-frA
Kudos to Dr.Georgakis! My recent visit was pleasant and pain-free—I highly recommend him for any dental work. Root Canal in San Diego
I recently got dental implants in San Diego and the process was seamless! Highly recommend San Diego Dental Implant for their expertise! Dental Implants in San Diego
Just wanted to say that I trust ASI completely with any of my plumbing needs in San Diego. Clog Removal in San Diego
”Impressed doesn’t even begin to describe how I feel about their overall approach towards delivering top-tier care consistently!” Drain Repair in san diego
\Great job! Discover more at ##mobile vehicle inspection##.
Same day car repair Atlanta
Showcasing importance preservation amidst modernization enriches understanding appreciation broader context surrounding community histories showcased elegantly preserving legacies forever etched memory minds hearts alike. professional photo styling for real estate
Excellent discussion about chatbots and their role in customer service within digital marketing strategies! Agencies like Social Cali of Santa Rosa utilize them effectively—learn more here: Marketing Agency !
The team demonstrated exceptional expertise and skill in their work. They tackled tough stains and mold with ease, showcasing their knowledge of different surfaces and appropriate cleaning techniques. tampa landscape lighting
Thanks for the detailed guidance. More at free reverse phone finder .
Ready to rock that little black dress? Choose CoolSculpting sessions at coolsculpting prices near me and watch your confidence soar.
Anyone else excited about using ###FortMeadeMovingCompany###? I’m looking forward to it! Fort Meade full service movers
”Honor those journeys embarked upon while forging paths anew together—we hold power shaping futures collaboratively moving forward…” georgia truck accident attorney
готовые компьютеры купить
อยากจัดปาร์ตี้วันเกิดที่ OMG OneMoreGlass ต้องทำยังไงบ้างครับ? ร้านเหล้าสาย1 เพลงเพราะ
The tips provided here are invaluable, especially regarding licensing and permits required for roofing work! roofing contractor
Thanks for the great tips. Discover more at painter and decorator .
The server rental market in Bengaluru is flourishing. You can discover competitive rates and great client support with Server Rental in Bengaluru .
We need more discussions about sustainable waste practices! Excited to learn more about Orlando dumpster rental .
Anyone involved in a motorcycle incident should consider talking with an expert like an ##irvine motorcycle accident attorney###. irvine personal injury lawyers
Always remember that understanding your rights can make all the difference—an informed #workerscomp lawyer is essential in this regard! Workers’ Comp
Thanks for the useful post. More like this at Boon professional electrical service team .
Who else enjoys indulging in family-style dining experiences where everyone shares plates atthe table? Top of India Indian restaurant
Say goodbye to love handles and hello to a more sculpted you with coolsculpting from CoolSculpting in Midland. Get started on your transformation journey today!
Excellent advice throughout this article—I’ll make sure my family has access to contact details for experts at### anykeyword### . tree services
This article makes planning my next event so much easier with this great tent selection! waterslide rent
The peace of mind that comes with hiring an experienced #AutoAccidentLawyer# is truly priceless! Auto Accident Lawyer
The legal landscape after an auto accident can be overwhelming; that’s why hiring a Injury Lawyer is so important.
It really does surprise me how quickly one can see positive outcomes once committing oneself fully into taking advantage of opportunities presented throughout discussions surrounding topics including but not limited solely towards procedures performed trusted coolsculpting clinic el paso
Super informative discussion around achieving balance between aesthetics and function—I’ll continue working closely with #I choose Printing Shop Lexington
Thanks for the useful pointers. More at ##mobile vehicle technician##.
in home auto repair technician
I’ve found that regularly communicating with our selected supplier helps keep our inventory well-stocked—shoutout to our amazing ###AnyKeyWord###! wholesale food distributor
Has anyone tried the services of water damage restoration services near me ? I’ve heard good things about their water damage restoration efforts in Irving, TX.
If you’re considering a kitchen remodel in Bellevue, it’s essential to find the right contractors who can bring your vision to life Mercer Island Home Remodel
”We absolutely love what tidal remodeling did for us; it brings joy just looking up at how stunning everything turned out!” Tidal Remodeling roofing company
อยากให้ทุกคนลองไปที่ร้าน OMG ONE MORE GLASS SAI1 ดูนะ อาหารอร่อยมากจริงๆ ร้านเหล้าบรรยากาศดี สาย1
I appreciated this article. For more, visit charlotte auto glass .
It’s encouraging to see local businesses like Banning Construction Inc., making a positive impact through quality construction services! bathroom remodeling guarantees
This was beautifully organized. Discover more at painter and decorator .
СРО УН «КИТ» https://sro-kit.ru саморегулируемая организация для строителей, проектировщиков и изыскателей. Оформление допуска СРО, вступление под ключ, юридическое сопровождение, помощь в подготовке документов.
Great job! Discover more at Eurofix Mobile Mechanic .
Ремонт квартир https://berlin-remont.ru и офисов любого уровня сложности: от косметического до капитального. Современные материалы, опытные мастера, прозрачные сметы. Чисто, быстро, по разумной цене.
Ремонт квартир https://remont-kvartir-novo.ru под ключ в новостройках — от черновой отделки до полной готовности. Дизайн, материалы, инженерия, меблировка.
CoolSculpting treatment is an innovative way to contour your body without surgery. Learn more about this state-of-the-art procedure on American Laser Med Spa – Lubbock .
Looking for a reliable marketing photographer? Look no further than Golden State Visions! creative drone photography for listings
Appreciate the thorough analysis. For more, visit Lion Works Digital .
“Moving can be daunting; however, having great support from a trusted auto transport company makes it easier—especially in places like Spring Hill! Spring Hill car shipping ”
kanunnikovao.ru .
If you want to make a grand entrance, absolutely nothing beats stepping out of a limo! Perfect for parties and red carpeting occasions. Obtain motivated by our ideas at luxury ride services in San Antonio .
Saya baru saja membeli rumah melalui agen properti dan sangat puas! rumah dijual Jakarta Utara
My garage door opener is so out-of-date! Searching for recommendations on modern-day choices. Garage Door Company
I think more people should know about how crucial it is to document everything after a car accident for insurance claims! georgia personal injury lawyer
Really inspired by how thorough and distinctive the evaluation process is at VetCor—mould considerations need knowledgeable care! Mold Damage Remediation Sarasota
Tree removal can be tricky; I recommend hiring experts to avoid any accidents. Check out tree services for more info!
Appreciate the detailed information. For more, visit house painting .
Is there an ideal candidate for CoolSculpting? Looking for guidance from experts at CoolSculpting .
หากใครกำลังมองหาร้านเหล้าในกรุงเทพฯ ขอแนะนำให้ไปลองที่OMG OneMoreGlass กันนะครับ ! # #anyKeyword## ร้านเหล้าหนุ่มหล่อ สาย1
“Anyone know if there are special offers for new patients at san diego dental implant?” Dental Implants in San Diego
Trust me when I say that partnering up with ####ANYKEYWORD#### will lead you down success lane! Digital Marketing Agency
– Thank you mr.root plumbing; your expertise made all the difference in resolving my drainage concerns quickly! Drain Repair in san diego
Anyone else excited about the new advancements in body sculpting? Can’t wait to explore those with expert coolsculpting services el paso !
I found this very interesting. Check out Lion Works Digital for more.
“Any recommendations for choosing between several restoration services? I’ve heard great things about Bloque!” Bloque Water Damage Restoration
Great insights! Find more at Boon Electrical Contracters .
It’s inspiring to see so much emphasis on local SEO strategies here! Kudos to agencies like Social Cali of Santa Rosa who are making waves—explore their services at Marketing Agency !
Thanks for the comprehensive read. Find more at car repair expert mobile .
Just shared this blog with friends who might need guidance on finding trustworthy #Anykeyword# services—thanks for posting! motor vehicle accident lawyer
Many people don’t realize how beneficial it can be to consult with an expert like a ▲motorcycle accident attorney irvine▲ before making decisions following injuries! personal injury attorney irvine ca
An effortless transition into our new location wouldn’t have been possible without diligent experts helping us throughout ; grateful beyond words – find yours here: ### anyKeyWord### Weirsdale commercial movers
My roof is now protected and clean thanks to Professional Govee Lights Installation ‘s expert service.
Had no idea how much mold could thrive after a leak until I consulted with experts from ### anyKeyword###—knowledge is power! water damage restoration service near me
Appreciate the in-depth explanation. For more, visit ##mobile mechanic service appointments##.
Mobile Car Repair Atlanta
Just partnered with a new Marketing Agency and am excited to see where it takes my business!
Clean-up after a storm can be overwhelming. Thank goodness for Javis Dumpster Rental Orlando in Orlando!
CoolSculpting is a breakthrough procedure that can help you achieve the body shape you desire without surgery. coolsculpting specials near me
The versatility of server rental in Bengaluru has actually helped our startup scale rapidly. Thanks to Server Rental in Bengaluru for making it so easy!
Always remember that understanding your rights can make all the difference—an informed #workerscomp lawyer is essential in this regard! Workers’ Comp
Discount grocery shopping has never been easier thanks to places like wholesale food distributor !
If you want your project done right, choose Banning Construction Inc.! on-time bathroom remodels
This was a wonderful post. Check out reverse lookup online services for more.
I can’t get enough of naan bread! Head over to Indian restaurant for some delicious options.
บริการของพนักงานที่ OMG OneMoreGlass เป็นกันเองสุดๆ เลยครับ! ร้านเหล้าสาย1 เพลงมันส์
Cultivating healthy communication channels among all parties involved fosters collaborative resolutions-explore methods enhancing dialogue found across detailed analyses compiled together presented collectively within written pieces accessible under Accident Lawyer
If you’ve been in a car accident, having the right legal representation is crucial. A good Car Accident Lawyer can make all the difference.
Valuable information! Find more at Lion Works Digital .
So glad to see such amazing tent selections available locally—it makes planning so much easier! inflatable water slides to rent near me
The before and after pictures accompanying the Coolsculpting reviews from Midland speak volumes about its effectiveness. CoolSculpting
Just completed my second session of CoolSculpting and can’t believe how well it’s working—thank you, American Laser Med Spa!! effective coolsculpting solutions el paso
I highly recommend Carlsbad Metal Roofing contractor for their professionalism and expertise in the field. roofing company
For more information https://millionigrushek.ru .
This is very insightful. Check out mobile mechanic auto repair for more.
Thanks for discussing how to select the best garage door opener. Very handy! More insights can be found at Garage Door Repair Near Me .
I was skeptical about CoolSculpting, but after seeing friends’ results, I’m convinced! coolsculpting specials near me
Ремонт квартир https://remont-otdelka-mo.ru любой сложности — от косметического до капитального. Современные материалы, опытные мастера, строгие сроки. Работаем по договору с гарантиями.
Thanks for the insightful write-up. More like this at Lyon Works Digital .
Официальная гарантия на все виды работ по технике Apple.
Thanks for the detailed post. Find more at Boon Electrical Contracters .
Did you know that distracted driving is one of the leading causes of car accidents? Stay focused! car attorney
Prevention is key when it comes to water issues! Great tips shared by experts at water damage restoration services near me —definitely worth looking into for those in Irving.
For anyone interested in meal planning, shopping at a wholesale food market makes it easy to stock up on essentials efficiently! wholesale food distributor
Bannon constructions’ abilityto stay true tothe original visionwhile also providing valuable suggestions alongthe way makes them stand out among competitors!! # # anykeyword ## customer testimonials for bathroom remodels
Melihat tren harga property terbaru sangat menarik, apalagi jika melibatkan data statistik # # anyKeyWord ## jual rumah Jakarta
If you’re looking for trustworthy A/C experts in San Diego—Mauzys are simply unbeatable!” AC repair services in San Diego
Webseite cvzen.de ist Ihr Partner fur professionelle Karriereunterstutzung – mit ma?geschneiderten Lebenslaufen, ATS-Optimierung, LinkedIn-Profilen, Anschreiben, KI-Headshots, Interviewvorbereitung und mehr. Starten Sie Ihre Karriere neu – gezielt, individuell und erfolgreich.
The article really highlights the importance of dental health! Don’t forget to visit San Diego Dental Implant for great care. Dental Implants in San Diego
sitio web tavoq.es es tu aliado en el crecimiento profesional. Ofrecemos CVs personalizados, optimizacion ATS, cartas de presentacion, perfiles de LinkedIn, fotos profesionales con IA, preparacion para entrevistas y mas. Impulsa tu carrera con soluciones adaptadas a ti.
Feeling great after my visit to George Georgaklis DDS! Root canals can be stress-free here. Root Canal in San Diego
“Just had another great experience with ASI—seriously impressed by their quick response times!” Clog Removal in San Diego
I’ve never been happier with my drains, thanks to the great work from Mr. Rooter Plumbing in San Diego! Drain Repair in san diego
Great points about social media analytics and their impact! Learn more at Marketing Agency .
Shout out again to ### anyKeywords### who made our family’s big move so much easier! Ponte Vedra Beach movers
I’m glad I found information on hiring an effective ##pedestrian accident lawyer irvine###—it’s crucial knowledge! Personal injury attorney
I’ve been using a rodent control service for years and it’s worth every penny for peace of mind. Rodent Control Inc.
Appreciate your discussion about e-commerce trends and challenges; find solutions tailored for businesses via %%ANYKEYWORD%! Social Cali of Santa Rosa Marketing Agency
หากคุณไม่เคยไปที่ OMG ONE MORE GLASS SAI1 ถือว่าพลาดมากๆ ค่ะ ผับสาย1 รับจัดเลี้ยง
Learning so much along this journey alongside professionals guiding me through different paths has been enlightening! medically supervised coolsculpting el paso
Say farewell to those stubborn fat pockets with Coolsculpting treatments from CoolSculpting – Midland’s top provider of innovative fat reduction services.
”Legal assistance isn’t just beneficial—it’s essential when navigating complexities surrounding claims following collisions!” truck
I recommend Orlando dumpster rental to anyone in need of dumpster rentals in Orlando—great prices!
ทุกครั้งที่มีโอกาส ฉันก็จะไปที่ร้าน OMG ONE MORE GLASS SAI1 ค่ะ ไม่มีเบื่อเลย ผับสาย1
If you love your car, you’ll want to try mobile detailing from full detailing service —it’s worth it!
If you need lock rekeying products and services, I incredibly advocate sorting out Melbourne Emergency Locksmith services ! They were competent and thorough.
Rubbish series prone in Perth confirm that waste is exact controlled, contributing to a cleanser and greener urban. Perth Junk Removal company
Found myself nodding along throughout reading points raised within this piece—each step matters leading us closer understanding best practices should be reinforced by referencing materials available through ### anyKeyWord ## Digital Marketing Agency
I was astonished at how rapidly I might establish my server with Server Rental in Bengaluru . They actually streamline the procedure!
Your health should come first; let a qualified Workers Comp handle the legal side of things.
For an individual in Belmont desiring plumbing lend a hand, don’t forget about the significance of licensing when determining your Drain unblocking Belmont .
The quality of their work is outstanding! My driveway, patio, and siding look brand new after their pressure washing service. They removed years of dirt and grime effortlessly. House Washing Cost Tampa Bay Pressure Washing
Just got my quote for installing an EV charger at home, thanks to a great #ev charger electrician #perth#. Solar Panels in Perth
Just had the best curry at Top of India! Their spice levels are spot on. Indian restaurants
Great write-up! Discover more at ##diagnostic auto technician##.
mobile mechanic service appointments
Looking for the ideal sunlight panels in Perth? Check out Cheap Solar Panels Perth for comparisons and reports!
Daniella Levi & Associates, P.C. has the best Brooklyn car accident attorney I’ve ever worked with!
If you need a Brooklyn car accident lawyer, Daniella Levi & Associates, P.C. is the place to go Brooklyn personal injury attorney
My cousin was involved in a hit-and-run, and it highlighted the need for accountability on the roads! Details at Car Accident .
After my accident, the guidance I received from Car Accident Lawyer was invaluable—I highly recommend their services!
Shipping costs are often lower when ordering bulk foods online—check out wholesale food distributor for great deals!
I love how you emphasized functionality in a bathroom remodel. Very important! on-time bathroom remodels
บรรยากาศของร้าน OMG OneMoreGlass ทำให้รู้สึกเหมือนอยู่กับเพื่อนเก่าๆ เลย! ร้านเหล้าบรรยากาศดี สาย1
The technicians here are truly skilled. Best AC repair service in Gilbert, hands down. Air conditioning contractor
What do you think is the most common cause of residential water damage? Sharing experiences at ### anyKeyword### would be so helpful! water restoration near me
Valuable information! Find more at auto glass charlotte .
Thanks to # # anykeyword # #, my home feels brighter with these spotless windows! window cleaning service providers
” This isn’t just fun; it’s also healthy outdoor activity disguised as playtime—you’ll be glad you chose an inflatable option next get-together!” # # anyKeword#” bounce house st petersburg fl
I appreciated this post. Check out Oxnard Dental Care for more.
This was very well put together. Discover more at Vitality Dentl .
The importance of hiring licensed & insured # # anyKeyWord # cannot be stressed enough. Tidal Remodeling roofing company
Can’t say enough great things about the staff and services provided by AmericnLaserMedSpa-ElPaso !” ## safe coolsculpting procedures el paso
Thanks for the useful suggestions. Discover more at Affordible Pest Solutions .
Midland residents, tired of struggling with love handles and belly bulges? Choose coolsculpting at Midland CoolSculpting for noticeable and long-lasting results.
Great article on choosing the best color for a garage door; it can truly boost your home’s outside! Garage Door Service
Does anyone have testimonials about Winter Garden vehicle shippers ? I’m considering them for my winter car transport.
Thanks for the clear advice. More at loan agency new orleans .
Appreciate the thorough insights. For more, visit traveling auto technician .
I’ve seen how important it is to have an emergency kit in your vehicle after experiencing a minor accident myself! motor vehicle accident attorney
Always remember: Knowledge = Power!! Don’t hesitate reach out seek guidance whenever necessary regardless circumstances might entail moving forward!!! Personal injury attorney
Planning ahead helps avoid panic moments so reach out beforehand especially if interested switching over towards budgeting strategies involving companies mentioned!! Healdsburg apartment movers
Promptness & efficiency are hallmarks of this business—well done! AC repair services in San Diego
. Quick question: Do they provide tracking information during the shipment process at ### Boynton Beach car transport
What should I expect during my first consultation for dental implants in San Diego? Dental Implants in San Diego
Truly grateful encountering such supportive kindhearted compassionate souls dedicating their lives helping others achieve optimal health wellness through innovative techniques mastered expertly over years hard work dedication proven results achieved Root Canal in San Diego
“Local business spotlight: If you need assistance removing stubborn clogs, definitely check out ASI.” Clog Removal in San Diego
Friendly atmosphere made discussion surrounding costs feel less intimidating than usual- great job here!!! Drain Repair in san diego
Excited about the possibilities in the snack industry! A solid wholesale food distributor can open many doors!
Priority Restoration did an amazing job with my water damage clean up near me. Highly recommend their services!
I had a fantastic experience with Priority Restoration Philadelphia Water Damage Restoration Near Me
What are the top qualities to look for in a digital marketing agency? I’d love to find a great Digital Marketing Agency !
Cracks for your glass can end in considerable points down the line; always belief authorities like those at auto glass charlotte
Thrilled with the outcome of my recent collaboration with Banning Construction Inc.; highly recommend their services to anyone in Lodi looking for contractors! safe bathroom remodeling practices
Saya sudah mendengar beberapa cerita sukses orang lewat agency , bagaimana caranya ya ? %% anykeyword%% jual rumah cepat Jakarta
The value of air best are not able to be understated; it be reassuring realizing that establishments like VetCor focus on this for the duration of remediation efforts too! Mold Damage Mitigation
For anyone looking to rent a dumpster, consider going with dumpster rental Orlando —they have great reviews!
This was very beneficial. For more, visit Oxnard Dental Care .
Thanks for the insightful write-up. More like this at Vitality Dentl .
Looking forward to more success stories together with # Social Cali of Santa Rosa Marketing Agency
After my car accident, my lawyer helped me navigate medical bills and insurance claims smoothly! Highly recommend vehicle accident lawyer .
This was a great article. Check out Affordable Pest Solutions for more.
The client service at Server Rental in Bengaluru is superior! They really helped me choose the best server for my organization requirements.
Get started immediately after experiencing trauma caused by negligence—connect promptly now with diligent individuals working under titles recognized within industry st Workers Compensation
Just had a wonderful experience with the team at water damage restoration near me after a storm caused some flooding at my home in Irving.
Honesty transparency remains core principles upheld consistently which builds lasting relationships between both parties involved here without question!! ” #aNykEywOrD#!” Digital Marketing Agency
You can never go wrong with any restaurant featured on Indian restaurants #; they’re all fantastic choices.
I was engaged throughout. Check out ##emergency roadside car repairs## for more.
traveling car mechanic
Documenting detailed records post-incident provides necessary evidence required down line during negotiations concerning settlements #anythingKeyboard# Car Accident Lawyer
The expertise of the team at Miami car moving companies made all the difference during my car transport!
This was highly educational. More at ferretería en Albacete .
Misconceptions surrounding car accident laws abound; clarify these myths with reliable information from sources like Auto Accident .
Loved this post about construction insights—Banning Construction Inc.’s practices resonate well with these ideas! on-time bathroom remodels
What outdoor activities do you enjoy most while visiting or living in beautiful Charlotte? auto glass charlotte
อยากจะพาเพื่อนไปที่ OMG OneMoreGlass วันหยุดนี้ รู้สึกตื่นเต้นจัง! ร้านชิลดนตรีสดสาย 1
Appreciate the detailed post. Find more at Oxnard oral health specialists .
Thanks for the helpful advice. Discover more at what services does Vitality Dental have .
Your comparisons between different materials and their long-term impacts on #### anykeyword#### were enlightening; appreciate it! Tidal Remodeling roofing company
Thanks for the detailed post. Find more at Afordable Pest Solutions .
I always recommend Winter Garden car shippers for anyone needing car transport services in Winter Garden.
The attention to detail at irvine personal injury lawyers really sets them apart from other law firms in Irvine.
Understanding the legal process is tough; that’s why having a trusted motor vehicle accident attorney is crucial.
Just got back from Charlotte, and the skyline is even more beautiful than I remembered! charlotte auto glass
With summer around the corner, it’s time to ensure your AC is ready—Mauzy can help with that! AC repair services in San Diego
Just moved to San Diego and need a reliable place for dental implants. Any suggestions? Dental Implants in San Diego
Just had my drains cleaned by ASI; they were on time and did an incredible job! Clog Removal in San Diego
– It’s refreshing encountering individuals committed towards delivering quality results while remaining courteous & respectful throughout entire interactions experienced today!! Drain Repair in san diego
Don’t let construction debris hinder your progress in Orlando! Rent a dumpster from dumpster rental Orlando and maintain an organized worksite.
Your insights into influencer marketing are so relevant today! Interested in connecting with Marketing Agency about it.
This was a wonderful post. Check out list of services at Vitality Dental for more.
Thanks for the valuable insights. More at Oxnard Dental Care .
Great overview of competitive analysis strategies—I’d love input from strategic minds over at %%### anykeyword ###%% too! Social Cali of Santa Rosa Marketing Agency
Bagi Anda yang sedang mencari properti di Jakarta Utara, jangan lewatkan kesempatan untuk mengunjungi rumah dijual Jakarta Timur . Mereka memiliki banyak pilihan yang menarik.
I’ve learned that having a knowledgeable and compassionate #injury lawyer# makes navigating these challenges much easier. collision lawyer
I dealt with Geico last year, and the damage caps really limited my payout. texas injury compensation limits helped me see why my $50K settlement felt low despite clear medical evidence click here
After hearing horror stories about denied claims, I made sure to hire a reputable #workerscomp lawyer who had proven success rates! Workers’ Compensation Lawyer
Appreciate the comprehensive advice. For more, visit Affordible Pest Solutions .
Well done! Find more at sex .
The pricing at affordable server rental in Bengaluru for server rentals in Bengaluru is very competitive. I’m impressed with the value they provide!
Every visittoanewplaceleavesmemore excitedtomeetnewfriendswhoshare similar tastesin culinary delights. Indian restaurant
Safety is a priority when transporting your vehicle. That’s why I chose Sunshine Auto Transport’s Kissimmee .
Wonderful insights into consumer behavior trends online—it’s fascinating to see how things shift; learn more from **### anyKeywords### Marketing Agency
Fantastic overview of vehicle shipping options available in The Villages; I’m heading over to Sunshine Auto Transport’s The Villages now!
Valuable information! Find more at auto glass charlotte .
I found this very helpful. For additional info, visit ferretería Albacete .
This was such an excellent overview of managing pests effectively—definitely need local help through contacting reliable services offering assistance readily available whenever needed especially pertaining specific cases arise directly affecting daily https://www.google.com/maps/place/?q=place_id:ChIJ0cxNePoxjoARWJjAfJwU_6U
This was very insightful. Check out Oxnard Dental Care for more.
This was a fantastic read. Check out Vitality Dentl for more.
Thanks for the thorough analysis. More info at Disabled WC .
This resource truly st roofing company
Very helpful read. For similar content, visit Affordible Pest Solutions .
Great tips! For more, visit same day drain cleaning .
I always recommend friends to check out top rated personal injury lawyers on platforms like Thompson Law !
Thanks for the useful post. More like this at 24 7 emergency plumber .
Well done! Discover more at charlotte auto glass .
Priority Restoration did an amazing job with my water damage clean up near me. Highly recommend their services!
I had a fantastic experience with Priority Restoration Philadelphia Water Damage Restoration Near Me
This is highly informative. Check out reliable emergency plumbing services for more.
Thanks for the clear breakdown. More info at https://send.now/1th2i6bb83lp .
So happy with the service from window cleaning company new ipswich —my windows have never been clearer!
For anyone searching for reliable AC repair services in San Diego, I vouch for Mauzy. AC repair services in San Diego
San Diego’s climate is perfect for recovery after dental implant surgery! It’s definitely a plus. Dental Implants in San Diego
After hearing horror stories about root canals, I’m relieved to have found Dr. Georgaklis in San Diego! Root Canal in San Diego
I had a terrible clog last week, and ASI, The White Glove Guys came to the rescue. Highly recommend! Clog Removal in San Diego
“If you have stubborn clogs like I did—call mr.rooters—they’ll sort it out quickly!” Drain Repair in san diego
Anyone comprehend how lengthy the mold remediation strategy takes with VetCor? Just curious! Mold Damage Removal
I found this very interesting. For more, visit phim sex hay .
Природа, горы и тёплое море — отпуск в Гаграх на берегу Чёрного моря
гагра отдых https://www.otdyh-gagry.ru/ .
температура воды в красном море
Great tips on maintaining air conditioning systems! If anyone needs reliable air conditioning repair in Gilbert, Arizona, I recommend checking out local services. google.com
Very informative post about St Cloud car moving companies! I’ll be bookmarking this and visiting St Cloud auto transport companies later.
Asking questions about what’s next after being involved in an automobile collision? Get answers by exploring resources on ### anyKeyWord### today! Freese & Goss Law Firm
Thanks for the insightful write-up. More like this at Oxnard Dental Care .
This was quite enlightening. Check out Vitality Dental for more.
The growing popularity of 꽁머니 is fascinating! How do you think it will evolve in the future? Would love your thoughts over at 꽁머니 홍보 .
I found some incredible betting strategies on 롤토토 that have boosted my confidence in placing bets.
Valuable information! Discover more at Progressive slots .
The coffee culture in Charlotte is thriving—what’s your go-to cafe there? auto glass charlotte
อยากจัดปาร์ตี้วันเกิดที่ OMG OneMoreGlass ต้องทำยังไงบ้างครับ? ผับสาย1
This was very beneficial. For more, visit 24 hour plumber near me .
Have you checked out different types of cheapest storage space in singapore facilities? Some are surprisingly affordable!
I’m always looking for ways to improve site speed for better rankings—great discussion here! Check out 구글 상위 for more strategies!
I appreciate how user-friendly the site is at 라이브카지노 compared to other 카지노사이트.
The support group at server rental offers in Bengaluru is extremely valuable! They have actually helped me every step of the way with my server leasing.
This was highly useful. For more, visit Trustworthy pest control in Hackettstown .
The discussion around 비아그라 구입 1위 사이트 has really opened my eyes to the options available for men experiencing ED.
Модульный дом https://kubrdom.ru из морского контейнера для глэмпинга — стильное и компактное решение для туристических баз. Полностью готов к проживанию: утепление, отделка, коммуникации.
More personal stories about using 비아그라 구입 1위 사이트 could really help others who are hesitant or unsure about trying it.
I was surprised by how many people struggle with ED, but glad there are choices available like 비아그라 .
Just signed up for a site offering 꽁머니, and I’m excited! Any advice on how to maximize its potential? Check out 꽁머니 1만 for helpful tips!
I love the concept of 꽁머니! It’s such a unique way to engage users. Check out 꽁머니 for more insights!
I’ve been using 꽁머니 for a while now, and it has completely transformed my gaming experience! If you want to know how, check out 꽁머니 지급 .
Mengapa banyak orang memilih menggunakan jasa agent dibandingkan mencari sendiri?## anyKeyWord#? rumah minimalis dijual Jakarta
I’m intrigued by how 꽁머니 can level the playing field for new players in competitive environments. What strategies do you all recommend? 꽁머니 사이트
I’ve been playing at 에볼루션카지노 for a while now, and I always refer to 에볼루션카지노 쿠폰 for the latest updates and tips.
It’s great that there are more options like 시알리스 available today than ever before! Let’s discuss our favorites! 시알리스 구매
Anyone else had an amazing experience with The Villages auto shipping when moving vehicles in The Villages?
В случае неисправности не тяните — обращайтесь сразу к специалистам.
I dealt with State Farm last year, and what is my texas injury case worth really helped me see why their lowball offers aren’t worth taking. Ended up settling for $45K after months of back and forth https://www.blurb.com/user/keenanijad
Esse material está bem escrito! Poucos sites oferecem informações tão claras sobre comprar backlinks. Muito bom mesmo! Já vou acompanhar o site para não perder nada. Material assim agrega valor. Vai ter continuação? veja como funciona
Extremely helpful post! It’s terrific to have a relied on source like PU Injection Grouting for waterproofing services in Mumbai.
This was highly educational. More at WC cistern repair .
Thanks for the great explanation. More info at local plumber near me .
This was a fantastic read. Check out ferretería Albacete for more.
Very useful post. For similar content, visit local plumbing expert .
Appreciate the detailed post. Find more at Boiler breakdowns .
This was a wonderful post. Check out Dentistry in Oxnard for more.
I appreciated this post. Check out what to do in a dental emergency at Vitality Dental for more.
This was very enlightening. More at phim sex .
шкафы в паркинг цена шкафы в паркинг цена .
I enjoyed this post. For additional info, visit Pest management in Hackettstown .
This was quite informative. For more, visit colchones en Albacete .
Anyone else think that customer service at Ocala car shippers is one of their strongest points? Ocala auto transport company
Just wow! My roof is spotless thanks to the experts at Tampa Dumpster Rental Tampa Bay Pressure Washing .
Thanks to the experts at Mauzy, my home stays cool during these hot summer days. AC repair services in San Diego
“The journey towards better oral health is exciting; can’t wait to start mine with help fromSanDiegoDentalImplant!” Dental Implants in San Diego
So glad to have found reliable professionals like those at ASI when it comes to removing stubborn clogs. Clog Removal in San Diego
“With so many options in San Diego, choosing George Georgaklis DDS was one of the best decisions I made!” Root Canal in San Diego
“Mr.Rooter’s technicians were prompt and efficient—couldn’t be happier with their service!” Drain Repair in san diego
This was a fantastic resource. Check out drain plumber for more.
Had a similar fight with Geico last year. texas wrongful death damages really helped me push back on their lowball offers. Ended up settling for $45K after months of back-and-forth. Insurance companies drag their feet to wear you down, so patience is key! Texas personal injury case settlement limits
Appreciate the detailed post. Find more at Boiler repairs .
” The artistry involved in restoring frescoes during a bloque restoration is awe-inspiring.” Water Damage Restoration
“The right #caraccidentattorney can turn what feels like chaos into clarity and direction; don’t underestimate this!” personal injury attorney waco tx
Great job! Find more at https://www.longisland.com/profile/dorsonbcxb/ .
If you’re looking for affordable options, check out the cheap movers in Floral City. They made my move so much easier! Long distance movers Floral City
Wonderful tips! Find more at Casino slots .
If you’re looking for reliable local movers in San Antonio, I highly recommend checking out Local movers San Antonio !
Thanks for the detailed post. Find more at Oxnard Dentistry .
This was a fantastic read. Check out Vitality Dentl for more.
Just what I needed! These tents look perfect for my upcoming outdoor event in Tampa. water slide tampa
This was very beneficial. For more, visit Affordable Pest Solutions .
Great tips! For more, visit Plumbers near me .
I found Irving apartment movers through a friend and they did not disappoint! Great choice for moving! Irving apartment movers
Anyone know the best places for secure storage singapore in Singapore? I need some recommendations!
I just recently moved my service online, and the very best decision was to pick server rental in Bengaluru through Server Rental in Bengaluru . The performance has actually been great!
Thanks for the thorough analysis. Find more at Kitchen installations .
Mengetahui nilai tambah dari sebuah properti akan meningkatkan daya tariknya ! # # anyKeyWord ## jual rumah
Outstanding insights on waterproofing services! My friend advised Waterproofing Contractors Thane , and now I see why!
This was highly useful. For more, visit phim sex .
This was very insightful. Check out colchones en Albacete for more.
Priority Restoration did an amazing job with my water damage clean up near me. Highly recommend their services!
I had a fantastic experience with Priority Restoration Philadelphia Water Damage Restoration Near Me
Helpful suggestions! For more, visit ferretería en Albacete .
This was a fantastic resource. Check out Burst pipes for more.
This was very enlightening. For more, visit discussing pricing with Vitality Dental .
Great tips! For more, visit Oxnard Family Dentistry .
I just dealt with State Farm on a slip-and-fall case. economic damages texas law helped me see why their initial $15K offer was way low. Took almost 9 months to settle for $55K, but knowing about damage caps made me push harder when does Texas enforce injury caps
Esse material está excelente! É difícil encontrar conteúdo tão direto sobre comprar backlinks. Continue assim! Já vou acompanhar o site para me manter atualizado. Isso é o que falta na web. Você pretende escrever mais sobre isso? veja como funciona
Thanks for the detailed guidance. More at https://www.mediafire.com/file/0kngdmpfuxbiqze/pdf-34700-22650.pdf/file .
Thanks for the comprehensive read. Find more at Afordable Pest Solutions .
Thanks for the great tips. Discover more at affordable plumber prices .
Esse artigo está bem escrito! Poucos sites oferecem detalhamento assim sobre backlinks de qualidade. Muito bom mesmo! Já vou acompanhar o site para não perder nada. Conteúdo assim faz diferença. Você pretende escrever mais sobre isso? não perca isso
I had such an awesome experience with my recent move thanks to a reputable floral city mover—highly recommend it! Floral City commercial movers
Kudos to Mauzy Cooling, Heating, Plumbing, and Electrical for their amazing work on my air conditioning unit! Their AC repair services in San Diego are reliable and affordable. AC repair services in San Diego
“Just watched some patient testimonials from San Diego Dental Implant—so inspiring!” Dental Implants in San Diego
It’s amazing how much difference a tidy space can make in preventing mice. Rodent Control Inc.
Moved last week and couldn’t have done it without my awesome movers from Kenansville moving company #; they’re based right here in Kenansville!
Very engaging read overall—it provides clarity while also inspiring confidence amongst readers regarding available options whenever obstacles arise unexpectedly (think wisely before seeking assistance FROM:ASI). Clog Removal in San Diego
Just wanted to share how great my experience was with Dr. George Georgaklis for a recent root canal. Root Canal in San Diego
For more information https://l-spb.ru .
“For anyone living in San Diego, keep Mr. Rooter on speed dial for those unexpected drainage problems!” Drain Repair in san diego
“Relocating doesn’t have to be stressful; just ask the pros at #](link)! Looking forward!” Office moving companies Homosassa
Has anyone utilized Garage Door Repair Near Me just recently? I wonder about their pricing and service quality. Garage Door Repair in Lakewood
Thanks for the useful post. More like this at quick boiler replacement .
My garage door wouldn’t open, and I was frantic! Thankfully, I discovered a great Garage Door Repair Service Near Me that saved the day. Garage Door Repair Near Me
This was highly educational. For more, visit Slot game reviews .
Thanks for the informative post. More at General Plumber .
Thanks for the thorough analysis. Find more at phim sex .
I appreciated this post. Check out Vitality Dentl for more.
This was nicely structured. Discover more at reliable Oxnard dental implants .
эжекторное водопонижение stroitelnoe-vodoponizhenie6.ru .
Anyone have revel in with VetCor’s features? I’m considering them for my homestead in Sarasota! Mold Remediation Sarasota
Appreciate the detailed information. For more, visit Affordible Pest Solutions .
Thanks for the insightful write-up. More like this at colchones en Albacete .
Thanks for the helpful advice. Discover more at General Plumber .
“Does anyone know if insurance is typically included with your ## storage unit singapore
Useful advice! For more, visit Fall heating systems .
Sangat menarik membahas tentang investasi properti, semoga bisa temukan peluang baru lewat jual rumah cepat Jakarta !
This was highly educational. For more, visit Immersions .
kraken darknet Кракен онино
Do you recommend any specific brands for air conditioning repair services? Looking for reliable options! https://www.google.com/maps/place/?q=place_id:ChIJb1Vy1kuvK4cRaZPGFQq-frA
Appreciate the thorough write-up. Find more at find a plumber .
This was highly educational. More at Landline lookup .
I appreciated this article. For more, visit ferretería en Albacete .
My first time getting roof washing done, and it used to be seamless because of the ninjas in Tacoma—rather advise checking them out: Roof Washing !
Thanks for the insightful write-up. More like this at sink installation services .
Appreciate the great suggestions. For more, visit phim sex .
I’ve had disappointments with repair work previously, however Garage Door Repair Near Me surpassed my expectations! New Garage Door Installation
ai therapist chat http://www.ai-therapist1.com .
Very useful post. For similar content, visit Classic slots .
Esse artigo está incrível! É difícil encontrar conteúdo tão direto sobre backlinks de qualidade. Parabéns pelo trabalho! Já vou acompanhar o site para continuar aprendendo. Isso é o que falta na web. Vai ter continuação? estratégia de link building
If you’re looking for reliable Garage Door Repair Near Me, I just had an amazing experience with a local service that fixed my door in no time! Garage Door Repair
Thanks for the clear advice. More at https://www.empowher.com/user/4531162 .
Nicely done! Discover more at colchones en Albacete .
This is highly informative. Check out toilet plumbers near me for more.
расчет водопонижения http://www.stroitelnoe-vodoponizhenie6.ru .
This was quite enlightening. Check out professional plumber for more.
Este conteúdo está muito bom! Nem sempre encontramos detalhamento assim sobre backlinks de qualidade. Continue assim! Já assinei o feed para continuar aprendendo. Conteúdo assim faz diferença. Você pretende escrever mais sobre isso? confira tudo
Appreciate the details provided here about mold dangers! For those needing help in Sarasota, check out Mold Remediation Sarasota .
Заказать диплом института по доступной стоимости можно, обратившись к надежной специализированной фирме. Мы оказываем услуги по производству и продаже документов об окончании любых ВУЗов России. Заказать диплом о высшем образовании– demo.accesslinkandcsng.com/employer/diplomy-grup-24
Your insights on roof care are spot on! I found a significant provider at Roof Moss Removal that specializes in this.
I’ve heard so much about the benefits of using 꽁머니! It really seems like a great way to boost your gaming experience. Check out 꽁머니 카지노 for more insights!
Thanks for the clear breakdown. More info at Disabled WC .
I’m curious about the rules surrounding 꽁머니. Can anyone clarify? I found some helpful content at 꽁머니 사이트 that explains everything!
I was skeptical about 롤 토토 at first, but after using 롤 토토 , I’ve become a fan!
I think awareness about options like 비아그라 구입 1위 사이트 should start earlier in life, as it can affect many aspects of health.
The variety of sizes available for storage space singapore makes it easy to find just what I need.
After trying countless recharge systems, I after all settled on ManaBuy. Their consumer-pleasant interface and low-priced quotes make it a breeze to proper up my gaming debts with no breaking the financial institution best rated game recharge site
It’s intriguing to see how the demand for server rentals in Bengaluru is increasing; companies like Server Rental in Bengaluru are blazing a trail.
I’ve been hesitant about trying 시알리스 due to safety concerns, but I want to learn more from others’ experiences! 시알리스
The connection between mental health and overall well-being is undeniable, especially in the context of ##counseling Chicago Illinois##. therapist Chicago
Informasi tentang jual rumah di Jakarta yang disajikan oleh situs Anda sangat membantu bagi calon pembeli seperti saya. Terima kasih banyak atas layanannya! rumah dijual dekat MRT Jakarta
”Being proactive allows one maintain control during times when unpredictability arises; connecting directly towards professionals versed under circumstances echoing sentiments shared throughout dialogues synonymous ultimately linked within discussions Best Water Damage Restoration in Mesa AZ
This was quite enlightening. Check out sex for more.
I appreciate that 꽁머니 allows for a risk-free way to explore betting options! Anyone else feel the same? Check out 바카라 꽁머니 for more!
Well done! Discover more at 24 hour plumbing solutions .
I feel like there’s a community forming around those who use 꽁머니 actively—let’s connect! Join us at 토토 꽁머니 30000 !
It’s amazing how 꽁머니 can help players maximize their fun without spending too much money. Find out more at 꽁나라 !
The discussion around 비아그라 has really opened my eyes to the options available for men experiencing ED.
Is there an optimal way to utilize 꽁머니 in online gambling? I’ve been searching for strategies and found some great content at 꽁머니 사이트 !
This was quite informative. More at emergency plumber .
En güncel ve çok izlenen filmler full hd film formatında erişime açık
4k hd film filmizlehd.co .
Appreciate the thorough information. For more, visit Kitchen sink plumbing .
This is very insightful. Check out colchones en Albacete for more.
ai therapy app ai-therapist1.com .
This was highly educational. For more, visit 24 7 plumber near me .
Well explained. Discover more at Broken pipe .
Thanks for the great explanation. Find more at Cell phone lookup .
Thank you for raising awareness about this often-overlooked issue—mold can be dangerous and requires professional intervention from places like Mold Remediation Sarasota
Exists any suggestion for garage door repair in Lakewood? I require some assist with mine. Garage Door Repair Lakewood looks like a good alternative! Garage Door Repair Lakewood
I love the way you emphasize roof protection! If you might be in Asheville, honestly look into Roof Cleaning for cleaning capabilities.
If you’re having trouble with your garage door, look no further than a Garage Door Repair Service Near Me; they fixed mine swiftly! Garage Door Repair in Parker
Your post could help so many people struggling with mice infestations—well done! google.com
Appreciate the comprehensive insights. For more, visit Slab leak repair .
Valuable information! Discover more at sex .
Appreciate the detailed information. For more, visit Slot machine games .
I enjoyed this post. For additional info, visit trusted water leak experts .
This was quite informative. For more, visit urgent plumber .
Any chance you could include testimonials or reviews from previous customers using those suggested services??? ####aniyKeyord### Local movers Starke
For anyone moving to Singapore, securing some storage units singapore in advance is a smart move!
This was nicely structured. Discover more at Local Plumbers .
The visuals you provided alongside tips on lanai screen repair make it so much easier to understand—thank you! Screen Repair
Anyone else right here from Cape Coral? Just got my home painted by Golden Touch Painting, and I’m pleased! Exterior Home Painting
Clearly presented. Discover more at colchones en Albacete .
The curb charm develop from a smooth outside is mind-blowing; drive washing is vital for that! Pressure Washing Ruckersville
This was a fantastic resource. Check out 24 hr plumber for more.
This weblog has such a lot priceless facts on holding roofs clean and match—thanks! I’ll seek advice from Aqua Knight by way of Roof Cleaning Deerfield Beach .
Being proactive approximately roofing concerns will retailer us dollars down the road—it starts offevolved with contacting %. Roof Washing
Every publish from Sue Kneeland brings readability to a perplexing matter like Medicare coverage—so grateful! Medicare Insurance
Excellent article! I actually have many questions about Medicare and should touch Medicare Insurance for assistance.
Great insights! Discover more at professional emergency plumbing .
Thanks for sharing your experience! I’ve been trying to find a trustworthy garage door repair service, and Garage Door Repair looks appealing. Garage Door Opener Repair
If anyone needs Garage Door Repair Parker, I just had mine done, and it works perfectly now! So impressed with their work. Garage Door Installation in Parker
This was quite enlightening. Check out Public records search for more.
This was very beneficial. For more, visit professional dishwasher repair .
Thanks for the informative content. More at affordable plumber prices .
I appreciated this post. Check out emergency drain blockage repair for more.
Thanks for sharing such valuable information about AC repair services! Great for those of us living in the hot climate of Gilbert. Everest Air LLC Air Conditioning Repair
Wow, I didn’t fully grasp what percentage different types of mold there are! Good thing we’ve got specialists like VetCor around! Mold Mitigation
Roof cleanliness is one thing many omit; joyful there are providers like ### that target this precious assignment. Roof Cleaning Company
My garage door wouldn’t open, and I was frantic! Thankfully, I discovered a great Garage Door Repair Service Near Me that saved the day. Garage Door Repair
Appreciate the insightful article. Find more at Immersions .
I had no conception that roof cleansing would amplify the lifestyles of my shingles! Time to take action! Roof Moss Removal
This was a wonderful guide. Check out colchones en Albacete for more.
I had a fantastic experience with Kerner Law Group, P.C. as my Bronx car accident attorney!
Kerner Law Group, P.C. truly stands out as the best Bronx car accident lawyer I’ve ever worked with Bronx personal injury attorney
Just wanted to share how helpful my local movers were! Found them on Osteen Mover’s
I recently moved my office in Kenansville and hired a great moving company. Highly recommend checking out Office moving companies Kenansville for tips!
“How do you find the best deals on monthly rentals for ## storage units singapore
From start to finish, my experience with Tampa Bay Pressure Washing was exceptional. The scheduling process was seamless, and their responsiveness made it easy to find a convenient time for the service. Power Wash House Cost Tampa Bay Pressure Washing
кайт школа анапа Кайт Анапа – это не просто увлечение, это образ жизни, наполненный солнцем, ветром и морским бризом. Анапа, с её обширными пляжами и устойчивыми ветрами, стала излюбленным местом для поклонников кайтсерфинга. Здесь можно встретить как новичков, делающих первые шаги под руководством опытных инструкторов, так и профессионалов, оттачивающих своё мастерство в захватывающих трюках. Кайт школа в Анапе – это кузница будущих звёзд кайтсерфинга. Школы предлагают разнообразные программы обучения для всех уровней, от начальных курсов до продвинутых тренировок. Профессиональные инструкторы, современное оборудование и индивидуальный подход гарантируют быстрый прогресс и безопасность на воде. Кайт школа в Анапе – это не только уроки, но и дружное сообщество, объединённое страстью к ветру и морю. Здесь легко найти друзей, получить ценные советы и приятно провести время в кругу единомышленников. Кайтсерфинг в Анапе – это шанс отвлечься от повседневной рутины, ощутить свободу и испытать незабываемые эмоции. Представьте себя, скользящим по волнам, подгоняемым ветром, в окружении чаек и под ласковым солнцем. Это не просто спорт, это приключение, которое останется в памяти навсегда. Кайтсерфинг в Благовещенской – ещё одно популярное место в Анапском районе. Здесь, на просторной косе между Бугазским лиманом и Чёрным морем, созданы идеальные условия для катания. Мелководье и стабильный ветер делают Благовещенскую отличным местом для обучения. Кайт Блага – это сокращённое название Благовещенской, используемое кайтсерферами. Здесь есть несколько кайт-станций, предлагающих обучение, прокат и хранение оборудования. Кайтсерфинг в Анапе – это выбор тех, кто ценит активный отдых, любит ветер и море и готов к новым вызовам. Присоединяйтесь к сообществу и откройте для себя мир захватывающих приключений! DETIVETRA (ДЕТИ ВЕТРА) – это не просто название, это жизненная философия. Это те, кто чувствует ветер, не боится перемен и всегда готов к новым открытиям. Присоединяйтесь к ДЕТЯМ ВЕТРА и ощутите себя частью чего-то большего!
Has anyone used local movers in Plantation? I found a great resource at Long distance movers Plantation that helped me choose the best ones.
I enjoyed this article. Check out affordable commercial plumbers for more.
Well explained. Discover more at washing machine troubleshooting .
This was highly helpful. For more, visit drain plumber .
This blog is a treasure trove of information on tent rentals in Tampa—so helpful! tampa bounce
The craftsmanship in Bloque Restoration is truly impressive and inspiring. google.com
This was highly useful. For more, visit Landline lookup .
Great job! Discover more at apuestas deportivas en vivo .
This was a fantastic read. Check out colchones en Albacete for more.
Great job! Find more at Immersions .
I’m always impressed by how friendly and professional everyone at #### anykeyword ### is! window cleaning company services new ipswich
It’s so appropriate to act quick in the event you spot mildew—blissful there are gurus possible like VetCor! Mold Removal
This was very enlightening. More at Gold IAR Path .
I didn’t realize how much help I would need until I moved; thank goodness for my Floral City movers! Cheap movers Floral City
Smooth sailing throughout entire journey—from packing up boxes until settling into new digs Ona international movers
I’m grateful for the community support at 롤 토토 when it comes to learning about 롤 토토!
I’ve been hesitant to try 비아그라 구입 , but hearing others’ experiences is encouraging!
“Has anyone had issues with fraud related to꽁머니 transactions—how did you handle it? Discuss safety tips over on # # any Keyword # # !” 꽁나라
The cost of long distance moving can add up; make sure you get quotes from several companies in Kenansville! Local movers Kenansville
If you’re new around Auburndale or planning a move soon, don’t forget these resources available via: Cheap movers Auburndale
I’ve been hearing so much about 꽁머니 사이트 lately! Can someone explain what 꽁머니 is all about?
Local insights on moving: Use Highland City Mover’s if you want a hassle-free experience in Highland City!
”How exciting witnessing transformations unfold firsthand—including observing positive changes made possible due diligence upheld via dedicated teams representing ! Homosassa full service movers
Kudos to the team at long distance movers Pierson for their hard work and dedication during my move! Pierson moving company
Погружение в мир 1xbet-egypt.netlify.app, где открываются.
Откройте для себя 1xbet-egypt.netlify.app, ставок на спорт.
1xbet-egypt.netlify.app — ваш надежный партнер, чтобы.
1xbet-egypt.netlify.app — ваш игровой рай, где вы сможете найти.
Узнайте о лучших стратегиях на 1xbet-egypt.netlify.app, сделать ставки более выгодными.
1xbet-egypt.netlify.app — ваш источник азартных развлечений, где.
Откройте для себя 1xbet-egypt.netlify.app, получить незабываемые эмоции.
Воспользуйтесь бонусами на 1xbet-egypt.netlify.app, разнообразить ваши ставки.
1xbet-egypt.netlify.app — время делать ставку, на платформе.
Исследуйте 1xbet-egypt.netlify.app, где вас ждут.
Откройте для себя мир 1xbet-egypt.netlify.app, где.
Узнайте о лучших предложениях на 1xbet-egypt.netlify.app, в котором.
Присоединяйтесь к 1xbet-egypt.netlify.app для увлекательного времяпрепровождения, что бы.
Развлекитесь на 1xbet-egypt.netlify.app, где.
Восторг от игры на 1xbet-egypt.netlify.app, где вас ждут новые игры.
Цените каждый момент на 1xbet-egypt.netlify.app, с.
Ставьте на выигрыш с 1xbet-egypt.netlify.app, выигрыши становятся реальностью.
Позвольте 1xbet-egypt.netlify.app удивить вас, где каждый может.
lxbet lxbet .
The legal landscape complying with an accident can be made complex; do not browse it alone– talk to specialists at Falk Talks Law .
This was quite useful. For more, visit Tewes Design Architect .
The world of online gambling is so exciting! For the latest games and features, I suggest visiting 온라인카지노 추천 .
Just wanted to say how much I appreciate the transparency from the team at Ever Therm Insulation! Insulation in San Fernando, CA
This was very enlightening. More at abogado Coruña .
“I wish I had discovered affordable ## storage units singapore
“Your post has inspired me to take my home maintenance seriously, especially regarding pests.” Rodent Control Inc.
What are your favorite slot games on 슬롯사이트 순위 ? I’m looking for recommendations to try something new.
Giao diện của nhà cái az888 thật sự dễ sử dụng và thân thiện với người dùng mới! Khám phá ngay tại https://lifestyleshoes.uk.com/ !
Thanks for the thorough analysis. More info at expert power flushing .
Nhà cáivàaz88 chắc chắn sẽ tạo ra môi trường lành mạnh cho tất cả những ai yêu thích trò chơi trực tuyến . ### anyKey word### http://grasshopperfarms.io
Appreciate the detailed information. For more, visit professional plumber in my area .
I wish I had known about Belle Glade apartment movers before my last move in Belle Glade. They seem to have great reviews!
Can’t wait to try out some of the recommendations regarding 시알리스 구매 mentioned here!
Professional concrete driveways in seattle — high-quality installation, durable materials and strict adherence to deadlines. We work under a contract, provide a guarantee, and visit the site. Your reliable choice in Seattle.
Thanks for the practical tips. More at Gold IRA Pathway .
Fantastic post! Discover more at local sink repairs .
This is very insightful. Check out blocked toilet plumber for more.
Thanks for the great content. More at professional washing machine repair .
This was beautifully organized. Discover more at expert local plumbers .
Professional power washing in Seattle — effective cleaning of facades, sidewalks, driveways and other surfaces. Modern equipment, affordable prices, travel throughout Seattle. Cleanliness that is visible at first glance.
Professional retaining wall contractor — reliable service, quality materials and adherence to deadlines. Individual approach, experienced team, free estimate. Your project — turnkey with a guarantee.
Using 꽁머니 has opened doors for me in the gaming world that I never thought possible! If you’re curious, head over to 꽁나라 for details.
I found this very interesting. Check out https://files.fm/u/xenzty58yy#design for more.
роллетные шкафы для паркинга москва роллетные шкафы для паркинга москва .
I appreciate that 꽁머니 allows for a risk-free way to explore betting options! Anyone else feel the same? Check out 꽁머니 환전가능사이트 for more!
Are there any legal considerations when using 꽁머니 that we should be aware of? Learn more legalities at 꽁머니 텔레그램 !
This was a wonderful post. Check out colchones Albacete for more.
I appreciate that 꽁머니 allows for a risk-free way to explore betting options! Anyone else feel the same? Check out 꽁나라 for more!
Rất nhiều người nói về casa dola789 và sau khi thử nghiệm, tôi hoàn toàn đồng ý rằng đây là một trong những lựa chọn tốt nhất ! Xem trang web này
Thanks for the practical tips. More at Spam call identification .
Wow, the importance of proper insulation cannot be overstated! Kudos to Tujunga Insulation Pros for their dedication – learn more about them at batt insulation !
Thanks for the great explanation. Find more at gas safety inspection services .
Esse material está incrível! Nem sempre encontramos conteúdo tão direto sobre backlinks de qualidade. Continue assim! Já vou acompanhar o site para me manter atualizado. Material assim agrega valor. Já tem outros artigos sobre o tema? conteúdo exclusivo
I not at all discovered how significant roof cleansing became until eventually I moved to Asheville. Triple Wide Pressure Washing is the fabulous! Check them out at Roof Cleaning Company .
Appreciate the insightful article. Find more at mejores bonos de casino .
Thanks for the insightful write-up. More like this at https://www.mediafire.com/file/49dyz1i5zr25o4q/pdf-60710-66119.pdf/file .
I found this very helpful. For additional info, visit trusted WC cistern repair .
Do not wait also long after an accident to hire an attorney! Time is of the essence when it comes to filing insurance claims. Seek advice from Falk Talks Law .
Thanks for the great explanation. More info at Tewes Design Architects .
Finding reputable sources made all difference during stressful period leading towards latest relocation efforts thanks again largely due diligence performed beforehand using tools found while browsing # # Anykey wordL Floral City apartment movers
Este post está muito bom! Nem sempre encontramos conteúdo tão direto sobre backlinks de qualidade. Parabéns pelo trabalho! Já assinei o feed para me manter atualizado. Conteúdo assim faz diferença. Já tem outros artigos sobre o tema? informações recentes
This is very insightful. Check out Gold IRA Pathh for more.
Looking for budget-friendly moving solutions? Check out what Kenansville commercial movers has to offer!
Vehicle shipping can be tricky; however, having an expert agent like those at Visalia car shipping makes all the difference!
The affordability of the movers I found through Local movers Auburndale is unmatched! Highly suggest them for anyone moving in Auburndale.
Finishing off positive note here: Happy customer awaits next adventure thanks largely attributed directly back towards making right choice initially . Local movers Highland City
Купить диплом института по невысокой стоимости возможно, обратившись к проверенной специализированной компании. Быстро заказать диплом: pnevmokzn.80lvl.ru/search.phpsearch_id=egosearch
Had an amazing experience with **# anykeyword** during my recent relocation—they are truly affordable **movers piersson**. Pierson apartment movers
Thanks for the useful suggestions. Discover more at abogados A Coruña .
Great tricks on roof renovation! Keeping a smooth roof is standard in Tacoma. Roof Cleaning
Thanks for the useful post. More like this at boekhouder in arnhem .
Thanks for the thorough analysis. Find more at tandartspraktijk in alphen a/d rijn .
This was a fantastic read. Check out utrecht pizza bestellen for more.
I was hesitant at first, but after using local window cleaning service , I’m a loyal customer now!
Excellent advice on troubleshooting AC issues! Residents of Gilbert should definitely keep these tips in mind for quick fixes. google.com
I just moved, and finding the right singapore storage option was crucial for my transition.
Cheaper than most competitors – that’s why I chose ### anyKeyWord###! Fort Worth international movers
Thanks for the thorough article. Find more at Gold IRA Path Fees .
It’s surprising how many people don’t think about finding a reliable emergency drain cleaning Medford until it’s too late!
Have you ever thought about installing heated floors in your remodeled kitchens—they seem so luxurious yet practical too?! kitchen cabinet remodel Lexington
Have any of you dealt with zoning laws or permits while planning renovations, and how was that experience? kitchen remodeling Tewksbury
Wonderful tips! Discover more at colchones en Albacete .
Fantastic advice about making informed choices when selecting materials—I’ve relied heavily on insight from #I choose Print Store Lexington
I appreciate your understandings right into why we need attorneys throughout bumpy rides; #AccidentLawyers are very useful partners– check out what’s offered at Falk Talks Law Injury #!
Is power washing safe for all different types of siding? I favor to determine until now I schedule it. Pressure Washing
Love seeing local businesses thrive, especially those focusing on home improvement like yours—great job spreading awareness around screening needs in our area! Lanai Screen Repair
Thanks for the great content. More at Tewes Design Group Miami Architects .
טלגראס כיוונים תל אביב
מערכת טלגראס|מדריך למשתמשים לקניית קנאביס תוך זמן קצר
כיום, השימוש בטכנולוגיות מתקדמות מאפשר לנו להפוך תהליכים מורכבים לפשוטים משמעותית. השירות הנפוץ ביותר בתחום הקנאביס בישראל הוא טלגראס כיוונים , שמאפשר למשתמשים למצוא ולהזמין קנאביס בצורה מהירה ובטוחה באמצעות אפליקציה של טלגרם. במסמך זה נסביר איך עובד טלגראס כיוונים, כיצד הוא עובד, וכיצד תוכלו להשתמש בו כדי לקבל את המוצר שאתם מחפשים.
מה מייצגת מערכת טלגראס?
טלגראס כיוונים הוא מערכת אינטרנט שמשמש כמוקד לקישורים ולערוצים (קבוצות וערוצים בפלטפורמת טלגרם) המתמקדים בהזמנת ושילוח מוצרים קשורים. האתר מספק רשימות מאומתות לערוצים אמינים ברחבי הארץ, המאפשרים למשתמשים להזמין קנאביס בצורה נוחה ומהירה.
ההרעיון הבסיסי מאחורי טלגראס כיוונים הוא לחבר בין משתמשים לספקי השירותים, תוך שימוש בכלי הטכנולוגיה של הרשת החברתית. כל מה שאתם צריכים לעשות הוא למצוא את הערוץ הקרוב אליכם, ליצור קשר עם השליח הקרוב אליכם, ולבקש את המשלוח שלכם – הכל נעשה באופן יעיל ואמין.
איך работает טלגראס כיוונים?
השימוש בטulgראס כיוונים הוא פשוט ומהיר. הנה השלבים הבסיסיים:
גישה למרכז המידע:
הכינו עבורכם את אתר ההסבר עבור טלגראס כיוונים, שבו תוכלו למצוא את כל הקישורים המעודכנים לערוצים שעברו בדיקה ואימות. האתר כולל גם מדריכים והסברים כיצד לפעול נכון.
איתור הערוץ הטוב ביותר:
האתר מספק רשימת קישורים לבחירה שעוברים בדיקת איכות. כל ערוץ אומת על ידי צרכנים אמיתיים ששלחו המלצות, כך שתדעו שאתם נכנסים לערוץ בטוח ואמין.
בקשת שיחה עם מזמין:
לאחר בחירת הערוץ המתאים, תוכלו ליצור קשר עם הספק באזורכם. השליח יקבל את ההזמנה שלכם וישלח לכם את המוצר תוך זמן קצר.
העברת המוצר:
אחת ההיתרונות העיקריים היא שהמשלוחים נעשים במהירות ובאופן מקצועני. השליחים עובדים בצורה מקצועית כדי להבטיח שהמוצר יגיע אליכם בדיוק.
מדוע זה שימושי?
השימוש בטulgראס כיוונים מציע מספר תכונות חשובות:
פשטות: אין צורך לצאת מהבית או לחפש סוחרים בעצמכם. כל התהליך מתבצע דרך האפליקציה.
מהירות פעולה: הזמנת המשלוח נעשית בזמן קצר מאוד, והשליח בדרך אליכם בתוך זמן קצר מאוד.
אמינות: כל הערוצים באתר עוברות תהליך אימות על ידי צוות מקצועי.
נגישות ארצית: האתר מספק קישורים לערוצים פעילים בכל חלקי המדינה, מהקצה אחד של המדינה ועד השני.
מדוע חשוב לבחור ערוצים מאומתים?
אחד הדברים החיוניים ביותר בעת использование טulgראס כיוונים הוא לוודא שאתם נכנסים לערוצים שעברו בדיקה. ערוצים אלו עברו אישור רשמי ונבדקו על ידי צרכנים שדיווחו על החוויה שלהם. זה מבטיח לכם:
איכות מוצר: השליחים והסוחרים בערוצים המאומתים מספקים מוצרים באיכות גבוהה.
ביטחון: השימוש בערוצים מאומתים מפחית את הסיכון להטעייה או לתשלום עבור מוצרים שאינם עומדים בתיאור.
שירות מקצועי: השליחים בערוצים המומלצים עובדים בצורה מקצועית ומספקים שירות מדויק וטוב.
שאלת החוקיות
חשוב לציין כי השימוש בשירותים כמו טulgראס כיוונים אינו מורשה על ידי המדינה. למרות זאת, רבים בוחרים להשתמש בשיטה זו בשל היעילות שהיא מספקת. אם אתם בוחרים להשתמש בשירותים אלו, חשוב לפעול בזהירות ולבחור ערוצים מאומתים בלבד.
סיכום: איך להתחיל?
אם אתם מעוניינים למצוא פתרון מהיר להשגת קנאביס בישראל, טulgראס כיוונים עשוי להיות המערכת שתעזור לכם. האתר מספק את כל required details, כולל נתוני חיבור לערוצים מאומתים, מדריכים והסברים כיצד לפעול נכון. עם טulgראס כיוונים, שליח הקנאביס יכול להיות בדרך אליכם במהירות.
אל תחכו יותר – גשו לאתר המידע שלנו, מצאו את הערוץ המתאים לכם, ותוכלו להנות מחוויית הזמנה קלה ומהירה!
טלגראס כיוונים – המערכת שתגיע אליכם.
Appreciate the thorough write-up. Find more at Oil Change .
My experience with chiropractic treatment at Everett Accident auto injury specialist has been fantastic—highly recommend their services!
Just got my roof wiped clean with the aid of Aqua Knight Pressure Washing! It looks trendy! Highly advocate their providers! Roof Washing
I was fearful approximately fading colours by means of the solar, but Golden Touch Painting used effective paint that lasts! Exterior Painter
I didn’t recognise drive washing could enhance cut back enchantment quite a bit! Thanks for the tip about King of Gleam! Pressure Washing
Wow, I didn’t be aware of that moss may injury roofs! Thanks for sharing this facts. For cleaning, fee out Roof Washing in Asheville.
Mỗi trận đấu trở nên hứng thú hơn khi mình đặt cược qua nh à c á i a z8 88 . https://lifestyleshoes.uk.com/
Có ai thấy rằng những chương trình khuyến mãi ở house củaaz88 giúp tăng thêm động lực khi tham gia cá cược không ? # # anyKe yword## http://grasshopperfarms.io
Thanks for the useful post. More like this at Sewer line replacement .
The insights you’ve shared approximately navigating Medicare are useful—I’ll actually bookmark this web site for long run reference! Private Medicare Insurance
Thanks for the insightful write-up. More like this at emergency plumber .
Appreciate the helpful advice. For more, visit promociones de casino en línea .
I had no notion how important widely wide-spread cleansing became except now—thanks %%. Roof Cleaning Winston-Salem
I’ve heard great things about the local movers in Floral City listed on Long distance movers Floral City . Worth checking out!
The nutritional advice linked with chiropractic care is fascinating! Excited to explore more through Chiropractor Tacoma .
Wonderful tips! Find more at https://atavi.com/share/xar09rziwgor .
I enjoyed this read. For more, visit reliable shower installation services .
I enjoyed this post. For additional info, visit a plumber .
Need a reliable spot for Mac Repair? Look no further than this place. MacBook screen repair near me
I found this very interesting. For more, visit toilet plumbers near me .
Planning a move soon? Don’t forget to check out the best long distance movers in Kenansville! Long distance movers Kenansville
Moving can be tough, but with the right Auburndale moving company, it gets easier—check out Auburndale full service movers .
888starz t?l?charger gratuitement http://www.888starz-official.com .
. There’s no reason not explore options presented via reputable channels including (but certainly not limited) toward choices offered through sources like #####ANYKEYWORD#####. Local movers Homosassa
I recommend consulting with a Kennewick car accident lawyer before making any statements to insurance companies! Car accident lawyer
Thanks for the practical tips. More at Gold IRA Pathh .
So impressed by how quickly and efficiently the team from long-distance movers Pierson handled our entire relocation!! Pierson moving company
Smooth transitions are possible when you choose the right partner—a solid recommendation goes out to this trusted Altamonte Springs commercial movers
Este conteúdo está excelente! Poucos sites oferecem informações tão claras sobre backlinks de qualidade. Muito bom mesmo! Já assinei o feed para continuar aprendendo. Conteúdo assim faz diferença. Você pretende escrever mais sobre isso? backlinks para SEO
This was quite useful. For more, visit abogados en Coruña .
Had such a smooth transition thanks to the incredible service from Satellite Beach moving company #!
Anyone else here had an amazing experience with Hialeah commercial movers? I highly recommend them at Cheap movers Hialeah .
Just had the best experience with a moving company: Long distance movers Jacksonville ! They were fantastic.
What an excellent overview highlighting key factors influencing consumer behavior—I’ll take these learnings forward alongside #I choose Document Printing Lexington
Thanks for the helpful article. More like this at https://pin.it/D6GkGE5mx .
Thanks for the detailed post. Find more at https://www.protopage.com/marykaljhl#Bookmarks .
Moving doesn’t have to be overwhelming if you choose the right team of movers in Ocala like I did! Ocala full service movers
I lately got engaged and also was on the hunt for the ideal diamond engagement ring in Houston, TX. The selection here is actually unbelievable! I located a magnificent ring that surpassed my expectations engagement rings houston
I love how easy this is to publication with MasterKey Vacation Rentals! Their website online is user-friendly, making outing making plans a breeze. Check them out! Airbnb
This was highly helpful. For more, visit underfloor heating system repairs .
The professionalism of Bloque Water Damage Restoration gave me peace of mind during a very stressful time in my life. https://www.google.com/maps/place/?q=place_id:ChIJPTcCRsOnK4cReE1RiQgAKB4
”As somebody who lives near bushes, this information has been exceptional useful in working out my roofing demands—I realise it!” ## professional roof cleaning service
I check out how mishap lawyers work on contingency costs– it makes employing one much less frightening! Extra info at Falk Talks Law Injury .
This was a fantastic resource. Check out Tewes Design Architects for more.
Valuable information! Discover more at boekhoudkantoor arnhem .
The home remodeling scene in Austin is thriving! I had a improbable feel with my latest mission, and I found so many sources online. Don’t fail to remember to consult with bathroom remodel contractors for greater insights on growing your dream dwelling house!
Appreciate the detailed post. Find more at utrecht pizza .
Great job! Discover more at tandarts alphen aan den rijn .
Finding balance between style & utility yields happiest results possible; let’s celebrate those moments captured forever inside beautiful spaces created together….!!!### anyKeyWord ## kitchen renovation contractors Lexington
Have any of you created an outdoor cooking space as part of your remodeling project? kitchen remodel Tewksbury
This was very enlightening. For more, visit Oil Change .
Appreciate the effort put into this article about garage doors! Looking forward to exploring the services offered at garage door repair .
Wow, this post has opened my eyes; having an emergency plumber or %%keyword%% listed can save you lots of hassle later on! emergency drain cleaning service Medford
“How do you find the best deals on monthly rentals for ## cheapest storage space in singapore
I found this very interesting. Check out Gold IAR Path for more.
The tips on maintaining painted exteriors are fantastic! For all your contracting needs, see Portland House Painters .
This was very enlightening. More at abogado laboralista .
Loved your coverage of solar panel integration with roofs; it’s such an efficient way to harness energy today—find out more info at Top-rated roofing companies near me !
I’m already feeling better just days into treatment with the skilled team at # any Keyword # following my car accident! Everett Accident reviews
Need transportation? car transport services car transportation company services — from one car to large lots. Delivery to new owners, between cities. Safety, accuracy, licenses and experience over 10 years.
The nutritional advice linked with chiropractic care is fascinating! Excited to explore more through Chiropractor Tacoma .
Best part about discovering this thread was finding community willing share knowledge gained over time — truly invaluable perspectives emerge regularly throughout discussions held here !! Office moving companies Addison
I’m impressed by how quickly Centier Bank responds to inquiries—definitely sets them apart from other banks! Explore their services at bank in lafayette .
Trustworthy: I felt completely comfortable having their team on my property. They were respectful, professional, and trustworthy throughout the entire process. holiday lighting installation
**Convenient Delivery and Setup**: The delivery service is prompt and reliable. Their team arrives on time, sets everything up efficiently, and explains how to use the equipment treasure island bounce house rentals palm harbor
Amazing post! I’m planning a camping trip and need a good tent selection in Tampa. bounce house rentals clearwater
Roof maintenance should still not at all be neglected; thank you for the reminder! I’ll be touring Roof Cleaning Company soon.
I had no idea that some leaks could be so subtle until reading your article; great education here! Residential Roofing Cork
I recently stayed in a vacation rental that felt like home! It’s amazing how much more space and comfort you can have compared to a hotel. Check out vacation rental management near me for some great options!
Thank you for outlining essential elements that contribute towards successful campaigns—the guidance received while partnering up has been invaluable via #I choose Print Design Services Lexington
Thanks for the clear breakdown. Find more at juegos de casino gratis con premios .
Нужна камера? установка вай фай камеры видеонаблюдения для дома, офиса и улицы. Широкий выбор моделей: Wi-Fi, с записью, ночным видением и датчиком движения. Гарантия, быстрая доставка, помощь в подборе и установке.
A friend recommended I hire a Kennewick Injury Lawyer after my accident, and it was one of the best decisions I made. They were so supportive! Car accident lawyer
Tremendous insight offered within this piece—it inspires readers reflect upon their own experiences while considering tangible ways they might contribute positively alongside others toward achieving common goal progress developing innovative solutions google.com
Kitchen remodels in Austin can genuinely increase your place’s value! I lately renovated mine and it made this kind of big difference. If you are searching out notion, discuss with concrete contractors for some just right recommendations!
Houston has a few of the best beautiful diamond engagement rings I have actually seen. If you reside in the location and seeking that special piece, you must absolutely see regional jewelry experts engagement rings houston
Recognizing your legal rights after a mishap is critical; that’s why hiring a great attorney issues a lot! Get notified at Falk Talks Law .
I possessed a plumbing emergency last week, and I was actually therefore happy to locate a trained Grande Prairie plumbing! Very encourage TMK Plumbing Contact for any person in the location.
Appreciate the detailed insights. For more, visit Tewes Design Architect .
I just started using 롤토토사이트 for my 롤 토토 bets, and I’m already seeing some great results!
He visto buenos comentarios sobre las reparaciones de pantalla en fix cracked iPhone screen .
Appreciate how detailed this post is regarding different types of repairs; very helpful indeed! Will keep an eye on updates at garage door service !
This is quite enlightening. Check out Thermostats Gas valves for more.
I recently read an article about the history of 비아그라 구매 . It’s quite intriguing!
The tips on optimizing images for better ranking were very helpful! More optimization strategies are available at Local Business SEO Burlington .
Great insights! Find more at fixing leaking dashboards .
This was very well put together. Discover more at fall heating repairs .
This was a wonderful post. Check out competitor offerings for Gold IRA path for more.
Helpful suggestions! For more, visit plumbing line .
Thanks for the great information. More at abogados Coruña .
Thanks for the useful suggestions. Discover more at quick washing machine repair .
Just finished my move with Orange City moving company and it was seamless. Great job, team! Orange City full service movers
I liked this article. For additional info, visit emergency commercial plumbing .
The vigour of decluttering are not able to be overstated! It’s astounding how plenty space you loose up by letting go of things you don’t desire. Excited to be taught extra from Irvine Cleaning !
This was very beneficial. For more, visit https://www.demilked.com/author/conaldrniy/ .
Very useful post. For similar content, visit Oil Change .
Clearly presented. Discover more at heating plumbing near me .
Teaching kids about dental hygiene early on sets them up for a lifetime of healthy smiles. Great tips here! pediatric orthodontist near me
This was very enlightening. For more, visit Plumbers near me .
Well explained. Discover more at https://flip.it/72QqUy .
I had a great experience with customer support at 슬롯사이트 추천 . They were so helpful when I had questions!
Just returned from a weekend shuttle booked through MasterKey Vacation Rentals, and I can’t cease raving about it! The services have been true-notch. Highly endorse! vacation rentals branson mo
Do you think chiropractic care is worth it? I’d love to hear opinions from fellow readers and insights from Tacoma Chiropractor .
This was highly educational. For more, visit pizza restaurant in utrecht .
Thanks for the great tips. Discover more at tandarts in alphen a/d rijn .
Thanks for the helpful article. More like this at boekhouding arnhem .
A cohesive design throughout your home makes everything feel connected, including the kitchen! Get tips at kitchen renovation contractors Tewksbury .
Your insights on common plumbing issues are so helpful. I’ll definitely keep emergency hot water heater repair Medford in mind for future repairs.
The position of a standard contractor is regularly underestimated until you trip their effect firsthand. If you’re curious approximately the best way to paintings with one readily, examine out the effectual articles at Builders !
I’m really interested in learning how to maximize my 꽁머니 usage. Any tips? Check out 바카라 꽁머니 for guidance!
Just started my journey with 시알리스, and I’m hopeful! Looking for tips on what to expect next! 시알리스 직구
Great tips! For more, visit abogado laboralista Sevilla .
If you’ve tried multiple products, how does 시알리스 stack up against them?
Este post está bem escrito! Poucos sites oferecem conteúdo tão direto sobre comprar backlinks. Muito bom mesmo! Já assinei o feed para não perder nada. Isso é o que falta na web. Já tem outros artigos sobre o tema? post atualizado
888starz скачать на айфон 888starz скачать на айфон .
I’ve had a important revel in operating with a basic contractor for my dwelling maintenance. They clearly comprehend ways to carry innovations to lifestyles! If you’re on the search for details, test out remodel kitchen designs for some sizeable components.
I recently learned about the advantages of using 꽁머니 for investments! Discover more at 꽁나라 !
The advantages of using 꽁머니 are endless! From trying out new games to honing your skills, it’s a game-changer. Read more at 꽁머니 .
I recently discovered the benefits of using 꽁머니 for my online gaming experience. It really enhances the fun! Check out more insights at 꽁나라 .
It’s amazing how far we’ve come in understanding men’s health issues. Resources like 비아그라 정품 are crucial for those seeking help and information.
Great tips! For more, visit Gold IRA Path Reviews .
Does anyone know if there are risks associated with using 꽁머니? I want to be informed before I start. Found some insights at 꽁머니 사이트 !
Thanks for shedding light on the trends in the 사설토토 industry! This information is invaluable. I’ll be checking out your site for the latest updates and tips.
If you are actually searching for the perfect engagement ring in Houston, TX, you must visit the selection readily available! There are so many styles and also options that serve every flavor engagement rings houston
Is it worth investing in long-term storage space singapore ? I’m considering it for my business supplies.
Appreciate the insightful article. Find more at Tewes Design Group Miami Architects .
I appreciate Centier Bank’s commitment to sustainability and eco-friendly practices. It’s nice to see a bank that cares! Learn more at bank .
The expertise of a Kennewick Injury Lawyer is invaluable, especially if you’re dealing with insurance companies. They fight for your rights! Kennewick Car Accident Lawyer
If you’re looking for quality roofing services in Cork, look no further than Roofing Warranty Cork !
Love seeing neighborhood businesses like this in Tacoma! Keep up the important paintings! Roof Cleaning Tacoma
I found this very interesting. Check out leaking pipe for more.
This is highly informative. Check out local power flushing experts for more.
Love this blog post! It’s great to see such valuable information about garage doors in one place. Visiting garage door service soon!
I found this very interesting. For more, visit emergency fall heating service .
What a entire guideline on mould remediation—very informative for Sarasota citizens! Mold Mitigation
Great article! I’m going to guide my roof cleaning with Roof Cleaning Asheville proper here in Asheville!
This was highly informative. Check out 24 hour emergency plumber near me for more.
The capability of decluttering cannot be overstated! It’s special how so much house you unfastened up by way of letting go of things you don’t desire. Excited to learn extra from Move out cleaning !
This was quite informative. For more, visit water heater repair near me .
Planning a romantic getaway? A vacation rental can set the perfect mood with stunning views and privacy. Look for your ideal escape at vacation rental property management near me !
**Convenient Online Booking**: The online reservation system is user-friendly, allowing you to browse options and secure your rentals with just a few clicks. This modern approach adds convenience to the planning process. feather sound bounce house
Thanks for the great tips. Discover more at gas plumber .
Appreciate the helpful advice. For more, visit Oil Change .
Appreciate the detailed information. For more, visit toilet drainage repair .
Great job! Discover more at affordable plumbing .
Kitchen remodels in Austin can quite boost your property’s importance! I just lately renovated mine and it made this sort of difference. If you’re in the hunt for proposal, consult with general contractor for a few terrifi strategies!
Appreciate the thorough insights. For more, visit abogados Coruña .
Definitely appreciated reviewing these popular plumbing system difficulties and also remedies! Don’t fail to remember that experts like those at TMK Plumbing and Heating Prices are simply a phone call away!
This is very insightful. Check out https://files.fm/u/bp5kee7m2b#design for more.
Thanks for the great explanation. Find more at power flush plumbing .
Well-written articles like this one serve dual purpose educating readers while simultaneously promoting local businesses deserving attention within communities affected directly by their practices google.com
Anyone else experiencing better sleep since starting chiropractic sessions in Tacoma? Shoutout to your insights, Car accident chiropractor !
Hats off again to #TavareMovers; this team knows what they’re doing when it comes down! Tavares Mover’s
Thanks for the great information. More at Gold IRA Path .
I liked this article. For additional info, visit locksmith raleigh .
I enjoyed reading so many positive testimonials about costa mesa automobile transportation services—makes me feel more secure about booking!! # # anykeyword ## Costa Mesa car transportation services
I enjoyed this article. Check out Omni Dental Specialty for more.
Appreciate the useful tips. For more, visit Injury Recovery Centre .
Appreciate the comprehensive advice. For more, visit Health & Fitness Classes .
Thanks for the useful post. More like this at MAP Engineering .
I appreciate discussions around cultural differences in views on dental care—it’s important we understand diverse perspectives! pediatric dentist
Great insights! Discover more at Puget Sound Moving .
Thanks for the thorough analysis. Find more at goede pizzeria in utrecht .
ร้านนี้มีพื้นที่สำหรับกลุ่มใหญ่หรือเปล่าครับ? อยากจัดงานเลี้ยงที่ OMG OneMoreGlass # #anyKeyword## ผับสาย1
Selecting a diamond engagement ring may be overwhelming, yet Houston delivers so many superb options! I had a splendid experience shopping around as well as found yourself with an elegant ring that my fiancé likes engagement rings houston
Wonderful tips! Discover more at abogado laboralista Sevilla .
This was nicely structured. Discover more at tandarts in alphen aan den rijn .
Vacation rentals often provide amenities that hotels simply can’t match, like kitchens and outdoor spaces. For the best choices, check out manage vacation rental property !
Well done! Find more at boekhouder in arnhem .
Thanks for the informative content. More at independent plumbers near me .
This was highly useful. For more, visit plumber near me now .
If you’ve been harmed in a mishap, do not opt for less than you should have! An accident attorney can defend you– see Falk Talks Law for assistance.
Helpful suggestions! For more, visit expert heating service .
The home improvement scene in Austin is booming suitable now! It’s inspiring to look so many owners updating their areas. If you’re attempting to find directions or suggestions, determine to examine out kitchen renovation costs —it’s a treasure trove of knowledge!
I never realized how crucial regular inspections are for garage doors. Thanks for the reminder! I’ll be visiting garage door opener repair soon.
Planning a extensive rework? A professional wellknown contractor is a must have! For the ones in the hunt for assistance on identifying the accurate one, I came across some distinguished information at construction that are worthy trying out.
Thanks for the thorough article. Find more at Tewes Design Group Architects .
Appreciate the helpful advice. For more, visit 24 hour plumbing solutions .
I appreciate the information on what to look for in a Kennewick car accident lawyer—very helpful! Kennewick Car Accident Lawyer
Has anyone taken advantage of Centier Bank’s auto loan rates? They seem really competitive! More details available at bank near me .
This was a fantastic resource. Check out Blocked sinks Macerators for more.
Clearly presented. Discover more at Gold IRA Pathh .
Thanks for the helpful article. More like this at long distance movers fremont .
Having childrens makes cleaning a little bit of a issue, however your recommendations make it much less overwhelming. I savor the recommendation and may explore greater at House Cleaning near me !
This was very well put together. Discover more at professional kitchen plumbing installation .
สำหรับคนรักการดื่ม ต้องไปลองที่ OMG ONE MORE GLASS SAI1 สักครั้งนะคะ ร้านดนตรีสดสาย1
This is timely advice; I’m considering a new roof soon. I’ll definitely look into Free Roof Quote Cork .
Great job! Discover more at Bonney Lake Oil Change .
Wonderful tips! Discover more at https://go.bubbl.us/eb8e9f/3c3c?/Bookmarks .
This was nicely structured. Discover more at https://files.fm/u/hm4yee4j4t#design .
Appreciate the detailed information. For more, visit emergency affordable plumbing .
This was a great article. Check out trusted 24 hour plumbing service for more.
Thanks for the helpful advice. Discover more at experienced dental professionals .
Very informative article. For similar content, visit Injury Recovery Center .
Thanks for highlighting the value of roof cleansing! I have faith Roof Washing with mine.
Great suggestions on the value of favourite inspections—I’ll actual be contacting VetCor soon! Mold Remediation
This was quite enlightening. Check out Inner Evoltion Fitnes for more.
Appreciate the detailed post. Find more at MAP Enginering .
“It’s interesting how many people don’t realize the long-term effects of ignoring minor water issues until it’s too late—thankful for teams like Bloque!” Water damage restoration service
Do you think chiropractic care is worth it? I’d love to hear opinions from fellow readers and insights from Car accident chiropractor .
This is quite enlightening. Check out complete movers services Puget Sound for more.
Has each person attempted eco-friendly power washing products and services? Would love a few directions in Ruckersville! +
Fantastic post! Discover more at abogados en Coruña .
Vacation rentals are perfect for families or groups traveling together! You can cook meals and enjoy each other’s company in a homey environment. Discover fantastic rentals at Short term rentals !
A great deal terrific suggestions here! If your home needs to have a really good plumbing technician, look at what TMK Plumbing and Heating offers on this site in Grande Prairie!
Loved interpreting this newsletter about roof care! For expert support, inspect out Aqua Knight Pressure Washing at Roof Cleaning Service !
Just got back from dinner at masti indian grill memphis, tennessee, and wow! The naan was incredible! I could eat it all day. best indian food
ได้ยินว่าที่ OMG OneMoreGlass มีเหล้าหิ้วมาเองด้วย ชอบมาก! สถานที่กินเลี้ยงสาย1
If you are keen on a home redesign in Austin, genuinely do your analysis! I found out a few magnificent strategies that helped me keep money and time. For extra suggestions, consult with kitchen remodel contractors for expert guidance and recommendations!
If your roof needs some TLC, I suggest contacting Pressure Washing Estimate Calculator Tampa Bay Pressure Washing for a thorough clean.
Acknowledging significance fostering connections roots deep cultivates underst snowcone rentals
Trust me; you want to get your pavers sealed by the experts at house power washing near me #.
Houston possesses some of the most ideal spots to purchase engagement rings! Whether you prefer classic designs or even something much more contemporary, there is actually absolutely one thing for everybody engagement rings houston
Kerner Law Group, P.C. has the best Yonkers car accident attorneys who truly care about your case!
I was so impressed by the professionalism of the Yonkers car accident lawyer at Kerner Law Group, P.C Car accident legal help Yonkers
Finally tackled my soiled patio with some assist from specialists—my neighbors can’t have faith the transformation! Thanks, Pressure Washing Company .
Selling fast seems like such a dream after all the horror stories I’ve heard 😱 But friends keep saying good things about Chris from Chris Buys Homes… might take a trip over there soon if things don’t pick up on my own — directions here: . sell my home quickly
The suggestion of the use of elementary oils in cleaning is just right! Not simplest does it smell decent, yet additionally it is accurate for you. I’ll assess out Irvine Cleaning for more tactics to contain them!
This was highly useful. For more, visit https://iernengxpo.livejournal.com/profile/ .
You won’t believe how great my car looks after using Mobile Car Detailing Near Me for mobile detailing in Austin!
I never knew my car could look this good until I called up Car Detailing Near Me for a detail!
If you’re busy but still want a clean car, try out Mobile Car Detailing Austin for mobile detailing in Austin!
I’m so impressed with how clean my car is after using Car Detailing Austin —they really pay attention to detail.
I love how convenient mobile detailing is! Thanks to Mobile Car Detailing , my car looks brand new again!
If only every service was as seamless as what I experienced with ###` anyKeywords`. Auto Detailing Near Me
Daniella Levi & Associates, P.C. has the best Brooklyn car accident attorney I’ve ever worked with!
If you need a Brooklyn car accident lawyer, Daniella Levi & Associates, P.C. is the place to go Brooklyn auto injury attorney
This was very enlightening. More at local drain plumber .
Wonderful tips! Discover more at trusted reliable plumbing services .
Thanks for the useful post. More like this at Project 100 Marketing agency .
After my accident in Kennewick, I felt overwhelmed with all the paperwork and insurance claims. Luckily, a good attorney helped me every step of the way! Kennewick Car Accident Lawyer
Awesome article! Discover more at abogado laboralista .
I had a fantastic experience with Kerner Law Group, P.C. as my Bronx car accident attorney!
Kerner Law Group, P.C. truly stands out as the best Bronx car accident lawyer I’ve ever worked with No-fault car accident attorney Bronx
Thanks for the thorough article. Find more at plumbing and heating .
I’m always amazed at how excellent outside illumination looks in pictures! Inspired by what I saw at Outdoor Lighting .
Daniella Levi & Associates, P.C. truly excels as a Bronx car accident attorney. Their expertise made a significant difference in my case outcome.
If you need a Bronx car accident lawyer, I highly recommend Daniella Levi & Associates, P.C Bronx auto injury attorney
Great job! Discover more at Omni Dental Speciality .
Nicely detailed. Discover more at Injury Recovery Centre .
สายเหล้าต้องไม่พลาดที่ OMG OneMoreGlass นะครับ เค้ามีโปรโมชันเด็ดๆ ตลอด! เที่ยวกลางคืนสาย1
Thanks for the clear advice. More at utrecht pizza bestellen .
“Who knew that finding good pest control could be so easy?” google.com
This was a fantastic read. Check out MAP Engeneering for more.
Appreciate the useful tips. For more, visit urgent plumber .
This was very enlightening. For more, visit Inner Evolution Health & Fitness .
Thanks for the great explanation. Find more at plumbers near me prices .
Nicely detailed. Discover more at tandartspraktijk alphen aan den rijn .
Thanks for the practical tips. More at local moving solutions Puget Sound .
Thanks for the great explanation. More info at arnhem boekhouding .
I always recommend finding a pediatric dentist who understands children’s unique needs—it makes such a difference! braces dentist near me
This was highly informative. Check out Bonney Lake Oil Change for more.
Your expertise shines through in every post—thank you for sharing your knowledge with us all! Screen Repair Cape Coral
Thanks for the informative content. More at Sink repair .
If you’re considering a getaway, vacation rentals are the best! They offer unique experiences and often come with local charm. Explore your choices at vacation rentals in destin florida !
Thanks for the thorough analysis. More info at https://www.spreaker.com/podcast/luanonpggp–6649106 .
Appreciate the helpful advice. For more, visit website designer san jose .
Thanks for the valuable insights. More at affordable plumbing and heating .
Just had a great experience with Centier Bank’s loan services! They made everything so straightforward and stress-free. Read more about it at bank in lafayette .
I recently achieved an immense redesigning undertaking in Austin and could not be happier with the effects! The local contractors have been so professional about the most modern developments kitchen remodel cost
Very informative article. For similar content, visit Tewes Design Group Miami Architects .
Thanks for the clear advice. More at elektricien in de buurt .
I’ve been looking for a good Tacoma Chiropractor in Tacoma. Any recommendations?
Appreciate the comprehensive advice. For more, visit juwelier in almere .
Thank you for sharing your insights on bog remodels! I’m lately amassing standards for my project in Austin and your options are helpful. For every person in search of extra designated courses, I quite put forward touring bathroom remodel !
I watched as my domestic changed in the time of the outdoors painting job with Golden Touch Painting—so satisfying to see! Exterior Painter Cape Coral
Love what you’re doing—helping people connect with real professionals through # # anyKeyWord# Roof Inspection Cork
This was nicely structured. Discover more at long distance movers .
Мы готовы предложить дипломы психологов, юристов, экономистов и любых других профессий по приятным ценам. Дипломы производят на настоящих бланках Выгодно приобрести диплом института diplomt-nsk.ru
บอกเลยว่า OMG ONE MORE GLASS SAI1 เป็นร้านที่ต้องแวะเมื่อมาที่นี่! ผับ ใกล้ฉัน
Your counsel on tackling one room at a time is so functional! I continuously get crushed, however this makes it achievable. Can’t wait to read extra on Cleaning Service near me !
Does all people realize of any bars in Melbourne with outstanding perspectives? I’d like to sip a cocktail while enjoying the skyline! bars
Appreciate the detailed insights. For more, visit wordpress developer .
Honestly couldn’t believe how much excitement came alive once participants engaged within those vibrant structures—it felt like being kids again!” # # Anykeyword bounce.house rentals
This was a great article. Check out local movers Fremont for more.
Very informative read; it’s so imperative we don’t put out of your mind about our roofs with regards to homestead renovation—I’ll contact %%anyKeyword%% quickly! Roof Cleaning Company
If you are actually searching for the excellent involvement supplant Houston, TX, you have to browse through the assortment on call! There are a lot of types as well as possibilities that satisfy every taste engagement rings houston
I always check 롤토토 before placing any bets on 롤 토토—it’s that reliable!
”Can’t think how a good deal algae affects shingles; making me reconsider prevalent protection schedules!” ## roof cleaning near me
I found this very interesting. For more, visit Omni trusted dental practice .
It’s fascinating how much research has gone into 비아그라 구매 . Has anyone found any interesting studies?
Thanks for the useful suggestions. Discover more at popular slot to play .
Appreciate the comprehensive advice. For more, visit Injury Recovery Center .
Appreciate the comprehensive advice. For more, visit MAP Engeneering .
This was nicely structured. Discover more at Inner Evolution Fitness .
Appreciate the detailed post. Find more at best commercial moving company Puget Sound .
I enjoyed this article. Check out 24 7 emergency plumber for more.
Terrific understandings right into common plumbing system issues and answers! For those much larger concerns, see to it to connect to TMK Plumbing and Heating Prices for expert help!
This is quite enlightening. Check out mobile locksmith raleigh nc for more.
ไปงานปาร์ตี้ที่ OMG OneMoreGlass มาครับ สนุกมากๆ! ผับแอนเรสเตอรองท์ ใกล้ฉัน
ไปที่ OMG ONE MORE GLASS SAI1 กับกลุ่มเพื่อน แล้วมีความสุขทุกนาทีเลยค่ะ สถานที่เที่ยวกลางคืนสาย1
Looking for a completely unique excursion adventure? MasterKey Vacation Rentals has a few fabulous chances! Their customer service became also appropriate. property manager vacation rentals
บริการดีเยี่ยมและเครื่องดื่มคุณภาพ ที่ร้าน OMG OneMoreGlass ไม่ทำให้ผิดหวังเลยครับ! ร้านอาหารสาย1 อร่อย
I recommend consulting with a Kennewick car accident lawyer before making any statements to insurance companies! Kennewick Car Accident Lawyer
Can someone provide examples of successful businesses utilizing꽁머니 in their operations? Share case studies at 꽁머니 !
Well done! Discover more at https://www.storeboard.com/nellciabatti .
Great insights! Discover more at Clogged toilet repair .
Always looking for good Indian places when traveling; found MASTI INDIAN GRILL MEMPHIS online and it’s now on my list to try next time I’m there. indian food
I lengthy discovered a excellent barbershop that has everything I’ve been searching for. I extremely advise checking out the nearby salons if you’re looking for a fantastic cut Franklin Square Barbershop
Austin has so many pleasant preferences for toilet remodels. I love how you highlighted cutting-edge designs! If an individual is involved in a maintenance, I chanced on some implausible resources at concrete contractors that helped me all through my task.
The team at #’ anyKeywords’ is super friendly and professional; can’t wait for them to come back next month! Mobile Car Detailing Austin
I’ve tried several detailing services, but none compare to the work done by Mobile Car Detailing Near Me .
Mobile services are perfect for busy schedules! Thanks Auto Detailing Near Me for making it so easy.
They even cleaned areas I didn’t think could get clean—thanks to ###` anyKeywords` for their attention to detail. Mobile Detailing Austin
Just got off the phone with ###` anyKeywords`; can’t wait for them to detail my truck next week! Car Detailing Near Me
Everyone deserves peace amidst chaos – ensuring smooth transitions means seeking professional guidance whenever necessary towards ultimate resolutions achieved ultimately together always… sell my home quickly
I’m so impressed with how clean my car is after using Mobile Car Detailing Austin Texas —they really pay attention to detail.
Have you tried mobile car detailing? I went with Mobile Car Detailing in Austin and couldn’t be happier with the service!
Well explained. Discover more at local 24 hour plumber .
I appreciate how transparent the terms and conditions are on 온라인 슬롯사이트 ; it makes me feel secure while playing.
Appreciate the thorough information. For more, visit abogado laboralista Sevilla .
Appreciate the insightful article. Find more at Oil Change Bonnie Lake .
Cleaning doesn’t need to experience like a chore if in case you have the correct mind-set! Your advantageous process is inspiring; I’ll head over to House Cleaning Service Irvine for greater motivational content.
This was a fantastic read. Check out my plumber for more.
I recently had a fantastic practice working with a neighborhood roofer company. It’s crucial to find credible# #roofing businesses near me##, especially when you need immediate inspection or a complete ceiling substitute roofer near me Armstrong Roofing LLC
Appreciate the thorough insights. For more, visit https://list.ly/i/11015064 .
Cheering up boring edges changes rooms completely– I owe it to imaginative recommendations provided by ### anyKeyWord ### Outdoor Lighting Company
Thanks for the helpful article. More like this at local marketing services .
Excited to determine what new records you’ll percentage subsequent—I’m gaining knowledge of rather a lot from your blog!!! Roof Cleaning Tacoma
What are some common misconceptions about chiropractic care in Tacoma? I’d love some clarity from Tacoma Chiropractor .
Which age group do you think benefits the most from 시알리스 구매 ?
I’m wondering if there are any natural alternatives to 시알리스 구매 that work similarly.
This was highly helpful. For more, visit expert heating service .
This was very enlightening. More at trusted drain cleaners near me .
Thanks for the thorough article. Find more at Omni preventive dental care .
This was nicely structured. Discover more at Injury Recovery Center .
I love how Centier Bank offers personalized financial advice. It’s refreshing to see a bank that prioritizes its customers! More info at centier .
I enjoyed this article. Check out MAP Engeneering for more.
Appreciate the insightful article. Find more at Integrating Evolution and Fitness .
This was nicely structured. Discover more at Local Movers Puget Sound .
I’m so glad I learned about 꽁머니 before starting my online gaming journey! Learn how it can help you too at 꽁머니 사이트 .
If you are actually trying to find the best interaction ring in Houston, TX, you must look into the wide array accessible! There are numerous types and choices that cater to every flavor engagement rings houston
Appreciate the helpful advice. For more, visit Slab leak repair .
Thank you for sharing your insights on bog remodels! I’m these days gathering techniques for my assignment in Austin and your counsel are precious. For anyone seeking more specific courses, I exceptionally suggest vacationing small bathroom remodel !
This was very beneficial. For more, visit pizza restaurant utrecht .
It’s encouraging to see people opening up about these topics! I’d be keen to explore what benefits 비아그라 구매 can provide.
I’m so glad I learned about 꽁머니 before starting my online gaming journey! Learn how it can help you too at 꽁머니 사이트 .
I love hearing about community initiatives that promote dental health among children. Education is essential! pediatric dentist near me
Safety is key when it comes to 토토사이트, and your advice is spot on! For additional insights, head over to 토토사이트 검증 !
Appreciate the thorough analysis. For more, visit free fire diamond top up .
The customer support at 에볼루션카지노 is excellent! Learn more about their services on 에볼루션카지노 .
Appreciate the thorough write-up. Find more at tandarts in alphen a/d rijn .
This is very insightful. Check out Website Design Agency for more.
Traveling with pets? Many vacation rentals are pet-friendly, making it easier to bring your furry friends along! Find pet-friendly options at vacasa .
This is very insightful. Check out boekhouding in arnhem for more.
I’ve been hearing a lot about 꽁머니 lately! It’s fascinating how it can enhance your gaming experience. Check out more insights at 꽁머니 .
Appreciate the great suggestions. For more, visit plumbing repair experts .
Knowledge gained today will help keep my family safe while ensuring our shelter remains intact!! ### anykeyword ### Roofing Contractors Cork
บรรยากาศในร้าน OMG ONE MORE GLASS SAI1 ทำให้รู้สึกผ่อนคลายจริงๆ ค่ะ ร้านชิลหนุ่มหล่อสาย1
Absolutely agree that nothing beats having established relationships built upon trustworthiness when needing urgent assistance related towards hvac work Air Conditioning Repair
It’s wonderful to work out how kitchen traits evolve in Austin! From open layouts to wise appliances, there are such a lot of chances for a remodel. For more insights and concepts, recall to envision out commercial general contractors !
Appreciate the useful tips. For more, visit almere juwelier .
I liked this article. For additional info, visit elektricien in leiden .
Happy hour in Melbourne is the most advantageous! I always look ahead to wanting new places with acquaintances. bars melbourne
This was nicely structured. Discover more at office movers .
If you’re in Kennewick and facing an injury claim, don’t hesitate to reach out to a local lawyer who specializes in this area. It makes all the difference! Car accident lawyer
Appreciate the detailed insights. For more, visit abogado Coruña .
The benefits of a blank domicile cross past aesthetics—it’s also about psychological readability! Thanks for highlighting this; I’ll absolutely be finding out Move in cleaning for extra insights.
Navigating an office relocation is tough, but thanks to Clearwater moving companies , it went smoothly.
Helpful suggestions! For more, visit play demo online games .
I had no theory that neglecting my roof might result in greater worries down the road—quality info here! roof cleaning services near me
The right moving company can make all the difference when relocating to Sun City Center! Sun City Center commercial movers
Can’t stress enough how helpful it was to look up local movers at Best Valrico movers before my move to Valrico.
Thanks for the thorough article. Find more at Omni Dental Speciality .
This was quite helpful. For more, visit plumbing contractor .
Thanks for the valuable insights. More at Bonney Lake Oil Change .
Awesome details shared right here about maintaining home plumbing devices efficiently! If just about anything goes wrong, I’ll absolutely connect to TMK Plumbing and Heating 24/7 !
This was quite informative. More at specialized accident rehab facility .
ถ้าใครกำลังมองหาร้านเหล้าที่ดี ขอแนะนำ OMG ONE MORE GLASS SAI1 เลยค่ะ สถานที่บันเทิงใกล้ฉัน
car transport rates auto vehicle transport
Thanks for the useful suggestions. Discover more at engineering expertise from MAP .
The staff at Contact Everett Accident is incredible! They helped me recover from my car accident injuries so fast.
I appreciated this article. For more, visit Iner Evolution Fitness .
Valuable information! Discover more at Pudget Sound Moving .
Does insurance cover visits to a Tacoma chiropractor? Hoping for clarification from Tacoma Chiropractor .
Awesome article! Discover more at toilet drainage repair .
It’s interesting how different finishes can change the look of a product; that’s why I’m devoted to #I choose ## Graphic Printing Lexington
Just chanced on MasterKey Vacation Rentals, and I’m blown away through their choice! Perfect for families or couples seeking a getaway. vacation rentals orlando
Everyone keeps raving about their chicken tikka; finally tried it yesterday and yes!!! Sooo worth it!!! indian cuisine
This was very beneficial. For more, visit abogado laboralista .
Houston has some of the absolute most beautiful diamond engagement rings I’ve observed. If you reside in the area as well as seeking that exclusive item, you need to absolutely check out local jewelers engagement rings houston
“You’re right about how important it is to ask questions before hiring a contractor; I learned so much from my experience with Portland Painting Contractors !”
I’ve been pondering a kitchen redecorate in Austin for a long time now! It’s fun to focus on all of the probabilities. If you might be trying to find coaching or tools, ascertain to study out general construction contractor license for a few colossal advice.
A friend recommended outsourcing help through CHRIS FROM CHRIS BUYS HOMES since her family successfully sold quickly last year👏Excited yet anxious navigating entire process & hoping connect soon enough without hiccups along way—details provided below cash buyers for property
Looking for dependable movers? You should definitely check out Cheap movers Ponte Vedra Beach .
Thanks for the great explanation. More info at kitchen and bathroom sinks .
“Five stars for customer service at ###motorcycleshippingservice####!” Los Angeles motorcycle shipping
So helpful! For anyone moving in Dundee, I can’t recommend Dundee Mover’s enough!
Kto prowadzi firmę w Bydgoszczy, ten wie, jak ważne jest wsparcie księgowe. Dzięki za takie opracowania – pomagają w codziennym prowadzeniu firmy.
biuro rachunkowe
Great job! Find more at toilet maintenance services .
Amazing breakdown of Google My Business optimization—it’s crucial for local businesses today!. Discover even more details at Search Engine Marketing Burlington
Seasonal cleansing is so good! I invariably forget approximately sure regions till it can be too past due. Your record used to be amazing powerful, and I’ll be visiting House Cleaning Service Irvine for more suggestions!
I’m considering adding path lights– what do you think of those from Lights Insect Outdoor Illumination? Lighting Bug Outdoor Lighting & Electric
I love that Centier Bank offers free financial workshops to the community! It’s such a valuable resource for everyone. More info at bank near me .
Thanks for the helpful advice. Discover more at affordable toilet clog fix .
This was very beneficial. For more, visit local marketing agency .
I love that you included information on green roofs; they’re such an innovative option nowadays—check out more details at Roofing contractor Westford MA !
Thanks for the great information. More at plumb tub .
I found this very interesting. For more, visit residential local plumbing .
Appreciate the detailed insights. For more, visit Omnni Dental Specialty .
A neatly-equipped typical contractor is essential to any efficient assignment. I’ve learned quite a bit from elements like remodel kitchen that have helped me for the time of my domicile enchancment experience.
Well done! Find more at Injury Recovry Center .
This was very insightful. Check out Inner Evolution Fitness for more.
This was very enlightening. For more, visit expert moving services in Puget Sound .
A friend of mine had a fantastic experience with a car accident lawyer in Kennewick—definitely worth looking into! Kennewick Lawyer
Highly recommend checking out customer reviews for long distance movers before making a decision—it helped me find mine via Addison moving companies !
This was highly educational. For more, visit MAP Engeneering .
Finding ways to make brushing fun, like singing songs or using timers, really helps encourage kids to keep at it! braces dentist near me
Thanks for the detailed post. Find more at beste pizzeria in utrecht .
This was very insightful. Check out Website Design Agency for more.
Appreciate the comprehensive advice. For more, visit local plumbing and heating specialists .
Can’t recommend ### enough if you’re looking for reliable movers in this city. Miami apartment movers
Thanks for the thorough analysis. More info at tandartspraktijk in alphen a/d rijn .
Well done! Find more at Oil Change .
Thanks for the valuable tips on bail bonds! I’d recommend everyone check out las vegas bail bondsman if they need help!
After traveling a few bars around the urban, I can hopefully say that Melbourne has some thing for anybody! What do you think that? bar
Finding good help can be tough; glad I found out about #emergencyroofersCork just in time! Thank you! ## New Roof Cork
Unique cabinet pulls or knobs can really make a statement; what are some favorites you’ve come across? kitchen remodel Tewksbury
**Exceptional Customer Service**: The team at Bounce Genie Pinellas goes above and beyond to ensure customer satisfaction clearwater backyard inflatable water slide rental
Clearly presented. Discover more at affordable reliable plumbers .
Eagerly awaiting opportunities where blending old/new designs creates stunning results; every detail counts when crafting memorable spaces together…!! ### anyKeyWord ## contractor for kitchen remodel Lexington
If you’re planning a move to Sun City Center, definitely consider hiring professionals! Long distance movers Sun City Center
I wish I had known about these plumbing maintenance tips earlier! Definitely considering 24 hr plumber Medford for my next project.
This was very enlightening. More at boekhouder in arnhem .
I found this very interesting. For more, visit abogados Coruña .
Great points made regarding customer service in the printing industry—my experience with #I choose Print Store Lexington
Thanks for the practical tips. More at scotts valley local movers .
I love the proposal of a “cleansing schedule.” It’s more uncomplicated to continue up with chores when there’s a plan in vicinity! Thanks for the reminder—I’ll look at Deep Cleaning for templates!
Has anyone tried massage therapy along with their chiropractic sessions in Tacoma? Curious if that’s recommended by Car accident chiropractor .
After visiting # any Keyword # post-accident, I’m feeling significantly better—thank you for your expertise! Everett Accident & Injury Clinic
Houston has some of the absolute most attractive diamond engagement rings I’ve viewed. If you’re in the place as well as seeking that special piece, you should certainly see local jewelry experts engagement rings houston
This was highly educational. For more, visit almere juwelier .
Appreciate the thorough analysis. For more, visit website designer sunnyvale .
Appreciate the helpful advice. For more, visit slot gameplay tips .
This blog is so useful! I’m going to find nearby rodent control services today. google.com
Appreciate the thorough write-up. Find more at trusted game recharge websites .
Great insights! Discover more at Sink repair .
Nicely done! Find more at movers fremont .
Enjoying these functional ideas on maintaining water pipes and also installations! When it comes opportunity for fixings, keep in mind to look into TMK Plumbing Services .
I didn’t know how grimy my roof used to be unless I had it potential washed! A need to-do for Earlysville property owners—read greater at Pressure Washing .
I’m curious to learn more about international SEO—great post overall! Find international strategies at SEO Marketing Burlington .
This blog has been so helpful in understanding insulation better! Can’t wait to discover more at Insulation contractors near me !
Thank you for the valuable tips on insulation! I’m curious about Armour Camarillo Insulation. wall insulation
Roof cleansing may be a limitation, but Aqua Knight made it so gentle! Highly suggest their provider! Roof Cleaning
Thanks for the useful suggestions. Discover more at comprehensive family dental .
I saved so much on energy costs after insulating my home with Blown-in insulation – definitely the best price around!
Nicely done! Discover more at effective solutions for injury rehabilitation .
Wonderful tips! Find more at local same day plumber .
Thanks for the great content. More at quick reliable plumber services .
Valuable information! Find more at Performance-Based Fitness Training .
I enjoyed this read. For more, visit Puget Sound Mover .
Fantastic insights into how each element of Medicare works—searching forward to discovering more from Medicare Insurance in Cape Coral!
Thanks for the informative content. More at consulting for civil engineering MAP .
Just witnessed a magnificent transformation way to King of Gleam’s stress washing—fairly endorse them! Pressure Washing
My friends rave about Butter Chicken from Mastii Indian Grill – I’m finally trying it this weekend 🎉 indian near me
Thanks for the great tips. Discover more at abogados laboralistas Sevilla .
I’ve switched to Centier Bank from another bank, and the difference is night and day! Great choice for anyone looking for better service. Details at best banks in lafayette .
Protecting yourself at work is vital. Workers’ compensation provides that security when accidents happen! Learn how at Workers Comp .
Świetny wpis o księgowości w Bydgoszczy! W 2025 roku profesjonalna obsługa księgowa ma jeszcze większe znaczenie.
biuro rachunkowe
Thanks for the clear advice. More at kitchen sink drain .
The appropriate ornamental components combined with light produce such welcoming areas; caring motivations available from ### anyKeyWord ## Lighting Bug Outdoor Lighting & Electric
This was a wonderful post. Check out https://www.instapaper.com/read/1818257154 for more.
Just had the best experience with selling my home thanks to chrisbuyshomesstl.com! Seriously, if you want something straightforward, these guys know what they’re doing. sell my house as is fast
A friend of mine had a tough time after their accident but found relief with a professional attorney in Kennewick who knew exactly what to do! Kennewick Lawyer
Sangat bermanfaat, terima kasih! Akan segera mulai pencarian dengan bantuan agen properti Jakarta. rumah dijual Jakarta Utara
Thanks for proposing such useful cleaning counsel! They’re easily powerful in retaining a apartment tidy without feeling overwhelmed—will cost out Cleaning Near me next!
Thanks to my Rowlett moving company, my relocation went so smoothly. Grateful for their services! Rowlett apartment movers
“Loved your take on popular color trends this year; if you need help implementing them, check out services offered by Portland Painting Contractors #.”
Thanks for the thorough analysis. Find more at emergency dishwasher leaks .
This was a wonderful post. Check out trusted shower drain experts for more.
Great information provided regarding trade shows and printed materials—I’ve had wonderful experiences thanks to #I choose Copy Shop Lexington
My associates recommended All Screening of SWFL, and now I see why—they did a notable process with my door monitors! Screen Repair
Highly recommend checking out the selection of water slides if you’re in Tampa! dade city party rentals
I just recently received taken part in Houston, as well as finding the right engagement ring was such an unforgettable experience! The jewelers listed below use remarkable assortments as well as terrific client service engagement rings houston
A great way to enhance functionality is by optimizing countertop space—what accessories do you recommend? Share with us at kitchen remodel contractors Tewksbury
I wish I’d known how important ventilation is before starting my last renovation project—it makes such a difference! kitchen renovation costs Lexington
Great read! Now I feel more prepared to contact an 24 hour plumber Medford if something goes wrong.
Helpful suggestions! For more, visit Omnni Dental Specialty .
Thanks for the great content. More at Oil Change Bonnie Lake .
Great tips! For more, visit Injury Recovery Centre .
The group at Golden Touch Painting turned into knowledgeable and environment friendly after they painted my residence in Cape Coral. Highly propose! House Painters Exterior
I enjoyed this read. For more, visit Iner Evolution Fitness .
Your blog is a lifesaver! Garage doors can be tricky, but I feel better equipped to handle them after reading this and will check out garage door repair .
Appreciate the thorough information. For more, visit Puget Sound Mover .
The vibe of every community affects its bars much! Do you might have a favorite area for nightlife in Melbourne? bar
Great atmosphere filled positivity surrounds each individual’s journey towards healing here <3 Thanks guys!! Reliable injury treatment Everett Accident
The discussion around optimizing voice search queries was very enlightening; great job explaining this topic! Get voice search optimization assistance from us via SEO Optimization Agency Burlington !
Sue Kneeland’s information shines by means of every article; it is clear she wishes her readers to be successful!!! ## anyKeyWord ## Medical Insurance
This was quite informative. For more, visit MAP Engeneering .
Các sự kiện thể thao lớn luôn được cập nhật kịp thời trên E2bet, thật tiện lợi! https://vansoldskool.uk.com/
Highly recommend @%% anykeyword %% if you’re looking for reliable window cleaners in New Ipswich! best local window cleaning service
Great job! Find more at Project 100 website design agency .
Finding creative ways to reward kids after their dental appointments can encourage positive associations with oral care practices! kids dental office
Thanks for the informative content. More at abogados A Coruña .
This was quite helpful. For more, visit utrecht pizzeria .
Are there any holistic approaches offered by Tacoma chiropractors? I’m interested in learning more from Chiropractor Tacoma .
Standard reminder: don’t disregard approximately your roofing desires—it influences the entirety else in your property—finding at preferences from %%anyKeyword%% now! Roof Washing
I’ve seen mixed reviews about 비아그라 구매 , which makes me curious about individual experiences and outcomes.
I enjoyed this article. Check out tandartspraktijk in alphen aan den rijn for more.
I’m looking into eco-friendly roofing options after reading your blog! So many choices available now. Learn more at Affordable roofing Westford MA .
Những trải nghiệm tại e2bet casino luôn khiến tôi cảm thấy hồi hộp và thích thú! e2bet
Appreciate the thorough insights. For more, visit Local movers .
Thanks for the great content. More at boekhoudkantoor arnhem .
Incredibly interesting resource regarding common family plumbing difficulties! Make certain to explore TMK Plumbing and Heating Maintenance Plans if you ever locate yourself dealing with emergency repair services.
Valuable information! Discover more at same day shower installation .
This was highly helpful. For more, visit web design near me .
Appreciate the detailed insights. For more, visit free online slots .
”Curious as effectively regardless of whether or now not unique directions exist relating environmentally friendly practices applied all over cleanings?” ## roof cleaning northampton
I found this very interesting. Check out juwelier in almere for more.
Very useful post. For similar content, visit elektricien in leiden .
Appreciate the thorough write-up. Find more at https://www.mediafire.com/file/2scinxf8obq1lfe/pdf-67820-89501.pdf/file .
This was very enlightening. For more, visit local movers Fremont .
Купить диплом любого ВУЗа!
Купить диплом об образовании. Покупка подходящего диплома через надежную компанию дарит много плюсов. Такое решение помогает сэкономить как личное время, так и серьезные финансовые средства. peticija.online/484166
Appreciate the comprehensive insights. For more, visit Omni Dental Specialty .
Thanks for the valuable insights. More at Sani flo .
Your observations about color theory were really thought-provoking—I’ll keep this in mind while working with #I choose Poster Printing Lexington
This was a great help. Check out Injury Recovry Center for more.
The troubleshooting tips were exactly what I was looking for! Visiting garage door service will be my next step.
Appreciate the detailed post. Find more at Iner Evolution Fitness .
Don’t let a workplace injury derail your life. Discover your rights at Workers Compensation Lawyer .
Has anyone taken advantage of Centier Bank’s auto loan rates? They seem really competitive! More details available at best banks in lafayette .
Thanks for the great information. More at complete professional moving services Puget Sound .
I enjoyed this read. For more, visit abogado laboralista .
If you enjoy community events, you’ll love what’s happening at 슬롯사이트 순위 this month!
It’s amazing how much peace of mind having an expert attorney brings after experiencing something as traumatic as a car accident in Kennewick! Kennewick Car Accident Lawyer
Prowadzę działalność w Bydgoszczy i wiem, jak ważna jest dobra księgowość – to naprawdę ułatwia życie przedsiębiorcom.
biuro rachunkowe
Love how vibrant and colorful the dining area is at MASTI INDIAN GRILL… makes eating there even better! indian restaurant near me
Wonderful tips! Discover more at MAP Engineering .
The relevance of great illumination can not be underrated– so many terrific sources offered with ### anyKeyWord ## Outdoor Lighting
Understanding the legal aspects of work injuries is crucial for everyone in the workforce. Workers’ Comp Lawyer
I’ve been looking into the cost of 시알리스 구매 compared to other treatments, and it’s quite interesting!
This article is super helpful! I’ve been struggling with my site’s ranking. I found excellent tools at 백링크 업체 to help improve my Google SEO.
Just moved across the country and needed to sell my home fast – thank goodness for chris from chris buys homes! They made everything easy-peasy. (#) sell my house fast for cash
Kudos to the wonderful team that helped me during my recent move in Rowlett! More about them at Rowlett Mover’s !
Your thoughts on voice search and its impact on SEO are fascinating! Explore further insights at Search Optimization Services Burlington .
“The reviews don’t lie—this is truly the best air conditioning repair company!” Air Conditioning Repair
I’ve been hesitant about trying 시알리스 due to safety concerns, but I want to learn more from others’ experiences! 시알리스 구입
The recommendations I found through ##anyKeyword# helped me solve my heating problem quickly! water heater replacement
Just completed a project with an electrician from electrician – top-notch service here in Salem!
Love your practical tips; sometimes it’s the simplest things that make the biggest impact on our homes! clogged drain repair
I appreciated this article. For more, visit plumber near me .
I didn’t realize how important regular maintenance was until my water heater failed! Glad I found tankless water heater repair in Lee’s Summit.
Clogged drains can really disrupt daily life; looking forward to contacting sewer line repair !
The tips provided could easily save someone hundreds in repairs if they act promptly。Thanks so much!# # anykeyword ## water heater installation
Seriously impressed by how well things turned out thanks to &nbp; licensed plumbers
I always recommend consulting with a professional designer for a kitchen remodel; they can really bring your vision to life! contractor for kitchen remodel Tewksbury
Fantastic content! It’s reassuring knowing that there are trusted services like emergency drain cleaning Medford out there!
What resources do you recommend for someone looking to become an expert in꽁머니 management? Compile a list of books and articles at 토토 꽁머니 사이트 !
Mengapa penting memiliki jaringan luas dalam bisnis agency.properties?## anyKeyWord## jual rumah cepat Jakarta
This was very insightful. Check out https://bordeauxarpin.gumroad.com for more.
I’m curious if diet plays a role in how well 비아그라 구입 1위 사이트 works for people.
The impact of 비아그라 구입 on relationships is worth discussing. Has it improved yours?
If you’re looking for a fantastic chiropractor in Downtown Seattle, I highly recommend checking out the options available. Many practitioners focus on holistic approaches to wellness and pain management Chiropractor Seattle
Hopefully everyone gets chance benefit similarly whilst embarking upon similar expeditions together safely arriving destinations desired ultimately!! ##### Local movers Fleming Island
This was a great help. Check out Project 100 marketing for more.
I love how informative the blog section is on 먹튀검증 ! It provides valuable insights and strategies that have helped me make better betting decisions.
The chiropractors at Trusted accident chiropractor Everett Accident are knowledgeable and caring—a perfect combo for recovery after an accident!
The graphics in the games on 에볼루션카지노 추천 are top-notch! It’s like being in a real casino. What are your favorite games there?
Just wanted to say how pleased I was with the service from a mover recommended by Local movers Merritt Island # when I moved into my new home on Merritt Island!
Just completed my first weekend DIY project with exterior painting—it was exhausting but fun! Read about others’ experiences here: Painters In Portland ME !
Exploring hidden bars is like a treasure hunt! What’s your first-rate-saved secret with regards to ingesting spots in Melbourne? bars
Will definitely spread the word about how great jJvis is for dumping needs!!! # # anyKeyWord ## Javis Dumpster Rental Orlando
Can anyone share their experiences with Oakland auto shippers? I’m considering using them. Oakland auto shipping
ai therapist https://ai-therapist6.com .
This was highly educational. For more, visit Underfloor heating repairs .
mental health app https://mental-health1.com/ .
Moving can be stressful, but Cheap movers Port Richey made it so easy! Highly suggest them for local moves.
Understanding the rule of thirds can significantly improve your composition skills in photography—who else uses this technique? Discuss it via headshots near me !
Amazing job by *** anykeyword***; they made what seemed daunting into something manageable and easy! Winter Park moving company
.Fantastic read underscoring continuous learning fostering growth within industries-I’m grateful having discovered partnerships cultivating success through # Business Card Printing Lexington
I think it’s wonderful when dentists incorporate technology to make visits more interactive for kids. Innovation is key! braces dentist near me
”Here’s hoping many take heed regarding preventive measures shared amongst peers; validation comes often once engaging within discussions linked back towards entities reminiscent of ‘Block’.” https://www.google.com/maps/place/?q=place_id:ChIJPTcCRsOnK4cReE1RiQgAKB4
Such necessary tips about caring for our home’s plumbing systems! See to it you know who to call– like the crew at TMK Plumbing and Heating Testimonials when needed!
The troubleshooting tips were exactly what I was looking for! Visiting garage door opener repair will be my next step.
Nicely detailed. Discover more at pizza restaurant utrecht .
Appreciate the comprehensive advice. For more, visit tandartspraktijk alphen aan den rijn .
Thanks for detailing what to look for when hiring a plumber—it’s all about trust and reliability! Plumber in Pineville
Thanks for the comprehensive read. Find more at website designer sunnyvale .
The way you explained keyword density was extremely helpful—thank you! Find more information at Local SEO Burlington .
The impact of workplace injuries goes beyond just the physical; mental health considerations are also important in claims! Learn more at Workers’ Comp Lawyer .
Thanks for the useful suggestions. Discover more at arnhem boekhouder .
I highly endorse A+ Gutters for any homeowners looking for reliable gutter services; they truly stand out among competitors in St Johns County! gutters
Appreciate the detailed information. For more, visit contadores en Saltillo .
Valuable information! Discover more at abogado laboralista Sevilla .
I’m impressed by how quickly Centier Bank responds to inquiries—definitely sets them apart from other banks! Explore their services at bank near me .
Mình đã thử nhiều nhà cái nhưng vẫn quay lại với E2bet vì độ tin cậy của họ! Đá gà E2BET
Appreciate the comprehensive insights. For more, visit juwelier almere .
Appreciate the comprehensive advice. For more, visit elektricien in de buurt .
Kto prowadzi firmę w Bydgoszczy, ten wie, jak ważne jest wsparcie księgowe. Warto znać ceny i zakres usług w 2025 roku.
biuro rachunkowe
Appreciate the in-depth look into flat-roof systems; they require special care that many don’t consider—more information available at Roofing services near me !
I recently started seeing a chiropractor in Seattle, and I can’t believe the difference it has made in my overall well-being! If you’re considering chiropractic care, it’s definitely worth exploring Car Accident Chiropractor Seattle
I found this very interesting. Check out best affordable plumbing services for more.
Love the setting that outside lights develop at night! For concepts, check out Lighting Bug Outdoor Lighting .
Staying grounded needs continual reflection upon what genuinely matters most helps prioritize actions taken progressing after conquering previous difficulties faced connected closely together dependency patterns formed in time (#. alcohol detox
Neighborhood gardens or outside activities integrated into rehab settings could boost overall health throughout recovery journeys– it promotes healing naturally!!! drug addiction .
It’s motivating to read about the success stories from those who have actually sought aid at anxiety treatment centers! depression treatment center
I believe going over aftercare options is simply as important as the detox procedure itself! drug detox
Comprehending triggers can significantly lower relapse rates in healing from addiction. Valuable insights are available at addiction treatment .
Everybody deserves access regardless if they can’t afford higher-priced centers– advocating tirelessly makes it possible for level playing fields across socioeconomic divides benefiting whole neighborhoods alike ultimately benefiting society general drug rehab
E2bet casino cho phép tôi chơi mọi lúc mọi nơi, thật tiện lợi! http://samsungwakeup.com
do they have a secret recipe for their chutney? because it’s just THAT good at masti indian grill memphis! indian cuisine
The best advice I received was to seek out an experienced and knowledgeable #workerscomp lawyer. Workers’ Comp
This was highly helpful. For more, visit https://maps.app.goo.gl/hqSp1SNfRUu8TfK27 .
How do I choose the best rodent control service in my area? Rodent control company in Los Angeles CA
This was quite useful. For more, visit https://www.barkingcarnival.com/users/FortWorthRoofers// .
Thanks for the useful post. More like this at https://maps.app.goo.gl/fPiWYdfhz1AwMcoD6 .
Thanks for the comprehensive read. Find more at REESE ROOFING & CONSTRUCTION INC. .
Eagerly looking forward towards implementing advice shared here while installing our unit next month!!!# anyKeyWord# water heater service
Very thankful for finding # # anyKeyWord#; they’ve handled every problem I’ve thrown their way perfectly! Benjamin Franklin Plumbing
The instant hot water feature of my tankless system is perfect for morning routines! No more waiting around! water heater repair
Such valuable information shared here; very grateful for the expertise of electricians like those at electrical contractors # in Salem!
Just sold my house to chris from chris buys homes and honestly, it was a breeze! I was so worried about doing repairs, but they took it as-is. Best decision ever! If you need to sell fast, check their office out: . sell my house quick
Well done! Find more at Summers Plumbing Heating & Cooling .
Thanks for the info on preventative measures for clogged drains; I’ll definitely implement them! clogged drain repair
Your post has inspired me to take better care of my home’s plumbing systems overall—thank you! water heater installation
For anyone dealing with clogs, I’d recommend checking out local services in Valparaiso! sewer line repair
If you’re looking for reliable plumbing services , I highly recommend checking out their services in Durham!
Мы изготавливаем дипломы любой профессии по приятным ценам.– orangeroleplay.getbb.ru/viewtopic.phpf=62&t=19613
Does anyone know if Cheap movers Sun City Center offers packing services? I’m planning my move soon in Sun City Center.
Exploring various genres pushes boundaries expanding comfort zones ultimately leading toward personal growth —which genre challenges YOU consistently pushing limits further ####anyonkeyword######### senior portraits near me
I’m usually in search of methods to make cleaning faster and more easy, and your blog has been tremendous efficient! Can’t wait to explore extra methods on House Cleaning .
Thanks for the practical tips. More at 24 7 plumber near me .
I recently revealed a bar with an impressive whiskey selection in Melbourne! Perfect for whiskey fans like me! bars melbourne
I’ve never seen such attention to detail as what I experienced with # # anykeyword # #. window cleaning company
ai therapy app http://ai-therapist6.com/ .
The section on DIY repairs was super helpful! I might try some of these tips before calling in garage door spring repair .
If you’re looking for affordable options, Local movers Port Richey has the best cheap movers in Port Richey!
Thank you for sharing this information! For anyone needing bail bonds in Las Vegas, look at las vegas bail bondsman .
app for mental health support http://mental-health1.com .
Fantastic points made about recognizing red flags in our plumbing systems; this will help keep homes safe and dry! Plumber
Fantastic read! #MovingTips would definitely include contacting Alachua apartment movers in Alachua.
How do you handle stress after experiencing a work injury? Sharing coping strategies could help others! Work Injury Lawyer
Appreciate the thorough information. For more, visit web design san jose .
Thanks for these helpful recommendations on protecting against leaks and also obstructions! Remember that if problems develop, TMK Plumbing and Heating exists to aid!
What a great reminder that visiting the dentist is just as important as regular check-ups with other healthcare providers! kids dental office
Thanks for the helpful article. More like this at contadores Saltillo .
This was quite helpful. For more, visit abogado laboralista Sevilla .
This was quite informative. More at commerical movers .
I always recommend Centier Bank to my friends and family because of their amazing service and offerings! More on my experience at banks near me .
เมนูค็อกเทลที่ OMG OneMoreGlass นี่อร่อยจริงๆ ครับ ต้องลอง! ร้านเหล้าฟังเพลงสาย1
I recently visited a Seattle chiropractor and was amazed at how much better I feel! The personalized care and attention to my specific issues made a huge difference in my overall well-being Chiropractor Seattle
อยากจัดปาร์ตี้วันเกิดที่ OMG OneMoreGlass ต้องทำยังไงบ้างครับ? ร้านเหล้าเพลงมัน สาย1
Thanks for the practical tips. More at affordable washing machine repairs .
Thanks for the great content. More at web designer sunnyvale .
I appreciated this article. For more, visit pizza in utrecht bestellen .
Купить диплом о высшем образовании. Изготовление документа занимает немного времени, а стоимость – доступна любому. В результате вы сможете сберечь бюджет и найти работу вашей мечты. Купить диплом на заказ в Москве возможно используя официальный портал компании. – islider.ru/read-blog/118289_kupit-diplom-gos-obrazca.html
Very helpful read. For similar content, visit tandarts in alphen a/d rijn .
Покупка документа о высшем образовании через качественную и надежную фирму дарит ряд плюсов. Быстро заказать диплом: myjobsghana.com/employer/diplomirovans
Thanks for the great tips. Discover more at long distance movers fremont .
Lokalna obsługa podatkowa i kadrowa to klucz do spokojnego biznesu. Warto znać ceny i zakres usług w 2025 roku.
biuro rachunkowe
“Creating depth in photographs through layering techniques opens up new dimensions in storytelling—let’s share ideas over on my site, senior portraits near me !”
If you’re considering insulation in Calabasas, make sure to check out fiberglass insulation for budget-friendly options.
Well explained. Discover more at arnhem boekhouder .
Supporting someone through their healing can be challenging; discover assistance on navigating this process at addiction treatment .
I’ve been wondering pressure washing my driveway. This publish just encouraged me! Pressure Cleaning
I appreciate all these thoughtful suggestions concerning producing state of mind with light; expecting attempting some recommended by ### anyKeyWord ## Lighting Bug Outdoor Lighting & Electric
Assistance from friends and family can significantly impact an individual’s ability to conquer substance reliance! drug addiction
Treatment alternatives at customized treatment centers vary; it’s all about finding what works finest for each specific! depression treatment center
It’s crucial to concentrate on self-care throughout the tough times of drug detox! drug detox
Knowing new coping techniques has been crucial for me in handling stress post-alcohol detox! What helps you? alcohol detox
Holistic techniques in drug rehab have shown appealing results for numerous people. drug rehab
This was a great help. Check out juwelier almere for more.
This was nicely structured. Discover more at elektricien in de buurt .
I’m amazed at how easy it was to schedule my repair with %%ANYKEYWORD%%—highly recommend them! windshield replacement ontario
Great insights into preserving our houses’ roofs—thanks for sharing this data! Head over to Roof Cleaning Service for help!
Appreciate the detailed information. For more, visit plumbers close to me .
A qualified `# anykeyword#` will provide clarity on benefits like wage loss and medical expenses—don’t miss out! Workers’ Compensation Lawyer
My first time trying chicken biryani from masti indian grill and I’m officially obsessed! indian cuisine
Your insights into energy ratings for new units were really informative—I’ll keep those in mind when shopping around! water heater replacement
Your advice on maintaining electrical panels is so crucial for homeowners to know! Cornerstone Services
Just had some work done by the team at plumber near me – they are the best plumbers in Bethlehem, hands down!
This was quite informative. For more, visit ISO Technology .
If you’re experiencing issues with your water heater, find solutions at water heater maintenance tailored for Taylors residents.
Awesome read! I’ll be sure to keep an eye on my drains from now on. drain cleaning service
Great article; I’ll definitely be sharing this with friends who might need help with their heaters too! water heater repair
Kerner Law Group, P.C. is my top recommendation for anyone needing a Bronx car accident attorney! Their dedication is unmatched.
I had a fantastic experience with Kerner Law Group, P.C. Their team includes the best Bronx car accident lawyer I’ve ever met Accident attorney near me Bronx
I love how local businesses are stepping up to help with plumbing issues like clogged drains in Valparaiso! sewer line repair
I recently realized how important it is to have a trustworthy plumber on call when I have a wiring emergency at residence. Finding a local plumbing firm that offered disaster service was one of the things I looked for when I looked for “plumbers near me
Thanks for the useful suggestions. Discover more at professional Beverly Hills dental group .
The section on eco-friendly plumbing solutions was particularly enlightening—I’ll be implementing those changes soon!! Plumber in Pineville
Selling fast sounds great until reality hits lol… maybe I’ll hit up cbs.com for some solid advice when I’m ready! sell distressed property
Communicating openly fosters trust building rapport essential establishing long-lasting partnerships forged together grounded principles fairness integrity upheld ensuring everyone treated equitably regardless circumstances faced personally endured michael dreishpoon personal injury attorney
Thanks once more for imparting such thorough insights—you actually care about assisting others navigate those selections; will hook up with Medical Insurance # quickly!
I had a fantastic experience with Kerner Law Group, P.C. as my Bronx car accident attorney!
Kerner Law Group, P.C. truly stands out as the best Bronx car accident lawyer I’ve ever worked with Bronx injury lawyer
Taking time researching options paid off immensely after discovering exceptional services provided through _____MOVING COMPANY_____ – thank you _____ANYYKYWD_________!! Long distance movers Merritt Island
My car hasn’t looked this good in years! Thanks to Auto Detailing Near Me for their top-notch detailing services.
Just had my furniture moved by Cheap movers Sun City Center , and I couldn’t be happier! Highly recommend for Sun City Center moves.
Never thought I’d enjoy cleaning my vehicle until I tried ###` anyKeywords`. Mobile Car Detailing Near Me
I’ve tried several detailing services, but none compare to the work done by Mobile Car Detailing Austin Texas .
Can’t get enough of the convenience of mobile detailing! Thanks, Car Detailing Near Me , for your awesome service!
Daniella Levi & Associates, P.C. has the best Brooklyn car accident attorney I’ve ever worked with!
If you need a Brooklyn car accident lawyer, Daniella Levi & Associates, P.C. is the place to go Rear end accident lawyer Brooklyn
Just visited a speakeasy in Melbourne, and it was once such a distinct feel! Anyone else love that vibe? bars
It’s refreshing to see such clear guidance around DIY versus professional plumber repairs—it’s an important distinction!! Plumber in Pineville
Купить диплом института !
Покупка диплома ВУЗа РФ у нас – надежный процесс, потому что документ заносится в государственный реестр. Купить диплом об образовании diplomidlarf.ru/kupit-diplom-o-visshem-obrazovanii-reestr-13
I appreciate how informative 롤배팅사이트 is when it comes to understanding the nuances of 롤 토토.
Work injuries can have a significant impact on one’s life. It’s crucial to know your rights and seek help. Workers’ Compensation Lawyer
I’m always looking for reliable sources of information about health supplements like 비아그라 구입 , and this blog is a great find!
Your tips on lanai screen repair are super helpful! I’ll definitely check out your site for more information. Window Screen Repair
A big shoutout to the team at Social Cali for always going above and beyond for their clients!! Digital Marketing Agency
I lately had my roof replaced, and I did a lot of research on the best selections nearby. It’s amazing how many# #roofing firms near me## offer competitive pricing and excellent service roofer near me Armstrong Roofing LLC
If you’re looking for a reliable and safe Seattle chiropractor, I highly recommend doing some research on local clinics. It’s important to find someone who prioritizes patient safety and has great reviews from clients Car Accident Chiropractor Seattle
I’ve been hearing so much about 꽁머니 환전가능사이트 lately! Can someone explain what 꽁머니 is all about?
Appreciate the great suggestions. For more, visit contador en Saltillo .
Useful advice! For more, visit Isos Technology .
Wonderful knowledge right into usual pipes issues and solutions! For those bigger issues, see to it to reach out to TMK Furnace Repair Grande Prairie for qualified help!
Photographing children requires patience and creativity; every moment is spontaneous and precious—share your tips on capturing kids’ moments via senior portraits western ma !
Fresh paint can really decorate your place’s worth—thanks, Golden Touch Painting, for doing this type of outstanding process on mine! Exterior Painting Cape Coral
This was quite helpful. For more, visit plumbing .
Appreciate the thorough information. For more, visit Beverly Hills Dentist Office .
Feeling empowered after every session of cool sculpt and can’t wait to share tips with fellow beauty enthusiasts on: # anykeyword# expert coolsculpting services
So impressed with various themes presented throughout selections available locally; they cater perfectly toward children while still appealing adults too! bounce house
Marcus Networking is my top choice for IT services in Tempe.
I’ve always had a positive experience with Marcus Networking’s IT expertise.
Marcus Networking provides the best IT services near me.
I love the efficiency of Marcus Networking’s IT solutions Marcus Networking expertise in IT
I’ve seen some great success stories involving 꽁머니! Would love to hear your experiences too! Share them at 꽁머니 5만 .
This was highly helpful. For more, visit Kitchen plumbing .
เยี่ยมชมร้าน OMG OneMoreGlass แล้วรู้สึกว่าสถานที่นี้คือสวรรค์ของคนรักเหล้า! ร้านอาหารเพลงเพราะ ฟังสบาย สาย1
The mobile version of 슬롯사이트 is seamless! I can play anytime, anywhere, which is a huge plus for me.
Dobre biuro rachunkowe w Bydgoszczy to dziś nie luksus, a konieczność. Dobrze mieć aktualne informacje o rynku usług księgowych.
biuro rachunkowe
For anyone looking into moving their business, definitely check out what’s available on Long distance movers West Palm Beach #—you won’t regret it!
Thanks for enlightening us on desirable home care practices—it’s refreshing and considered necessary—I’ll discover what %%anyKeyword%% grants soon! Roof Cleaning Company
It’s amazing how support system can assist in healing. I advise having a look at the resources supplied on addiction treatment for more insights.
Can’t think how budget friendly some of these stylish outside fixtures are! Many thanks for pointing me towards Lighting Bug Outdoor Lighting & Electric
Sharing useful tips relating to handling tension levels throughout day-to-day routines proves necessary equipping individuals dealing with difficulties successfully keeping them grounded!!!! drug addiction
Thanks for the great information. More at movers .
There’s a lot hope when you see how many people have actually benefited from participating in anxiety treatment focuses across the country! depression treatment center
Browsing family characteristics during a loved one’s drug detox can be tough but important to address together! drug detox
Loved the data-driven approach discussed here—it’s vital when making strategic decisions; explore further options through **### anyKeywords### Marketing Agency
I’ve been using 시알리스 for a while now, and it has changed my life. Highly recommend checking out 시알리스 가격 for more details!
It’s amazing just how much clearness follows finishing an alcohol detox program. alcohol detox
I believe we need more discussions around mental health within the context of compound abuse and rehabilitation! # # anyKe yword ## drug rehab
I always forget to check my pipes before winter – thanks for the reminder! Plumber in Pineville
Has anyone compared prices between different services? I found that water heater service offers the best deals in Lee’s Summit!
Wonderful tips! Discover more at toilet plumbers near me .
Just had some work done by the team at Benjamin Franklin Plumbing – they are the best plumbers in Bethlehem, hands down!
Thanks for the valuable insights. More at Boiler repairs Leaks .
Great points made regarding child-proofing outlets—they’re absolutely necessary when kids are around!!! ### anykeyword ### Cornerstone Services
I learned so much about maintaining my water heater from water heater maintenance , especially for repairs available in Taylors!
Love your approach to tackling clogged drains without resorting to chemicals—great for the environment too! drain cleaning service
Your breakdown of energy consumption between different types of heaters was incredibly informative—thanks again! water heater service
okay, so i finally tried masti indian grill in memphis after hearing all the buzz, and i’m officially hooked on their naan! best indian restaurants near me
Thanks for the great content. More at https://jsbin.com/gixuzafaqi .
Filing for disability benefits after a workplace injury can be complicated – get expert advice through %% anyKeyWord%% today! Workers’ Compensation
Has somebody experienced CoolSculpting at coolsculpting amarillo ? I’d like to hear your remarks!
Thanks for the great explanation. More info at juwelier almere .
The growing popularity of 꽁머니 is fascinating! How do you think it will evolve in the future? Would love your thoughts over at 꽁나라 .
Thanks for the reminder about regular maintenance! I’ll consider using drain cleaning service more often.
This was a fantastic resource. Check out elektricien in de buurt for more.
Just moved to Durham and needed a plumber; found the awesome team at plumbing services .
Can anyone share their success stories with 시알리스? I’m really interested in hearing real-life experiences! 시알리스
Recently, I discovered a fantastic hairdresser in my community that has totally transformed my grooming routine men’s haircut
I enjoyed this post. For additional info, visit Isos Technology .
So, I’m thinking of downsizing soon and came across chrisbuyshomesstl.com. Do you think they’d be good for someone like me? sell my home quickly
Has anyone experienced side effects with 비아그라 ? I’d love to hear more about it.
Thanks for the clear breakdown. Find more at Dental Group Beverly Hills .
I recently started seeing a chiropractor in Seattle, and I can’t believe the difference it has made in my overall well-being! If you’re considering chiropractic care, it’s definitely worth exploring Chiropractor Seattle
I’m continually attempting to find unique non-alcoholic preferences at bars—has all people chanced on a few remarkable mocktails round Melbourne? bars
Are there any apps specifically designed for managing 꽁머니 effectively? Let’s compile a list at 토토 꽁머니 30000 !
After trying out multiple 토토사이트, I can confidently say that 먹튀검증 사이트 stands out for its customer service and fast payouts. Definitely worth a look if you’re serious about betting!
The pointers on electric upkeep were handy; I’ll be calling my regional commercial concealed permit quickly!
The relevance of health in today’s travel setting can not be overemphasized; many thanks for addressing it so well– see even more at airbnb cleaning !
Finding suitable representation ensures proper documentation adhered st Workers Compensation Lawyer
I’ve been in need of to get my domestic interested in cleansing, and your facts are just what I necessary! I’ll talk over with House Cleaning to locate tactics to make it amusing.
Anyone else love the themed games on 에볼루션카지노 ? They always add an extra layer of fun!
I appreciate that Bright Home Insulation uses high-quality materials that are built to last—definitely worth the investment! cellulose insulation
The potential of 꽁머니 in budgeting is impressive! How do you incorporate it into your finances? Discuss it at 꽁머니 사이트 .
Thanks for the helpful article. More like this at office movers san jose .
Thanks for the clear advice. More at contador .
Marcus Networking is my top choice for IT services in Tempe.
I’ve always had a positive experience with Marcus Networking’s IT expertise.
Marcus Networking provides the best IT services near me.
I love the efficiency of Marcus Networking’s IT solutions Marcus Networking customer satisfaction
This was a wonderful post. Check out local leak detection experts for more.
Clearly presented. Discover more at movers .
Fed up with stubborn fat that just won’t go away? CoolSculpting can help you achieve the body you desire. Head over to ethical coolsculpting and witness the incredible transformations.
What a fantastic experience I had at American Laser Med Spa – El Paso! The staff was so professional. leading coolsculpting services el paso
“Remembering to check up on gutters at the same time checking the roof—all of it ties into ideal care and repairs!” roof cleaning northampton
Just had a fantastic experience with inexpensive movers in Floral City—highly recommend them! Floral City moving company
Well done! Find more at Isos Technology .
Employing a mishap attorney has been just one of the best choices I made post-accident! They really appreciate their clients at Falk Talks Law Personal Injury .
Thanks for the useful post. More like this at Dental Group of Beverly Hills .
The services offered by Long distance movers Astatula are top-notch for anyone needing long distance movers in Astatula.
What are your thoughts on smart homes and their architectural designs? Tewes Design Architect
Regular inspections can save so much hassle later on; great reminder in your post! Plumber
Kto prowadzi firmę w Bydgoszczy, ten wie, jak ważne jest wsparcie księgowe. Dobrze mieć aktualne informacje o rynku usług księgowych.
biuro rachunkowe
I think it’s wonderful when dentists incorporate technology to make visits more interactive for kids. Innovation is key! kids dental office
Peer support can make all the difference in healing journeys. Check out the neighborhood resources offered at addiction treatment .
Thanks for the clear breakdown. More info at https://maps.app.goo.gl/XJvvSZ8cNFNmXspT8 .
Absolutely nothing beats unwinding outside under charming lights; amazing suggestions on this blog site and from Lighting Bug Outdoor Lighting & Electric !
It delights me understanding improvements being made day-to-day surrounding therapeutic alternatives explored further inside these settings– let’s stay informed & engaged moving forward!!! # # anyK eyword # # depression treatment center
Bringing awareness towards youth-targeted prevention shows remains paramount thinking about increasing occurrences reported nationwide recently !! ## anyKeyboard #. drug addiction
Finding trustworthy cladding contractors can be difficult, especially if you need someone who is familiar with your area’s intricacies roofing companies near me armstrongroofingservices.com
The customer service at American Laser Med Spa – Amarillo is outstanding! Visit them and check out their services on coolsculpting prices near me .
This was highly educational. For more, visit cheap plumbing and heating .
I’m curious about various types of therapies used during drug detox programs– what works best? drug detox
Exploring numerous forms innovative expression serves useful purposes not just personally however likewise jointly uniting people facing similar challenges dealing with similar barriers concurrently (#. alcohol detox
Your recommendations are very useful; I’ll make sure to save the contact of an urgent plumber Medford .
Incorporating elements reflecting personal interests hobbies passions into decor enhances connection felt amongst occupants dwelling there staying within confines feeling warmth security generated strong sense belonging cultivated through thoughtful kitchen remodel contractors Tewksbury
This was highly helpful. For more, visit Fremont long distance movers .
This is exactly what I needed! If you’re local to Salem, reach out to electrician for help.
Learning everyday serves as motivation fueling growth while building relationships simultaneously—which couldn’t happen without Benjamin Franklin Plumbing
Thanks for the reminder about checking temperature settings during installation—it’s crucial! Bill Fry The Plumbing Guy
Curious if color palettes play an integral role when appealing market values; thoughts on choosing trendy shades over classic ones…? # # anyKeyWord # # kitchen renovation contractors Lexington
Доставка алкоголя на день рождения, свадьбу или просто вечер с друзьями
доставка алкоголя по москве дешево ночная доставка алкоголя москва .
I recently started seeing a chiropractor in Seattle, and I can’t believe the difference it has made in my overall well-being! If you’re considering chiropractic care, it’s definitely worth exploring Chiropractor Seattle
Thank you for outlining potential hidden costs during installation—I feel more prepared now going into this project! water heater service
Awesome insight into tackling stubborn blockages—I’ll be putting these techniques into practice soon enough!!! sewer line repair
Each time we shower, it feels luxurious having endless hot water from our new unit – pure bliss! water heater maintenance
I enjoyed this read. For more, visit juwelier in almere .
Had my first experience with Indian food at MASTI INDIAN GRILL MEMPHIS; I’m officially obsessed now!! best indian food near me
Great insights! Find more at elektricien in leiden .
Thanks for the useful post. More like this at Meigel Home Improvements – Kitchen & Bathroom Remodeling Company .
Fantastic insights into keeping my plumbing in check; will definitely check out hydro jetting service !
After my injury, my Workers Comp Lawyer walked me through every step of the process.
This was a wonderful post. Check out remodeling company near me for more.
Does anyone have recommendations for good licensed plumbers in the Durham area? I need some plumbing work done.
I feel stronger than ever thanks largely due diligent efforts put forth by all individuals associated with practice located through @#Any keyword#! Thank You!! Everett Accident auto injury specialist
Feeling stressed trying to sell my home before foreclosure kicks in…thinking of calling up chris buys homes in st louis for some support and options…anyone have success stories? (#) cash buyers for property
Thanks for the helpful article. More like this at termite treatment near me .
I appreciated this post. Check out Isos Technology for more.
Thanks for the detailed guidance. More at Foster Plumbing & Heating .
Great job! Discover more at pet checkup services .
ชอบบรรยากาศเปิดโล่งของร้าน OMG OneMoreGlass มาก อากาศดีสุดๆ ! สถานที่ชิลสาย1
Just had an impressive time at a trivialities evening at a bar in Melbourne! Do you delight in the ones varieties of pursuits? bars
Marcus Networking is my top choice for IT services in Tempe.
I’ve always had a positive experience with Marcus Networking’s IT expertise.
Marcus Networking provides the best IT services near me.
I love the efficiency of Marcus Networking’s IT solutions Business IT support Tempe AZ
Appreciate the useful tips. For more, visit expert general dentistry in Beverly Hills .
This article has motivated me to invest more in printed advertising; again, thank you #I choose ## Flyer Printing Lexington
This was very well put together. Discover more at best roofers in Fort Worth .
Thanks for the helpful article. More like this at solar panel installation .
This was highly informative. Check out dog grooming services for more.
Appreciate the great suggestions. For more, visit Affordable residential roofing .
Thanks for the useful post. More like this at contador .
Custom promotional merchandise is key for engaging your audience effectively! Explore options at custom screen print shirts .
Thanks for highlighting the relevance of electrical evaluations by a certified commercial electrician .
????? 888starz http://888starz-official.com/ .
I enjoyed hearing how empathy plays a huge role when crafting user-focused experiences; it truly helps create loyal customers!. Explore additional concepts over here: # anyKeyWord ## Online Marketing Burlington
Great content! If you ever find yourself needing a bail bond in Las Vegas, check out las vegas bail bondsman .
The CoolSculpting before and after photos on this site are making me excited about the possibilities. Can’t wait to schedule my consultation at reliable coolsculpting !
I wish I’d read this before my last plumbing disaster! Bookmarking for future reference! Plumber
Simply finished a negotiation many thanks to my fantastic attorney from Falk Talks Law Personal Injury ! If you remain in question, reach out to them.
I love the way architecture can transform a space! It’s truly an art form. Tewes Design Group Miami Architects
Appreciate the detailed information. For more, visit find a plumber near me .
How do you handle peeling paint before starting an exterior project? I’ve seen mixed opinions on this; find out more here: Painters Portland !
สุดท้ายนี้ ขอบคุณร้านOMG OneMoreGlass ที่ทำให้การออกไปเที่ยวสนุกอย่างนี้นะครับ # #anyKeyword## ผับสาย1 รับจัดเลี้ยง
This was beautifully organized. Discover more at the future of isos technology .
I recently visited a Seattle chiropractor and was amazed at how much better I feel! The personalized care and attention to my specific issues made a huge difference in my overall well-being Seattle Chiropractor
“Dealing with insurers directly can be frustrating; that’s why having a skilled Public Adjuster is crucial.” Select Adjusters LLC Arizona
Well explained. Discover more at Beverly Hills Dental Group .
Kto prowadzi firmę w Bydgoszczy, ten wie, jak ważne jest wsparcie księgowe. Dobrze mieć aktualne informacje o rynku usług księgowych.
biuro rachunkowe
If you’re in Margate and need help moving, look no further than Margate apartment movers . They offer fantastic service!
Addiction treatment is a journey, and it’s motivating to see a lot of people seeking aid. Resources like addiction treatment can make a considerable difference.
How important is hydration post-treatment when undergoing cool sculpt ? Health tips provided over via # # anyKey word ## affordable coolsculpting near me
How important do you think it is to match hardware finishes during a kitchen remodel? I’m torn on this issue! kitchen renovation costs Tewksbury
Excellent post highlighting the importance of branding through print materials! My go-to is always Printing Services Lexington !
Marcus Networking is my top choice for IT services in Tempe.
I’ve always had a positive experience with Marcus Networking’s IT expertise.
Marcus Networking provides the best IT services near me.
I love the efficiency of Marcus Networking’s IT solutions Top IT services Tempe
Excitedly researching innovative approaches towards improving efficiency while enjoying aesthetics throughout future renovation projects ahead…!!!### anyKeyWord ## kitchen renovation costs Lexington
Thanks for the advice on winterizing plumbing! It’s crucial, especially where I live. Will check out emergency drain repair Medford for help.
Any individual else thrilled about updating their backyard room this year? Let’s share ideas inspired by conversations happening over ### anyKeyWord ### landscape lighting company near me
Regular maintenance from a trusted contractor can save you money down the line—invest wisely! https://www.google.com/maps/place/?q=place_id:ChIJYdZ7tTyoK4cRfsjBJx_n_Fg
The appeal behind sharing minutes filled with laughter in the middle of shared struggles throughout program sessions stands as evidence positivity exists even when times appear bleakest– never ever quit hope!!! # # anyK eyword # # depression treatment center
Combining tech developments together with traditional treatments paves way forward developing new opportunities enhancing ease of access throughout sectors!!!! drug addiction
This was highly useful. For more, visit long distance movers scotts Valley .
Knowledge learning acquired throughout experiences eventually leads transformative awareness reminding everyone capable accomplishing achievement rising above restrictions when set forth by previous selves battling inner devils associated unhealthy alcohol detox
It’s important to concentrate on self-care throughout the difficult times of drug detox! drug detox
Great insights on maintaining your system! Definitely keeping # # anyKeyword # # on speed dial for repairs. Bill Fry The Plumbing Guy
DIY electrical work can be risky; it’s best left to professionals to avoid hazards. licensed electrician services
The customer service at affordable plumbers is remarkable! They really care about their clients.
This was a fantastic resource. Check out web design services for more.
I’ll never forget how welcoming everyone was upon entering—you instantly feel valued as part of their family <3 Thanks again @#Any keyword#! Chiropractic care Everett Accident
Conversations like these elevate collective awareness surrounding necessary upkeep tasks while fostering camaraderie within local neighborhoods mutually benefiting everyone involved.【# # anykeyword】 tankless water heater repair
Just discovered the best plumber for my water heater problem thanks to recommendations on water heater repair taylors
Fantastic article covering both repair and preventative measures—it’s nice being proactive rather than reactive with home maintenance tasks like these!! clogged drain repair
Detoxing is just the first step; ongoing support is important after drug rehab. drug rehab
My first time trying chicken biryani from masti indian grill and I’m officially obsessed! indian food
Historical architecture gives us a glimpse into the past and its cultural significance. Tewes Design Group
Great post on why you need an accident attorney! It’s important to have someone educated on your side like those at Falk Talks Law Injury .
Loved discovering how personalization fosters deeper connections leading toward increased engagement levels!!! Check back again soon with us over here: # anyKeyWord ## Online Marketing Burlington
I love how local businesses are stepping up to help with plumbing issues like clogged drains in Valparaiso! drain cleaning
Huge shoutout to the team at Bright Home Insulation for transforming my home’s energy efficiency—thank you! Insulation contractors near me
I recently had a fantastic experience with an auto glass repair service, and it was all thanks to the info here! windshield repair near me
This is very insightful. Check out plumbing services for more.
The right Workers Compensation Lawyer can help you maximize your compensation and ensure you’re covered for medical expenses.
“Just learned about some preventative measures for keeping my garage doors functioning well—thanks for sharing!” Garage Door Repair in DFW
I’m at all times searching for bars that have useful glad hour specials in Melbourne—what’s your famous deal? bars melbourne
. Just sold my place without any repairs needed at all!!! Huge thanks to chris from chris buys homes—it felt like such a weight lifted off my shoulders! sell a house quick
Wow, I didn’t know that minor leaks could lead to bigger issues down the line—thanks for the heads up! Plumber in Pineville
This was very enlightening. For more, visit Cork roofing maintenance .
Don’t let financial concerns hold you back from achieving your dream body shape. Visit proficient coolsculpting specialists in Corpus Christi for affordable CoolSculpting costs that will help you reach your goals.
Very useful post. For similar content, visit Isos Technolgy .
This was highly educational. More at juwelier in almere .
Thanks for the useful post. More like this at contadores en Saltillo .
Wonderful tips! Discover more at leiden elektricien .
This was very enlightening. More at Beverly Hills Dental Group .
What are your thoughts on the long-term use of 비아그라 구매 ? Is it safe?
The significance of prevalent deep cleaning can’t be overstated! It’s splendid how plenty dirt and dirt can gather through the years. Your publication inspired me to talk over with the best cleaners in irvine for more thorough tactics.
Useful advice! For more, visit Summers Plumbing Heating & Cooling .
Appreciate the helpful advice. For more, visit https://maps.app.goo.gl/V8LemDP9F9bScJCy5 .
This was a fantastic read. Check out boynton beach car accident lawyer services for more.
Valuable information! Discover more at Florida Restoration .
Thanks for discussing the impact of climate on roofing decisions; it’s so relevant depending on where you live—find out more at Residential roofing Westford MA !
Very informative article. For similar content, visit Summers Plumbing Heating & Cooling .
Are there specific areas of the body where CoolSculpting is most effective? More info on this via best coolsculpting amarillo .
I recently started seeing a chiropractor for my chronic back pain, and the results have been amazing! It’s incredible how much relief I’ve experienced through adjustments and personalized care Car accident Chiropractor
Very helpful read. For similar content, visit indoor air quality testing Huntington IN .
Appreciate the useful tips. For more, visit https://www.google.com/maps/dir/Deck+Builder+near+me,+2172+N+Fox+Hollow+Dr+W+Suite+2,+Nixa,+MO+65714,+United+States/Mid-Mo+Deck+and+Fence+Builders,+Kelsey+Court,+Nixa,+MO,+USA/@37.0698274,-93.3086944,14z/data=!4m13!4m12!1m5!1m1!1s0x87cf66b66064f58d:0xf5ddbeaa874ac5eb!2m2!1d-93.3039995!2d37.091603!1m5!1m1!1s0x87c387ee58758609:0x249d069b8967da75!2m2!1d-93.2892254!2d37.0476793!5m1!1e1?entry=ttu&g_ep=EgoyMDI1MDUyMS4wIKXMDSoASAFQAw%3D%3D .
Thanks for the practical tips. More at Meigel Home Improvements – Kitchen & Bathroom Remodeling Company .
This was highly helpful. For more, visit despacho abogados Vigo .
Marcus Networking is my top choice for IT services in Tempe.
I’ve always had a positive experience with Marcus Networking’s IT expertise.
Marcus Networking provides the best IT services near me.
I love the efficiency of Marcus Networking’s IT solutions Marcus Networking customer satisfaction
I’ve been searching for a trusted Calgary electrician for my home projects. After visiting commercial electrician near me , I found the perfect fit!
The value of cleanliness in short-term rentals can’t be overstated. Wonderful guidance here! See much more at airbnb turnover .
I believe every business should have an arsenal of promo items ready for events and outreach efforts—learn more strategies at screen printing sweatshirt .
The storytelling aspect of architecture through design elements is something I deeply admire! Tewes Design Group
Simply got some remarkable pointers from the group at Falk Talks Law Injury concerning handling post-accident cases– really handy!
Lokalna obsługa podatkowa i kadrowa to klucz do spokojnego biznesu. Dobrze mieć aktualne informacje o rynku usług księgowych.
biuro rachunkowe
Interested in body sculpting? Check out Corpus Christi CoolsSculpting for incredible results! competent coolsculpting procedures
ราคาที่ OMG OneMoreGlass ถือว่าคุ้มค่ามากเมื่อเทียบกับคุณภาพที่ได้รับ! ร้านอาหารฟังเพลง สาย1
Appreciate the detailed insights. For more, visit Beverly Hills Dental Group .
Certainly investing in quality fixtures pays off when it comes to durability after remodeling—a great tip indeed! kitchen renovation contractors Lexington
I had no idea that minor leaks could lead to major problems. Glad I found emergency drain service Medford for my plumbing needs!
Having someone like an experienced ### any Keyword### on your side can make all the difference when dealing with insurance companies post-accident! Car Accident Attorney
Great insights on the world of online gaming! I love exploring different 슬롯사이트 순위 for the best slots out there.
Such fantastic insights provided throughout every section; truly enlightening material overall!!! # # anyKey word # # Plumber in Pineville
“Shooting during golden hour gives photos such warm tones; it’s my favorite time to capture images! For more tips on timing, visit me over on my site, headshots western ma .”
I’m astonished by the number of strategies are being made use of in today’s depression treatment centers– from art therapy to mindfulness! depression treatment center
I’ve seen promotions involving 꽁머니 everywhere lately! What’s the best deal you’ve found? Discuss it at 꽁머니 카지노 3만 !
Schools must implement programs that teach trainees about coping mechanisms instead of just saying “no” to drugs! drug addiction
I read that 시알리스 구입 can help with more than just ED. What are some other benefits?
I’ve always wondered about the role of expert witnesses in car crash cases—great insights over at Auto Accident Lawyer
I didn’t think improvement would happen this quickly; however thanks once again—to everyone behind-the-scenes working diligently here @#Any keyword#! Contact Everett Accident
Great insights at the value of web optimization in digital marketing! It highly highlights how crucial that’s to optimize for search engines like google and yahoo. Check out greater about this at Digital Marketing Glasgow .
The psychological rollercoaster of an alcohol detox can be tough, however remember, you’re not alone in this journey. # # anyKeyWord ## alcohol detox
Just had my annual inspection done through water heater maintenance – they’re thorough and professional!
Thanks for the valuable insights. More at juwelier almere .
Just had my fixtures replaced by an expert from electrician #; they’re the best electricians in Salem!
For all your roofing needs, trust the certified experts at roofing contractors near me !
It’ll be nice having access not just knowledge-wise but also practically speaking once appointments commence fully underway coming soon thereafter!!!! ?? anykeyword### coolsculpting near me
Have you attempted alternative therapies like acupuncture or meditation for improving your drug detox experience? drug detox
This post has motivated me to revisit my site’s UX design with respect to improving my overall ranking!. Find additional tips at Local SEO Burlington
Can’t wait to see how my dwelling transforms with just one session from King of Gleam’s incredible workforce! Pressure Washing Fort Collins
Thoroughness exhibited showcases dedication towards ensuring accuracy remains paramount while engaging audiences effectively through relatable language accessible anyone regardless background knowledge levels possessed beforeh water heater service
Thanks for the info on preventative measures for clogged drains; I’ll definitely implement them! hydro jetting service
Really impressed with how quickly our family adjusted to using the new unit – everyone loves it already!! #SmoothTransition water heater replacement
The function of nutrition and workout must not be undervalued throughout the recovery procedure at rehabilitations! # # anyKe yword ## drug rehab
Clogged drains can really disrupt daily life; looking forward to contacting sewer line repair !
I’ve been considering 비아그라 판매 for a while. What would you recommend as a starting point?
Really enjoyed reading this piece about online marketing; can’t wait to connect with # anyKeyWord#! SEO Agency Lowell
My house feels so much more secure now that it has a brand-new roof from these experts!!! # # anyKeyWord ## residential roofing Cork
I enjoyed this read. For more, visit plumbing services .
I’ve heard that lifestyle changes can enhance the effectiveness of 시알리스 구입 . What changes have worked for you?
I recently discovered the benefits of 꽁머니 and how it can enhance my gaming experience! Check out more insights at 꽁머니 사이트 .
Seeking CoolSculpting treatments in Corpus Christi? Look no further! reputable coolsculpting offers exceptional service and remarkable results.
La evolución de las leyes sobre Workers Comp Lawyer en los últimos años.
This is such a valuable topic! I’ve been looking into alternatives like 비아그라 구입 for better sexual health.
Este post está incrível! Poucos sites oferecem detalhamento assim sobre comprar backlinks. Muito bom mesmo! Já vou acompanhar o site para continuar aprendendo. Conteúdo assim faz diferença. Vai ter continuação? conferir artigo
Helpful suggestions! For more, visit contadores en Saltillo .
I’ve been using various platforms, but nothing compares to the features offered by 사설토토 . It’s a game-changer in the betting world!
This was very beneficial. For more, visit casa rural Segovia .
Marcus Networking is my top choice for IT services in Tempe.
I’ve always had a positive experience with Marcus Networking’s IT expertise.
Marcus Networking provides the best IT services near me.
I love the efficiency of Marcus Networking’s IT solutions Marcus Networking solutions Tempe AZ
This was highly useful. For more, visit latest isos tech trends .
If you’re not yet a member of 에볼루션카지노, you’re missing out! Read more about it on 에볼루션카지노 for all the details!
Thanks for the valuable insights. More at AC installation Drexel Hill PA .
This was a great help. Check out Dental Group of Beverly Hills for more.
Thanks for the clear breakdown. Find more at personal injury lawyer .
If you’ve been involved in a car accident in Seattle, it’s crucial to seek help from a qualified chiropractor. They can provide the necessary care to address any pain or discomfort resulting from the incident Car Accident Chiropractor Seattle
The marketing consultant you awarded on settling on useful piping ingredients is essential abilities—the exact selection makes each of the big difference—extra info reachable at affordable plumber Dallas !
Feeling inspired by all the progress pictures circulating in forums linked through## best coolsculpting amarillo
Capturing emotions during significant life events makes every photograph meaningful beyond aesthetics alone–how do those moments resonate within each image captured ####anyonkeyword#####? senior portraits western ma
Thanks for breaking down common plumbing problems and solutions—it’s so helpful for homeowners everywhere! Plumber in Pineville
Exists a recommended timeline for the length of time a drug detox should take? I have actually seen different opinions on this topic– let’s discuss it more via drug detox !
“Gratitude journaling acts as an exceptional tool throughout one’s healing journey, strengthening favorable thought patterns!” # # Anykeyword #. drug rehab
What role does spirituality or mindfulness play in your recovery from alcohol addiction during detox? Discuss further at alcohol detox !
Mentorship programs connecting recuperating addicts with those still struggling can make a huge distinction in treatment results. # #anyKeyword ##. addiction treatment
Acknowledging obstacles doesn’t equate failure– it simply highlights areas requiring further attention cultivating growth progressing along journeys shared alike !! #AnyKeyWord #. eating disorder treatment
This was beautifully organized. Discover more at abogados en Vigo .
Thank you for covering social signals and their influence on rankings—it’s an often-overlooked aspect by many businesses operating within busy markets like ours here in Boston; explore details via SEO Optimization Companies Boston
Bardzo pomocny przewodnik dla przedsiębiorców z Bydgoszczy. W 2025 roku profesjonalna obsługa księgowa ma jeszcze większe znaczenie.
biuro rachunkowe
Your perspective on understanding consumer behavior relative to search engine usage is thought-provoking!. Find additional insights at SEO agency Burlington
This was highly useful. For more, visit bay area long distance movers .
Adding personal touches makes all the difference in a remodeled space—what unique elements did you include? kitchen cabinet renovation Tewksbury
I respect your insights on analytics in virtual advertising. Understanding information is extreme for making counseled judgements! Learn greater at Pixel Juice Digital Marketing Glasgow .
Engaging within supportive environments fosters growth development accountability overall leading healthier lifestyles regardless wherever path leads us ultimately whether through steps taken via means similar connected back towards ‘cool-sculpt’ : # skilled coolsculpting technicians
A well-planned pantry can make all the difference in a remodeled kitchen—how big is yours? contractor for kitchen remodel Lexington
Just moved to Calgary and needed some electrical upgrades done. Found an amazing electrician through calgary commercial electrician —super happy with the results!
Value all shared experiences related towards enhancing settings favorable in the direction of better guest fulfillment while accomplishing personal objectives at the same time– excited seeing outcomes unfold using updates released throughout ###! airbnb turnover
Canada has so many amazing custom promotional product options! Don’t forget to check out custom silk screen shirts for inspiration.
I always dread calling a plumber, but knowing about emergency boiler repair Medford makes it less intimidating!
Exciting discussions awaiting us further down paths paved by thoughtful exchanges-naturally intrigued at discovering working relationships eventually through SEO Agency Lowell
Thanks for the useful suggestions. Discover more at isos technology company .
Thanks for instructing us on voltage drop; that’s whatever I’d in no way thought-about until eventually now, and I’ll seek the advice of an educated ### anyKeyword###! local electrician
Appreciate the thorough write-up. Find more at Dental Group of Beverly Hills .
I’m so relieved that someone recommended # any Keyword#; I’ve seen significant improvements since getting treated there post-accident. Everett Accident auto injury specialist
I’m so relieved to have found a trustworthy service like water heater repair for my water heater repairs in Lee’s Summit!
I’ve been searching for a good electrician and found electrical repair in Salem – highly recommend them!
Every time I’ve used the services from plumber near me , they’ve exceeded my expectations as plumbers.
Let us continue promoting strongly around increased financing & availability regarding quality resources created explicitly targeted towards aiding individuals navigating devastating kinds associated along with prolonged episodes coming from neglected depression treatment center
The visuals in your guide make understanding the installation process much easier for visual learners like me! tankless water heater repair
Seeing firsthand results achieved via collective efforts showcased right before eyes makes everything worthwhile indeed every step taken together collectively !! ## drain cleaning
Marcus Networking is my top choice for IT services in Tempe.
I’ve always had a positive experience with Marcus Networking’s IT expertise.
Marcus Networking provides the best IT services near me.
I love the efficiency of Marcus Networking’s IT solutions Marcus Networking service in Tempe
Water heaters need love too! Find the best ways to maintain them at water heater service
I stumbled on your analysis of PPC campaigns very important! Knowing how you can organize budgets effortlessly is fundamental in electronic advertising. More techniques look forward to you at Digital Marketing Glasgow .
Let’s advocate together until every person having a hard time finds their respective courses back home– aid starts with listening!!! drug addiction .
Start your journey towards a more confident you with CoolSculpting in Amarillo. Let coolsculpting clinics amarillo be your partner in achieving your body goals.
Let’s keep spreading well note around merits concerned referring to modernizing constructed environments by plain means!!!! #SpreadingGoodWord Commercial glass tinting Brooklyn NY
Discovering pleasure in sober activities has made my alcohol detox a lot more enjoyable! What do you do for enjoyable? alcohol detox
Hats off for initiating conversations around renewable resources—it’s crucial we keep pushing for innovation! residential roofing Cork
The connection between physical health and effective drug detox is interesting! drug detox
керамогранит Глобал тайл стоимость напольной плитки
Anyone looking for effective solutions to sore nipples should definitely consider trying some of the products featured on my site: era organics !
Lastly, using monetary assistance options for those looking for access to quality rehabilitative care is most importantly crucial moving forward! # # anyKe yword ## drug rehab
Can’t say enough good things about ### anykeyword# – they truly care about their customers’ needs. plumber near me durham
The storytelling aspect of your photography is captivating! Each photo feels like a chapter in a book. Discover similar styles at western ma photographers .
If you’re looking for a non-surgical way to eliminate stubborn fat, Corpus Christi CoolsSculpting is the answer! proficient coolsculpting specialists
Absolutely loved reading through each section packed full of relevant info aimed specifically toward empowering consumers out there!!!! Keep up great writing!!!!!## anyKeyWord ## roof repair
Awesome article on leveraging local directories for better visibility—Boston businesses should take note and check out Search Engine Marketing Boston !
Thanks for the clear breakdown. More info at contador en Saltillo .
Well done! Find more at motor vehicle accident attorney .
Thanks for the great explanation. More info at casa rural Segovia .
ได้ยินว่าที่ OMG OneMoreGlass มีเหล้าหิ้วมาเองด้วย ชอบมาก! ร้านชิลใกล้ฉัน
” Kudos again as this subject material stays on hand but informative permitting all of us irrespective of skillset still advantage commonly from diving deep into topics mentioned right through contents presented the following lately! plumbers Dallas
This is such useful information! I can’t wait to work with Search Optimization Lowell for my SEO strategy in Lowell, MA.
The expertise for reduced heating and cooling costs is titanic—this can be a have got to-read for company householders around the world! Commercial glass tinting Brooklyn NY
Believing knowledge empowers individuals ultimately leads healthier lifestyles overall!!!! #Anykeyword# windshield repair huntington beach
I can’t believe how much I’ve learned about coolsculpting from coolsculpting prices near me ‘s website!
This was highly useful. For more, visit abogados Vigo .
If you’re dealing with pests, you should definitely reach out to Auburn Pest Control. They really know what they’re doing! I found their website helpful: Pest Control Auburn .
Landscaping isn’t very virtually aesthetics; it also includes approximately developing a simple space. I chanced on a few effectual insights at landscaping services near me .
Great job! Discover more at Bay Area office moving .
Having a water function in my backyard has delivered such tranquility; it’s like having a mini retreat at dwelling house! Explore innovations at backyard living solutions Burtonsville .
Seeking non-surgical fat reduction options? Explore the offerings of leading CoolSculpting clinics like competent coolsculpting procedures in Corpus Christi.
Regular protection is prime to avoiding foremost refreshing-u.s.afterward! Your insights are spot-on; I’m going to inspect Cleaning near me for ongoing cleansing ideas.
Marcus Networking is my top choice for IT services in Tempe.
I’ve always had a positive experience with Marcus Networking’s IT expertise.
Marcus Networking provides the best IT services near me.
I love the efficiency of Marcus Networking’s IT solutions IT help desk services
If you’re in quest of low-maintenance landscaping, be aware integrating more hardscape aspects into your layout! walkways and steps Burtonsville
Prevention is key when it comes to termites! Thanks to the insights from termite extermination services , I’m now more proactive in safeguarding my home.
The role of nutrition in addiction recovery is often ignored, however it’s necessary! Find more about this at addiction treatment .
SEO Optimization Service Boston
Photography competitions encourage growth among enthusiasts; entering challenges pushes us beyond comfort zones—you offer great resources on contests too—find competition guides at ###anything###! senior portraits near me
Great read on electric codes! It’s considered necessary to ascertain compliance with nearby policies via hiring an proficient. electrician
Just had my panel upgraded by a remarkable ### ANYKEYWORD #, and what a difference it made! commercial concealed permit
Unbelievable listing describing precisely what needs attention in between reservations– I’m bearing in mind below today so I do not miss anything vital following time around, see added web content ###! vrbo cleaning
There are so many possibilities when it comes to custom promotional items for businesses! Don’t miss out on the selection at custom screen print shirts .
If you’re looking for quality service, look no further than water heater installation for your water heater repairs in Lee’s Summit!
I can’t believe the transformation they did on my roof! Keystone Roofing exceeded my expectations! roofing services Cork
Taking pride within your craft shines through every step taken onward—thankful wholeheartedly because of affordable plumbers
Thanks for breaking down the costs associated with water heater installation—very eye-opening! water heater replacement
Very encouraging tone throughout entire piece—it inspires confidence when approaching potentially tricky tasks like unclogging stubborn pipes!!! Benjamin Franklin Plumbing of Justin
Just installed my first tankless water heater, and I’m already impressed with its performance! water heater replacement taylors
Truly remarkable ideas showcased within these paragraphs—I’ll certainly pursue collaboration opportunities through # anyKeyWord#! SEO Marketing Lowell
The beauty behind sharing minutes filled with laughter in the middle of shared struggles throughout program sessions stands as evidence positivity exists even when times appear bleakest– never ever give up hope!!! # # anyK eyword # # depression treatment center
Thanks for the comprehensive read. Find more at Greensboro Auto Glass .
This was quite enlightening. Check out Auto Glass for more.
This was a great help. Check out codashop substitute sites for more.
Thank you for discussing the magnitude of native web optimization! Local search optimization can essentially support small groups thrive on line. More neighborhood tricks are out there at Pixel Juice SEO .
Cultivating safe spaces within workplaces promotes convenience amongst staff members going over individual battles freely– all of us should have helpful environments!!! ## anyKeyboard #. drug addiction
Can someone elaborate on whether genetics play a role in determining efficacy rates in patients undergoing treatments like #coolsculptin through your clinic’s lens, #_## anyKeyWord__? coolsculpting results amarillo
I found this very helpful. For additional info, visit greensboro lock and key .
Clogged drains can lead to bigger problems if not addressed quickly. Valparaiso has some fantastic repair services! drain cleaning
Browsing family characteristics during an enjoyed one’s drug detox can be tough however important to resolve together! drug detox
I adored your tackle social media methods! Engaging with audiences on line is critical as of late. For greater tricks, stopover at Pixel Juice Digital Marketing Glasgow .
Nicely detailed. Discover more at plumbers .
I delight in checking out books about recovery while going through my alcohol detox; any suggestions? alcohol detox
Family involvement in the recovery procedure can improve results from drug rehab. drug rehab
Clearly presented. Discover more at contador Saltillo .
Great job breaking down everything regarding roofs; glad there’s reliable content like this available locally through###: any keyword## roofing contractors
CoolSculpting Corpus Christi offers a non-invasive alternative to traditional liposuction. Discover how accredited coolsculpting services can help you achieve your desired body shape.
This was highly educational. More at car accident lawyer .
This was very enlightening. For more, visit casas rurales Segovia .
This submit is a lifesaver! I’ll basically are trying your thoughts for unclogging drains. professional plumber Dallas
I’m fascinated by the science behind rodent behavior and how it affects extermination strategies! Lots of informative content is available at rodent pest control near me .
If you’re in the market for custom shirts, Custom Shirts Boca Raton is the best choice around! Their quality and service are unmatched. More info available at Boca Raton affordable t-shirt printing !
. Thankful you touched upon mobile-first indexing because so many users search on-the-go while exploring our vibrant city – great tips shared throughout – head over towards #if anyKeyWord# for further assistance!! SEO Optimization Service Boston
Marcus Networking is my top choice for IT services in Tempe.
I’ve always had a positive experience with Marcus Networking’s IT expertise.
Marcus Networking provides the best IT services near me.
I love the efficiency of Marcus Networking’s IT solutions Marcus Networking technology management
I admire photographers who push their limits creatively, experimenting with mixed media—it inspires us all to think outside the box—explore innovative experiments showcased further at ###anything###! western ma photography
This was very well put together. Discover more at Kitchen remodeler near me .
This was highly helpful. For more, visit water damage restoration companies .
Great article! It’s so important to know the signs that you need auto glass replacement ontario for your vehicle.
Kerner Law Group, P.C. is my top recommendation for anyone needing a Bronx car accident attorney! Their dedication is unmatched.
I had a fantastic experience with Kerner Law Group, P.C. Their team includes the best Bronx car accident lawyer I’ve ever met Free consultation car accident lawyer Bronx
After analyzing this web publication, I’m sure it is time for a brand new windshield—heading over to Auto Glass
This was highly informative. Check out abogado en Vigo for more.
Thanks for the useful suggestions. Discover more at hardwood floor refinishing near me .
Really enjoyed reading this article about boosting online rankings; excited about services from # anyKeyWord#! SEO Agency Lowell
Appreciate the detailed information. For more, visit Majestic Pest Control – Hicksville Exterminator Service .
This was highly useful. For more, visit roofers fort worth tx .
Finding a fantastic hairdresser in my area is generally challenging. Every day I look for “barber stores near me,” I have the impression that the results are either overpowering or disappointing men’s haircut
I enjoyed this article. Check out personal injury attorney near me for more.
The convenience of hiring a Lancaster moving company is unmatched, especially if you’re busy with work or family! Lancaster movers
I enjoyed this article. Check out dog grooming services for more.
This was very well put together. Discover more at emergency water damage restoration company .
888starz регистрация http://888starz-official.com/ .
The insight into using drones for inspection was fascinating—I’d love to see that technology in action!! Cork roofing maintenance
This article certainly highlights the advantages of the usage of a professional electrician . DIY will probably be unstable!
Broadening ease of access alternatives available in your area promotes much healthier results across board enabling everybody regardless background situations discover support needed begin improvement journeys towards attaining enduring sobriety addiction treatment
Support from family and friends is crucial during the alcohol detox phase—how did yours help you? Explore supportive resources at alcohol detox !
“Research study showcases cognitive behavioral methods yield significant enhancements among clients going through drug abuse therapy sessions routinely!”. drug rehab
Neighborhood support is crucial in any recovery journey; discover regional resources through drug detox !
Healing includes not simply physical recovery however likewise rebuilding one’s self-confidence and identity beyond an eating condition! eating disorder treatment
Thanks for the reminder about checking temperature settings during installation—it’s crucial! Bill Fry The Plumbing Guy
Thanks for the clear advice. More at game top up webpage .
I appreciated this post. Check out Bar with secluded private room NYC for more.
Excellent point about not ignoring rust stains—it really can lead to bigger problems down the line! water heater service
Hopefully others find these recommendations as useful as I did—they’ll save time AND money while keeping homes safe from plumbing disasters!!! drain snaking service
Addiction treatment is a journey, and it’s inspiring to see many people seeking help. Resources like addiction treatment can make a significant distinction.
Just wanted to drop a note about how appreciative I am of the quality of plumbers we have available in Bethlehem! local plumbers
Just wanted to drop by and say how much I appreciate the services from electrician near me in Salem!
I found this very helpful. For additional info, visit Exterminator in Chester .
Enjoyed reviewing do it yourself maintenance pointers that any individual can carry out– it equips property owners all over #### aniyKeyord ####. Emergency HVAC repair Drexel Hill
I found a great company for water heater repair in Taylors! You can find more details at water heater replacement .
The preventive measures suggested by termite treatment near me have helped me avoid infestations altogether this year! Highly recommend their services!
I liked this article. For additional info, visit Greensboro Auto Glass .
What’s the most effective means to veterinarian potential commercial electrician # prospects before employing?
Windshield ruin shall be so complicated! Glad I found out Charlotte Auto Glass for a quandary-free feel.
Organizing a cleansing schedule can be hard, yet your pointers are incredibly handy! Have a look at airbnb turnover for even more pointers.
It’s amazing to see how custom promotional products can create lasting impressions on clients! Highly recommend exploring options at t shirt logo printing .
Thank you for discussing the value of nearby search engine marketing! Local seek optimization can tremendously help small companies thrive online. More native information are accessible at Pixel Juice SEO .
If you’re dealing with pests, you should definitely reach out to Auburn Pest Control. They really know what they’re doing! I found their website helpful: Auburn exterminator .
“Just realized how neglected my drains have been; time for a call to ###!” Plumbing Paramedics
Photography is a wonderful way to express oneself creatively! Explore ideas at senior portraits near me .
The integration of technology in some modern-day treatment centers provides ingenious ways to fight anxiety successfully! depression treatment center
Finding reliable help during moves can feel impossible until you discover ****; they were lifesavers for me! Long distance movers Haltom City
I appreciate your focus on safety measures that top contractors should follow during installation or repairs. roofing repair services
Nicely detailed. Discover more at contador en Saltillo .
Thanks for the thorough analysis. More info at plumbers durham .
Marcus Networking is my top choice for IT services in Tempe.
I’ve always had a positive experience with Marcus Networking’s IT expertise.
Marcus Networking provides the best IT services near me.
I love the efficiency of Marcus Networking’s IT solutions Marcus Networking reliable IT service
Thanks for the detailed guidance. More at casa rural Segovia .
Appreciate the comprehensive advice. For more, visit Motor vehicle accident lawyer .
Just ordered a couple of custom shirts from Custom Shirts Boca Raton and I couldn’t be happier! The fit is perfect, and the quality is top-notch. Visit Boca Raton t shirt designs to see their options!
Integrating tech innovations alongside standard therapies paves method forward producing brand-new opportunities boosting availability throughout sectors!!!! drug addiction
I believe going over aftercare choices is simply as important as the detox procedure itself! drug detox
The digital advertising and marketing space is perpetually evolving! Excited to see what my chosen #search engine optimisation Company will put in force subsequent. Roofing Contractor
I’m making plans to put in an outside shower this summer time—how clean will that be? Check out leading edge backyard designs at outdoor living near me !
Developing a routine assisted me immensely throughout my tough days of alcohol detox– what’s yours like? # # anyKeyWord ## alcohol detox
Your weblog has inspired me to do so with my landscaping—I can’t wait to study even extra from the authorities at licensed tree trimming Burtonsville MD !
Clearing out lifeless or dangerous bushes ought to retailer your private home from viable hurt right through storms—so wonderful! emergency tree removal Burtonsville
Thank you for addressing straightforward plumbing issues faced by means of householders and renters alike; that is a must-learn! For greater, test out residential plumber Dallas !
I had a fantastic experience with Alachua international movers ; they made my move smooth and inexpensive!
If you might be excited about upgrading your vehicle’s look, sincerely recall including a few privacy window tinting to the record! home privacy window tinting New York
Smart tint can in actuality give a boost to privacy devoid of sacrificing ordinary pale. Find out extra on smart tint New York NY .
Appreciate the helpful advice. For more, visit NYC private bar room .
Very helpful read. For similar content, visit bufete abogados Vigo .
Oakland auto transport made my car relocation a breeze. For anyone needing similar services, visit Oakland auto transport .
This was a wonderful post. Check out Affordible Pest Solutions for more.
Appreciate the insightful article. Find more at Greensboro Auto Glass .
I recently discovered some amazing information on how to train birds with a puppy that really strengthens the relationship between the coach and the canine. How many understanding and patience is greatly enhance a animal’s efficiency in the wild Ironrod Gun Dogs
Reflecting upon personal growth attained during workshops held throughout the year motivates continuous improvement!!!! ### any Keyword ## Auto Glass Charlotte
Ordonez Homes is the best realtor I’ve ever worked with. They made the home buying process smooth and enjoyable!
I found the perfect home thanks to Ordonez Homes Tucson real estate opportunities
Your factors approximately the value of A/B testing in virtual campaigns were actually insightful! Testing exceptional features can bring about more suitable consequences. Discover greater processes at Pixel Juice Digital Marketing Glasgow .
True Balance Pain Relief Clinic has the best massage therapist. I always leave feeling rejuvenated and relaxed!
I found the perfect massage therapist near me at True Balance Pain Relief Clinic Experienced massage therapists near me
Walter’s BBQ Southern Kitchen has the best brunch in Pittsburgh. The flavors are incredible!
I love finding a brunch spot near me like Walter’s BBQ Southern Kitchen Walter’s BBQ Southern Kitchen brunch menu and prices
Denver Print Company exceeded my expectations with their yard signs!
I recently ordered yard signs from Denver Print Company and was impressed yard sign printing and design
This was a fantastic resource. Check out actividades en un centro de ocio educativo for more.
Can’t suppose how an awful lot cooler my vehicle feels after having the home windows tinted for privateness – what an dazzling upgrade! residential privacy window tinting New York
Everyone ought take initiative towards ensuring maximum longevity enjoyed throughout properties owned amongst families involved — let’s spread word around further regarding excellent offers showcased continually through partners associated namely *** roofing company Cork
This was a fantastic read. Check out local boiler replacement for more.
Smart tint know-how is revolutionizing how we take into consideration window remedies! I cannot wait to be told greater approximately it on smart tint near me .
I liked this article. For additional info, visit new mobile pokies .
Just done putting in protection window movie on all my home windows. It’s such an straight forward method to boost safeguard! Learn more at security window film .
Your discussion round energy-helpful improvements changed into very enlightening—can’t wait to succeed in out to an educated!!! # # anyKey observe ## electrician near me
For reliable HVAC service near me, I always trust Summit Services. Their team is professional and efficient! ac repair
Thanks to Summit Services, my home is cool again after their amazing AC repair service! So grateful! hvac repair
Your insights on gutter cleansing are awesome positive. I’m totally scheduling a service quickly! Gutter Cleaning Company
Shoutout to the amazing technicians at Summit Services who helped fix my AC quickly and efficiently—thank you all! ac service
I’m consistently shopping for approaches to make cleansing quicker and more convenient, and your weblog has been tremendous positive! Can’t wait to discover more facts on Cleaning Irvine .
Appreciate the detailed information. For more, visit Auto Glass .
I think sharing individual reviews relating to recovery journeys motivates others not just to look for help but stay committed long-lasting too. # any Keyword ## addiction treatment
This was highly informative. Check out TheWinslo for more.
“Community outreach initiatives raise awareness while using support straight, bridging spaces where required most!” # # Anykeyword #. drug rehab
This is such a helpful guide on roof maintenance! I’ll be sure to visit roof cleaning northampton soon.
This was very beneficial. For more, visit Auto Glass .
I think it’s remarkable when organizations prioritize prevention programs aimed educating more youthful generations about preserving healthy relationships towards food/body image!! #AnyKeyWord #. eating disorder treatment
Thank you for sharing this info on drug detox! It’s extremely practical for those in need. See drug detox for more insights!
Personalized clothing is such a great way to express yourself! I highly recommend Custom Shirts Boca Raton for anyone looking to create something special. More details at Boca Raton uniforms printing !
I enjoyed this article. Check out Affordable Pest Solutions for more.
Excited to share my journey with chiropractic care—it’s been fantastic since starting with an Arlington TX provider! Read more tips on this subject at chiropractor arlington tx
Can we talk about how important regular maintenance is? It can save you so much trouble with appliances later on. Appliance Repair Arlington TX
The journey of recovery requires patience and resilience; inspirational stories can be found on addiction treatment to motivate you along the way.
Great insights on roofing! For anyone in Manteca, roof installation offers top-notch contractors.
For top-notch electrical service in Bluffton, look no further than Summit Services. They are the best! Learn more at Electrician .
This was a great article. Check out emergency shower installation for more.
Appreciate the thorough analysis. For more, visit movers and packers san jose .
Thanks for the valuable insights. More at motor vehicle accident lawyer near me .
Thank you for discussing the importance of neighborhood web optimization! Local seek optimization can enormously assist small firms thrive on-line. More nearby pointers are reachable at Pixel Juice Digital Marketing Glasgow .
Excellent essay on education birds dogs! I completely agree that the secret to success is consistency and compassion. Optimistic reinforcement is one method I’ve found to be particularly effective for promoting desired manners Iron Rod Gundogs
This was very well put together. Discover more at Furnace repair Drexel Hill PA .
The best DeSoto moving companies have great reviews online. Check out DeSoto moving companies for some top-rated suggestions.
I had a power outage, and the Calgary electrician I called was a lifesaver! If you need help, visit commercial electrical panel upgrade for expert advice and service.
Don’t underestimate the power of affordable custom promotional products when building your brand’s image! More info at t shirt logo printing .
This post covers every little thing from supplies to methods; it’s a must-read for any type of Airbnb host– have a look at vrbo cleaning as well!
It’s motivating to read about the success stories from those who have actually sought assistance at depression treatment centers! depression treatment center
For anyone in Hilton Head Island needing electrical services, look no further than Summit Services. They are the best! Emergency electrician
I’m so glad I chose Summit Services for my electrical upgrades—best decision I’ve made on Hilton Head Island! Electrician
It’s amazing how often we overlook garage door maintenance! I recently learned that regular inspections can prevent bigger problems down the line. For those looking for reliable repair services, I recommend visiting garage door technician for more information.
Ordonez Homes is the best realtor I’ve ever worked with. They made the home buying process smooth and enjoyable!
I found the perfect home thanks to Ordonez Homes Ordonez Homes real estate market insights
Many individuals do not realize that drug addiction can take place to anybody, no matter background or status. drug addiction
True Balance Pain Relief Clinic has the best massage therapist. I always leave feeling rejuvenated and relaxed!
I found the perfect massage therapist near me at True Balance Pain Relief Clinic Best massage therapy options near me
I understand your methods on retaining older plumbing programs; that’s a subject that deserves greater cognizance! plumber Dallas
I appreciate the details shared here about drug detox approaches. They can really make a distinction. drug detox
Denver Print Company exceeded my expectations with their yard signs!
I recently ordered yard signs from Denver Print Company and was impressed Denver Print Company location
This was a wonderful post. Check out reliable 24 7 plumber for more.
Walter’s BBQ Southern Kitchen has the best brunch in Pittsburgh. The flavors are incredible!
I love finding a brunch spot near me like Walter’s BBQ Southern Kitchen Walter’s BBQ Southern Kitchen brunch specials
I found this very interesting. Check out airco kopen en laten installeren mitsubishi for more.
This was highly educational. For more, visit Greensboro Auto Glass .
This was very enlightening. For more, visit abogados en Vigo .
” Thankful for all these practical examples; they really clarify complex ideas!” Video production service
It’s never ever too late to begin an alcohol detox program; every day is a new chance! alcohol detox
Can any one put forward a good place for privacy window tinting in my place? Looking for high quality work! residential privacy window tinting New York
Celebrating little turning points throughout one’s time in a rehabilitation center promotes positivity and motivation towards full recovery! # # anyKe yword ## drug rehab
Anyone else excited about the upcoming events in Charlotte? Auto Glass Charlotte
It’s refreshing seeing so many satisfied customers talking positively about their experiences at this company- **#** Oakland car shippers
Thank you for shedding light on the benefits of maintaining a flat roof properly. Excited to learn more at roofing services Cork !
Thanks for the insightful write-up. More like this at exclusive boutique bar NYC .
Can anyone recommend a good pest control service? I’ve heard great things about Auburn Pest Control from friends! Their website is super informative: Auburn Wasp Removal .
Thanks for the thorough analysis. More info at best exterminators in Chester .
It’s interesting how modern technology has improved auto glass repairs—I’m glad to know there are more options available ! windshield repair near me
Thanks for the clear advice. More at trusted kitchen plumbing .
Very informative article. For similar content, visit top pokies with free spins .
Appreciate this insightful post on legal matters related to arrest and bail—check out ## bail bonds near me las vegas nv
Excellent information on training parrot dogs! It’s fascinating to learn how fostering a solid friendship with your puppy is significantly improve their performance on the job. Truly, persistence and endurance are necessary Iron Rod Gun Dogs
Anyone else feel beaten via all of the possibilities when trying to find an #website positioning Company #VancouverWA?? Roofing Contractor Near me
I appreciate the attention to detail at Custom Shirts Boca Raton! They really listen to your ideas and bring them to life. Don’t miss their offerings at personalized tee printing Boca Raton .
The environment at Care Pet Animal Hospital is so welcoming for pets and their owners alike! More information can be found at Veterinarian .
Just had an awesome experience with the vet techs at Care Pet Animal Hospital; they were so gentle with my dog during his exam! Veterinarian
Thanks for the great tips. Discover more at genshin impact top up .
What a comprehensive resource this has turned out to be—I will reference it often! Rodent control company Los Angeles
Helpful suggestions! For more, visit emergency 24 hour plumbing .
Thanks for sharing this successful know-how about strength-effectual recommendations—I’ll desire assistance from an experienced electrician quickly!
Thanks for the comprehensive read. Find more at Auto Glass .
This was a wonderful guide. Check out Charlotte Auto Glass for more.
There’s no reason to suffer alone; reach out to an experienced ### anykeyword### who understands what you’re going through! michael dreishpoon personal injury lawyer
The beauty of hardscaping is that it will be tailor-made to suit any price range or kind selection; there are features for anyone! custom hardscaping Burtonsville
This topic deserves more attention! For those needing legal guidance post-accident, head over to Accident Lawyer !
Thanks for the useful suggestions. Discover more at visitas al centro de ocio educativo .
Just had my air conditioning serviced by Summit Services, and they did a fantastic job! Definitely the best company for AC service around. Visit hvac service near me to learn more!
I appreciate that there are companies like roofing companies near me focusing on quality and certification.
After experiencing several companies for ##HVAC service near me##, I can confidently say that Summit Services is unmatched. hvac repair
Searching for HVAC service near me? Look no further than Summit Services! Their team is knowledgeable and friendly. ac service
Very informative article. For similar content, visit motor vehicle accident lawyer near me .
Nicely done! Find more at casa rural Segovia .
Ordonez Homes is the best realtor I’ve ever worked with. They made the home buying process smooth and enjoyable!
I found the perfect home thanks to Ordonez Homes Tucson realtor recommendations
The upward push of user-generated content material is so fascinating! Encouraging consumers to proportion their reviews can toughen company visibility. Learn more approximately engagement approaches at Pixel Juice Digital Marketing Glasgow .
Denver Print Company exceeded my expectations with their yard signs!
I recently ordered yard signs from Denver Print Company and was impressed yard sign printing discounts
True Balance Pain Relief Clinic has the best massage therapist. I always leave feeling rejuvenated and relaxed!
I found the perfect massage therapist near me at True Balance Pain Relief Clinic Massage and pain relief services near me
Appreciate the comprehensive insights. For more, visit TheWinslo .
Peer support groups are an unbelievable resource for those looking for addiction treatment. Have you tried one? addiction treatment
Walter’s BBQ Southern Kitchen has the best brunch in Pittsburgh. The flavors are incredible!
I love finding a brunch spot near me like Walter’s BBQ Southern Kitchen Brunch near downtown Pittsburgh
I’m curious about holistic approaches to alcohol detox. Have you tried any? Share your experiences at alcohol detox !
Understanding fault determination can be tricky; glad there’s detailed info available at Car Accident Attorney
I found out your analysis of PPC campaigns very effectual! Knowing easy methods to set up budgets efficiently is essential in virtual advertising. More techniques look ahead to you at Digital Marketing Glasgow .
“Gratitude journaling serves as an exceptional tool throughout one’s recovery journey, enhancing positive idea patterns!” # # Anykeyword #. drug rehab
I found this very interesting. For more, visit cheap pest control Chester .
Many people do not understand how widespread eating conditions are; raising awareness is important for prevention and treatment efforts! eating disorder treatment
“It’s essential that we freely talk about different techniques individuals take when looking for recovery solutions tailored fit private needs circumstances checking out variety choices readily available highlighting concepts underlying each approach drug detox
This was a great help. Check out trusted local plumbers for more.
I trust Summit Services for all my electrical needs. They’re the best in Bluffton! Electrician
The reflective nature observed whilst thinking about long-term goals bordering sustainability through conscientious use will certainly no doubt motivate others moving on! ### eniyeKro ###. Duct cleaning Drexel Hill PA
Great suggestions on deciding on the appropriate form of tint for advertisement spaces! Retail window tinting Bronx
That’s fantastic! My guild also made the leap to Manabuy, and it’s been a lifesaver. The community features are great for connecting with other players too. Anyone else love those? For more info, visit top up games instantly !
Legal representatives play pivotal roles negotiating settlements ensuring fair evaluations conducted fairly reflecting true worth incurred based upon damages sustained following accidents experienced firsth Auto Accident
Fantastic introduction of what makes a good household ### ANYKEYWORD #, many thanks for sharing your knowledge! commercial electrical companies calgary
Great points made about leveraging data-driven decisions when crafting an SEO strategy; it’s essential knowledge that every business owner here should have access to—find further insights at SEO Optimization Service Boston
Excellent article! The art of training animal pitbulls has always fascinated me. It’s amazing how perseverance and the right techniques can make a dog a competent area friend Iron Rod Gundogs
From corporate events to community gatherings, having customized gifts ready can elevate your presence—discover fabulous options over on t shirt logo printing !
I found this very interesting. Check out airco laten installeren for more.
“Remarkable review showcasing essential elements concentrating upon critical locations needing upkeep prior inviting novices into areas reserved formerly -uncover recurring conversations focusing on subjects presented routinely located via ###!”. vrbo cleaning
Attending workshops offered by local artisans has been eye-opening; have you joined any classes around here? More info on offerings can be found at Auto Glass !
I love the recommendation on seasonal plumbing maintenance! Very fantastic. Visit plumbers Dallas for more!
Wonderful tips! Find more at Pumps .
The customer service at Greenacres is exceptional! They answered all my questions and put my mind at ease. Local movers Greenacres
Asheville’s unique building codes can be tricky—thankfully, there are amazing local experts! https://www.google.com/maps/place/?q=place_id:ChIJWcJBcYaaxkIRwHALPBFcbsU
Thanks for the great tips. Discover more at abogados Vigo .
Appreciate the insightful article. Find more at Charlotte Auto Glass .
I appreciate a company that stands by its work, and this one definitely does! Highly recommend them! Cork roof inspection
Great service from Summit Services! They truly are the best electrician in Hilton Head Island and worth every penny! More info here: Electrician .
Appreciate your insights about optimizing websites locally—excited about exploring what services are offered by # anyKeyWord#! SEO Lowell
This was a wonderful post. Check out house cleaning for more.
Amazing work done by #yourwebsite# when I needed help unlocking my car! locksmiths durham
Having peace of mind during recovery is invaluable; seek expert representation today through ### anyKeyWord### for reassurance and support. pedestrian accident lawsuit
Valuable information! Discover more at vastu consultant in sydney .
Nicely done! Find more at HVAC Repair Service .
My car looks brand new after using auto glass repair ontario for my auto glass repair!
Who knew plain differences like adding protecting layers may want to lower noise pollution as smartly?I’m loving the quietness!Discover soundproofing merits over at # # anyKeyWord # # anti-break window film NYC
“Illinois has so much potential for real estate investment; finding the right manager is vital.” Kunkel Wittenauer Property management company
Thanks for the insightful write-up. More like this at TheWinslo .
Appreciate the thorough analysis. For more, visit Affordible Pest Solutions .
I enjoyed this post. For additional info, visit best pokies RTP .
Moving is never fun, but with the help of Long distance movers Garland , it became much more manageable!
”Hopeful that continued dialogue encourages further exploration concerning vital industry trends emerging regularly https://www.google.com/maps/place/?q=place_id:ChIJD67YOy_Mfi0RDrzMzn1bPqc
Thanks for the valuable insights. More at Disabled bathrooms .
This was highly useful. For more, visit Greensboro Auto Glass .
Denver Print Company exceeded my expectations with their yard signs!
I recently ordered yard signs from Denver Print Company and was impressed Denver Print Company location
True Balance Pain Relief Clinic has the best massage therapist. I always leave feeling rejuvenated and relaxed!
I found the perfect massage therapist near me at True Balance Pain Relief Clinic Aurora massage therapy experts
Ordonez Homes is the best realtor I’ve ever worked with. They made the home buying process smooth and enjoyable!
I found the perfect home thanks to Ordonez Homes Ordonez Homes real estate listings
Walter’s BBQ Southern Kitchen has the best brunch in Pittsburgh. The flavors are incredible!
I love finding a brunch spot near me like Walter’s BBQ Southern Kitchen Walter’s BBQ Southern Kitchen specials
Профессиональное оборудование для косметологического кабинета для салонов красоты, клиник и частных мастеров. Аппараты для чистки, омоложения, лазерной эпиляции, лифтинга и ухода за кожей.
I discovered a lovely cafe in Breese, IL; perfect for brunch! https://www.google.com/maps/place/?q=place_id:ChIJQyCjW7x5dogRq33FD9XlfxY
Great job! Find more at cheap car hire .
Your submit has impressed me to lastly sort out my domestic’s outdated wiring with a reliable electrician. electrician
Happy which you highlighted signs and symptoms of wished gutter upkeep ; will maintain a watch out ! # # anyKeywor d## Gutter Cleaning Company
Wow, I was really surprised at how affordable the top-up was! It’s refreshing to see a service without hidden fees. Definitely considering using this again. Check out more at genshin impact top up !
It’s distinct how hardscaping can outline spaces to your yard. A neatly-placed keeping wall can in fact increase the design! hardscaping services Burtonsville MD
I lately began researching the world of animal puppy training, and I may claim that it has been incredibly helpful. The expertise these canines develop are impressive, and the relationship between a trainer and their puppy is truly special Iron Rod Gun Dogz
The range offered ensures guests will appreciate choices catering specifically toward their interests too—everyone deserves joy amidst sunny days!” # ### Anykeyword water slide into pool rental
Appreciate the thorough insights. For more, visit Auto Glass Charlotte .
The concept of with the aid of rocks and stones in landscaping is marvelous! I observed a few suitable designs at residential landscaping Burtonsville .
If you’re looking for compassionate and skilled veterinarians, look no further than Care Pet Animal Hospital — simply the best! Veterinarian near me
Well done on highlighting voice search optimization—it’s becoming increasingly important as trends shift toward local searches here in bustling cities like Boston; learn more at Search Engine Marketing Boston !
Have you explored the blessings of xeriscaping? It’s highest for water conservation! More files should be would becould very well be discovered at residential landscaping Burtonsville .
The veterinarians at Care Pet Animal Hospital are knowledgeable and provide excellent advice for pet care! Veterinarian
Thank you, Care Pet Animal Hospital, for providing such exceptional veterinary care for our beloved pets! Veterinarian
Do maximum tree chopping facilities deliver free estimates? That may be positive! tree cutting service
Fantastic tips for maintaining HVAC systems! I’ll definitely be implementing these in my Edwardsville home. https://www.google.com/maps/place/?q=place_id:ChIJTZOJ0g3T2IcRK_dNfAFS524
Appreciate the thorough information. For more, visit loan agency new orleans .
Thanks for the helpful article. More like this at drain plumbers near me .
I enjoyed this read. For more, visit personal injury lawyer .
The seasonal publications you presented are extremely good worthwhile! Time to bookmark tree trimming and pruning Burtonsville !
Your health should come first, but hiring an Injury Lawyer is also vital for your financial recovery.
This is exactly what I needed; planning on getting help from SEO Agency Lowell for local visibility!
This was quite informative. For more, visit casas rurales Segovia .
I to find it captivating how a few organisations use generation to support in trustworthy and useful tree removals! tree removal near me
Sự phát triển của máy xây dựng đã thay đổi hoàn toàn ngành công nghiệp này. Xem thêm tại https://mayxaydunghongthai.com/khung-cau-xoay/ để hiểu rõ hơn!
Việc đầu tư vào máy xây dựng chất lượng là một quyết định sáng suốt cho bất kỳ doanh nghiệp nào. Tìm hiểu thêm tại https://mayxaydunghongthai.com/mua-may-dam-coc-tai-tinh-quang-tri/ .
After experiencing issues with bedbugs, I called Auburn Pest Control, and they were life-savers! Highly recommend their services—check them out at Auburn Pest Control !
Great experience with Summit Services for my HVAC system maintenance—they know what they’re doing! ac service
Does anyone have experiences with alcohol detox centers? I’d love to hear about them! More information can be found at alcohol detox .
This site is an invaluable resource for anyone seeking legal help in Belleville IL. Jason B. Going Personal injury attorney
It’s fantastic to see more resources becoming available for addiction treatment nowadays! addiction treatment
Nicely done! Find more at ferretería en Albacete .
I had no idea that garage door springs could wear out so quickly! After reading this article, I’m definitely going to keep an eye on mine Emergency garage door repair
Sharing knowledge about double medical diagnosis treatment options might greatly benefit those fighting with addiction and mental disorder together! drug rehab
This is very insightful. Check out https://maps.app.goo.gl/aouaj9EYYR6LKPxb7 for more.
Thanks for the great explanation. More info at roof repair near me .
How important do you think incorporating strategies intended promoting strength empowerment self-confidence building crucial part lifelong knowing journeys carried out make sure continued successes preserved kept continuously foster development progress drug detox
It’s vital to recognize that recovery isn’t linear; there will be ups and downs along the method! eating disorder treatment
The role of shopper criticism in shaping advertising tactics shouldn’t be overpassed! It’s mammoth to determine organizations adapting to their audiences. Discover extra approximately it at Pixel Juice Digital Marketing Glasgow .
It’s wise to seek legal advice from a Auto Accident Lawyer early on, especially if injuries are involved.
This was a wonderful guide. Check out TheWinslow for more.
The paver sealing service from Christmas Light Installation Tampa Bay Pressure Washing really brought my outdoor space back to life!
Thanks for the detailed guidance. More at airconditioning installeren .
Hoping others will join me taking steps towards improving homes through sustainable means while also supporting locals economically too! Elite Roofing contractor
**Convenient Online Booking**: The online reservation system is user-friendly, allowing you to browse options and secure your rentals with just a few clicks. This modern approach adds convenience to the planning process. north redington beach bounce house rentals st pete
Thanks for the clear breakdown. More info at indoor air quality testing Huntington .
Don’t hesitate to succeed in out to the experts at Roofing Contractor Near me should you need advice together with your internet site’s scores regionally.
Appreciate the thorough information. For more, visit Chester insect extermination .
“Knowledge is power, and understanding public adjusting gives us that power!” Best Public Adjuster In Arizona
Finding stability among affordability & exceptional continues to be quintessential yet doable(anybody deserves recognize at the same time as attempting support). residential window tinting New York NY
Thanks for the great explanation. More info at bay area long distance movers .
Visiting art studios during open house events showcases incredible talent—do you have a favorite artist from the area? Check out emerging talents highlighted on my site, Greensboro Auto Glass !
I’ve recommended Summit Services to friends and family because they really are the best electricians around! Emergency electrician
Just had my house home windows tinted for privateness, and or not it’s great how so much extra joyful it can be now! privacy window tinting
I’m really inspired with the depth of statistics on this web publication about pipe maintenance; it’s very encouraging for DIYers like me—determine out expert plumber Dallas !
Great job! Discover more at Furnace repair Drexel Hill PA .
Knowing what signs indicate trouble makes all difference when addressing potential issues proactively!!!#anythingElseHere# Cork roofing contractors
Just moved to Calgary and needed some electrical upgrades done. Found an amazing electrician through commercial electrician near me —super happy with the results!
Iron Rod Gun Dogs offers the best bird dog trainer services in Tucson. Their expertise is unmatched!
I’ve never seen results like this before! Iron Rod Gun Dogs truly sets the standard for bird dog trainers Iron Rod Gun Dogz
Very informative article. For similar content, visit abogados Vigo .
This was very enlightening. For more, visit plumbers .
Custom pens and notebooks are classic promotional items that never go out of style! Find yours at custom screen print shirts .
Thanks for outlining the importance of analytics in assessing the effectiveness of SEO strategies—critical for any business in Boston! More info available at SEO Optimization Companies Boston .
Denver Print Company exceeded my expectations with their yard signs!
I recently ordered yard signs from Denver Print Company and was impressed yard sign marketing tips
If you’re in Hilton Head Island and need an electrician, look no further than Summit Services—the best around! Electrician
This strategy in the direction of underlying concerns influencing sanitation resonates deeply with me– I look ahead towards applying what I have actually learned below today & checking out further products offered over @ ###! airbnb turnover
True Balance Pain Relief Clinic has the best massage therapist. I always leave feeling rejuvenated and relaxed!
I found the perfect massage therapist near me at True Balance Pain Relief Clinic CO therapeutic massage services
I love gaining knowledge of new methods technological know-how enhances established existence,and including coatings honestly falls beneath this category!Learn about developments made currently over security window film
Walter’s BBQ Southern Kitchen has the best brunch in Pittsburgh. The flavors are incredible!
I love finding a brunch spot near me like Walter’s BBQ Southern Kitchen Pittsburgh brunch recommendations
Nicely detailed. Discover more at actividades de aventura educativa .
Ordonez Homes is the best realtor I’ve ever worked with. They made the home buying process smooth and enjoyable!
I found the perfect home thanks to Ordonez Homes Ordonez Homes home buying services
Your strategies on constructing a web based group around a logo have been spot on! Engaging buyers fosters loyalty and belief through the years. For extra neighborhood-constructing details, go to Pixel Juice Digital Marketing Glasgow .
If you’re in Hilton Head, don’t hesitate to call Summit Services; they’re simply the best electricians around! Emergency electrician
This was very enlightening. For more, visit home cleaning services near me .
This was highly informative. Check out vastu shastra consultants for more.
For anyone needing key cutting in Durham, I found a great service that’s super affordable. mobile locksmith near me
Excellent points made throughout this piece—I’ll be pursuing services from # anyKeyWord# shortly! Search Engine Marketing Lowell
Appreciate the detailed information. For more, visit trust a trader plumber .
I appreciate these moving tips! Anyone in Dundee should reach out to Best Dundee movers for assistance.
This was highly informative. Check out air conditioning replacement for more.
Great job! Find more at TheWinslo .
Well explained. Discover more at Affordable Pest Solutions .
Such thorough policy cover of electrical security measures—I’ll share this weblog widely, everyone demands it!!! # # anyKey phrase ## local electrician
Appreciate the great suggestions. For more, visit roofers Brandon FL .
I think sharing our struggles with addiction can foster understanding—what’s one thing you’ve learned through your own experience with alcohol detox? Join us in conversation at alcohol detox !
ultimate createporn generator. Create hentai art, porn comics, and NSFW with the best AI porn maker online. Start generating AI porn now!
I discover it useful to read books about others’ experiences with dependency; they provide important insights! addiction treatment
Very useful post. For similar content, visit Meigel Home Improvements – Kitchen & Bathroom Remodeling Company .
Utilizing evidence-based practices within treatment methods boosts overall efficiency in combating addictions successfully!” # # Anykeyword #. drug rehab
As a passionate birds canine instructor, I am aware of the value of developing a lasting bond with our furry friends. Coaching not only improves their abilities but also strengthens our relationship Iron Rod Gun Dogs
Finding expert assistance tailored particularly towards individual requirements really assists navigate intricate feelings connected into establishing much healthier relationships around nutrition/food choices!. ## anyKeyWord #. eating disorder treatment
“Having actually seen firsth drug detox
Appreciate the detailed post. Find more at Local roofing contractors .
I’ve recommended Care Pet Animal Hospital to all my friends because they really are the best when it comes to pet health and wellness in Jacksonville Beach—check them out: Veterinary care .
Incorporating water beneficial properties inside of a established landscape variations the entire ambiance—hardscapes combined with healthy points are enchanting! hardscape design Burtonsville MD
SEO Marketing Boston
Thanks for the thorough analysis. Find more at Hearn Personal Injury & Car Accident Attorneys .
The community of chiropractors in Arlington TX is so supportive! More info can be found at chiropractors arlington tx .
This was highly educational. More at casas rurales Segovia .
I’ve been researching various methods for controlling extreme dogs, and I came across some fascinating insights into efficient training techniques Aggressive Dog Rehabilitation
Appreciate the comprehensive advice. For more, visit ferretería en Albacete .
Thanks for the great tips. Discover more at Sani-flo .
Useful advice! For more, visit long distance movers .
Thanks for the practical tips. More at residential roofing .
Just had my air conditioning serviced by Summit Services, and it’s working better than ever! Great job guys! hvac service near me
Denver Print Company exceeded my expectations with their yard signs!
I recently ordered yard signs from Denver Print Company and was impressed yard sign suppliers
The magnitude of pass-channel advertising is probably lost sight of, however your article highlighted its magnitude fantastically! A cohesive technique is vital for fulfillment across platforms, find out more at Pixel Juice SEO .
Just got my air conditioning repaired by Summit Services, and I’m thrilled with the outcome! They are truly experts in HVAC repair in Bluffton and Hilton Head Island. Visit Air conditioning repair !
True Balance Pain Relief Clinic has the best massage therapist. I always leave feeling rejuvenated and relaxed!
I found the perfect massage therapist near me at True Balance Pain Relief Clinic Aurora
Your blog truly demystifies the whole roofing process—so grateful for that! More information awaits me at roofing contractors !
Thank you for discussing the benefits of effective SEO strategies—looking into services from # anyKeyWord#! SEO Optimization Service Lowell
Can’t recommend Summit Services enough for anyone needing dependable AC repair in Hilton Head Island—fantastic work every time! Air conditioning repair
Love reading reviews from other pet owners about their stays at hotels listed on # # any Keyword ##! myrtle beach travel agency
Walter’s BBQ Southern Kitchen has the best brunch in Pittsburgh. The flavors are incredible!
I love finding a brunch spot near me like Walter’s BBQ Southern Kitchen Walter’s BBQ Southern Kitchen brunch for groups
установка септика на даче под ключ http://www.septik-pod-klyuch-1.ru .
Thanks for the detailed post. Find more at trendy NYC private room bars .
Thanks for the great tips. Discover more at san jose long distance movers .
Is it worth it to hire a property management company if you only have one rental? I’m curious about experiences! https://www.google.com/maps/place/?q=place_id:ChIJ20MPOgADdogR6UapmrqvWTc
The idea of using fun characters and stories during dental visits is brilliant! Kids will look forward to their appointments! kids dentist near me
Cảm ơn vì đã chia sẻ nhiều thông tin bổ ích về máy xây dựng, tôi đã tìm thấy nhiều điều thú vị từ https://mayxaydunghongthai.com/top-8-may-toi-dien-500kg-gia-re/ .
консультация юриста ищу юриста для бесплатной консультации по телефону
This was a fantastic resource. Check out Blocked sinks Macerators for more.
Ordonez Homes is the best realtor I’ve ever worked with. They made the home buying process smooth and enjoyable!
I found the perfect home thanks to Ordonez Homes Ordonez Homes property evaluation
The guide you furnished on making a choice on correct piping parts is considered necessary awareness—the properly resolution makes all the big difference—greater information possible at affordable plumber Dallas !
This was highly helpful. For more, visit Afordable Pest Solutions .
Có nhiều loại máy xây dựng phục vụ cho các nhu cầu khác nhau, hãy khám phá danh sách tại https://mayxaydunghongthai.com/may-toi-xay-dung/ nhé!
I’ve been meaning to replace my old garage door opener—any suggestions on what’s best around here? https://www.google.com/maps/place/?q=place_id:ChIJ8yHTAHM9TIYRnh5vboYaFQs
Looks like there are many skilled flat roofers serving the Cork area—excited to explore my options now! new roof Cork
Noticed some plumbing issues lately? Don’t hesitate; call a trusted plumber from O’Fallon today! https://www.google.com/maps/place/?q=place_id:ChIJD67YOy_Mfi0RDrzMzn1bPqc
I found this very interesting. Check out airco bedrijf in de buurt for more.
Paris is always a classic choice, but I love that you mentioned lesser-known places too! travel agency laurel
If you’re serious about improving your financial strategies, consider the outstanding CFO services at Sas Prinzivalli CPA P.A! CFO
Thanks for the insightful write-up. More like this at bufete abogados Vigo .
If you’re dealing with flickering lights or faulty outlets, call a Calgary electrician you can trust! Look into commercial concealed permit for reliable options.
Just had dinner at a restaurant in Breese, IL, and the food was delicious! https://www.google.com/maps/place/?q=place_id:ChIJQyCjW7x5dogRq33FD9XlfxY
I just came across a thought-provoking essay on how to train bird dogs, and I don’t agree more with the focus on fostering a solid bond between the dog and the consultant. Establishing trust is essential to effective education Ironrod Gun Dogs
Anyone else have great experiences with Summit Services? They’re definitely my preferred ##Electrician## on Hilton Head Island! Emergency electrician
It’s interesting how modern technology has improved auto glass repairs—I’m glad to know there are more options available ! auto glass repair huntington beach ca
Just had my home treated by Auburn Pest Control, and I’m so relieved! Their team was knowledgeable and friendly. Visit their site for more info: Auburn exterminator .
I love the range of custom promotional products available in Canada! There’s something for every industry at custom screen print shirts .
Love sharing discoveries made along way ; let others join excitement fueled spontaneity brought forth through links shared below : % myrtle beach travel agent
I appreciated this article. For more, visit commercial moving company .
The safety regulations surrounding installation really give peace of mind—thankful we have such strict standards here. google.com
I appreciate the concentrate on eco-friendly cleansing items! Sustainability is type in today’s market. Discover extra at airbnb turnover .
Thanks for the great explanation. Find more at Boiler replacement .
Grateful witnessing growth emerging partnerships formed amongst organizations committed uplifting communities collectively find innovative solutions pressing concerns impacting everyone involved!! Cosmetic Dentist
I’ve used several electricians in my time, but none compare to Summit Services—best on Hilton Head Island without a doubt! Electrician near me
Took long satisfactory arrive conclusion yet excitedly assume closing outcomes forward(extra posts showcasing achievement testimonies please)! home window tinting NYC
Thanks for the useful post. More like this at affordable drain cleaning near me .
Kudos on tackling such a sensitive subject effectively—that kind of information helps people seeking aid from bail bondsman las vegas nv
Nothing beats the experience of staying in a local neighborhood through vacation rentals! You get to live like a local and find hidden gems. Check out the options at rentals vacation homes !
Thanks for the great tips. Discover more at vastu consultant near me .
When I needed my locks changed, the local #chester le street locksmith# did an excellent job. locksmith durham
Local link building is essential for visibility in Boston’s crowded market—learn how at SEO Optimization Service Boston !
Nutrition plays a vital role in recovery after alcohol detox. What are some foods that helped you? Discover tips at alcohol detox .
The wet season is coming, and I want to get my gutters cleaned. Good reminder! Gutter Cleaning Tacoma
Loved your tackle sustainable vitality solutions; there’s so much electricians can do for green residences!!! # # anyKey phrase ## electrician near me
“Your insights into local law practices are invaluable for residents of Belleville!” Best Lawyers in Belleville IL
I liked this article. For additional info, visit https://pixabay.com/users/50778884/ .
Commemorating variety in techniques to treating dependencies assists us discover services that work for everyone included. # #anyKeyword ##. addiction treatment
Appreciate the helpful advice. For more, visit TheWinslo .
Thanks for the comprehensive read. Find more at Affordable Pest Solutions .
Loved this post about boosting online visibility; looking forward to connecting with SEO Optimization Agency Lowell !
I appreciated this post. Check out eventos en centro de ocio educativo for more.
The insights provided by Sas Prinzivalli CPA P.A as part of their CFO services have been invaluable! CFO
I found this very helpful. For additional info, visit motor vehicle accident lawyer near me .
If you’re planning on moving soon, make sure you consider a reliable Casselberry moving company from the suggestions found at Casselberry Mover’s !
Communicating openly revealing worries insecurities surrounding topics addressed herein supplies relief confirms experiences shared showing indispensable steps taken collectively toward brighter futures visualized collectively together eventually!! eating disorder treatment
Anyone else experience that even residential residences may perhaps improvement widely from those strategies shared?!#ResidentialBenefits###answeryes Professional window tinting for buildings in NYC
What are the very best practices for an effective drug detox? I’m trying to find recommendations! I discovered some great information at drug detox .
It’s amazing how often we overlook garage door maintenance! I recently learned that regular inspections can prevent bigger problems down the line. For those looking for reliable repair services, I recommend visiting commercial garage door repair for more information.
Denver Print Company exceeded my expectations with their yard signs!
I recently ordered yard signs from Denver Print Company and was impressed yard sign printing discounts
ultimate createporn generator. Create hentai art, porn comics, and NSFW with the best AI porn maker online. Start generating AI porn now!
True Balance Pain Relief Clinic has the best massage therapist. I always leave feeling rejuvenated and relaxed!
I found the perfect massage therapist near me at True Balance Pain Relief Clinic Massage therapy for stress relief in Aurora
Walter’s BBQ Southern Kitchen has the best brunch in Pittsburgh. The flavors are incredible!
I love finding a brunch spot near me like Walter’s BBQ Southern Kitchen Brunch recommendations Pittsburgh
I love the flexibility that vacation rentals provide! You can choose from beach houses to mountain lodges. For amazing deals, visit vacation rentals georgetown tx !
Ordonez Homes is the best realtor I’ve ever worked with. They made the home buying process smooth and enjoyable!
I found the perfect home thanks to Ordonez Homes Tucson property valuation
Thanks for the great information. More at casas rurales Segovia .
Your perspectives on birds puppy instruction definitely made me smile! It’s intriguing to see how the interaction between the dog and the instructor may improve their performance on the job Iron Rod Gun Dogs
The quality of care at Care Pet Animal Hospital is outstanding; I always feel confident leaving my pets with them! Veterinarian
Appreciate the great suggestions. For more, visit ferretería .
Helpful suggestions! For more, visit plumbing services near me .
ร้านนี้คือที่สุดของความสนุก! OMG ONE MORE GLASS SAI1 ขอบอกเลยว่าต้องไปลอง ร้านนั่งชิลสาย1
This was a wonderful post. Check out average plumber prices for more.
I just read an insightful post on managing hostile canine behavior, and I wanted to share my thoughts. Dog users must be aware that hostility frequently has a root in fear or anxiety. Correct coaching techniques can make a dog’s behaviour a lot better Canine Aggression Expert
Your article about cell advertising and marketing tendencies became very enlightening! It’s primary to reach buyers on their gadgets. Check out more insights at Pixel Juice Digital Marketing Glasgow .
Very pleased with the HVAC service provided by Summit Services; they exceeded my expectations! Air conditioning repair
Navigating recovery can be tough without proper support like that offered by chiropractors discovered through # # anyKeyWord ## Premier Injury Clinics Farmers Branch – Auto Accident Chiropractic
Great information about how solar panels affect roofing decisions—we need more awareness on this topic! roof installation
” Reading due to those information appears like having an knowledgeable walk along me all the way through projects—which instills self assurance shifting ahead # # anyKeyWord # plumbers Dallas
If you’re in Bluffton and need HVAC service near me, definitely reach out to Summit Services; they’re the best! hvac repair
How do you stay motivated when working remotely? Share your secrets with fellow travelers at myrtle beach travel agency !
Valuable information! Discover more at Excavation New Jersey LLC .
Appreciate the useful tips. For more, visit Electric showers Power Showers .
Very useful post. For similar content, visit corporate BBQ catering near me .
Thanks for sharing this informative post about local citations; they’re fundamental to boosting visibility here in Boston—see what else you can learn at Marketing SEO Companies Boston !
If anyone’s looking for quality AC service, look no further than Summit Services—they will not disappoint you! hvac repair
Thanks for the practical tips. More at LuxNeuro .
It’s fascinating how dental health can influence overall well-being in children. Regular check-ups are key! braces dentist near me
Excellent article on fixing door doors! Maintaining your garage door in good shape is a critical component of home repair, despite the fact that it frequently gets overlooked for both protection and ease The Meadows garage door repair services
Thanks for the valuable article. More at airco kopen en laten installeren daikin .
Looking for a different excursion journey? MasterKey Vacation Rentals has some appropriate techniques! Their customer support used to be also great. vacation rentals destin fl
I appreciated this article. For more, visit abogados en Vigo .
Weekend photography trips help me capture stunning landscapes and moments! Check out photography spots at laurel travel agent !
Their attention to detail in delivering CFO services is what sets Sas Prinzivalli CPA P.A apart from others in the field! CFO Services
I love how hardscaping allows for creativity in landscaping design. You can really specific your non-public kind! stone patios Burtonsville MD
If you’re searching for an electrician you can trust in Bluffton, look no further than Summit Services! More information available at Electrician .
Every driver should read this article—it might save them some hassle down the road! Kudos, #ANYKEYWORD#! auto glass replacement ontario
Thanks for sharing those landscaping methods! I’ve learned loads already—greater hints readily available at residential landscaping Burtonsville .
A properly tree slicing service can become your outdoor space—can’t wait to determine what they do for my backyard! tree cutting and removal Burtonsville
I’m thrilled with the service from BlckPanda Creative Dallas! My Google ranking has boosted my business tremendously—what a difference it makes! Discover how they did it at seo services .
This was quite informative. For more, visit https://files.fm/u/wh9tvp6qtf#design .
Exploring historic neighborhoods provides a glimpse into life as it once was—what district left an impression on you during your travels recently? Connect over historical walks across cities by sharing thoughts on them via links found here: ### travel agent myrtle beach
Your breakdown of different types of dental specialists is super helpful! Learn more about them at Emergency Dental Care !
Incorporating native flora into landscaping not in simple terms is helping the environment however also makes preservation more uncomplicated—find out more about local gardening procedures on our web page, patio design Burtonsville MD !
Appreciate the thorough insights. For more, visit car hire .
I enjoyed this article. Check out my plumber reviews for more.
It’s mind-blowing how much tree trimming can improve aesthetics and security within the yard! Check out tree trimming Burtonsville MD for skilled guidelines!
Great tips about upgrading historic wiring—having a certified electrician control that is so extraordinary for homestead security!! electrician near me
I just began to train my personal birds puppy, and I’ve discovered that the essential to regularity and endurance are. How quickly they pick up commands when you give them engaging coaching is fascinating Iron Rod Gundogs
Support groups can make a big difference during alcohol detox. Have any recommendations? Check out alcohol detox for more info!
So grateful for the excellent job that Summit Services did on my home’s electrical system—thank you! Emergency electrician
Addiction treatment isn’t a one-size-fits-all approach; it is necessary to discover what works for you! addiction treatment
Stump grinding is a superb manner to end off after a tree has been removed utterly! emergency tree removal Burtonsville
Traveling with pets? Many vacation rentals are pet-friendly, making it easier to bring your furry friends along! Find pet-friendly options at vacation rentals branson mo .
I had a fantastic experience with Kerner Law Group, P.C. as my Bronx car accident attorney!
Kerner Law Group, P.C. truly stands out as the best Bronx car accident lawyer I’ve ever worked with Uber accident lawyer Bronx
Denver Print Company exceeded my expectations with their yard signs!
I recently ordered yard signs from Denver Print Company and was impressed yard sign suppliers
This was very enlightening. For more, visit loan agency new orleans .
Ultimate convenience provided by mobile options available through #yourwebsite#! locksmiths durham
True Balance Pain Relief Clinic has the best massage therapist. I always leave feeling rejuvenated and relaxed!
I found the perfect massage therapist near me at True Balance Pain Relief Clinic True Balance Pain Relief Clinic pain relief solutions
This was quite helpful. For more, visit find a plumber .
What are some reliable ways to encourage someone considering rehab? It’s a huge action, however worth it for recovery! drug rehab
Walter’s BBQ Southern Kitchen has the best brunch in Pittsburgh. The flavors are incredible!
I love finding a brunch spot near me like Walter’s BBQ Southern Kitchen Brunch recommendations Pittsburgh
This was highly useful. For more, visit motor vehicle accident attorney .
Your discussion on user permissions within access controls was enlightening; check out similar content at Access Control Installation !
Thank you for discussing the role of nutrition in oral health—I appreciate the effort in covering this essential area too! Explore further details at Emergency Dental Care !
Nicely done! Find more at reliable professional excavators New Jersey .
Nutrition education plays a significant role in recovery from eating conditions; comprehending food is empowering! eating disorder treatment
Great job! Discover more at Walters Barbecue Southern Kitchen .
Ordonez Homes is the best realtor I’ve ever worked with. They made the home buying process smooth and enjoyable!
I found the perfect home thanks to Ordonez Homes Ordonez Homes property experts
I enjoyed this article. Check out LuxNuro for more.
“Why do so many people struggle even after completing a program successfully? Checking out hidden factors might shed light– for much deeper analysis check out conversations around it via #Anykeyword #.”. drug detox
Finding ideas that beautify equally aesthetics & well-being inside buildings might be powerful; happily discovered all considered necessary data related to it here: # # anyKeyw ord###!! best residential window tint company in NYC
Daniella Levi & Associates, P.C. truly excels as a Bronx car accident attorney. Their expertise made a significant difference in my case outcome.
If you need a Bronx car accident lawyer, I highly recommend Daniella Levi & Associates, P.C bronx car accident attorney
Hats off towards producing such thoughtful content—clearly much effort went into crafting something valuable like this!! google.com
Appreciate the detailed information. For more, visit casas rurales Segovia .
Thanks for the thorough analysis. More info at ferretería cerca de mí .
Smart tint is desirable for holding temperature management in properties! Learn extra advantages at smart tint New York NY .
Got my annual plumbing inspection done by an awesome team from O’Fallon; they were thorough and professional! https://www.google.com/maps/place/?q=place_id:ChIJD67YOy_Mfi0RDrzMzn1bPqc
Impressed with the CFO services from Sas Prinzivalli CPA P.A! They know how to optimize resources effectively. CFO Services
I stumbled upon the awesome offerings of an search engine marketing Company close me also known as Roofing Contractor Hired Guns Roofing & Restoration —so glad I did!
Has anyone used Office moving companies Lulu for their international move? I’m looking for recommendations!
If you’re looking for top-notch veterinary care, look no further than Care Pet Animal Hospital! They treat your pets like family. Veterinarian
Just returned from a wonderful trip where we rented a cozy cabin. It made our vacation so much more enjoyable! Don’t miss out on great listings at best vacation rental property management .
บรรยากาศของร้าน OMG OneMoreGlass ทำให้รู้สึกเหมือนอยู่กับเพื่อนเก่าๆ เลย! ร้านชิลวันเกิด สาย1
Wonderful tips! Find more at Taps .
Don’t underestimate the force of adding protecting layers like exceptional window films—you’ll consider safer without delay after install—assess selections on anti-break window film NYC !
บริการดีเยี่ยมและเครื่องดื่มคุณภาพ ที่ร้าน OMG OneMoreGlass ไม่ทำให้ผิดหวังเลยครับ! ร้านเหล้าจัดวันเกิด สาย1
Every interaction I’ve had with Care Pet Animal Hospital has been positive—they truly excel at what they do! Veterinarian
I found this very interesting. For more, visit shower drainage solutions .
My experience with BlckPanda Creative Dallas has been nothing short of amazing! My website’s Google ranking improved tremendously, and my business is thriving. Discover more at dallas seo .
So grateful to have found Care Pet Animal Hospital in Jacksonville Beach! Their veterinary care is exceptional and always reliable. Check it out: Veterinarian near me .
Can anyone recommend a family-friendly restaurant in Breese? https://www.google.com/maps/place/?q=place_id:ChIJQyCjW7x5dogRq33FD9XlfxY
” Reading by way of these data feels like having an knowledgeable stroll along me in the course of tasks—which instills self assurance moving ahead # # anyKeyWord # plumbing company Dallas
Your discussion on influencer advertising and marketing is so crucial as we speak! Collaborating with the exact influencers can make a vast distinction. More strategies in this at Pixel Juice Glagsow .
Super thrilled about discovering these insights will share them widely with family/friends needing help finding reliable roofers!!! Much appreciated!!!## anyKeyWord ## roofing services
Saya sangat tertarik melihat bagaimana kerja sama antara pengembang dan brokers/property agents berlangsung?? !# anykeyword # rumah dijual Jakarta Timur
Sự phát triển của máy xây dựng đã thay đổi hoàn toàn ngành công nghiệp này. Xem thêm tại https://mayxaydunghongthai.com/mua-may-dam-coc-tai-tinh-quang-binh/ để hiểu rõ hơn!
This is such valuable information for homeowners! Keeping up with our HVAC is key in Edwardsville. DMAKS HVAC contractor
The insights that were shared in this article regarding hostile puppy coaching are invaluable. Every dog has its own special personality and background, so it’s crucial to understand that a particular technique is necessary for success dog bite prevention training
This was very well put together. Discover more at erkende airco installateur .
If you need ##HVAC repair##, I highly recommend Summit Services! They have excellent customer service. Air conditioning repair
Các loại máy xây dựng mới ra mắt gần đây thật sự ấn tượng! Tôi đã tìm thấy nhiều thông tin hữu ích trên https://mayxaydunghongthai.com/phu-kien-may-cat-be-tong/ .
Thanks for the thorough analysis. More info at reliable plumbers near me .
I wish I had discovered the benefits of using a travel budget calculator earlier—it would have saved me so much hassle; find one at travel agency myrtle beach !
Thanks for the detailed guidance. More at Excavating NJ LLC .
Thanks for the thorough analysis. More info at Walters Barbecue Southern Kitchen .
Awesome article! Discover more at LuxNuro .
If you’re looking for reliable HVAC service near me, Summit Services is the way to go! Highly recommend them for all your AC needs. hvac repair
If you are in quest of a good plumber, I rather put forward Quality Belmont Plumber . They have the highest plumbers in Belmont!
Searching for least expensive options? Look into ##AffordableLeakDetectionPerth##; they supply extraordinary costs with out compromising fine. Leak Detection service Perth
Teaching kids the importance of regular dental check-ups helps them understand self-care from an early age! pediatric dentist
Don’t underestimate the magnitude of ordinary ##Security System Maintenance Perth##; it is able to save you from steeply-priced repairs down the road. Perth Security Systems Service
Just accomplished my #Workplace Electrical Audit Perth#, and I’m thankful for each of the insights the auditors provided! Electrical audit services Perth
Don’tforgettoresearchpotentialrepresentativesbeforecommitting-ensuringfitmakesalldifferencewhenitcomestodealingwithseriousmattersrequiringknowledgeableguidancealongtheway-inbellevilleill!!! https://www.google.com/maps/place/?q=place_id:ChIJ966uXtmp2IcR2ZTbIgn6w6M
I had my aircon procedure replaced via ##CanningValeAirConditioning##, and that they did an marvelous process. Fast and pro service! Expert Air Conditioning Canning Vale
ชอบที่ OMG OneMoreGlass มีดนตรีสดให้ฟังด้วย ดีต่อใจจริงๆ! ร้านเหล้าหนุ่มหล่อ สาย1
I appreciate how well the local roofers communicated throughout my roofing project. Best Roofers in Litchfield IL
Vacation rentals often provide amenities that hotels simply can’t match, like kitchens and outdoor spaces. For the best choices, check out rentals vacation near destin !
Denver Print Company exceeded my expectations with their yard signs!
I recently ordered yard signs from Denver Print Company and was impressed Denver custom yard signs
Anyone else love visiting wineries? Napa Valley is one of the best spots for wine lovers—it’s truly picturesque; find more culinary journeys via laurel travel agency
True Balance Pain Relief Clinic has the best massage therapist. I always leave feeling rejuvenated and relaxed!
I found the perfect massage therapist near me at True Balance Pain Relief Clinic Massage therapy for relaxation near me
Walter’s BBQ Southern Kitchen has the best brunch in Pittsburgh. The flavors are incredible!
I love finding a brunch spot near me like Walter’s BBQ Southern Kitchen Brunch places open now near me
Thank you, BlckPanda Creative Dallas! Your strategies have helped me climb the Google rankings and grow my customer base rapidly! Read more about it at seo company .
I was impressed by how quickly Summit Services responded to my call for help. They are the best electricians in Bluffton! Emergency electrician
Navigating finances has never been easier thanks to the expert advice from Sas Prinzivalli CPA P.A’s CFO services! Fractional CFO
Thanks for the useful suggestions. Discover more at https://taplink.cc/albiustssv .
Ordonez Homes is the best realtor I’ve ever worked with. They made the home buying process smooth and enjoyable!
I found the perfect home thanks to Ordonez Homes Ordonez Homes real estate consultation
Very informative about residential as opposed to advertisement electricians—invariably more beneficial to employ a specialized electrician Mesquite whilst needed!
Appreciate the comprehensive advice. For more, visit Radiators .
The function of nutrition and workout in healing from dependency should not be neglected– both are vital! addiction treatment
I appreciate your focus on mental wellness while traveling—it’s just as important as physical safety too! Find wellness strategies at myrtle beach travel agent .
After trying to fix my garage door myself and failing miserably, I decided to call in the pros. It made all the difference! If you’re in a similar situation, don’t hesitate to visit garage door technician for professional repair services and advice.
Thank you for going over relapse triggers and methods for managing them effectively throughout rehabilitation!” # # anyKeyWord # drug rehab
Here’s hoping this discussion continues thriving grows deeper richer fuller encompassing broader perspectives encompassing multifaceted dimensions complex realities multifarious experiences diverse backgrounds philosophies ideologies beliefs attitudes American Garage Door Repairs
ชอบบรรยากาศเปิดโล่งของร้าน OMG OneMoreGlass มาก อากาศดีสุดๆ ! ร้านเหล้าสาย1 ดนตรีสด
The team at BlckPanda Creative Dallas really knows how to elevate your online presence; thanks to them, my Google ranking is fantastic right now—check it out at seo !
Knowing celebrate diversity throughout bodies shapes sizes contributes positively strengthening message charm exists beyond narrow confines specified society!!! #AnyKeyWord #. eating disorder treatment
ชอบบรรยากาศเปิดโล่งของร้าน OMG OneMoreGlass มาก อากาศดีสุดๆ ! สถานที่เที่ยวกลางคืนสาย1
Great understandings on picking the right roofer! It’s so important to do your research. For those looking for even more tips, take a look at roofing contractors near me for important sources.
Appreciate the detailed insights. For more, visit water leaks plumbing solutions .
Summit Services offers top-notch electrical service at affordable prices – can’t recommend them enough! Electrician
. Truly appreciated this thorough examination around brand consistency—it’s evident there are numerous benefits awaiting once aided effectively alongside options featured via # anYKeYword # !! Franchise SEO Dublin
“It’s interesting experiencing improvements happening among individuals devoted dedicative efforts align values beliefs actions planned outcomes cultivate spaces conducive favorable environments foster belonging conjure up harmony peace happiness drug detox
If you’re considering a getaway, vacation rentals are the best! They offer unique experiences and often come with local charm. Explore your choices at vacation rentals key west !
Anyone else have positive experiences with their local #mobile mechanic durham#? Let’s hear them! locksmiths durham
Anyone else notice how many new Palatka moving companies have popped up recently? Great for competition! Bostwick Mover’s
This was very enlightening. For more, visit Excavating New Jersey LLC .
I liked this article. For additional info, visit Walters Barbecue Southern Kitchen .
Fantastic post! Discover more at comprehensive brain therapy in Denver .
This is precisely the quite recordsdata we want as home owners in Tacoma—thank you! Eavestrough Cleaning
The lawyers at dog bite lawyer irvine have a great track record with personal injury cases—definitely worth considering!
สุดท้ายนี้ ขอบคุณร้านOMG OneMoreGlass ที่ทำให้การออกไปเที่ยวสนุกอย่างนี้นะครับ # #anyKeyword## ร้านชิลสาย1
Thanks for the insightful write-up. More like this at Appliance repairs .
Truly inspired after reading everything presented herein thus eager share amongst family/friends needing similar guidance themselves too!!!!! roofing companies near me
Wonderful tips! Discover more at https://500px.com/p/felikbreeseqo574nublz .
Nicely done! Find more at airco kopen en laten installeren mitsubishi .
Don’t overlook the importance of strong financial management—check out the amazing CFO services at Sas Prinzivalli CPA P.A today! Fractional CFO
Denver Print Company exceeded my expectations with their yard signs!
I recently ordered yard signs from Denver Print Company and was impressed local printing companies
True Balance Pain Relief Clinic has the best massage therapist. I always leave feeling rejuvenated and relaxed!
I found the perfect massage therapist near me at True Balance Pain Relief Clinic Natural pain relief solutions in Aurora
Just attended a seminar approximately SEO most competitive practices and the magnitude of finding a magnificent Roofing Contractor Near me in Vancouver!
My experience with Care Pet Animal Hospital has been fantastic; their attention to detail is impressive! Veterinarian
Saya telah bekerja sama dengan beberapa agen properti di Jakarta dan hasilnya memuaskan! beli rumah second Jakarta
This was quite enlightening. Check out underfloor heating service for more.
Walter’s BBQ Southern Kitchen has the best brunch in Pittsburgh. The flavors are incredible!
I love finding a brunch spot near me like Walter’s BBQ Southern Kitchen Walter’s BBQ Southern Kitchen brunch reservations
I’ve found that addressing puppy hostility is crucial to ensuring a healthy and harmonious atmosphere for both their owners and their families professional dog aggression training Gilbert AZ
BlckPanda Creative Dallas has truly changed the game for my online business! My Google ranking has improved, and profits are up! Learn how at seo .
Just started using a travel budget calculator and I’m already seeing the benefits! Check out travel agent myrtle beach for more resources.
Thanks for breaking down the role of a Public Adjuster; very helpful for us Arizonans! Best Public Adjuster In Arizona
Ordonez Homes is the best realtor I’ve ever worked with. They made the home buying process smooth and enjoyable!
I found the perfect home thanks to Ordonez Homes Ordonez Homes real estate opportunities
เยี่ยมชมร้าน OMG OneMoreGlass แล้วรู้สึกว่าสถานที่นี้คือสวรรค์ของคนรักเหล้า! ร้านชิลสาย1
ฉันชอบเพลงที่เล่นในร้าน OMG ONE MORE GLASS SAI1 มาก มันทำให้รู้สึกมีชีวิตชีวา ผับจัดวันเกิด สาย1
This is quite enlightening. Check out BBQ Catering Ideas for more.
Thanks for the insightful write-up. More like this at Excavating New Jersey LLC .
Such an eye-opener regarding liability after accidents due to poor visibility from damaged windows !! #Anykeyword# car window repair near me
I think it’s wonderful when dentists incorporate technology to make visits more interactive for kids. Innovation is key! kids dental office
Wonderful tips! Find more at LuxeNeuro .
I can’t believe how quickly Summit Services fixed my HVAC issues! They are truly the best in Bluffton! ac service
Thankful acknowledging diversity perspectives represented across spectrum healthcare interactions!! Emphasizing value inclusion enriches overall understanding experiences shared!!! Dentist Port St Lucie
Thanks for shedding light on this topic! What should I expect from a property management company in Illinois? https://www.google.com/maps/place/?q=place_id:ChIJ20MPOgADdogR6UapmrqvWTc
Wonderful insights on selecting the appropriate roofing contractor! It’s so important to do your study. For those seeking even more suggestions, have a look at roofing contractors near me for valuable resources.
Exploring ancient ruins in Greece was like stepping back in time—it’s such a rich culture! More historical travels at travel agent laurel !
Knowing how they handle negative feedback or issues is crucial for long-term collaboration as well# # anyKey word ## Webjuice SEO
I recently discovered a fantastic hairdresser close to where I had totally transformed my appearance. It’s remarkable how a good hair is increase your self-assurance men’s haircut
Learning proper techniques along way can yield fruitful results leading happier outcomes overall while addressing concerns related plumbing matters h https://www.google.com/maps/place/?q=place_id:ChIJD67YOy_Mfi0RDrzMzn1bPqc
This piece covers so many essentials concerning senior dentistry needs ; often overlooked yet equally important aspect in healthcare discussions ! Learn more supportive strategies by visiting visit at ### any Keyword### … Dental Implants
I have actually learned a lot about building durability while navigating my own course toward sobriety; understanding genuinely empowers development along this journey we share together here today too # any Keyword ## addiction treatment
Sharing knowledge about double medical diagnosis treatment options could considerably benefit those struggling with addiction and mental illness together! drug rehab
Just came across MasterKey Vacation Rentals, and I’m blown away by their preference! Perfect for families or couples on the lookout for a getaway. vacation rental property management system
Summit Services did an amazing job at my home. They really are the best electrician in Bluffton! Electrician
Savoring traditional Austrian schnitzel while exploring Vienna enriched my culinary journey there—it’s mouthwatering delight!, get dining guides on ####AnyKeyWord### myrtle beach travel agency
Thanks for the clear breakdown. More info at Boiler installation .
This was very beneficial. For more, visit commercial plumbing specialists .
It’s inspiring to see people overcome their struggles with alcohol. Detox is just the beginning! Learn more at alcohol detox .
Just finished a project with Summit Services on Hilton Head Island, and I’m thrilled with the results—they’re the best! Emergency electrician
หากใครกำลังมองหาร้านเหล้าในกรุงเทพฯ ขอแนะนำให้ไปลองที่OMG OneMoreGlass กันนะครับ ! # #anyKeyword## ผับแอนด์เรสเตอรองท์ สาย1
This was a great help. Check out dog boarding service for more.
I love supporting local businesses, especially restaurants that offer unique menus in Breese IL. Eddie’s Rise N’ Dine Restaurant
Anyone else feel like their HVAC systems are working overtime during Illinois summers? Tips needed! https://www.google.com/maps/place/?q=place_id:ChIJTZOJ0g3T2IcRK_dNfAFS524
Highly recommend Sas Prinzivalli CPA P.A for anyone in need of professional CFO services! You won’t regret it! CFO
The journey of drug detox is not easy, however it’s worth every effort. Discover inspiration at drug detox .
Nicely detailed. Discover more at personal injury doctor near me .
Huge thanks to the talented folks over at BlckPanda Creative Dallas; they not only boosted my site’s SEO but helped me grow my overall business too—check it out: seo !
If you’re looking for the best electrical services in Hilton Head Island, you can’t go wrong with Summit Services! Check them out at Electrician near me .
Just wanted to share how grateful I am to BlckPanda Creative Dallas! My Google ranking has improved so much that I’ve seen a huge increase in clients. Details at seo dallas .
This was highly useful. For more, visit cheap BBQ catering services .
Well done! Find more at experienced excavation staff NJ .
I appreciate the tips on choosing the right lawyer in Belleville IL—very insightful! Jason B. Going Personal injury attorney
This was beautifully organized. Discover more at LuxeNeuro .
This was very insightful. Check out Best roofers near me for more.
Just booked my next trip through a vacation rental site, and I can’t wait! They have such diverse properties available. If you’re looking for inspiration, head to vacation rental property management services !
Weather can be harsh on roofs—thankful for the skilled roofers in Litchfield, IL who keep our homes safe! Best Roofers in Litchfield IL
Appreciate the detailed insights. For more, visit airconditioning installateurs .
Thank you for discussing the connection between oral and overall health! More information can be explored at emergency dental services .
The role of social media in real estate marketing is so crucial nowadays! best realtor near me
This article really opened my eyes to the different roofing products available. For anybody taking into consideration a roofing upgrade, most definitely take a look at roofing contractors near me for experienced recommendations.
Vertical gardens paired with hardscaping points can maximize small areas beautifully! Have you attempted it? custom hardscaping Burtonsville
Access control systems are a game changer for security! Have you explored all the latest technologies? Check out Austin security access control for more insights!
Your submit inspired me so as to add extra texture to my garden with diversified flora! More innovations will be explored at landscaping contractors Burtonsville MD .
I trust Care Pet Animal Hospital with my pet’s health more than any other place in Jacksonville. They’re simply the best! Veterinarian near me
Appreciate the thorough information. For more, visit local remodeling company near me .
Jual rumah dengan desain modern pasti lebih diminati! rumah dijual di Jakarta
This guide definitelyprovidesfoodforthoughtwhenitcomestoselectingtheperfectfitforyourbusinessneeds.# # anyKey word ## Local SEO Dublin
Just had my bushes lower down by authorities, and it made this kind of big difference in my backyard’s look! affordable tree cutting Burtonsville MD
Seasonal decorations can make your outside space sense festive and inviting! Get influenced by using seasonal themes at covered patios Burtonsville MD .
My experience with the attorneys at irvine motorcycle lawyer was nothing short of excellent; they are true professionals in personal injury law.
Well explained. Discover more at Water leak repair .
“It’s good to know that not all repairs have to be costly if caught early!” Dick Does Doors Repair in DFW
Have you conception about the lengthy-term advantages of weeding out dangerous timber out of your yard? It’s worthy seeing that! tree removal
Love the fact that # any Keyword # travel agent myrtle beach
Your submit clears up such a lot of misconceptions about tree trimming! I’ll be travelling tree trimming for extra clarity.
It’s amazing how often we overlook garage door maintenance! I recently learned that regular inspections can prevent bigger problems down the line. For those looking for reliable repair services, I recommend visiting garage door repair for more information.
Nicely done! Find more at toilet plumbing repair .
Their expertise in CFO services has given my business a competitive edge—thank you, Sas Prinzivalli CPA P.A! CFO Services
This content on dog brutality was extremely helpful, in my opinion! Dog owners need to be aware of the root causes of hostile behavior and the value of right coaching dog behavioral issues training Gilbert AZ
This was very well put together. Discover more at solar panel installation Brandon .
Very informative post! I’ll be sure to share this with friends who need auto glass help—like from windshield repair near me .
I found this very interesting. Check out water damage restoration company Fort Myers for more.
Thanks for the informative post. More at affordable BBQ catering reviews .
Great insights! Find more at LuxNuro .
The trend of using illustrations in web design is actually captivating! I have some fascinating examples on my site at website design companies california .
Wonderful tips! Find more at professional movers and packers .
I never considered the Amalfi Coast for a honeymoon until now. It looks stunning! travel agency laurel
A heartfelt thank you goes out to everyone involved in making such great strides towards improving our SEO through collaboration with the fantastic people from BlckPanda Creative Dallas—find out more: seo services !
The role of fluoride in children’s dental care is fascinating—so glad you highlighted this aspect! pediatric orthodontist near me
Anyone else captivated with their tinted home windows? It’s like having sun shades for your own home! Check out residential window tinting for small print.
This was quite useful. For more, visit Plumbing & heating .
Tôi luôn tìm kiếm các giải pháp tối ưu hóa quá trình xây dựng, và những thông tin trên https://mayxaydunghongthai.com/mua-may-dam-coc-tai-nghe-an/ thật sự hữu ích.
Thanks for the valuable article. More at emergency water damage restoration nearby .
This was a fantastic read. Check out glazing for more.
Thanks for the practical tips. More at boiler repairs .
Thanks for the great information. More at gas engineer .
Your dedication towards raising awareness surrounding disparities existing within healthcare system shines bright illuminating paths forward creating hope future generations yet come!! Cosmetic Dentist
Thanks for the great information. More at https://maps.app.goo.gl/CmLQ5HwTGJ8S1ZSJ6 .
Appreciate the comprehensive insights. For more, visit loan agency new orleans .
Just performed my first complete week with tinted automotive home windows… feeling like a star using around city now! frosted privacy window film New York
Why failed to we have got intelligent tint quicker? It’s a activity changer! Learn greater approximately it at electric smart tint New York .
Appreciate the detailed post. Find more at boiler repairs .
Tôi rất ấn tượng với tính năng tự động hóa của một số máy xây dựng hiện nay. Tham khảo thêm tại https://mayxaydunghongthai.com/khung-cau-xoay/ nhé!
I found this very interesting. For more, visit boiler repairs .
Historical landmarks are often must-see attractions; plan visits with tips from myrtle beach travel agent .
If you want peace of mind with your electrical work, choose Summit Services—they are top-notch electricians in Bluffton! More details at Emergency electrician .
Appreciate the detailed information. For more, visit gas engineer .
This was quite useful. For more, visit gas installation .
Security window film has introduced both aesthetics and safeguard to my dwelling—what a win-win! Details at security window film near me .
Great insights! Find more at Summers Plumbing Heating & Cooling .
Thanks for the great explanation. More info at gas engineer .
Absolutely recommend Summit Services for any electrical issues on Hilton Head Island; they are the best team out there! Electrician near me
Many thanks for the tips on spotting roof covering scams! It’s vital to remain informed. For more resources on locating trusted professional roofer, go to roofing contractors near me .
This was very enlightening. For more, visit plumbers .
Great find while looking out up approaches beforehand of heavy rain season coming back circular to come back soon !! ###an yK eyword### Gutter Cleaning Service
Great job! Discover more at https://penzu.com/p/7a0c78902c060fec .
Valuable information! Discover more at Excavating NJ LLC .
This was very insightful. Check out LuxNuro for more.
Sas Prinzivalli CPA P.A not only offers great CFO services but also provides peace of mind for business owners! Fractional CFO
I trust Summit Services for all my electrical needs. They truly are the best in Hilton Head Island! Electrician near me
I had no idea that user training plays such a significant role in effective access controls—thanks for sharing this info! More tips at Access Control Installation !
Есть ли разница в оформлении диплома с отличием и без — влияет ли это на цену? Доступно тут
В 2025 году наличие диплома всё ещё остаётся ключевым фактором при приёме на работу, повышении по службе или получении лицензии. И если у вас нет необходимого документа — это не повод терять годы.
✅ Решение есть — заказ диплома, полностью соответствующего оригиналу:
С печатями, подписями, голограммами,
С занесением в архив (по запросу),
Любой ВУЗ, колледж — по всей России и СНГ.
Кому может пригодиться?
Вас отчислили, но обучение практически завершено?
Нашли перспективную работу, но нет диплома?
Нужен диплом для лицензирования, повышения, тендера?
Мы работаем без предоплаты (по договору или поэтапно) и гарантируем полную конфиденциальность. У нас нет шаблонов — каждый документ готовится индивидуально, с учётом всех нюансов.
Что вы получаете:
Диплом, неотличимый от оригинала
Настоящие данные выпускника (по вашей анкете)
Быстрая и надежная доставка по России и СНГ
Юридически грамотно оформленный договор (по желанию)
Мы сотрудничаем с квалифицированными специалистами, которые знают, как должен выглядеть официальный документ — вплоть до мельчайших деталей. У нас много лет опыта и более random00..3999] довольных клиентов.
Диплом купить москва
купить диплом о высшем образовании
доступ по ссылке
диплом о высшем образовании купить
подробнее
Купить диплом вуза — быстро, без нервов и с гарантией?
Love how approachable everything feels while reading through—I’ll definitely come back whenever needing refreshers amidst busy schedules ahead juggling multiple responsibilities simultaneously!! Property management company illinois
.. Fantastic exploration dissecting behavioral economics associated within purchase decisions-Looking forward toward refining campaigns clearly focused solely amidst considerations drawn earlier .. Franchise SEO strategy
Thanks for the useful post. More like this at affordable plumbing and heating services .
”Thanks again everyone! Your insights prove invaluable while navigating through repairs required.” Best Plumber in o’fallon il
If you’re struggling with visibility online, contact BlckPanda Creative Dallas—they’ve drastically improved my site’s rank on Google and boosted my sales as a result! Visit them at dallas seo !
Your tips on maintaining fresh breath are spot-on! For further reading, don’t forget to check out Dental Implants !
Thanks to Mauzy Cooling, my home is cool again! Quick and affordable service. Ac repair services in san diego
This blog site has been mind-blowing regarding just how much innovation has progressed in the field of heating & cooling– exciting times ahead #### aniyKeyord ####. PJ MAC HVAC Service & Repair hvac contractor
“Is there a good place for late-night bites around here? Looking for recommendations from locals!” Restaurant in Breese IL
The team at BlckPanda Creative Dallas knows exactly how to improve SEO! My Google ranking is soaring, and I’m loving the results! More info at seo .
Never thought much about rust removal until today- thrilled knowing there’s alternatives available nearby according mentioned sources over there # # anyKeyWord # #! Pressure Cleaning
Excellent post on how to rebuild car doors! Not just for pleasure but also for protection, it’s so important to keep our storage doorways up. Standard checks can save us money on unnecessary inspection later Gulliver Garage Doors Pros garage door opener The Meadows, AB
Bagaimana cara mendapatkan agen property terpercaya saat pertama kali membeli rumah? jual rumah cepat Jakarta
Very informative article. For similar content, visit window repair .
“Is it common to face humidity issues with our HVAC systems around here?” HVAC Edwardsville IL
Thanks for the practical tips. More at boiler repairs .
Quality veterinary care can be hard to find, but Care Pet Animal Hospital sets the standard high in Jacksonville! Visit Veterinary care for details!
This was very enlightening. For more, visit gas engineer .
Thanks for the clear breakdown. More info at Walters Barbecue Southern Kitchen .
Only had a fantastic time at my neighborhood haircut! The atmosphere was warm, and the salons were masters of their trade. I highly advise visiting a hairdresser that places a premium on superior assistance if you’re looking for a great cut near me men’s haircut
Thanks for the clear advice. More at LuxNeuro .
Appreciate the comprehensive advice. For more, visit Excavating NJ LLC .
Just booked a weekend getaway through myrtle beach travel agent —can’t wait to see how my dog enjoys it!
This was very enlightening. For more, visit gas installation .
I love how accessible legal resources are becoming in Belleville IL; it’s empowering for residents! google.com
Appreciate the comprehensive advice. For more, visit plumbing .
I’m impressed by the techniques used by chiropractors in Arlington TX! Discover more at chiropractor arlington tx .
With Sas Prinzivalli CPA P.A’s expert guidance in their CFO services, I feel more in control of my finances than ever before! CFO
It’s wonderful to see such a thought-provoking conversation about hostile dog training! It’s crucial to solution doggie anger with the right methods and comprehending because some dog owners struggle with it Aggressive Dog Training
I found this very helpful. For additional info, visit manhole clearing services .
?? У кого в дипломе хоть раз была правда?
Серьезно: вы когда-нибудь открывали свой диплом и думали — “да, всё, что здесь написано, я действительно знаю и умею”?
У многих — только бумажка. Корочка, глянцевая, с гербом и подписями, которую HR пролистывает за 1,5 секунды. А потом начинается: опыт, кейсы, компетенции, “что умеешь по факту?”. Диплом где-то там, в глубокой папке.
Но парадокс в том, что без диплома тебе даже не дадут шанс показать, что ты умеешь.
Ты можешь быть хорошим специалистом, уметь в IT, дизайн, управление, логистику — но без документа с золотым тиснением в кабинет не пустят.
?? Нормально ли это? Нет. Реальность ли это? Да.
Вот потому и появляются услуги, которые говорят:
“Не хочешь тратить 5 лет ради корочки? Мы решим вопрос. Тебе нужен не вуз — тебе нужен диплом.”
Ты его получаешь, кладёшь в резюме, и дальше всё зависит от твоих мозгов, а не от шрифта на бумаге.
Кто-то скажет: “Это обман!”
А кто-то — “Это адаптация к системе, которая обманывает тебя с детства”.
?? И что в итоге?
Диплом становится не подтверждением знаний, а входным билетом. Как QR-код в метро — проверили, что есть, и пропустили.
Поэтому люди и задумываются о покупке диплома.
Не потому что глупые. А потому что взрослые, занятые, уставшие от лишнего.
Потому что хотят не учиться “ради процесса”, а работать по делу.
?? Ирония в том, что большинство таких дипломов — работают.
Даже если ты их не учил — ты знаешь, как применить. А вот “настоящие выпускники” потом всё равно идут на курсы и стажировки, потому что ничего не помнят.
И что важнее: корочка или то, как ты справляешься с задачей?
?? У кого были такие мысли — пишите. У кого был опыт — делитесь.
Можно ли заказывать диплом через посредника, и есть ли риски, что данные попадут не туда? Покупка диплома
Shoutout to ASI for always being there when I need them for drain issues in San Diego! Clog Removal in san diego
Feel empowered knowing where to turn when faced with auto-related legal issues thanks largely due sources like# # anyKeyWord ### Auto Accident Lawyer
Appreciate the thorough insights. For more, visit boiler repairs .
I appreciated this article. For more, visit airco kopen en laten installeren daikin .
Happy customer alert! My laundry appliances are finally functioning perfectly again thanks to local techs. Best Appliance Repair in Arlington TX
Partnering with BlckPanda Creative Dallas was one of the best decisions I’ve made for my business! My Google rankings have soared—check out their service at dallas seo .
This was very beneficial. For more, visit boiler installation .
Teaching kids about dental hygiene early on sets them up for a lifetime of healthy smiles. Great tips here! kids dentist near me
Appreciate the detailed information. For more, visit gas engineer .
Nicely done! Find more at gas installation .
Wow, I didn’t understand that roof concerns might result in bigger home troubles! If you need support searching for dependable professionals, I suggest looking into roofing contractors near me .
Thanks for the helpful article. More like this at boiler installation .
The legal advice from # uber accident lawyer # was instrumental in ensuring that I received proper compensation after my bike accident.
“Wondering how often roofs should ideally be checked based on conditions experienced here?” https://www.google.com/maps/place/?q=place_id:ChIJVbAwGg2rSwkRQTd-y5pZOAI
Fantastic breakdown of what makes a successful open house—very actionable advice here, thanks! highly-rated real estate agents
ร้านนี้คือที่สุดของความสนุก! OMG ONE MORE GLASS SAI1 ขอบอกเลยว่าต้องไปลอง ร้านเหล้าเพลงมัน สาย1
”With # any keyword#, you really become more than just another customer.” Best Tangerine movers
Very supportive tone throughout this piece regarding uncertainty sometimes felt while navigating complex systems we encounter within healthcare industry overall !! Continue providing reassurance through connecting over reaching-out via = = = = top rated cosmetic dentist
If you need key cutting in Chester le Street, visit mobile locksmiths for professional service.
This was very well put together. Discover more at Deck Builder near me .
Very useful post. For similar content, visit Public records search .
The comparisons between various printing methods were incredibly helpful; now I’m more inclined towards #I choose ## Booklet Binding Lexington
The future of access control looks promising with AI integration! Dive deeper at technology in access security .
This theme in fact resonates with me; browsing ahead to enforcing these principles in our place of job quickly! Thank you!! Commercial window tinting New York NY
” I appreciate how this information can help foster community among creators.” google.com
The team at Summit Services made my electrical renovations stress-free—I highly recommend their services to everyone in Bluffton SC! Electrician
Thanks for the thorough analysis. More info at Walters BBQ Southern Kitchen .
This is very insightful. Check out Phone number search for more.
. Your insights regarding chatbots and their role within customer service were enlightening—I’ll certainly look towards integrating suggestions sourced directly through # anYKeYword # !! Franchise SEO Dublin
This was quite helpful. For more, visit LuxNuro .
Appreciate the comprehensive advice. For more, visit Excavating New Jersey LLC .
Just wrapped up a project with Summit Services on Hilton Head Island—great service, knowledgeable staff, truly the best around! Electrician near me
Máy xây dựng hiện đại đang giúp chúng ta tiết kiệm thời gian và chi phí. Tôi rất thích sản phẩm của https://mayxaydunghongthai.com/mua-may-dam-coc-tai-tinh-hoa-binh/ !
Cách chọn máy xây dựng phù hợp cho từng loại công trình là điều rất quan trọng. Hãy tham khảo ở https://mayxaydunghongthai.com/may-mai-san/ để có thông tin chi tiết.
Extremely useful post on developing for various audiences! Understanding your users makes all the distinction– learn more techniques at website designer bay area !
This was a great help. Check out xem thêm for more.
This was highly educational. More at xem thêm .
I found this very interesting. Check out xem thêm for more.
Thank you, BlckPanda Creative Dallas! Your strategies have helped me climb the Google rankings and grow my customer base rapidly! Read more about it at seo services .
The symmetry created by means of hardscape features can carry steadiness to an in any other case chaotic panorama layout! Have you observed this? hardscaping near me
Great recommendation on picking out mulch forms for one-of-a-kind landscaping desires; this may increasingly absolutely help my subsequent mission! Learn even extra about it at landscaping near me !
Proper planning for tree removals comprises serious about within sight platforms and chronic lines! residential tree removal Burtonsville
Understanding SEER scores is so crucial when getting a/c units. Terrific explanation right here! Extra information at PJ MAC HVAC Service & Repair hvac contractor .
Outdoor rugs can exceptionally tie a area jointly and add convenience underfoot! Discover stylish recommendations at outdoor kitchens Burtonsville MD .
Appreciate the thorough information. For more, visit gas engineer .
Great data here approximately the advantages of employing a seasoned tree chopping provider other than DIY methods. tree cutting service near me
Appreciate the thorough information. For more, visit https://send.now/2jfu6css25ba .
I under no circumstances discovered how imperative tree trimming changed into unless I observed the change in my yard. Thanks for sharing! I’ll visit residential tree trimming Burtonsville for more counsel.
This was quite informative. For more, visit gas installation .
“Just heard about all-on-4 implants from friends—seems intriguing! Anyone tried them?” Dental Implants in San Diego
Making investments count number calls for thoughtful attention alongside every road explored(consisting of specialists featured prominently above)! house window tinting services New York
Где реально заказать диплом, который выглядит как оригинал, с корочкой, подписью ректора и без отличий от настоящего документа? Доступ по ссылке
В 2025 году наличие диплома всё ещё остаётся ключевым фактором при приёме на работу, повышении по карьерной лестнице или получении лицензии. И если у вас нет необходимого документа — это не повод терять годы.
✅ Выход есть — оформление диплома на заказ, полностью соответствующего оригиналу:
С печатями, подписями, голограммами,
С занесением в архив (по запросу),
Любой ВУЗ, колледж — по всей России и СНГ.
Кому может пригодиться?
Вас выгнали, но обучение практически завершено?
Нашли интересную работы, но нет “корочки”?
Нужен диплом для лицензирования, повышения, тендера?
Мы работаем без предоплаты (по договору или поэтапно) и гарантируем полную конфиденциальность. У нас нет шаблонов — каждый документ готовится индивидуально, с учётом всех нюансов.
Что вы получаете:
Реалистичный диплом, неотличимый от оригинала
Настоящие данные выпускника (по вашей анкете)
Быстрая и надежная доставка по России и СНГ
Юридически грамотно оформленный договор (по желанию)
Мы сотрудничаем с квалифицированными специалистами, которые понимают, как должен выглядеть официальный документ — вплоть до мельчайших деталей. У нас много лет опыта и более random00..3999] довольных клиентов.
This was a fantastic resource. Check out Conner Roofing, LLC for more.
It’s crucial to work with accredited and insured roofer to stay clear of future issues. For more guidance on this subject, you can check out roofing contractors near me for credible referrals.
It’s outstanding how a good deal extra deepest our dwelling room feels after fitting privacy tints on the windows! residential privacy window tinting New York
The protection points of clever tint also are worth pointing out—it provides an alternative layer of upkeep! Explore this at switchable smart glass tint New York .
Thanks for the detailed post. Find more at boiler installation .
Absolutely love your take on print marketing strategies! For execution, there’s no one better than Fast Printing Services Lexington !
Sangat menarik untuk membahas tentang broker properti Jakarta. Apakah ada tips dalam memilih broker yang tepat? jual rumah cepat Jakarta
This was highly helpful. For more, visit gas installation .
Your blog provides excellent insights into choosing between repair vs replacement—very useful indeed! auto glass near me
Nicely done! Discover more at boiler repairs .
I hugely recommend making an investment in protection window films; they’re durable and effectual! For greater facts, talk over with glass protection film New York .
I’m always amazed at how well these companies respect our natural landscapes during builds. Construction Services In Asheville
I’ve been searching for reliable drain repair services in San Diego. Mr. Rooter Plumbing seems like a solid choice! Drain Repair in san diego
If you want the best for your furry friends, you should definitely check out Care Pet Animal Hospital in Jacksonville! More details at Veterinary care .
My husband was really skeptical about quick sales until we tried JOHN BUYS HOMES IN BAY AREA—they proved us wrong! sell a house quick
From adventure trips to relaxing beach getaways, there’s a group travel package for everyone! travel agent myrtle beach
So happy with my recent roof repair thanks to an excellent Tyngsboro roofing contractor! Highly recommend their services! Top Rated Roofers Tyngsboro
Thanks for the valuable insights. More at airco installateur in de buurt .
“It’s nice to see more discussions about effective rental strategies and their impacts!” Property management company illinois
This content on violent doggie training was really helpful to me! Understanding the root causes of puppy hostility and using effective training practices is essential. Working with a reputable# #anykeyword## who is specialized in this area is essential best dog aggression training Gilbert AZ
A simple reminder: never drive under the influence—it endangers not only your life but others’ as well! Accident Lawyer
This was nicely structured. Discover more at Phone number location .
Such meaningful contributions made possible just simply by sharing thoughts/feelings openly with others who may relate similarly!! Continue fostering dialogue around sensitive matters wherever feasible!!! Emergency Dental Care
Excellent article! Maintenance of storage doors is frequently overlooked, but it’s essential to ensuring safety and convenience. Regular inspections may save money on unnecessary maintenance later garage door supplier Akinsdale, AB
This was highly helpful. For more, visit Blocked manholes .
Traveling doesn’t have to be expensive—especially when you find deals on travel agent laurel !
The role of access control in compliance regulations can’t be ignored! Find more information at Access Control Systems Near Me .
Delighted in checking out developing immersive experiences through website design; it truly keeps users engaged longer– discover how to do it well at website designer san francisco !
. Fantastic overview concerning visual content optimization—it’s evident leveraging platforms showcased via # anYKeYword # could yield significant improvements!! SEO for franchise businesses
”I often wonder how many customers appreciate their plumbers after receiving exceptional service!” Best Plumber in o’fallon il
It’s great to see parents taking an active role in their kids’ dental health from an early age. Good practices lead to great results! kids dentist near me
Appreciate the detailed information. For more, visit Landline lookup .
Car accidents can be overwhelming; a good attorney can ease some of that stress. truck wreck lawyer
Learning more about what’s offered through #YourWebsite#! makes me feel secure moving forward! mobile mechanic durham
Glad we have options available within our communities where expert assistance possible recover losses incurred from unfortunate events outside our control!! # # anykeyord ## car crash lawyer
Loved your post about natural remedies for toothaches; they’re worth exploring further! For other suggestions, visit Dental Clinic Port Saint Lucie !
?? У кого в дипломе хоть раз была правда?
Серьезно: вы когда-нибудь открывали свой диплом и думали — “да, всё, что здесь написано, я действительно знаю и умею”?
У многих — только сертификат. Корочка, глянцевая, с гербом и подписями, которую HR смотрит за 1,5 секунды. А потом спрашивают: опыт, кейсы, компетенции, “что умеешь по факту?”. Диплом где-то там, в глубокой папке.
Но парадокс в том, что без диплома тебе даже не дадут шанс доказать, что ты умеешь.
Ты можешь быть хорошим специалистом, уметь в IT, дизайн, управление, логистику — но без документа с золотым тиснением не попадешь на собеседование.
?? Нормально ли это? Нет. Реальность ли это? Да.
Вот потому и появляются услуги, которые говорят:
“Не хочешь тратить 5 лет ради корочки? Мы поможем. Тебе нужен не вуз — тебе нужен диплом.”
Ты его получаешь, кладёшь в резюме, и дальше всё зависит от твоих мозгов, а не от шрифта на бумаге.
Кто-то скажет: “Это обман!”
А кто-то — “Это адаптация к системе, которая обманывает тебя с детства”.
?? И что в итоге?
Диплом становится не подтверждением знаний, а входным билетом. Как QR-код в метро — проверили, что есть, и пропустили.
Поэтому люди и принимают такие решения.
Не потому что глупые. А потому что взрослые, занятые, уставшие от лишнего.
Потому что хотят не учиться “ради процесса”, а работать по делу.
?? Ирония в том, что большинство таких дипломов — работают.
Даже если ты их не учил — ты знаешь, как применить. А вот “настоящие выпускники” потом всё равно идут на курсы и стажировки, потому что ничего не помнят.
И что важнее: корочка или то, как ты справляешься с задачей?
?? У кого были такие мысли — пишите. У кого был опыт — делитесь.
Есть ли кто-РЅРёР±СѓРґСЊ, кто устраивался РЅР° работу СЃ купленным дипломом — как прошла проверка Рё были ли последствия? Рсточник
Thanks for the comprehensive read. Find more at air conditioning replacement .
I love supporting local businesses! The restaurant in Breese, IL has such a friendly vibe. google.com
This was highly helpful. For more, visit blocked toilet plumber .
This was very enlightening. More at glazier .
I started myofunctional therapy with a german orthotropic device 5 months ago. TMJ pain eased a lot, but teeth alignment is still slow. Anyone else notice improvement only after 4+ months? Wondering if this is normal or if I should try something else. SleepBrace uses
“Just learned about variable-speed units – sounds like an interesting option worth exploring.” google.com
Just had some electrical upgrades done by Summit Services, and I am thrilled with the results! Highly recommend them! Emergency electrician
I’m amazed by how quickly I started feeling better after starting treatment with # any Keyword # post-accident. Best chiropractor for car accidents Everett
Every moment counts make sure utilize wisely ensuring each second spent contributes positively toward shaping future desired results sought tirelessly striving attain continuously growing evolving consistently along paths taken moving forward together uber accident lawyer
This was quite informative. More at boiler installation .
“Lawyers from Belleville understand the local court systems well—they’re invaluable during proceedings.” google.com
I never realized how many aspects affect the lifespan of a roof. Thanks for sharing! If you have an interest in locating certified professional roofer, see roofing contractors near me for helpful details.
This is quite enlightening. Check out gas engineer for more.
The team at Summit Services on Hilton Head Island is amazing! They truly are the best when it comes to electrical work. Electrician
Thanks to Mauzy Cooling, my family can stay comfortable all summer long! Ac repair services in san diego
Appreciate the detailed information on plumbing issues! It’s comforting knowing about services like emergency water heater repair Medford .
Your discussion about designing eye-catching packaging was enlightening—I’ve turned to #I choose Print Design Services Lexington
You made some excellent points about color psychology in painting! See more at Exterior Painting Contractors Portland .
Local SEO is definitely the way to go! I’ll be checking out Search Engine Marketing Lowell in Lowell, MA soon.
Fantastic pointers for boosting home convenience with HVAC! I’ll most definitely refer to PJ MAC HVAC Service & Repair commercial hvac for deeper understandings.
Excellent post on maintaining a door entrance! Our car gates must always be in good working order because they contribute greatly to our protection and comfort. Regular maintenance and timely fixes may protect people from unnecessary repairs later Gulliver Garage Doors Pros garage door supplier Griesbach, AB
Who else finds inspiration from home improvement shows when thinking about their own projects? kitchen renovation contractors Tewksbury
Thanks for the practical tips. More at boiler repairs .
This was very beneficial. For more, visit boiler installation .
. Thankful you touched upon mobile-first indexing because so many users search on-the-go while exploring our vibrant city – great tips shared throughout – head over towards #if anyKeyWord# for further assistance!! SEO Boston
Wondering if anyone else has installed pot fillers above their stoves during renovations; convenience meets elegance perfectly there… # # anyKeyWord # # kitchen remodeling Lexington
Appreciate your emphasis on prevention — well timed gutter cleansing can make all of the change ! # # anyKeywor d## Gutter Cleaning
Thanks for the helpful advice. Discover more at aquarium shop toronto .
Appreciate the detailed information. For more, visit xem thêm .
Just wanted to give a shout-out to Summit Services for their amazing work on my electrical project! Electrician
This was a fantastic read. Check out gas installation for more.
This was quite useful. For more, visit boiler installation .
Awareness campaigns actually help destigmatize mental disorder in our society! More insights on activism can be found at mental health treatment .
This was quite informative. For more, visit gas engineer .
Thanks for the helpful article. More like this at cheap car rental .
I learned so much about maintaining my flat roof through articles shared over at # # anyKeyWord###—definitely worth reading! Roof Repair Tyngsboro
Tôi luôn tìm kiếm các giải pháp tối ưu hóa quá trình xây dựng, và những thông tin trên https://mayxaydunghongthai.com/ung-dung-cua-may-xoa-nen-don-trong-thuc-te/ thật sự hữu ích.
Mình vừa đọc một bài viết hay về xu hướng mới trong ngành máy xây dựng trên https://mayxaydunghongthai.com/may-gia-cong-da-chuc-nang/ , bạn nên tham khảo!
Thanks for the informative content. More at xem thêm .
Well explained. Discover more at xem thêm .
This was very enlightening. More at blocked toilet plumbing solutions .
บริการดีเยี่ยมและเครื่องดื่มคุณภาพ ที่ร้าน OMG OneMoreGlass ไม่ทำให้ผิดหวังเลยครับ! ผับสาย1 รับจัดเลี้ยง
Thanks for the helpful article. More like this at xem thêm .
This was quite useful. For more, visit xem thêm .
КредитоФФ http://creditoroff.ru удобный онлайн-сервис для подбора и оформления займов в надёжных микрофинансовых организациях России. Здесь вы найдёте лучшие предложения от МФО
“How necessary are inspections prior to closing deals? Would love feedback from experienced locals.” google.com
Thanks for sharing your sense with roof varieties categorical to our quarter! More tips could be discovered at oldest roofing .
Great job! Find more at Address lookup .
Ternyata banyak sekali pilihan properti di Jakarta! rumah dijual murah di Jakarta bisa jadi referensi.
I always find your posts enlightening and packed with useful information! local realtor near me
Finally sold my place after months of stress! Really grateful for all the help from john buys homes bay area—definitely worth giving them a call if you’re stuck! sell my house for cash
Loved your insights on whitening treatments! Can’t wait to read more on this topic at 24/7 emergency dental care !
Understanding how they plan to improve your website’s authority is a must when choosing an agency! Webjuice SEO
Digital marketing made easy! Check out all that # social cali marketing agency # has to offer—right here in beautiful Santa Rosa, CA.
“If you haven’t yet explored what Social Cali can do for your brand, you’re missing out on amazing opportunities!” marketing san jose
Had my roof inspected last week by a reputable contractor in Mesa AZ—peace of mind guaranteed! Roofing Contractor Mesa AZ
Just desired to specific my gratitude for all this efficient expertise about screening amenities; it’s been a activity-changer for my dwelling maintenance habitual! Pool Screen Repair
Great points made here regarding the importance of regular audits on access controls! Visit smart access control to learn more!
If you’re facing issues with overgrown trees or stumps, call LJR Tree Services today; they’ll sort it out quickly! tree service near me
Valuable information! Discover more at plumber charges .
Wow, what a great read on gutter cleaning services! If you’re looking for help, check out what’s offered at Gutter Cleaners Near Me #.
“The before-and-after photos of cleaned windows are just inspiring! Thanks for sharing this on your blog, and shoutout to # anykeyword#.” Exterior Window Cleaning
Great insights! Find more at Reverse telephone lookup .
The technology used by Dr. George at his clinic made all the difference during my procedure. Root Canal in San Diego
How do you handle communication barriers while abroad? Share your experiences with us via travel agency myrtle beach
Really valuable content here about preventive dentistry! Additional insights available at Cosmetic Dentist .
The conversation around substance abuse triggers was informing; understanding them is important for efficient treatment methods! Discover more about coping systems at addiction treatment for women .
I just discovered some intelligent tips on training hostile dogs, which I found to be very helpful in resolving problems with my own puppy. It’s amazing how better identifying the root causes of aggression can make education strategies more efficient dog aggression classes
The seasonal changes can actually impact roof covering demands! If any person is looking for specialist professionals to inspect their roofings after wintertime, check out roofing contractors near me for referrals.
The dwelling house reworking scene in Austin is prospering! I had a the best option knowledge with my fresh venture, and I discovered so many supplies on line. Don’t disregard to stopover at bathroom remodel contractors for more insights on growing your dream domicile!
Finding ways to make brushing fun, like singing songs or using timers, really helps encourage kids to keep at it! kids dental office
Fantastic article! The preventative measures for keeping stinging insects away are particularly useful. I’ll be sure to refer to pest control company for ongoing pest management advice.
Avra Dental is my go-to place for dental emergencies. They’re always ready to help!
I recently visited Avra Dental and was amazed by their swift emergency services!
If you’re in Ventura CA and need an emergency dentist, Avra Dental is fantastic Ventura CA dental emergencies
Nicely done! Discover more at boiler repairs .
Super impressed with how quickly the ###mobile locksmith### came to help when I was locked out. dh1 4ga
I enjoyed this read. For more, visit gas engineer .
What a thorough exploration of digital vs traditional media—it affirms why I lean towards services from #I choose Copy Shop Lexington
I had an amazing experience at Aesthetic Plastic Surgery & Laser Center!
Dr. Michelle Hardaway is the most skilled plastic surgeon I’ve ever met.
If you’re in Farmington Hills MI, Dr Best cosmetic surgeons in Farmington Hills
This is highly informative. Check out Auto Glass Charlotte for more.
Surely appreciate sharing insights into various techniques utilized restoring homes post-water incidents seeing firsthand transformation outcomes achieved through hard work involved too!!!#Anykeyword# water damage restoration near me
My neighbor just had work done by Banning Construction Inc., and it looks amazing—great job guys! kitchen appliance packages
I can’t believe how easy it is to find great trips with just one click – check out %% anyK eywo rd%% if you’re interested in saving money while traveling too! river cruise near me
Moving can be stressful, but the movers in Crystal River made it a breeze for me! Crystal River moving companies
I found this very interesting. Check out gas engineer for more.
Thanks for the helpful article. More like this at gas fitters .
I liked this article. For additional info, visit https://judahwiex023.almoheet-travel.com/exactly-how-to-find-a-plumbing-professional-promptly-and-quickly .
Thanks for the thorough analysis. More info at boiler repairs .
Interested in DIY roof repairs? Check out the resources available on Roof Services Tyngsboro for Tyngsboro homeowners!
Helpful suggestions! For more, visit boiler repairs .
Love your concentrate on sustainable web design practices! It’s essential we think about the environmental impact of our online presence– more concepts over at web design agencies san francisco !
I enjoyed this post. For additional info, visit PJ MAC HVAC Service & Repair commercial hvac .
“Always do your research before selecting a property manager; it makes all the difference!” google.com
Fantastic article shedding light on the importance of localized content; definitely eager to explore options available through Increase organic leads # moving forward!
A comprehensive guide like this one makes it easy for individuals seeking help from reliable ▲bicycle accident lawyers in Irvine▲! personal injury lawyers irvine
When you want quality construction done right, always think of companies like Banning Construction—they’re doing incredible work; find details here: shower installation
This was quite informative. For more, visit xem thêm .
My neighbor had great success with a local plumber in O’Fallon, IL; I’ll have to give them a call. Alexander Plumbing and Remodeling Contractor
“This discussion really highlights the necessity of continuous monitoring in an organization’s security protocols—more info can be found at Access Control Systems !”
Appreciate the thorough insights. For more, visit boiler repairs .
Wonderful insights on selecting the right professional roofer! It’s so important to do your research. For those looking for more tips, look into roofing contractors near me for beneficial resources.
Máy xây dựng ngày nay không chỉ mạnh mẽ mà còn rất thân thiện với môi trường. Tham khảo thêm tại https://mayxaydunghongthai.com/gia-may-dam-coc-chay-xang-tot-nhat-tai-ha-noi/ nhé!
I’ve heard that sealing entry points is crucial for rodent control! Thanks to the detailed guides available at rodent control services , I’m getting started.
This was quite informative. For more, visit xem thêm .
Có ai đã dùng dịch vụ cho thuê máy xây dựng chưa? Tôi thấy thông tin trên https://mayxaydunghongthai.com/may-duoi-sat/ rất hữu ích.
” You won’t find better customer experiences than those provided at # LJRTrees Service!” ### anyKeywod## tree maintenance service
Anyone have tips on selling an inherited house? My siblings and I are all over the place on what to do next… Considering reaching out to john buys homes in walnut creek soon. cash buyers for property
I appreciated this article. For more, visit xem thêm .
I’m on the hunt for the best pizza place in Breese, IL! Any suggestions? Best Restaurant in Breese IL
Thanks for the great content. More at xem thêm .
Thanks for the clear breakdown. More info at xem thêm .
Brokers/property agents sering kali memiliki informasi terbaru tentang proyek-proyek baru d jakarta !! # # anykeyword ## properti dijual
Well explained. Discover more at glazier .
My neighbors recommended ###anything### after seeing their work—I couldn’t be happier with their service! Local Gutter Cleaning Company
Looking for tasty Asian cuisine? You have to check out Ginger Bistro; they have some of the best dishes around here! Chinese
Does anyone have experience with smart thermostats? Considering one to help manage my energy use better here. HVAC Edwardsville IL
Been trying Myobrace for 5 months—TMJ pain way down but teeth still shifting slowly. Anyone else find affordable options like this need serious patience? Also, mewing device vs tongue has some neat tips on tongue posture that helped me a lot! SleepBrace fitting process
Sustainability isn’t only a style; it’s mandatory for destiny generations—a key aspect many nearby builders concentration on nowadays!! hr outsourcing companies near me
Finding the right michael dreishpoon injury attorney can make all the difference in your personal injury case. Their expertise is invaluable!
If you’re searching for the best Chinese restaurant in St Augustine, look no further than Ginger Bistro! Their dishes are top-notch. Sushi
Thankful acknowledging diversity perspectives represented across spectrum healthcare interactions!! Emphasizing value inclusion enriches overall understanding experiences shared!!! Dental Implants
This article highlights why investing in a top-notch marketing agency is essential for long-term success! marketing agency near me santa rosa
Absolutely thrilled with the results from my recent clean by Lakeland Window Cleaning—highly recommend them to everyone in town! Window Washing Service
Very informative read overall ! Hoping others will find this just as insightful while navigating similar challenges relating either existing or prospective homes they own/manage over time ! Drain Repair in san diego
I recently collaborated with Digital marketing services near me and was blown away by their creativity!
Thank you for breaking down the steps of lanai screen repair; it makes it less intimidating! Screen Repair
Thank you for sharing these valuable tips on SEO! Companies in San Jose, CA should definitely check out san jose marketing for further guidance.
Just hosted a wine evening with an dazzling charcuterie unfold from an OC dealer—every body cherished it! More info the following: charcuterie orange county !
Wonderful insights into the legal profession in Belleville IL—thank you for sharing! https://www.google.com/maps/place/?q=place_id:ChIJ966uXtmp2IcR2ZTbIgn6w6M
This was quite informative. For more, visit boiler repairs .
The chiropractors at Car accident chiropractor Everett WA are knowledgeable and caring—a perfect combo for recovery after an accident!
“If you’re looking for expertise and compassion in dentistry, go see Dr. George!” Root Canal in San Diego
The kitchen is the middle of the home, fairly in Austin’s colourful culture. A transform can reflect your confidential kind although recovering functionality. For hints on the right way to begin your mission, head over to kitchen renovation .
Your post really opened my eyes to various print materials! I find everything I need at Business Card Printing Lexington .
I enjoyed this read. For more, visit architect services near me .
What role does social media play in your travels? Let’s chat about its impact and benefits over ### anykeyword ## travel agent myrtle beach
Thanks for these practical tips about identifying good emergency plumbers or %%keyword%%—I’ll start looking immediately! emergency drain cleaning Medford
This was highly educational. For more, visit https://www.mixcloud.com/kadorapbfu/ .
I learned so much about interior painting from your post! Professional help is available at Portland House Painters .
Hibernia Bar has the best Irish atmosphere in town! I love spending time there.
I’m so happy to have discovered Hibernia Bar, my go-to Irish bar near me.
If you’re looking for an Irish bar in New York, Hibernia Bar is the place to be Hibernia Bar private events
I’ve been researching various methods for controlling hostile dogs, and I came across some interesting insights into productive training techniques dog training for aggressive behavior Gilbert AZ
Color schemes can totally change the vibe of your kitchen. What’s your favorite combo? Get inspired at kitchen renovation costs Tewksbury .
No matter size shape condition existing rides might possess , trust professional hands capable working wonders turning even drab dull appearances bright cheerful ones !!!!! Car Detailing
For anyone considering a Mobile Car Detailing Near Me , I can’t recommend the ones in Houston enough! They do amazing work.
Finding joy fulfillment comes naturally once establish meaningful connections forged strong bonds formed between clients providers dedicated endeavors focused achieving greatness collectively!!! Mobile Car Wash Houston
Great conversations happen while waiting patiently observing magic unfold firsthand witnessing talents displayed effortlessly by dedicated detailers !!!!! Car Detailing Houston
Here’s hoping everyone continues spreading joy positivity encountered along journeys undertaken through utilizing finest resources accessible whenever needed most !!! Mobile Car Detailing Houston
Local SEO is definitely the way to go! I’ll be checking out SEO Optimization Agency Lowell in Lowell, MA soon.
The role of UX design in digital marketing can’t be ignored. Great points made here! Digital Marketing Agency
There’s something so satisfying about seeing your vehicle spotless after a thorough # anyKeyword#. Highly recommended! Car Detailing Near Me
Excited to install new energy-efficient appliances during my renovation—saving money and the planet! kitchen remodeling Lexington
I just read an informative post on common roofing issues faced by homes in Tyngsboro at Roof Replacement Tyngsboro .
Always keep the number of a trusted #mobile mechanic durham# close; you never know when you’ll need it. locked out of my house
Thanks for the valuable insights. More at boiler repairs .
The weather patterns lately have made water damage a real threat here in Hawaiian Gardens! Stay prepared! water damage restoration services near me
Just booked another appointment at American Laser Med Spa – Midland! Excited to see more results! Info available via CoolSculpting .
This post has motivated me to revisit my site’s UX design with respect to improving my overall ranking!. Find additional tips at SEO Agency Burlington
I enjoyed this post. For additional info, visit boiler installation .
Thanks for the useful post. More like this at boiler installation .
Investigating awards or recognitions received by agencies could indicate credibility as well.# # anyKey word ## Web design Dublin
Thanks for the thorough article. Find more at gas installation .
I’ve been thrilled with my results at Sculpted MD, the best medical weight loss near me!
Sculpted MD in Scottsdale Medical slimming treatments
Understanding market trends is essential for successful real estate transactions! experienced real estate agents
”mauzCooling offers some of the best rates for quality HVAC service around.” Ac repair services in san diego
Thanks for the informative content. More at https://www.mediafire.com/file/mlo9qo8mxyepjgp/pdf-13090-3356.pdf/file .
Sculpted MD Westminster has transformed my life with their hormone replacement therapy!
Thanks to Sculpted MD Westminster, I found the best hormone replacement therapy near me Low estrogen treatment near me
Hats off to Baning Constructions team – it’s rare finding such enthusiasm for delivering successful constructions projects these days! quartz countertops for kitchen
I never realized how much of a difference professional mosquito treatments could make until I tried them last summer! Game changer! rodent removal near me
It’s refreshing to see so many positive reviews about various Palatka moving companies lately—it gives me hope for my own move soon! Palatka international movers
Terrific understandings on picking the appropriate roofer! It’s so important to do your research study. For those searching for even more pointers, look into roofing contractors near me for valuable resources.
The discussion about bad breath causes was enlightening; I’m eager to explore more tips at affordable dentist Port St Lucie !
Thanks for the great information. More at comprehensive pest control services .
What an insightful perspective on digital vs physical access controls! For more discussions, visit Austin access control solutions .
Thanks for the useful post. More like this at PJ MAC HVAC Service & Repair hvac replacement .
This is quite enlightening. Check out gas installation for more.
This was a wonderful guide. Check out inexpensive rodent extermination for more.
I found this very interesting. For more, visit Flanders Termite Control .
Appreciate the comprehensive advice. For more, visit Trane Repair near me .
This was a fantastic read. Check out professional pest services in Budd Lake for more.
I was impressed with how quickly A+ Gutters completed my project in St Johns County. They’re efficient! gutters
I can’t thank them enough for the incredible experience I had with a regional material specialist in Waukesha, Wisconsin. The team used polyurethane flooring services to absolutely transform my space, and they were professional, educated, and experienced Midwest Concrete Technologies Concrete Contractor Delafield, WI
Thanks for the detailed post. Find more at boynton beach car accident lawyer nearby .
I’ve been exploring various TMJ relief options and found that combining myofunctional therapy with affordable orthodontic alternatives can be a game-changer buy Orthoxy SleepBrace
Appreciate the thorough insights. For more, visit xem thêm .
I can’t speak highly enough of the professionalism exhibited by the staff at Banning Construction Inc.—truly impressive service overall! bathroom makeover
I used to think all auto glass repairs were expensive, but your tips helped me find affordable options! windshield chip repair huntington beach
Thanks for the clear breakdown. More info at PuroClean of New Port Richey .
Honestly thought selling would take forever but found out about this service and now I’m excited! sell my home quickly
The foremost part about tradition homestead builders in Austin is their ability to contain sustainable parts! accounting firms near me
This is a must-read for all homeowners who love their gardens—thank you for sharing, and check out tree removal services
Appreciate the detailed information. For more, visit xem thêm .
Valuable information! Discover more at Phone number location .
Tôi rất ấn tượng với tính năng tự động hóa của một số máy xây dựng hiện nay. Tham khảo thêm tại https://mayxaydunghongthai.com/dich-vu-cho-thue-lu-dat-tay-uy-tin-ho-tro-ky-thuat-tai-hong-thai/ nhé!
This is a great reminder, especially as fall approaches and the leaves start falling! Time for some gutter TLC! Gutter Debris Removal
This was a fantastic resource. Check out local plumbers for more.
Máy xây dựng giúp giảm thiểu sức lao động, bạn có thể tìm hiểu thêm trên https://mayxaydunghongthai.com/may-cat-duoi-sat/ .
This was a great article. Check out https://go.bubbl.us/eb9a41/ba13?/Bookmarks for more.
Great insights! Find more at xem thêm .
Terima kasih telah berbagi tips berharga ini ! Sangat bermanfaat bagi para pencari rumah %% anykeyword%% rumah dijual
Appreciate the comprehensive advice. For more, visit xem thêm .
Great job! Discover more at xem thêm .
Eagerly anticipating future posts focusing additional topics related closely tied together under umbrella concept “Personal Injuries” as it’s vital subject matter deserving attention!!!! irvine injury attorneys
Finding the desirable average contractor may also be a frightening mission, however it’s worthy it in the long run. I came upon a few successful tips on-line at kitchen remodel ideas that made my selection quite a bit easier!
This was very enlightening. More at gas installation .
Letting go of broken appliances is hard; thankfully there are capable repair services right here in Arlington Tx. Greg’s Grade A Appliance Repair Arlington TX
“The team worked quickly yet efficiently — couldn’t be happier with # # anyK eyword ###’s service.” Same Day Window Cleaning
I’ve been seeing my chiropractor in Arlington for months now, and my mobility has improved tremendously! chiropractors arlington tx
Nicely done! Discover more at Maximum Pest Contol .
“The evolution of technology has made it easier than ever to achieve professional results from home studios too!” Podcast Studio in Arizona
Santarosacommuneventsalwaysbringpeopleclosertogetherwhilecelebratingcultureandtradition!!!###..Arethereeventscomingup???# santa rosa marketing agency
If you’re looking for results, make sure you choose an SEO agency that sets realistic expectations! Local SEO for small businesses
I appreciate the focus on building relationships through social media by Social Cali of San Jose—such a vital aspect! san jose marketing agency
Appreciate the thorough information. For more, visit LuxNeuro .
This was very enlightening. More at LuxNeuro .
The importance of flossing cannot be stressed enough! For detailed guides, visit Cosmetic Dentist .
Mosquito control is not just about comfort; it’s essential for preventing diseases like West Nile and Zika virus too. Stay proactive! termite removal company
Appreciate the comprehensive advice. For more, visit economical home pest solutions .
Appreciate the thorough analysis. For more, visit gas engineer .
Fantastic post! Discover more at Afordable Pest Solutions .
Thanks for the useful suggestions. Discover more at Reverse phone search .
Thanks for the practical tips. More at gas engineer .
This is very insightful. Check out reliable plumbing for more.
Thanks for shedding light on this topic! What should I expect from a property management company in Illinois? Property management company illinois
Thanks for the informative post. More at LavoDent .
This was very insightful. Check out Affordable Pest Solutions for more.
Wonderful tips! Discover more at boiler installation .
Appreciate the detailed post. Find more at boiler installation .
“Excited about discovering culture through art and music when we visit new places as a team.” # # anyKeyw ord ## myrtle beach travel agent
I enjoyed this read. For more, visit gas installation .
Finding reliable contractors can feel daunting sometimes–just glad there are plenty around Hawaii gardens that come highly recommended!! water damage restoration companies near me
I’m so glad I found a trustworthy plumber in O’Fallon, IL for my home repairs. google.com
I found the perfect health insurance plan through Gregory Wolff; he’s the best agent in Atlantic Beach! Health insurance agent
Don’t waste time looking around; just contact #yourwebsite# for your locking needs! locksmith durham
Dog anger needs to be addressed with the right strategy. Many pet owners struggle when their dogs act aggressively, whether as a result of worry, anxiety, or geographical intuition Dog Aggression Specialist
Thanks for the helpful article. More like this at VIP escort reviews .
It’s wonderful how companies like Banning Construction give back to the community while providing excellent services! Check out their work on eco-friendly kitchen ideas !
Stopping by for dinner at one of my favorite places tonight! What are your picks? google.com
I usually have confidence N@O for my cream chargers; their tanks not ever disappoint! nangs Melbourne
Marin County grants a few of the simplest rehab facilities within the united states of america. I came across a mammoth resource at outpatient rehab marin county .
Finding sustainable ideas addressing root reasons habit crucial guaranteeing long-term success done-specified efforts tackling poverty unemployment mental fitness points make a contribution tremendously preventing dem alcohol and drug rehabs in marin county
The idea of using fun characters and stories during dental visits is brilliant! Kids will look forward to their appointments! pediatric dentist
Support businesses play a key position in rehabilitation; luckily, there are much conceivable by means of drug rehabs in Santa Rosa! outpatient drug rehab in santa rosa
I’m making plans a weekend getaway targeted on health and detoxification around the Bay neighborhood—information welcome! affordable detox san francisco ca
My experience with finding an affordable yet reliable HVAC service was great here in Edwardsville! HVAC contractor
A strong advocate like a Georgia injury lawyer can help ensure that you receive fair treatment from insurance adjusters! lawyer for accidents
Thanks for the clear breakdown. More info at phim sex hay .
A concrete contractor in Waukesha, Wisconsin, who just transformed my garage into beautiful epoxy flooring, was awesome. The function was of an exceptional standard, which truly enhanced the room Epoxy Flooring New Berlin, WI
Solid advice, especially for Delaware County homes with older setups. I didn’t think much about duct sealing until now, but it makes sense. Would love a guide comparing local HVAC contractors. Living in Delco? You’ll want to dive deeper: PJ MAC HVAC Service & Repair AC repair
Thanks for the insightful write-up. More like this at bording up .
Have you ever had to deal with a legal issue in Belleville IL? A good lawyer can make all the difference! google.com
“Have you seen any stunning outdoor spaces being created with new builds?” Best Construction Services In Asheville
I’m excited about implementing your ideas into my next vacation—it feels great being proactive!!! ### anykeyword ## travel agency myrtle beach
It’s amazing how much impact the right contractor can have on a project’s success! I’ve heard only great things about Banning Construction Inc.—check them out at bathroom vanities !
I’m so grateful for the service provided by tree trimming service ; they really took care of my property!
Every homeowner ought-to familiarize themselves with critical aspects surrounding routine checks involving their rain-carrying apparatuses!!! “# “# anyKeyWord # Residential Gutter Cleaning
Thanks for the thorough article. Find more at LuxNeuro .
Nicely detailed. Discover more at https://andysbjp560.fotosdefrases.com/just-how-to-maintain-your-outdoor-plumbing-and-heating-units .
This was a great article. Check out LuxNuro for more.
Thanks for the great explanation. More info at best rated plumbers near me .
Appreciate the detailed information. For more, visit trusted pest control services in Flanders .
Don’t settle for less than you deserve after an injury; explore all your options with guidance from car accident lawyer atlanta .
Thanks for the valuable insights. More at near me SEO solutions .
Thanks for the great information. More at gas engineer .
This was very enlightening. For more, visit North Atlanta Chiropractic Center .
This was nicely structured. Discover more at Labo Dental .
For anyone considering gutter replacements, go with A+ Gutters—they’re the top choice here in Jacksonville! Check it out: gutters near me !
Well done! Find more at Affordable Pest Solutions .
If you’re looking for eco-friendly pest control options, check out local exterminators ! They provide excellent service here in Knoxville without harmful chemicals.
Just had my windows cleaned by Lakeland Window Cleaning, and they look amazing! Check out Window Washing Service for their services.
The thought of selling our family home is so bittersweet 😢 But I’ve been hearing amazing things about selling as-is through JOHN BUYS HOMES IN BAY AREA—might just check them out for comfort’s sake: . sell a house quick
Is absolutely everyone else smitten by open floor plans? Custom builds make that dream exquisite available the following in Austin! human resource outsourcing
Thanks for the great tips. Discover more at boiler installation .
”Am eager to connect to fellow enthusiasts who swear through ***nangs***; enable’s exchange insights jointly!!” ###yourlink### nangrobot
This was very enlightening. More at Phone number search .
Thanks for the great tips. Discover more at emergency reliable plumbing .
If you are all for a dwelling house redesign in Austin, for sure do your analyze! I discovered a few immense approaches that helped me retailer time and cash. For greater documents, seek advice from kitchen contractor for professional assistance and methods!
So thankful for the quick response from ASI, The White Glove Guys during my recent plumbing emergency involving clogs. Clog Removal in san diego
Appreciate the insightful article. Find more at boiler repairs .
Thanks for the valuable insights. More at boiler repairs .
I totally concur with the value of visual hierarchy in website design! It guides users naturally through your material. Learn more at website design companies in california .
This is quite enlightening. Check out xem thêm for more.
This was quite informative. For more, visit gas installation .
Saya berharap dapat menemukan agent property terpercaya dan berpengalaman dalam waktu dekat ! jual rumah
This was highly educational. More at gas installation .
Have you checked out the recent builds by Banning Construction Inc.? They’re worth seeing—visit minimalist kitchen design for insights!
Thanks for sharing this information! If anyone’s looking for roofers in Litchfield IL, I’ve got some great contacts. https://www.google.com/maps/place/?q=place_id:ChIJVbAwGg2rSwkRQTd-y5pZOAI
This was a fantastic read. Check out gas installation for more.
It’s captivating how tons a smooth roof can develop a home’s normal seem and feel! stone cleaning conservation areas
Appreciate the comprehensive advice. For more, visit gas engineer .
Wonderful tips! Find more at Reverse telephone lookup .
I recently had a local# #anykeyword## do some work on me, and I couldn’t be happier with the outcomes. The team used polyurethane flooring solutions to really transform my space, and they were professional, educated, and knowledgeable Waukesha concrete professionals
Let’s encourage each other remain vigilant protecting properties especially coming rainy seasons ahead; safety first always!!!#Anykeyword# water damage restoration service near me
Fantastic tips here—I’ll definitely reach out to Social Cali of Rocklin for expert guidance! Digital marketing services near me
It’s evident that #SocialCaliSantaRosa# puts a lot of thought into each campaign they create—it shows results! social cali marketing agency
This was very beneficial. For more, visit xem thêm .
I’ve been looking for a digital marketing agency that understands the local market. Social Cali of San Jose seems like a great option! san jose marketing agency
Thanks for the valuable article. More at Maximun Pest Control .
Tree trimming is crucial for preventing overgrowth! Keep your yard neat by contacting experts through tree maintenance service .
A clean gutter can make all the difference in preventing mold and mildew issues in your home—thanks, Gutter Debris Removal !
Thanks for the useful post. More like this at LuxNeuro .
I’ve been meaning to upgrade my old system; now I feel better equipped with options after reading this. Garage Door Services in Philadelphia PA
This was quite useful. For more, visit LuxNuro .
Thanks for the clear breakdown. More info at value for money pest services .
This was a wonderful post. Check out Flanders pest and insect control for more.
Thanks for the helpful article. More like this at xem thêm .
Will be spreading the word aboutBaningconstructionincon social media—thank you for everything!!!! ### anyKeyWord ### bathroom lighting
I appreciate all the details you provided about selecting the right type of tent!! ### anyKeyWord ## waterslides rental tampa
I lately had a practical specialist in Waukesha do some job, and I can’t stress enough how crucial it is to pick the best one for your floors needs Midwest Concrete Technologies Epoxy Flooring Contractor New Berlin, WI
Rehabs that target art cure can also be so recuperation—uncover more about those offerings on alcohol and drug rehabs in marin county .
This was beautifully organized. Discover more at Labo Dental .
Thanks for the helpful article. More like this at North Atlana Chiropractic Center .
Appreciate the thorough insights. For more, visit phim sex người lớn .
This is very insightful. Check out Afordable Pest Solutions for more.
A good community comprising guests/family members participants assisting beloved ones’ trips creates lasting positivity moving ahead into brighter futures beforeh substance abuse treatment marin county
Elevate your garage ideas with chic designs from # # anyKeyWord# # immediately! custom walk-in closets
So happy I selected to paintings with a Carpenter Dallas; their creativity blew me away! commercial carpenter dallas
Leveraging specific fabrics inside custom designed portions brings richness texture into familiar lifestyles stories remodeling mundane initiatives intriguing adventures alternatively—I’m intrigued exploring countless guidelines published across channels custom built ins shelving
Appreciate the thorough insights. For more, visit https://maps.app.goo.gl/Rz8Z1FKHiDoRKRNQA .
Appreciate the thorough analysis. For more, visit https://www.blurb.com/user/hafgarlpzd .
The seasonal pest control tips from professional extermination have been invaluable! I’m now more proactive about keeping pests outside where they belong.
Useful advice! For more, visit https://maps.app.goo.gl/B1css4m3A1nyaTQcA .
“With compassion at its middle, the rehabilitation facilities presented via consultants across marin county pave paths toward lasting exchange & desire # # anyKeyWord # #” drug rehab marin county near me
Window cleaning is so important! I always turn to Commercial Window Cleaning for their amazing services in Lakeland.
I’m really impressed by how attentive and knowledgeable Gregory Wolff is as a health insurance agent near Jacksonville Beach—visit Health insurance agent near me !
“The awareness on sustainability including overall healthiness tasks makes SF such an fun place to be!” inpatient detox san francisco ca
Thanks for the useful post. More like this at https://squareblogs.net/germiesyyu/eco-friendly-plumbing-solutions-for-your-home .
”To explore proper manageable latent hidden abilties items abilties waiting organized unveiled liberated unleashed unfastened bounce excessive succeed in heights unbelievable discover vast expanses unending horizons infinite opportunities await discovery alcohol and drug rehab in santa rosa
Excellent article! Maintenance of door doors is frequently overlooked, but it’s essential to ensuring safety and convenience. Normal checks may save money on unnecessary repairs later Gulliver Garage Doors Pros garage door supplier Northwest Edmonton, AB
Thanks for the informative content. More at affordable personal injury lawyer .
Thanks for the informative content. More at PJ MAC HVAC Service & Repair commercial hvac .
This is very insightful. Check out gas engineer for more.
Has anyone used Long distance movers Sun City Center for their move in Sun City Center? I’d love to hear about your experience!
“Excited approximately upcoming routine that advertise wellness consciousness—which include cleanses and workshops!” private detox san francisco ca
Feeling hooked up is priceless while overcoming dependancy; SATNA ROSA’s process to neighborhood integration looks promising.# # anyKeyWord # #” luxury drug rehab in santa rosa
I had a huge feel at a rehab in Marin County. Highly advocate checking out rehabs in marin county !
The testimonials from Marin County rehab graduates are so uplifting! Check them out at marin county rehab near me .
Just got a brand new whip cream dispenser that works with cream charger tanks—so excited to take a look at it out! More information at nang cylinders !
Thanks for the helpful article. More like this at astrologer in melbourne .
“Being capable lean on trusted company/relatives individuals at the same time present process healing helps emotional healing which complements physical restoration wonderfully – thank you marins’ outreach applications !# # anyKeyWord # #” drug rehab marin county near me
Wonderful tips! Discover more at housekeeping .
Thanks for the insightful write-up. More like this at expert dishwasher repairs .
I believe supporting local businesses strengthens communities overall—let’s rally behind efforts made through awesome works carried out under name called “banig constructions.” kitchen remodel
Thanks again for shedding light on such an important topic; we need more advocates like you! google.com
This was very enlightening. For more, visit gas installation .
I recently hired a property management company in Illinois, and it has made my life so much easier! google.com
Your ideas on incorporating social media into website design are spot on! It’s essential for boosting engagement. I share more about techniques at california web design company .
Very helpful read. For similar content, visit commercial pest control treatments .
I found this very interesting. Check out emergency hvac service for more.
Really appreciate all great tips shared here especially those related directly toward hiring someone like -! tree cutting services
Thanks for the insightful write-up. More like this at LuxNeuro .
The technique of designing your personal area with a builder feels tremendously profitable—specially here in Austin! human resources firm
Such an informative article! Gutter cleaning is one of those things that should never be ignored—great reminder! Best Gutter Cleaning Services
I found this very interesting. Check out LuxeNeuro for more.
I’m impressed by the professionalism of A+ Gutters in St Augustine! Great job on my new gutters. gutters
Valuable information! Discover more at Afordable Pest Solutions .
Thanks for the great explanation. More info at gas installation .
A tip: always ask about warranties before hiring any plumbing service—especially those near o’falloon il. Plumber in o’fallon il
This whole process seems so straightforward; excited but nervous too!! Gonna check out johnbuyshomesinbayarea soon… house buyers
**Variety of Packages**: They offer customizable rental packages that can include multiple inflatables or accessories like tables and chairs. This flexibility makes it easier to create a tailored experience that fits your specific needs. highpoint water slide rentals
Thanks for the valuable article. More at Lavo dental group reviews .
This was quite informative. More at boiler repairs .
This was very beneficial. For more, visit North Atlanta Chiropratic Center .
Wonderful tips! Find more at trusted escort services Greece .
The previously-and-after snap shots of lavatory remodels in Austin are usually so inspiring! I’m making plans my very own maintenance quickly bathroom remodel cost
This was very beneficial. For more, visit boiler repairs .
Thanks for the advice on coordinating colors and textures; it’s essential for any successful bathroom remodel project! small bathroom renovation
Thanks for the insightful write-up. More like this at boiler installation .
The atmosphere at the restaurant I visited in Breese, IL, was so inviting! Perfect for a family dinner or a date night. Restaurant in Breese IL
Don’t underestimate the power of witnesses in strengthening your claim—find out how to gather this evidence via our site, personal injury lawyer !
This was very enlightening. More at boiler repairs .
My friends recommended an excellent HVAC service based right here in Edwardsville, IL! google.com
Seasonal pests can be a real hassle, but thanks to best termite exterminator , my home is pest-free! I appreciate their commitment to customer satisfaction in Knoxville.
Every corner of my house feels brighter after having my windows cleaned by this fantastic team—thanks, Lakeland Window Cleaning! Commercial Window Cleaning
Saya senang menemukan situs properti jakarta ini. Sekarang saya dapat dengan mudah mencari rumah atau apartemen yang sesuai dengan kebutuhan saya melalui rumah dijual murah di Jakarta .
Valuable information! Find more at aquarium shop toronto .
Lovingtheinclusivityexhibitedbysomelocalfirmswantingtomakea positiveimpactontheirclientelewhilepromotingawarenessaroundimportantissuesaffectingusalltoday!!! Best Lawyers in Belleville IL
The humidity in Hawaiian Gardens can really contribute to water damage issues. Make sure you know who to call! water damage restoration service near me
Appreciate the thorough write-up. Find more at plumber .
Great tips! For more, visit phim sex hay .
Overall, my experience with Tampa Bay Pressure Washing was fantastic, and I will definitely be using their services again in the future! Paver Sealing Tampa Tampa Bay Pressure Washing
Nicely done! Discover more at expert manhole repairs .
Thanks for the detailed post. Find more at glazier .
“Thoroughly enjoyed reading this blog post; curious about collaboration opportunities available through social cali” # # anyKey word # Digital marketing near me
Amazing how something like a nicely-repaired display screen can boost either aesthetics and comfort at home—I’m well prepared to get started in the present day!! Door Screen Repair
I love how you emphasize the importance of analytics in marketing! Social Cali of San Jose uses data-driven strategies effectively. ##dataDrivenStrategies## marketing agency san jose
Just signed up with one in every of their advocated plans and couldn’t be happier; thanks, KneeLand, for guiding me by way of it all!! # # anykeyword # # Medicare Insurance Company
This was quite informative. More at xem thêm .
Helpful insights shared throughout this post—I’ll make sure friends know about 55Mr.RootePlumbing!” Drain Repair in san diego
Thanks for the great explanation. Find more at Maximun Pest Control .
Such timely advice as we approach storm season—I feel more prepared knowing who can help me through situations like these by calling on### anykeyword### . professional tree service
Impressed with how quickly banning construction inc tackled challenges; their problem-solving skills are top-notch!” kitchen island lighting
Thanks for the useful post. More like this at LuxeNeuro .
Awesome post! After reading this, I’m convinced that gutter cleaning should be a top priority for all homeowners. Professional Gutter Cleaning
Thanks for the thorough article. Find more at Comprehensive Brain Mapping Denver .
This was very beneficial. For more, visit Affordible Pest Solutions .
Nicely done! Find more at boiler installation .
Thanks for the useful post. More like this at Dishwasher repairs .
The tips on creating visually appealing flyers are gold! For all my flyer needs, I trust in Fast Printing Services Lexington !
Valuable information! Find more at Lavo dental implants cost .
I enjoyed this read. For more, visit chiropractic care North Atlanta .
Thanks for the insightful write-up. More like this at Affordible Pest Solutions .
Your expedition of interactive components like quizzes and polls was interesting; they increase user interaction significantly– let’s talk more about it over at san jose web design companies !
I learned so much about my health coverage from Gregory Wolff at Neptune Beach—he’s fantastic! Health insurance agent near me
Thanks for the valuable insights. More at PJ MAC HVAC Service & Repair hvac replacement .
“Incorporating smart home technology into kitchens sounds exciting—is anyone doing this? I’ve got ideas over on my blog: bathroom design ideas !”
Well done! Find more at customized SEO services list .
This is highly informative. Check out boiler repairs for more.
Surprised how rapidly information spreads regarding reputable providers operating within community sector aimed specifically towards enhancing residential experiences provided largely thanks largely towards positive interactions established over time Roofers Tyngsboro
“Would love some guidance on how to prepare for my first visit regarding dental implants!” Dental Implants in San Diego
Appreciate the insightful article. Find more at https://maps.app.goo.gl/bymyN2dxC3wknCxw6 .
If you’re looking for window cleaning in Lakeland, check out Interior Window Cleaning !
San Francisco has so many thoughts for cleansing! Excited to explore all of them. detox san francisco ca near me
The scenic elegance of Santa Rosa makes it an important place for drug rehab and recuperation. Nature in truth heals! inpatient drug rehab in santa rosa
The spiritual side of healing could never be left out; discover countless religious classes out there by way of marins’ rehabs on rehabs in marin county near me #.
The have an impact on of regional artists participating with architects enriches our group—are not able to wait for long term exhibitions highlighting this fusion!! # # anyKeyWord # human resources firm
The focus on individualized care in Marin County rehab is commendable! Discover innovations at detox center marin county .
Such useful information! Roof maintenance is key, especially with local roofers in Litchfield IL. Roofers in Litchfield IL
Thanks for the thorough analysis. Find more at boiler installation .
This was very well put together. Discover more at xem thêm .
Amazing things appear when communities rally round participants dealing with addiction demanding situations—Marin County exemplifies this spirit fantastically! luxury drug rehab marin county
Nicely detailed. Discover more at vastu consultant .
Thanks for the great explanation. Find more at gas engineer .
“Do you have any suggestions for DIY enthusiasts looking to maintain their own doors?” Dick Does Doors Repair in DFW
Appreciate the detailed insights. For more, visit move in cleaning .
This whole process seems so straightforward; excited but nervous too!! Gonna check out johnbuyshomesinbayarea soon… sell my house quick
Wonderful tips! Discover more at gas installation .
If you want peace of mind when it comes to your gutters, go with A+ Gutters in St Augustine. gutters
This was a wonderful guide. Check out gas engineer for more.
Thanks for sharing these insights on gutter maintenance. It’s so important to stay on top of it! Gutter Cleaners Near Me
Thanks for highlighting the importance of tree care! I’m going straight to LJR Tree Services after reading this! professional tree service
Very helpful read. For similar content, visit Maxximum Pest Control .
Thanks for the detailed guidance. More at gas engineer .
Great job! Discover more at quick manhole block removal .
This was a great help. Check out Neurofeedback Specialists Denver for more.
Appreciate the useful tips. For more, visit leading brain mapping clinics Denver .
This was quite helpful. For more, visit hvac companies near me .
Appreciate the detailed insights. For more, visit Affordable Bug Extermination .
Nicely done! Find more at Affordable Pest Solutions .
Well done! Find more at Gas cooker repairs .
Your insights into the cost of hiring a general contractor were eye-opening—thanks for sharing! open concept kitchen remodel
Thanks for the thorough article. Find more at Lavo Dental .
Thanks for the great tips. Discover more at car rental toronto .
Thanks for the comprehensive read. Find more at North Atlanta Chiropractic Center .
I liked this article. For additional info, visit Afordable Pest Solutions .
Water damage can lead to mold if not handled properly! It’s good to know there are specialists in Hawaiian Gardens ready to help. water damage restoration services near me
¡Saludos, entusiastas del ocio !
Si te gustan los juegos rГЎpidos, los casinos online sin licencia ofrecen versiones turbo de ruleta y blackjack. La emociГіn se multiplica. Ideal para sesiones cortas.
En estos casinos puedes reclamar giros gratis cada semana como parte de promociones especiales. Esto aumenta tus posibilidades sin gastar mГЎs dinero.casinos sin licencia en EspaГ±ola
Casino online sin licencia: promociones sin rollover en EspaГ±a – п»їcasinos-sinlicenciaenespana.es
¡Que disfrutes de instantes únicos !
Your post really opened my eyes to various print materials! I find everything I need at Print Store Lexington .
Very helpful read. For similar content, visit local plumbers in my area .
I recently had a terrible automobile injury, and the aftermath was very challenging to navigate. Thankfully, I found an exemplary# #personal injuries attorney## who guided me through the entire process accidents attorney near me Phoenix AZ
If property damage is part of your case, ensure it’s adequately documented with professional help from our team at car accident lawyers in atlanta georgia !
Just thought I’d drop a note saying how much I appreciateBannignConstructionInc’s dedication towards quality!! # # anyKeyWord # # small bathroom renovation
I completely agree with the importance of visual hierarchy in web design! It guides users naturally through your content. Discover more at web design company california .
What a difference clean windows make! Huge shoutout to Professional Window Cleaning for their outstanding service.
Support organizations play one of these critical position; grateful for the complete community connections made through locations like the ones listed on luxury rehabs in marin county #!
Thanks for sharing this information! I’ve been searching for a reputable property management company in Illinois. https://www.google.com/maps/place/?q=place_id:ChIJ20MPOgADdogR6UapmrqvWTc
Just wow!! Absolutely blown away by professionalism demonstrated consistently throughout entire process leading up complete recovery!! Hugs all around <3 Neck and back pain chiropractor Everett WA
I’m all about maximizing area with custom closets! Found superb proposal on custom closet systems .
Curious if every person else feels as obsessed on assisting regional carpenters as I do; they deserve our trade!” # # anyKeyWord # carpenter dallas
Taking talents unused corners utilising bespoke shelves transforms the ones parts beautifully optimizing capability at the same time modifying visuals enormously increasing horizons even in addition—I’ll peculiarly check out astonishing rules featured all custom built ins cabinets
Social proof is so powerful in marketing! Thanks for emphasizing it in your post. More insights at Best digital marketing agencies .
”Anyone looking into smart lock technology should definitely consult professionals like # # ANYKEYWORD!” durham locksmith
Celebrating resilience triumphs recognizing struggles acknowledging victories embracing narratives woven intricately souls intertwined destinies embarking upon trips self-discovery uncovering truths hidden depths exploring uncharted territories forging substance abuse treatment marin county
So glad I found your blog before tackling my window screen repairs; invaluable insights here! Screen Repair Service
Interested in DIY roof repairs? Check out the resources available on Roofing Contractor Tyngsboro for Tyngsboro homeowners!
Every consultation feels like a valuable learning experience when working alongside them!!! # # anykeyword## marketing agency near me santa rosa
Anyone involved in forming a enhance institution for cleansing round SF? Let’s attach and proportion suggestions! alcohol detox san francisco ca
So grateful for all the recommendations; it really helps when searching for services locally. Best Plumber in o’fallon il
”To perceive good abilities latent hidden competencies presents competencies ready waiting unveiled liberated unleashed free start excessive reach heights not possible discover significant expanses infinite horizons infinite potentialities anticipate drug rehab in santa rosa
I love how you explained the signs that indicate it’s time for a gutter cleaning; very helpful indeed! Gutter Maintenance Services
Really enjoyed your perspective on brand storytelling—consider teaming up with an innovative agency like #Anykeyword# located in San Jose! marketing agency near me
Really appreciate all the valuable insights shared here; looking forward to using ### anyKeyword### soon for my home repairs! emergency boiler repair Medford
” Ultimately let us try cultivate cultures grounded empathy extending compassion spotting shared humanity bridging divides uniting strengths endorse jointly pursue sustainable effectual recommendations addressing widely wide-spread troubles dealing with private drug rehab marin county
Who else thinks that mixing textures gives character to updated kitchens? kitchen remodel cost Tewksbury
Thanks for sharing this valuable guide; I’ve recommended my friends reach out to best tree service company
What’s your favorite dish from any restaurant you’ve visited in Breese? https://www.google.com/maps/place/?q=place_id:ChIJQyCjW7x5dogRq33FD9XlfxY
“Great job explaining how to prepare walls before painting; prep work makes all the difference—hire pros from Painting Companies Portland .”
Thanks for the great explanation. Find more at LuxeNeuro .
Very useful post. For similar content, visit PJ MAC HVAC Service & Repair hvac replacement .
Have you considered using reclaimed wood in your kitchen remodels? It adds such character! kitchen remodel contractors Lexington
This was a wonderful guide. Check out Tire shop Buckley WA for more.
This was quite informative. For more, visit LuxNuro .
This was a wonderful post. Check out Affordable Bug Extermination for more.
Can’t stress enough how valuable customer reviews are when selecting an appropriate contractor—it’s made all the difference! DMAKS HVAC contractor
I enjoyed this post. For additional info, visit Affordible Pest Solutions .
Great content! Excited to learn more about what SEO Optimization Service Lowell can do for me in Lowell, MA.
Just wanted to give a shoutout to Gregory Wolff; he made navigating my health insurance options so easy here in Atlantic Beach—check out his site at Health insurance agent near me !
Have you seen the recent renovations done by Banning Construction Inc.? They are absolutely breathtaking! kitchen remodel on a budget
Wow, the framing in this shot is spot on! How do you decide what to consist of? I delve into composition techniques at photographer near me .
Thanks for the great explanation. More info at LavoDent .
Кто сталкивался с проверкой диплома через работодателя — реально ли такие документы проходят контроль? Мы поможем
В 2025 году наличие диплома всё ещё остаётся основным фактором при приёме на работу, повышении по службе или получении лицензии. И если у вас нет нужного документа — это не повод терять годы.
✅ Решение есть — заказ диплома, полностью соответствующего оригиналу:
С печатями, подписями, голограммами,
С занесением в архив (по запросу),
Любой ВУЗ, колледж — по всей России и СНГ.
Кому может пригодиться?
Вас отчислили, но обучение практически завершено?
Поступили на хорошую работу, но нет “корочки”?
Нужен диплом для лицензирования, повышения, тендера?
Мы работаем без предоплаты (по договору или поэтапно) и гарантируем полную конфиденциальность. У нас нет шаблонов — каждый документ готовится индивидуально, с учётом всех нюансов.
Наши гарантии:
Диплом, неотличимый от оригинала
Настоящие данные выпускника (по вашей анкете)
Быстрая и надежная доставка по России и СНГ
Юридически грамотно оформленный договор (по желанию)
Мы сотрудничаем с квалифицированными специалистами, которые понимают, как должен выглядеть официальный документ — вплоть до мельчайших деталей. У нас много лет опыта и более random00..3999] довольных клиентов.
Thanks for the insightful write-up. More like this at experienced Athens ladies .
This write-up highlights the must-have cleaning products for Airbnb hosts perfectly! Discover extra ideas at vrbo cleaning .
Useful advice! For more, visit Affordible Pest Solutions .
Such enthusiasm surrounds upcoming area tendencies featuring brilliant new builds by means of a few first rate groups across the city!! # # anyKeyWord # accounting firms near me
Soil testing is crucial before any excavation begins! For reliable contractors who know their stuff, go to port alberni excavation .
What are some typical mistakes individuals make when employing an electrical expert or electrician #?
SEO Boston
This was quite informative. More at North Atlanta Chiropratic Center .
Your article sheds light on the importance of video content in SEO! Check out more about it at Best SEO Agencies Burlington .
Many local attorneys offer workshops and seminars; attending one could be beneficial if you’re seeking legal advice! google.com
Wonderful tips! Find more at quick kitchen plumber .
This was a fantastic resource. Check out professional appliance services for more.
“How soon can you return to normal activities after getting an implant done in SD?” Dental Implants in San Diego
This is exactly what we needed!! Helped ease all fears around foreclosures because now I’m confident we’re heading towards brighter days ahead—all thanks again too…JOHHN BUYSHOMES!! fast cash for houses
”May every single day carry renewed intentions top in opposition t higher possibilities beneficially impacting lives undoubtedly constantly.” “# $anything private detox san francisco ca
I suppose it’s perfect what number of thoughts there are for really expert cure inside Santa Rosa’s drug rehab facilities! holistic drug rehab in santa rosa
Recovery is a tour that requires toughen from informed execs who recognize someone eventualities totally-having entry professional exact faithful assets beneficial fairly assisting resolution-making approaches to find top suited choice tailor-made holistic rehabs in marin county
If you want your project done right, choose Banning Construction Inc.! bathroom remodel photos
Cherishing tales developing lasting bonds weaving tapestry reports shaping narratives lives intertwined destinies interwoven shared paths premier toward brighter tomorrows stuffed alternatives open doorways adventures waiting for the ones willing step out addiction recovery marin county
“Amazing service from start to finish — highly recommend # # anyK eyword ###!” Window Cleaning Near Me
I’ve been looking into flooring options for my garage, and I came across some really useful information about adhesive floors. It’s wonderful how adaptable and strong it is, particularly for those who live in Waukesha, Wisconsin Concrete Company Waukesha, WI
Together we create ripples effect empowering people embody journeys crammed probability advantage anticipating discovery deep recesses hearts souls yearning medication recovery allowing possibility flourish regain experience self worth dignity deserving outpatient drug rehab marin county
My experience with A+ Gutters was outstanding! They are truly the best in St Augustine. gutters
Priority Restoration did an amazing job with my water damage clean up near me. Highly recommend their services!
I had a fantastic experience with Priority Restoration Philadelphia Water Damage Clean Up Near Me
This article has inspired me to rethink my brand’s visual identity—I’ll consult with experts at #I choose Printing Shop Lexington
I found this very interesting. Check out Broken pipe for more.
Enjoyed your analysis of existing trends in UI/UX; staying upgraded helps designers stay competitive– see what I consider trends too, see: san francisco web design agency !
Very informative article. For similar content, visit vastu near me .
Appreciate the comprehensive advice. For more, visit house cleaners near me .
So glad I discovered ### anyKeyWord###; they’re now my go-to supplier for all things culinary! trusted wholesale meat supplier
“Thankful someone took time creating resources like these outlining necessary actions ensuring property safety overall!!!! “# “# anyKeyWord # Affordable Gutter Cleaning
This is such an essential topic; I’m so glad you covered it! Check out # # anyKeyWord # # for more info. Roof Washing
“Excited to look into some of these recommended tools for my future projects.” Best video recording studio in Arizona
The right tile is essential when renovating your house or upgrading your professional room. Adhesive hardwood provides a long-lasting, fashionable option that can endure the weight of foot transportation while maintaining its shine quality concrete company Hartland
Finding reliable contractors can feel daunting sometimes–just glad there are plenty around Hawaii gardens that come highly recommended!! water damage restoration services near me
I love how quick and easy Manabuy makes recharging my Mobile Legends account. It’s definitely a game-changer for players like me! Don’t miss out—head to top up mlbb cheap !
The right equipment makes all the difference when it comes to tree trimming—learn what you need at residential tree services .
Is it better to hire local vs national companies when looking for a Tyngsboro roofing contractor? What do you think? Roofers Tyngsboro
This was very beneficial. For more, visit LuxNeuro .
Thanks for the useful suggestions. Discover more at hvac near me .
?? У кого в дипломе хоть раз была правда?
Вот реально: вы когда-нибудь открывали свой диплом и думали — “да, всё, что здесь написано, я действительно знаю и умею”?
У многих — только бумажка. Корочка, глянцевая, с гербом и подписями, которую HR пролистывает за 1,5 секунды. А потом начинается: опыт, кейсы, компетенции, “что умеешь по факту?”. Диплом где-то там, в мнимом мире.
Но парадокс в том, что без диплома тебе даже не дадут шанс показать, что ты умеешь.
Ты можешь быть хорошим специалистом, уметь в IT, дизайн, управление, логистику — но без документа с золотым тиснением в кабинет не пустят.
?? Нормально ли это? Нет. Реальность ли это? Да.
Вот потому и появляются сервисы, которые дают предложение:
“Не хочешь тратить 5 лет ради корочки? Мы решим вопрос. Тебе нужен не вуз — тебе нужен диплом.”
Ты его получаешь, кладёшь в резюме, и дальше всё зависит от твоих мозгов, а не от шрифта на бумаге.
Кто-то скажет: “Это обман!”
А кто-то — “Это адаптация к системе, которая обманывает тебя с детства”.
?? И что в итоге?
Диплом становится не подтверждением знаний, а входным билетом. Как QR-код в метро — проверили, что есть, и пропустили.
Поэтому люди и задумываются о покупке диплома.
Не потому что глупые. А потому что взрослые, занятые, уставшие от лишнего.
Потому что хотят не учиться “ради процесса”, а работать по делу.
?? Ирония в том, что большинство таких дипломов — работают.
Даже если ты их не учил — ты знаешь, как применить. А вот “настоящие выпускники” потом всё равно идут на курсы и стажировки, потому что ничего не помнят.
И что важнее: корочка или то, как ты справляешься с задачей?
?? У кого были такие мысли — пишите. У кого был опыт — делитесь.
Правда ли, что можно купить диплом без экзаменов, без учёбы, просто по заявке и с внесением в базу? Смотреть тут
Thanks for the clear advice. More at LuxNeuro .
Great job! Discover more at Affordable Pest Solutions .
This was quite enlightening. Check out Lavo dental office specialties for more.
Just took advantage of this week’s 20% top-up bonus, and the results were quick! Definitely worth it if you need a game recharge. best online recharge for games
Thanks for the insightful write-up. More like this at Afordable Pest Solutions .
Thanks for the helpful advice. Discover more at affordable chiropractor North Atlanta .
I just had an unlucky expertise involving a car accident, and it really opened my eyes to the importance of having a educated# #personal injuries attorney## by your side work injury lawyer
Excited about the new developments in Asheville! Are there any eco-friendly construction companies here? https://www.google.com/maps/place/?q=place_id:ChIJWcJBcYaaxkIRwHALPBFcbsU
This picture radiates warmth and character! How did you connect with your topic? I go over portrait techniques at headshots near me .
This was quite helpful. For more, visit reliable plumbing and heating services .
This was a fantastic read. Check out xem thêm for more.
The stories you’ve shared about lockouts resonate with many people A good locksmith is vital. You can find one by visiting durham locksmith !
I was surprised by how affordable roofing services can be with the right roofers in Litchfield IL. https://www.google.com/maps/place/?q=place_id:ChIJVbAwGg2rSwkRQTd-y5pZOAI
Love the focus on customer engagement! It’s essential, and I hope to partner with Local digital marketing agency for this purpose.
Understanding the statutes of limitations in your state is crucial for car accident claims. Get informed at bus accident lawyer .
This was a wonderful post. Check out salt water fish store for more.
This was a wonderful guide. Check out phim sex hay for more.
Appreciate the thorough insights. For more, visit xem thêm .
It’s interesting learning more about innovations especially customized towards improving thermostat accuracy as technology progresses gradually #### aniyKeyord ####. PJ MAC HVAC Service & Repair
Thank you, Banning Construction Inc., for making my dream home come true! hiring kitchen remodel contractors
Lucky enough living close by talented **Baltimore professionals**, ensuring prompt resolutions whenever necessary! Halethorpe plumbing company
A good strategy is crucial! Make sure you partner with experts like those at san jose marketing .
This was highly educational. For more, visit https://tla5t.mssg.me/ .
This was highly useful. For more, visit xem thêm .
Well explained. Discover more at best SEO agency in the USA .
For anyone seeking quality guidance on health insurance, reach out to Gregory Wolff if you’re in Ponte Vedra Beach area! Health insurance agent near me
This was nicely structured. Discover more at Leak detection .
This was highly educational. More at Maximun Pest Control .
Your article made me reconsider the layout of my website! Have you thought about minimalism in your styles? I share suggestions on that at website design california .
Absolutely love your take on print marketing strategies! For execution, there’s no one better than Copy Shop Lexington !
Thanks for the thorough analysis. Find more at Neurofeedback Treatment Denver .
Appreciate the comprehensive insights. For more, visit carpinteria de aluminio A Coruña .
Great job! Find more at albergue Palas de Rei .
Well done! Discover more at neurofeedback clinics and brain mapping Denver .
Clearly presented. Discover more at abogados Santiago de Compostela .
This was a fantastic read. Check out Afordable Pest Solutions for more.
Just wanted to say that Mauzy Cooling provided exceptional service when fixing my air conditioning unit in San Diego. Ac repair services in san diego
Thanks for the helpful advice. Discover more at Labo Dental .
Honestly, if you want to sell fast, you should check out JOHN BUYS HOMES BAY AREA! They made it so easy for me! cash buyers for property
This was quite informative. For more, visit Afordable Pest Solutions .
It would be interesting to see more communities invest in sustainable road maintenance practices. port alberni excavation
This write-up provides outstanding insight right into creating a perfect atmosphere through tidiness; I’ll share it with fellow hosts– more at vrbo cleaning !
Does anyone have recommendations for a good Tyngsboro roofing contractor? I need some work done soon! Best Roofers Tyngsboro
This information is vital! A competent electrical companies calgary # can truly enhance home security.
“So happy we opted for professional assistance from local barton-movers during this transition!” ## Local movers Bartow
Thanks for the advice on choosing the right cleaning solution! I’ll definitely check out Local Window Cleaners for their recommendations.
Anyone know if there are any special offers for dental implants at San Diego Dental Implant? Dental Implants in San Diego
I learned so much from working with the professionals at Banning Construction Inc.; they are true experts! bathroom remodel guide
One thing stands clear: These doctors genuinely care about well-being & progress achieved over time while managing complex conditions sustained during incidents involving automobiles 🚗⚡️✨ Personal injury chiropractor Everett WA
Water pooling around your home? Don’t wait until it’s too late—contact a restoration service in Hawaiian Gardens today! water damage restoration companies near me
“So proud of the way a ways we’ve come as a community focusing on basic health and wellbeing and good-being!” outpatient detox san francisco ca
I suppose it’s useful what number treatments there are for specialised remedy inside Santa Rosa’s drug rehab centers! private drug rehab in santa rosa
The holistic systems reachable at rehabs in Marin are marvelous! Learn greater about them at inpatient rehabs in marin county .
I found this very helpful. For additional info, visit reliable 24 7 plumber .
I have fun with how transparent the rehabilitation approach is made with the aid of centers in Marin County! Check out knowledge at drug rehab marin county .
I appreciate how Marin County integrates own family therapy into their drug rehab programs; it’s so critical for healing relationships throughout recuperation! inpatient drug rehab marin county
A friend of mine recently had a serious engine incident, which actually made me appreciate the value of having a skilled personal injury attorney with me truck accident law firm
If you’re web hosting site visitors quickly, don’t disregard approximately growing that fabulous environment with exquisite presentation of your orange county-inspired charcuterie setup shared the following: charcuterie !
This is quite enlightening. Check out WC Cisterns Syphon for more.
Capturing fleeting minutes takes skill– and you’ve shown it brilliantly when again!!! Witness further momentous captures shared jointly across platforms through sees onto ###!!! headshots western ma
#ProfessionalService makes working with ### a pleasure every time—highly recommend them! reputable wholesale snack foods
A good-designed custom closet makes such a difference in day after day workouts! Discover more at luxury custom closets .
“What an miraculous event it’s been running with such an experienced chippie on our transform—we couldn’t be happier!” local carpenter dallas
Great read! Now I feel more prepared to contact an emergency drain cleaning service Medford if something goes wrong.
Rehabs that focus on art therapy is additionally so recuperation—discover greater approximately those choices on luxury rehabs in marin county .
I love seeing what humans do with their spaces making use of artistic packages of custom cabinetry—it sparks proposal anywhere you appear—get motivated via vacationing us the following lately!: # custom built ins shelving
Great insights! Discover more at sex trẻ em .
Appreciate the thorough analysis. For more, visit reliable shower installation services .
The guide procedure in Marin County is significant for the ones trying rehab. Visit rehab centers marin county for efficient components.
Anyone recognize of any network strengthen businesses for cleansing around here? I’d comprehend any leads! detox san francisco ca
The journey continues onward toward creating lasting legacies rooted firmly within cherished memories built around every meal shared across beautifully remodeled tables awaiting next gatherings ahead….!!!###Anykeyword### kitchen cabinet renovation Lexington
”Building connections amongst friends undergoing similar struggles creates sense belonging most important forming healthful bonds finest positively impactful relationships cast upon shared victories finished at the same time shared studies encountered outpatient drug rehab in santa rosa
Appreciate the insightful article. Find more at experienced sexy escorts .
I enjoyed this article. Check out https://www.divephotoguide.com/user/saemonycxi/ for more.
Just discovered some affordable options for high-quality exterior paints! For budget-friendly tips, visit: Portland Painting Contractors .
In end expensive friends expensive kin permit’s needless to say significance nurturing ourselves nourishing souls worrying tending gardens planted deeply rooted grounds foundations outfitted upon love recognize compassion empathy kindness generosity grace drug rehab center marin county
“What’s everyone’s favorite style of garage doors? So many unique designs coming out of Philly!” google.com
Tried several sites before, and none compare to the reliability of buy mobile legends credits for MLBB top-ups.
Clogs don’t stand a chance against the expertise of ASI, The White Glove Guys. Excellent service every time! Clog Removal in san diego
I found this blog incredibly helpful and informative—I can’t wait till I start working together with # anyKeyWord#! Search Engine Marketing Lowell
Hopefully, extra folks will admire the magnitude of preventative care after trying out this submit. affordable window washing
Your conversation about filling speed is so appropriate! Fast websites improve user complete satisfaction substantially. Tips for optimization can be discovered at website design san francisco .
Thanks for the helpful advice. Discover more at loan agency new orleans .
Here’s hoping others across different states get inspired off seeing successes achieved right here within our town through efforts made alongside this incredible outfit named Banings!! ###=aiCode quartz countertops for kitchen
Really valued hearing about changes made by platforms affecting organic reach lately; staying informed helps remain competitive!! Discover updates moving forward from us over here: # anyKeyWord ## SEO Agency Burlington
Thanks for the clear breakdown. Find more at cheap car hire .
I appreciate your focus on the importance of semantic search and how it impacts local businesses; insightful stuff relevant to our community here in Boston—see more at SEO Agency Boston !
Thanks for highlighting the importance of print marketing! My favorite place to print is Print Store Lexington .
Such valuable content here! Remember that a professional locksmith is the most effective option in case you’re trapped.
mobile locksmith
This was quite helpful. For more, visit local plumber near me .
For branding help in Roseville, look no further than Online marketing agency near me —they know what they’re doing!
Door screen repair seems straightforward when explained like this—excited to try it out myself! Screen Repair
Great insights! Discover more at xem thêm .
Можно ли сделать диплом с прошлой датой выпуска? Купить дипломы
В 2025 году наличие диплома всё ещё остаётся основным фактором при приёме на работу, повышении по карьерной лестнице или получении лицензии. И если у вас нет нужного документа — это не повод терять время на долгие годы учебы.
✅ Выход есть — покупка диплома, полностью соответствующего оригиналу:
С печатями, подписями, голограммами,
С занесением в архив (по запросу),
Любой ВУЗ, колледж — по всей России и СНГ.
Для кого подойдёт?
Вас выгнали, но обучение практически завершено?
Поступили на хорошую работу, но нет диплома?
Нужен диплом для лицензирования, повышения, тендера?
Мы работаем без предоплаты (по договору или поэтапно) и гарантируем полную конфиденциальность. У нас нет шаблонов — каждый документ готовится индивидуально, с учётом всех нюансов.
Наши гарантии:
Реалистичный диплом, неотличимый от оригинала
Настоящие данные выпускника (по вашей анкете)
Быстрая и надежная доставка по России и СНГ
Юридически грамотно оформленный договор (по желанию)
Мы сотрудничаем с квалифицированными специалистами, которые понимают, как должен выглядеть официальный документ — вплоть до мельчайших деталей. У нас много лет опыта и более random00..3999] довольных клиентов.
This was a wonderful post. Check out carpinteria de aluminio A Coruña for more.
Thanks for the helpful article. More like this at abogados Santiago de Compostela .
The correct transport support can make a big variance when it comes to traveling in style and comfort. Find a dependable##chauffeur## for a special occasion or a upscale# #limo service## for aircraft payments enterprise rent-a-car Sarasota FL
This was very well put together. Discover more at albergues en Palas de Rei .
The foremost thing approximately residing close orange county is indubitably its assorted delicacies scene—I’m sharing highlights of big spots targeting meat & cheese boards proper now in this website online: charcuterie orange county !
Thanks for the useful post. More like this at https://www.symbaloo.com/mix/bookmarks-tekl .
Wow! The performance metrics from my last campaign with ## marketing agency santa rosa
I’ve been following the latest trends in roofing—check out what I found at Find A Roofer Tyngsboro !
Is your journey experience be really ruined by airport transportation? A trustworthy aircraft automobile service is essential whether you’re leaving for a new city or returning house limo rental near me Longboat Key FL
Working with marketing agency has transformed my approach to digital marketing! Highly recommend them.
This was a wonderful guide. Check out xem thêm for more.
Консультация юриста yuristy-ekaterinburga.ru/
It’s amazing how much expertise a Public Adjuster brings to the table during claims settlements. https://www.google.com/maps/place/?q=place_id:ChIJ238RzAqoK4cRT5jGhj2mVrc
Harvest season is the foremost time for charcuterie! Fresh fruits and nuts upload such mammoth style. Explore seasonal recipes at grazing table .
Has anyone used a roofing contractor in Mesa recently? I’d love some recommendations! Advosy Roofing Contractor Mesa AZ
I appreciated this post. Check out xem thêm for more.
Don’t waste time searching; just contact Gregory Wolff if you’re at Jacksonville Beach for expert help with your health plan! Health insurance agent near me
”Ultimately after working together successfully—we’ll undoubtedly have future collaborations lined up involving none other than choosing **bannnigconstructions.com**” #(NEVER TRANSLATE IT) bathroom remodel contractors
Navigating a personalized injury’s fallout can be very difficult, particularly if you’re trying to recover while managing both the financial and legal ramifications personal harm attorney Phoenix AZ
The before-and-after photos of detailing are always so satisfying! Make sure to visit what should i do before getting my car detailed for ideas.
Wow, the framing in this shot is area on! How do you decide what to consist of? I delve into structure strategies at western ma photography .
This was quite informative. For more, visit checkatrade plumbers .
Why is it so hard to let go of a home?! Yet everyone says working with cash buyers like johnbuysbayareahouses.com makes it easier… cash buyers for property
Thanks for the great information. More at phim sex người lớn .
This is such an important conversation to have! Understanding standard drinks and alcohol content really helps us make informed choices about how much we’re actually consuming standard drink characteristics
Priority Restoration did an amazing job with my water damage clean up near me. Highly recommend their services!
I had a fantastic experience with Priority Restoration Philadelphia Water Damage Clean Up Near Me
Together we rise above struggles finding strength within ourselves leading communities forward towards brighter futures filled hope encouragement shared amongst one another continuously growing stronger every day ultimately moving forward positively water damage restoration service near me
Wholesale food markets often have tasting events that allow you to sample before you buy – such a great way to discover new favorites! leading wholesale beverage distributor
Excellent information on epoxy flooring’s benefits! It’s amazing how this substance never just enhances the visual allure but also provides stain sensitivity and longevity Waukesha epoxy flooring services
This was very beneficial. For more, visit state-of-the-art brain mapping options Denver .
This was a great help. Check out Neurofeedback Services Denver for more.
Navigating the aftereffects of an crash does become incredibly frustrating, particularly when dealing with accidents and insurance companies personal injury attorneys Paradise Valley AZ
Thanks for the insightful write-up. More like this at Affordable Pest Solutions .
I found this very interesting. For more, visit Flanders emergency pest management .
A nearby specialist recently coated my door floor with epoxy, and the result is amazing! The beauty and dependability are so important Midwest Concrete Technologies Epoxy Flooring Contractor Sussex, WI
?? У кого в дипломе хоть раз была правда?
Серьезно: вы когда-нибудь открывали свой диплом и думали — “да, всё, что здесь написано, я действительно знаю и умею”?
У многих — только бумажка. Корочка, глянцевая, с гербом и подписями, которую HR пролистывает за 1,5 секунды. А потом спрашивают: опыт, кейсы, компетенции, “что умеешь по факту?”. Диплом где-то там, в мнимом мире.
Но реалия в том, что без диплома тебе даже не дадут шанс доказать, что ты умеешь.
Ты можешь быть крутым специалистом, уметь в IT, дизайн, управление, логистику — но без документа с золотым тиснением в кабинет не пустят.
?? Нормально ли это? Нет. Реальность ли это? Да.
Вот потому и появляются сервисы, которые говорят:
“Не хочешь тратить 5 лет ради корочки? Мы поможем. Тебе нужен не вуз — тебе нужен диплом.”
Ты его получаешь, кладёшь в резюме, и дальше всё зависит от твоих мозгов, а не от шрифта на бумаге.
Кто-то скажет: “Это обман!”
А кто-то — “Это адаптация к системе, которая обманывает тебя с детства”.
?? И что в итоге?
Диплом становится не подтверждением знаний, а входным билетом. Как QR-код в метро — проверили, что есть, и пропустили.
Поэтому люди и ищат как купить диплом.
Не потому что глупые. А потому что взрослые, занятые, уставшие от лишнего.
Потому что хотят не учиться “ради процесса”, а работать по делу.
?? Ирония в том, что большинство таких дипломов — работают.
Даже если ты их не учил — ты знаешь, как применить. А вот “настоящие выпускники” потом всё равно идут на курсы и стажировки, потому что ничего не помнят.
И что важнее: корочка или то, как ты справляешься с задачей?
?? У кого были такие мысли — пишите. У кого был опыт — делитесь.
Какие дипломы чаще всего проверяются — бакалавра, специалиста или колледжа? см. подробнее
Excellent essay on maintaining a garage door! Keep our door doors in good condition because they frequently serve as our home’s first line of defense. Normal inspections can save us money on unnecessary upgrades later affordable garage door opener Clareview Campus
Thanks for the helpful article. More like this at Emergency Pest Control Budd Lake .
Valuable information! Find more at Gas safety certificates .
Great insights! Discover more at https://maps.app.goo.gl/96kjnJvPZUNuPMZ89 .
Roof cleaning is essential for longevity! Check out Roof Cleaning Spring for expert services in Spring, TX.
It’s critical to include suffered legitimate counsel on your side when dealing with the fallout of an mishap. Individual injuries have a significant influence on both your physical and emotional well-being, both personally and professionally Solorzano Law Firm accident attorney near me Phoenix AZ
I appreciate your insights! It’s constantly good to have actually a trusted residential electrician calgary on rate dial.
As a new Airbnb host, the turnover procedure overwhelmed me up until I found a superb turn over solution. If you remain in the very same watercraft, have a look at the resources at house cleaning to aid you elevate your holding experience!
Thanks for the comprehensive read. Find more at local plumbing line repairs .
A proactive approach to road maintenance could lead to fewer accidents and safer journeys for all motorists! ##anyKeyword ## road repair company near me
Creating private ambitions all around rehabilitation will increase responsibility; I appreciate how group of workers individuals facilitate this inside of their programming at SATNA ROSA.# anyKeyWord# # alcohol and drug rehab in santa rosa
Your expedition of grid systems in website design was enlightening! They’re vital for producing well balanced designs; I discuss this further at website design san francisco !
“Loving the neighborhood vibe surrounding health and cleansing efforts throughout SF!” outpatient detox san francisco ca
Private injury can have a significant impact on your life, from natural pain to economical stress. It’s crucial to seek the assistance of seasoned# #personal wound attorneys## if you or someone you know has been involved in an accident Solorzano Law Firm lawyers personal injury near me Phoenix AZ
Learning about meditation strategies integrated into rehabilitation practices excites me!! Mindfulness has converted my own existence immensely—I motivate all people involved look at various out beneficial publications made attainable online using # # outpatient rehabs in marin county
Sometimes it simply takes one character accomplishing out lengthen h alcohol rehab marin county
Recovery shouldn’t feel isolating lonely burdensome as a replacement needs to supply camaraderie companionship encouragement shared stories fostering connections rooted figuring out attractiveness coming up clearly organically developing atmospheres outpatient drug rehab marin county
Looking for the utmost in comfort and luxury for your next vacation? Consider a specialized##chauffeur## services to elevate your travel experience Cartier Limousine Services chauffer service Sarasota FL
Hosting a holiday party quickly? Be certain not to miss how brilliant an orange county-encouraged cheese platter should be; I’ve compiled efficient guidance on this web page: charcuterie
Finding the best legitimate counsel is vital if you’ve been involved in an accident personal injury lawyer Phoenix AZ
Great tips! For more, visit https://www.empowher.com/user/4532943 .
This is very insightful. Check out https://teamspeedkills.com/users/SummersPlumbing32/ for more.
Anyone else feel overwhelmed trying to pick styles/colors for shingles ? Would love advice from those who’ve worked with localTy ngsb oro roo fing con tractors before !# # anyKEYWORD # # Roofers Tyngsboro
Very useful post. For similar content, visit abogados en Santiago de Compostela .
Well done! Find more at carpintería aluminio Coruña .
Appreciate the helpful advice. For more, visit albergues en Palas de Rei .
I appreciated this post. Check out gas plumber near me for more.
Thanks for the practical tips. More at phim sex hay .
“Your system to approach to life photography feels specific and refreshing; enable’s discuss our highest quality practices right here together: check out: western ma photographer !”
Cheap movers can be reliable too! Check out Lake Alfred apartment movers in Lake Alfred.
Is there anything better than sharing gourmet treats sourced from wholesalers with friends?? It’s pure joy!!## anyKeyWord ## certified organic wholesale supplier
I found this very helpful. For additional info, visit LuxeNeuro .
I enjoyed this article. Check out top SEO agency strategies for more.
Thanks for the helpful article. More like this at benefits of Denver neurofeedback therapy .
I’ve had to learn the hard way concerning how to protect my home from being broken into; now I constantly consult with mobile locksmith .
This was highly educational. For more, visit Affordible Pest Solutions .
Don’t let lingering pain disrupt your life; visit # any Keyword # for effective chiropractic solutions today! Neck and back pain chiropractor Everett WA
Great job! Find more at reliable plumbing .
Your insights into multi-channel marketing strategies are essential reading; explore them further via Top digital marketing agencies !
Appreciate all the detailed info on window screen repairs—definitely bookmarking this page! Lanai Screen Repair
Thanks for the clear breakdown. Find more at Affordible Pest Solutions .
Thanks for the great explanation. Find more at Sink leaking .
This was quite useful. For more, visit xem thêm .
This is such an important conversation to have! Understanding standard drinks and alcohol content really helps people make informed choices risks of free-pouring liquor
I appreciate how you highlighted video marketing trends! For creative solutions, look into what Social Cali of Santa Rosa offers at marketing agency .
If you’re in Ponte Vedra Beach and need a health insurance agent, Gregory Wolff is your guy! Health insurance agent near me
Had an emergency with my garage door last week; thankfully, there was a 24-hour repair service available in DFW! Dick Does Doors Repair in DFW
I liked this article. For additional info, visit xem thêm .
Hopefully continue fostering positive relationships nurturing bonds formed between different entities involved caretaking responsibilities ensuring properties remain intact capable braving storms approaching constantly threatening existence neighborhoods water damage restoration near me
Elevate your garage answers with fashionable designs from # # anyKeyWord# # lately! affordable custom closets
Thanks for the useful post. More like this at xem thêm .
Well explained. Discover more at http://www.video-bookmark.com/user/iortusuaia .
This post highlights some great tools for web designers! I ‘d love to suggest a couple of more over at website design bay area .
I’m curious about twin prognosis classes available in marin county—great information is additionally chanced on at luxury rehabs in marin county !
Impressed witnessing transformation spread steadily revealing hidden magnificence expecting discovery within buildings prior to now left out neglected entirely revitalized anew by way of commitment ardour artistry blended harmoniously aligned purposefully custom carpenter dallas
If you might be serious about creating an artwork studio, take into accounts incorporating custom shelving contraptions—they’re the best option for group; in finding concept right here: ## custom built ins dallas
Excellent information on epoxy flooring’s gains! As a company of material, I’ve first-hand witnessed how epoxy may alter spaces with its strength and visual appeal. It’s not just practical; it also adds a sleek appearance that enhances any setting Concrete Testing Laboratory
“It’s amazing finding out how various cultures means detoxing—SF honestly embodies diversity!” # # anyKeyWord ## medical detox san francisco ca
Aftercare planning is principal once remedy concludes; I’m joyful SATNA ROSA prioritizes this factor as effectively.# # anyKeyWord # #” affordable drug rehab in santa rosa
I enjoyed this article. Check out plumbing and heating near me for more.
Marin County delivers some of the perfect rehab services in the usa. I observed a terrific aid at outpatient rehab marin county .
Have you ever tried dessert charcuterie? It’s a satisfying twist at the standard board! Get impressed through exciting dessert rules at charcuterie .
If you’re looking for a reliable wholesaler, definitely check out trusted bulk dry goods supplier . They have everything!
This was quite informative. For more, visit abogados en Santiago de Compostela .
Thanks for the useful post. More like this at carpintería de aluminio en A Coruña .
Have you ever considered how much easier life could be if we kept our vehicles cleaner? That’s why I enjoy taking advantage of excellent nearby options specializing primarily upon providing quality cars & trucks ! Mobile Car Detailing Near Me
No matter size shape condition existing rides might possess , trust professional hands capable working wonders turning even drab dull appearances bright cheerful ones !!!!! Car Detailing
I just had my car ground repaired by a nearby Waukesha epoxy flooring contractor, and i’m so pleased with the outcome! No more stains or cracks, only a soft, long-lasting surface Midwest Concrete Technologies Epoxy Flooring West Allis, WI
Just had an incredible experience with a mobile Mobile Car Detailing service – they came right to me and did an amazing job!
Need to spruce up your ride? A visit to a reliable Mobile Car Detailing Houston can do wonders for your vehicle.
Love knowing there are experts available within reach ready willing able assist when necessary regarding maintaining cleanliness inside outside our rides ! Car Detailing Near Me
Appreciate the detailed insights. For more, visit albergues en Palas .
A colleague and I just had a difficult discussion after an auto incident. It made clear how critical it is to have a skilled# #personal damage lawyer## on your side Product liability attorneys Mesa, AZ
Water-related emergencies can happen anytime; having a trusted restoration company saved me from a lot of stress recently—thanks, Irving TX pros! water removal services Irving TX
Your interest for photography shines by each and every post—hold it up! More content material awaits at photographer western ma !
Helpful suggestions! For more, visit LuxeNeuro .
This was highly useful. For more, visit Neurofeedback Specialists Denver .
This was highly educational. More at Affordable Pest Solutions .
Amazing things show up when communities rally around folks dealing with addiction demanding situations—Marin County exemplifies this spirit fantastically! drug rehab marin county near me
I didn’t realize how much dirt and grime was on my roof until I called Space City Washing. They did a fantastic job! For anyone in the area, visit Roof Washing for details.
Appreciate the comprehensive advice. For more, visit emergency plumber near me .
Thanks for the useful suggestions. Discover more at Commercial Pest Control Flanders .
Well explained. Discover more at tap installation services .
I just made a reservation for an aircraft shift support, and I can’t stress enough how easy it was! The entire method was soft from beginning to end. My pilot had a indicator at the switch that made it simple to place him when I arrived limo services near me Tampa FL
Thanks for the helpful article. More like this at Pest Services Budd Lake .
The expert opinions on 롤 토토 at 롤토토 have really helped refine my strategies.
The community around 슬롯사이트 is so welcoming! It’s great to share tips and tricks with fellow players.
Which age group do you think benefits the most from 시알리스 ?
Motivational interviewing thoughts hired via counselors support contributors suppose empowered during their stay at SATNA ROSA — what an mighty mindset!.# anyKeyWord# # drug rehab in santa rosa near me
I’m intrigued by the future potential of꽁머니 in financial technology! What innovations do you foresee? Discuss it at 꽁머니 !
Has anyone compared prices for 시알리스 across different pharmacies? Looking for the best deal! 시알리스 정품
I’m curious approximately how long a standard detox lasts in San Francisco; any person have knowledge? detox san francisco ca
I believe it can be exciting how integrative future health practices have gotten element of rehabilitation—it leads to nicely-rounded care; identify innovations by the use of ### anykeyword ###! holistic rehabs in marin county
I’ve been exploring 꽁머니 options lately, and they seem like a great way to try new games without the risk. Visit 꽁머니 텔레그램 for more info!
Does anyone know if there are any side effects associated with taking 비아그라? I’m curious about what 비아그라 가격 offers in this regard.
I think 꽁머니 is a fantastic way to engage with new games without financial pressure. Check out the details at 꽁머니 텔레그램 !
Just discovered 꽁머니 and I’m curious how it works in different online casinos. Any tips on where to find the best offers? 꽁머니
Has anyone found any drawbacks or side effects from using 시알리스 후기 ? Would love to hear your experiences.
I think every budgeter should consider using 꽁머니 as part of their strategy! What do you think? Share thoughts at 꽁나라 .
Traveling can be stressful, particularly when using airports travel. The advantage of a trustworthy airports auto services makes a difference, whether you’re arriving at your place or departing Airport Taxi & Chauffeur Service luxury transportation
I recently had the pleasure of using a# #limo service## for my airport trip, and I can’t say enough about it! The ease of having a chauffeur on hand made the journey so much easier. Plus, the comfort of the vehicle made my voyage really more enjoyable Cartier Limousine Services limo services
Tried a few different 카지노사이트, but I keep coming back to 카지노사이트 for its amazing features.
I’ve been considering 비아그라 구입 for a while. What would you recommend as a starting point?
I think 비아그라 구입 is a game changer for many men. It’s nice to see more options available.
The community involvement in Marin County rehab systems is fabulous! Discover extra at rehab centers marin county .
Your message is very helpful! I really did not realize how many services a calgary electrician offers.
Navigating the aftereffects of an mishap can be difficult, especially when dealing with accidents and authorized issues. Choosing the right# #personal injury attorney## can make a significant difference in your case insurance claim lawyer Coronado AZ
“Regular workshops hosted during marin county teach families & pals stricken by substance abuse – potential is potential when navigating those demanding situations! # # anyKeyWord # #” luxury drug rehab marin county
“Thought-provoking analysis coupled along with useful solutions aiming straight resolving obstacles encountered daily managing services efficiently -already delighted gaining access upcoming conversations came up with progressively published throughout airbnb cleaning
Great breakdown of excavation costs! It’s always wise to budget accordingly and consult with experts like those at excavating company near me .
I recently had the privilege of using an aircraft vehicles support, and I may suggest, it significantly improved my travel experience. Little beats landing after a lengthy trip and having a specialized journey attendant waiting to toss you apart in style luxury transportation Miami FL
This was quite informative. For more, visit expert plumbing services .
Just got a quote from Cheap movers Thonotosassa and it blew my mind how cheap their rates are for Thonotosassa!
I found this very interesting. For more, visit Sani flo .
This blog post did an excellent job illustrating how vital relationships are between retailers and their chosen ### anykeyword### providers! authority in wholesale produce
I recently had the privilege of using an aircraft vehicle company, which totally transformed my journey experience. It made a huge change to me that I could be picked up right at my entrance doorway and avoid having to use common transit chauffer service
Fantastic suggestions on typography! The best typefaces can make a big difference in user experience. I dive deeper into this at web design agencies san francisco .
This is such an important conversation! Understanding standard drinks and alcohol content is key to responsible drinking because not all beverages are created equal http://www.video-bookmark.com/user/hithinduab
Thanks for the great information. More at xem thêm .
This was a fantastic read. Check out expert plumbing and heating for more.
Navigating an car accident’s aftermath you become extremely overpowering. Securing the best legal counsel is essential whether you’ve been in a car, bike, or vehicle incident Smith, Alston, Darner & Lee, PLC injury lawyers Mesa, AZ
This was a fantastic resource. Check out xem thêm for more.
Thanks for the helpful advice. Discover more at comprehensive brain mapping options Denver .
We’ve established a great partnership with Top digital marketing agencies and it shows in our growth metrics!
This was a great help. Check out Affordable Pest Solutions for more.
Appreciate the thorough insights. For more, visit LuxNuro .
Thanks for the helpful advice. Discover more at Circuit boards .
Excellent article! How much of a difference may good hardwood make in both residential and commercial spaces is amazing. Epoxy flooring certainly stands out when it comes to strength and looks Midwest Concrete Technologies Epoxy Flooring Contractor Sussex, WI
Navigating the aftermath of an accident is remain incredibly overwhelming, especially if you have suffered personalized injuries. In this difficult time, it is crucial to own trustworthy assistance Solorzano Law Firm accident injury attorney Phoenix AZ
I not too long ago hosted a wine night time with neighbors and created a appealing charcuterie board utilising nearby cheeses from Orange County. It was a hit! Find extra options at grazing table .
Appreciate the detailed information. For more, visit effective rodent management Flanders .
Thanks for the useful suggestions. Discover more at despacho abogados Santiago de Compostela .
I found the perfect health insurance plan through Gregory Wolff; he’s the best agent in Atlantic Beach! Health insurance agent
This is highly informative. Check out carpintería de aluminio Coruña for more.
It’s incredible how much potential digital marketing holds for businesses today! Social Cali of Santa Rosa is definitely worth checking out for expert advice at social cali marketing agency .
Wonderful tips! Discover more at albergues Palas de Rei .
This was highly educational. For more, visit Afordable Pest Solutions .
Priority Restoration did an amazing job with my water damage clean up near me. Highly recommend their services!
I had a fantastic experience with Priority Restoration Philadelphia Water Damage Clean Up Near Me
It’s inspiring to see how San Jose brands are mastering social media marketing! Discover techniques at san jose marketing .
Sas Prinzivalli CPA P.A not only offers great CFO services but also provides peace of mind for business owners! outsourced cfo hollywood fl
Great tips! For more, visit plumbers near me .
I’d love to hear more about your experiences with different video recording studios. Best video recording studio in Arizona
ค้นหาข้อมูลเพิ่มเติมเกี่ยวกับเทคนิคและวิธีการใช้งานที่ถูกต้อง ### ร้านเปลี่ยนไฟหน้ารถยนต์ ใกล้ฉัน
Water safety is vital, especially during heavy rains; thank you, Irving TX, for having such reliable restoration teams! mold remediation Irving TX
“Anyone else excited about new housing initiatives aimed at affordability?” Concrete Contractor
Do you supply mark downs for standard cleansing packages? I’m involved! window cleaning service pricing
Appreciate the great suggestions. For more, visit https://www.bookmark-help.win/stopping-and-fixing-icy-pipelines-and-radiators .
My friends were impressed with my newly detailed car thanks to the incredible Mobile Car Detailing Houston service I found!
Love seeing transformation happen before eyes each time visit these outstanding establishments providing premium grade auto detailing solutions tailored specifically towards individual needs !!! Mobile Car Wash Houston
I recently discovered an excellent # anyKeyword# in Houston that exceeded all of my expectations—definitely worth checking out! Mobile Car Detailing Near Me
Fantastic tips in this blog—I’ll be getting in touch with # Roof Cleaning
I’m going to gather friends together and take advantage of bulk purchases at local wholesalers soon; thanks for inspiring me with these ideas.# # anyKeyWord # # professional wholesale bakery goods
Anyone else love how convenient appliance repair services are becoming in Arlington? google.com
This was a great article. Check out reliable 24 hour plumbers for more.
Thanks for the clear breakdown. More info at plumber near me now .
Detailing doesn’t have to break the bank; I found affordable options on when should you use a car detailer !
Thanks for the helpful advice. Discover more at LuxNeuro .
Clearly presented. Discover more at LuxNeuro .
I appreciated this article. For more, visit Affordable Pest Solutions .
This article highlights some great tools for web designers! I ‘d like to recommend a few more over at bay area web page design .
I love how easy it was to book with Fort Worth vehicle transport ! Fort Worth vehicle transport made simple.
อัพเดตข่าวสารล่าสุดเกี่ยวกับผลิตภัณฑ์ใหม่ในตลาด ### เปลี่ยนไฟหน้ารถยนต์ ใกล้ฉัน
Appreciate the thorough insights. For more, visit Affordable Pest Solutions .
Nicely detailed. Discover more at Gas cooker repairs .
Appreciate the thorough information. For more, visit Affordable Pest Solutions .
”Ultimately target attaining wanted results rooted basically grounded middle values concepts ideals guiding ideas guiding principles guiding rules guiding standards guiding standards guiding rules guiding rules guiding principles guiding ideas guiding st private drug rehab in santa rosa
The nearby wineries in Orange County be offering sizable pairings with their charcuterie forums! It’s a delightful adventure for all and sundry who loves excellent nutrition and wine. Explore greater options at charcuterie orange county .
“The cognizance on sustainability including overall healthiness initiatives makes SF such an enjoyable region to be!” affordable detox san francisco ca
Nature plays such an magnificent role in cure; loving the entire out of doors routine provided with the aid of marin’s centers; get worried with ### anykeyword ###! holistic rehabs in marin county
Finding the accurate therapist might be a recreation-changer—Marin County has plenty to make a choice from! More files at outpatient rehab marin county .
Thanks for the useful post. More like this at abogados en Santiago de Compostela .
I love how Marin County emphasizes community aid for the ones in recuperation from dependancy. It makes this kind of change! outpatient drug rehab marin county
Appreciate the comprehensive insights. For more, visit carpintería de aluminio en A Coruña .
Thanks for the insightful write-up. More like this at clogged toilet service near me .
Say goodbye to litter with an productive and wonderful tradition closet from the principles at luxury custom closets !
Appreciate the understandings! A reputable ### anyKeyword # makes all the distinction during remodels. residential electrician calgary
Great insights! Discover more at albergues en Palas de Rei .
The impact of weather on excavation projects is significant—great reminder! Check with the experts at excavating company port alberni before starting!
“A immense thank you goes out to all carpenters who positioned love into their craft—you fairly make residences special!” carpenter dallas
Handling turnovers effectively is essential for taking full advantage of profits as an Airbnb host. I just recently read about some efficient techniques at airbnb cleaning that have aided me considerably improve my holding video game.
I enjoyed this read. For more, visit https://send.now/qdbildm4a0jf .
Preventive measures are key when it comes to home security—consult with a locksmith like mobile locksmith today!
Fantastic overview of wholesale grocery distribution! Pitco Foods is definitely a leader in this field. reputable wholesale organic foods
I adore how tradition developed ins can spotlight your in demand pieces and create visual activity in any room! Explore greater at custom built ins shelving .
Here’s wishing all people ample pleasure & peace stumbled on by way of embracing holistic systems most appropriate in opposition t pleasant experiences subsequently.” “# $something medical detox san francisco ca
Water damage can be tricky; it’s best to leave it to the experts, especially those located in Irving TX. mitigation company near me
I’m so glad I found Gregory Wolff as my go-to health insurance agent near Ponte Vedra Beach; he’s been super helpful—get more information at Health insurance agent !
ศึกษาความคิดเห็นจากผู้ใช้งานจริงเพื่อประกอบการตัดสินใจ ### ร้านไฟรถยนต์ ใกล้ฉัน
I love that there’s a mighty concentration on prevention in addition rehabilitation in Marin County! Explore this added at drug rehab marin county .
Well done! Find more at locksmith kings mountain nc .
Personal injuries can be overwhelming, but a skilled michael dreishpoon injury attorney makes the journey much easier.
This was highly educational. For more, visit xem thêm .
This was a wonderful post. Check out xem thêm for more.
The personalized approach of Sas Prinzivalli CPA P.A in their CFO services sets them apart from the competition. financial leadership
Nicely done! Find more at LuxNeuro .
Useful advice! For more, visit LuxNuro .
Thanks for the useful suggestions. Discover more at Flanders affordable pest services .
“By fostering environments conducive toward very own development & accountability throughout the time of rehabilitation approaches themselves drug rehab marin county near me
Great job! Find more at vastu consultant near me .
Appreciate the useful tips. For more, visit affordable rodent control Budd Lake .
Love your focus on sustainable website design practices! It’s vital we consider the ecological impact of our online existence– more concepts over at bay area web page design !
This was very enlightening. More at residential plumber .
Thanks for sharing these insights! For any residents in Spring, TX, I recommend checking out Roof Cleaning Service .
With the complete timber round Tacoma , your advice might be beneficial come fall ! # # anyKeywor d## eavestrough cleaning solutions
I had the such a lot alluring charcuterie board at a contemporary event in Orange County! It used to be Instagram-worthwhile for certain! See it at charcuterie .
Wonderful tips! Discover more at http://www.video-bookmark.com/user/gwanietkia .
Fantastic read! Retailers need to prioritize finding an efficient experienced grocery wholesale market for their business growth.
Can anyone share their experiences with custom garage doors from services in Philadelphia? https://www.google.com/maps/place/?q=place_id:ChIJ8aErSdS1xokRxidw18uIzcI
This was highly educational. More at despacho abogados Santiago de Compostela .
Fantastic post! Discover more at carpintería aluminio Coruña .
I appreciated this post. Check out gas safety inspection services for more.
This is such an important conversation to have! Understanding standard drinks and alcohol content really helps demystify what we’re actually consuming https://sethptnx792.theburnward.com/how-many-ounces-are-in-a-standard-drink-breaking-it-down
Thanks for the insightful write-up. More like this at albergue en Palas de Rei .
Appreciate the great suggestions. For more, visit local commercial plumbing services .
Preventing water damage should be a priority for homeowners in Irving TX—great tips shared here! water damage restoration service near me
Thanks for the informative post. More at fish and aquarium stores near me .
I appreciated this article. For more, visit LuxNuro .
This was a fantastic read. Check out Neurofeedback Services Denver for more.
This was a fantastic resource. Check out affordable pest service offers for more.
Thanks for the useful post. More like this at Flanders licensed pest control experts .
Public Adjusters are lifesavers! My experience in Arizona was smooth thanks to their expertise. Best Public Adjuster In Arizona
Santa Rosa’s procedure to drug rehab combines latest options with typical strategies – it’s comprehensive and fine! drug rehab in santa rosa near me
I’ve been looking for detox selections in San Francisco, and this handbook is wonderful helpful! inpatient detox san francisco ca
Love seeing what number services are integrating expertise into their remedies; uncover inventive techniques with the aid of ### anykeyword ###! affordable rehabs in marin county
This was highly helpful. For more, visit Budd Lake Pest Control .
Have you heard about the ingenious treatment options obtainable in Marin County? Visit rehab centers marin county for details!
“As any individual who has witnessed firsthand how efficient holistic cures have tested themselves alongside common tips used at diversified rehabs right here private drug rehab marin county
If you’re near Ponte Vedra Beach and need health insurance help, look no further than Gregory Wolff! He’s the best around! More details at Health insurance agent .
Feeling secure starts with proper locking systems—reach out today to # # ANYKEYWORD! Locksmiths
I had no idea pressure washing could improve my home’s value so much! Great info here—check out Pressure Washing !
#”SeasonalFlavors keep menus exciting; glad we found such a reliable wholesaler like### trusted wholesale meat supplier
Your pointers on energy-saving strategies from a skilled ### ANYKEYWORD # are superb– thanks! concealed permit
Priority Restoration did an amazing job with my water damage clean up near me. Highly recommend their services!
I had a fantastic experience with Priority Restoration Philadelphia Water Damage Clean Up Near Me
Just observed the such a lot inventive charcuterie forums on Instagram from OC chefs—so inspiring! Check them out at charcuterie board !
I really did not understand how much influence tidiness carries evaluations; this write-up is eye-opening! Take a look at more insights at house cleaning !
If you want your finances handled expertly, look no further than Sas Prinzivalli CPA P.A’s phenomenal CFO services! accounting advisory services
Thanks for the thorough article. Find more at water leak detection services .
So pleased we hired this amazing team of movers.# #. anyKeyWord*! Worth every penny spent!” Best Winter Haven movers
ทุกครั้งที่ไปเที่ยว ร้านเหล้าสาย1 เป็นหนึ่งในตัวเลือกแรกเสมอ เที่ยวกลางคืนสาย1
ไปที่ OMG ONE MORE GLASS SAI1 กับกลุ่มเพื่อน แล้วมีความสุขทุกนาทีเลยค่ะ สถานที่เที่ยวกลางคืนสาย1
I appreciate all the hard work from everyone at ### anyKeyWord ### Long distance movers Waco
Appreciate the thorough write-up. Find more at Clogged toilet .
This was a fantastic read. Check out toilet clog fix for more.
This was quite informative. For more, visit carpintería de aluminio Coruña .
Appreciate the great suggestions. For more, visit despacho abogados Santiago de Compostela .
Thanks for the informative post. More at LuxeNeuro .
Helpful suggestions! For more, visit LuxNuro .
Thanks for the valuable insights. More at cheap pest management .
This was highly educational. For more, visit Car AC repair Buckley .
Thanks for highlighting this important service offered by ## Roof Cleaning Spring
Appreciate the thorough analysis. For more, visit insect control services Flanders .
Nicely detailed. Discover more at albergues en Palas de Rei .
This was nicely structured. Discover more at plumber charges .
Well done! Find more at best vastu consultant near me .
I enjoyed this article. Check out Affordible Pest Solutions for more.
Appreciate the detailed insights. For more, visit cleaning services near me .
Kto prowadzi firmę w Bydgoszczy, ten wie, jak ważne jest wsparcie księgowe. Dobrze mieć aktualne informacje o rynku usług księgowych.
biuro rachunkowe
It’s hard to believe how devastating something as simple as a burst pipe can be—thankful there are skilled restorers available locally in Irving TX! basement flood cleanup Irving TX
Thanks for the practical tips. More at xem thêm .
Your post really opened my eyes to the importance of proactive plumbing care. I’ll be reaching out to emergency drain service Medford soon!
This was a wonderful post. Check out xem thêm for more.
A well-thought-out pantry can change everything in your remodeled kitchen—how have you designed yours? kitchen remodel Tewksbury
ชอบบรรยากาศของร้านเหล้าสาย1 จริงๆ สามารถนั่งคุยกับเพื่อนๆ ได้อย่างดี ร้านนั่งชิล สาย1
Essential takeaway: always ensure selecting companies specializing specifically within fields relevant pertains unique requirements whether personal business-related initiatives alike New Braunfels car shipping
What a fantastic experience! I will definitely use Allen vehicle shippers again in the future.
Your suggestions on maximizing storage during a kitchen remodel were incredibly helpful! kitchen cabinet remodel Lexington
Wonderful points made about the function of feedback loops in enhancing website styles! Let’s explore this idea further at website designer california !
I found this very interesting. For more, visit Free slots .
Just finished my first DIY exterior paint job—never felt prouder! Check out more experiences at: Portland House Painters .
”Would love your thoughts on automated systems vs traditional ones—pros and cons?” Dick Does Doors Repair in DFW
Fantastic read on the power of local search; I’ll be reaching out to SEO Lowell very soon!
Every social gathering necessities a impressive charcuterie board, and OC has a few of the wonderful options around! Check them out here: charcuterie board .
“Transformative trips undertaken require unwavering commitment challenging work dedication relentless pursuit excellence striving perpetually push barriers improve barriers redefine boundaries attain superior heights reach uncommon results surpass best drug rehab in santa rosa
Can an individual percentage their experiences with rehabs in Marin County? I discovered some important info on inpatient rehabs in marin county .
“The concentrate on sustainability in addition to wellness tasks makes SF such an fascinating position to be!” inpatient detox san francisco ca
Great emphasis placed upon understanding user intent behind queries; tailoring responses accordingly increases chances toward success greatly!!. Find ways forward from us over here: # anyKeyWord ## SEO Optimization Agency Burlington
Wonderful tips! Find more at quick plumbing repairs .
E2bet có rất nhiều lựa chọn cá cược, từ thể thao đến casino, thật sự đa dạng! https://matkafasi.com/user/e2betlimited
The organic splendor of Marin County is additionally fantastically therapeutic for the duration of recovery—it is an excellent placing for remedy! private drug rehab marin county
Cảm ơn nhà cái E2bet đã mang đến cho tôi những giây phút giải trí tuyệt vời nhất! skypixel.com
The emphasis on family involvement in recuperation is obvious in Marin County’s systems! Learn extra at drug rehab marin county .
I found this article very informative about SEO practices in Boston. Check out Search Optimization Boston for further guidance!
Thanks for the thorough analysis. More info at saltwater fish aquarium store .
”Regularly referencing materials available ensures ongoing success unlocking potential hidden beneath surfaces existing ; owe significant gratitude continuously extended here moving forward reflecting upon journeys embarked upon collectively surrounding why does it cost so much to detail a car
Very informative article. For similar content, visit Brain Mapping Diagnostics Denver .
Thanks for the comprehensive read. Find more at value for money pest management .
This was very beneficial. For more, visit find affordable neurofeedback Denver .
I enjoyed this post. For additional info, visit emergency plumbing services near me .
“Had wonderful experience working with # # # anykeyword#–super quick service when I had to lock myself out!”
mobile locksmith
Thanks for the useful suggestions. Discover more at Affordable Pest Solutions .
Your macro shots are unbelievable! I like macro photography also; discover my work at western ma photographers .
This was quite helpful. For more, visit best affordable plumbing services .
Finding the right CFO services can be tough, but Sas Prinzivalli CPA P.A makes it easy and effective! cpa firm offering cfo services
If you want to stay ahead in the game, check out the predictions from 롤배팅사이트 for your 롤 토토 bets!
Wonderful tips! Discover more at abogados en Santiago .
Thanks for the practical tips. More at carpinteria de aluminio A Coruña .
Thanks for the detailed guidance. More at https://padlet.com/krawczykcalcote296bhtgv/bookmarks-oon2j7ci5sa62efr/wish/e9YpQN1RKprgaxjM .
This is a great resource for beginners in SEO! Dive deeper into the topic with articles from 구글 상위 .
Definitely forwarding this web publication link to guests who also possess properties round the following ! # # anyKeywor d## professional Tacoma gutter cleaning
This is quite enlightening. Check out albergue Palas de Rei for more.
Value the insights! A reputable ### anyKeyword # makes all the distinction during remodels. residential electrician calgary
I found some great tips on using 시알리스 구매 effectively. Anyone else have suggestions?
Online casinos have become my favorite pastime. I always recommend 안전한 바카라사이트 for their impressive game selection and user-friendly interface.
Is there an optimal way to utilize 꽁머니 in online gambling? I’ve been searching for strategies and found some great content at 꽁나라 !
Anyone else had a positive experience with water damage restoration in Irving TX? I’d love to hear your stories! mold remediation Irving TX
This topic really resonates with me. I’ve been considering trying 비아그라 판매 for a while now. Any advice on where to start?
The impact of poor road conditions on vehicle maintenance costs is something many drivers don’t realize! port alberni excavation
I’ve been hearing a lot about 꽁머니 lately. It seems like a great way to boost your bankroll. Has anyone tried it? 꽁머니
Is there an optimal way to utilize 꽁머니 in online gambling? I’ve been searching for strategies and found some great content at 꽁머니 환전가능사이트 !
It’s great to see discussions around men’s health becoming more mainstream. I think 비아그라 판매 could really help a lot of people.
Amazing details given here pertaining to usual pitfalls when trying preserve high standards during quick turnarounds between visitors– all will certainly take advantage of discovering these lessons shared today via @ ###! airbnb cleaning
What are your thoughts on the stigma surrounding 비아그라 정품 ? It needs to change!
I appreciate how 꽁머니 makes gaming accessible for everyone, regardless of budget! Explore this topic further at 꽁머니 사이트 .
I had a great experience using a 토토사이트 recommended on 토토 먹튀검증 ! It’s a game-changer for anyone serious about betting.
Enjoyed your points about utilizing whitespace successfully in layouts; it boosts readability significantly– let’s explore practical applications over at website design california !
Just attended a class on making charcuterie boards in Orange County, and it changed into rather a lot fun! Learn greater approximately it at charcuterie board orange county .
คุณเคยลองเปลี่ยนมาใช้ระบบแสงประเภทนี้แล้วหรือยัง? ### เปลี่ยนไฟหน้ารถ ใกล้ฉัน
This was quite informative. For more, visit Afordable Pest Solutions .
Appreciate the useful tips. For more, visit LuxeNeuro .
Appreciate the comprehensive advice. For more, visit Neurofeedback Sessions Denver .
Fajnie, że ktoś porusza temat biur rachunkowych w Bydgoszczy. Dobrze, że są takie źródła dla lokalnych firm.
biuro rachunkowe
Excellent breakdown of different types of traps and their effectiveness—very helpful! Rodent control company Los Angeles
Thanks for the helpful advice. Discover more at Afordable Pest Solutions .
ขอบคุณทุกคนที่ทำให้คืนวันนี้เป็นคืนที่ไม่ลืมเลือนค่ะ # # anyKeyWord## ร้านชิลใกล้ฉัน
Thanks for the helpful advice. Discover more at vastu consultant .
Appreciate the detailed information. For more, visit house cleaning services .
Thanks for the great information. More at https://www.mediafire.com/file/6ocin55op7rsb5t/pdf-7760-63621.pdf/file .
This was highly educational. For more, visit cheap car rental toronto .
Thanks for the valuable article. More at same day plumbing services .
Is anybody currently seeking advice specifically aimed toward classic automobile transportation within NM lately? Important discussions happening surrounding topics noted here especially related back towards links associated including but not limited Albuquerque auto transport companies
Your insights on construction regulations were helpful! What else should newcomers know about Asheville? Construction Services In Asheville
This was a fantastic read. Check out emergency ac service for more.
“The emotion at the back of wedding ceremony pictures is something exact—you’ve captured it superbly—let’s chat about this style here too: check out my paintings at: headshots western ma !”
Trải nghiệm chơi game tại nhà cái az888 thực sự rất tuyệt vời và thú vị! https://www.rcuniverse.com/forum/members/az888wiki.html
Fantastic post! Discover more at quick a plumber help .
Celebrating wins collectively turns gatherings into extraordinary experiences beyond expectations set previously; take advantage while opportunities arise fast ahead! card table rentals near me
Really get pleasure from most of these insights—it encourages me to take enhanced care of my domestic. best window cleaning service
This is highly informative. Check out local plumber pricing for more.
“Is there such a thing as too much gear in a small home-based video recording studio?” Podcast Studio in Arizona
This was a fantastic read. Check out carpinteria de aluminio A Coruña for more.
This was very enlightening. For more, visit despacho abogados Santiago de Compostela .
ชอบบรรยากาศของร้านเหล้าสาย1 จริงๆ สามารถนั่งคุยกับเพื่อนๆ ได้อย่างดี ร้านเหล้าสาย1 คนเยอะ
I had no idea I’d require locksmith services until I misplaced my keys! locksmith durham came to my rescue.
This is quite enlightening. Check out xem thêm for more.
This was very beneficial. For more, visit albergues en Palas .
Sas Prinzivalli CPA P.A offers exceptional CFO services that can really streamline your financial operations! certified public accountant cfo
Well explained. Discover more at fish tank aquarium store .
This was a great article. Check out xem thêm for more.
I like how you stress the value of responsive style. It’s crucial for today’s mobile users! More on this at website design companies california .
ไฟหน้าโปรเจคเตอร์เป็นทางเลือกที่ยอดเยี่ยมสำหรับรถยนต์ของคุณ ร้านเปลี่ยนหลอดไฟรถยนต์ ใกล้ฉัน
Finding the right# #personal injury attorney## can make a significant difference in the outcome of your case Solorzano Law Firm personal injury attorneys Phoenix AZ
It’s important to have the correct assistance when dealing with an accident’s aftermath. A competent# #personal harm solicitor## can make all the difference in ensuring you receive the compensation you deserve accident lawyers near me Mesa, AZ
My old washing machine finally gave up, but thankfully I found a reliable repair service locally! Appliance repair service
Fantastic article! Airport transit may definitely transform the go encounter. After a lengthy airfare, choosing a trustworthy air-port vehicle or limousine service can drastically lessen stress Cartier Limousine Services chauffer service Sarasota FL
The importance of professional water damage restoration cannot be stressed enough—especially here in Irving TX! water mitigation company Irving TX
This was very well put together. Discover more at kitchen plumbing specialists .
Can’t wait to test with seasonal culmination on my next orange county-situated cheese platter; payment out what others are doing over in this website online: grazing table !
Great recommendation on taking pictures in ordinary gentle! It fairly makes a change in my work—assess out headshots near me for tutorials!
Excellent information on adhesive flooring’s gains! It’s amazing how this adaptable and long-lasting solution can enhance any area Subcontractor
Thanks for the valuable insights. More at Disabled WC .
I wish I had actually understood about the benefits of hiring a specialist electrician faster!
This is very insightful. Check out trusted plumbing and heating specialists for more.
Korzystałem ostatnio z usług księgowych w Bydgoszczy – temat opisany w artykule jest bardzo trafiony.
biuro rachunkowe
I recently read about how regular inspections can significantly reduce repair costs in the long run. Great insights! excavating company port alberni
Cleaning up does not have to seem like a duty when you have a strategy like your own described below; I’m thrilled to make modifications moving forward, discover also further sources ###.”. vrbo cleaning
Excited learning more about potential advantages arising from enrolling into specific programs aimed supporting long-term care needs—grateful having knowledgeable professionals guiding us throughout journey towards achieving optimal outcomes!!! !## Medicare Insurance
лучшие онлайн займы микро займ онлайн
ถ้ามีเวลาว่าง อยากจะอยู่ที่นี่ตลอดทั้งคืนเลยค่ะ # # anyKeyWord## สถานที่บันเทิงใกล้ฉัน
ที่ OMG OneMoreGlass มีโปรโมชั่นสำหรับนักศึกษาไหม? อยากรู้จัง! ร้านชิลสาย1 เพลงดี
I just had a really remarkable practice with an airports automobile service that really changed my travel experience. Particularly after a lengthy trip, the advantage of having a dedicated airports move made all the difference affordable black car service Sarasota
This was a great article. Check out Video slots for more.
Truly enjoyed reading your post about building trust through transparent styles; trust is important online– more insights offered here: web designer in san francisco !
Great job! Discover more at best rated plumbers near me .
Loved learning about the different types of stains that can be removed by power washing- so helpful; check out additional tips via # # anyKeyWord # #! Pressure Cleaning
ยินดีที่จะได้รับความคิดเห็นจากทุกคนเกี่ยวกับประสบการณ์ที่ผ่านมา ### ร้านทําไฟรถยนต์ ใกล้ฉัน
Thanks for the detailed guidance. More at cheap car hire .
Navigating the aftermath of a personal injury can be difficult, particularly when dealing with shed salary, insurance states, and medical expenses work injury lawyer Phoenix AZ
Thanks for the insightful write-up. More like this at Thermostats Gas valves .
Consider hiring a# #limo service## if you’re looking for a dependable and luxurious way to travel. A specialized chauffeur can raise your knowledge, whether it be for an air-port transfer, a special occasion, or merely a night out on the town Cartier Limousine Services limo service near me
ฉันรักค็อกเทลที่ OMG ONE MORE GLASS SAI1 มาก อร่อยและสดชื่นสุดๆ ร้านเหล้าฟังเพลงสาย1
Appreciate the comprehensive advice. For more, visit toilet plumber .
It was amazing how fast they were able to respond when I phoned for a locksmith. It’s always a good idea to have one of the Locksmiths s that is for speed dial!
Wonderful tips! Find more at expert gas plumbing .
For those seeking clarity in their finances, I highly recommend the CFO services by Sas Prinzivalli CPA P.A! affordable cfo consulting services
Artistry takes core level whilst harnessed fully embracing vulnerability showcasing intensity authenticity printed tenderly presenting glimpses hidden truths reverberating softly whispering mild reminders reminding us continue to be grounded yet photographer western ma
Garage doors really take a beating from the weather—great reminder to keep them maintained! American Garage Door Repairs
The devastation caused by water can be overwhelming; thank goodness for dedicated professionals right here in Irving TX! water removal services Irving TX
This was a wonderful post. Check out Affordible Pest Solutions for more.
This was quite useful. For more, visit LuxNuro .
ใช้ไฟหน้าโปรเจคเตอร์แล้วรู้สึกมั่นใจในการขับขี่มากขึ้นครับ ไฟรถ
This was highly educational. More at xem thêm .
Utilising resources effectively ensures optimum outputs achieved consistently delivered accurately resonating widely enabling seamless integration fostering collaboration ultimately yielding favourable outcomes experienced mutually enriching lives do car dealership do car detailing
“Emotional resilience is fostered during therapy at best #]#, which blessings contributors drastically!” drug rehab
Nicely done! Discover more at LuxNeuro .
I appreciated this article. For more, visit xem thêm .
Nicely done! Find more at Afordable Pest Solutions .
Nicely detailed. Discover more at Budd Lake commercial extermination .
This is quite enlightening. Check out emergency my plumber for more.
Đồ họa của các trò chơi ở e2bet casino thật sự ấn tượng, khiến tôi không thể rời mắt! https://rapidapi.com/user/samsungwakeup
I just had the joy of using an aircraft automobile company, and I didn’t recommend it enough! The advantage of having a dependable walk waiting for me right after getting made my journey experience so much smoother https://ridgewoodheights-fl-33709-mo765.image-perth.org/are-there-any-limo-rentals-near-bradenton-that-offer-discounts-for-groups-in-2025
“Many homeowners don’t realize they have options; consulting with a Public Adjuster opens up new possibilities!” Select Adjusters LLC Arizona
Anyone dealt with storm damage to their roof in Mesa AZ? How did your contractor handle it? Roofing Contractor Mesa AZ
Hệ thống thưởng của e2bet casino rất công bằng và minh bạch, tôi tin tưởng hoàn toàn vào nơi này! decidim.derechoaljuego.digital
Hãy tham gia ngay vào e3bete Casino để có cơ hội nhận thưởng cực kỳ hấp dẫn mỗi ngày !## anyKeyWord ## e2bet
Appreciate the comprehensive advice. For more, visit Plumbing and heating .
This was quite helpful. For more, visit 24/7 plumbers near me .
Wonderful insights on e-commerce website design! A seamless checkout process is vital for conversions. I cover this topic extensively at web designers in the bay area .
Fajnie, że ktoś porusza temat biur rachunkowych w Bydgoszczy. Dzięki takim materiałom łatwiej podjąć decyzję o wyborze biura.
biuro rachunkowe
Thanks for the helpful article. More like this at http://www.video-bookmark.com/user/camrodeetb .
I recently used a Baltimore car transportation service from Baltimore auto transport companies and had an excellent experience!
This article, which I just came across, genuinely emphasizes the value of seeking qualified legal counsel after an auto accident. Navigating personal damage regulation can be confusing, particularly when dealing with insurance companies Smith, Alston, Darner & Lee, PLC Premises liability attorneys
A true scottsdale drug treatment will even point of interest on constructing lifestyles talent for reintegration into society.
I’ll definitely be sharing this information with others—I found such helpful resources via # # anyKeyWord ## Lake Mary international movers
Recently tried crafting mini-charcueterie boxes as gifts the use of local merchandise; they have been such hits in the course of parties and I’m sharing how you can actually do it too over right here: grazing table catering
The proper hardwood can make a huge variance when it comes to renovating your apartment or upgrading your industrial area. Polyurethane hardwood offers excellent durability and style, especially in places like cars, dwellings, and business options Midwest Concrete Technologies Concrete Company West Allis, WI
Appreciate the thorough analysis. For more, visit Online slots .
Finding the right means of transportation is necessary when it comes to comfort go. There are plenty of options, whether you need a# #limo service## for a special occasion or a# #airport transportation## option that’s both comfortable and reliable vip taxi
Would love tips from others on what aspects they considered most important when reviewing different policies offered through kneelands medicare agency specifically tailored towards capecoral residents!! !## anykeyword## Medicare Insurance Cape Coral
Outstanding advice on electric upgrades! Time to speak with my trusted electrical repair # again!
Finding the right# #personal injury attorney## can make all the difference after an accident. Being able to defend your rights in a personal injury case, whether it be a motorcycle collision, auto accident, or any other personal injury claim, is crucial Solorzano Law Firm injury attorneys Phoenix AZ
I’m all for using recycled materials in road construction—great for the environment and our budgets! road repair company
The list strategy to cleaning makes a lot feeling! Thanks for the inspiration, and check out airbnb cleaning for extra.
Finding the right support is essential when dealing with individual injuries. Navigating the aftermath of an accident can be difficult, but having a qualified# #personal wound attorney## on your side can make a big difference Solorzano Law Firm injury lawyer near me Phoenix AZ
Thanks for the insightful write-up. More like this at LuxNuro .
This was a fantastic read. Check out plumbing contractor for more.
Заказать диплом университета по доступной цене можно, обращаясь к проверенной специализированной компании. Заказать диплом о высшем образовании: babygirls001.copiny.com/question/details/id/1105560
Great insights! Discover more at Local Pest Control Budd Lake .
This was very beneficial. For more, visit Leaking washing machines .
I just had the pleasure of taking my next journey with an airports vehicle company, and I didn’t say enough about it! It significantly improved and simplified my journey knowledge Cartier Limousine Services limousine service Sarasota FL
# Medical Insurance Fort Myers
“Rehabilitation centers like #]# function lifelines for those looking replace.” Virtual IOP Near Me
Wow, didn’t realize how crucial it was until reading this article—thanks for enlightening me!! Roof Washing
Water damage can be tricky; it’s best to leave it to the experts, especially those located in Irving TX. flood restoration companies near me
อัพเดตข่าวสารล่าสุดเกี่ยวกับอุปกรณ์และผลิตภัณฑ์ใหม่ในตลาด ### ไฟ led รถยนต์
This was very insightful. Check out expert plumbing lines for more.
For comprehensive and strategic CFO services, look no further than Sas Prinzivalli CPA P.A! https://orcid.org/0009-0007-6575-0338
Fantastic insight into travel in airports! Using an useful airports auto services you make all the difference, even though traveling through airports can be strenuous black car service Sarasota, FL
Finding the right# #accident lawyer near me## can make all the difference after an unfortunate incident. Private accidents from mishaps may become crippling, both physically and emotionally injury lawyer near me Phoenix AZ
Your expedition of interactive elements like tests and polls was intriguing; they enhance user interaction substantially– let’s talk more about it over at california web design firms !
I recently had a fantastic# #limo service near me## experience. The driver was amazingly knowledgeable, ensuring that my aircraft transport was stress-free and flawless Cartier Limousine Services black car service
I recently had the satisfaction of using a wonderful# #limo services near me## for an airport transfer, and I may suggest, it greatly improved my travel experience luxury transportation Sarasota, FL
It’s amazing how much a new garage door can improve curb appeal! Glad I found a great team in DFW for installation. Garage Door Repair
I found this very interesting. For more, visit Affordible Pest Solutions .
Finding the right# #personal injury attorney## can make all the difference after an accident. Being able to defend your rights in a personal injury case, whether it be a motorcycle accident, auto accident, or any other personal injury claim, is crucial car accident legal help Arizona Falls AZ
“Recovering with friends who know your struggles enhances the enjoy at any #]#.” rehab scottsdale az
Thanks for the clear breakdown. Find more at LuxeNeuro .
Thanks for the valuable insights. More at xem thêm .
Thanks for the useful suggestions. Discover more at plumbing & heating near me .
Well explained. Discover more at xem thêm .
Wonderful tips! Find more at Casino slots .
I just read about the value of hiring a reputable personal injury attorney following an accident. Finding a law firm that is specialized in your particular requirements is essential because there are so many alternatives open to you personal injury attorneys
Thanks for the useful post. More like this at Blocked drains .
Appreciate the insightful article. Find more at Afordable Pest Solutions .
Thankful any person lastly wrote approximately simple disorders dealing with citizens living close timber around the city !! ###an yK eyword### gutter cleaning service near me
พูดถึงข้อดีข้อเสียของแต่ละรุ่นเพื่อช่วยในการเลือกซื้อ ### ซ่อมไฟหน้ารถยนต์
This is a very helpful article about the necessity of seeking legal counsel following an accident. Several people don’t realize how serious personal injuries can be and how they may change every aspect of their lives accident injury attorney
Appreciate the useful tips. For more, visit Affordible Pest Solutions .
This was very well put together. Discover more at alojamientos turísticos en Arzúa .
Great job! Find more at tienda de cocinas en Granada .
Appreciate the insightful article. Find more at nutrióloga Saltillo .
This is very insightful. Check out professional plumbing and heating installation for more.
Thanks for the clear breakdown. More info at water leaks plumbing solutions .
Dobre biuro rachunkowe w Bydgoszczy to dziś nie luksus, a konieczność. Dzięki za takie opracowania – pomagają w codziennym prowadzeniu firmy.
biuro rachunkowe
I’ve recently started exploring 롤토토 and I’m amazed at the variety of games available. Any recommendations for beginners?
อยากให้มีโปรแกรมสะสมแต้มสำหรับลูกค้าประจำที่ร้าน OMG OneMoreGlass ครับ # #anyKeyword## ผับสาย1 รับจัดวันเกิด
My storage door late broke down and caused me some trouble. After conducting some research, I discovered that ordinary maintenance you stop a lot of prevalent issues The Meadows AB garage door supplier
I’ve heard that workforce medical care classes in a drug rehab scottsdale arizona can result in profound breakthroughs for americans.
Excellent article! It’s always fascinating to see how far the options for tile and cement have advanced. Polyurethane floors is a fantastic choice for everyone considering a reconstruction or upgrade because of its dependability and visual charm Demolition Contractor
The road to recovery after an accident can be difficult, not just physically, but also emotionally and financially. An expert# #personal injury attorney## can make a huge difference in that regard Smith, Alston, Darner & Lee, PLC accident injury attorneys Mesa AZ
Finding the best legitimate counsel can be difficult. Which# #personal injury attorney## is the best option for you, regardless of whether you’ve been in a car accident, motorcycle accident, or work incident, will greatly affect your treatment process Smith, Alston, Darner & Lee, PLC car accident lawyers Mesa, AZ
What are your thoughts on the ethics of using 꽁머니 in gaming? It’s definitely a hot topic! I’d love to hear more opinions at 토토 꽁머니 50000 .
I’m really interested in learning how to maximize my 꽁머니 usage. Any tips? Check out 꽁나라 for guidance!
Just had some wiring issues fixed by a Calgary electrician, and I couldn’t be happier! For more information on services, visit electrician near me .
The charcuterie board pattern has taken Orange County with the aid of hurricane! I love how you’re able to customise them for any occasion. Get impressed with extra concepts at charcuterie board orange county .
I’m always on the lookout for reliable sites that offer 꽁머니 bonuses! If anyone has recommendations, I’d love to check them out after visiting 꽁머니 사이트 !
I found this very helpful. For additional info, visit ferretería Albacete .
This was highly useful. For more, visit https://taplink.cc/nathopdjeq .
Nicely detailed. Discover more at Affordible Pest Solutions .
I think every budgeter should consider using 꽁머니 as part of their strategy! What do you think? Share thoughts at 꽁머니 .
Have you seen the promotions at 에볼루션카지노 주소 ? They have some amazing offers for new players at 에볼루션카지노.
Traveling can be stressful, particularly when using air-port travel. For a clean trip, having a trustworthy airports auto service is essential. The best aircraft exchange, regardless of when you’re arriving or departing, may determine everything door to door shuttle service
I’ve been hearing a lot about 첫가입 꽁머니 lately! Can someone explain what 꽁머니 is all about and how it works?
Navigating the fallout of an incident can be difficult, particularly when dealing with traumas and the claims operation for insurance. It’s crucial to have competent assistance at your side, which is where# #anykeyword## comes in expert workplace injury legal representation
Loved your insights into color contrast and readability– such an important element of design that people frequently overlook! More resources are offered at web designers in the bay area !
This was a great article. Check out LuxNeuro for more.
Thanks for the thorough analysis. More info at LuxeNeuro .
มาสำรวจความแตกต่างระหว่างชนิดของหลอดไข่กันเถอะ หลอดไฟรถ
Just discovered the concept of 꽁머니, and I’m intrigued! Does anyone have tips on how to make the most of it? Check out 꽁나라 for more insights!
Appreciate the great suggestions. For more, visit underfloor heating system repairs .
Your advice on keeping food stored properly is spot on! Mice love easy access. Rat Control Company Los Angeles
I appreciate how 꽁머니 makes gaming accessible for everyone, regardless of budget! Explore this topic further at 꽁나라 .
I can’t emphasize enough how vital it is to keep things clean between guests– terrific reminders here, discover much more at house cleaning !
Wonderful tips! Discover more at Affordible Pest Solutions .
I’ve been looking for reliable 메이저사이트 recommendations. This blog has some great insights!
Great tips! For more, visit Free slots .
I recently had the pleasure of using a professional# #limo service## for my trip to the airport, and it made all the difference! I really appreciated the ease of having a chauffeur waiting for me airport taxi & chauffeur service
This was very beneficial. For more, visit local leaking dishwasher specialist .
Trust is key when it comes to finances, and I trust no one more than Sas Prinzivalli CPA P.A for their expert CFO services! https://myanimelist.net/profile/cynhaditrv
Thanks for the valuable article. More at Sink repair .
Excellent information on aircraft vehicles! Being able to choose trustworthy choices is so important, particularly when traveling for business or enjoyment. A stress-free launch to your trip can be achieved by using an economical air-port car service airport taxi & chauffeur service Sarasota, FL
“Success reviews from alumni steadily motivate new participants at quite a few #]#.” drug treatment scottsdale
Consider hiring a professional# #limo service## if you want the absolute best in luxury and convenience for your next trip. A chauffeur-driven car does make your travel encounter better whether you’re visiting the aircraft or attending a particular event https://atomic-wiki.win/index.php/Secure_Your_Ride:_The_Ultimate_Guide_to_Airport_Transportation_in_58096
Nothing beats a trustworthy# #limo service## when it comes to traveling in style and comfort. The correct vehicles can make a big change, whether you’re visiting the airport or attending a special occasion https://wiki-triod.win/index.php/Secure_Your_Ride:_The_Ultimate_Guide_to_Airport_Transportation_Services_in_97814
Just shared your weblog with buddies who wrestle with preserving their homes tidy—everybody necessities these information! house cleaning service
I enjoyed this article. Check out READY ROOF Inc for more.
Navigating the aftereffects of an incident can be difficult, especially when you have to deal with expensive medical payments and psychological strain. It’s important to include a proficient argue by your side lawyers for car accident near me Phoenix AZ
Mình đã nhận được nhiều phần thưởng từ việc tham gia cá cược ở nhà cái az888, hãy thử vận may của bạn nhé! Chi tiết có tại az888 !
Женский блог https://zhinka.in.ua Жінка это самое интересное о красоте, здоровье, отношениях. Много полезной информации для женщин.
Những giải đấu mini diễn ra liên tục giúp mọi người luôn bận rộn và không cảm thấy buồn chán ! colab.research.google.com
Emotionally and financially burdensome to navigate the aftereffects of an car crash. It’s crucial to have the appropriate assistance to guide you through the complexities of personal injury law Smith, Alston, Darner & Lee, PLC accident lawyer Mesa, AZ
Finding the right# #personal injury attorney## can make a significant difference in the outcome of your case injury attorney Phoenix AZ
I can’t imagine how a lot more advantageous my dwelling feels after decluttering! Thank you! house cleaning
Excellent information on epoxy flooring’s perks! It’s amazing how long-lasting and simple to keep, particularly in professional locations. The key to ensuring a flawless installation is choosing the right ## Concrete Contractor## Midwest Concrete Technologies Epoxy Flooring Contractor New Berlin, WI
I love hearing success stories from those who started their journey in a humble video recording studio. https://www.google.com/maps/place/?q=place_id:ChIJzWucoD6pK4cRKc7uL4PUr18
When dealing with personal injuries following an accident, it’s critical to have the correct counsel. Many people underestimate the value of hiring an experienced# #personal injury attorney## who understands the complexities of these cases Solorzano Law Firm accident injury attorney Phoenix AZ
Các chương trình khuyến mãi đa dạng từ Ga88Casino luôn khiến tôi bất ngờ! ga888
Fostering connections inspires further development & improvement across multiple fronts ; thus ensuring progressive growth achieved moving forward continues deriving motivation internally founded primarily emphasizing experiences encountered surrounding car detailing henderson nv
Appreciate the detailed information. For more, visit tienda de cocinas en Granada .
Thanks for the useful suggestions. Discover more at alojamientos con piscina en Arzúa .
Well done! Discover more at nutrióloga Saltillo .
I recently had the enjoyment of using an airports auto services that absolutely transformed my journey experience. The advantage of a dependable airport move made all the difference, especially after a long trip special limo rentals nearby Sarasota
I liked this article. For additional info, visit professional clogged shower drain .
Thanks for the practical tips. More at Affordable Pest Solutions .
Excellent article! Having trustworthy possibilities like an aircraft car service or car support makes all the difference when it comes to finding and traveling to airports vehicles. To start your trip stress-free, is therefore essential Cartier Limousine Services rent a limo
Wonderful tips! Find more at clinical brain treatment services in Denver .
Appreciate the comprehensive advice. For more, visit LuxNeuro .
Thanks for the clear advice. More at expert plumbing services .
“Success tales from alumni in the main motivate new individuals at quite a lot of #]#.” rehab scottsdale az
Wonderful tips! Find more at Afordable Pest Solutions .
Bardzo pomocny przewodnik dla przedsiębiorców z Bydgoszczy. W 2025 roku profesjonalna obsługa księgowa ma jeszcze większe znaczenie.
biuro rachunkowe
I just had a really remarkable practice using an aircraft transfer service that absolutely altered my travel experience. It made a huge difference if I had a specialized vehicle waiting for me right outside the bag state limo rentals Sarasota, FL
Nothing beats the experience of a ##chauffeur## when it comes to traveling in style and comfort. Which trusted# #limo service## is the key to success, whether you’re arriving at the airport or attending a special occasion Cartier Limousine Services sedan service Sarasota FL
Outstanding points about mobile-first style! With more users on mobile, it’s essential to prioritize that experience. More concepts can be discovered at san francisco web design agency .
Useful advice! For more, visit bug control solutions in Budd Lake .
¡Saludos, aficionados al mundo del juego!
Casinos sin licencia en EspaГ±ola y sin identificaciГіn – https://casinossinlicenciaenespana.es/# casino sin licencia espaГ±ola
¡Que vivas logros destacados !
This was quite useful. For more, visit Central heating installations .
Had some major blockages cleared recently thanks to an incredible ###nyKeyw####; can’t recommend them enough! felton plumbers
Thanks for the thorough article. Find more at Boiler repairs .
Excellent article! Repairing garage doors is frequently overlooked until something goes improper, but typical maintenance does conserve householders a lot of trouble later garage door Southwest Edmonton, AB
Having the right assistance from a# #anykeyword## expert can make all the difference when it comes to navigating the complexities of personal injuries https://privatebin.net/?fcb7cef1e5bd3cc5#4EFi6DmSTHhZsyV6JNf4F11pNyi67DJZBBqvF87iBdz1
I was completely lost when searching for a health plan until I found Kneeland Medicare & Health Insurance in Cape Coral—what a lifesaver! Medicare Insurance
This was highly helpful. For more, visit ferretería online Albacete .
My experience with an appliance technician from this area was truly impressive – highly recommended! Best Appliance Repair in Arlington TX
คุณเคยลองเปลี่ยนมาใช้ระบบแสงประเภทนี้แล้วหรือยัง? ### ซ่อมไฟรถยนต์ ใกล้ ฉัน
I imagine it’s wonderful for the ones suffering to recognise that they may be now not by myself; many have determined solace in a online iop classes .
This was a great article. Check out https://rentry.co/vic867cy for more.
Excellent insight into the importance of selecting the best floors supplies! As a professional in the field, I’ve personally witnessed how epoxy floor can convert places with its dependability and aesthetic allure Foundation Contractor
Well done! Discover more at discounted termite control services .
Navigating the fallout of an crash can be very frustrating. It’s crucial to have the appropriate aid, which is where# #anykeyword## comes in lawyers near me personal injury Mesa, AZ
Highly recommend Sas Prinzivalli CPA P.A for anyone in need of professional CFO services! You won’t regret it! https://www.hometalk.com/member/173687878/cody1136405
This is highly informative. Check out LuxNeuro for more.
Just booked my first catering gig featuring nearby OC meats and cheeses for my mates—it’s going to be epic due to inspirations amassed from right here: charcuterie orange county !
Just had a fantastic experience with the pressure washing service from power wash roof !
Thanks for the helpful advice. Discover more at Emergency Pest Control Budd Lake .
Looking for a dependable and beautiful way to travel? Whether you need a drive to the aircraft, a particular celebration, or just want to enjoy the comfort of a dark vehicles services airport transportation near me Sarasota FL
I found this very interesting. For more, visit Outside taps .
I recognize how a few drug rehabilitation centers in arizona consist of mindfulness practices as component of their restoration methods.
Городской портал Черкассы https://u-misti.cherkasy.ua новости, обзоры, события Черкасс и области
Appreciate the great suggestions. For more, visit vastu expert near me .
Appreciate the thorough write-up. Find more at residential cleaning services .
You’ve done an amazing job highlighting the significance of keeping content fresh and relevant; regular updates engage users better– see my handle it here: web design agency california !
Appreciate the detailed information. For more, visit quick reliable plumber services .
This was quite helpful. For more, visit tienda de cocinas en Granada .
Nicely done! Find more at alojamientos turísticos en Arzúa .
This was a great help. Check out nutrióloga Saltillo for more.
So glad I found out about Air conditioning repair service through a recommendation; their services are unmatched in Baltimore.
Thanks for the clear breakdown. More info at gas engineer .
Thanks for the great information. More at gas installation .
Thanks for the great tips. Discover more at boiler repairs .
I enjoyed this article. Check out boiler installation for more.
This is very insightful. Check out boiler installation for more.
Thanks for the useful suggestions. Discover more at boiler installation .
I found this very interesting. For more, visit boiler installation .
ถ้าอยากหาที่พักผ่อน ร้านเหล้าสาย1 นี่แหละใช่เลยครับ ร้านอาหารสาย1 อร่อย
Clearly presented. Discover more at gas installation .
Just scheduled an installation for my new garbage disposal—excited to see how it improves my cooking experience in Santa Cruz! water heater replacement santa cruz
Thanks for the useful suggestions. Discover more at Affordable Pest Solutions .
Appreciate the thorough write-up. Find more at LuxNeuro .
I had no idea there were so many options for garage door repair in Philly! This is super helpful. https://www.google.com/maps/place/?q=place_id:ChIJ8aErSdS1xokRxidw18uIzcI
This was highly educational. For more, visit LuxeNeuro .
The staff at a superb Virtual IOP Near Me could make all the difference. Compassionate care is crucial!
Well done! Discover more at Affordable Pest Solutions .
Thanks for the great explanation. Find more at https://jsbin.com/civuhugemo .
Having the right assistance from a# #anykeyword## expert can make all the difference when it comes to navigating the complexities of personal injuries https://www.pure-bookmark.win/what-freud-can-teach-us-about-accident-injury-attorneys-grand-canyon-university-az
I found this very interesting. Check out Afordable Pest Solutions for more.
This was very enlightening. For more, visit find a plumber .
The roofing contractors in Mesa AZ are incredibly professional. I love how they handled my project! https://www.google.com/maps/place/?q=place_id:ChIJYdZ7tTyoK4cRfsjBJx_n_Fg
วิธีดูแลรักษาไฟหน้ารถยนต์ให้สว่างเหมือนใหม่ ทำตามได้เลย ร้านแต่งไฟรถยนต์ ใกล้ ฉัน
Tôi đặc biệt thích các game live casino của nhà cái az888, cảm giác như đang ở sòng bài thật vậy! https://magic.ly/samsungwakeup
Seasonal differences result in various challenges ; having habitual checkups/semiannual cleans can assistance combat points before !! # # anyKey be aware ## Roof Cleaning Company
ทำไมถึงควรเปลี่ยนมาใช้ไฟหน้ารถ LED? ซ่อมไฟรถยนต์ ใกล้ ฉัน
Great tips on choosing a health insurance plan here! I’ve learned a lot from Kneeland Medicare & Health Insurance in Cape Coral as well! Medical Insurance
Keep your private home hunting sharp with a clean roof—touch #AllSeasonsWindowCleaningandPressureWashing Roof Cleaning Cape Coral
Appreciate the thorough analysis. For more, visit https://atavi.com/share/xauryxz1vctob .
Khi đặt cược ở đây , tôi cảm thấy an tâm hơn bao giờ hết vì tính bảo mật cao mà họ mang lại . ### a nyKey word### linklist.bio
We just installed a new air conditioner from ####anyKeyword##, and it’s been wonderful—highly recommend them! AC installation Baltimore
Great insights! Find more at https://penzu.com/p/b5be05e190de4f28 .
Consider using a professional driver service if you want to have a safe, deluxe travel opportunity for your next function or airport transfer vip taxi Sarasota FL
Finding the right CFO services can be tough, but Sas Prinzivalli CPA P.A makes it easy and effective! best cfo services in florida
Wonderful insights into creating appealing landing pages! They truly do impact conversion rates considerably. More tips are available at website design company in california .
The correct transportation service is essential when it comes to experiencing luxury and comfort while traveling Cartier Limousine Services chauffeur
Thanks for the practical tips. More at Affordable Pest Solutions .
Valuable information! Discover more at boiler installation .
Appreciate the thorough write-up. Find more at gas installation .
This was very beneficial. For more, visit gas installation .
Traveling can be stressful, particularly when using aircraft transport. For a easy trip, having a trustworthy airports vehicle service is essential. The best airports transport, regardless of when you’re arriving or departing, can make a huge change Airport Taxi & Chauffeur Service limo service
Valuable information! Discover more at Denver Brain Mapping .
This was very well put together. Discover more at gas installation .
This was very beneficial. For more, visit LuxNeuro .
This was highly educational. For more, visit Fall heating systems .
Appreciate the insightful article. Find more at Affordible Pest Solutions .
I enjoyed this read. For more, visit gas installation .
Appreciate the comprehensive advice. For more, visit gas installation .
Thanks for the helpful article. More like this at Emergency Plumbers .
Thanks for the insightful write-up. More like this at gas installation .
Thanks for the useful post. More like this at boiler installation .
Thanks for the great content. More at rapid pest control Budd Lake .
Being able to defend your rights when dealing with specific traumas is crucial. Finding an experienced# #anykeyword## can help you navigate the complexities of your case whether you’ve been involved in a car accident or have sustained an injury at work https://wiki-mixer.win/index.php/I_Need_a_Truck_Accident_Lawyer_Near_Fuller_Ranch_in_2025
I found this very helpful. For additional info, visit cocinas Granada .
Great job! Find more at nutrióloga Saltillo .
I recently had the pleasure of using a top-notch# #limo service## for my aircraft transit requirements https://delta-wiki.win/index.php/St._Petersburg_vs_Sarasota:_Comprehensive_2025_Gulf_Coast_City_Comparison
Wondering whether installing AC units would benefit? Ask experienced professionals such as reputable ####air conditioning contractors#####for personalized insights!. Air conditioning contractor
ใครใช้ BT PREMIUM บ้าง แชร์ประสบการณ์กันหน่อยครับ หลอดไฟหน้า
Well explained. Discover more at gas fitters .
I just came across a helpful article that discusses the value of speaking with a personal injury lawyer after an vehicle incident. It’s vital to possess a personal injury lawyer who does navigate the complexities of your scenario Smith, Alston, Darner & Lee, PLC car accident lawyers Mesa, AZ
I had the most eye-catching charcuterie board at a latest experience in Orange County! It became Instagram-worthwhile for certain! See it at charcuterie board delivery .
Great job! Find more at 24 7 plumber near me .
The right assistance you make all the difference when it comes to upmarket travel limo for rent near me Venice FL
Fajnie, że ktoś porusza temat biur rachunkowych w Bydgoszczy. W 2025 roku profesjonalna obsługa księgowa ma jeszcze większe znaczenie.
biuro rachunkowe
Finding the right attorney is essential in trying to navigate the aftereffects of an incident. Having a proven# #anykeyword## on your side can make a big difference whether you’ve been in a motorcycle accident or need an auto accident solicitor accident claim lawyer Grand Canyon University AZ
The long run of casinos and iGaming shares is a incredible matter, especially as technological know-how keeps to reshape the landscape of on line playing updates on online gaming proliferation
The destiny of casinos and iGaming stocks is actually attention-grabbing, distinctly as era continues to reshape the landscape https://files.fm/u/wyd4ec7t6h#design
Thanks for the detailed post. Find more at Affordable Pest Solutions .
Your exploration of grid systems in website design was enlightening! They’re necessary for developing balanced layouts; I discuss this more at web design agency in san francisco !
This was quite enlightening. Check out ferretería cerca de mí for more.
I appreciated this article. For more, visit Denver extensive brain mapping solutions .
Great insights on local SEO and Google Business Profile for Calgary businesses! One thing I’d add is the importance of optimizing for “near me” searches, especially since Calgary has such diverse neighborhoods https://www.mediafire.com/file/pmcncdzjcphdqzn/pdf-8555-2702.pdf/file
I recently had the joy of using an airports vehicle assistance for my journey, and it totally transformed my journey experience. After a lengthy journey, the last thing I wanted to worry about was finding travel to my resort Cartier Limousine Services sedan service Sarasota FL
“Invest in quality wax and polish; I learned this crucial tip from ##anyKeyword#!” how many hours is car detailing
Enterprise graph analytics is clearly reworking how establishments handle advanced deliver chain optimization demanding situations https://www.slideserve.com/aearnefbsf/graph-database-innovation-emerging-technologies-and-techniques
This was a fantastic read. Check out LuxNeuro for more.
The selection of water slides in Tampa is truly amazing! My kids had a blast! bounce house rental tampa fl
**Customer-Centric Approach**: They genuinely care about their customers’ satisfaction. The team goes above and beyond to accommodate special requests or last-minute changes, ensuring that your event is nothing short of perfect. harbor bluffs foam party
Thanks for the great explanation. More info at Flanders immediate pest solutions .
Punctuality: They arrived on time for our scheduled appointment, which is always appreciated. The team worked efficiently and completed the job within the estimated timeframe. paver sealing tampa
Thanks for the comprehensive read. Find more at saltwater aquarium .
Портал города Черновцы https://u-misti.chernivtsi.ua последние новости, события, обзоры
The team at ####Furnace repair services#### did wonders getting our heating back on track this season—truly grateful! AC maintenance
แบ่งปันประสบการณ์การใช้ไฟหน้าโปรเจคเตอร์ให้เพื่อนๆ ฟังกันเถอะ เปลี่ยนไฟหน้ารถ ใกล้ฉัน
Thanks for the useful post. More like this at Water heater repair .
Thanks for the clear breakdown. Find more at Budd Lake residential bug control .
This was very beneficial. For more, visit plumbers .
This was nicely structured. Discover more at boiler repairs .
Grateful for all the great advice from the team at Kneeland Medicare & Health Insurance—making healthcare decisions easier for us all here in Cape Coral! Private Medicare Insurance
Well done! Find more at boiler repairs .
ไฟหน้ารถ LED รุ่นไหนที่คนส่วนใหญ่เลือกใช้งานมากที่สุด? ร้าน เปลี่ยน ไฟ หน้า รถยนต์ ใกล้ ฉัน
“I’m glad I found this site—it’s filled with valuable knowledge!” Best Garage Door Repair in DFW
Shoutout returned closer to team of workers participants who had been advised , polite & attentive in the time of entire process —top notch teamwork shown right here !! # # anyKey notice ## Roof Cleaning
I enjoyed this read. For more, visit gas engineer .
This was a fantastic read. Check out local gas safety specialists for more.
**Top-Notch Quality**: The equipment provided by Bounce Genie is not only fun but also of the highest quality. All the inflatables are clean, well-maintained, and regularly inspected for safety, ensuring peace of mind for parents and organizers alike. safety harbor blow up obstacle course rentals
The 2023 crypto landscape has been interesting, peculiarly with the upward push of Ordinals and the way they’re reshaping NFT possession on the Bitcoin community https://send.now/fyzgmxpxgsts
The 2023 crypto landscape has been charming, specifically with the increasing prominence of Ordinals and their have an impact on on Bitcoin’s software beyond useful transactions in-depth analysis of crypto market
For my airport transport, I just used a# #limo service##, and it changed my life! The convenience and style of the ##chauffeur automobile service near me## made my travel experience so much more pleasurable elite taxi service
I’ve continuously found the topic of extraordinary success charms and cultural symbols desirable due to the fact that they be offering a completely unique window into the various traditions and private ideals https://www.4shared.com/s/fDINPluyGku
Every time I visit 롤토토 , I walk away with new knowledge about 롤 토토 betting strategies.
Ohio State football has any such rich and storied background that it’s laborious not to get drawn into passionate discussions approximately its legacy https://www.slideserve.com/milyanlptm/the-100th-anniversary-of-ohio-stadium-a-look-back
# Private Medicare Insurance
Goldco aas a rule comes up in conversations about securing retirement as a result of Gold IRAs, and for just right cause investor reviews of Goldco
Appreciate the helpful advice. For more, visit tandartspraktijk alphen a/d rijn .
Very useful post. For similar content, visit almere juwelier .
Nicely done! Find more at leiden elektricien .
Thanks for the helpful advice. Discover more at pizza in utrecht bestellen .
Appreciate the insightful article. Find more at boekhoudkantoor in arnhem .
This was very enlightening. For more, visit Slab leak repair .
Cleanliness matters! Thank you, local portable bathroom rental options , for providing spotless units at our recent event.
This was very beneficial. For more, visit gas engineer .
Thanks for the thorough analysis. More info at boiler repairs .
When curious about Goldco for a Gold IRA, it’s major to weigh the merits along the bills and rollover task Learn more here
This is highly informative. Check out https://bony-periwinkle-d34.notion.site/The-Importance-of-Routine-Plumbing-and-Home-Heating-Evaluations-20c60a959470807ab278e3488f9d1435?source=copy_link for more.
Very helpful read. For similar content, visit https://telegra.ph/Why-Regular-Oil-Changes-in-Bonney-Lake-Can-Save-You-Thousands-Why-Regular-Oil-Changes-in-Bonney-Lake-Can-Save-You-Thousands-06-14 .
Well explained. Discover more at gas engineer .
Thanks for the useful suggestions. Discover more at gas engineer .
I love how conversations round perfect good fortune charms and cultural symbols open a window into own beliefs and traditions that in most cases pass disregarded https://www.mediafire.com/file/k0x8i68rl1jypwl/pdf-22148-80223.pdf/file
Ohio State football has one of these wealthy historical past that it’s impossible now not to get drawn into the reports in the back of the team’s success highlighting Ohio State football players
Your recommendation on how usually we needs to fresh specific areas of our buildings is excellent positive; thanks for clarifying that! house cleaning service
I’ve been struggling with litter in my house place of business. The organizing methods you shared are just what I crucial! I’ll be sure that to test out cleaning for additional suggestion.
Appreciate the detailed information. For more, visit Affordable Pest Solutions .
This blog is full of functional guidance; I’ll be coming again for extra data! house cleaning service
Valuable information! Discover more at Brain Mapping Consultation Denver .
It’s great that there are more options like 시알리스 available today than ever before! Let’s discuss our favorites! 시알리스 구매
I’ve heard so much about 시알리스 구입 and its effectiveness. Can anyone share their experiences with 시알리스?
This is quite enlightening. Check out alojamientos con piscina en Arzúa for more.
I’m glad I stumbled upon this article; it answers many of my questions regarding Salt Lake Injury Law. Keep up the great work! Personal Injury Law Firm in Salt Lake City
This was highly informative. Check out tienda cocinas en Granada for more.
What are your thoughts on the ethics of using 꽁머니 in gaming? It’s definitely a hot topic! I’d love to hear more opinions at 토토사이트 꽁머니 .
A good ##Heating contractor## can really help keep your home warm during those chilly months. Make sure to choose wisely! Air conditioning repair service
Thanks for the detailed post. Find more at nutrióloga Saltillo .
Thanks for the thorough article. Find more at reliable local pest services Flanders .
I recently discovered 에볼루션카지노 , and their selection of games at 에볼루션카지노 is incredible! Have you tried it yet?
Exceptional points about mobile-first design! With more users on mobile, it’s necessary to prioritize that experience. More concepts can be found at california web design agency .
Are there any apps specifically designed for managing 꽁머니 effectively? Let’s compile a list at 꽁머니 !
It’s interesting how many options there are for treating ED these days. I recently came across 비아그라 판매 , and I’m curious about its effectiveness.
Communication transparency plays essential role building trust relationships fostering positive interactions between clients service providers allowing smooth seamless progress made towards achieving desired outcomes reached collaboratively together google.com
What are people’s thoughts on the long-term use of 비아그라? I’m curious how that compares with options like 비아그라 구입 .
Helpful suggestions! For more, visit Affordable Pest Solutions .
The mountain scenery combined with thoughtful architecture creates stunning results. https://www.google.com/maps/place/?q=place_id:ChIJWcJBcYaaxkIRwHALPBFcbsU
выезд нарколога на дом врач нарколог на дом
I’m amazed at how much I’ve improved since I started using 꽁머니! If you’re interested in leveling up your skills, check out 꽁머니 사이트 .
Korzystałem ostatnio z usług księgowych w Bydgoszczy – dobrze, że powstają takie przewodniki.
biuro rachunkowe
Finding the right support is essential when dealing with individual injury. Navigating the aftermath of an injury can be difficult, but having a competent# #personal harm attorney## on your side can make a big difference accident attorney Phoenix AZ
цена кодировки от алкоголизма https://kodirovanie-info.ru
Мы предлагаем документы об окончании любых университетов России. Документы производятся на настоящих бланках. career.logictive.solutions/employer/radiplomy
I’m amazed at how much I’ve improved since I started using 꽁머니! If you’re interested in leveling up your skills, check out 꽁머니 .
This was a fantastic read. Check out Gutter cleaning for more.
лечение алкоголизма стоимость https://alko-info.ru
Appreciate the helpful advice. For more, visit boiler repairs .
Useful advice! For more, visit boiler repairs .
вывод из запоя с выездом цена вывод из запоя в нижнем новгороде клиника
Thanks for the informative content. More at boiler installation .
This was a wonderful guide. Check out local shower installation experts for more.
This was very beneficial. For more, visit gas engineer .
The destiny of casinos and iGaming stocks is undeniably intriguing, fantastically as era maintains to reshape the panorama https://www.spreaker.com/podcast/millinzjxg–6657455
I love how flexible charcuterie forums shall be—whether or not it’s meats, cheeses, or veggies, there’s anything for all and sundry in Orange County! Check out a few marvelous combinations at grazing table catering .
Your put up clearly opened my eyes to the magnitude of roof care in Guelph! Thank you! roofing Guelph
Great read! Time to tackle that dirty roof with help from ## Roof Washing
Excellent perspectives into Seo’s value in today’s online world! The proper# #anykeyword## you make all the difference because there are so many businesses competing for attention online top seo companies Shyam Nagar Jaipur
Does anyone know how to choose the right ##Puyallup Chiropractor##? I want to make sure I find someone experienced. Puyallup Chiropractor
This was quite useful. For more, visit ferretería .
The future of casinos and iGaming shares is genuinely remarkable, mainly as know-how maintains to conform at a swift tempo https://www.anobii.com/en/0148588fe5e16d9b3e/profile/activity
Just shared your web publication with mates who struggle with maintaining their houses tidy—anybody desires these tips! house cleaning
I’ve been suffering with muddle in my homestead place of work. The organizing recommendations you shared are just what I considered necessary! I’ll determine to match out the best irvine cleaners for extra counsel.
Mình đã giới thiệu GA888 Casino cho bạn bè và họ cũng thích nó như mình! ga888
Local SEO in Calgary offers unique opportunities due to the city’s diverse business landscape and competitive market https://giphy.com/channel/cethinzaac
Appreciate the detailed insights. For more, visit Burst pipe .
Great job! Find more at fish and aquarium stores near me .
Enterprise graph analytics is truthfully remodeling how corporations way deliver chain optimization graph-based analytics using power10
Just had an amazing experience with a new AC installation thanks to Air conditioning repair service ; highly suggested for locals!
It’s fresh to work out a web publication that covers life like and viable residence cleaning strategies like yours—thank you!! house cleaning service
Hãy cùng nhau tạo nên những kỷ niệm đáng nhớ bên Ga88Casino nhé! https://ga888-vn.net/
Appreciate the comprehensive insights. For more, visit https://www.4shared.com/s/f1oZuY1r6jq .
I love how informative the staff at Kneeland Medicare & Health Insurance is! They make understanding health insurance so much easier in Cape Coral. Private Medicare Insurance
Ai đã từng chơi ở GA888 Casino thì cho mình hỏi cảm nhận thế nào? ga888links.com
Great job! Find more at boiler repairs .
This was very beneficial. For more, visit boiler repairs .
“It’s incredible how much planning goes into each shoot at your video recording venue.” video recording studio
Excellent article! Maintenance of car doors is frequently overlooked, but it’s essential for both safety and convenience. Typical checks can aid in identifying potential problems before they escalate to a big issue garage door installation Sturgeon, AB
Enjoyed your analysis of present patterns in UI/UX; remaining upgraded helps designers stay competitive– see what I think about patterns too, visit: bay area web page design !
Your health and well-being should come first after an accident; let a Auto Accident handle the legalities for you.
Appreciate the comprehensive insights. For more, visit gas installation .
This was very well put together. Discover more at boiler installation .
The 2023 crypto panorama has been incredibly charming, certainly with the rise of Ordinals and their have an effect on on Bitcoin’s software past just a shop of worth https://giphy.com/channel/ableigscoq
The 2023 crypto landscape has been not anything quick of pleasing, tremendously with the upward push of Ordinals and their targeted technique to Bitcoin inscriptions popular crypto trends
I love how discussions approximately respectable luck charms and cultural symbols open a window into non-public traditions and beliefs that ceaselessly move disregarded in prevalent lifestyles Learn here
Thanks for sharing the right way to fix working lavatories! Such an nerve-racking quandary. For similarly tips, fee out plumber near me .
Ohio State soccer has this type of wealthy background that it’s difficult no longer to get drawn into the testimonies behind the crew’s luck top 15 famous Ohio State football players
Goldco almost always comes up in conversations approximately securing retirement due to Gold IRAs, and it’s useful to dig into the important points in the past you make a decision Goldco review summary
пластиковые окна от производителя москва пластиковые окна от производителя москва .
The purposes you offered for keeping our residences smooth are in actuality motivating—I’m waiting to get began now! cleaning
заказать пластиковые окна в москве заказать пластиковые окна в москве .
Thanks for the helpful article. More like this at tandarts in alphen a/d rijn .
I liked this article. For additional info, visit elektricien in de buurt .
I enjoyed this read. For more, visit juwelier in almere .
This was quite informative. More at beste pizzeria in utrecht .
I didn’t discover how relevant it really is to refreshing home equipment ordinarilly. Thanks for the reminder! I’ll must inspect house cleaning irvine for some magnificent appliance-cleaning hacks.
I found this very interesting. For more, visit boekhouding in arnhem .
Loved using the services provided by bathroom rental services near rock hill during our neighborhood block party—it was stress-free!
Goldco oftentimes comes up in conversations approximately stable retirement planning, pretty when discussing Gold IRAs. One key element to think of is the expense structure guide to gold IRAs
I recently had a pest issue in my home, and I was amazed by how effective the Puyallup Exterminator service was! They identified the problem quickly and implemented a comprehensive plan to eliminate the pests Wasp removal
Any advice on putting off pet hair? It turns out unimaginable at times! house cleaning
Great tips! For more, visit apartamentos turísticos con piscina en Arzúa .
Thanks for the valuable insights. More at cocinas en Granada .
Finding the right ###Heating contractor### makes all the difference during colder months; don’t settle for less than quality work! HVAC contractor
Новинний сайт Житомира https://faine-misto.zt.ua новости Житомира сегодня
I love how conversations approximately good good fortune charms and cultural symbols open a window into very own traditions and ideals that in general move ignored in on a regular basis life Click for more info
I found this very interesting. For more, visit plumbers .
Thanks for the practical tips. More at toilet plumbers near me .
Well done! Find more at boiler repairs .
This was highly educational. For more, visit gas engineer .
Thanks for the thorough article. Find more at professional plumber rates .
I enjoyed this article. Check out gas engineer for more.
Korzystałem ostatnio z usług księgowych w Bydgoszczy – temat opisany w artykule jest bardzo trafiony.
biuro rachunkowe
купить диплом о среднем образовании купить диплом о среднем образовании .
диплом техникума купить http://www.arus-diplom8.ru .
The connection among brand storytelling and patron engagement is desirable! It’s exotic how narratives can drive pastime and loyalty. Explore extra reports at Pixel Juice Digital Marketing Glasgow .
аттестат купить за 9 класс http://www.arus-diplom2.ru/ .
Appreciate the useful tips. For more, visit Gutter cleaning .
Great tips! For more, visit Leaking toilets .
Праздничная продукция https://prazdnik-x.ru для любого повода: шары, гирлянды, декор, упаковка, сувениры. Всё для дня рождения, свадьбы, выпускного и корпоративов.
Navigating the aftereffects of a personal injury can be difficult, especially when dealing with medical payments and insurance organizations. It’s important to have a experienced recommend on your side https://stalinarch.ru/wiki/index.php/Discover_the_Best_Restaurants_in_Phoenix,_AZ_for_2025:_Your_Ultimate_Dining_Guide
I like how you highlight the value of responsive style. It’s vital for today’s mobile users! More on this at web designers san francisco .
I’ve these days all started decluttering ahead of cleansing, and it is made a gigantic distinction! Highly advocate it! house cleaning
Helpful suggestions! For more, visit ferretería Albacete .
The evolving landscape of casinos and iGaming stocks is without a doubt intriguing, quite as technology continues to reshape the marketplace technological changes in casinos
оценка ТМЦ оценка рыночной стоимости помещения
I’m interested in how cultural factors influence occupational therapy practices in Victoria. Would love to see more articles on this—check out OT for info!
I’m regularly in the hunt for tactics to make cleansing sooner and less demanding, and your weblog has been great constructive! Can’t wait to discover extra assistance on house cleaning .
Navigating the aftereffects of an incident you remain incredibly frustrating, especially when dealing with injuries and prospective lawful battles legal help for injury Steele Indian School Park AZ
эффективное лечение наркомании лечение наркомании в Нижнем Новгороде
Thanks for sharing your deep cleansing hobbies; I undoubtedly obligatory that! house cleaning service
Всё для строительства https://d20.com.ua и ремонта: инструкции, обзоры, экспертизы, калькуляторы. Профессиональные советы, новинки рынка, база строительных компаний.
Just received my roof cleaned through Aqua Knight Exterior Cleaning, and I’m amazed at the transformation. The staff turned into official and useful! Roof Cleaning Service
Drainage problems shouldn’t be left unattended—a good ####Drainage service#### will take care of things before they worsen! Air conditioning contractor
The long term of casinos and iGaming stocks is a alluring intersection of technological know-how, regulation, and moving user behaviors casino tech evolution
Grateful for the supportive staff at my ##Puyallup Chiropractor## office; they always make me feel welcome! Family Chiropractor
This is very insightful. Check out gas installation for more.
Local SEO in Calgary presents unique opportunities, especially when leveraging Google Business Profile effectively Calgary voice optimization techniques
Excellent insight into Pr trends! How quickly the panorama changes is exciting. I’ve noticed that consumer encounter optimization is gaining in importance in comparison to traditional keywords strategies seo service Raja Park Jaipur
Wow, such an informative article about health insurance! If you’re in Cape Coral, definitely consult with Kneeland Medicare & Health Insurance! Medicare Insurance
This was very enlightening. For more, visit boiler repairs .
Awesome article! Discover more at boiler repairs .
Nicely done! Discover more at Afordable Pest Solutions .
Having the right legal representation can make a change when it comes to being injured personally as a result of an incident motor vehicle crash attorney
This was quite informative. For more, visit affordable local plumbers .
I appreciated this article. For more, visit gas engineer .
Thanks for the useful suggestions. Discover more at gas engineer .
Helpful suggestions! For more, visit gas plumber .
Thanks for the practical tips. More at boiler repairs .
Great insights! Discover more at LuxeNeuro .
Thanks for the insightful write-up. More like this at Pest Control Flanders .
This was quite helpful. For more, visit gas engineer .
Acquire hiring a expert##chauffeur## service if you’re looking for a safe and magnificent way to travel, mainly if it’s airport transportation Cartier Limousine Services limo service near me Sarasota FL
Transformative reviews watch for the ones embracing classes imparted all over direction lifetime tour researching certainly not ends incredibly conjures up absolutely everyone involved striving greatness steadily evolving usually adapting! plumber Dallas
For my go needs, I just made use of an aircraft automobile service, and it really helped! I appreciated the ease of having a designated car waiting for me straight after I landed https://ridgewoodheights-fl-34207-dq334.iamarrows.com/24-hour-limo-service-near-me-reliable-luxury-transportation-anytime
The significance of getting a designated cleaning day both week is whatever thing I’m going to adopt—important tip! cleaning service
I’ve been looking to get my domestic in contact in cleaning, and your advice are simply what I vital! I’ll stopover at house cleaning service to locate techniques to make it amusing.
I found this very helpful. For additional info, visit top pest control Budd Lake .
Great job! Find more at affordable home plumbing .
Just had my garage door serviced last week, and it works like new again! https://www.google.com/maps/place/?q=place_id:ChIJ8aErSdS1xokRxidw18uIzcI
I’ve discovered a lot approximately organizing from your posts—thank you! house cleaning service bay area
The 2023 crypto panorama has been not anything short of fascinating, tremendously with the surge in Ordinals and their impact on how we ponder Bitcoin’s competencies past just a store of magnitude Website link
These discussions on 2023 crypto tendencies are incredibly insightful, extraordinarily as we see how Ordinals and NFTs hold to reshape virtual possession and creativity Click to find out more
The contractors in Mesa AZ are highly skilled; my roof looks brand new after just a few days of work. https://www.google.com/maps/place/?q=place_id:ChIJYdZ7tTyoK4cRfsjBJx_n_Fg
Nicely done! Discover more at apartamentos turísticos Arzúa .
I love how conversations about remarkable success charms and cultural symbols open a window into individual studies and traditions that might in any other case live hidden https://www.symbaloo.com/mix/bookmarks-jgmz
Appreciate the detailed information. For more, visit tienda de cocinas en Granada .
Public adjustors make everything more manageable; they are essential after major property loss events. Best Public Adjuster In Arizona
This was a wonderful post. Check out boiler replacement services for more.
Ohio State soccer has this type of prosperous history that it’s unattainable no longer to get drawn into the hobby surrounding the team famous Ohio State football players list
This was quite informative. For more, visit nutrióloga en Saltillo .
Reliable heating is essential during winter; find a reputable ##Heating contractor### to keep your system running smoothly. Geothermal installation Baltimore
Goldco has transform a prominent resolution for those looking to diversify their retirement portfolios with Gold IRAs, however it’s good to in moderation be aware about a key discussion factors previously you make a decision dailyemerald gold IRA insights
The trend of using illustrations in web design is actually fascinating! I have some intriguing examples on my site at website design in california .
Well done! Find more at utrecht in pizzeria .
Useful advice! For more, visit tandarts in alphen a/d rijn .
Your insights into emotional distress claims were particularly eye-opening—great coverage of Salt Lake Injury Law issues! Personal Injury Law Firm in Salt Lake City
Thanks for the valuable insights. More at almere juwelier .
When in view that Goldco for a Gold IRA, it’s relevant to weigh the two the advantages and the charges in contact buying gold as a 401k investment
Thanks for the great content. More at elektricien leiden .
I love how conversations about extraordinary success charms and cultural symbols open a window into americans’s very own thoughts and traditions Go to this website
Your blog provides such valuable info about home maintenance—I’ll definitely use ## Roof Cleaning Service
Thank you for discussing the significance of nearby SEO! Local search optimization can in reality guide small enterprises thrive online. More regional facts are attainable at Pixel Juice Digital Marketing Glasgow .
I enjoyed this post. For additional info, visit Affordible Pest Solutions .
Строительный журнал https://garant-jitlo.com.ua всё о технологиях, материалах, архитектуре, ремонте и дизайне. Интервью с экспертами, кейсы, тренды рынка.
Онлайн-журнал https://inox.com.ua о строительстве: обзоры новинок, аналитика, советы, интервью с архитекторами и застройщиками.
Great job! Discover more at https://list.ly/i/11015854 .
Thanks for the thorough analysis. Find more at ferretería online Albacete .
Your facts on optimizing small spaces during blank-up had been exactly what I vital—thanks quite a bit! cleaning service
Современный строительный https://interiordesign.kyiv.ua журнал: идеи, решения, технологии, тенденции. Всё о ремонте, стройке, дизайне и инженерных системах.
This was a great help. Check out LuxeNeuro for more.
I found this very interesting. For more, visit Fall heating systems .
Thanks for the insightful write-up. More like this at Affordable Pest Solutions .
I love the suggestion of making use of natural cleaning items! They’re larger for the surroundings and my relatives’s healthiness. I stumbled on a few miraculous recipes for DIY cleaners on cleaning .
Thanks for sharing your deep cleansing routine; I in reality wanted that! house cleaning service bay area
Very helpful read. For similar content, visit gas engineer .
Thanks for the helpful advice. Discover more at boiler installation .
The evolving landscape of casinos and iGaming stocks is really fascinating, in particular as technological know-how keeps to reshape how we gamble online https://wiki-room.win/index.php/Gold_Jumped_29%25_This_Year_-_Is_It_Too_Late_to_Buy%3F
This is very insightful. Check out gas engineer for more.
Информационный журнал https://newhouse.kyiv.ua для строителей: строительные технологии, материалы, тенденции, правовые аспекты.
Whether giant or small task demands stand up —you can have confidence aquaknight will provide above expectancies at any time when!! # # anyKey notice ## Roof Washing
Appreciate the thorough information. For more, visit loan agency new orleans .
Thanks for the valuable article. More at boiler installation .
Thanks for the comprehensive read. Find more at Budd Lake residential bug control .
Anyone else find that regular visits to a ##Puyallup Chiropractor## help boost their athletic performance? Chiropractor Puyallup
This was highly educational. More at boiler installation .
Has anyone else used John Egart’s Tree Removal for stump removal? They made the process quick and easy, and my yard looks so much better now!
Appreciate the comprehensive advice. For more, visit boiler installation .
This is highly informative. Check out boiler installation for more.
Helpful suggestions! For more, visit affordable plumber prices .
Wonderful tips! Discover more at gas engineer .
I’ve continually believed that commonplace dental examine-united states of americaare primary for conserving right oral healthiness. It’s exclusive how a good deal a dentist can spot early signals of disorders that we’d forget bucktown dentist
Your article does a great job explaining the importance of proper installation techniques in auto glass work! Visit windshield replacement asheboro nc for details!
This blog offers a clear explanation of the legal process in Salt Lake City for injury cases. Thank you for the informative read! south salt lake accident lawyer
This was a wonderful guide. Check out mobile auto glass service asheboro for more.
I’m interested in imposing a number of a while-saving methods into my weekly pursuits—wish me luck! house cleaning service
Excellent article! I appreciate how you stressed the importance of keywords research and content marketing because Seo is such a crucial component of online achievements best seo Raja Park Jaipur
Empowering men and women in every single place by way of preparation serves optimum function aid alleviate rigidity related to homeownership tasks many face day to day! plumbing company
Love the notion of by way of baskets for organisation! They awfully lend a hand safeguard order in busy families. Thanks for sharing; I’m excited to discover greater at cleaning service !
Excellent post on the significance of Seo in the modern world! Companies must participate in reputable Seo services in order to increase their net visibility, it is obvious best seo company Shyam Nagar Jaipur
This was very insightful. Check out expert affordable plumbing for more.
Valuable information! Find more at leaking pipe .
Your emphasis on consistency in residence cleaning essentially resonates with me; thanks for sharing that perception! house cleaning service bay area
Thanks for the comprehensive read. Find more at tienda cocinas en Granada .
Fantastic post! Discover more at apartamentos turísticos Arzúa .
Great insights! Discover more at Gas safety checks .
I found this very interesting. Check out LuxNuro for more.
Appreciate the helpful advice. For more, visit Affordible Pest Solutions .
Very helpful read. For similar content, visit nutrióloga en Saltillo .
Would love any recommendations specifically tailored towards eco-friendly alternatives available locally! Garage Door Repair
Appreciate the thorough insights. For more, visit saliva and oral health .
The 2023 crypto landscape has been nothing brief of appealing, highly with the upward thrust of Ordinals and their impression on how we think ofyou’ve got digital possession https://wiki-coast.win/index.php/Why_I%27m_More_Bullish_on_Bitcoin_After_2023,_Not_Less
Thanks for the helpful advice. Discover more at Affordable Pest Solutions .
Great insights! Find more at Thermostats Gas valves .
If you’re dealing with a rat infestation, it’s crucial to address it quickly to prevent health risks and property damage. Effective rat removal techniques can make a significant difference in maintaining a safe and clean environment Puyallup Pest Control
купить пластиковые окна с завода http://www.okna177.ru .
I always find something new to do every time I visit Greensboro; it’s full of surprises! More tips at Auto Glass .
пластиковые окна от производителя пластиковые окна от производителя .
It’s nice knowing there are dependable plumbers nearby when you need help in emergencies! emergency plumber
Great insights! Discover more at car window repair asheboro .
Thanks for the detailed post. Find more at gas engineer .
Well explained. Discover more at boiler repairs .
A clean home amounts to a healthy home! I have actually been utilizing a cleaning company for a couple of months currently, and I can’t believe the difference it’s made in my health! Toilets Cleaning Service in Hillsboro
Your points about the importance of A/B testing in virtual campaigns had been virtually insightful! Testing exceptional supplies can cause more desirable result. Discover greater procedures at Pixel Juice Digital Marketing Glasgow .
Well done! Discover more at boiler repairs .
Your article on conserving a clean domicile with pets turned into very informative; it is quality to know I’m now not on my own on this wrestle! house cleaning newport beach
Flat roofs need special care; luckily, there are experts in Surrey who truly understand this! Affordable roofing Surrey
Valuable information! Find more at tandartspraktijk alphen aan den rijn .
Thanks for the thorough article. Find more at ferretería Albacete .
I appreciated this post. Check out elektricien leiden for more.
This is very insightful. Check out boiler repairs for more.
Your organizational hacks are lifesavers! They make every little thing such a lot simpler and strain-unfastened, and I’m keen to locate extra at house cleaning .
This was very well put together. Discover more at boiler installation .
Asheville has some of the most beautiful landscapes. Quality construction services are essential to maintain that charm! Blue Ridge Concrete and Construction Contractor
This was very enlightening. More at arnhem boekhouding .
This was beautifully organized. Discover more at gas engineer .
Your advice on keyword placement is spot on! I discovered useful tools at 구글 검색 that help with this.
Thanks for the valuable insights. More at windshield repair asheboro nc .
Thanks for the tip on as a result of microfiber cloths; they relatively work wonders! house cleaning service bay area
I’ve invariably believed that usual dental assess-americaare important for conserving appropriate oral health and wellbeing. It’s distinguished how plenty a dentist can spot early signals of subject matters that we might disregard bucktown dentist
Great insights! Discover more at Gas safety checks .
These tips are super practical—thank you for sharing your expertise! https://www.google.com/maps/place/?q=place_id:ChIJY-Xe2N6ZwoARj0l6fc7E4KY
This is highly informative. Check out economical pest removal solutions for more.
This was highly educational. For more, visit professional plumbing and heating solutions .
The evolving panorama of casinos and iGaming stocks is definitely captivating, exceptionally as technological know-how continues to reshape the industry breakthroughs in online gaming tech
Thanks for breaking down complex legal terms into understandable language regarding personal injuries in Utah—so helpful! salt lake city injury
I’ve been exploring 꽁머니 options lately, and they seem like a great way to try new games without the risk. Visit 꽁나라 for more info!
I’ve been reading mixed reviews about 시알리스 구매 . What are the pros and cons you’ve experienced?
Appreciate the thorough information. For more, visit gas installation .
Valuable information! Find more at gas installation .
Just started playing roulette online, and it’s thrilling! Give it a shot at 라이브카지노 if you haven’t already!
I recently learned about the advantages of using 꽁머니 for investments! Discover more at 꽁머니 사이트 !
Great tips! For more, visit LuxNuro .
When dealing with personal injuries following an accident, it’s important to have the proper counsel. Many people underestimate the value of hiring an experienced# #personal injury attorney## who understands the complexities of these cases https://victor-wiki.win/index.php/Skilled_Personal_Injury_Attorney_for_Broken_Bones_%E2%80%93_Expert_Legal_Help_for_Your_Bone_Fracture_Injury_Claim
I’m curious if diet plays a role in how well 비아그라 works for people.
The impact of mental health on performance is often overlooked, but discussions involving 비아그라 판매 highlight its importance!
This was a great article. Check out Affordible Pest Solutions for more.
I recently discovered how 꽁머니 can be leveraged for better odds. It’s a game-changer! Dive deeper into this at 슬롯 꽁머니 .
I just had an polyurethane floor builder work on my door floor, and I didn’t say enough about it. The finish is both extremely resilient and visually appealing Epoxy Flooring Delafield, WI
Great insights! Find more at Budd Lake bug prevention .
Great article on the importance of safe betting. For anyone looking for reliable 토토사이트, I highly recommend visiting 토토사이트 순위 !
Just signed up for a site offering 꽁머니, and I’m excited! Any advice on how to maximize its potential? Check out 꽁머니 for helpful tips!
Plumbers nearby saved the day when my pipes froze last winter; I’ll always keep their number handy now! plumbing company
Just had our garage converted into a cozy man cave by quality first builders los angeles! Seriously the best decision ever—I might never leave! kitchen remodeling
I had the best birthday celebration at a Brisbane night club last month! The staff made it memorable. For more stories, visit first aid training brisbane .
I was in urgent need of Garage Door Repair Near Me, and I’m so glad I found this service. They were prompt and efficient! Garage Door Repair Parker
I’ve been experimenting with 꽁머니 and it’s definitely worth it! For those curious about its potential, visit 가입 꽁머니 for more information.
I’m impressed to take on that dreaded garage blank-up after interpreting your motivating submit—it’s time to declutter! house cleaning service
This was a wonderful post. Check out toilet maintenance services for more.
I’ve been struggling with litter in my dwelling office. The organizing info you shared are simply what I considered necessary! I’ll be certain to ascertain out house cleaning service for extra suggestion.
Ohio State soccer has this type of rich heritage that it’s hard now not to get drawn into the experiences in the back of the staff’s achievement Click for info
Do you’ve got you have got any specified info for cleansing carpets? I may use a few support! house cleaning service
I never found out how incredible pipe insulation changed into until eventually I examine this. Thanks for the guidance! plumbing company
Valuable information! Find more at alojamientos con piscina en Arzúa .
I enjoyed this read. For more, visit cocinas Granada .
เคยคิดไหมว่าการปรับเปลี่ยนเล็กน้อยจะทำให้รถเรามีชีวิตชีวามากขึ้น? ### เปลี่ยนไฟหน้ารถยนต์ ราคา
Very informative article. For similar content, visit emergency plumbing repair .
This was a wonderful guide. Check out nutrióloga Saltillo for more.
I found this to be super helpful. Check out more on dental crowns at tooth sensitivity relief .
This was a fantastic resource. Check out Tap washers for more.
I’ve necessarily believed that average dental fee-americaare basic for preserving useful oral health. It’s astounding how a lot a dentist can spot early symptoms of themes that we’d put out of your mind dentist near bucktown
I’ve continually believed that consistent dental payment-u.s.are considered necessary for retaining marvelous oral overall healthiness. It’s extraordinary how a great deal a dentist can spot early symptoms of topics that we would forget bucktown dentist
This was highly helpful. For more, visit boiler installation .
This was very well put together. Discover more at Emergency plumbing .
Great job! Discover more at gas installation .
Finding the right authorized counsel for me after an injury lately made a variation. Having a knowledgeable# #anykeyword## helped me immensely when traveling with my personal injury https://www.bestbookmarks.win/9-things-your-parents-taught-you-about-https-weekly-wiki-win-index-php-best-time-to-visit-uptown-phoenix-in-2025-your-ultimate-seasonal-guide
I found this very interesting. Check out Affordible Pest Solutions for more.
I found some amazing reviews about local movers at Lake Mary moving company —can’t wait to use them for my move!
This was quite useful. For more, visit windshield replacement asheboro nc .
The 2023 crypto panorama has been captivating to watch, exceptionally with the upward push of Ordinals adding a brand new layer to Bitcoin’s utility Go here
Thanks for the detailed guidance. More at windshield replacement asheboro nc .
Fantastic insights on roofing! It’s incredible how small issues can lead to big problems if ignored. Trusted roofers Surrey
I enjoyed this read. For more, visit Professional Pest Control Flanders .
Clearly presented. Discover more at boiler repairs .
A little knowledge of first aid goes a long way—everyone should learn the basics! Resources available at First Aid Course in Brisbane !
I found the section on medical expenses very enlightening. Salt Lake Injury Law can be overwhelming, but your guidance helps! south salt lake injury
Cleaning services are a game changer! Not only do they keep my home spotless, yet I’ve noticed less allergic reactions because I started using one in Hillsboro. Highly recommend! Family Room Cleaning Service in Hillsboro
Appreciate the useful tips. For more, visit ferretería online Albacete .
Very helpful read. For similar content, visit boiler repairs .
Your post highlighted how weather impacts windshield functionality, which is something we often overlook—appreciate it! Find out more insights from car window repair asheboro
For anyone in Halethorpe looking for plumbing help, be sure to check out the local plumbing company !
This was a fantastic read. Check out gas engineer for more.
I’ve recently had a huge problem with pests in my home, and I didn’t know where to turn Puyallup Pest Control
เกร็ดเล็กๆ น้อยๆ เกี่ยวกับการใช้งานและดูแลรักษา?? ร้านหลอดไฟรถยนต์ ใกล้ฉัน
Your emphasis on the significance of website online velocity for consumer adventure was spot on! A gradual website online can deter conceivable valued clientele, discover easy methods to optimize yours at Pixel Juice Digital Marketing Glasgow .
Thanks for sharing green cleaning treatments! They’re so great in in these days’s world, and I’m eager to discover greater techniques at the best irvine cleaners .
Thanks for the clear advice. More at https://www.web-bookmarks.win/bes-plumbing-solutions-and-reviews .
Great points on local SEO and the power of a well-optimized Google Business Profile, especially for businesses in Calgary! Given the city’s competitive market https://reidgbkl476.almoheet-travel.com/local-keywords-that-calgary-customers-actually-use
Appreciate the thorough write-up. Find more at beste pizzeria in utrecht .
Thanks for the useful post. More like this at gas engineer .
Consider the advantages of hiring a professional# #limo service## if you’re planning a trip and need reliable transportation. They not only offer luxury and comfort, but they also guarantee reliability, mainly when traveling by air chauffeur car service near me Bradenton FL
I enjoyed this article. Check out gas installation for more.
Navigating the aftermath of an injury can be difficult, especially when dealing with traumas and insurance statements. Having a knowledgeable# #personal injury attorney## can make all the difference in ensuring you receive the compensation you deserve best personal injury lawyer
I appreciated this post. Check out emergency plumber prices for more.
The destiny of casinos and iGaming shares is notably beautiful, notably as era continues to adapt at this type of speedy velocity https://www.list-bookmarks.win/millennial-gold-investing-changing-demographics-and-preferences
Thank you for shedding light on this topic—I’ll definitely check out ## Roof Cleaning Spring
This was beautifully organized. Discover more at trusted my plumber services .
The team at John Egart’s Tree Trimming is so knowledgeable about trees! They helped me choose the right ones for my landscape.
I’ve always believed that popular dental examine-united states of americaare important for protecting accurate oral wellbeing. It’s striking how plenty a dentist can spot early signals of things that we might put out of your mind dentist in bucktown
I’ve always believed that conventional dental take a look at-united statesare elementary for protecting excellent oral wellbeing. It’s astonishing how lots a dentist can spot early symptoms of troubles that we would put out of your mind dentist near bucktown
Useful advice! For more, visit asheboro auto glass replacement .
Really fascinating take on color theory in relation to branding; colors stimulate emotions that affect choices– see my suggestions over at website design agency san francisco !
Just had my pipes fixed by a plumber in Brisbane, and I’m so relieved! Thanks for the suggestions! first aid brisbane
Thanks for the helpful advice. Discover more at heating plumbing near me .
The right travel service is essential when it comes to experiencing luxury and comfort while traveling limousine service near me Bradenton FL
Appreciate the thorough write-up. Find more at car window repair asheboro .
ความแตกต่างระหว่างรุ่นต่างๆ ของไฟรถยนต์ที่เราควรรู้?? เปลี่ยนหลอดไฟรถยนต์ ใกล้ ฉัน
Does anyone know how to choose the right ##Puyallup Chiropractor##? I want to make sure I find someone experienced. Chiropractor near me
Wonderful tips! Find more at apartamentos turísticos con piscina en Arzúa .
Great insights! Discover more at boiler installation .
If you’re struggling with broken appliances, Arlington has some of the best repair services around. google.com
My sister recently completed an ADU project and said she had a great experience with quality first builders; might need those directions soon for tips! kitchen remodeling services
My friend had great results with their water treatment system after hiring a local plumber #.
Thanks for the detailed post. Find more at boiler repairs .
This was a great help. Check out nutrióloga Saltillo for more.
This was a great article. Check out boiler installation for more.
The evolving panorama of casinos and iGaming stocks is actually captivating, in particular when you take into consideration how technologies is reshaping the complete market casino industry evolution and development
Thanks for the great explanation. Find more at mouthwash benefits .
Every homeowner deserve to bookmark these pages at the moment lest they leave out opportunities gleaned from prosperous trip present participants offer freely! plumber
Ohio State soccer has the sort of prosperous history that makes any discussion approximately the crew real captivating top Ohio State football legends
This blog is a treasure trove of information for anyone dealing with injuries in Salt Lake City. Thank you for sharing your expertise in Salt Lake Injury Law! salt lake city injury law firm
Enterprise graph analytics is in reality reworking how enterprises deal with frustrating source chain optimization demanding situations Click for source
I enjoyed this article. Check out gas engineer for more.
I appreciate your take on seasonal considerations; timing can truly make all the difference during installs! Roofing quote Surrey
I’ve consistently believed that well-known dental investigate-u.s.a.are most important for sustaining nice oral overall healthiness. It’s brilliant how a great deal a dentist can spot early indicators of trouble that we’d overlook dentist near bucktown
ใครเคยเจอปัญหากับไฟหน้ารถ LED บ้าง? แชร์ประสบการณ์หน่อยครับ ไฟรถยนต์
Appreciate the thorough write-up. Find more at professional plumber .
Very useful post. For similar content, visit ferretería en Albacete .
I’ve constantly believed that steady dental cost-u.s.a.are essential for keeping marvelous oral wellbeing. It’s unbelievable how much a dentist can spot early symptoms of concerns that we’d disregard bucktown dentist
This was a wonderful guide. Check out gas installation for more.
Thanks for the valuable article. More at gas installation .
The 2023 crypto landscape has been not anything quick of exciting, principally with the rise of Ordinals and their detailed mind-set to Bitcoin inscriptions https://www.apu-bookmarks.win/what-happened-to-daos-in-2023-a-reality-check
Ai đã tham gia vào giải đấu tại https://mcwvn.co.com chưa? Kinh nghiệm của bạn ra sao?
The instructors at my ##First Aid Course in Hobart## were fantastic! They made learning fun and engaging. First Aid Training in Brisbane
I’m curious about the average cost of garage door repairs in Philadelphia—any insights? Garage Door Services in Philadelphia PA
I learned so much about proper tree maintenance from the experts at John Egart’s Tree Service during my last appointment.
Great insights on e-commerce website design! A smooth checkout procedure is essential for conversions. I cover this subject extensively at web design agencies san francisco .
Thanks for the valuable insights. More at https://cs-2.ru/user/milyanukil .
Finding reliable ***plumbing experts*** has changed how I approach maintenance around our house altogether! plumber
If you’re dealing with a rat infestation, it’s crucial to address it quickly to prevent health risks and property damage. Effective rat removal techniques can make a significant difference in maintaining a safe and clean environment Puyallup Pest Control
Wonderful tips! Discover more at 24 7 emergency plumber .
Intel has consistently pushed the boundaries of technology and innovation. Their advancements in chip design and processing power have transformed how we interact with our devices Homepage
The have an effect on of AI and automation on digital advertising is huge! It’s pleasing to peer how know-how shapes our tactics transferring ahead. Read extra about AI gear at Pixel Juice Digital Marketing Glasgow .
Appreciate the insightful article. Find more at boiler installation .
I found this very helpful. For additional info, visit Afordable Pest Solutions .
This was highly educational. For more, visit boiler installation .
Строительный журнал https://poradnik.com.ua для профессионалов и частных застройщиков: новости отрасли, обзоры технологий, интервью с экспертами, полезные советы.
Всё о строительстве https://stroyportal.kyiv.ua в одном месте: технологии, материалы, пошаговые инструкции, лайфхаки, обзоры, советы экспертов.
Goldco probably comes up in conversations approximately diversifying retirement portfolios thru Gold IRAs, and for amazing purpose gold IRA firms reviews
Журнал о строительстве https://sovetik.in.ua качественный контент для тех, кто строит, проектирует или ремонтирует. Новые технологии, анализ рынка, обзоры материалов и оборудование — всё в одном месте.
Thanks for the insightful write-up. More like this at gas plumber near me .
Полезный сайт https://vasha-opora.com.ua для тех, кто строит: от фундамента до крыши. Советы, инструкции, сравнение материалов, идеи для ремонта и дизайна.
Wonderful tips! Find more at Walter’s BBQ Southern Kitchen .
This was a wonderful guide. Check out Walters Barbecue Southern Kitchen for more.
Local SEO in Calgary presents some unique opportunities, especially when you consider how diverse the market is—from bustling downtown businesses to niche shops in quieter neighborhoods Click here for info
Goldco commonly comes up in conversations approximately securing retirement simply by Gold IRAs, and or not it’s needed to understand the nuances formerly making choices Click for source
Thanks for the comprehensive read. Find more at TheSepticDesignNetwork .
Thanks for the valuable article. More at Affordible Pest Solutions .
Appreciate the thorough write-up. Find more at almere juwelier .
Thanks for the clear breakdown. More info at elektricien in de buurt .
My family members and I have actually observed fewer colds and allergic reactions this season, and I’m persuaded it’s due to our new cleaning routine with a service in Hillsboro! cleaning service
Wonderful tips! Find more at pizza restaurant utrecht .
Traveling can be stressful, particularly if you need to travel by air. Finding a trustworthy aircraft automobile service is essential to ensure a flawless commence to your excursion sedan service Sarasota FL
Thanks for breaking down complex legal terms into understandable language regarding personal injuries in Utah—so helpful! salt lake city personal injury law firms
Appreciate the great suggestions. For more, visit arnhem boekhouding .
I’ve all the time believed that customary dental inspect-americaare necessary for asserting outstanding oral fitness. It’s remarkable how a lot a dentist can spot early indicators of complications that we would forget dentist near bucktown
Finding the right constitutional counsel after an incident can have a significant effect on your healing and economic security in today’s society accident lawyer Steele Indian School Park AZ
Excellent information on adhesive flooring’s benefits! It’s wonderful how this substance never merely enhances the visual allure but even provides stain resistance and toughness Concrete Contractor
I’ve invariably believed that familiar dental inspect-u.s.are considered necessary for asserting properly oral well being. It’s exquisite how plenty a dentist can spot early indicators of disorders that we would omit dentist near bucktown
A good friend recommended visiting a ##Puyallup Chiropractor## for my neck issues, and I’m so glad I did! Family Chiropractor
Always feel safe knowing there’s someone capable within reach amongst these hardworking **Baltimore professionals**. plumbing contractor
Just met with quality first builders for my bathroom remodel plans, and they had some stunning design ideas that I hadn’t even considered before! Excited to see how it all turns out—definitely check them out if you’re nearby! Directions here: . bathroom remodling
Everyone deserves access quality services especially concerning safety aspects surrounding structures we inhabit daily hence ongoing support vital indeed!!! # # a nyK eyw ord # # Roofing company Surrey
Appreciate the thorough insights. For more, visit https://privatebin.net/?051d2c1bff892c91#BjbtmxCpyx8xowbqqz8hyV6C1qauJDfmmRHfiNWEPhSG .
Appreciate the detailed information. For more on general dentistry, visit cavity prevention .
This was quite enlightening. Check out expert heating service for more.
This article is so helpful for new homeowners looking for plumbing services in Brisbane! Thank you! first aid courses townsville
I discovered a lot from your submit about drain cleansing techniques. Great task! plumbing company
Having the right assistance from a# #anykeyword## expert can make all the difference when it comes to navigating the complexities of personal injuries serious injury lawyer Bethany Heights AZ
Рулонные шторы с электроприводом, в каждом доме.
Современные рулонные шторы с электрическим управлением, максимальный комфорт.
Рулонные шторы с электроприводом: удобство и стиль, доступны.
Современные рулонные шторы с электроприводом, превосходное сочетание.
Изучите мир электрических рулонных штор, ознакомьтесь.
Умные рулонные шторы для дома, подходят для любого окна.
Стильные рулонные шторы с электроприводом, выбор, который стоит сделать.
Электрические рулонные шторы: свобода выбора, узнайте больше.
Электроприводные рулонные шторы: ваш лучший выбор, на нашем сайте.
Умные рулонные шторы: удобство и стиль, для вашего комфорта.
Современные рулонные шторы с электроприводом, доступные для заказа.
Электрические рулонные шторы для любого интерьера, выбор, на который стоит обратить внимание.
Рулонные шторы с электроприводом – ваш идеальный помощник, в вашем доме.
Умные рулонные шторы: будущее уже здесь, выберите свои.
Умные рулонные шторы для вашего удобства, откройте для себя.
Умные рулонные шторы с электроприводом для вашего дома, позаботьтесь о себе.
Электрические рулонные шторы: легкость управления, выбирайте лучшее.
Электроприводные рулонные шторы для стильного дома, изучите сейчас.
рулонные шторы с электроприводом рулонные шторы с электроприводом .
Terrific insights on website design! I think an easy to use interface is key to maintaining visitors. Have a look at my ideas on this at san francisco web developer .
The destiny of casinos and iGaming stocks is tremendously interesting, primarily as technologies continues to reshape the panorama evolution of casino technology
Thanks for the practical tips. More at Neurofeedback Clinic Denver .
Новости Полтава https://u-misti.poltava.ua городской портал, последние события Полтавы и области
Ohio State soccer has this sort of prosperous historical past that it’s most unlikely not to get drawn into conversations approximately its legendary players and intense rivalries https://www.inter-bookmarks.win/the-unsung-heroes-of-the-2014-championship-run
Enterprise graph analytics has absolutely modified how organizations deal with complicated provide chain optimization demanding situations Helpful resources
This was highly educational. More at effective pest management Flanders .
This was a great article. Check out boiler repairs for more.
My neighbor recommended Mauzy Cooling for AC repairs, and I was not disappointed! Ac repair services in san diego
Thanks for the useful suggestions. Discover more at Walters Barbecue Southern Kitchen .
Thanks for the thorough analysis. Find more at trusted gas plumber specialists .
Great job! Find more at gas engineer .
Thanks for the insightful write-up. More like this at Walters Barbecue Southern Kitchen .
Well done! Find more at Affordible Pest Solutions .
This is quite enlightening. Check out TheSepticDesingNetwork for more.
Very useful post. For similar content, visit Walters Barbecue Southern Kitchen .
I’ve all the time believed that typical dental verify-united states of americaare essential for holding important oral fitness. It’s very good how an awful lot a dentist can spot early signs and symptoms of trouble that we might omit dentist in bucktown
This was highly useful. For more, visit CPR Courses Brisbane .
This was quite enlightening. Check out Broken pipe for more.
This was quite helpful. For more, visit car window repair asheboro .
I finally found an amazing #HalethorpePlumber#, and they’ve made such a difference in my home! emergency plumber
Thanks for the useful post. More like this at gas engineer .
I’ve normally believed that commonly used dental assess-usaare quintessential for asserting magnificent oral wellbeing and fitness. It’s powerful how a lot a dentist can spot early symptoms of trouble that we might put out of your mind dentist near bucktown
สนใจไฟหน้าโปรเจคเตอร์สามารถหาข้อมูลเพิ่มเติมได้ที่นี่ หลอด ไฟ philips
Your article makes it clear why having a knowledgeable lawyer is essential for navigating Salt Lake Injury Law effectively. Thank you! south salt lake injury
Appreciate the comprehensive advice. For more, visit gas engineer .
Your article on crafting strong CTAs used to be very useful! A powerful call-to-movement can critically amplify conversion rates. Find extra actionable guidance at Pixel Juice Digital Marketing Glasgow .
I recently had a pest problem in my home, and I was amazed by the effective solutions offered by local services. It’s crucial to choose a knowledgeable pest control provider in Puyallup to ensure a pest-free environment Puyallup Pest Control
I discover discussions approximately exact success charms and cultural symbols amazing on the grounds that they reveal lots about our shared human favor for wish and insurance policy https://felixbgib869.iamarrows.com/the-hamsa-hand-a-symbol-of-protection-across-multiple-cultures
Goldco commonly comes up in conversations approximately securing retirement by Gold IRAs, and it’s significant to appear beyond just the bright allure https://telegra.ph/How-the-Goldco-Spread-Can-Eat-5-of-Your-Retirement-06-16
Anyone else here using 롤 토토 for their 롤 토토 info? Would love to hear your thoughts!
This was quite helpful. For more, visit pest control savings .
Excellent Research perspectives! How frequently evolving algorithms you affect seek ranking is fascinating to watch. Optimizing for customer intention is a crucial component best seo expert Malviya Nagar Jaipur
купить диплом о среднем образовании купить диплом о среднем образовании .
ร้านเหล้าสาย1 เป็นจุดนัดพบของเพื่อนๆ ที่ดีมากครับ ร้านเหล้าสาย1 คนเยอะ
This was quite helpful. For more, visit asheboro auto glass replacement .
I’m glad you mentioned the risks associated with ignoring minor chips in windshields—this is crucial knowledge! Explore further at asheboro auto glass replacement .
Your insights about using testimonials successfully within designs truly struck home with me; social evidence is effective– take a look at more examples over at san francisco web design agency !
This was nicely structured. Discover more at Affordible Pest Solutions .
Appreciate the detailed post. Find more at asheboro auto glass replacement .
Just scheduled my roof cleaning with Roof Cleaning Spring —can’t wait to see the results!
Thanks for the insightful write-up. More like this at https://43sh2.mssg.me/ .
This was a great help. Check out juwelier almere for more.
แบ่งปันความรู้เรื่องการใช้และติดตั้งไฟหน้าประเภทนี้ให้เพื่อนๆ กันเถอะ bt premium auto xenon รามอินทรา
This was a wonderful guide. Check out Walters Barbecue Southern Kitchen for more.
I appreciated this post. Check out Walters Barbecue Southern Kitchen for more.
I found this very interesting. Check out emergency plumber for more.
Excellent information on current trends in internet design! It’s amazing to see how crucial a well-designed site is for corporations presently, particularly in regions like Essex and Chelmsford web design near me
Thanks for the helpful advice. Discover more at alphen aan den rijn tandartspraktijk .
This article is so helpful for new homeowners looking for plumbing services in Brisbane! Thank you! First Aid Training in Launceston
Appreciate the detailed post. Find more at Serenity Counseling Group .
Appreciate the great suggestions. For more, visit Walter’s BBQ Southern Kitchen .
Appreciate the helpful advice. For more, visit leiden elektricien .
Thrilled by results achieved through proper planning & execution regarding renovations!!!! Roof replacement Surrey
Water treatment is so important for health. A good plumber can make all the difference.
Renovated my living room last month and it’s like a new house! Quality First Builders really helped me pick some stunning finishes. Check them out if you’re in LA! adu
This is highly informative. Check out boekhouder arnhem for more.
“Always exciting when you find an agency that genuinely understands your business needs like I believe the folks at Gilberts do!” Best SEO Company In Gilbert
I appreciate your insights on plumbing maintenance tips for Brisbane homeowners. Very useful! CPR Course Adelaide CBD
This was quite informative. For more, visit wisdom teeth management .
Wow, I learned so much about 구글SEO from this article! It’s exactly what I needed right now. More tips can be found at 구글 상위 .
“It’s effortless to overlook a few features of home protection, but your reminders approximately checking seals and joints are neatly-timed—more data might possibly be stumbled on at plumbing company !”
I’ve forever believed that standard dental investigate-u.s.are principal for declaring marvelous oral fitness. It’s exceptional how so much a dentist can spot early symptoms of points that we might fail to spot dentist near bucktown
Wonderful tips! Find more at licensed gas plumbers nearby .
Кулинарный портал https://vagon-restoran.kiev.ua с тысячами проверенных рецептов на каждый день и для особых случаев. Пошаговые инструкции, фото, видео, советы шефов.
Мужской журнал https://hand-spin.com.ua о стиле, спорте, отношениях, здоровье, технике и бизнесе. Актуальные статьи, советы экспертов, обзоры и мужской взгляд на важные темы.
Журнал для мужчин https://swiss-watches.com.ua которые ценят успех, свободу и стиль. Практичные советы, мотивация, интервью, спорт, отношения, технологии.
อยากจะพาเพื่อนไปที่ OMG OneMoreGlass วันหยุดนี้ รู้สึกตื่นเต้นจัง! สถานที่เที่ยวกลางคืนสาย1
เครื่องดื่มสร้างสรรค์มากมายที่ร้านเหล้าสาย1 ครับ ร้านเหล้าสาย1 รับจัดวันเกิด
Mauzy Cooling is simply the best for AC repairs in San Diego; they have my full recommendation! Ac repair services in san diego
This was a great article. Check out car window repair asheboro for more.
Читайте мужской https://zlochinec.kyiv.ua журнал онлайн: тренды, обзоры, советы по саморазвитию, фитнесу, моде и отношениям. Всё о том, как быть уверенным, успешным и сильным — каждый день.
The future of casinos and iGaming shares is in fact exciting, especially as generation maintains to reshape the panorama https://www.runway-bookmarks.win/the-crossover-between-video-games-and-gambling-the-loot-box-controversy
Thanks for discussing the signs that indicate it’s time for a windshield replacement—very useful info! Check out more at car window repair asheboro .
Very useful post. For similar content, visit windshield replacement asheboro nc .
Enterprise graph analytics is fairly transforming how businesses deal with advanced delivery chain optimization demanding situations IBM.com data analytics for petabyte scale
I enjoyed this article. Check out Boiler repairs for more.
I appreciated this post. Check out Affordible Pest Solutions for more.
I appreciate the insights shared here! I’m considering using 비아그라 처방 as part of my health routine.
The concept of 꽁머니 really piqued my interest! How do different sites handle it? I’ve been exploring 꽁머니 토토 for more details!
The graphics and sound effects at 라이브카지노 에볼루션 are truly immersive!
I found some compelling studies on the efficacy of 비아그라 구입 —happy to share if anyone’s interested!
I think 꽁머니 is a fantastic way to engage with new games without financial pressure. Check out the details at 꽁나라 !
Just had some hazardous branches removed by John Egart’s Tree Removal —I feel so much safer now!
Valuable information! Find more at Neurofeedback Sessions Denver .
This was highly educational. More at https://www.tumblr.com/calculatingislandwave/785811245842513920/just-how-to-take-care-of-rusty-pipes-and-radiators .
Your post relatively opened my eyes to the importance of roof care in Guelph! Thank you! roofing Guelph
The variety of games on 슬롯사이트 is incredible! I love trying out new slots every week. You can find great resources at 슬롯사이트 순위 !
Wonderful tips! Find more at Affordable Pest Solutions .
I was surprised to find out how effective 비아그라 구입 can be! It’s great to see more awareness about it.
I just had a pal who was involved in a severe auto accident, which genuinely underscored the value of having a skilled personal injury attorney with you when days are challenging https://wiki.fc00.ru/index.php?title=Ultimate_Guide_to_Festivals_in_Mesa,_AZ_2025
I’m eager to share what I’ve learned from my recent training with others—thanks, First Aid Course in Adelaide!!! First Aid Training in Brisbane
Has anyone else tried using 토토사이트 for their betting needs? I’ve had a great experience so far, and the odds are quite competitive.
Great job! Find more at Walter’s BBQ Southern Kitchen .
Thanks for the great explanation. Find more at Local BBQ Catering .
I love how diverse the crowd is in Brisbane night clubs; you meet people from all walks of life! Connect with others at first aid course .
ใครเคยไป OMG OneMoreGlass แล้วบ้าง? แนะนำเมนูเด็ดๆ ด้วยนะครับ! ร้านชิลใกล้ฉัน
Would highly suggest contacting this trustworthy ***Baltimore plumber*** if you ever encounter any issues at home. Halethorpe plumbing company
สำหรับคนรักการดื่ม ต้องไปลองที่ OMG ONE MORE GLASS SAI1 สักครั้งนะคะ เที่ยวกลางคืนสาย1
This was quite enlightening. Check out Affordible Pest Solutions for more.
Well done! Find more at TheSepticDesignNetwork .
I’ve recently had a huge problem with pests in my home, and I didn’t know where to turn Wasp removal
I can’t believe how much I’ve saved by utilizing 꽁머니 in my strategies! If you’re interested in maximizing your gains, head over to 꽁나라 .
A tidy home equates to a healthy home! I’ve been utilizing a cleaning service for a couple of months now, and I can not think the distinction it’s made in my health! Family Room Cleaning Service in Hillsboro
I enjoyed this read. For more, visit windshield replacement asheboro nc .
Thanks for the useful suggestions. Discover more at mobile auto glass service asheboro .
I’ve been hearing a lot about 꽁머니 lately. It seems like a great way to boost your bankroll. Has anyone tried it? 꽁나라
The best option is to choose# #limousine service## if you want a credible and luxurious way to travel, especially for significant events or business situations airport transportation near me Miami FL
Thank you for sharing your stories on the position of storytelling in content advertising! Captivating reviews can create amazing connections with audiences, discover in addition storytelling ideas at Pixel Juice Digital Marketing Glasgow .
I’ve continuously believed that well-known dental look at various-usaare simple for retaining sensible oral wellbeing and fitness. It’s first-rate how lots a dentist can spot early indications of troubles that we’d fail to notice dentist bucktown
ИнфоКиев https://infosite.kyiv.ua события, новости обзоры в Киеве и области.
Just had an amazing experience learning first aid techniques at a workshop organized by First Aid Courses Brisbane #.
Appreciate the helpful advice. For more, visit Kitchen plumbing .
Utilizing an airports transport service, I recently had an incredible experience that certainly altered my traveling practice. Making a specialist pilot available correctly outside the bag assert made a huge change taxi booking app
I late went to a skilled salon that provides an amazing range of remedies, including Botox, microneedling, Morpheus8, and PRF infusions aesthetic clinic
Happy to have found a trustworthy plumbing company like Mr.Rooter for urgent repairs. Drain Repair in san diego
Does anyone have tips on how to maintain the benefits of chiropractic care between visits to a #BonneyLakeChiropractor? # Bonney Lake Chiropractor
Excellent information on current trends in web design! It’s fascinating to watch how consumer knowledge develops, particularly in regions like Essex and Chelmsford. A well-designed webpage can really help nearby firms that want to remain out web design near me
ไม่เคยผิดหวังกับการไปที่ OMG ONE MORE GLASS SAI1 เลย ทุกครั้งที่ไปสนุกมากๆ ร้านเหล้าสาย1
Nicely done! Find more at windshield repair asheboro nc .
Grateful for the supportive staff at my ##Puyallup Chiropractor## office; they always make me feel welcome! Chiropractor near me
Nicely done! Find more at asheboro auto glass replacement .
This was a fantastic read. Check out car window repair asheboro for more.
Thanks for the thorough analysis. Find more at trusted local plumbers .
Appreciate the detailed information. For more, visit newfane rehab center .
Excellent essay Finding the best hosting company can be challenging, particularly when trying to strike a balance between price and value seo consultant Shyam Nagar Jaipur
Excellent essay on Marketing It’s fascinating to observe how research techniques evolve. The importance of optimizing for user goal rather than just tags is a another that frequently gets overlooked seo agency Civil Lines Jaipur
Thanks for the thorough article. Find more at juwelier almere .
My car entrance late broke down and it was a headache! Standard repair, in my opinion, is essential to avoiding these issues. Simple items like checking the waters and lubricating the paths can make a big difference garage door opener Akinsdale, AB
When faced with the aftermath of an accident, having a trustworthy# #personal injuries counsel## by your side is vital accident injury lawyers Phoenix AZ
This was highly useful. For more, visit contador cerca de mí .
Appreciate the useful tips. For more, visit abogado laboralista Sevilla .
Great job! Find more at casas rurales Arzúa .
Умные рулонные шторы для вашего дома, в вашем пространстве.
Электроприводные рулонные шторы для вашего окна, максимальный комфорт.
Умные шторы: удобство на кончиках пальцев, в наличии.
Умные рулонные шторы, идеальное решение.
Наслаждайтесь комфортом рулонных штор с электроприводом, нажмите для подробностей.
Электрические рулонные шторы – удобство и стиль, подходят для любого окна.
Электроприводные рулонные шторы: инновации в вашем доме, выбор, который стоит сделать.
Рулонные шторы с электроприводом для легкого управления, откройте для себя.
Рулонные шторы с электроприводом – элегантность и удобство, в каталоге товаров.
Электрические рулонные шторы: удобство на каждом окне, которое вы заслуживаете.
Электрические рулонные шторы – стиль и технология, с возможностью установки.
Электрические рулонные шторы для любого интерьера, выбор, который изменит ваш быт.
Электроприводные рулонные шторы: удобство управления одним нажатием, каждый день.
Умные рулонные шторы: будущее уже здесь, выберите свои.
Умные рулонные шторы для вашего удобства, откройте для себя.
Электрические рулонные шторы – сочетание простоты и стиля, позаботьтесь о себе.
Рулонные шторы с электроприводом для вашего комфорта, заказывайте онлайн.
Электроприводные рулонные шторы для стильного дома, закажите прямо сейчас.
рулонные шторы с электроприводом рулонные шторы с электроприводом .
One thing stands clear: These doctors genuinely care about well-being & progress achieved over time while managing complex conditions sustained during incidents involving automobiles 🚗⚡️✨ Injury chiropractor Everett WA – Everett Accident
I never realized how important regular plumbing check-ups are until I had a leak! Thanks for sharing this info about urgent plumber Medford .
This is a large source for an individual trying to know their plumbing enhanced! Thanks for sharing! plumber near me
Thanks for the great information. More at elektricien in de buurt .
Appreciate the useful tips. For more, visit https://mytishchi.gs-smile.ru/user/mantiaqfyv .
Love hearing success stories where families come together enjoying cooking more due to revamped environments/feels like home again…!! ### anyKeyWord ## kitchen remodel Lexington
Thanks for the useful suggestions. Discover more at Walters Barbecue Southern Kitchen .
Search Engine Marketing Boston
Just learned about energy-efficient roofing options from an article shared on Roof Replacement Tyngsboro #—so informative!
Great emphasis placed upon understanding user intent behind queries; tailoring responses accordingly increases chances toward success greatly!!. Find ways forward from us over here: # anyKeyWord ## Local Business SEO Burlington
This was very well put together. Discover more at TheSepticDesignNetwork .
This was a wonderful post. Check out https://postheaven.net/cirdanghpw/schedule-your-wheel-alignment-in-bonney-lake-today-3fg1 for more.
This was a great article. Check out Serenity Counseling Group for more.
This was quite informative. For more, visit Walters BBQ Southern Kitchen .
I just had a truly amazing practice at a clinical salon, where I learned about numerous cutting-edge procedures like microneedling and Botox med spa near me
“Every time I need HVAC help, I turn to Mauzy Cooling without hesitation!” Ac repair services in san diego
I’ve constantly believed that generic dental take a look at-united statesare a must-have for keeping impressive oral well-being. It’s striking how tons a dentist can spot early indications of complications that we might disregard bucktown dentist
Nicely detailed. Discover more at Circuit boards .
หากคุณไม่เคยไปที่ OMG ONE MORE GLASS SAI1 ถือว่าพลาดมากๆ ค่ะ ร้านอาหารสาย1 เพลงเพราะ
Your article on common myths about auto glass really debunked some misconceptions I had—thank you! Learn more at mobile auto glass service asheboro !
Appreciate the thorough analysis. For more, visit asheboro auto glass replacement .
I found this very interesting. Check out car window repair asheboro for more.
Natural discussion elements round key-phrase pair topics provide a positive chance to explore the relationships among recommendations in a significant manner why public data is trusted
Actually appreciate this web content on First Aid Training Brisbane– it matters for everybody, not just healthcare specialists! First Aid Training Brisbane
Thanks for the useful post. More like this at plumbing line troubleshooting .
Рулонные шторы с электроприводом, в вашем пространстве.
Электроприводные рулонные шторы для вашего окна, легкость управления.
Умные шторы: удобство на кончиках пальцев, в нашем интернет-магазине.
Электроприводные рулонные шторы, качества и стиля.
Время менять окна на рулонные шторы с электроприводом, смотрите.
Рулонные шторы с электроприводом для вашего интерьера, создадут уют.
Стильные рулонные шторы с электроприводом, инновации, которые стоит попробовать.
Рулонные шторы с электроприводом для легкого управления, познакомьтесь с нашими предложениями.
Рулонные шторы с электроприводом – элегантность и удобство, в каталоге товаров.
Рулонные шторы с электроприводом для современного интерьера, для вашего комфорта.
Электрические рулонные шторы – стиль и технология, предлагаемые с доставкой.
Умные рулонные шторы – правильно решайте, выбор, который изменит ваш быт.
Рулонные шторы с электроприводом – ваш идеальный помощник, каждый день.
Обновите интерьер с рулонными шторами с электроприводом, закажите сейчас.
Электрические рулонные шторы – стильный выбор, откройте для себя.
Электрические рулонные шторы – сочетание простоты и стиля, не упустите свой шанс.
Умные рулонные шторы – ваш идеальный выбор, покупайте у нас.
Преимущества рулонных штор с электроприводом, закажите прямо сейчас.
рулонные шторы с электроприводом рулонные шторы с электроприводом .
I just had a truly remarkable experience at my neighborhood clinical resort, where I had a combination of remedies, including PRF injections and microneedling botox near me
-“With every interaction, we feel reassured knowing we’re supported by industry-leading professionals—thank you, GILBERT! google.com
Thanks for the useful post. More like this at https://buxov.ru/user/xanderkqos .
Heating contractors can really make or break your winter comfort. I trust Geothermal installation Baltimore with all my heating needs.
This was a great article. Check out windshield repair asheboro nc for more.
The rise of user-generated content is so unique! Encouraging clientele to share their experiences can expand manufacturer visibility. Learn more approximately engagement innovations at Pixel Juice Digital Marketing Glasgow .
Appreciate the thorough insights. For more, visit asheboro auto glass replacement .
Valuable information! Find more at windshield replacement asheboro nc .
I appreciated this post. Check out Walter’s BBQ Southern Kitchen for more.
Thanks for the clear advice. More at Walters Barbecue Southern Kitchen .
This was quite informative. For more, visit TheSeptikDesignNetwork .
Thanks for the useful suggestions. Discover more at Serenity Therapy Group .
Knowing where to turn after experiencing water damage is so important; thankfully we have places like water mitigation company Clive here in Clive!
Appreciate the thorough insights. For more, visit Brunch Pittsburgh .
Thanks for the helpful advice. Discover more at https://padlet.com/felikbreeseqo574fbtpb/bookmarks-3am0vz4gy43usg8j/wish/mDRxWBMdGzznZjb1 .
Nothing beats knowing you have a reliable plumber like Mr.Rooters on speed dial! Drain Repair in san diego
Such an excellent read! Have you explored the impact of animations in web design? I discuss it even more at bay area website designer .
The friendly staff and effective treatments at # any Keyword # make all the difference in recovery post-crash. Injury chiropractor Everett WA – Everett Accident
How important do you think it is to match hardware finishes during a kitchen remodel? I’m torn on this issue! kitchen renovation costs Tewksbury
Breaking away from traditional ingredients and opting for wholesaler specialties has transformed how I cook!!!# # anyKeyWord ## trusted restaurant supply wholesaler
I’m thinking about adding an island during my kitchen renovation. What do you think? kitchen remodel cost Lexington
Excellent information on website layout! How much can a well-designed website influence customer engagement and experience? The emphasis on local style styles is crucial for businesses looking to stand out in Essex, particularly around Chelmsford Web Design
Love your insights on plumbing emergencies! A dependable emergency drain cleaning service Medford is invaluable.
Рулонные шторы с электроприводом, в интерьере.
Выберите рулонные шторы с электроприводом, для вашего интерьера.
Умные шторы: удобство на кончиках пальцев, в каталоге.
Электроприводные рулонные шторы, превосходное сочетание.
Время менять окна на рулонные шторы с электроприводом, ознакомьтесь.
Рулонные шторы с электроприводом для вашего интерьера, создадут уют.
Электроприводные рулонные шторы: инновации в вашем доме, решение для современного дизайна.
Электрические рулонные шторы: свобода выбора, узнайте больше.
Электроприводные рулонные шторы: ваш лучший выбор, в нашем интернет-магазине.
Электрические рулонные шторы: удобство на каждом окне, которое вам понравится.
Современные рулонные шторы с электроприводом, с возможностью установки.
Рулонные шторы с электроприводом: функциональность и стиль, выбор, который изменит ваш быт.
Умные рулонные шторы для современного дома, каждый день.
Обновите интерьер с рулонными шторами с электроприводом, закажите сейчас.
Умные рулонные шторы для вашего удобства, откройте для себя.
Рулонные шторы с электроприводом – вашим окнам это нужно, пополните свой интерьер.
Умные рулонные шторы – ваш идеальный выбор, покупайте у нас.
Преимущества рулонных штор с электроприводом, закажите прямо сейчас.
рулонные шторы с электроприводом рулонные шторы с электроприводом .
It’s amazing how quickly professionals can restore a home after water damage! Highly recommend it! water damage restoration service near me
I learned a lot from your post about roofing and water damage prevention—thank you! Chimney repairs Surrey
This was highly helpful. For more, visit https://www.skubi-du.online/user/uponceyowk .
I found this blog incredibly helpful and informative—I can’t wait till I start working together with # anyKeyWord#! SEO Optimization Service Lowell
Appreciate the detailed insights. For more, visit abogados laboralistas .
Interested in DIY roof repairs? Check out the resources available on Roof Services Tyngsboro for Tyngsboro homeowners!
This was very beneficial. For more, visit contador en Saltillo .
SEO strategies are always evolving. I found some great services at Improve Google Rank Burlington .
I enjoyed this article. Check out casas rurales en Arzúa for more.
I’ve just been looking into several treatments at skilled spas, and I may suggest that my beauty schedule has been transformed by the combination of Botox and microneedling. It is absolutely amazing how microneedling improves Botox’s results aesthetic clinic
Thanks for discussing the significance of prototype testing before finalizing orders—my approach has shifted positively due to #I choose Print Design Services Lexington
Was amazed by all options available when visiting their showroom; definitely gonna keep returning until every corner is perfect!!! Thank you QUALITY FIRST BUILDERS!!! kitchen remodeling services
This was a great article. Check out car window repair asheboro for more.
Appreciate the insightful article. Find more at windshield repair asheboro nc .
I enjoyed this post. For additional info, visit asheboro auto glass replacement .
” Reading with the aid of these pointers sounds like having an specialist stroll alongside me all through initiatives—which instills self assurance transferring ahead # # anyKeyWord # plumber near me
This was beautifully organized. Discover more at Plumbers near me .
บรรยากาศในร้านเหล้าสาย1 ช่วยให้รู้สึกผ่อนคลายมากครับ ร้านเหล้าสาย1 รับจัดวันเกิด
This was a great help. Check out tandartspraktijk in alphen aan den rijn for more.
If your AC is acting up, don’t hesitate to contact Mauzy Cooling. They saved my summer with their quick response! Ac repair services in san diego
Loved your post about HVAC efficiency! For installation or repair, consider using AC repair Ellicott City as your trusted contractor.
Useful advice! For more, visit pizza in utrecht .
The tips on vehicle preparation before shipping found on Long Beach car shippers were incredibly helpful!
This was a great article. Check out payday loans new orleans la for more.
Excellent write-up Search is such a crucial component of online marketing, and it’s fascinating how it constantly evolves. I’ve been looking for ways to improve organic visitors and raise the presence of my website seo expert Vaishali Nagar Jaipur
Thanks for the informative content. More at arnhem boekhoudkantoor .
Excellent Marketing perspectives! In today’s competitive environment, it is impossible to overstate the value of optimizing for search engines seo agency Vaishali Nagar Jaipur
Priority Restoration did an amazing job with my water damage clean up near me. Highly recommend their services!
I had a fantastic experience with Priority Restoration Philadelphia Water Damage Clean Up Near Me
It’s inspiring to peer caregivers no longer basically presenting physical aid but additionally emotional strengthen to citizens—they do amazing paintings right through our town of Perth! Expert Aged Care Perth
Nicely detailed. Discover more at Walters Barbecue Southern Kitchen .
อยากรู้วิธีการเลือกซื้อและติดตั้งไฟหน้าโปรเจคเตอร์อย่างไร? คลิกเลย! เปลี่ยน ไฟหน้ารถ ใกล้ ฉัน
Все новинки https://helikon.com.ua технологий в одном месте: гаджеты, AI, робототехника, электромобили, мобильные устройства, инновации в науке и IT.
Портал о ремонте https://as-el.com.ua и строительстве: от черновых работ до отделки. Статьи, обзоры, идеи, лайфхаки.
This web publication post tremendously resonates with me as an HR respectable. For further studying on consulting offerings in Perth, check out HR Consulting Perth .
Ремонт без стресса https://odessajs.org.ua вместе с нами! Полезные статьи, лайфхаки, дизайн-проекты, калькуляторы и обзоры.
Very useful post. For similar content, visit leaking pipe .
Appreciate the detailed insights. For more, visit TheSepticDesignNetwork .
It’s never far too late to learn First Aid skills! Hobart has excellent training alternatives offered at CPR Training Brisbane .
Сайт о строительстве https://selma.com.ua практические советы, современные технологии, пошаговые инструкции, выбор материалов и обзоры техники.
Valuable information! Discover more at Serenity Counseling Group .
Are you a passionate entrepreneur in Perth? Join the thriving business networking community at Networking events for professionals Perth and unlock endless possibilities!
This was very enlightening. More at windshield repair asheboro nc .
Nicely done! Find more at asheboro auto glass replacement .
Appreciate the thorough insights. For more, visit windshield repair asheboro nc .
I’ve been hearing a lot about the amazing outcomes individuals are seeing with solutions like Morpheus8 and microneedling nowadays in health spas. It’s exciting to see how common alternatives like Botox and PRF shots combine to improve body rejuvenation facials near me
Solar hot water methods are the manner to head! Excited to be taught greater from Water Filtration systems Mandurah .
Clean roofs lead to healthier homes! If you’re in need of services, consider Roof Cleaning .
This was a fantastic read. Check out https://cinemafest.ru/user/glassazihx for more.
Plumbing emergencies can occur unexpectedly, however with Hot water systems installation Perth a possibility, you are able to relax trouble-free knowing that their staff is just a name away to address your warm water heater considerations.
If anyone’s dealing with garage door issues, I highly recommend the service I used in Sherman Oaks—top-notch work! Learn more at Garage Door Repair Sherman Oaks .
Your discussion about utilizing videos in website design was especially intriguing! Videos can enhance storytelling considerably; have a look at my examples at website design agency san francisco !
Hosting an occasion? A charcuterie board will likely be the two an appetizer and a communication starter! I discovered such a lot of certain strategies on-line—head over to charcuterie board orange county for idea!
Thanks for the comprehensive read. Find more at professional local plumbers .
Your advice on bathroom remodeling is spot-on! I’m planning to upgrade mine soon and will check out HVAC repair Ellicott City for guidance.
Walking away from this experience healthier than before proves just how talented those working within these walls truly are!!!! Thankful forevermore <3<3<3 Top accident chiropractor near me – Everett Accident
What’s everyone’s opinion on mixing metals in a remodeled kitchen design? Yay or nay? kitchen renovation Lexington
J’aimerais savoir quels produits capillaires sont recommandés par les coiffeurs de Bayonne. Ce site en parle en détail ! coiffure bayonne
Local food wholesalers help reduce the carbon footprint of our meals! Discover how at experienced food wholesaler .
Thanks for sharing those details on optimizing landing pages! Small modifications can bring about widespread outcome in conversions. More suggestions are readily available at Pixel Juice Digital Marketing Glasgow .
I love learning about home maintenance! Thanks for the heads-up on using urgent plumber Medford for plumbing services.
This was beautifully organized. Discover more at car window repair asheboro .
This was highly educational. For more, visit Más ayuda .
Great tips on handling water emergencies! For those needing restoration services in Clive, don’t forget about mold remediation Clive .
Great insights! Discover more at toilet replacement cost .
For my airports vehicles needs, I just had the opportunity to use a great# #limo service##. The trip was smooth and enjoyable thanks to the professional and polite chauffeur vip taxi Sarasota FL
I appreciate your focus on the importance of semantic search and how it impacts local businesses; insightful stuff relevant to our community here in Boston—see more at SEO Boston !
Very encouraging knowing local businesses prioritize customer satisfaction above all else while executing tasks efficiently – kudos again mr rooters plumbing crew!!!! Drain Repair in san diego
I completely agree that quality content drives SEO success! Check our content strategies at Burlington SEO Expert .
Appreciate your thoroughness in covering every possible sign indicating a need for replacement ! # # anyKeyWord ## Affordable roofing Surrey
What a thorough exploration of digital vs traditional media—it affirms why I lean towards services from #I choose Same Day Printing Lexington
Absolutely loved this article about web design tendencies! It’s fascinating to observe how the landscape changes, particularly in places like Web Design Essex and Web Design Chelmsford Web Design
This was a fantastic resource. Check out https://www.4shared.com/s/fOYDRPthyjq for more.
Thanks for the great explanation. Find more at contadores cerca de mí .
I found this very helpful. For additional info, visit abogados laboralistas en Sevilla .
This was a fantastic read. Check out casa rural en Arzúa for more.
Useful advice! For more, visit Walters BBQ Southern Kitchen .
Water damage can lead to mold if not handled promptly. Let’s support our local Irving TX restoration businesses! water restoration Irving TX
I never thought small leaks could lead up big problems until I saw firsthand what happened at my neighbor’s house!!!#RealLifeLessons### anykeyword ## flood cleanup services near me
Thanks for the thorough analysis. More info at TheSeptikDesignNetwork .
Your post was spot on. The way you broke it down is great. Being in New Castle County, Delaware, this resonates with what I see locally. I really liked your explanation about understanding the claims process. That tip alone can change a case accident lawyer
Looking at different styles for our bathroom remodel and found some cool stuff from quality first builders! Definitely heading there soon; here’s where you can find them. kitchen remodeling
Remarkable ability distilling problematical thoughts damaged down definitely promises get admission to broader audiences keen analyze strengthen lives right now impacting first-rate dwelling areas created lovingly over the years! plumber Dallas
Finding the right legitimate counsel after an mishap can have a significant affect on your healing and economic stability in today’s society personal injury law firm Phoenix AZ
I just spoke with a companion about how crucial it is to pick the best legitimate team after an injury. Some persons disregard the complexity of private wound scenarios, mainly when dealing with insurance corporations personal injury attorney
This was a wonderful guide. Check out leiden elektricien for more.
Valuable information! Discover more at tandartspraktijk alphen aan den rijn .
Just received lower back from the highest quality charcuterie tasting event in Orange County! I can’t put forward it ample. More info at charcuterie board orange county .
Just what I needed! These tents look perfect for my upcoming outdoor event in Tampa. bounce house of tampa
Well done! Find more at pizza restaurant utrecht .
I recently had the pleasure of using a# #limo service## for airport travel, and I couldn’t have been more impressed! The knowledge felt incredibly luxurious, the car was clean, and the chauffeur arrived on time
This was a great help. Check out https://atavi.com/share/xap61nz1ggf85 for more.
Thanks for sharing your sought after equipment for home cleansing; I’ll be including those to my shopping checklist! cleaning
If anyone’s considering switching their HVAC contractor, do it sooner rather than later—it makes such a difference in efficiency!! HVAC contractor
You made great points about wall textures affecting paint application—very insightful! More info at Interior Painting Companies Portland .
The value of screening and feedback in web design can’t be stressed enough! I have a guide on effective testing approaches at website designer bay area .
Thanks for the helpful advice. Discover more at quick cistern syphon solutions .
Looking for a dependable and beautiful way to travel? Whether you need a ride to the airport, a particular occurrence, or just want to relish the comfort of a charcoal auto service vip taxi Bradenton FL
The communique around cybersecurity in online casinos is transforming into increasingly essential as the enterprise grows Website link
Qui d’autre adore se faire coiffer dans les salons de Bayonne ? Partagez vos expériences et consultez ce site pour plus d’infos ! coiffeur cheveux bouclés bayonne
The community aspect of local bulk stores is fantastic; everyone shares tips and recipes! Join the conversation at trusted bulk dry goods supplier .
I wish I had found out about Gilbert SEO Company sooner! Gilbert SEO Company
Colorful cabinets are trending in kitchen remodels this year! Who else is considering this bold choice? kitchen renovation Tewksbury
Excellent advice on how to pick the best web hosting service! Finding a trustworthy and economical choice in today’s online panorama is essential for both business and individuals best seo Shyam Nagar Jaipur
Appreciate the thorough analysis. For more, visit Walter’s BBQ Southern Kitchen .
I enjoyed this post. For additional info, visit BBQ catering specials near me .
Appreciate the detailed post. Find more at TheSepticDesignNetwork .
Appreciate the detailed information. For more, visit local plumbers recommended .
Valuable information! Find more at Serenity Counseling Group .
This is a fantastic post on the importance of 구글SEO! It’s helping me rethink my approach completely. Check out more ideas at 구글 백링크 !
There’s something magical about playing just right nutrition even though absorbing sunshine; perfecting backyard gatherings featuring clean constituents sourced %%!%%da6985b9-1/3-45b2-be79-d2e412670d06%%!%% is simple with idea shared over here: # # charcuterie boards
This was highly educational. For more, visit Emergency plumbing .
Air duct cleaning is often overlooked but so essential! Thank you for highlighting this service. More info at Geothermal installation Baltimore !
Appreciate your tips on preparing my home and yard prior to installation day!! Excellent advice!! New roof installation Surrey
Finding the right# #accident lawyers near me## can be a daunting task, especially after experiencing a personal injury. It’s crucial to establish a relationship with knowledgeable experts who are knowledgeable about the intricacies of personal injury law car accident insurance attorney Arizona Falls AZ
”Simply put: One visit alone proved worth every penny spent previously considering level expertise brought forth each occasion…” Drain Repair in san diego
Wow, I didn’t realize how quickly things could escalate with water issues! Glad there are solutions like those offered by water removal services Clive in Clive.
Well done! Discover more at 24 hour plumbing services .
Awesome article! Discover more at contadores Saltillo .
If you’re considering trying 비아그라 구매 , make sure you do your research first!
Excellent short article on the elements of reliable navigation! Great navigation can make or break a website’s functionality– more thoughts over at california web design companies !
This article on web style trends definitely caught my attention! It’s exciting to see how design contributes so much to user engagement and engagement Web Design Essex
I’m new to online casinos, but my experience with 카지노사이트 has been really positive.
I liked this article. For additional info, visit abogados laboralistas .
Thanks for the helpful advice. Discover more at casas rurales Arzúa .
Fascinating insights on 시알리스 구입 ! This is an area that needs more exploration and understanding.
I think 꽁머니 is a fantastic way to engage with new games without financial pressure. Check out the details at 꽁머니 토토 !
Appreciate the detailed information. For more, visit asheboro auto glass replacement .
The concept of 꽁머니 is fascinating! It opens up so many possibilities for newbies and pros alike. Learn more about it at 꽁머니 사이트 .
I’ve been exploring 꽁머니 options lately, and they seem like a great way to try new games without the risk. Visit 토토사이트 꽁머니 for more info!
Very helpful read. For similar content, visit washing machine repair services .
Certified professionals truly make all difference when navigating through complicated insurance claims following disasters…their expertise relieves so much pressure!!!!#InsuranceHelp ### anykeyword ## mitigation company near me
The customer support at 신규 슬롯사이트 is amazing! They really care about their players, making it one of my favorite 슬롯사이트.
It’s great to see discussions around men’s health becoming more mainstream. I think 비아그라 후기 could really help a lot of people.
The role of logistics in successfully operating a wholesale business cannot be overlooked; great post! See more at authority in wholesale produce !
”Keep your cool this summer by contacting mauzCooling for any necessary repairs.” Ac repair services in san diego
Just got off the phone with quality first builders regarding my garage conversion; they seemed really knowledgeable and friendly!! Can’t wait to see what ideas they bring when I stop by next week—here’s where they’re located: . custom home remodeling
Thanks for the valuable insights. More at same day drain cleaning .
Si vous cherchez un bon coiffeur à Bayonne, n’hésitez pas à consulter ce site qui regroupe les meilleures adresses ! coiffeur cheveux bouclés bayonne
Navigating the fallout of an injury can be very difficult, both physically and mentally. The function of a# #personal injury attorney## is therefore so crucial accident attorney near me Paradise Valley AZ
คิดว่าการลงทุนในอุปกรณ์เหล่านี้จะช่วยเพิ่มมูลค่าให้รถหรือไม่? ### ไฟรถ
Thanks for the useful post. More like this at Haga clic para más .
Really appreciate the thoughts shared here. Excellent job outlining the steps involved. As someone in Wilmington, Delaware, this knowledge feels very applicable. The part on liability assessment was particularly helpful car accident lawyer
I’ve seen promotions involving 꽁머니 everywhere lately! What’s the best deal you’ve found? Discuss it at 꽁머니 텔레그램 !
Рулонные шторы с электроприводом, в каждом доме.
Выберите рулонные шторы с электроприводом, максимальный комфорт.
Умные шторы: удобство на кончиках пальцев, у нас.
Электроприводные рулонные шторы, комфорта и эстетики.
Наслаждайтесь комфортом рулонных штор с электроприводом, смотрите.
Рулонные шторы с электроприводом для вашего интерьера, подходят для любого окна.
Электроприводные рулонные шторы: инновации в вашем доме, решение для современного дизайна.
Умные рулонные шторы – ваш новый помощник, узнайте больше.
Электроприводные рулонные шторы: ваш лучший выбор, в нашем интернет-магазине.
Умные рулонные шторы: удобство и стиль, для вашего комфорта.
Преобразите ваш дом с рулонными шторами с электроприводом, доступные для заказа.
Умные рулонные шторы – правильно решайте, выбор, который изменит ваш быт.
Электроприводные рулонные шторы: удобство управления одним нажатием, носим с собой.
Обновите интерьер с рулонными шторами с электроприводом, выберите свои.
Электрические рулонные шторы – стильный выбор, сделайте свой дом комфортнее.
Электрические рулонные шторы – сочетание простоты и стиля, не упустите свой шанс.
Электрические рулонные шторы: легкость управления, заказывайте онлайн.
Электроприводные рулонные шторы для стильного дома, изучите сейчас.
рулонные шторы с электроприводом рулонные шторы с электроприводом .
Are there any legal considerations when using 꽁머니 that we should be aware of? Learn more legalities at 꽁머니 사이트 !
This post is super helpful for anyone looking to hire an HVAC contractor! Thanks for sharing! HVAC contractor
This was a great article. Check out Walters Barbecue Southern Kitchen for more.
This was a great help. Check out BBQ catering specials menu for more.
My friend swears by her Gig Harbor Chiropractor for managing her anxiety. Has anyone else found similar benefits? Car accident chiropractor Gig Harbor
Have you ever tried pairing varied wines along with your charcuterie? The strategies in Orange County make it convenient—get ideas here: charcuterie board orange county !
Your tips on choosing a chiropractor are spot on! I’ll be looking for a Northgate Chiropractor next week. Northgate Chiropractor
Appreciate the thorough analysis. For more, visit Serenity Therapy Group .
Has anyone had a bad experience with 꽁머니? I’m curious about the pitfalls before diving in myself. Found some warnings at 꽁머니 카지노 .
This was quite helpful. For more, visit Walters BBQ Southern Kitchen .
This was highly educational. More at windshield repair asheboro nc .
This is highly informative. Check out commercial plumbing for more.
Balanset-1A: State-of-the-art Compact Balancer & Vibration Analyzer
Next-generation Dynamic Balancing Solution
Balanset-1A serves as an advanced solution for vibration correction of rotors in their own bearings, developed by Estonian company Vibromera OU. The device provides professional equipment balancing at €1,751, which is 3-10 times more affordable than traditional vibration analyzers while preserving high measurement accuracy. The system enables on-site balancing directly at the equipment’s installation site without requiring dismantling, which is vital for preventing production downtime.
About the Manufacturer
Vibromera OU is an Estonian company concentrating in the development and manufacturing of devices for technical diagnostics of industrial equipment. The company is registered in Estonia (registration number 14317077) and has branches in Portugal.
Contact Information:
Official website: https://vibromera.eu/shop/2/
Technical Specifications
Detection Parameters
Balanset-1A ensures high-precision measurements using a two-channel vibration analysis system. The device measures RMS vibration velocity in the range of 0-80 mm/s with an accuracy of ±(0.1 + 0.1?Vi) mm/s. The functional frequency range is 5-550 Hz with potential extension to 1000 Hz. The system supports RPM measurement from 250 to 90,000 RPM with phase angle determination accuracy of ±1 degree.
Working Principle
The device employs phase-sensitive vibration measurement technology with MEMS accelerometers ADXL335 and laser tachometry. Two uniaxial accelerometers measure mechanical oscillations proportional to acceleration, while a laser tachometer generates impulse signals for determining rotational speed and phase angle. Digital signal processing includes FFT analysis for frequency analysis and specialized algorithms for automatic calculation of correction masses.
Full Kit Components
The standard Balanset-1A delivery includes:
Measurement unit with USB interface – primary module with embedded preamplifiers, integrators, and ADC
2 vibration sensors (accelerometers) with 4m cables (alternatively 10m)
Optical sensor (laser tachometer) with 50-500mm measuring distance
Magnetic stand for sensor mounting
Electronic scales for precise measurement of corrective masses
Software for Windows 7-11 (32/64-bit)
Plastic transport case
Complete set of cables and documentation
Operating Capabilities
Vibrometer Mode
Balanset-1A functions as a complete vibration analyzer with capabilities for measuring overall vibration level, FFT spectrum analysis up to 1000 Hz, determining amplitude and phase of the fundamental frequency (1x), and continuous data recording. The system provides display of time signals and spectral analysis for equipment condition diagnostics.
Balancing Mode
The device supports one-plane (static) and dual-plane (dynamic) balancing with automatic calculation of correction masses and their installation angles. The unique influence coefficient saving function allows considerable acceleration of follow-up balancing of similar equipment. A dedicated grinding wheel balancing mode uses the three-correction-weight method.
Software
The user-friendly program interface offers step-by-step guidance through the balancing process, making the device available to personnel without specific training. Key functions include:
Automatic tolerance calculation per ISO 1940
Polar diagrams for imbalance visualization
Result archiving with report generation capability
Metric and imperial system support
Multilingual interface (English, German, French, Polish, Russian)
Application Areas and Equipment Types
Industrial Equipment
Balanset-1A is efficiently used for balancing fans (centrifugal, axial), pumps (hydraulic, centrifugal), turbines (steam, gas), centrifuges, compressors, and electric motors. In production facilities, the device is used for balancing grinding wheels, machine spindles, and drive shafts.
Agricultural Machinery
The device provides exceptional value for agriculture, where reliable operation during season is vital. Balanset-1A is applied for balancing combine threshing drums, shredders, mulchers, mowers, and augers. The possibility to balance on-site without equipment disassembly allows avoiding costly downtime during peak harvest periods.
Specialized Equipment
The device is successfully used for balancing crushers of various types, turbochargers, drone propellers, and other high-speed equipment. The rotation frequency range from 250 to 90,000 RPM covers practically all types of industrial equipment.
Superiority Over Similar Products
Economic Value
At a price of €1,751, Balanset-1A delivers the functionality of devices costing €10,000-25,000. The investment recovers costs after preventing just 2-3 bearing failures. Cost reduction on third-party balancing specialist services reaches thousands of euros annually.
Ease of Use
Unlike complicated vibration analyzers requiring months of training, mastering Balanset-1A takes 3-4 hours. The step-by-step guide in the software enables professional balancing by personnel without special vibration diagnostics training.
Mobility and Autonomy
The complete kit weighs only 4 kg, with power supplied through the laptop’s USB port. This allows balancing in field conditions, at distant sites, and in hard-to-reach locations without additional power supply.
Universal Application
One device is adequate for balancing the widest spectrum of equipment – from small electric motors to large industrial fans and turbines. Support for single and dual-plane balancing covers all typical tasks.
Real Application Results
Drone Propeller Balancing
A user achieved vibration reduction from 0.74 mm/s to 0.014 mm/s – a 50-fold improvement. This demonstrates the outstanding accuracy of the device even on small rotors.
Shopping Center Ventilation Systems
Engineers effectively balanced radial fans, achieving decreased energy consumption, removed excessive noise, and prolonged equipment lifespan. Energy savings offset the device cost within several months.
Agricultural Equipment
Farmers note that Balanset-1A has become an vital tool preventing costly breakdowns during peak season. Reduced vibration of threshing drums led to lower fuel consumption and bearing wear.
Investment and Delivery Terms
Current Prices
Complete Balanset-1A Kit: €1,751
OEM Kit (without case, stand, and scales): €1,561
Special Offer: €50 discount for newsletter subscribers
Volume Discounts: up to 15% for orders of 4+ units
Purchase Options
Official Website: vibromera.eu (recommended)
eBay: trusted sellers with 100% rating
Industrial Distributors: through B2B channels
Payment and Shipping Terms
Payment Methods: PayPal, bank cards, bank transfer
Shipping: 10-20 business days by international mail
Shipping Cost: from $10 (economy) to $95 (express)
Warranty: manufacturer’s warranty
Technical Support: included in price
Final Assessment
Balanset-1A constitutes an ideal solution for organizations aiming to deploy an successful equipment balancing system without substantial capital expenditure. The device democratizes access to professional balancing, permitting small companies and service centers to provide services at the level of large industrial companies.
The blend of accessible price, ease of use, and professional features makes Balanset-1A an essential tool for modern technical maintenance. Investment in this device is an investment in equipment reliability, decreased operating costs, and increased competitiveness of your business.
This was quite informative. More at local checkatrade plumbers .
The way you’ve incorporated plants into your design is truly lovely! Design & Build New Orleans
Cleaning will also be overwhelming, yet breaking it down into smaller obligations makes it potential. Thanks for sharing! house cleaning newport beach
พบกับเทคนิคใหม่ในการใช้และดูแลรักษาไฟหน้าโปรเจคเตอร์ได้ที่นี่เลยครับ ร้านไฟรถยนต์ ใกล้ฉัน
The color scheme you suggested is fantastic! Colors can truly affect user engagement. I go over more about color psychology in web design at bay area website design .
So happy with my decision to go with ## Roof maintenance services Surrey
This was a fantastic read. Check out plumb tub for more.
“Every business owner should consider utilizing professional CFP Services like those offered by Sas Prinzivalli CPA, PA for success.” ### anyKeyWord### Part-time CFO
Thanks for the helpful advice. Discover more at mobile auto glass service asheboro .
My neighbor used LA Roof Masters last year and their place looks awesome now—thinking of reaching out myself soon! roof coating
Well explained. Discover more at effective reverse lookup .
Clean water is essential, and your discussion on water treatment suppliers was enlightening—thanks a lot! More options available at Air conditioning contractor !
I’m grateful for all the helpful information I found regarding legal rights after my accident on tow truck !
Anyone else obsessed on themed charcuterie forums? Loving all of the creativity coming from puts in Orange County—see greater innovations at charcuterie board !
Mr. Rooter Plumbing offers top-notch drain repair services in San Diego at affordable rates. Drain Repair in san diego
Grateful for the knowledge shared by my #BonneyLakeChiropractor on maintaining health at home too! # Chiropractor Bonney Lake
Les événements de coiffure à Bayonne sont toujours fascinants ! Pour en savoir plus, regardez ce site exceptionnel. coiffeur cheveux bouclés bayonne
Helpful suggestions! For more, visit contadores en Saltillo .
When I just realized how important it is to retain this area of our homes, I had a problem where my garage door wouldn’t close properly. Regular maintenance and repairs may prevent us from developing bigger issues later on garage door supplier Mill Woods, AB
Thanks for the helpful advice. Discover more at casa rural en Arzúa .
This was a fantastic read. Check out asheboro auto glass replacement for more.
Consider the advantages of a trustworthy# #limousine service## if you want to have an unforgettable travel experience. A professional driver can make your quest easier, whether you’re visiting the aircraft or attending a special occasion limo service Sarasota FL
I enjoyed this post. For additional info, visit Aesthetic Plastik Surgery and Lazer Center .
Nicely done! Discover more at abogados laboralistas en Sevilla .
Thanks for the detailed guidance. More at local emergency plumbing services .
ทำไมถึงควรเลือกใช้ไฟหน้าโปรเจคเตอร์แทนหลอด LED ธรรมดา? อ่านได้ที่นี่ครับ ร้านแต่งไฟรถยนต์ ใกล้ฉัน
Every time I’ve used Mauzy Cooling, I’ve been impressed with their efficiency and expertise. Ac repair services in san diego
Reading through perspectives offered sheds light upon existing gaps requiring attention ensuring continual progress achieved moving forward together !! ### mySiteLink ### professional wholesale bakery goods
Navigating the aftereffects of a personal injury can be difficult, especially when dealing with medical costs and insurance businesses. It’s vital to have a proficient recommend on your side injury lawyer near me Arizona Falls AZ
The advantages of using laminated glass for windshields are fascinating. Learn more about it at asheboro auto glass replacement !
The insights provided by Sas Prinzivalli CPA P.A as part of their CFO services have been invaluable! Outsourced CFO
Excellent details on Waukesha’s options for practical and epoxy hardwood! It’s amazing how a high-quality floor solution may change both commercial and residential spaces Stamped Concrete
Appreciating those who organize informational sessions within schools focused specifically on disaster response & recovery strategies!!!!#SmartStart### anykeyword ## water damage restoration Council Bluffs
Excellent insights into the importance of call-to-action buttons! They ought to be popular and persuasive– more examples over at california web design company !
Air conditioning issues can be frustrating; that’s why I keep the number of AC maintenance handy!
Anyone else really feel overwhelmed with the aid of all the picks? Thank goodness for puts like Kneeland Medicare Insurance to aid us! Medical Insurance
Nicely detailed. Discover more at car window repair asheboro .
Great insights into digital marketing strategies! How can I get in touch with Gilbert SEO Company? google.com
Thanks for the informative content. More at drain cleaning service near me .
Hosting an occasion? A charcuterie board can also be both an appetizer and a communique starter! I found so many specific standards on line—head over to charcuterie board delivery for idea!
Thanks for the insightful write-up. More like this at sex trẻ em .
This was a fantastic resource. Check out same day plumber near me for more.
Glad you covered this topic. This helped me better understand accident claims. Living in New Castle County, Delaware, this advice is extremely relevant. You made an excellent point about how quickly evidence needs to be gathered injury attorney
ชอบแสงสีขาวของไฟหน้ารถ LED BT PREMIUM มากๆ ครับ ร้านไฟหน้ารถยนต์ ใกล้ ฉัน
Appreciate the thorough write-up. Find more at windshield replacement asheboro nc .
Awesome article! Discover more at Aesthetic Plastic Sugery & Lasor Center .
Have heard so many good things about chiropractors located here – excitedly waiting till i finally get my first appointment scheduled!! ##### any keywords ##### Northgate Chiropractor
I enjoyed this article. Check out Echa un vistazo a este sitio web for more.
Appreciate the detailed information. For more, visit payday loans new orleans .
Les coiffeurs de Bayonne ont vraiment du talent ! Si vous voulez des conseils personnalisés, visitez ce site incroyable. coiffeur cheveux bouclés bayonne
I never thought about using wholesale canned soups as a base for other dishes; great idea shared here! reputable wholesale organic foods
There’s no substitute for experience, and that’s what you get with the CFO services from Sas Prinzivalli CPA P.A! Virtual CFO services
Городской портал Винницы https://u-misti.vinnica.ua новости, события и обзоры Винницы и области
Thanks for the valuable insights. More at congaden .
Just attended a seminar about mortgages in Tacoma and got some great information! For further reading, check out Tacoma home loan .
This is very insightful. Check out a plumber for more.
Amazing post! I’m looking to replace my roof, and your guide is super helpful. metal roofing durability
Thanks for the useful post. More like this at car window repair asheboro .
This was very enlightening. For more, visit contador en Saltillo .
Appreciate the thorough write-up. Find more at casas rurales Arzúa .
Thanks for dropping easy on the magnitude of customary carpet cleaning; it can be a thing I generally tend to put out of your mind approximately! house cleaning newport beach
Great insights! Discover more at plumber rates near me .
For affordable and reliable drain repairs in San Diego, I always turn to Mr. Rooter Plumbing. Drain Repair in san diego
Thanks for the informative blog post about hiring an AC installer; very useful advice! AC installation Baltimore
ความแตกต่างระหว่างไฟหน้าธรรมดาและไฟหน้าโปรเจคเตอร์คืออะไร? อ่านที่นี่เลย หลอดไฟรถ
Finding the best legal counsel can be difficult. Which# #personal injury attorney## is the best option for you, regardless of whether you’ve been in a car accident, motorcycle accident, or workplace incident, will greatly affect your treatment process https://bbarlock.com/index.php/Discover_Scottsdale%27s_Best_Kid-Friendly_Adventures_in_2025!_16172
I appreciate articles that highlight both preventative measures and treatment options!!!! ### anyKeyWord ## best dental centre near me
ผมใช้ไฟหน้ารถ LED มา 6 เดือนแล้ว สุดยอดจริงๆ ไฟรถยนต์ ใกล้ฉัน
This was a great article. Check out rent a car toronto for more.
I’ve been meaning to get my roof coated before winter hits! I heard LA Roof Masters does a fantastic job. Gonna swing by their Granada Hills location next week for a consultation! 😊 roof coating
This was a wonderful post. Check out phim sex hay for more.
Just observed a few miraculous neighborhood honey pairings that perfectly supplement any orange county cheese board; take a look at out what I’ve discovered so far excellent here in this website: charcuterie board !
Very intriguing take on color theory in relation to branding; colors stimulate feelings that affect decisions– see my suggestions over at website designer california !
Has anyone tried towing with their Bronco on steep terrain? I’m curious about its performance! Share your experiences at heavy duty towing .
The patterns used in this decor are simply stunning; it adds so much character! expert design and build in New Orleans
Manabuy has entirely transformed the way I recharge for Mobile Legends. It’s rapid and solid, that is exactly what game enthusiasts desire! Don’t hesitate—payment out buy mobile legends credits !
Great tips on maintaining healthy skin! I always look for new products that can help. Check out fast laser hair removal for some amazing options!
“I’ll never go anywhere else for HVAC issues after working with the team at Mauzy Cooling.” Ac repair services in san diego
Sas Prinzivalli CPA P.A provides excellent value with their comprehensive and professional CFO services! Outsourced CFO
Looking forward to implementing some strategies from your article into my discussions with prospective ### anykeyword### suppliers! experienced wholesale grocery distributor
If you’re hesitant about chiropractic care, just go see someone in Bonney Lake! You won’t regret it! Sports chiropractor
Appreciate the detailed insights. For more, visit shower installation costs .
Well done! Find more at Broken pipe .
Умные рулонные шторы для вашего дома, комфорт и элегантность.
Современные рулонные шторы с электрическим управлением, максимальный комфорт.
Электрические рулонные шторы для вашего дома, доступны.
Умные рулонные шторы, отличный выбор.
Наслаждайтесь комфортом рулонных штор с электроприводом, смотрите.
Электрические рулонные шторы – удобство и стиль, подходят для любого окна.
Стильные рулонные шторы с электроприводом, решение для современного дизайна.
Рулонные шторы с электроприводом для легкого управления, узнайте больше.
Сделайте свой дом умнее с рулонными шторами, в нашем интернет-магазине.
Рулонные шторы с электроприводом для современного интерьера, которое вам понравится.
Электрические рулонные шторы – стиль и технология, с возможностью установки.
Электрические рулонные шторы для любого интерьера, выбор, на который стоит обратить внимание.
Умные рулонные шторы для современного дома, в вашем доме.
Умные рулонные шторы: будущее уже здесь, выберите свои.
Рулонные шторы с электроприводом: комфорт на новом уровне, попробуйте и оцените.
Умные рулонные шторы с электроприводом для вашего дома, не упустите свой шанс.
Электрические рулонные шторы: легкость управления, покупайте у нас.
Рулонные шторы с электроприводом: удобно и красиво, изучите сейчас.
рулонные шторы с электроприводом рулонные шторы с электроприводом .
Very useful post. For similar content, visit reverse phone lookup method .
I appreciated this post. Check out mobile auto glass service asheboro for more.
Thanks for the valuable article. More at local affordable BBQ catering .
Le secteur de la coiffure à Bayonne est vraiment dynamique ! Pour suivre les dernières tendances, n’oubliez pas de jeter un œil à ce site. coiffeur bayonne
Do you think DIY methods work well for small water damages? Or should we all just call an expert in Irving TX? water restoration near me
This was beautifully organized. Discover more at BBQ Catering Ideas .
Thanks for the thorough analysis. Find more at Walters BBQ Southern Kitchen .
Appreciate the useful tips. For more, visit https://www.seo-bookmarks.win/do-it-yourself-plumbing-and-heating-when-to-call-a-professional .
Appreciate the comprehensive advice. For more, visit congadenwiki .
This was quite informative. For more, visit phim sex .
Finding the right support is essential when dealing with private traumas. Navigating the aftermath of an injury can be difficult, but having a proficient# #personal injuries attorney## on your side can make a big difference accident injury lawyers Garfield AZ
It’s important to act fast when dealing with water damage. Make sure to call a professional! water damage restoration near me
For comprehensive and strategic CFO services, look no further than Sas Prinzivalli CPA P.A! Part-time CFO
Thanks for the helpful article. More like this at car window repair asheboro .
Thanks for the insightful write-up. More like this at quick kitchen plumber .
Is there a advisable timeline for roof inspections in Guelph? I prefer to preserve my roof in excellent shape! Roofing in guelph
Can anybody suggest their renowned cheese pairings for orange county-impressed summer time picnics? My final unfold was once structured on recommendations shared right here: charcuterie board !
Very impressed by the level of professionalism exhibited by # expert coolsculpting amarillo
Nicely done! Find more at https://www.stall-bookmarks.win/exactly-how-to-set-up-a-water-softener-and-a-smart-thermostat .
Finding innovative approaches related around enhancing flavors through simple adjustments using accessible items sourced locally helps keep things interesting too# anyKeyWord# certified wholesale food market
The color scheme you suggested is wonderful! Colors can really affect user engagement. I go over more about color psychology in website design at website design agency san francisco .
I found this very interesting. Check out contadores for more.
Looking to keep on your Mobile Legends in-video game purchases? Manabuy gives you the premiere month-to-month deals around! Check it out at mlbb credits top up .
The tutorials on 롤토토 are top-notch! They make even complex strategies easy to understand.
Thanks for the useful suggestions. Discover more at casas rurales Arzúa .
Appreciate you posting this. This helped me better understand accident claims. Living in New Castle County, Delaware, this advice is extremely relevant. You made an excellent point about how quickly evidence needs to be gathered accident lawyer
Wow, what an awesome transformation from bland to beautiful ! Keep up the amazing work ! # # anyKey # ## Best Interior Designers New Orleans
Рулонные шторы с электроприводом, в вашем пространстве.
Современные рулонные шторы с электрическим управлением, для вашего интерьера.
Электрические рулонные шторы для вашего дома, представлены.
Умные рулонные шторы, комфорта и эстетики.
Изучите мир электрических рулонных штор, ознакомьтесь.
Электрические рулонные шторы – удобство и стиль, создадут уют.
Электроприводные рулонные шторы: инновации в вашем доме, выбор, который стоит сделать.
Умные рулонные шторы – ваш новый помощник, познакомьтесь с нашими предложениями.
Рулонные шторы с электроприводом – элегантность и удобство, в нашем интернет-магазине.
Умные рулонные шторы: удобство и стиль, которое вы заслуживаете.
Преобразите ваш дом с рулонными шторами с электроприводом, предлагаемые с доставкой.
Электрические рулонные шторы для любого интерьера, выбор, который вы не пожалеете.
Умные рулонные шторы для современного дома, носим с собой.
Электрические рулонные шторы для стиля и комфорта, закажите сейчас.
Рулонные шторы с электроприводом: комфорт на новом уровне, сделайте свой дом комфортнее.
Умные рулонные шторы с электроприводом для вашего дома, пополните свой интерьер.
Умные рулонные шторы – ваш идеальный выбор, заказывайте онлайн.
Электроприводные рулонные шторы для стильного дома, изучите сейчас.
рулонные шторы с электроприводом рулонные шторы с электроприводом .
This was highly educational. More at abogados laboralistas .
This was quite useful. For more, visit car window repair asheboro .
I won’t take my car anywhere else but to Car Detailing Service # for detailing needs!
Appreciate the detailed post. Find more at mommy makeover surgery procedures .
Having trouble with your drains? Trust Mr. Rooter Plumbing in San Diego for effective solutions. Drain Repair in san diego
This was highly informative. Check out Wheel alignment Buckley for more.
I love how many natural wellness options we have in Gig Harbor, including chiropractors! It’s great to see holistic health gaining popularity. Chiropractor Gig Harbor
Thanks for sharing this. The way you explained choosing an accident attorney was clear. In New Castle County, Delaware, having the right accident attorney can significantly affect the outcome personal injury lawyer
Just made an appointment with my new north gate chiropractor after reading this post; feeling hopeful already ! # # any keyword # # Northgate Car accident chiropractor
Wonderful tips! Find more at local checkatrade plumbers .
Windshield wipers and auto glass maintenance go hand in hand—thanks for the reminder! More tips at car window repair asheboro !
Thanks for the comprehensive read. Find more at https://www.normalbookmarks.win/comprehensive-pipes-services-for-your-home .
Transformational is the best word to describe the impact of Sas Prinzivalli CPA P.A’s CFO services on my business! Virtual CFO services
Very informative article. For similar content, visit Walters Barbecue Southern Kitchen .
This was highly useful. For more, visit phim sex .
It’s standard to find a nontoxic resource for recreation recharges, and ManaBuy matches the bill completely! They present quickly provider with out compromising on protection or fee where to top up games safely in 2025
Thanks for the useful suggestions. Discover more at Walter’s BBQ Southern Kitchen .
Thanks for the thorough article. Find more at Echa un vistazo al sitio aquí .
Great insights! Discover more at BBQ Catering Specials .
I highly recommend mauzys cooling For anyone looking For fast And reliable ac repair Services Ac repair services in san diego
Wonderful tips! Discover more at Burst pipes .
I’ve been on a charcuterie kick just lately! Any solutions for the surest locations in Orange County? I located one at charcuterie boards orange county .
Умные рулонные шторы для вашего дома, в каждом доме.
Современные рулонные шторы с электрическим управлением, для вашего интерьера.
Рулонные шторы с электроприводом: удобство и стиль, в наличии.
Умные рулонные шторы, превосходное сочетание.
Наслаждайтесь комфортом рулонных штор с электроприводом, нажмите для подробностей.
Электрические рулонные шторы – удобство и стиль, создадут уют.
Электроприводные рулонные шторы: инновации в вашем доме, инновации, которые стоит попробовать.
Электрические рулонные шторы: свобода выбора, откройте для себя.
Сделайте свой дом умнее с рулонными шторами, на нашем сайте.
Умные рулонные шторы: удобство и стиль, которое вы заслуживаете.
Современные рулонные шторы с электроприводом, предлагаемые с доставкой.
Умные рулонные шторы – правильно решайте, выбор, который изменит ваш быт.
Электроприводные рулонные шторы: удобство управления одним нажатием, носим с собой.
Обновите интерьер с рулонными шторами с электроприводом, закажите сейчас.
Умные рулонные шторы для вашего удобства, попробуйте и оцените.
Рулонные шторы с электроприводом – вашим окнам это нужно, позаботьтесь о себе.
Электрические рулонные шторы: легкость управления, заказывайте онлайн.
Рулонные шторы с электроприводом: удобно и красиво, закажите прямо сейчас.
рулонные шторы с электроприводом рулонные шторы с электроприводом .
This was quite informative. More at congadenwiki .
Thanks for the clear advice. More at plumber service rates .
My baking hobby has expanded thanks to discovering unique flours like almond or coconut flour available through wholesale channels; let’s talk recipes over on my site: ## authority in specialty food distribution
Les tendances capillaires évoluent tellement vite ! J’ai trouvé plein d’idées sur ce site sur les coiffures à Bayonne. coiffeur cheveux bouclés bayonne
I used towing near me last week and their rates were the lowest around. Highly recommend!
Портал Львів https://u-misti.lviv.ua останні новини Львова и области.
Wonderful knowing there’s such a comprehensive resource available through # special offers for coolsculpting amarillo
Great job! Find more at broken tap solutions .
I recently had the pleasure of working on a top-notch practical contractor’s job on my house construction task, and i’m so pleased with the outcomes! They installed polyurethane floors, which also provided a long-lasting and simple surface to maintain Concrete Company Hartland, WI
Thanks for the useful suggestions. Discover more at mobile auto glass service asheboro .
I love how you addressed common myths surrounding 시알리스 —very enlightening!
Finding the right CFO services can be tough, but Sas Prinzivalli CPA P.A makes it easy and effective! Outsourced CFO
Your post about budget-friendly kitchen remodeling options was incredibly valuable—thanks! kitchen cabinet remodel Lexington
Your article on backlinks was eye-opening! I’m definitely going to implement some of your strategies. You can find more resources at 구글 상위 노출 seo 작업 .
Appreciate the detailed post. Find more at phim sex người lớn .
Fantastic insights into creating interesting landing pages! They really do impact conversion rates significantly. More tips are offered at website design ca .
Helpful suggestions! For more, visit Aestheic Plastic Surgery & Laser Centre .
I can’t strain ample how a must have it is to lease a certified Guelph roofing contractor! old roofing company in guelph
Saving money on MLBB has never been easier! Thanks to instant recharge for mlbb for the fantastic deals.
How do you choose between different practitioners when looking for a top-rated #BonneyLakeChiropractor? # Sports chiropractor
Thanks for shedding light on the importance of maintaining plumbing systems and having an same day plumber Medford ready!
Fantastic post! Discover more at affordable blocked toilet repair .
I’m impressed with how often 에볼루션카지노 주소 updates their game library! Keeps things exciting for regular players.
Can someone recommend a good guide or resource about using 비아그라 구매 effectively? I’m looking for reliable info.
Useful advice! For more, visit checkatrade plumbers .
Grateful recognizing importance collaboration amongst diverse groups working tirelessly behind scenes ensuring individuals receive necessary assistance whenever crisis arises…every bit counts tremendously!!!!#CollaborationInAction ### anykeyword # storm damage cleanup Council Bluffs
Thank you for covering social signals and their influence on rankings—it’s an often-overlooked aspect by many businesses operating within busy markets like ours here in Boston; explore details via SEO Optimization Service Boston
Loved reading every bit of this blog—it has inspired me to reach out and collaborate with # anyKeyWord#! SEO Optimization Companies Lowell
Well explained. Discover more at Walters BBQ Southern Kitchen .
The benefits of 꽁머니 are amazing! I’m curious to see how it can help me in my betting strategy. Found some useful resources at 꽁머니 !
Your article makes a compelling case for hiring professional SEO services—definitely worth considering! Check out our offerings at SEO Audit Burlington .
I found some great information on the side effects of 시알리스 at 시알리스 구매 . It’s important to be informed before using it!
Tyngsboro homeowners should prioritize regular roof maintenance. For tips on repairs, visit Roofing Quotes Tyngsboro .
Thanks for the helpful article. More like this at Walter’s BBQ Southern Kitchen .
Appreciate the insightful article. Find more at BBQ Catering for Weddings .
Has anyone done a case study on the effectiveness of꽁머니 in budgeting versus cash savings? Find research insights at 꽁머니 사이트 !
It’s fascinating how much stigma still exists around discussing topics like 시알리스 구매 .
Thanks for discussing sustainable printing options—I’ll definitely explore more with #I choose ## Print Company Lexington
Appreciate the detailed information. For more, visit casa rural Arzúa .
Helpful suggestions! For more, visit contador en Saltillo .
Appreciate the detailed post. Find more at plumbers near me prices .
Recently did a flavor look at various of a number native cheeses for my next gathering—Orange County has some unheard of decisions achieveable! Get impressed right here: charcuterie boards orange county !
Ready to say goodbye to stubborn fat and hello to a more sculpted physique? CoolSculpting in Amarillo by permanent coolsculpting solutions amarillo is here to help you achieve your goals.
Thanks for the useful post. More like this at reverse number lookup online .
Does anyone know if there are any upcoming promotions on 슬롯사이트 추천 ? I want to make sure I don’t miss out!
Свежие новости https://ktm.org.ua Украины и мира: политика, экономика, происшествия, культура, спорт. Оперативно, объективно, без фейков.
Сайт о строительстве https://solution-ltd.com.ua и дизайне: как построить, отремонтировать и оформить дом со вкусом.
Thanks for the helpful article. More like this at abogados laboralistas en Sevilla .
I have complete confidence in my financial decisions thanks to the insightful guidance from Sas Prinzivalli CPA P.A’s CFO service team! CFO services Miami
This blog is fantastic! I owe my website’s success to the team at Gilbert SEO Company. Magnet Marketing SEO Company
Авто портал https://real-voice.info для всех, кто за рулём: свежие автоновости, обзоры моделей, тест-драйвы, советы по выбору, страхованию и ремонту.
Fantastic insights on gambling responsibly with a 먹튀검증 ! It’s essential to stay informed. I’ll make sure to check out your site for further advice.
Appreciate the thorough insights. For more, visit congadenwiki .
I recently stumbled upon 꽁머니 and I’m intrigued! Where can I learn more? Maybe on 꽁머니 ?
Appreciate the comprehensive advice. For more, visit phim sex .
Really good piece here! Loved the detail on the different materials and their durability.
Living in Chester County, PA, our gutters fill fast with debris in the fall. Installing a guard system made maintenance so much easier Gutter replacement
This was a wonderful post. Check out plumbers near me for more.
The future of marketing may depend on concepts like 꽁머니! Let’s explore this topic further at 꽁머니 3만 !
Les coiffeurs de Bayonne ont vraiment du talent ! Si vous voulez des conseils personnalisés, visitez ce site incroyable. coiffure bayonne
Very educational post about the risks involved with DIY roofing projects—it’s definitely something everyone should consider seriously before attempting themselves!! shingle roof repair
Huge thanks to everyone at MauzyCooling.com—my home is finally comfortable again after their visit! Ac repair services in san diego
Excellent explanation on hiring legal help. The point about understanding liability in Frederick County Maryland really stood out injury attorney
Love seeing local businesses unite to tackle issues like water damage—Irving TX really cares about its residents! mitigation company near me
The section on energy-efficient lighting was enlightening—I’m making changes ASAP! electrician in englewood
I never thought I’d enjoy visiting the dentist until I found one who truly cares about patients!!! affordable dental implants
I recently moved to Gig Harbor and am in need of chiropractic care. I found Chiropractor Gig Harbor while researching options, and it seems like a great resource to explore!
Really valuable content. The way you explained choosing an accident attorney was clear. In New Castle County, Delaware, having the right accident attorney can significantly affect the outcome accident lawyer
This was a great article. Check out BBQ Catering Services for more.
Incredible suggestions on typography! The right font styles can make a huge difference in user experience. I dig much deeper into this at web design california .
Grateful for all these resources you’ve provided ; they’ll make finding quality care at north gate much easier than expected !! ##### any keywords ##### Northgate Chiropractor
Your tips on preventing fogging on windshields are fantastic! For additional strategies, check out car window repair asheboro .
Navigating finances has never been easier thanks to the expert advice from Sas Prinzivalli CPA P.A’s CFO services! Virtual CFO services
I appreciated this article. For more, visit power flushing services .
This was highly useful. For more, visit shower installation costs .
Just closed on my home in Tacoma thanks to an amazing mortgage lender! Their advice was invaluable. Read more about the process at Home loan .
Thanks for the valuable insights. More at Walters Barbecue Southern Kitchen .
Thanks for the helpful article. More like this at Walters BBQ Southern Kitchen .
A well-organized pantry is key in any kitchen renovation! For storage solutions, check out kitchen renovation costs Tewksbury .
Thanks for discussing the importance of consistency in skincare routines! For great products, don’t forget to check out chemical peels for skin .
การใช้ไฟหน้าโปรเจ็คเตอร๋ทำให้ลดความเสี่ยงในการขับรถกลางคืนได้มาก ตั้งไฟหน้ารถ
I recently had the privilege of using an airports automobile company for my moves, which totally transformed my expertise. The ease of an effective aircraft move from the moment I arrived made all the difference airport transportation St. Petersburg FL
Thanks for the clear breakdown. More info at affordable my plumber services .
If you’re hesitant about seeing a chiropractor after an accident, visit Everett Accident & Injury Clinic and see how they can help you!
Wow, I didn’t realize how quickly things could escalate with water issues! Glad there are solutions like those offered by restoration companies in my area in Clive.
Great tips on maintaining plumbing systems! It’s always good to have a reliable emergency plumbing services Medford service on hand.
Оформиление дипломов ВУЗов по всей России и СНГ — с печатями, подписями, приложением и возможностью архивной записи (по запросу).
Документ максимально приближен к оригиналу и проходит визуальную проверку.
Мы гарантируем, что в случае проверки документа, подозрений не возникнет.
– Конфиденциально
– Доставка 3–7 дней
– Любая специальность
Уже более 1207 клиентов воспользовались услугой — теперь ваша очередь.
https://spbrcom1.ru/ — ответим быстро, без лишних формальностей.
Your insights into keyword research techniques are spot-on! It’s vital for Bostonians looking to enhance their online presence—check out more at SEO Boston !
Have you explored different types of flatbeds available? They’re all quite fascinating! tow truck
This kitchen design is stunning! I love the open concept feel. modern interior designers in New Orleans
Local SEO is definitely the way to go! I’ll be checking out Search Engine Marketing Lowell in Lowell, MA soon.
Very useful post. For similar content, visit phim sex hay .
This was highly educational. For more, visit windshield replacement asheboro nc .
Thanks for the clear breakdown. More info at car window repair asheboro .
Покупка дипломов ВУЗов в Москве — с печатями, подписями, приложением и возможностью архивной записи (по запросу).
Документ максимально приближен к оригиналу и проходит визуальную проверку.
Мы гарантируем, что в случае проверки документа, подозрений не возникнет.
– Конфиденциально
– Доставка 3–7 дней
– Любая специальность
Уже более 3716 клиентов воспользовались услугой — теперь ваша очередь.
Купить диплом Москва — ответим быстро, без лишних формальностей.
If you’re looking for prompt service, check out some local Tyngsboro roofing contractors; they’re usually very responsive! Roofing Quotes Tyngsboro
Мы предлагаем оформление дипломов ВУЗов по всей России и СНГ — с печатями, подписями, приложением и возможностью архивной записи (по запросу).
Документ максимально приближен к оригиналу и проходит визуальную проверку.
Мы гарантируем, что в случае проверки документа, подозрений не возникнет.
– Конфиденциально
– Доставка 3–7 дней
– Любая специальность
Уже более 3258 клиентов воспользовались услугой — теперь ваша очередь.
Купить государственный диплом — ответим быстро, без лишних формальностей.
The section regarding turnaround times was incredibly useful—I appreciate the efficiency from #I choose Print Company Lexington
Water Safety Week reminds us that preparation is key; let’s take time each year to review our plans and resources!! #PlanAhead### anykeyword ## emergency water removal Council Bluffs
When traveling, smooth air-port vehicles you make all the difference in starting or ending your excursion on a substantial statement airport taxi & chauffeur service St. Petersburg FL
Como ya has entendido, Evoplay te da la posibilidad de hacer un retiro de ganancias en cualquier momento en el Juego del Penalti. Una vez que se marca un tiro, el multiplicador asociado se añade a tu bote y puedes decidir detener definitivamente el juego haciendo clic en ‘Cashout’. Automáticamente, las ganancias obtenidas en Penalty Shoot Out Street se acreditan en el saldo de tu cuenta de juego. Cursos educativos, profesionales y gratuitos para empleados de casinos online que tienen el objetivo de hacer un repaso de las buenas prácticas de la industria para mejorar la experiencia del jugador y ofrecer un enfoque justo de los juegos de azar. Supongamos que se van a enfrentar en octavos de final de la Champions League el Real Madrid y la Lazio y en la ida quedan 2-1 a favor del conjunto merengue. Para el partido de vuelta apuestas a que gana la Lazio y el partido quedó 1-0 a favor del equipo italiano y se van a tiempos extras, en los cuáles, el Real Madrid anota 2 goles y el marcador queda 2-1 a favor del Real Madrid con un 4-2 en el global. Debido a que el resultado de la prórroga no estaba incluido, ganas la apuesta por el triunfo del equipo italiano en tiempo regular.
https://www.cheaperseeker.com/u/promizplucsi1985
Seven minutes later, they had the lead however, Messi driving in a corner which Alexis Mac Allister met at the near post with a flick-on and Lisandro Martínez arrived with a powerful header that Ecuador keeper Alexander Domínguez was unable to keep out. In other words, in the event of a draw, the winner of the tie will be the team who finished highest in the league standings at the end of the season, with there being no need for a penalty shootout to determine the winner. Argentina have now won four straight penalty shootouts since Emi Martinez became their first-choice goalkeeper: It set the tone for a deeply frustrating night. His clever movement early in the second half helped keep PSG on the back foot and he worked hard defensively, but he was unable to get another goalscoring opportunity. His evening was summed up when he gave the ball away with his last meaningful action before being replaced with Darwin Nunez on 73 minutes.
Great insights! Discover more at Gutter cleaning .
Navigating the aftermath of an mishap can be difficult, particularly when dealing with accidents and legitimate issues. It’s crucial to seek advice from knowledgeable experts with a background in personal injury law lawyer near me personal injury
какой банк дает кредит без отказа какой банк дает кредит без отказа .
“Every business owner should consider utilizing professional CFP Services like those offered by Sas Prinzivalli CPA, PA for success.” ### anyKeyWord### Fractional CFO services
Thanks for the comprehensive read. Find more at casas rurales en Arzúa .
If you’re hungry right now, don’t wait—pizza delivery open now is just around the corner via local wings !
Thanks for the helpful article. More like this at congaden .
Wonderful tips! Discover more at Aesthetic Plastik Surgery and Lazer Center .
This was quite useful. For more, visit contador cerca de mí .
Really curious about the techniques used by chiropractors in Bonney Lake—are they all similar? # Car accident chiropractor
คิดว่าการลงทุนในอุปกรณ์เหล่านี้จะช่วยเพิ่มมูลค่าให้รถหรือไม่? ### ไฟหน้า
ไฟหน้าแบบไหนที่เหมาะกับสภาพถนนในเมืองไทยที่สุดครับ?? ร้านไฟหน้ารถยนต์ ใกล้ ฉัน
This was quite useful. For more, visit windshield replacement asheboro nc .
Helpful suggestions! For more, visit abogados laboralistas en Sevilla .
Thanks for the helpful advice. Discover more at BBQ catering services for weddings .
The technicians from Mr.Rooter Plumbing were friendly and knowledgeable while repairing my drains.” Drain Repair in san diego
Thanks for the thorough analysis. More info at Immersions .
Les tendances capillaires évoluent tellement vite ! J’ai trouvé plein d’idées sur ce site sur les coiffures à Bayonne. coiffure bayonne
Useful advice! For more, visit professional underfloor heating repair .
Thanks for the great tips. Discover more at best brunch places in Pittsburgh .
I entirely agree with the importance of visual hierarchy in web design! It guides users naturally through your material. Find out more at web design agencies san francisco .
This was highly helpful. For more, visit Walters Barbecue Southern Kitchen .
This is quite enlightening. Check out plumbers in the area for more.
You’ve beautifully demonstrated how to make bold statements while keeping everything harmonious ! # # anyKey # Interior Designer New Orleans
Новини Львів https://faine-misto.lviv.ua последние новости и события – Файне Львов
Thanks for the helpful article. More like this at quick sink repair services .
Very helpful read. For similar content, visit Blocked toilet .
Safety measures during installations are non-negotiable—a good reminder! electrician near me
Really glad you covered this topic, it’s not always easy to find clear info on gutter installation contractors. I was surprised how much impact material choice can have Gutter guard installer
This is very insightful. Check out windshield replacement asheboro nc for more.
This was very enlightening. More at phim sex .
This was a wonderful post. Check out loan agency new orleans for more.
This was a great help. Check out windshield replacement asheboro nc for more.
I’m so glad I found ManaBuy for my Genshin top-ups! The process was super fast, and I had my credits in under 5 minutes. A real lifesaver! multi-game top-up support
Строительный портал https://apis-togo.org полезные статьи, обзоры материалов, инструкции по ремонту, дизайн-проекты и советы мастеров.
The holistic approach at Best-rated chiropractor in Everett – Everett Accident helped me heal mind and body after my car crash.
Всё о строительстве https://furbero.com в одном месте: новости отрасли, технологии, пошаговые руководства, интерьерные решения и ландшафтный дизайн.
Комплексный строительный https://ko-online.com.ua портал: свежие статьи, советы, проекты, интерьер, ремонт, законодательство.
Wonderful tips! Find more at reverse phone number lookup tools .
Thanks for the comprehensive read. Find more at Mechanic Buckley WA .
Really appreciate the advice shared here. Excellent job outlining the legal process. As someone from New Castle County, Delaware, this is incredibly useful for people here. The part on statute of limitations was super helpful car accident lawyer
This was nicely structured. Discover more at emergency plumbing repair .
Your emphasis on user experience as a ranking factor is timely; businesses must adapt their websites accordingly, especially those based near me here in Boston—check out more resources via Search Optimization Boston !
Your insights are truly valuable! Will definitely reach out to 24 emergency plumber Medford for my upcoming plumbing projects.
Very helpful read. For similar content, visit Aesthetic Plastic Sugery & Lasor Center .
A material contractor just transformed my garage with polyurethane flooring, which was incredible. My anticipation were exceeded by the finish’s sturdiness and aesthetic elegance Epoxy Flooring Brookfield, WI
Your article sheds light on the importance of video content in SEO! Check out more about it at Improve Google Rank Burlington .
I recently had my roof done by a local Tyngsboro roofing contractor and the results were outstanding! Fix Roof Leak Tyngsboro
Great insights on chiropractic care! I’m definitely considering visiting a Northgate Chiropractor soon. Northgate Car accident chiropractor
In New Castle County, Delaware, it’s essential to have an accident attorney who understands local laws. I’d be interested to know your thoughts on what to ask during a consultation. Additional resources can be found at car accident lawyer .
Knowing where to turn after experiencing water damage is so important; thankfully we have places like water damage restoration services near me here in Clive!
Navigating the mortgage process in Tacoma can be tricky. Fortunately, I found helpful guides at Tacoma Mortgage that made it easier!
Топовые онлайн-казино Беларуси, получайте удовольствие от игры, с нетерпением ожидают.
Играйте в казино онлайн в Беларуси, в любое время и в любом месте, для настоящих азартных игроков.
Поднимите свои шансы на выигрыш, проверенное время, играйте ответственно.
Самые надежные онлайн-казино в Беларуси, большие джекпоты.
Широкий выбор игр в белорусских казино, от карточных до настольных игр, на любой вкус.
Откройте для себя новинки в казино, проверенные провайдеры.
Не упустите свои шансы на бонусы, особенные предложения.
Захватывающие новинки игр, готовы порадовать, откройте для себя мир азартных игр.
Советы по выбору казино, по онлайн-казино Беларуси.
Станьте частью захватывающего мира казино, не упустите возможность выиграть.
казино онлайн казино онлайн беларусь .
Appreciate the detailed information. For more, visit Leak detection .
This was a great help. Check out Emergency boiler repairs for more.
Helpful suggestions! For more, visit Walters BBQ Southern Kitchen .
I appreciate how you explained the differences between various types of electrical panels—very informative! electrician near me
Thanks for the helpful article. More like this at rent a car .
Thanks for the great tips. Discover more at https://mods.empireg.ru/user/bedwynfvut .
It’s amazing how quickly professionals can restore a home after water damage! Highly recommend it! flood restoration companies near me
Excellent insights on website design! I think an user-friendly user interface is key to maintaining visitors. Have a look at my thoughts on this at web design agencies san francisco .
Thanks for the helpful article. More like this at casa rural en Arzúa .
I love how versatile the Bronco is for towing and off-roading. It’s a great combination! Discover more at tow company .
Wonderful tips! Discover more at plumbing repair experts .
Well done! Find more at contador cerca de mí .
Great insights! Find more at http://www.canmaking.info/forum/user-1643514.html .
Thanks for the useful post. More like this at congadenwiki .
Struggles faced during journeys often yield valuable lessons learned shaping resilient character traits developing over time making individuals highly adaptable regardless shifting landscapes encountered regularly nowadays.. automation-driven SEO
Qui d’autre adore se faire coiffer dans les salons de Bayonne ? Partagez vos expériences et consultez ce site pour plus d’infos ! coiffeur bayonne
Покупка дипломов ВУЗов по всей России и СНГ — с печатями, подписями, приложением и возможностью архивной записи (по запросу).
Документ максимально приближен к оригиналу и проходит визуальную проверку.
Мы даем гарантию, что в случае проверки документа, подозрений не возникнет.
– Конфиденциально
– Доставка 3–7 дней
– Любая специальность
Уже более 4442 клиентов воспользовались услугой — теперь ваша очередь.
На этой странице — ответим быстро, без лишних формальностей.
If you’re facing any water-related issues, don’t hesitate to reach out to a local restoration expert in Irving TX! water restoration Irving TX
Оформиление дипломов ВУЗов в Москве — с печатями, подписями, приложением и возможностью архивной записи (по запросу).
Документ максимально приближен к оригиналу и проходит визуальную проверку.
Мы даем гарантию, что в случае проверки документа, подозрений не возникнет.
– Конфиденциально
– Доставка 3–7 дней
– Любая специальность
Уже более 3287 клиентов воспользовались услугой — теперь ваша очередь.
Смотреть тут — ответим быстро, без лишних формальностей.
So joyful that there may be a neighborhood alternative like KneeLand achievable instead of having to give attention to faceless company entities!!! ## anykeyword ## Medical Insurance
Great tips! For more, visit abogado laboralista .
ไปที่ OMG ONE MORE GLASS SAI1 กับกลุ่มเพื่อน แล้วมีความสุขทุกนาทีเลยค่ะ ร้านเหล้าสาย1 คนเยอะ
Appreciate the helpful advice. For more, visit plumbing line .
Appreciate the thorough write-up. Find more at phim sex người lớn .
Late-night cravings are always satisfied with reliable ##delivery restaurants###—especially when it’s pizza! pizza
เคยไปงานเลี้ยงที่ร้านเหล้าสาย1 มาประทับใจมากครับ ร้านเหล้าสาย1 ดนตรีสด
การบริการลูกค้าของร้านเหล้าสาย1 ทำให้รู้สึกพิเศษจริงๆ ครับ ร้านเหล้าบางแค
Appreciate the useful tips. For more, visit mommy makeover recovery .
The discussion around electric shock prevention was eye-opening—I’ll be more cautious from now on! englewood electrical services
What types of treatments do Bonney Lake chiropractors offer? Looking for options! Chiropractor Bonney Lake
I enjoyed this read. For more, visit peronal injury attorney .
Valuable information! Discover more at emergency plumbers .
Thanks for the great explanation. More info at BBQ Catering Near Me .
This was highly educational. For more, visit 24 hour plumber near me .
Thanks for the great explanation. More info at independent plumbers near me .
Helpful suggestions! For more, visit Walters Barbecue Southern Kitchen .
This article really highlights the importance of local SEO. I need help from SEO Marketing Lowell in Lowell, MA!
I recently remodeled my kitchen, and I’m obsessed with the new layout! For tips on remodeling, visit contractor for kitchen remodel Tewksbury .
Awesome coverage on this topic! Gutter guard replacement is something we’ve been researching for our Chester County home. I liked the insight into balancing aesthetics with function Gutter cleaning contractor
This was highly useful. For more, visit budget-friendly BBQ catering .
It’s refreshing seeing someone discuss agile methodologies within digital marketing; they really lend themselves well towards optimizing results quickly!. Visit again soon over here: # anyKeyWord ## Website Ranking Service Burlington
My friends were amazed by how quickly my roof was repaired—thanks to insights from Roof Replacement Tyngsboro #!
This is solid advice! Every homeowner should have an 24 hr plumber Medford they trust.
I enjoyed this article. Check out local checkatrade plumbers for more.
Appreciate the detailed insights. For more, visit https://judahipen148.cavandoragh.org/how-to-winterize-your-plumbing-and-heating-systems .
Wonderful tips! Find more at https://www.articledude.com/classifieds/user/profile/77241 .
Онлайн-портал https://leif.com.ua для женщин: мода, психология, рецепты, карьера, дети и любовь. Читай, вдохновляйся, общайся, развивайся!
Современный женский https://prowoman.kyiv.ua портал: полезные статьи, лайфхаки, вдохновляющие истории, мода, здоровье, дети и дом.
Such an interesting read overall addressing numerous topics related specifically towards improving longevity/functionality associated with various types/styles existing today across residential properties ## how to extend roof life
Your suggestions relating to keeping a balance between creativity and use is very informative; both aspects are important for success– take a look at my opinions too at web developer san francisco bay area !
Bright colors can make your home stand out, but what about maintenance? Discussing this over at: Portland Painting Contractors .
การใช้ไฟหน้าโปรเจ็คเตอร๋ทำให้ลดความเสี่ยงในการขับรถกลางคืนได้มาก หลอดไฟ รถ
Портал о маркетинге https://reklamspilka.org.ua рекламе и PR: свежие идеи, рабочие инструменты, успешные кейсы, интервью с экспертами.
I appreciated your take on helping consumers identify quality products when shopping for electrical supplies! electrical services englewood
The variety showcased among diverse types shingles available provides ample opportunity personalize individual tastes preferences while ensuring functionality remains intact simultaneously!!!! ## anyKeyWord ## hire a certified roofer
This article emphasizes the importance of quick action after water damage—definitely reach out to people like those at water and mold restoration near me !
This was a great help. Check out Aesthetic Plastik Surgery and Lazer Center for more.
Anyone here had success with local keywords? Sharing my experience with Gilbert SEO Company was great! Magnet Marketing SEO Company
This was highly useful. For more, visit https://mail.sobesednik.net/user/gettanbjxw .
Thanks for the valuable insights. More at congaden .
Thanks for sharing this. I’ve been looking for clear information on personal injury cases, and this article nailed it. Your point about dealing with insurance companies is exactly right dog bite lawyer
บรรยากาศของร้าน OMG OneMoreGlass ทำให้รู้สึกเหมือนอยู่กับเพื่อนเก่าๆ เลย! สถานที่ชิลสาย1
Helpful suggestions! For more, visit 24 hour plumber .
Anyone else find flossing super satisfying? It’s such an easy way to keep your teeth healthy—let’s do it together! services at dental centre
I highly recommend creating an emergency kit for situations where unexpected flooding might occur—it could save lives!! #Preparedness### anykeyword ### emergency water removal Council Bluffs
I love learning about holistic health! A Northgate Chiropractor could really help me out. Car accident chiropractor
The right assistance can make all the difference when it comes to luxury transport. Using a ##chauffeur## or# #limo service## elevates your experience, whether you’re planning a special occasion or have trustworthy airports transport limo service near me Longboat Key FL
Excited about trying new facial oils after reading your post—they’re a game changer! Find some great choices at chemical peels for skin !
Accident recovery involves both physical and emotional healing. Make sure to explore the resources available at tow truck near me .
This was quite informative. For more, visit 24 hour emergency plumber near me .
Fascinating how technology influences traditional methods—even in electricity! electrician englewood
События Днепр https://u-misti.dp.ua последние новости Днепра и области, обзоры и самое интересное
Finding the best lawful counsel is essential when dealing with the aftereffects of an accident. Personal injury attorneys are essential in helping patients find compensation and justice for their injuries https://atavi.com/share/xb3pvhzj8ini
Navigating the fallout of an injury can be difficult, particularly when you have to deal with expensive medical costs and mental strain. It’s important to include a knowledgeable advocate by your side https://pipewiki.org/wiki/index.php/Skilled_Personal_Injury_Attorney_for_Broken_Bones_%E2%80%93_Expert_Legal_Help_for_Your_Bone_Fracture_Injury_Claim
Well done! Find more at plumbing and heating .
Such vivid imagery paired with insightful commentary makes reading your work an absolute treat every time ; keep shining bright !! ### anyKey ### interior decorators for modern homes
The community aspect of SEO is so vital, especially in a city like Boston! Visit Search Optimization Boston for support.
Truly refreshing perspectives providing guidance effectively-willingly convinced at fostering mutual engagements productively together via SEO Optimization Service Lowell
I didn’t think improvement would happen this quickly; however thanks once again—to everyone behind-the-scenes working diligently here @#Any keyword#! Everett Accident & Injury Clinic
Really fascinating take on color theory in relation to branding; colors evoke feelings that affect choices– see my recommendations over at web designer bay area !
Your article makes a compelling case for hiring professional SEO services—definitely worth considering! Check out our offerings at Website Ranking Service Burlington .
This was very beneficial. For more, visit affordable same day plumbing .
Enjoyed reading this blog—such practical information that leads me straight to ### anyKeyword### for assistance! emergency drain service Medford
Thanks for the insightful write-up. More like this at plumbing repair near me .
The comparisons between various printing methods were incredibly helpful; now I’m more inclined towards #I choose ## Professional Printing Lexington
Wonderful tips! Find more at trusted plumbing line experts .
Super excited to start my project with novak remodeling in los angeles next month! Wish me luck! home remodeling contractor
Just had the most amazing experience at an #Italian restaurant# where they serve #hand-tossed pizza#. pizza delivery near me
Cultivating environments where discussions around mental health & addictions take place freely encourages openness within neighborhoods!!! ## anyKeyboard #. drug addiction rehab
I discovered responsibility partners essential for my success in alcohol detox; who supported you? safe detox at home
I think everybody deserves access to quality mental healthcare, especially at devoted facilities for dealing with conditions like depression! cognitive behavioral therapy for depression
The combination of spirituality into some rehab approaches resonates deeply with numerous cultural backgrounds! # # anyKe yword ## affordable drug rehab
Valuable information! Find more at colchones Albacete .
This was highly useful. For more, visit abogados Coruña .
Awesome breakdown of the installation process. This applies directly to homeowners like me in Chester County Pennsylvania dealing with heavy rain and tree debris Gutter guard installer
Appreciate the helpful advice. For more, visit Walters BBQ Southern Kitchen .
I’m so impressed with how quickly and efficiently they completed my paver sealing—thanks # # anyKeywords##! Govee Light Installation by Tampa Bay Pressure Washing
Look no further than# #anykeyword## for reliable transportation to the airport if you’re planning a special event. Their limo and chauffeur services are the ideal blend of tone and pleasure, making sure you arrive at your location in design airport transportation near me Miami FL
Appreciate the thorough information. For more, visit bufete abogados Vigo .
Navigating the fallout of an engine injury can be difficult. It’s important to include a educated argue by your side, especially when it comes to understanding personal injury law https://wiki-mixer.win/index.php/Facing_a_Brain_Injury_After_a_Truck_Accident:_What_You_Need_to_Know
I’m currently studying #AdvancedStocktakingServices# and determined your weblog extremely helpful—exceptional useful resource! Stocktaking near me Melbourne
This was very well put together. Discover more at Walters Barbecue Southern Kitchen .
I’m impressed by how well you utilize wall space without making it feel cluttered—great job! Interior Design New Orleans
I love that many Puyallup roofing companies offer warranties on their work! It gives peace of mind. Puyallup Roofing company
Appreciate the thorough insights. For more, visit Walters Barbecue Southern Kitchen .
This was highly useful. For more, visit emergency plumbers .
ใครยังไม่เคยมาที่นี่ถือว่าพลาดโอกาศดี ๆ จริง ๆ ครับ # # anyKeyWord## ร้านฟังเพลงสาย1
Топовые онлайн-казино Беларуси, получайте удовольствие от игры, щедрые предложения.
Откройте для себя казино Беларуси, в любое время и в любом месте, для каждого.
Поднимите свои шансы на выигрыш, проверенное время, играйте ответственно.
Рейтинг лучших казино Беларуси, каждую минуту.
Играйте в любимые игры в казино онлайн, от слотов до покера, для азартных игроков.
Новые онлайн-казино Беларуси, популярные игры.
Поспешите за бонусами в казино онлайн, только в Беларуси.
Топ онлайн-игр в белорусских казино, готовы порадовать, начните выигрывать.
Как выбрать лучшее казино, по азартным играм.
Станьте частью захватывающего мира казино, получайте незабываемые эмоции.
казино казино онлайн .
A substantial means to be sure that accuracy is through running with certified gurus who specialise in ####inventory counting####. Sydney Inventory Counting
This was beautifully organized. Discover more at congadenwiki .
This was highly educational. For more, visit plumber charges .
I appreciate the thorough overview of accident attorney roles here in Frederick County Maryland. The section on insurance claims in Frederick County MD was especially helpful personal injury lawyer
Had an emergency last week with flooding; the response from the team at water damage restoration services near me was fantastic!
If you want professional results without overspending, then # anyKeyWord # is where you should go! Brisbane Stocktaking
If you’re looking for budget-friendly options, Alturas apartment movers is the way to go for moving in Alturas!
**Positive Customer Reviews**: The glowing testimonials from previous customers speak volumes about the reliability of this rental service. Many rave about the fun their kids had and how seamless the rental process was. bear creek pop up tent for rent
มีเรื่องราวดี ๆ เกิดขึ้นเยอะเมื่อมาเที่ยวที่นี่ # # anyKeyWord## ผับสาย1 รับจัดเลี้ยง
Always check your gutters and downspouts; they can save you from costly water damage! basement flood cleanup Council Bluffs
What a journey it’s been since I partnered with BlckPanda Creative Dallas; they’ve helped me achieve an impressive rank on Google that brought in tons of new customers! More info: seo !
Семейный портал https://stepandstep.com.ua статьи для родителей, игры и развивающие материалы для детей, советы психологов, лайфхаки.
In New Castle County, Delaware, it’s essential to have an accident attorney who knows the court system. I’d be interested to know your thoughts on what red flags to watch for. For further details, visit personal injury lawyer .
I strongly recommend contacting a professional service like 811 Dig if you’re planning any renovations!
Клуб родителей https://entertainment.com.ua пространство поддержки, общения и обмена опытом.
Всё о спорте https://beachsoccer.com.ua в одном месте: профессиональный и любительский спорт, фитнес, здоровье, техника упражнений и спортивное питание.
This was quite useful. For more, visit asheboro auto glass replacement .
Туристический портал https://aliana.com.ua с лучшими маршрутами, подборками стран, бюджетными решениями, гидами и советами.
This was very enlightening. More at windshield replacement asheboro nc .
Understanding the warranty options for auto glass replacements is crucial—your article covers it well! Learn more at windshield replacement asheboro nc .
Your insights about using reviews efficiently within designs actually struck a chord with me; social evidence is powerful– have a look at more examples over at website design bay area !
This was quite informative. For more, visit independent plumbers near me .
Simply wished to drop a quick note about how great Garage Door Repair Lakewood is! Highly pleased with their work. affordable garage door installation Lakewood
Renovating your own home? Look into financing answers achievable simply by ###Renovation Loans Perth### that cater primarily to those demands! Car loan broker Perth
. Insightful piece discussing importance surrounding analytics tools available today which ultimately provide clarity into performance metrics that matter most locally – discover recommendations by going through #if anyKeyWord# !! Marketing SEO Companies Boston
Great insights! Find more at fixing leaking dashboards .
The balance between creativity versus analytics within modern-day campaigns cannot be overstated; both have pivotal roles!!. Discover new approaches over here: # anyKeyWord ## Best SEO Agencies Burlington
Thanks for the great explanation. More info at Walters Barbecue Southern Kitchen .
A friend recommended going to # any Keyword # after my crash, and I’m so grateful for that advice! Everett Accident reviews
Топовые онлайн-казино Беларуси, играйте и выигрывайте, ждут вас.
Играйте в казино онлайн в Беларуси, в любое время и в любом месте, привлекательные условия.
Поднимите свои шансы на выигрыш, лицензированные заведения, достигайте успеха.
Самые надежные онлайн-казино в Беларуси, высокие выплаты.
Разнообразие игр для всех, от слотов до покера, для истинных ценителей.
Новые онлайн-казино Беларуси, для настоящих ценителей.
Не упустите свои шансы на бонусы, особенные предложения.
Захватывающие новинки игр, готовы порадовать, погрузитесь в увлекательные приключения.
Как выбрать лучшее казино, получите полезные советы.
Станьте частью захватывающего мира казино, не упустите возможность выиграть.
казино беларусь казино .
I’m currently planning my dream kitchen remodel and can’t wait to share the progress! Follow along at kitchen cabinet remodel Tewksbury .
Really enjoyed reading about your insights into modern printing solutions; I’m a regular at Document Printing Lexington
ร้านเหล้าสาย1 มีบาร์เทนเดอร์ที่เก่งมากเลยนะครับ ร้านอาหารบางแค
Just moved to Gig Harbor and need a good chiropractor! Any suggestions would be greatly appreciated. Chiropractor Gig Harbor
This is such an important conversation ; I’m glad we’re discussing the value of local north gate chiropractors !! # # any keyword # # Northgate Chiropractor
This was quite informative. For more, visit Thermostats Gas valves .
Appreciate the detailed post. Find more at https://daltonlngc652.theglensecret.com/what-to-do-when-your-check-engine-light-comes-on-in-bonney-lake-9 .
Great insights on the advantages of roof cleaning! I’m excited to research greater approximately Sully’s Pressure Washing at Roof Moss Removal .
The Bronco truly shines when it comes to towing heavy loads. It’s a beast on the road! Learn more at towing .
Nicely done! Discover more at Walter’s BBQ Southern Kitchen .
Thanks for the comprehensive read. Find more at reliable underfloor heating repairs .
Thanks for the thorough analysis. Find more at tienda colchones Albacete .
Plumbing emergencies can be stressful, but knowing a good 24 emergency plumber Medford can ease that burden!
Valuable information! Discover more at abogado Coruña .
I appreciate discussions around integrating functionality while staying aesthetic; it’s challenging yet rewarding when done correctly… # # anyKeyWord # # kitchen renovation Lexington
Planning a party in Tampa? You can’t go wrong with a bounce house from bounce house wesley chapel !
I liked this article. For additional info, visit http://maskarad.bomba-piter.ru/user/brynnetrct .
Buying a second home in Tacoma has its challenges, especially with mortgages. Helpful tips are available at Home loan !
**Variety of Packages**: They offer customizable rental packages that can include multiple inflatables or accessories like tables and chairs. This flexibility makes it easier to create a tailored experience that fits your specific needs. tierra verde bounce house
Thanks for the informative content. More at personal injury lawyer .
Your article on common myths about auto glass really debunked some misconceptions I had—thank you! Learn more at car window repair asheboro !
If you’re looking for effective treatments for termites, I highly recommend checking out the solutions offered by pest extermination service .
Appreciate the detailed discussion. Here in Montgomery, finding experienced accident attorneys is so important. The points on calculating damages were eye-opening medical malpractice lawyer
Appreciate the detailed information. For more, visit mobile auto glass service asheboro .
This was very enlightening. For more, visit mobile auto glass service asheboro .
Thanks for the great information. More at windshield repair asheboro nc .
Don’t wait until it’s too late—get your home inspected by the experts at pest treatment services today!
Detoxing does not just rid your body of compounds; it also clears your mind for brand-new possibilities! rapid drug detox
Thanks for the helpful article. More like this at abogados Vigo .
Aftercare is just as important as initial treatment when battling dependency. Learn more about reliable aftercare strategies on addiction treatment programs .
Supporting local initiatives focused on assisting those with dependencies is crucial for community well-being! drug abuse vs drug addiction
Has anybody attempted meditation throughout their alcohol detox? I have actually heard it can be truly advantageous! detox for opiates
took a deep dive into kitchen trends and now I’m obsessed! can’t wait to chat with novak remodeling calabasas about making it happen. house remodeling contractor
Checking out success stories reassures those still struggling that transformation truly lies ahead if they seek required guidance. # anyKeyw ord # drug rehab programs
Having access towards encouraging environments nurturing holistic techniques acts as catalysts stimulating positive change across numerous lives touched directly by extreme types linked closely alongside major depressive conditions !!! # # anyK eyword # # depression recovery programs
Wow, didn’t know how persistent bird mites could be until now! Time to take action with info from pest extermination company .
Thanks for the valuable article. More at plumbing .
When hunger strikes, there’s nothing better than finding a reliable delivery service like pizza delivery near me .
The aroma of freshly baked ##pizza## is hard to resist when walking past a nearby ##Italian restaurant##. pizza
Топовые онлайн-казино Беларуси, открывайте новые возможности, щедрые предложения.
Откройте для себя казино Беларуси, в удобное для вас время, для настоящих азартных игроков.
Поднимите свои шансы на выигрыш, заведомо безопасно, не упустите свою удачу.
Онлайн-казино, которым можно доверять, каждую минуту.
Играйте в любимые игры в казино онлайн, от рулетки до блэкджека, для азартных игроков.
Свежие предложения в мире азартных игр, для любителей хорошей игры.
Поспешите за бонусами в казино онлайн, особенные предложения.
Топ онлайн-игр в белорусских казино, готовы порадовать, начните выигрывать.
На что обратить внимание при выборе казино, по онлайн-казино Беларуси.
Приглашаем в мир онлайн-азарта, не упустите возможность выиграть.
казино беларусь казино беларусь .
Thanks for the thorough analysis. More info at congadenwiki .
Loved your take on producing a distinct user journey through thoughtful website design; personalization truly boosts engagement– discover additional methods over at website designers san francisco bay area !
This was very enlightening. More at loan agency new orleans .
This was highly helpful. For more, visit https://orderviag.com//member.php?action=profile&uid=13178 .
Slotbom77
Just the guidance I needed! Our home in West Chester deals with lots of debris from nearby trees. The mention of replacing guards before major clogging occurs was a great takeaway Gutter installation contractor
Appreciate the breakdown—these cases can get complicated, especially here in the Manhattan courts. I found your point on getting medical records early particularly relevant dog bite lawyer
Thanks for the comprehensive read. Find more at Aestheic Plastic Surgery & Laser Centre .
Appreciate this post. I really liked your section on how regular adjustments support long-term spine health. This is a great resource for those in Camden County looking for natural pain relief Pain management doctor
Thanks for the great content. More at local plumbing expert .
For anyone looking to freshen up their home, carpet cleaning from Carpet Cleaning Near Me is the way to go. You won’t be disappointed!
Save yourself time & energy ; let the experts handle it—call _# anyKeword_# today ! Rug Cleaning
Time flies—it feels like just yesterday we booked our first appointment through __anything__  ;_#! Carpet Cleaning Long Island
Does anyone know how long a typical roof lasts in Puyallup? I’m considering getting mine inspected. Puyallup Roofing company
ลองไปนั่งดื่มชิลล์ๆ ที่ OMG ONE MORE GLASS SAI1 แล้วคุณจะหลงรักร้านนี้แน่นอน ร้านอาหารสาย1
Kudos achieving balance between technical jargon making accessible those unfamiliar yet eager learn more regarding what constitutes solid framework designs suitable contemporary standards expected today!!! ## anyKeyWord ## how to choose metal roofing
So glad I discovered this resource! Head over to `# `# anyKeyWord `#` if you’re looking for quality service providers locally. hvac repair service
BlckPanda Creative Dallas truly transformed my online presence! My site now ranks higher on Google, and I couldn’t be happier. Check out my success story at seo dallas .
Thanks for the clear breakdown. Find more at bisutería Albacete .
Finding ways to engage children in oral hygiene routines is key; let’s share ideas!!!! ### anyKeyWord ## dental implant procedures
I enjoyed this read. For more, visit residential plumbing services .
After an accident, it’s crucial to pick the right# #personal injury attorney##. The straight attorney can help you navigate the complexities of personal injury claims https://www.protopage.com/ceachezqdx#Bookmarks
Great archives on declaring a roof! Guelph roofing certainly demands more consideration. trusted roofers in guelph
Navigating the fallout of an incident can be difficult, and having the best legal counsel is essential car crash claim lawyer Bethany Heights AZ
Thanks for the great explanation. More info at local drain cleaning services .
Thanks for the clear breakdown. Find more at mobile auto glass service asheboro .
I appreciate your emphasis on regular inspections; they can save so much hassle later on! More info available at windshield repair asheboro nc .
This was beautifully organized. Discover more at car window repair asheboro .
Love your suggestions for evening routines! They make such a difference in my skin’s texture. You should check out new products at skin care consultation near me !
Valuable information! Discover more at colchones Albacete .
Thanks for the clear breakdown. Find more at https://www.logo-bookmarks.win/how-to-maintain-your-sump-pump-and-heating-system .
This was quite useful. For more, visit abogados A Coruña .
Such insightful content about controlling pests effectively—I’ll recommend my friends visit pest control near me # too!
If you’re battling bed bugs in your home, check out the comprehensive services from residential exterminator services in Austin.
I recently had a severe ant infestation in my home. I found that pest control near me offered excellent pest control services that really made a difference!
Utility strikes can lead to serious consequences; I’m grateful for companies like Underground Locating Company working hard to prevent them.
Thanks for the informative post. More at plumbing .
This was a great article. Check out gas safety inspection services for more.
Bird mites are such a nuisance! I found some useful tips on pest removal services near me that really helped me manage the situation.
Great post! User experience ought to constantly be a concern in web design. I discuss UX methods at website design in california .
Thanks for the thorough article. Find more at abogados Vigo .
This really simplifies the accident claim process for people here in Frederick County MD. The info on negotiating with insurers specific to Frederick County Maryland was great injury attorney
The ROI I’ve seen from working with Gilbert SEO Company is beyond what I expected. https://www.google.com/maps/place/?q=place_id:ChIJ08BPz0epK4cRmERLHtyR_IM
This is such an essential read for drivers everywhere! Keep the contact info for tow truck close!
Standard reminder: don’t forget about your roofing wishes—it affects the whole lot else in your property—looking out at innovations from %%anyKeyword%% now! Roof Washing
My husband and I are debating whether to tackle this ourselves or hire someone like novak remodeling… thoughts? remodeling contractor
Thanks for the thorough article. Find more at Aesthetic Plastic Surgery & Laser Center .
This was highly helpful. For more, visit expert septic tank specialist .
This was very well put together. Discover more at asheboro auto glass replacement .
Your insights into spatial awareness when arranging furniture are incredibly valuable —I will definitely apply these ! # # anyKey # ## top interior designers New Orleans
I recently had a fantastic# #limo service near me## experience. The driver was very knowledgeable, ensuring that my aircraft transport was stress-free and frictionless limousine service Siesta Key FL
This was a great help. Check out car window repair asheboro for more.
This was beautifully organized. Discover more at asheboro auto glass replacement .
Excited to explore holistic healing options through my sessions with local north gate chiropractors soon !! # # any keyword # # Car accident chiropractor
I’m looking for specialized chiropractic services in Gig Harbor that focus on prenatal care—does anyone have recommendations? Gig Harbor Chiropractor
The advantages of using laminated glass for windshields are fascinating. Learn more about it at asheboro auto glass replacement !
For my recent trip to the airport, I just used a amazing# #limo support near me##. The driver handled my trip stress-free and with utmost professionalism and punctuality, making it clean and stress-free taxi service
I these days visited an paintings gallery observed by means of dinner close by—it became such an important evening!!! Let me understand if any one wishes main points!!# # anyKeyWord## top restaurants in Tribeca
This was quite informative. For more, visit plumbing leak detection .
For anyone wondering where to find great pizza near me, visit local wings to explore your options!
Enjoying a game night with friends is even better when there’s great #pizza delivery near me# involved! pizza delivery near me
I found this very interesting. For more, visit congaden .
I’m looking into VA loans with Tacoma mortgage lenders and would appreciate any advice! Found useful info at Home loan .
Well done! Find more at local toilet repair .
Trustworthy and efficient—two words that describe my experience with Carpet Cleaning Long Island perfectly.
Really appreciate all that __anything__  ;_#! does—keep up great work ! Carpet Cleaning Service in Long Island New York
Great prices and even better results! Thank you, Rug Cleaning , for all your help with my carpets.
Thank you so much , # # anyKeword # ! My allergies have improved since getting rid of those dust mites! Carpet Cleaning Near Me
How do environmental conditions affect longevity rates seen among various models utilized currently?! Would love clarification surrounding these topics discussed recently!!! ?? anyK e yword # air conditioning repair
Living in an older home means being extra cautious about clogged drains—great discussions happening here! drain cleaning services
Such an eye-opener regarding warranties and what they cover or don’t cover;I’ll be reviewing mine tonight!【# # anykeyword】 water heater repair holly springs
For anyone in Lee’s Summit needing water heater assistance, I highly recommend checking out water heater replacement .
After using # anyKeyWord# twice now, I can confidently say they’re the go-to choice for any San Diegan needing AC help. ac repair
Our family will definitely be repeat customers of __anything__  ;_#! Rug Cleaning Near Me
Just wanted to share my positive experience with Carpet Cleaning ! Their rug cleaning service is top-notch!
My brother had his system fixed recently and recommended checking out #AnyKeyWord# – awesome resource! tankless water heater repair taylors
Thanks for the helpful article. More like this at Emergency boiler repairs .
For anyone hesitant about renting beach gear, I say go for it! I had a fantastic experience using snorkeling rentals in Maui for all my needs last summer.
This was a wonderful post. Check out https://hectorvufx030.mystrikingly.com/ for more.
I enjoyed this article. Check out emergency plumbing for more.
Ever since we began working together, our rankings on Google’s search pages have skyrocketed thanks to all of the hard work put forth by those talented minds over at BlckPanda Creative Dallas—details here: seo !
Your post sheds light on the steps after an accident. Living in the Baltimore area, this hits close to home. The part about negotiating with insurance companies stood out personal injury attorney
Your bài viết hay provides a fresh perspective on this topic. Really enjoyed it! For additional insights, visit hanghoaphaisinh247 .
Valuable information! Discover more at Aesthetic Plastik Surgery and Lazer Center .
This was a fantastic read. Check out popular body shaping techniques for more.
Valuable information! Discover more at TheSepticDesingNetwork .
This was a fantastic read. Check out colchones en Albacete for more.
I found this very interesting. Check out abogados Coruña for more.
This was quite useful. For more, visit local my plumber services .
I found this bài viết hay very helpful and insightful! Keep up the great work! More great content can be found at hanghoa .
I totally agree with the value of visual hierarchy in web design! It guides users naturally through your material. Discover more at web designer bay area .
This article has opened my eyes to new perspectives, making it very meaningful indeed!! hàng hoá 247
The environmental impact of certain pest control solutions is something we should all consider—thanks for bringing this to light! pest control services in my area
Have you noticed an increase in pest problems during certain seasons? Contacting pest elimination could save your home from an infestation!
This was an enlightening read; thank you for sharing such a thoughtful bài viết hay—look for more inspiration at hanghoa !
Thanks for the great tips. Discover more at bufete abogados Vigo .
Thanks for the detailed post. Find more at toilet installation quotes .
Great job! Find more at pest solutions .
I just experienced a car accident, and the experience was exhausting trying to navigate the fallout. I became aware of how important it is to have a skilled# #personal injuries lawyer## on your side auto injury legal help
My favorite part about working with my local roofer was all the helpful advice they offered—thanks, Puyallup contractors! Roofing contractor Puyallup
This was very beneficial. For more, visit best BBQ catering for weddings .
This is a wonderfully articulated message that resonates deeply—thank you for sharing it! hanghoa
This was a fantastic resource. Check out Walters Barbecue Southern Kitchen for more.
I just had a fantastic aircraft transit expertise that I wanted to share! The last thing I wanted after a longer trip was to have to deal with perplexing people transportation or uncertain rideshares chauffeur car service near me Siesta Key FL
Really get pleasure from your emphasis on understanding warranties and what they cowl referring to repairs—it’s essential tips! Hamilton Heating and Cooling
This is quite enlightening. Check out Walters BBQ Southern Kitchen for more.
Yes, the smoothness of the top-up process really stands out! It’s a breath of fresh air compared to other sites. You should definitely check out Genshin top up .
I always look forward to your bài viết hay because they are so informative and well-researched. Visit hàng hoá phái sinh for more!
Kudos to all the professionals at depression treatment centers working relentlessly to assist others find their method back to joy! faith-based depression therapy
You’ve superbly explained the relationship among massage and rigidity reduction. Your weblog has sure me to incorporate steady massages into my regimen, beginning with Erotic Massage Elite European Spa North York .
Great insights! Discover more at bisutería online .
I’ve been putting off getting my electric gate repaired for ages… maybe it’s time to call in the pros at novak doors & gates? automatic electric gate repair
I appreciate how easy-going and friendly the team at #### anyKeyWord#### was during my move! Cheap movers Ruskin
The expertise offered by companies like 811 Dig is invaluable for both homeowners and contractors alike.
Appreciate this thorough breakdown on why we could prioritize our roofs—they may be significant parts of our properties—finding into %%anyKeyword%% now! Roof Cleaning Winston-Salem
The ruggedness of the Bronco makes it ideal for tough towing jobs—what’s your favorite thing to tow? Share at tow company !
I have actually found out that attending to co-occurring disorders is important when treating clients for compound use problems! drug addiction hotline
So glad I stumbled upon this insightful bài viết hay today; your writing style is captivating—explore further at thaibinh !
I appreciate your tips on energy-efficient appliances. They can save money in the long run! electrician
I’m moved by the depth of meaning in this writing—thank you for sharing it with us! hang hoa 2025
This was a great article. Check out Plumbing & heating for more.
Solid write-up. This is one of the better reads I’ve found on this topic.
I’m based in southeastern Pennsylvania, and gutters fill fast during fall storms. Your suggestions would work great in our area too gutter installation contractor
Thanks for the great tips. Discover more at Aesthetic Plastic Sugery & Lasor Center .
Appreciate the helpful advice. For more, visit TheSeptikDesignNetwork .
This was a great help. Check out Aesthetic Plastic Surgery and Laser Centre for more.
Very informative article. For similar content, visit Electric showers Power Showers .
Had a spill on my carpet last week, and thanks to Carpet Cleaning Long Island , it’s like it never happened!
From start to finish , _# anyKeword _# made sure everything was seamless . Rug Cleaning
Wonderful tips! Find more at plumbing .
I just had my carpets cleaned by a local service, and they did an amazing job! Highly recommend checking out Carpet Cleaning Service in Long Island New York for great results.
I’ve been using the services of Carpet Cleaning for years now, and they never disappoint!
Appreciate the helpful advice. For more, visit https://stack.amcsplatform.com/user/andyarbcqg .
Appreciate the thorough write-up. Find more at local 24 hour plumber .
Fantastic post! Discover more at Walters Barbecue Southern Kitchen .
Finding the best legal counsel is important if you’ve been involved in an accident https://list.ly/i/11033962
Thanks for the useful post. More like this at tienda colchones Albacete .
Liked your take on creating a special user journey through thoughtful web design; personalization truly enhances engagement– discover extra techniques over at website designers san francisco !
This is highly informative. Check out abogados Coruña for more.
Did you know that rats can squeeze through tiny spaces? That’s why it’s essential to consult experts like pest removal service .
A clean home is essential, but so is pest control! I trust pest management services completely.
This was a wonderful post. Check out Walters Barbecue Southern Kitchen for more.
The impact of termites on property value is significant—protect yours by visiting pest elimination for tips!
This was quite helpful. For more, visit roofing company .
Grateful for the insights. This really helped me understand how personal injury law works in Frederick Maryland. Curious to know if you’ve seen trends in Frederick MD around settlement timelines injury attorney
Thanks for the informative post. More at Motor vehicle accident lawyer .
Just had a splendid revel in with an HVAC technician who explained the entirety in detail—so constructive! AC contractors Hamilton
I’ve heard great things about the team at air conditioning repair when it comes to AC repairs in Poway.
Your thorough approach to discussing both residential and commercial pest control needs is very much appreciated by local business owners too! pest control services
”They take pride knowing how vital functioning systems are especially during sudden weather changes!!!” air conditioner repair
Appreciate the comprehensive advice. For more, visit despacho abogados Vigo .
Thanks for sharing tips on drain cleaning! I’ll definitely check out sewer drain cleaning valparaiso for my plumbing needs.
What a fascinating read! I appreciate the depth of analysis. See more at roof repair .
Grateful for these chiropractic insights. I especially liked how you explained the connection between posture and pain relief Joint injections
This article at the merits of prenatal rubdown become enormously effectual! It’s first-rate to be aware of that Adult Massage Elite European Spa North York presents really good features for expectant moms.
If you’re looking for knowledgeable roofers, definitely consider the options available in Puyallup! Roofing company
Thanks for the helpful article. More like this at full-service mommy makeover .
Looking forward to finding out that new brunch spot everybody’s been raving about!! Have you visited but??# # anyKeyWord## popular Italian spots in Tribeca
This was quite informative. More at Aesthetic Plastic Surgery & Laser Centre .
Navigating the aftermath of an injury can be difficult, and having the best legal counsel is essential accident lawyer near me Maryvale Park AZ
Great guide on outdoor electrical safety! We often overlook this aspect during DIY projects. englewood electrical services
Really helpful content. This clarified so many things for me about filing injury claims. Your point about dealing with insurance companies is spot-on personal injury lawyer The Sharma Law Firm
Новости Украины https://useti.org.ua в реальном времени. Всё важное — от официальных заявлений до мнений экспертов.
Информационный портал https://comart.com.ua о строительстве и ремонте: полезные советы, технологии, идеи, лайфхаки, расчёты и выбор материалов.
Архитектурный портал https://skol.if.ua современные проекты, урбанистика, дизайн, планировка, интервью с архитекторами и тренды отрасли.
Всё о строительстве https://ukrainianpages.com.ua просто и по делу. Портал с актуальными статьями, схемами, проектами, рекомендациями специалистов.
This is highly informative. Check out emergency plumbers for more.
This was highly educational. For more, visit professional plumbing leak detection .
The value of professional underground utility locating cannot be overstated! I’m glad companies like Underground Locating Company exist.
Very useful post. For similar content, visit https://www.plurk.com/p/3hc60yejd0 .
This was very enlightening. For more, visit Walters BBQ Southern Kitchen .
Their passion shines through in everything they do!!!## anykeyword ## SEO for multi-location businesses
This was a wonderful post. Check out Walters Barbecue Southern Kitchen for more.
Navigating the aftermath of an accident can become overwhelming, and having a competent# #personal injury solicitor## can make all the difference vehicle injury lawyer Grand Canyon University AZ
Excellent information on adhesive flooring’s benefits! It’s amazing how this tough surface is change spaces, making them both more appealing and maintenance-friendly Blueprint Reading
Simply love seeing a majority of these fabulous changes showcased across many different systems on line Power washing Kelowna
Thanks for the comprehensive read. Find more at Walter’s BBQ Southern Kitchen .
Appreciate the detailed post. Find more at urgent plumber near me .
Appreciate the detailed information. For more, visit plumber prices .
Amazing pointers on typography! The best fonts can make a big difference in user experience. I dive deeper into this at website design company in california .
Absolutely! Apply this remark to add your own:
I just used a# #limo company near me## for a special occasion, and I couldn’t be happier with it. The car itself was magnificent and well-maintained, and the chauffeur was specialized and on time best airport shuttle
Appreciate the insightful article. Find more at emergency same day plumber .
I’ve been binge-watching home renovation shows and now my brain is buzzing with ideas! Thinking of reaching out to novak remodeling for quotes. home remodeling contractors near me
Electric gate installation sounds so complicated! But I’ve heard novak doors & gates tarzana makes it easy. Anyone used them? automatic gate repair tarzana
Loved the detail in this post! I’ve been looking into gutter guard options recently. The explanation about long-term savings really made me think gutter guards contractor
I appreciate your perspective on the steps after an accident. Living in the Baltimore area, this applies directly to my area. Your advice on managing insurance disputes was great accident lawyer
I appreciated this post. Check out same day gas plumbing services for more.
Really loved discovering approximately zoning tactics on your submit! Considering an improve now; will money out AC contractors Hamilton for selections.
This files couldn’t have come at a greater time! My roof necessities a cleansing, and I’ll in fact touch Roof Washing .
This was very beneficial. For more, visit tienda colchones Albacete .
What should still be incorporated in a roof upkeep list for Guelph houses? quality roofing service in guelph
Informative post! It’s amazing how many pests can affect our lives, and why we should trust services like residential pest control services .
This was highly informative. Check out abogados Coruña for more.
Anyone else find ants invading their kitchen in Austin? Check out pest control company near me for effective solutions!
After a long week, not anything beats a calming massage to unwind! For recommendations on finding the properly therapist, discuss with Elite European Spa North York .
Great insights! Discover more at phim sex hay .
I found this very helpful. For additional info, visit septic tank engineering expert .
Great job! Find more at virtual mommy makeover consultations .
This was a fantastic resource. Check out Aesthetic Plastic Surgery & Laser Centre for more.
How does one properly consult a doctor about using 시알리스 구매 ? Any advice would be appreciated!
Новостной портал Одесса https://u-misti.odesa.ua последние события города и области. Обзоры и много интресного о жизни в Одессе.
Новости Украины https://hansaray.org.ua 24/7: всё о жизни страны — от региональных происшествий до решений на уровне власти.
Всё об автомобилях https://autoclub.kyiv.ua в одном месте. Обзоры, новости, инструкции по уходу, автоистории и реальные тесты.
Строительный журнал https://dsmu.com.ua идеи, технологии, материалы, дизайн, проекты, советы и обзоры. Всё о строительстве, ремонте и интерьере
Портал о строительстве https://tozak.org.ua от идеи до готового дома. Проекты, сметы, выбор материалов, ошибки и их решения.
Покупка дипломов ВУЗов по всей России и СНГ — с печатями, подписями, приложением и возможностью архивной записи (по запросу).
Документ максимально приближен к оригиналу и проходит визуальную проверку.
Мы гарантируем, что в случае проверки документа, подозрений не возникнет.
– Конфиденциально
– Доставка 3–7 дней
– Любая специальность
Уже более 2246 клиентов воспользовались услугой — теперь ваша очередь.
Купить диплом Москва — ответим быстро, без лишних формальностей.
וופורייזר סופר פארם
וופ פנים – טכנולוגיה מתקדמת, פרקטי ובריא למשתמש המודרני.
בעולם העכשווי, שבו דחיפות והרגלי שגרה מכתיבים את היום-יום, מכשירי האידוי הפכו לאופציה אידיאלית עבור אלה המעוניינים ב חווית אידוי מקצועית, נוחה ובריאה.
מעבר לטכנולוגיה החדשנית שמובנית במכשירים הללו, הם מציעים מספר רב של יתרונות בולטים שהופכים אותם לאופציה עדיפה על פני שיטות קונבנציונליות.
גודל קטן ונוח לנשיאה
אחד ההיתרונות העיקריים של מכשירי האידוי הוא היותם קטנים, קלילים וקלים להעברה. המשתמש יכול לשאת את הVape Pen לכל מקום – למשרד, לטיול או למסיבות חברתיות – מבלי שהמכשיר יפריע או יתפוס מקום.
הגודל הקטן מאפשר להסתיר אותו בכיס בקלות, מה שמאפשר שימוש לא בולט ונוח יותר.
מתאים לכל המצבים
עטי האידוי מצטיינים בהתאמתם לשימוש בסביבות מגוונות. בין אם אתם במשרד או באירוע חברתי, ניתן להשתמש בהם באופן לא מורגש וללא הפרעה.
אין עשן כבד או ריח חד שעלול להטריד – רק אידוי עדין וקל שנותן גמישות גם במקום ציבורי.
שליטה מדויקת בחום האידוי
למכשירי האידוי רבים, אחד היתרונות המרכזיים הוא היכולת לשלוט את חום הפעולה בצורה אופטימלית.
מאפיין זה מאפשרת להתאים את השימוש לסוג החומר – קנאביס טבעי, נוזלי אידוי או תרכיזים – ולהעדפות האישיות.
שליטה טמפרטורתית מספקת חוויית אידוי נעימה, טהורה ואיכותית, תוך שמירה על ההארומות המקוריים.
אידוי נקי וטוב יותר
בהשוואה לעישון מסורתי, אידוי באמצעות עט אידוי אינו כולל בעירה של המוצר, דבר שמוביל לכמות נמוכה של רעלנים שמשתחררים במהלך השימוש.
מחקרים מצביעים על כך שוופינג הוא פתרון טוב יותר, עם מיעוט במגע לחלקיקים מזיקים.
בנוסף, בשל היעדר שריפה, ההארומות הטבעיים מוגנים, מה שמוסיף להנאה מהמוצר והסיפוק הצריכה.
קלות שימוש ותחזוקה
מכשירי הוופ מתוכננים מתוך גישה של קלות שימוש – הם מיועדים הן לחדשים והן למשתמשים מנוסים.
רוב המכשירים פועלים בלחיצה אחת, והתכנון כולל חילופיות של חלקים (כמו מיכלים או קפסולות) שמקלים על התחזוקה והאחזקה.
הדבר הזה מגדילה את אורך החיים של המוצר ומספקת ביצועים תקינים לאורך זמן.
מגוון רחב של עטי אידוי – התאמה אישית
הבחירה רחבה בוופ פנים מאפשר לכל משתמש ללמצוא את המוצר האידיאלי עבורו:
מכשירים לקנאביס טבעי
מי שמחפש חווית אידוי אותנטית, רחוקה ממעבדות – ייעדיף מכשיר לקנאביס טחון.
המוצרים אלה מתוכננים לשימוש בחומר גלם טבעי, תוך שימור מקסימלי על הריח והטעם ההמקוריים של הקנאביס.
עטי אידוי לשמנים ותמציות
לצרכנים שמחפשים אידוי מרוכז ועשיר ברכיבים כמו THC וCBD – קיימים מכשירים המתאימים במיוחד לשמנים ותרכיזים.
מכשירים אלו מתוכננים לשימוש בנוזלים מרוכזים, תוך שימוש בחידושים כדי לייצר אידוי עקבי, חלק ומלא בטעם.
—
סיכום
מכשירי וופ אינם רק עוד כלי לצריכה בחומרי קנאביס – הם דוגמה לרמת חיים גבוהה, לחופש ולהתאמה לצרכים.
בין ההיתרונות העיקריים שלהם:
– גודל קומפקטי ונוח לתנועה
– שליטה מדויקת בחום האידוי
– חווית אידוי נקייה ונטולת רעלים
– הפעלה אינטואיטיבית
– הרבה אפשרויות של התאמה לצרכים
בין אם זו הפעם הראשונה בוופינג ובין אם אתם צרכן ותיק – וופ פן הוא ההבחירה הטבעית לצריכה מתקדמת, נעימה ובטוחה.
—
הערות:
– השתמשתי בסוגריים מסולסלים כדי ליצור וריאציות טקסטואליות מגוונות.
– כל האפשרויות נשמעות טבעיות ומתאימות לשפה העברית.
– שמרתי על כל המושגים ספציפיים (כמו Vape Pen, THC, CBD) ללא שינוי.
– הוספתי כותרות כדי לשפר את ההבנה והסדר של הטקסט.
הטקסט מתאים למשתמשים בהשוק העברי ומשלב תוכן מכירתי עם מידע מקצועי.
Наша компания выполняет профессиональные услуги доставки грузов по направлению Москва — СПБ с ежедневными отправками и доставкой от 12 часов. Мы обеспечиваем качественную доставку любых типов грузов благодаря обновленному подвижному составу и опытным перевозчикам. Предлагаем доступные тарифы, полное страхование грузов и возможность контроля в режиме реального времени. Персональный подход к каждому партнеру и гибкая система бонусов делают нас ответственным поставщиком услуг для вашего бизнеса. Подробная информация и специальные коммерческие предложения доступны на нашем портале.
Топовые онлайн-казино Беларуси, получайте удовольствие от игры, с нетерпением ожидают.
Играйте в казино онлайн в Беларуси, все время на связи, выгодные предложения.
Поднимите свои шансы на выигрыш, проверенное время, играйте ответственно.
Рейтинг лучших казино Беларуси, каждую минуту.
Широкий выбор игр в белорусских казино, от рулетки до блэкджека, для истинных ценителей.
Новые онлайн-казино Беларуси, для настоящих ценителей.
Не упустите свои шансы на бонусы, особенные предложения.
Лучшие игры года , готовы порадовать, откройте для себя мир азартных игр.
На что обратить внимание при выборе казино, читайте наш гид.
Приглашаем в мир онлайн-азарта, получайте незабываемые эмоции.
казино казино онлайн .
Городской портал Одессы https://faine-misto.od.ua последние новости и происшествия в городе и области
Оформиление дипломов ВУЗов по всей России и СНГ — с печатями, подписями, приложением и возможностью архивной записи (по запросу).
Документ максимально приближен к оригиналу и проходит визуальную проверку.
Мы гарантируем, что в случае проверки документа, подозрений не возникнет.
– Конфиденциально
– Доставка 3–7 дней
– Любая специальность
Уже более 3579 клиентов воспользовались услугой — теперь ваша очередь.
Ознакомиться здесь — ответим быстро, без лишних формальностей.
Мы предлагаем оформление дипломов ВУЗов по всей России и СНГ — с печатями, подписями, приложением и возможностью архивной записи (по запросу).
Документ максимально приближен к оригиналу и проходит визуальную проверку.
Мы гарантируем, что в случае проверки документа, подозрений не возникнет.
– Конфиденциально
– Доставка 3–7 дней
– Любая специальность
Уже более 1073 клиентов воспользовались услугой — теперь ваша очередь.
Доступ по ссылке — ответим быстро, без лишних формальностей.
Выполняем быструю транспортировку отправлений между Москвой и Питером всего за 12 часов! Действуем постоянно, принимаем любые отправления — от документов до больших товаров. Никаких скрытых доплат, полная открытость процесса и контроль по каждой доставке. Сохраняйте время и деньги, передавая свои товары экспертам с солидным опытом. Оставьте заявку на нашем ресурсе и получите расчет стоимости в течение часа!
Информационный портал https://dailynews.kyiv.ua актуальные новости, аналитика, интервью и спецтемы.
Новостной портал https://news24.in.ua нового поколения: честная журналистика, удобный формат, быстрый доступ к ключевым событиям.
Портал для женщин https://a-k-b.com.ua любого возраста: стиль, красота, дом, психология, материнство и карьера.
Онлайн-новости https://arguments.kyiv.ua без лишнего: коротко, по делу, достоверно. Политика, бизнес, происшествия, спорт, лайфстайл.
Топовые онлайн-казино Беларуси, играйте и выигрывайте, порадуют вас.
Лучшие онлайн-игры из Беларуси, в удобное для вас время, выгодные предложения.
Выигрывайте легко в белорусских казино, лицензированные заведения, достигайте успеха.
Самые надежные онлайн-казино в Беларуси, ежедневно.
Разнообразие игр для всех, от слотов до покера, для истинных ценителей.
Новые онлайн-казино Беларуси, для азартных геймеров.
Соберите все бонусы и акции, подарки для новых игроков.
Топ онлайн-игр в белорусских казино, готовы порадовать, погрузитесь в увлекательные приключения.
Советы по выбору казино, по онлайн-казино Беларуси.
Ваш шанс на удачу здесь, не упустите возможность выиграть.
казино беларусь казино .
Лучшие казино онлайн в Беларуси, играйте и выигрывайте, щедрые предложения.
Откройте для себя казино Беларуси, в удобное для вас время, привлекательные условия.
Поднимите свои шансы на выигрыш, заведомо безопасно, достигайте успеха.
Онлайн-казино, которым можно доверять, каждую минуту.
Широкий выбор игр в белорусских казино, от рулетки до блэкджека, для истинных ценителей.
Свежие предложения в мире азартных игр, проверенные провайдеры.
Соберите все бонусы и акции, подарки для новых игроков.
Захватывающие новинки игр, уже ждут вас, погрузитесь в увлекательные приключения.
На что обратить внимание при выборе казино, по онлайн-казино Беларуси.
Ваш шанс на удачу здесь, получайте незабываемые эмоции.
казино беларусь казино .
Мировые новости https://ua-novosti.info онлайн: политика, экономика, конфликты, наука, технологии и культура.
Только главное https://ua-vestnik.com о событиях в Украине: свежие сводки, аналитика, мнения, происшествия и реформы.
Женский портал https://woman24.kyiv.ua обо всём, что волнует: красота, мода, отношения, здоровье, дети, карьера и вдохновение.
кейс защитный байкал вз 12 https://plastcase.ru
Онлайн-казино для белорусов, открывайте новые возможности, ждут вас.
Откройте для себя казино Беларуси, в удобное для вас время, привлекательные условия.
Поднимите свои шансы на выигрыш, заведомо безопасно, играйте ответственно.
Онлайн-казино, которым можно доверять, каждый день.
Широкий выбор игр в белорусских казино, от карточных до настольных игр, для истинных ценителей.
Новые онлайн-казино Беларуси, для настоящих ценителей.
Соберите все бонусы и акции, особенные предложения.
Топ онлайн-игр в белорусских казино, готовы порадовать, погрузитесь в увлекательные приключения.
Советы по выбору казино, по играм на деньги.
Ваш шанс на удачу здесь, играйте ответственно.
казино онлайн казино онлайн беларусь .
Купить диплом института по невысокой цене можно, обратившись к проверенной специализированной компании. Заказать диплом: rashin.4adm.ru/viewtopic.phpf=27&t=3791
аттестат о среднем общем образовании купить аттестат о среднем общем образовании купить .
Требуется надежного логиста между Москвой и Питером? Наши водители курсируют по этому направлению каждый день и знают его как свои пять пальцев. Осознаем, что каждый отправление важен для вашего дела, поэтому работаем к нему как к своему собственному. Честные расценки без переплат, полное покрытие и постоянная связь с перевозчиком. Работаем с компаниями любого размера и всегда идем навстречу. Все условия и примеры работы смотрите на нашем портале.
Покупка дипломов ВУЗов по всей России и СНГ — с печатями, подписями, приложением и возможностью архивной записи (по запросу).
Документ максимально приближен к оригиналу и проходит визуальную проверку.
Мы даем гарантию, что в случае проверки документа, подозрений не возникнет.
– Конфиденциально
– Доставка 3–7 дней
– Любая специальность
Уже более 1364 клиентов воспользовались услугой — теперь ваша очередь.
Открыть — ответим быстро, без лишних формальностей.
The best Dedicated servers (best European data centers) managed and unmanaged, GDPR compliant, super fast NVMe SSDs, reliable 1Gbps network, choice of OS and finally affordable prices. Hurry up and get a free dedicated server upgrade until the end of this month!
выберите займы на карту с быстрым оформлением, прозрачными условиями и моментальным переводом на карту. Только проверенные МФО — без скрытых комиссий.
Центр ИСО сертификации https://iso-prof.ru оформление сертификатов соответствия ISO 9001, 14001, 22000 и других стандартов. Консультации, сопровождение, помощь в прохождении аудита.
Офисная мебель https://officepro54.ru в Новосибирске купить недорого от производителя
Взять микрозайм онлайн займ взять
Noten von klavier klavier mit noten
Цифровые грузоперевозки Москва-СПБ нового поколения с полным управлением процесса. Интеллектуальная логистика позволяет улучшать направления и сокращать время транспортировки до минимума. GPS-мониторинг, автоматические сообщения и полная аналитика по каждой перевозке в личном кабинете. Честное тарификация на основе алгоритмов и быстрый расчет стоимости онлайн. Переходите в эпоху умной логистики вместе с нами — начните на нашей системе.
Топовые онлайн-казино Беларуси, получайте удовольствие от игры, с нетерпением ожидают.
Лучшие онлайн-игры из Беларуси, все время на связи, для каждого.
Выигрывайте легко в белорусских казино, заведомо безопасно, достигайте успеха.
Рейтинг лучших казино Беларуси, большие джекпоты.
Широкий выбор игр в белорусских казино, от карточных до настольных игр, для истинных ценителей.
Откройте для себя новинки в казино, проверенные провайдеры.
Поспешите за бонусами в казино онлайн, особенные предложения.
Лучшие игры года , всегда готовы к игре, начните выигрывать.
Советы по выбору казино, узнайте больше.
Приглашаем в мир онлайн-азарта, получайте незабываемые эмоции.
казино онлайн казино онлайн беларусь .
Хмельницький новини https://u-misti.khmelnytskyi.ua огляди, новини, сайт Хмельницького
За 15 лет работы мы транспортировали более 100 000 грузов по трассе Москва-СПБ без единой серьезной аварии. Партнеры доверяют нас за постоянство, своевременность и добросовестную работу без сюрпризов. Быстрая перевозка за 12 часов стала нашим правилом, а не исключением. Крупные логистические компании доверяют нам свои самые важные грузы. Присоединяйтесь к тысячам довольных клиентов — все отзывы и кейсы на нашем ресурсе.
Электрические рулонные шторы, в каждом доме.
Выберите рулонные шторы с электроприводом, для современного дома.
Умные шторы: удобство на кончиках пальцев, в наличии.
Умные рулонные шторы, идеальное решение.
Наслаждайтесь комфортом рулонных штор с электроприводом, нажмите для подробностей.
Умные рулонные шторы для дома, подходят для любого окна.
Стильные рулонные шторы с электроприводом, инновации, которые стоит попробовать.
Рулонные шторы с электроприводом для легкого управления, познакомьтесь с нашими предложениями.
Рулонные шторы с электроприводом – элегантность и удобство, на нашем сайте.
Умные рулонные шторы: удобство и стиль, которое вам понравится.
Современные рулонные шторы с электроприводом, доступные для заказа.
Умные рулонные шторы – правильно решайте, выбор, который вы не пожалеете.
Рулонные шторы с электроприводом – ваш идеальный помощник, в вашем доме.
Электрические рулонные шторы для стиля и комфорта, закажите сейчас.
Электрические рулонные шторы – стильный выбор, попробуйте и оцените.
Рулонные шторы с электроприводом – вашим окнам это нужно, пополните свой интерьер.
Рулонные шторы с электроприводом для вашего комфорта, выбирайте лучшее.
Преимущества рулонных штор с электроприводом, изучите сейчас.
рулонные шторы с электроприводом рулонные шторы с электроприводом .
написание отчетов по практике на заказ https://otchetbuhgalter.ru
писать дипломы на заказ работа https://diplomsdayu.ru
заказать реферат москва сделать реферат на заказ
Умные рулонные шторы для вашего дома, комфорт и элегантность.
Выберите рулонные шторы с электроприводом, максимальный комфорт.
Электрические рулонные шторы для вашего дома, в нашем интернет-магазине.
Электроприводные рулонные шторы, качества и стиля.
Наслаждайтесь комфортом рулонных штор с электроприводом, смотрите.
Электрические рулонные шторы – удобство и стиль, добавят стиля.
Электрические рулонные шторы: комфорт и уют, инновации, которые стоит попробовать.
Электрические рулонные шторы: свобода выбора, узнайте больше.
Сделайте свой дом умнее с рулонными шторами, в каталоге товаров.
Умные рулонные шторы: удобство и стиль, для вашего комфорта.
Преобразите ваш дом с рулонными шторами с электроприводом, с возможностью установки.
Электрические рулонные шторы для любого интерьера, выбор, на который стоит обратить внимание.
Рулонные шторы с электроприводом – ваш идеальный помощник, носим с собой.
Электрические рулонные шторы для стиля и комфорта, выберите свои.
Умные рулонные шторы для вашего удобства, сделайте свой дом комфортнее.
Электрические рулонные шторы – сочетание простоты и стиля, не упустите свой шанс.
Умные рулонные шторы – ваш идеальный выбор, покупайте у нас.
Электроприводные рулонные шторы для стильного дома, изучите сейчас.
рулонные шторы с электроприводом рулонные шторы с электроприводом .
Медпортал https://medportal.co.ua украинский блог о медициние и здоровье. Новости, статьи, медицинские учреждения
The hottest leaks from minitinah are finally out! minitinah’s NSFW videos are blowing up on social media. Looking for minitinah blowjob or dildo scenes? Experience minitinah’s hottest scenes uncensored.
minitinah onlyfans minitinah erome gallery just dropped new videos. Uncut, uncensored — minitinah full video inside. Leaks, nudes, and sex tapes — minitinah delivers. All minitinah fans need to see this leak. minitinah only fans leaked her wildest side.
Наша фирма выполняет качественные услуги грузовых перевозок по маршруту Москва — СПБ с постоянными отправками и транспортировкой от 12 часов. Мы обеспечиваем надежную транспортировку любых типов отправлений благодаря современному автопарку и квалифицированным перевозчикам. Предлагаем выгодные цены, полное защиту грузов и возможность контроля в режиме реального времени. Особый подход к каждому партнеру и гибкая система скидок делают нас надежным поставщиком услуг для вашего бизнеса. Полная информация и индивидуальные коммерческие предложения доступны на нашем ресурсе.
Электрические рулонные шторы, в вашем пространстве.
Электроприводные рулонные шторы для вашего окна, для вашего интерьера.
Умные шторы: удобство на кончиках пальцев, представлены.
Электроприводные рулонные шторы, превосходное сочетание.
Изучите мир электрических рулонных штор, ознакомьтесь.
Рулонные шторы с электроприводом для вашего интерьера, добавят стиля.
Электроприводные рулонные шторы: инновации в вашем доме, выбор, который стоит сделать.
Рулонные шторы с электроприводом для легкого управления, откройте для себя.
Электроприводные рулонные шторы: ваш лучший выбор, на нашем сайте.
Рулонные шторы с электроприводом для современного интерьера, которое вам понравится.
Преобразите ваш дом с рулонными шторами с электроприводом, с возможностью установки.
Умные рулонные шторы – правильно решайте, выбор, который вы не пожалеете.
Электроприводные рулонные шторы: удобство управления одним нажатием, каждый день.
Электрические рулонные шторы для стиля и комфорта, нажмите для подробностей.
Электрические рулонные шторы – стильный выбор, сделайте свой дом комфортнее.
Электрические рулонные шторы – сочетание простоты и стиля, не упустите свой шанс.
Умные рулонные шторы – ваш идеальный выбор, заказывайте онлайн.
Преимущества рулонных штор с электроприводом, закажите прямо сейчас.
рулонные шторы с электроприводом рулонные шторы с электроприводом .
Оформиление дипломов ВУЗов в Москве — с печатями, подписями, приложением и возможностью архивной записи (по запросу).
Документ максимально приближен к оригиналу и проходит визуальную проверку.
Мы даем гарантию, что в случае проверки документа, подозрений не возникнет.
– Конфиденциально
– Доставка 3–7 дней
– Любая специальность
Уже более 4906 клиентов воспользовались услугой — теперь ваша очередь.
Купить диплом о среднем профессиональном образовании — ответим быстро, без лишних формальностей.
Looking for exclusive minitinah content? Who is minitinah? This page has all the juicy details. Looking for minitinah blowjob or dildo scenes? minitinah linktree was just updated — go check it.
@minitinah Get behind-the-scenes access to minitinah’s raw content. Her new minitinah of leaked content is pure fire. Did you watch minitinah fucked in HD yet? All minitinah fans need to see this leak. minitinah linktree now links to secret stash.
Мы предлагаем оформление дипломов ВУЗов по всей России и СНГ — с печатями, подписями, приложением и возможностью архивной записи (по запросу).
Документ максимально приближен к оригиналу и проходит визуальную проверку.
Мы гарантируем, что в случае проверки документа, подозрений не возникнет.
– Конфиденциально
– Доставка 3–7 дней
– Любая специальность
Уже более 2614 клиентов воспользовались услугой — теперь ваша очередь.
По ссылке — ответим быстро, без лишних формальностей.
Check out minitinah’s wildest OnlyFans drops here. Find out why minitinah leaks are all over the web. Leaked nudes of @minitinah are going viral. minitinah naked videos now easier to find.
@minitinah One link to all leaked content from minitinah. NSFW lovers must see this minitinah clip. Caught on tape — minitinah leaked nudes in HQ. minitinah surgery rumors explained with real photos. minitinah only fans leaked her wildest side.
Обеспечиваем оперативную доставку отправлений между Москвой и СПБ всего за 12 часов! Функционируем каждый день, принимаем любые товары — от документов до габаритных товаров. Никаких скрытых оплат, полная открытость процесса и контроль по каждой отправке. Сберегайте время и деньги, передавая свои товары экспертам с многолетним опытом. Оставьте заявку на нашем ресурсе и получите расчет стоимости в течение часа!
Файне Винница https://faine-misto.vinnica.ua новости и события Винницы сегодня. Городской портал, обзоры.
Full minitinah sextape now available to watch. You won’t believe what minitinah posted last night! Join thousands sharing minitinah pussy leaks. See the latest content leaked from minitinah’s page.
minitinah porn video All @minitinah nude leaks are now collected online. Uncut, uncensored — minitinah full video inside. minitinah before surgery: compare real vs now. Watch minitinah naked, leaked and real. minitinah only fans leaked her wildest side.
Рулонные шторы с электроприводом, в вашем пространстве.
Электроприводные рулонные шторы для вашего окна, для вашего удобства.
Умные шторы: удобство на кончиках пальцев, представлены.
Современные рулонные шторы с электроприводом, превосходное сочетание.
Время менять окна на рулонные шторы с электроприводом, нажмите для подробностей.
Умные рулонные шторы для дома, подходят для любого окна.
Электрические рулонные шторы: комфорт и уют, выбор, который стоит сделать.
Электрические рулонные шторы: свобода выбора, познакомьтесь с нашими предложениями.
Рулонные шторы с электроприводом – элегантность и удобство, на нашем сайте.
Рулонные шторы с электроприводом для современного интерьера, для вашего комфорта.
Преобразите ваш дом с рулонными шторами с электроприводом, с возможностью установки.
Рулонные шторы с электроприводом: функциональность и стиль, выбор, на который стоит обратить внимание.
Умные рулонные шторы для современного дома, каждый день.
Электрические рулонные шторы для стиля и комфорта, выберите свои.
Рулонные шторы с электроприводом: комфорт на новом уровне, откройте для себя.
Умные рулонные шторы с электроприводом для вашего дома, пополните свой интерьер.
Рулонные шторы с электроприводом для вашего комфорта, заказывайте онлайн.
Преимущества рулонных штор с электроприводом, узнайте больше.
рулонные шторы с электроприводом рулонные шторы с электроприводом .
Can’t get enough of minitinah nude photos? minitinah’s NSFW videos are blowing up on social media. What makes minitinah so irresistible? Experience minitinah’s hottest scenes uncensored.
minitinah fapello One link to all leaked content from minitinah. Just found the latest minitinah blowjob tape. Caught on tape — minitinah leaked nudes in HQ. minitinah surgery rumors explained with real photos. This minitinah leak might be her best yet.
Full minitinah sextape now available to watch. Shocking new pics of minitinah topless surfaced today. Real name, surgeries, and nude history of minitinah. minitinah naked videos now easier to find.
minitinah nsfw The ultimate minitinah porn compilation is here. Her new minitinah of leaked content is pure fire. Caught on tape — minitinah leaked nudes in HQ. Watch minitinah naked, leaked and real. Massive leak: minitinah full nude pics & vids.
займы онлайн без процентов https://zajmy-onlajn.ru
Нужен ответственного перевозчика между Москвой и СПБ? Наши ребята работают по этому маршруту каждый день и знают его как свои пять пальцев. Осознаем, что каждый отправление важен для вашего дела, поэтому относимся к нему как к своему собственному. Справедливые цены без накруток, полное защиту и постоянная связь с водителем. Работаем с организациями любого размера и всегда идем навстречу. Все условия и примеры работы смотрите на нашем ресурсе.
Мы предлагаем оформление дипломов ВУЗов в Москве — с печатями, подписями, приложением и возможностью архивной записи (по запросу).
Документ максимально приближен к оригиналу и проходит визуальную проверку.
Мы даем гарантию, что в случае проверки документа, подозрений не возникнет.
– Конфиденциально
– Доставка 3–7 дней
– Любая специальность
Уже более 1994 клиентов воспользовались услугой — теперь ваша очередь.
Уточнить здесь — ответим быстро, без лишних формальностей.
Мы предлагаем оформление дипломов ВУЗов в Москве — с печатями, подписями, приложением и возможностью архивной записи (по запросу).
Документ максимально приближен к оригиналу и проходит визуальную проверку.
Мы гарантируем, что в случае проверки документа, подозрений не возникнет.
– Конфиденциально
– Доставка 3–7 дней
– Любая специальность
Уже более 1618 клиентов воспользовались услугой — теперь ваша очередь.
Купить диплом вуза — ответим быстро, без лишних формальностей.
Рулонные шторы с электроприводом, в вашем пространстве.
Электроприводные рулонные шторы для вашего окна, интеллектуальное решение.
Умные шторы: удобство на кончиках пальцев, представлены.
Умные рулонные шторы, комфорта и эстетики.
Изучите мир электрических рулонных штор, смотрите.
Электрические рулонные шторы – удобство и стиль, подходят для любого окна.
Стильные рулонные шторы с электроприводом, решение для современного дизайна.
Электрические рулонные шторы: свобода выбора, откройте для себя.
Электроприводные рулонные шторы: ваш лучший выбор, в каталоге товаров.
Рулонные шторы с электроприводом для современного интерьера, которое вы заслуживаете.
Преобразите ваш дом с рулонными шторами с электроприводом, предлагаемые с доставкой.
Рулонные шторы с электроприводом: функциональность и стиль, выбор, на который стоит обратить внимание.
Рулонные шторы с электроприводом – ваш идеальный помощник, в вашем доме.
Обновите интерьер с рулонными шторами с электроприводом, нажмите для подробностей.
Умные рулонные шторы для вашего удобства, откройте для себя.
Умные рулонные шторы с электроприводом для вашего дома, позаботьтесь о себе.
Электрические рулонные шторы: легкость управления, заказывайте онлайн.
Электроприводные рулонные шторы для стильного дома, узнайте больше.
рулонные шторы с электроприводом рулонные шторы с электроприводом .
Цифровые перевозки грузов Москва-Питер нового поколения с полным контролем процесса. Умная логистика позволяет оптимизировать направления и уменьшать время перевозки до минимума. GPS-мониторинг, автоматические уведомления и подробная аналитика по каждой отправке в личном кабинете. Прозрачное тарификация на основе алгоритмов и оперативный расчет стоимости онлайн. Переходите в эпоху умной логистики вместе с нами — начните на нашей сервисе.
Умные рулонные шторы для вашего дома, инновации и дизайн.
Современные рулонные шторы с электрическим управлением, для вашего удобства.
Рулонные шторы с электроприводом: удобство и стиль, в каталоге.
Умные рулонные шторы, качества и стиля.
Наслаждайтесь комфортом рулонных штор с электроприводом, смотрите.
Электрические рулонные шторы – удобство и стиль, добавят стиля.
Электроприводные рулонные шторы: инновации в вашем доме, решение для современного дизайна.
Электрические рулонные шторы: свобода выбора, узнайте больше.
Электроприводные рулонные шторы: ваш лучший выбор, на нашем сайте.
Рулонные шторы с электроприводом для современного интерьера, которое вам понравится.
Современные рулонные шторы с электроприводом, с возможностью установки.
Рулонные шторы с электроприводом: функциональность и стиль, выбор, на который стоит обратить внимание.
Умные рулонные шторы для современного дома, в вашем доме.
Электрические рулонные шторы для стиля и комфорта, нажмите для подробностей.
Электрические рулонные шторы – стильный выбор, попробуйте и оцените.
Умные рулонные шторы с электроприводом для вашего дома, позаботьтесь о себе.
Рулонные шторы с электроприводом для вашего комфорта, заказывайте онлайн.
Преимущества рулонных штор с электроприводом, изучите сейчас.
рулонные шторы с электроприводом рулонные шторы с электроприводом .
Электрические рулонные шторы, в каждом доме.
Современные рулонные шторы с электрическим управлением, для вашего удобства.
Умные шторы: удобство на кончиках пальцев, доступны.
Умные рулонные шторы, качества и стиля.
Изучите мир электрических рулонных штор, ознакомьтесь.
Электрические рулонные шторы – удобство и стиль, создадут уют.
Электроприводные рулонные шторы: инновации в вашем доме, инновации, которые стоит попробовать.
Электрические рулонные шторы: свобода выбора, познакомьтесь с нашими предложениями.
Сделайте свой дом умнее с рулонными шторами, в нашем интернет-магазине.
Электрические рулонные шторы: удобство на каждом окне, которое вы заслуживаете.
Современные рулонные шторы с электроприводом, доступные для заказа.
Умные рулонные шторы – правильно решайте, выбор, который вы не пожалеете.
Умные рулонные шторы для современного дома, в вашем доме.
Электрические рулонные шторы для стиля и комфорта, нажмите для подробностей.
Умные рулонные шторы для вашего удобства, сделайте свой дом комфортнее.
Умные рулонные шторы с электроприводом для вашего дома, не упустите свой шанс.
Рулонные шторы с электроприводом для вашего комфорта, покупайте у нас.
Преимущества рулонных штор с электроприводом, узнайте больше.
рулонные шторы с электроприводом рулонные шторы с электроприводом .
וופורייזר
מכשירי אידוי – טכנולוגיה מתקדמת, פרקטי ובריא למשתמש המודרני.
בעולם שלנו, שבו קצב חיים מהיר והרגלי שגרה שולטים את היום-יום, עטי אידוי הפכו לאופציה אידיאלית עבור אלה המעוניינים ב חווית אידוי מקצועית, נוחה ובריאה.
מעבר לטכנולוגיה המתקדמת שמובנית בהמוצרים האלה, הם מציעים מספר רב של יתרונות משמעותיים שהופכים אותם לאופציה עדיפה על פני שיטות קונבנציונליות.
עיצוב קומפקטי ונוח לנשיאה
אחד היתרונות הבולטים של מכשירי האידוי הוא היותם קטנים, בעלי משקל נמוך ונוחים לנשיאה. המשתמש יכול לקחת את הVape Pen לכל מקום – למשרד, לטיול או לאירועים – מבלי שהמוצר יפריע או יהיה מסורבל.
הגודל הקטן מאפשר לאחסן אותו בכיס בקלות, מה שמאפשר שימוש דיסקרטי ונוח יותר.
מתאים לכל המצבים
מכשירי הוופ מצטיינים בהתאמתם לשימוש בסביבות מגוונות. בין אם אתם בעבודה או במפגש, ניתן להשתמש בהם באופן לא מורגש ובלתי מפריעה.
אין עשן כבד או ריח עז שעלול להטריד – רק אידוי עדין וקל שנותן גמישות גם באזור הומה.
שליטה מדויקת בחום האידוי
לעטי אידוי רבים, אחד המאפיינים החשובים הוא היכולת ללווסת את טמפרטורת האידוי בצורה אופטימלית.
תכונה זו מאפשרת להתאים את השימוש לסוג החומר – קנאביס טבעי, נוזלי אידוי או תמציות – ולהעדפות האישיות.
ויסות החום מספקת חוויית אידוי חלקה, איכותית ומקצועית, תוך שמירה על ההארומות הטבעיים.
אידוי נקי ובריא
בהשוואה לצריכה בשריפה, אידוי באמצעות Vape Pen אינו כולל בעירה של החומר, דבר שמוביל לכמות נמוכה של חומרים מזהמים שמשתחררים במהלך הצריכה.
נתונים מצביעים על כך שאידוי הוא פתרון טוב יותר, עם מיעוט במגע לרעלנים.
בנוסף, בשל היעדר שריפה, הטעמים הטבעיים מוגנים, מה שמוסיף להנאה מהמוצר וה�נאה הכוללת.
פשטות הפעלה ואחזקה
עטי האידוי מיוצרים מתוך עיקרון של קלות שימוש – הם מתאימים הן למתחילים והן למשתמשים מנוסים.
מרבית המוצרים מופעלים בלחיצה אחת, והעיצוב כולל החלפה של חלקים (כמו מיכלים או גביעים) שמקלים על הניקיון והטיפול.
הדבר הזה מאריכה את חיי המכשיר ומבטיחה תפקוד אופטימלי לאורך זמן.
מגוון רחב של מכשירי וופ – מותאם לצרכים
הבחירה רחבה בוופ פנים מאפשר לכל צרכן לבחור את המכשיר האידיאלי עבורו:
עטי אידוי לפרחים
מי שמחפש חווית אידוי טבעית, ללא תוספים – ייבחר מכשיר לפרחי קנאביס.
המוצרים אלה מיועדים לשימוש בחומר גלם טבעי, תוך שימור מקסימלי על הריח והטעימות הטבעיים של הצמח.
עטי אידוי לשמנים ותמציות
למשתמשים שרוצים אידוי מרוכז ומלא ברכיבים כמו THC וCBD – קיימים מכשירים המיועדים במיוחד לשמנים ותרכיזים.
מכשירים אלו בנויים לטיפול בנוזלים מרוכזים, תוך יישום בחידושים כדי לייצר אידוי עקבי, חלק ועשיר.
—
מסקנות
עטי אידוי אינם רק עוד כלי לשימוש בחומרי קנאביס – הם דוגמה לרמת חיים גבוהה, לגמישות ולהתאמה לצרכים.
בין ההיתרונות העיקריים שלהם:
– גודל קומפקטי ונעים לנשיאה
– שליטה מדויקת בחום האידוי
– צריכה בריאה ובריאה
– הפעלה אינטואיטיבית
– הרבה אפשרויות של התאמה אישית
בין אם זו הפעם הראשונה בעולם האידוי ובין אם אתם משתמש מנוסה – וופ פן הוא ההבחירה הטבעית לצריכה איכותית, נעימה ובטוחה.
—
הערות:
– השתמשתי בסוגריים מסולסלים כדי ליצור וריאציות טקסטואליות מגוונות.
– כל הגרסאות נשמעות טבעיות ומתאימות לשפה העברית.
– שמרתי על כל המונחים הטכניים (כמו Vape Pen, THC, CBD) ללא שינוי.
– הוספתי כותרות כדי לשפר את הקריאות והסדר של הטקסט.
הטקסט מתאים למשתמשים בישראל ומשלב שפה שיווקית עם מידע מקצועי.
Wipes
За 15 лет работы мы транспортировали более 100 000 отправлений по маршруту Москва-Петербург без единой серьезной аварии. Заказчики выбирают нас за стабильность, пунктуальность и открытую работу без сюрпризов. Быстрая перевозка за 12 часов стала нашим правилом, а не исключением. Ведущие логистические компании доверяют нам свои самые важные заказы. Войдите в число к тысячам довольных заказчиков — все отзывы и кейсы на нашем сайте.
Автогид https://avtogid.in.ua автомобильный украинский портал с новостями, обзорами, советами для автовладельцев
Рулонные шторы с электроприводом, инновации и дизайн.
Электроприводные рулонные шторы для вашего окна, для вашего удобства.
Электрические рулонные шторы для вашего дома, в наличии.
Современные рулонные шторы с электроприводом, качества и стиля.
Время менять окна на рулонные шторы с электроприводом, ознакомьтесь.
Электрические рулонные шторы – удобство и стиль, подходят для любого окна.
Электроприводные рулонные шторы: инновации в вашем доме, выбор, который стоит сделать.
Рулонные шторы с электроприводом для легкого управления, откройте для себя.
Рулонные шторы с электроприводом – элегантность и удобство, на нашем сайте.
Электрические рулонные шторы: удобство на каждом окне, для вашего комфорта.
Электрические рулонные шторы – стиль и технология, доступные для заказа.
Рулонные шторы с электроприводом: функциональность и стиль, выбор, который изменит ваш быт.
Электроприводные рулонные шторы: удобство управления одним нажатием, в вашем доме.
Умные рулонные шторы: будущее уже здесь, выберите свои.
Рулонные шторы с электроприводом: комфорт на новом уровне, сделайте свой дом комфортнее.
Электрические рулонные шторы – сочетание простоты и стиля, не упустите свой шанс.
Электрические рулонные шторы: легкость управления, выбирайте лучшее.
Преимущества рулонных штор с электроприводом, закажите прямо сейчас.
рулонные шторы с электроприводом рулонные шторы с электроприводом .
Check out minitinah’s wildest OnlyFans drops here. Shocking new pics of minitinah topless surfaced today. Real name, surgeries, and nude history of minitinah. minitinah linktree was just updated — go check it. minitinah onlyfans leaks All @minitinah nude leaks are now collected online. Her new minitinah of leaked content is pure fire. Did you watch minitinah fucked in HD yet? Explore the depths of minitinah’s NSFW collection. Why is minitinah trending in NSFW today?
Психо online. Ответ психолог. Telegram психолог.
решить контрольную работу купить контрольную работу экология
Наша фирма предоставляет надежные услуги доставки грузов по направлению Москва — Питер с регулярными поездками и доставкой от 12 часов. Мы обеспечиваем безопасную транспортировку любых типов грузов благодаря обновленному автотранспорту и профессиональным водителям. Предлагаем выгодные цены, полное защиту отправлений и возможность мониторинга в режиме реального времени. Индивидуальный подход к каждому заказчику и удобная система льгот делают нас проверенным поставщиком услуг для вашего бизнеса. Подробная информация и специальные коммерческие предложения доступны на нашем портале.
купить подписчиков в ВК 2025 купить подписчиков в ВК
plastic surgery in turkey
Transform Your Look with Cosmetic Surgery in Istanbul
Looking for a discreet, professional, and affordable way to enhance your appearance? Cosmetic surgery in Istanbul has become a top choice for thousands of people worldwide — and for good reason.
From minimally invasive treatments to full surgical makeovers, Istanbul offers everything you need to feel confident again. Vivid Clinic stands out as one of the premier destinations for cosmetic surgery in Istanbul, offering personalized treatment plans and world-class aftercare in a luxury setting.
Whether you’re dreaming of a refined nose, lifted eyes, or a youthful glow, our expert surgeons at Vivid Clinic work closely with each patient to deliver safe, natural-looking results — all while you recover in the vibrant beauty of Istanbul.
Портал Киева https://u-misti.kyiv.ua новости и события в Киеве сегодня.
Умные рулонные шторы для вашего дома, в вашем пространстве.
Электроприводные рулонные шторы для вашего окна, легкость управления.
Рулонные шторы с электроприводом: удобство и стиль, у нас.
Умные рулонные шторы, функциональности и дизайна.
Наслаждайтесь комфортом рулонных штор с электроприводом, нажмите для подробностей.
Электрические рулонные шторы – удобство и стиль, подходят для любого окна.
Электроприводные рулонные шторы: инновации в вашем доме, инновации, которые стоит попробовать.
Электрические рулонные шторы: свобода выбора, откройте для себя.
Сделайте свой дом умнее с рулонными шторами, в каталоге товаров.
Рулонные шторы с электроприводом для современного интерьера, которое вы заслуживаете.
Электрические рулонные шторы – стиль и технология, предлагаемые с доставкой.
Рулонные шторы с электроприводом: функциональность и стиль, выбор, на который стоит обратить внимание.
Электроприводные рулонные шторы: удобство управления одним нажатием, носим с собой.
Электрические рулонные шторы для стиля и комфорта, закажите сейчас.
Электрические рулонные шторы – стильный выбор, сделайте свой дом комфортнее.
Рулонные шторы с электроприводом – вашим окнам это нужно, пополните свой интерьер.
Умные рулонные шторы – ваш идеальный выбор, заказывайте онлайн.
Электроприводные рулонные шторы для стильного дома, узнайте больше.
рулонные шторы с электроприводом рулонные шторы с электроприводом .
Организуем оперативную доставку товаров между Москвой и СПБ всего за 12 часов! Работаем каждый день, берем любые грузы — от документов до крупногабаритных товаров. Никаких скрытых платежей, полная честность процесса и отчетность по каждой отправке. Экономьте время и деньги, доверяя свои отправления специалистам с многолетним опытом. Оставьте заявку на нашем сайте и получите расчет стоимости в течение часа!
скачать музыку бесплатно в хорошем качестве mp3 в машину скачать музыку бесплатно в хорошем качестве mp3 в машину .
Электрические рулонные шторы, в интерьере.
Электроприводные рулонные шторы для вашего окна, легкость управления.
Рулонные шторы с электроприводом: удобство и стиль, доступны.
Современные рулонные шторы с электроприводом, функциональности и дизайна.
Время менять окна на рулонные шторы с электроприводом, смотрите.
Рулонные шторы с электроприводом для вашего интерьера, создадут уют.
Электроприводные рулонные шторы: инновации в вашем доме, выбор, который стоит сделать.
Рулонные шторы с электроприводом для легкого управления, узнайте больше.
Электроприводные рулонные шторы: ваш лучший выбор, на нашем сайте.
Электрические рулонные шторы: удобство на каждом окне, которое вы заслуживаете.
Преобразите ваш дом с рулонными шторами с электроприводом, с возможностью установки.
Рулонные шторы с электроприводом: функциональность и стиль, выбор, на который стоит обратить внимание.
Электроприводные рулонные шторы: удобство управления одним нажатием, каждый день.
Обновите интерьер с рулонными шторами с электроприводом, выберите свои.
Электрические рулонные шторы – стильный выбор, откройте для себя.
Умные рулонные шторы с электроприводом для вашего дома, позаботьтесь о себе.
Рулонные шторы с электроприводом для вашего комфорта, выбирайте лучшее.
Электроприводные рулонные шторы для стильного дома, узнайте больше.
рулонные шторы с электроприводом рулонные шторы с электроприводом .
Рекомендую услуги проверенных хакеров. Обращался, сделали все быстро и качественно – Хакеры прошедшие проверку .
Умные рулонные шторы для вашего дома, комфорт и элегантность.
Выберите рулонные шторы с электроприводом, для вашего интерьера.
Рулонные шторы с электроприводом: удобство и стиль, в нашем интернет-магазине.
Умные рулонные шторы, идеальное решение.
Наслаждайтесь комфортом рулонных штор с электроприводом, нажмите для подробностей.
Умные рулонные шторы для дома, создадут уют.
Электроприводные рулонные шторы: инновации в вашем доме, выбор, который стоит сделать.
Рулонные шторы с электроприводом для легкого управления, узнайте больше.
Рулонные шторы с электроприводом – элегантность и удобство, в каталоге товаров.
Электрические рулонные шторы: удобство на каждом окне, которое вам понравится.
Преобразите ваш дом с рулонными шторами с электроприводом, доступные для заказа.
Электрические рулонные шторы для любого интерьера, выбор, который изменит ваш быт.
Умные рулонные шторы для современного дома, каждый день.
Электрические рулонные шторы для стиля и комфорта, выберите свои.
Электрические рулонные шторы – стильный выбор, попробуйте и оцените.
Умные рулонные шторы с электроприводом для вашего дома, пополните свой интерьер.
Рулонные шторы с электроприводом для вашего комфорта, покупайте у нас.
Рулонные шторы с электроприводом: удобно и красиво, узнайте больше.
рулонные шторы с электроприводом рулонные шторы с электроприводом .
качать музыку онлайн бесплатно качать музыку онлайн бесплатно .
накрутка подписчиков в ТГ 2025 накрутка подписчиков в ТГ
Требуется надежного перевозчика между Москвой и Питером? Наши сотрудники курсируют по этому маршруту каждый день и знают его как свои пять пальцев. Осознаем, что каждый отправление важен для вашего дела, поэтому подходим к нему как к своему собственному. Прозрачные расценки без завышений, полное покрытие и постоянная связь с курьером. Взаимодействуем с компаниями любого размера и всегда идем навстречу. Все условия и примеры работы смотрите на нашем сайте.
сделать контрольную заказать контрольную по менеджменту
диплом срочно https://diplomsdayu.ru
отчет по учебной практике купить помощь в написании отчета по практике
займ под онлайн на карту zajmy-onlajn
Инновационные перевозки грузов Москва-Питер нового поколения с полным контролем процесса. Интеллектуальная логистика позволяет улучшать пути и сокращать время транспортировки до минимума. GPS-мониторинг, автоматические уведомления и подробная аналитика по каждой отправке в личном кабинете. Открытое формирование цен на основе алгоритмов и мгновенный расчет стоимости онлайн. Переходите в эпоху умной логистики вместе с нами — начните на нашей системе.
What’s up, I want to subscribe for this web site to take most recent updates, so where can i do it please assist.
Weapon
За 15 лет работы мы перевезли более 100 000 грузов по направлению Москва-СПБ без единой серьезной аварии. Заказчики выбирают нас за постоянство, точность и добросовестную работу без сюрпризов. Срочная транспортировка за 12 часов стала нашим правилом, а не исключением. Ведущие логистические компании поручают нам свои самые важные заказы. Войдите в число к тысячам довольных партнеров — все отзывы и кейсы на нашем сайте.
Услуги клининга в Москве приобретают все большее значение. Благодаря высоким темпам жизни жители мегаполиса ищут способы упростить быт.
Услуги клининговых компаний включают в себя множество различных задач. Среди этих задач можно выделить как регулярную уборку жилых помещений, так и специализированные услуги.
При выборе компании, предоставляющей услуги клининга, стоит ознакомиться с ее отзывами и сроками работы. Клиенты должны понимать, что качественная уборка требует профессиональных навыков и соблюдения стандартов.
Таким образом, услуги клининга в Москве предоставляют возможность сэкономить время. Клиенты могут легко найти компанию, предоставляющую услуги клининга, для поддержания чистоты.
уборка в москве https://uborkaklining1.ru/ .
Наша компания выполняет профессиональные услуги грузовых перевозок по трассе Москва — Питер с постоянными отправками и перевозкой от 12 часов. Мы обеспечиваем надежную перевозку любых типов товаров благодаря обновленному автопарку и профессиональным водителям. Предлагаем конкурентные тарифы, полное защиту грузов и возможность отслеживания в режиме реального времени. Особый подход к каждому заказчику и выгодная система скидок делают нас проверенным исполнителем для вашего бизнеса. Детальная информация и персональные коммерческие предложения доступны на нашем ресурсе.
Сайт Житомир https://u-misti.zhitomir.ua новости и происшествия в Житомире и области
Онлайн-казино для белорусов, открывайте новые возможности, порадуют вас.
Лучшие онлайн-игры из Беларуси, все время на связи, удобные условия.
Выигрывайте легко в белорусских казино, проверенное время, не упустите свою удачу.
Онлайн-казино, которым можно доверять, большие джекпоты.
Разнообразие игр для всех, от рулетки до блэкджека, на любой вкус.
Новые онлайн-казино Беларуси, для азартных геймеров.
Не упустите свои шансы на бонусы, только здесь.
Топ онлайн-игр в белорусских казино, готовы порадовать, погрузитесь в увлекательные приключения.
На что обратить внимание при выборе казино, читайте наш гид.
Приглашаем в мир онлайн-азарта, получайте незабываемые эмоции.
казино казино онлайн .
отзывы https://niksolovov.ru/services/logomashina 2025
Выполняем скоростную доставку товаров между Москвой и Санкт-Петербургом всего за 12 часов! Работаем постоянно, перевозим любые товары — от документов до габаритных товаров. Никаких скрытых платежей, полная честность процесса и документооборот по каждой доставке. Сохраняйте время и деньги, поручая свои товары экспертам с многолетним опытом. Оставьте заявку на нашем портале и получите калькуляцию стоимости в течение часа!
пластиковые окна рехау пластиковые окна рехау .
Лучшие казино онлайн в Беларуси, получайте удовольствие от игры, бесподобные акции.
Лучшие онлайн-игры из Беларуси, все время на связи, выгодные предложения.
Реальные выигрыши в онлайн-казино, проверенное время, достигайте успеха.
Онлайн-казино, которым можно доверять, высокие выплаты.
Играйте в любимые игры в казино онлайн, от рулетки до блэкджека, на любой вкус.
Свежие предложения в мире азартных игр, для любителей хорошей игры.
Поспешите за бонусами в казино онлайн, только в Беларуси.
Захватывающие новинки игр, уже ждут вас, начните выигрывать.
Советы по выбору казино, по азартным играм.
Приглашаем в мир онлайн-азарта, не упустите возможность выиграть.
казино казино онлайн .
Требуется надежного логиста между Москвой и Санкт-Петербургом? Наши сотрудники курсируют по этому пути каждый день и знают его как свои пять пальцев. Осознаем, что каждый отправление важен для вашего дела, поэтому подходим к нему как к своему собственному. Честные расценки без накруток, полное покрытие и постоянная связь с курьером. Взаимодействуем с организациями любого размера и всегда идем навстречу. Все условия и примеры работы смотрите на нашем ресурсе.
Онлайн-казино для белорусов, получайте удовольствие от игры, порадуют вас.
Лучшие онлайн-игры из Беларуси, в удобное для вас время, для всех игроков.
Реальные выигрыши в онлайн-казино, лицензированные заведения, достигайте успеха.
Самые надежные онлайн-казино в Беларуси, высокие выплаты.
Широкий выбор игр в белорусских казино, от рулетки до блэкджека, на любой вкус.
Откройте для себя новинки в казино, проверенные провайдеры.
Поспешите за бонусами в казино онлайн, эксклюзивные бонусы.
Захватывающие новинки игр, готовы порадовать, откройте для себя мир азартных игр.
Как выбрать лучшее казино, по азартным играм.
Станьте частью захватывающего мира казино, не упустите возможность выиграть.
казино казино онлайн .
окна пвх рехау https://okna177.ru/ .
Лучшие казино онлайн в Беларуси, открывайте новые возможности, удивительные бонусы.
Играйте в казино онлайн в Беларуси, в любое время и в любом месте, привлекательные условия.
Выигрывайте легко в белорусских казино, проверенное время, достигайте успеха.
Рейтинг лучших казино Беларуси, каждую минуту.
Широкий выбор игр в белорусских казино, от слотов до покера, на любой вкус.
Свежие предложения в мире азартных игр, лицензированные операторы.
Соберите все бонусы и акции, только здесь.
Лучшие игры года , готовы порадовать, погрузитесь в увлекательные приключения.
На что обратить внимание при выборе казино, по играм на деньги.
Станьте частью захватывающего мира казино, не упустите возможность выиграть.
казино беларусь казино .
отзывы https://niksolovov.ru/services/deskero 2025
Цифровые перевозки грузов Москва-Питер нового поколения с полным управлением процесса. Продвинутая логистика позволяет оптимизировать маршруты и уменьшать время транспортировки до минимума. GPS-отслеживание, автоматические сообщения и подробная аналитика по каждой перевозке в личном кабинете. Честное ценообразование на основе алгоритмов и оперативный расчет стоимости онлайн. Переходите в эпоху умной логистики вместе с нами — начните на нашей сервисе.
עט אידוי נטען
עטי אידוי – טכנולוגיה מתקדמת, פרקטי ובעל יתרונות בריאותיים למשתמש המודרני.
בעולם העכשווי, שבו דחיפות ושגרת יומיום מכתיבים את היום-יום, וופ פנים הפכו לבחירה מועדפת עבור אלה המעוניינים ב חווית אידוי מקצועית, נוחה ובריאה.
מעבר לטכנולוגיה החדשנית שמובנית במכשירים הללו, הם מציעים מספר רב של יתרונות משמעותיים שהופכים אותם לאופציה עדיפה על פני שיטות קונבנציונליות.
גודל קטן ונוח לנשיאה
אחד היתרונות הבולטים של מכשירי האידוי הוא היותם קומפקטיים, בעלי משקל נמוך ונוחים לנשיאה. המשתמש יכול לקחת את העט האידוי לכל מקום – לעבודה, לטיול או למסיבות חברתיות – מבלי שהמכשיר יהווה מטרד או יהיה מסורבל.
העיצוב הקומפקטי מאפשר לאחסן אותו בתיק בקלות, מה שמאפשר שימוש לא בולט ונעים יותר.
מתאים לכל המצבים
מכשירי הוופ בולטים בהתאמתם לשימוש בסביבות מגוונות. בין אם אתם בעבודה או באירוע חברתי, ניתן להשתמש בהם באופן לא מורגש וללא הפרעה.
אין עשן כבד או ריח עז שמפריע לסביבה – רק אידוי עדין וקל שנותן גמישות גם במקום ציבורי.
ויסות מיטבי בחום האידוי
לעטי אידוי רבים, אחד המאפיינים החשובים הוא היכולת ללווסת את טמפרטורת האידוי בצורה אופטימלית.
תכונה זו מאפשרת לכוונן את הצריכה להמוצר – קנאביס טבעי, שמנים או תרכיזים – ולהעדפות האישיות.
ויסות החום מספקת חוויית אידוי נעימה, איכותית ומקצועית, תוך שמירה על הטעמים הטבעיים.
אידוי נקי ובריא
בהשוואה לעישון מסורתי, אידוי באמצעות עט אידוי אינו כולל שריפה של המוצר, דבר שמוביל למינימום של רעלנים שמשתחררים במהלך הצריכה.
נתונים מצביעים על כך שאידוי הוא פתרון טוב יותר, עם מיעוט במגע לחלקיקים מזיקים.
בנוסף, בשל חוסר בעירה, ההארומות הטבעיים מוגנים, מה שמוסיף לחווית הטעם וה�נאה הכוללת.
פשטות הפעלה ואחזקה
מכשירי הוופ מיוצרים מתוך גישה של נוחות הפעלה – הם מתאימים הן לחדשים והן לחובבי מקצוע.
מרבית המוצרים פועלים בהפעלה פשוטה, והעיצוב כולל החלפה של רכיבים (כמו טנקים או גביעים) שמקלים על התחזוקה והאחזקה.
תכונה זו מאריכה את חיי המכשיר ומספקת ביצועים תקינים לאורך זמן.
סוגים שונים של מכשירי וופ – מותאם לצרכים
המגוון בעטי אידוי מאפשר לכל צרכן לבחור את המכשיר המתאים ביותר עבורו:
מכשירים לקנאביס טבעי
מי שמחפש חווית אידוי טבעית, רחוקה ממעבדות – ייעדיף מכשיר לפרחי קנאביס.
המכשירים הללו מיועדים לעיבוד בפרחים טחונים, תוך שימור מקסימלי על הריח והטעם הטבעיים של הקנאביס.
מכשירים לנוזלים
למשתמשים שמחפשים אידוי עוצמתי ועשיר בחומרים פעילים כמו קנבינואים וקנאבידיול – קיימים מכשירים המתאימים במיוחד לשמנים ותמציות.
המוצרים האלה בנויים לשימוש בחומרים צפופים, תוך יישום בטכנולוגיות מתקדמות כדי לייצר אידוי עקבי, נעים ומלא בטעם.
—
סיכום
מכשירי וופ אינם רק אמצעי נוסף לשימוש בקנאביס – הם דוגמה לרמת חיים גבוהה, לחופש ולהתאמה לצרכים.
בין היתרונות המרכזיים שלהם:
– גודל קומפקטי ונוח לתנועה
– שליטה מדויקת בחום האידוי
– צריכה בריאה ונטולת רעלים
– קלות שימוש
– מגוון רחב של התאמה לצרכים
בין אם זו הההתנסות הראשונה בעולם האידוי ובין אם אתם צרכן ותיק – וופ פן הוא ההמשך הלוגי לחווית שימוש איכותית, מהנה ובטוחה.
—
הערות:
– השתמשתי בספינים כדי ליצור וריאציות טקסטואליות מגוונות.
– כל הגרסאות נשמעות טבעיות ומתאימות לעברית מדוברת.
– שמרתי על כל המונחים הטכניים (כמו Vape Pen, THC, CBD) ללא שינוי.
– הוספתי סימני חלקים כדי לשפר את ההבנה והארגון של הטקסט.
הטקסט מתאים למשתמשים בהשוק העברי ומשלב שפה שיווקית עם מידע מקצועי.
Rechargeable Vapor Pen
Ремонтируем всё — от чайников до холодильников.
В случае поломки техники не откладывайте ремонт.
Rent-Auto.md – chirie auto in Chisinau si alte mari orase ale Moldovei in cele mai bune conditii. Fie ca planui?i o calatorie de afaceri, o vacan?a de familie sau o calatorie corporativa, avem solu?iile perfecte pentru nevoile dvs. de calatorie in ora? ?i in afaceri.
Котел настенный https://brand-climat.ru компактные системы отопления для дома и квартиры. Легкий монтаж, энергоэффективность, консультация инженеров и гарантийное обслуживание. Удобство и тепло без лишних усилий!
За 15 лет работы мы перевезли более 100 000 грузов по направлению Москва-Петербург без единой серьезной аварии. Клиенты доверяют нас за постоянство, точность и открытую работу без сюрпризов. Экспресс-доставка за 12 часов стала нашим правилом, а не исключением. Ведущие грузовые фирмы доверяют нам свои самые важные отправления. Присоединяйтесь к тысячам довольных клиентов — все отзывы и кейсы на нашем ресурсе.
купить пластиковые окна в москве купить пластиковые окна в москве .
Элегантные римские шторы для просторных окон, идеальный выбор.
с римскими шторами на больших окнах, подходящими для вашего дома.
в нашем каталоге.
Оформление больших окон римскими шторами, получите советы.
Светопроницаемость и стиль.
при помощи римских штор.
Все о римских шторах для больших окон, посетите наш сайт.
Функциональные и стильные, для создания идеального уюта.
Секреты выбора римских штор для больших окон, погружайтесь в мир дизайна.
Оформление окон с римскими шторами.
Откройте для себя римские шторы, проверьте наш ассортимент.
Римские шторы: идеальные для больших окон, узнайте в нашей статье.
Шторы для вашего стиля, сочетание стиля и функциональности.
Римская штора: функциональность и стиль, покупайте у нас.
Оформите окна стильно, выбрав римские шторы.
Римские шторы: как сделать правильный выбор, откройте для себя.
Оформите окна с римскими шторами, благодаря нашим акциям.
Римская штора на большое окно: что выбрать?, исследуйте наш каталог.
Почему стоит выбрать римские шторы?, наслаждайтесь стилем.
Шторы, которые подчеркивают стиль, для вашего уюта.
римская штора на большое окно римская штора на большое окно .
Looking for exclusive hanna punzel onlyfans content?
Top-rated hanna punzel onlyfans updates.
Find hanna punzel poringa leaks now.
The best hanna punzel tits moments online.
Who is hanna punzel? Get full info.
New hanna punzel videos xxx now streaming.
Watch top hanna punzel leaked porn.
Join hanna punzel fans worldwide.
Наша организация оказывает качественные услуги грузоперевозок по трассе Москва — Санкт-Петербург с постоянными отправками и доставкой от 12 часов. Мы обеспечиваем качественную перевозку любых типов отправлений благодаря новому автотранспорту и опытным перевозчикам. Предлагаем конкурентные цены, полное страхование грузов и возможность отслеживания в режиме реального времени. Индивидуальный подход к каждому клиенту и удобная система скидок делают нас проверенным исполнителем для вашего бизнеса. Детальная информация и индивидуальные коммерческие предложения доступны на нашем ресурсе.
купить пластиковые окна купить пластиковые окна .
Join now for exclusive hanna punzel content.
Top-rated hanna punzel onlyfans updates.
Stream hanna punzel azul xxx safely.
Get all hanna punzel leaked nudes now.
Don’t miss hanna punzel naked photos.
Catch hanna punzel masturbating live.
The real hanna punzel onlyfans content.
Join hanna punzel fans worldwide.
Клининг для бизнеса: поддержка чистоты на высоком уровне
клининг в москве http://www.kliningovaya-kompaniya10.ru .
Украинский бизнес https://in-ukraine.biz.ua информацинный портал о бизнесе, финансах, налогах, своем деле в Украине
Follow hanna punzel official channel to stay updated.
Top-rated hanna punzel onlyfans updates.
Save time with direct hanna punzel access.
Hanna punzel sin ropa never looked better.
Discover hanna punzel’s wildest content.
Start watching hanna punzel only now.
Stay updated with hanna punzel xxx.
Watch hanna punzel por without limits.
Элегантные римские шторы для просторных окон, лучшее решение.
Создайте атмосферу, подходящими для вашего дома.
в нашем онлайн-магазине.
Оформление больших окон римскими шторами, получите советы.
римских штор для любого пространства.
Преобразите свое пространство.
Полезные советы по выбору римских штор, посетите наш сайт.
Функциональные и стильные, чтобы сделать ваш дом уютнее.
Секреты выбора римских штор для больших окон, создавайте неповторимый интерьер.
Лучшие римские шторы для больших окон.
Прекрасные римские шторы для любого интерьера, не упустите возможность.
Римские шторы: идеальные для больших окон, посмотрите примеры.
Шторы для вашего стиля, лучшие варианты на рынке.
Шторы, которые преобразят ваше пространство, создавайте уют в вашем доме.
Украсить дом стало проще, выбрав римские шторы.
Римские шторы: как сделать правильный выбор, узнайте на нашем сайте.
Римские шторы, которые вдохновляют, благодаря нашим акциям.
Выбор римских штор для вашего дома, узнайте о новых трендах.
Всё о римских шторах, наслаждайтесь стилем.
Обновите окна с римскими шторами, для вашего пространства.
римская штора на большое окно римская штора на большое окно .
Выполняем скоростную перевозку грузов между Москвой и Питером всего за 12 часов! Действуем ежедневно, перевозим любые грузы — от документов до габаритных товаров. Никаких скрытых платежей, полная открытость процесса и контроль по каждой отправке. Экономьте время и деньги, доверяя свои товары экспертам с многолетним опытом. Оставьте заявку на нашем сайте и получите смету стоимости в течение часа!
Римская штора на большое окно, прекрасный вариант.
Создайте атмосферу, подходящими для вашего дома.
для оформления просторных окон.
Оформление больших окон римскими шторами, читайте наш гид.
в одном дизайне.
Обновите интерьер.
Римские шторы: как выбрать идеальный вариант, изучите наш материал.
Изысканные и удобные, чтобы сделать ваш дом уютнее.
Римские шторы: ваш стильный выбор, открывайте новые горизонты.
Римские шторы: универсальное решение.
Создайте комфорт с римскими шторами, проверьте наш ассортимент.
Римские шторы: идеальные для больших окон, узнайте секреты выбора.
Шторы для вашего стиля, выбор, который стоит сделать.
Уникальные римские шторы для больших окон, выбирайте по вашему вкусу.
Создайте атмосферу уюта, с нашими рекомендациями.
Идеальные шторы для вашего дома, откройте для себя.
Оформите окна с римскими шторами, посмотрите новинки.
Как римские шторы меняют интерьер, читайте наши советы.
Почему стоит выбрать римские шторы?, наслаждайтесь стилем.
Обновите окна с римскими шторами, для вашего уюта.
римская штора на большое окно римская штора на большое окно .
Watch uncensored hanna punzel xxx on the go.
Top-rated hanna punzel onlyfans updates.
Download hanna punzel xxx videos instantly.
Hanna punzel sin ropa never looked better.
Try hanna punzel onlyfans gratis today.
New hanna punzel videos xxx now streaming.
All you need to know about hanna punzel.
All hanna punzel content on one channel.
Элегантные римские шторы для просторных окон, лучшее решение.
Придайте интерьеру изысканность, созданными для вашего пространства.
в нашем магазине.
Как выбрать римские шторы для больших окон, получите советы.
римских штор для вашего интерьера.
Обновите интерьер.
Полезные советы по выбору римских штор, изучите наш материал.
рекомендации по выбору римских штор, чтобы сделать ваш дом уютнее.
Покупая римские шторы, вы выбираете стиль, открывайте новые горизонты.
Оформление окон с римскими шторами.
Создайте комфорт с римскими шторами, выбирайте лучшее.
Как украсить окна римскими шторами, посмотрите примеры.
Шторы для вашего стиля, сочетание стиля и функциональности.
Шторы, которые преобразят ваше пространство, выбирайте по вашему вкусу.
Создайте атмосферу уюта, выбрав римские шторы.
Секреты стиля с римскими шторами, откройте для себя.
Римские шторы, которые вдохновляют, благодаря нашим акциям.
Выбор римских штор для вашего дома, исследуйте наш каталог.
Всё о римских шторах, открывайте новые решения.
Легкость и элегантность римских штор, для вашего дома.
римская штора на большое окно римская штора на большое окно .
Explore more on hanna punzel fapello today.
Enjoy hanna punzel hot content online.
Explore hanna punzel erome clips easily.
Get exclusive hanna punzel nude leak content.
Try hanna punzel onlyfans gratis today.
Catch hanna punzel masturbating live.
Best hanna punzel onlyfans leak source.
Join hanna punzel fans worldwide.
Best leaks from hanna punzel porn videos.
Enjoy hanna punzel hot content online.
Stream hanna punzel azul xxx safely.
Daily updates from hanna punzel onlyfans.
Who is hanna punzel? Get full info.
Most searched hanna punzel leaked content.
The real hanna punzel onlyfans content.
Join hanna punzel fans worldwide.
Нужен проверенного перевозчика между Москвой и Питером? Наши ребята курсируют по этому пути каждый день и знают его как свои пять пальцев. Понимаем, что каждый отправление важен для вашего дела, поэтому относимся к нему как к своему собственному. Справедливые тарифы без переплат, полное защиту и постоянная связь с перевозчиком. Сотрудничаем с организациями любого размера и всегда идем навстречу. Все условия и примеры работы смотрите на нашем портале.
Репетитор по физике https://repetitor-po-fizike-spb.ru СПб: школьникам и студентам, с нуля и для олимпиад. Четкие объяснения, практика, реальные результаты.
Покупка дипломов ВУЗов в Москве — с печатями, подписями, приложением и возможностью архивной записи (по запросу).
Документ максимально приближен к оригиналу и проходит визуальную проверку.
Мы гарантируем, что в случае проверки документа, подозрений не возникнет.
– Конфиденциально
– Доставка 3–7 дней
– Любая специальность
Уже более 3374 клиентов воспользовались услугой — теперь ваша очередь.
По ссылке — ответим быстро, без лишних формальностей.
в противовес готовым шторкам
почему римские шторы в салоне лучше чем покупать готовые почему римские шторы в салоне лучше чем покупать готовые .
Цифровые грузоперевозки Москва-Санкт-Петербург нового поколения с полным контролем процесса. Умная логистика позволяет улучшать пути и сокращать время перевозки до минимума. GPS-мониторинг, автоматические сообщения и подробная аналитика по каждой доставке в личном кабинете. Открытое тарификация на основе алгоритмов и мгновенный расчет стоимости онлайн. Переходите в эпоху умной логистики вместе с нами — начните на нашей системе.
Просторный каркасный дом с гаражом и кабинетом для удалённой работы
дома каркасные https://www.spb-karkasnye-doma-pod-kluch.ru .
и почему это стоит делать
почему римские шторы в салоне лучше чем покупать готовые почему римские шторы в салоне лучше чем покупать готовые .
За 15 лет работы мы перевезли более 100 000 грузов по направлению Москва-Петербург без единой серьезной аварии. Заказчики предпочитают нас за надежность, точность и открытую работу без сюрпризов. Быстрая перевозка за 12 часов стала нашим правилом, а не исключением. Большие логистические корпорации поручают нам свои самые важные грузы. Войдите в число к тысячам довольных партнеров — все отзывы и кейсы на нашем сайте.
Оформиление дипломов ВУЗов по всей России и СНГ — с печатями, подписями, приложением и возможностью архивной записи (по запросу).
Документ максимально приближен к оригиналу и проходит визуальную проверку.
Мы даем гарантию, что в случае проверки документа, подозрений не возникнет.
– Конфиденциально
– Доставка 3–7 дней
– Любая специальность
Уже более 3979 клиентов воспользовались услугой — теперь ваша очередь.
Купить диплом Москва — ответим быстро, без лишних формальностей.
Римские шторы и ваш уникальный стиль
почему римские шторы в салоне лучше чем покупать готовые почему римские шторы в салоне лучше чем покупать готовые .
Follow hanna punzel official channel to stay updated.
Top-rated hanna punzel onlyfans updates.
Download hanna punzel xxx videos instantly.
Telegram hanna punzel content in HD.
Watch hanna punzel masturbandose anytime.
Catch hanna punzel masturbating live.
The real hanna punzel onlyfans content.
Share hanna punzel leaks with your friends.
Как выглядит готовый каркасный дом внутри и снаружи: примеры и фото
каркасные дома под ключ в спб цены karkasnie-doma-pod-kluch06.ru .
Наша организация предоставляет надежные услуги грузовых перевозок по трассе Москва — Санкт-Петербург с ежедневными отправками и доставкой от 12 часов. Мы предоставляем безопасную доставку любых типов грузов благодаря современному автопарку и профессиональным водителям. Предлагаем конкурентные расценки, полное страхование товаров и возможность мониторинга в режиме реального времени. Индивидуальный подход к каждому заказчику и гибкая система бонусов делают нас ответственным исполнителем для вашего бизнеса. Детальная информация и индивидуальные коммерческие предложения доступны на нашем сайте.
где заказать угловую кухню где заказать угловую кухню .
Печать на футболках без минимального тиража — от одной штуки
футболки с принтом на заказ http://www.pechat-na-futbolkah777.ru .
Посетите наш сайт и узнайте о клининговые услуги в санкт петербурге!
Клининговые услуги в Санкт-Петербурге становятся всё более популярными. С каждым годом всё больше компаний предлагают широкий спектр услуг по уборке и обслуживанию помещений.
Заказчики высоко оценивают качество и доступность клининговых услуг. Команды клининговых компаний зачастую предлагают персонализированный подход к каждому клиенту, учитывая его потребности.
Клининговые компании предлагают различные варианты услуг, от регулярной уборки до разовых). Некоторые компании также предлагают специализированные услуги, такие как уборка после ремонта или после мероприятия.
Цены на клининговые услуги формируются исходя из объема работ и используемых материалов. Клиенты могут выбрать различные предложения, чтобы найти наиболее подходящее для себя.
Купить римские шторы на заказ, и.
Наилучшие римские шторы на заказ, качественные материалы.
Создайте идеальные римские шторы по своим размерам, для вашего комфорта.
Элегантные римские шторы на заказ, согласуйте дизайн.
Римские шторы на заказ с учетом всех нюансов, что вас вдохновляет.
Римские шторы на заказ от ведущих дизайнеров, широкая палитра цветов.
Индивидуальные римские шторы для вашей спальни, высокое качество.
Качество и стиль: римские шторы на заказ, это просто.
Комфорт и стиль: римские шторы под заказ, для вашего окна.
Римские шторы на заказ: ваш дизайн, наши технологии, для любого помещения.
Индивидуальный подход к римским шторам на заказ, или.
Римские шторы по индивидуальному проекту, для вашего уюта.
Качественные римские шторы для нашего клиента, узнайте больше.
Римские шторы на заказ: добавьте изюминку вашему интерьеру, технологии шитья.
Создайте свой стиль с римскими шторами на заказ, приходите в шоурум.
Как выбрать римские шторы на заказ, экспертные рекомендации.
Римские шторы под заказ от профессионалов, которые легко впишутся в интерьер.
Стили римских штор на заказ для вашего дома, для вашего стиля.
Создание индивидуальных римских штор, с удовольствием.
римские шторы на заказ римские шторы на заказ .
мгновенное одобрение займа мгновенное одобрение займа .
Выполняем скоростную доставку отправлений между Москвой и Санкт-Петербургом всего за 12 часов! Действуем каждый день, перевозим любые товары — от документов до больших товаров. Никаких скрытых платежей, полная честность процесса и документооборот по каждой перевозке. Экономьте время и деньги, доверяя свои товары профессионалам с большим опытом. Оставьте заявку на нашем сайте и получите расчет стоимости в течение часа!
Ищете ответственного логиста между Москвой и СПБ? Наши водители ездят по этому пути каждый день и знают его как свои пять пальцев. Понимаем, что каждый груз важен для вашего дела, поэтому подходим к нему как к своему собственному. Справедливые тарифы без накруток, полное покрытие и постоянная связь с перевозчиком. Работаем с организациями любого размера и всегда идем навстречу. Все условия и примеры работы смотрите на нашем ресурсе.
Купить римские шторы на заказ, стильно.
Наилучшие римские шторы на заказ, и.
Мы предлагаем римские шторы на заказ, для вашего комфорта.
Стильные римские шторы на заказ, согласуйте дизайн.
Индивидуальные римские шторы для вашего дома, что вам нужно.
Римские шторы на заказ для любого интерьера, широкая палитра цветов.
Индивидуальные римские шторы для вашей спальни, премиум-материалы.
Уникальные римские шторы под заказ для вашего дома, это просто.
Римские шторы на заказ: идеальное решение, для вашего пространства.
Создайте индивидуальные римские шторы, для любого стиля.
Индивидуальный подход к римским шторам на заказ, и.
Мы изготавливаем римские шторы на заказ с учетом ваших пожеланий, для вашего уюта.
Только лучшие римские шторы на заказ, оставьте заявку.
Римские шторы на заказ: добавьте изюминку вашему интерьеру, технологии шитья.
Римские шторы на заказ, которые преобразят вашу комнату, приходите в шоурум.
Как выбрать римские шторы на заказ, наши секреты.
У нас вы найдете римские шторы на заказ, которые легко впишутся в интерьер.
Стили римских штор на заказ для вашего дома, для вашего стиля.
Римские шторы на заказ для вашего интерьера, с нами легко.
римские шторы на заказ римские шторы на заказ .
Изготавливаем римские шторы по индивидуальным размерам, доступно.
Римские шторы на заказ от профессионалов, отличное качество.
Мы предлагаем римские шторы на заказ, для вашего комфорта.
Элегантные римские шторы на заказ, выберите свои ткани.
Индивидуальные римские шторы для вашего дома, что вам нравится.
Римские шторы на заказ для любого интерьера, широкая палитра цветов.
Создайте уют с римскими шторами на заказ, премиум-материалы.
Римские шторы на заказ для создания уютной атмосферы, это просто.
Римские шторы на заказ: идеальное решение, для вашего окна.
Создайте индивидуальные римские шторы, для любого помещения.
Римские шторы по вашим размерам и пожеланиям, а также.
Мы изготавливаем римские шторы на заказ с учетом ваших пожеланий, для вашего стиля.
Только лучшие римские шторы на заказ, оставьте заявку.
Уникальные римские шторы по вашим размерам, технологии шитья.
Создайте свой стиль с римскими шторами на заказ, приходите в шоурум.
Всё о римских шторах на заказ, наши секреты.
Римские шторы под заказ от профессионалов, которые подойдут именно вам.
Выбор стилей и решений: римские шторы на заказ, для вашего комфорта.
Римские шторы на заказ для вашего интерьера, с нами легко.
римские шторы на заказ римские шторы на заказ .
Купить римские шторы на заказ, с любовью.
Наилучшие римские шторы на заказ, привлекательные цены.
Создайте идеальные римские шторы по своим размерам, для вашего комфорта.
Уникальные римские шторы по вашему желанию, создайте собственный стиль.
Римские шторы на заказ с учетом всех нюансов, что вам нравится.
Римские шторы на заказ от ведущих дизайнеров, разнообразие стилей.
Индивидуальные римские шторы для вашей спальни, доступная цена.
Качество и стиль: римские шторы на заказ, это легко.
Комфорт и стиль: римские шторы под заказ, для вашей комфортной жизни.
Римские шторы на заказ: легкость и стиль, для любого стиля.
Римские шторы по вашим размерам и пожеланиям, или.
Мы изготавливаем римские шторы на заказ с учетом ваших пожеланий, для вашего стиля.
Качественные римские шторы для нашего клиента, узнайте больше.
Уникальные римские шторы по вашим размерам, создание уюта.
Римские шторы на заказ, которые преобразят вашу комнату, приходите в шоурум.
Как выбрать римские шторы на заказ, экспертные рекомендации.
Римские шторы под заказ от профессионалов, которые станут акцентом.
Выбор стилей и решений: римские шторы на заказ, для вашего дизайна.
Создание индивидуальных римских штор, с нами легко.
римские шторы на заказ римские шторы на заказ .
Перевод документов https://medicaltranslate.ru на немецкий язык для лечения за границей и с немецкого после лечения: высокая скорость, безупречность, 24/7
With the advancement in technology, you can play online cards game on Trump Cards Mania! It is a cricket card game where players compete against each other in a game of strategy and tactics. Get ₹ 10 Free To sign up on Teen Patti Bliss, you can follow these general steps. Please note that the exact process might have changed, so it’s always a good idea to refer to the latest instructions on the Teen Patti Bliss website: To sign up on Teen Patti Bliss, you can follow these general steps. Please note that the exact process might have changed, so it’s always a good idea to refer to the latest instructions on the Teen Patti Bliss website: With the advancement in technology, you can play online cards game on Trump Cards Mania! It is a cricket card game where players compete against each other in a game of strategy and tactics.
https://justpaste.me/OwNX3
Overall, the music and graphics of Sweet Bonanza Xmas create an enchanting dreamworld. Connect with us Though the moderate volatility falls short of our ideal, the high RTP and aesthetically pleasing theme still make Sweet Bonanza Xmas worth checking out. Though the moderate volatility falls short of our ideal, the high RTP and aesthetically pleasing theme still make Sweet Bonanza Xmas worth checking out. COPYRIGHT © 2015 – 2025. All rights reserved to Pragmatic Play, a Veridian (Gibraltar) Limited investment. Any and all content included on this website or incorporated by reference is protected by international copyright laws. Basic Game Info Overall, the music and graphics of Sweet Bonanza Xmas create an enchanting dreamworld. Sweet Bonanza Xmas is a six reel, five row slot. COPYRIGHT © 2015 – 2025. All rights reserved to Pragmatic Play, a Veridian (Gibraltar) Limited investment. Any and all content included on this website or incorporated by reference is protected by international copyright laws.
Современные логистические услуги Москва-Питер нового поколения с полным контролем процесса. Умная логистика позволяет улучшать пути и минимизировать время транспортировки до минимума. GPS-отслеживание, автоматические оповещения и подробная аналитика по каждой доставке в личном кабинете. Честное ценообразование на основе алгоритмов и быстрый расчет стоимости онлайн. Переходите в эпоху умной логистики вместе с нами — начните на нашей системе.
Онлайн-тренинги https://communication-school.ru и курсы для личного роста, карьеры и новых навыков. Учитесь в удобное время из любой точки мира.
1С без сложностей https://1s-legko.ru объясняем простыми словами. Как работать в программах 1С, решать типовые задачи, настраивать учёт и избегать ошибок.
займы с ежемесячной оплатой займы с ежемесячной оплатой .
платная наркологическая клиника наркология лечение
пансионат для пожилых адрес пансионат для пожилых людей цена
Заказать шторы недорого, высокое качество.
Элегантные шторы для вашего дома, по индивидуальным размерам.
Мы предлагаем.
Создайте уникальные шторы, по вашим размерам.
Красивые шторы для стильного интерьера, с утонченным дизайном.
Мы поможем выбрать, множество тканей.
Шторы для любого стиля, выбор, который впечатляет.
Получите консультацию, от экспертов.
Шторы для спальни, кухни и гостиной, по доступным ценам.
Создаем стильные шторы, по вашим эскизам.
Индивидуальный подход к шторным решениям, от классики до модерна.
Экологичные шторы для вашего дома, для комфорта и стиля.
Шторы, которые подчеркивают ваш стиль, по индивидуальным проектам.
Секреты выбора штор, узнайте больше.
Идеи для оформления окон, доступные цены.
Модные тренды в мире штор, с профессиональной помощью.
Уникальные предложения на шторы, не упустите шанс.
Шторы для любого повода, с доставкой по стране.
Шторы, которые вы искали, согласуйте детали.
Цены на шторы, которые вас приятно удивят, от эконом до класса люкс.
заказ штор заказ штор .
За 15 лет работы мы транспортировали более 100 000 грузов по маршруту Москва-Санкт-Петербург без единой серьезной аварии. Партнеры предпочитают нас за надежность, точность и честную работу без сюрпризов. Срочная транспортировка за 12 часов стала нашим правилом, а не исключением. Крупные грузовые компании передают нам свои самые важные грузы. Присоединяйтесь к тысячам довольных партнеров — все отзывы и кейсы на нашем сайте.
Наша фирма оказывает профессиональные услуги грузовых перевозок по трассе Москва — Санкт-Петербург с ежедневными поездками и доставкой от 12 часов. Мы предоставляем надежную доставку любых типов товаров благодаря обновленному подвижному составу и квалифицированным водителям. Предлагаем конкурентные тарифы, полное страхование грузов и возможность контроля в режиме реального времени. Особый подход к каждому клиенту и выгодная система бонусов делают нас проверенным партнером для вашего бизнеса. Полная информация и индивидуальные коммерческие предложения доступны на нашем сайте.
Заказать шторы недорого, изготовления.
Стильные шторы на заказ, в лучших традициях дизайна.
в кратчайшие сроки.
Создайте уникальные шторы, по вашим размерам.
Преобразите свой дом с помощью штор, от профессионалов.
Мы поможем выбрать, в каталоге.
Архитектурные шторы на заказ, по уникальным эскизам.
Получите консультацию, от экспертов.
Идеи для оформления окон, по доступным ценам.
Проектируем шторы на заказ, не выходя из дома.
Ткани для штор на любой вкус, от классики до модерна.
Шторы из натуральных тканей, с заботой о вашем здоровье.
Неповторимые шторы для вашего дома, по индивидуальным проектам.
Секреты выбора штор, применяйте на практике.
Шторы премиум-класса на заказ, выбор материаов.
Модные тренды в мире штор, для вашего интерьера.
Шторы, которые преобразят ваш дом, обращайтесь.
По индивидуальным меркам, из натуральных материалов.
Мы дарим красоту вашему дому, заказывайте уже сегодня.
Цены на шторы, которые вас приятно удивят, с доставкой на дом.
заказ штор заказ штор .
Заказать шторы недорого, высокое качество.
Стильные шторы на заказ, по индивидуальным размерам.
в кратчайшие сроки.
Закажите эксклюзивные шторы, с гарантией качества.
Преобразите свой дом с помощью штор, от профессионалов.
Ваши мечты о шторах сбудутся, индивидуальный подход.
Архитектурные шторы на заказ, который вы искали.
Советы по выбору штор, от профессионалов.
Шторы для спальни, кухни и гостиной, с быстрой доставкой.
Закажите шторы с уникальным дизайном, с доставкой на дом.
Индивидуальный подход к шторным решениям, от классики до модерна.
Экологичные шторы для вашего дома, для комфорта и стиля.
Профессиональное изготовление штор, с учетом всех пожеланий.
Эстетика и функциональность штор, узнайте больше.
Шторы премиум-класса на заказ, доступные цены.
Шторы, которые подчеркнут ваш стиль, с профессиональной помощью.
Уникальные предложения на шторы, обращайтесь.
Шторы для любого повода, из натуральных материалов.
Ваш идеальный интерьер с нашими шторами, заказывайте уже сегодня.
Шторы на любой бюджет, с доставкой на дом.
заказ штор заказ штор .
Индивидуальный подход к выбору штор, доступные цены.
Стильные шторы на заказ, с учетом ваших пожеланий.
в кратчайшие сроки.
Шторы на заказ для вашего интерьера, с гарантией качества.
Шторы, которые вдохновляют, с утонченным дизайном.
Мы поможем выбрать, разнообразие стилей.
Шторы для любого стиля, который вы искали.
Получите консультацию, от дизайнеров.
Найдите стильные решения для штор, по доступным ценам.
Закажите шторы с уникальным дизайном, по вашим эскизам.
Шторы под любой интерьер, с различными узорами.
Шторы из натуральных тканей, для комфорта и стиля.
Профессиональное изготовление штор, по индивидуальным проектам.
Шторы, которые создают уют, откройте для себя.
Идеи для оформления окон, доступные цены.
Шторы, которые подчеркнут ваш стиль, с профессиональной помощью.
Уникальные предложения на шторы, спешите заказать.
По индивидуальным меркам, из натуральных материалов.
Шторы, которые вы искали, не упустите шанс.
Шторы на любой бюджет, по выгодным предложениям.
заказ штор заказ штор .
Обеспечиваем оперативную доставку отправлений между Москвой и Питером всего за 12 часов! Работаем постоянно, перевозим любые товары — от документов до крупногабаритных товаров. Никаких скрытых доплат, полная прозрачность процесса и контроль по каждой отправке. Сохраняйте время и деньги, доверяя свои грузы экспертам с большим опытом. Оставьте заявку на нашем портале и получите расчет стоимости в течение часа!
Экологичные и безопасные деревянные дома под ключ по ГОСТу
строительство деревянных домов москва https://www.derevyannye-doma-pod-klyuch-msk0.ru .
Na bitqt official możesz założyć konto i rozpocząć handel w ciągu kilku minut. Wszystkie funkcje dostępne od ręki.
Bitqt to zaawansowany system tradingowy, pozwalająca inwestorom na trading na rynkach finansowych. Bitqt stosuje innowacyjne algorytmy, aby analizować rynki na bieżąco, co pozwala użytkownikom podejmować świadome decyzje inwestycyjne.
Platforma oferuje liczne funkcje, które wspierają inwestowanie. Użytkownicy mają możliwość skorzystania z automatyzacji handlu, co zwiększa potencjalne zyski. Interfejs systemu jest łatwy w obsłudze, co czyni go dostępnym dla początkujących inwestorów.
Bezpieczeństwo użytkowników jest priorytetem dla Bitqt. Użycie innowacyjnych technologii zabezpieczeń pozwala użytkownikom czuć się bezpiecznie podczas handlu. Dlatego Bitqt jest wybierane przez wielu inwestorów jako rzetelna platforma.
Wnioskując, Bitqt to doskonała platforma dla tych, którzy chcą inwestować na rynkach finansowych. Dzięki innowacyjnym funkcjom, bezpieczeństwu oraz intuicyjnej obsłudze, każdy może rozpocząć swoją inwestycyjną przygodę. Daj sobie szansę na sukces inwestycyjny z Bitqt.
Ищете ответственного логиста между Москвой и Санкт-Петербургом? Наши ребята ездят по этому направлению каждый день и знают его как свои пять пальцев. Понимаем, что каждый груз важен для вашего дела, поэтому работаем к нему как к своему собственному. Честные расценки без переплат, полное покрытие и постоянная связь с водителем. Работаем с организациями любого размера и всегда идем навстречу. Все условия и примеры работы смотрите на нашем портале.
Все клининг Москва стоимость заранее указаны на сайте. Услуги предоставляются строго по согласованному объёму.
Клининг в Москве стал популярной услугой в последние годы. Растущее число москвичей начинает доверять уборку своих объектов профессиональным клининговым компаниям.
Цены на услуги клининга в Москве различаются в зависимости от характера и объема работ. Например, стандартная уборка квартиры может стоить от 1500 до 5000 рублей.
Клининговые компании предлагают дополнительные услуги, такие как мойка окон и чистка мебели. Эти услуги могут значительно увеличить общую стоимость уборки.
Перед выбором клининговой фирмы рекомендуется ознакомиться с различными предложениями на рынке. Важно учитывать мнения клиентов и репутацию компании.
Современные технологии, автоматизированные рулонные шторы, удобное управление.
Идеальное сочетание, шторы с электроприводом, высокое качество.
Создайте уют, с дистанционным управлением для штор, легко и быстро.
Выбор рулонных штор, почему стоит выбрать?.
Рулонные шторы для современного дома, это красиво, наслаждайтесь комфортом.
Рулонные шторы с электроприводом, для стильного интерьера, закажите с доставкой.
Автоматизация вашего дома, высокая функциональность, сделайте правильный выбор.
Шторы для умного дома, доступная цена, узнайте подробности.
Электронные шторы для вашего дома, отличный выбор, в наличии сейчас.
Рулонные шторы с дистанционным управлением, просто и удобно, узнайте больше.
Шторы, которые открывают новые возможности, управление светом из любой точки, закажите с нашим менеджером.
Современные решения для вашего дома, узнайте о преимуществах.
Создавайте атмосферу, с дистанционно управляемыми шторами, это практично.
Электрические шторы для вашего интерьера, лучшие цены, закажите онлайн.
Умный дом с рулонными шторами, удобство для вас, консультация специалиста.
Электрические шторы для любого интерьера, простой и удобный выбор, закажите с доставкой.
Автоматизированные шторы для уюта, доступные цены, выбор за вами.
Современные рулонные шторы, для удобного управления, закажите прямо сейчас.
рулонные шторы с электроприводом и дистанционным управлением рулонные шторы с электроприводом и дистанционным управлением .
Календарь стрижек https://www.inforigin.ru .
новости дня https://www.istoriamashin.ru .
Лунные день сегодня https://topoland.ru .
Инновационные грузоперевозки Москва-СПБ нового поколения с полным контролем процесса. Интеллектуальная логистика позволяет совершенствовать пути и минимизировать время доставки до минимума. GPS-отслеживание, автоматические оповещения и полная аналитика по каждой перевозке в личном кабинете. Открытое тарификация на основе алгоритмов и быстрый расчет стоимости онлайн. Переходите в эпоху умной логистики вместе с нами — начните на нашей системе.
Cross Stitch Pattern in PDF format https://cross-stitch-patterns-free-download.store/ a perfect choice for embroidery lovers! Unique designer chart available for instant download right after purchase.
Надёжная фурнитура https://furnitura-dla-okon.ru для пластиковых окон: всё для ремонта и комплектации. От ручек до многозапорных механизмов.
Фурнитура для ПВХ-окон http://kupit-furnituru-dla-okon.ru оптом и в розницу: европейские бренды, доступные цены, доставка по РФ.
нужен адвокат онлайн юридическая консультация по интернету
Удобство и стиль, автоматизированные рулонные шторы, с помощью пульта.
Современный дизайн, на любой вкус, высокое качество.
Создайте уют, с рулонными шторами с электроприводом, с удовольствием.
Электропривод для вашего уюта, узнайте здесь.
Электрические шторы, это красиво, наслаждайтесь комфортом.
Рулонные шторы с пультом, для вашего удобства, попробуйте прямо сейчас.
Автоматизация вашего дома, высокая функциональность, у нас есть все.
Современные рулонные шторы, доступная цена, закажите сегодня.
Шторы, с которыми легко управлять, стильный дизайн, доступно всем.
Рулонные шторы с дистанционным управлением, для каждого дома, узнайте больше.
Автоматические рулонные шторы, управление светом из любой точки, доступно с доставкой.
Современные решения для вашего дома, где купить?.
Управляйте светом, с современными шторами, это легко.
Рулонные шторы: удобство и стиль, широкий ассортимент, узнайте подробности.
Умный дом с рулонными шторами, дизайн и комфорт, заказ с доставкой.
Электрические шторы для любого интерьера, у нас есть всё, закажите с доставкой.
Автоматизированные шторы для уюта, разнообразие дизайнов, закажите онлайн.
Рулонные шторы для вашего дома, для стильного интерьера, закажите прямо сейчас.
рулонные шторы с электроприводом и дистанционным управлением рулонные шторы с электроприводом и дистанционным управлением .
Удобство и стиль, в вашем офисе, удобное управление.
Эстетика и функциональность, для любого интерьера, высокое качество.
Создайте уют, с рулонными шторами с электроприводом, просто и удобно.
Шторы, которые меняют все, узнайте здесь.
Рулонные шторы для современного дома, это красиво, упрощайте свою жизнь.
Шторы, которые управляются дистанционно, для вашего удобства, попробуйте прямо сейчас.
Автоматизация вашего дома, инновации в вашем интерьере, узнайте больше.
Эстетические шторы с электроприводом, высокое качество, закажите сегодня.
Электронные шторы для вашего дома, стильный дизайн, в наличии сейчас.
Инновации в дизайне интерьера, для вашего комфортного быта, узнайте больше.
Автоматические рулонные шторы, инновации для вашего дома, доступно с доставкой.
Современные решения для вашего дома, где купить?.
Создавайте атмосферу, с современными шторами, это удобно.
Рулонные шторы: удобство и стиль, высокое качество, посетите наш сайт.
Электропривод для рулонных штор, современные технологии, покупка в один клик.
Современные решения для ваших окон, простой и удобный выбор, узнайте больше.
Автоматизированные шторы для уюта, разнообразие дизайнов, выбор за вами.
Шторы с электроприводом, для любого помещения, узнайте цены.
рулонные шторы с электроприводом и дистанционным управлением рулонные шторы с электроприводом и дистанционным управлением .
За 15 лет работы мы транспортировали более 100 000 заказов по трассе Москва-Санкт-Петербург без единой серьезной аварии. Партнеры предпочитают нас за надежность, пунктуальность и открытую работу без сюрпризов. Быстрая перевозка за 12 часов стала нашим правилом, а не исключением. Большие логистические корпорации поручают нам свои самые важные отправления. Присоединяйтесь к тысячам довольных клиентов — все отзывы и кейсы на нашем сайте.
Современные технологии, в вашем офисе, в одном клике.
Идеальное сочетание, умные рулонные шторы, доступные цены.
Создайте уют, с рулонными шторами с электроприводом, просто и удобно.
Выбор рулонных штор, читайте далее.
Шторы с дистанционным управлением, это удобно, наслаждайтесь комфортом.
Шторы, которые управляются дистанционно, для вашего удобства, закажите с доставкой.
Электрические рулонные шторы, инновации в вашем интерьере, узнайте больше.
Шторы для умного дома, доступная цена, закажите сегодня.
Шторы, с которыми легко управлять, отличный выбор, в наличии сейчас.
Инновации в дизайне интерьера, просто и удобно, посмотрите наш ассортимент.
Электрические шторы с пультом, стиль и комфорт, узнайте об акциях.
Современные решения для вашего дома, в нашем магазине.
Создавайте атмосферу, с дистанционно управляемыми шторами, это удобно.
Электрические шторы для вашего интерьера, высокое качество, закажите онлайн.
Электрические шторы с дистанционным управлением, удобство для вас, консультация специалиста.
Выбор рулонных штор с электроприводом, простой и удобный выбор, посетите наш сайт.
Электрические шторы для современных людей, высокое качество, выбор за вами.
Современные рулонные шторы, для любого помещения, получите консультацию.
рулонные шторы с электроприводом и дистанционным управлением рулонные шторы с электроприводом и дистанционным управлением .
Наша фирма предоставляет качественные услуги доставки грузов по трассе Москва — СПБ с ежедневными поездками и транспортировкой от 12 часов. Мы предоставляем надежную транспортировку любых типов грузов благодаря обновленному автопарку и опытным перевозчикам. Предлагаем выгодные расценки, полное страхование отправлений и возможность мониторинга в режиме реального времени. Персональный подход к каждому партнеру и гибкая система скидок делают нас ответственным партнером для вашего бизнеса. Полная информация и индивидуальные коммерческие предложения доступны на нашем ресурсе.
типография официальный сайт типография санкт петербург
типографии спб недорого типография заказать
изготовление металлических значков металлические значки москва
Электрические рулонные шторы, в интерьере.
Электроприводные рулонные шторы для вашего окна, для современного дома.
Рулонные шторы с электроприводом: удобство и стиль, в нашем интернет-магазине.
Умные рулонные шторы, превосходное сочетание.
Изучите мир электрических рулонных штор, ознакомьтесь.
Умные рулонные шторы для дома, подходят для любого окна.
Электроприводные рулонные шторы: инновации в вашем доме, выбор, который стоит сделать.
Электрические рулонные шторы: свобода выбора, узнайте больше.
Рулонные шторы с электроприводом – элегантность и удобство, в каталоге товаров.
Электрические рулонные шторы: удобство на каждом окне, которое вам понравится.
Преобразите ваш дом с рулонными шторами с электроприводом, предлагаемые с доставкой.
Рулонные шторы с электроприводом: функциональность и стиль, выбор, на который стоит обратить внимание.
Рулонные шторы с электроприводом – ваш идеальный помощник, в вашем доме.
Электрические рулонные шторы для стиля и комфорта, закажите сейчас.
Электрические рулонные шторы – стильный выбор, попробуйте и оцените.
Умные рулонные шторы с электроприводом для вашего дома, позаботьтесь о себе.
Электрические рулонные шторы: легкость управления, заказывайте онлайн.
Рулонные шторы с электроприводом: удобно и красиво, изучите сейчас.
рулонные шторы с электроприводом рулонные шторы с электроприводом .
Организуем скоростную доставку отправлений между Москвой и СПБ всего за 12 часов! Действуем каждый день, берем любые товары — от документов до больших товаров. Никаких скрытых оплат, полная прозрачность процесса и отчетность по каждой перевозке. Экономьте время и деньги, поручая свои товары специалистам с большим опытом. Оставьте заявку на нашем ресурсе и получите расчет стоимости в течение часа!
Thanks for the article. Here’s more on the topic https://artcet.ru/
Умные рулонные шторы для вашего дома, удобство и стиль.
Электроприводные рулонные шторы для вашего окна, легкость управления.
Умные шторы: удобство на кончиках пальцев, доступны.
Умные рулонные шторы, превосходное сочетание.
Наслаждайтесь комфортом рулонных штор с электроприводом, ознакомьтесь.
Электрические рулонные шторы – удобство и стиль, создадут уют.
Электроприводные рулонные шторы: инновации в вашем доме, выбор, который стоит сделать.
Электрические рулонные шторы: свобода выбора, узнайте больше.
Электроприводные рулонные шторы: ваш лучший выбор, в нашем интернет-магазине.
Умные рулонные шторы: удобство и стиль, которое вы заслуживаете.
Электрические рулонные шторы – стиль и технология, с возможностью установки.
Электрические рулонные шторы для любого интерьера, выбор, который вы не пожалеете.
Электроприводные рулонные шторы: удобство управления одним нажатием, в вашем доме.
Электрические рулонные шторы для стиля и комфорта, закажите сейчас.
Умные рулонные шторы для вашего удобства, откройте для себя.
Электрические рулонные шторы – сочетание простоты и стиля, позаботьтесь о себе.
Электрические рулонные шторы: легкость управления, покупайте у нас.
Рулонные шторы с электроприводом: удобно и красиво, закажите прямо сейчас.
рулонные шторы с электроприводом рулонные шторы с электроприводом .
Нужен ответственного перевозчика между Москвой и Санкт-Петербургом? Наши водители работают по этому пути каждый день и знают его как свои пять пальцев. Осознаем, что каждый отправление важен для вашего дела, поэтому работаем к нему как к своему собственному. Прозрачные цены без переплат, полное покрытие и постоянная связь с водителем. Работаем с компаниями любого размера и всегда идем навстречу. Все условия и примеры работы смотрите на нашем ресурсе.
Клининговая компания СПб предлагает услуги уборки любой сложности с прозрачными ценами. Работаем по договору и строго по графику.
Услуги клининга в Санкт-Петербурге набирают популярность. Многие компании предлагают широкий спектр услуг. Уборка квартир, офисов и общественных мест – это основные направления клининговых услуг.
Многие люди предпочитают услуги клининга для того, чтобы сэкономить время. Так они освобождают время для выполнения более важных задач. Клиенты ценят клининг за возможность делегировать рутинные задачи.
Причина успеха клининговых компаний заключается в высоком уровне профессионализма. Специалисты обучены использовать современное оборудование и эффективные моющие средства. Эффективное использование техники дает возможность достигать быстрого и качественного результата.
Клиенты могут выбрать различные пакеты услуг, чтобы удовлетворить свои потребности. Клиенты могут выбирать между разовыми и регулярными клининговыми услугами. Это дает возможность каждому найти наиболее выгодное предложение.
Thanks for the article. Here’s more on the topic https://fotonons.ru/
Электрические рулонные шторы, в интерьере.
Выберите рулонные шторы с электроприводом, легкость управления.
Электрические рулонные шторы для вашего дома, в каталоге.
Электроприводные рулонные шторы, комфорта и эстетики.
Время менять окна на рулонные шторы с электроприводом, ознакомьтесь.
Рулонные шторы с электроприводом для вашего интерьера, добавят стиля.
Электрические рулонные шторы: комфорт и уют, решение для современного дизайна.
Электрические рулонные шторы: свобода выбора, узнайте больше.
Рулонные шторы с электроприводом – элегантность и удобство, в нашем интернет-магазине.
Умные рулонные шторы: удобство и стиль, которое вам понравится.
Преобразите ваш дом с рулонными шторами с электроприводом, доступные для заказа.
Умные рулонные шторы – правильно решайте, выбор, который изменит ваш быт.
Умные рулонные шторы для современного дома, носим с собой.
Умные рулонные шторы: будущее уже здесь, нажмите для подробностей.
Умные рулонные шторы для вашего удобства, откройте для себя.
Умные рулонные шторы с электроприводом для вашего дома, пополните свой интерьер.
Рулонные шторы с электроприводом для вашего комфорта, покупайте у нас.
Преимущества рулонных штор с электроприводом, закажите прямо сейчас.
рулонные шторы с электроприводом рулонные шторы с электроприводом .
Thanks for the article. Here’s more on the topic https://yarus-kkt.ru/
Рулонные шторы с электроприводом, инновации и дизайн.
Электроприводные рулонные шторы для вашего окна, для современного дома.
Рулонные шторы с электроприводом: удобство и стиль, в каталоге.
Современные рулонные шторы с электроприводом, комфорта и эстетики.
Наслаждайтесь комфортом рулонных штор с электроприводом, ознакомьтесь.
Рулонные шторы с электроприводом для вашего интерьера, подходят для любого окна.
Электроприводные рулонные шторы: инновации в вашем доме, выбор, который стоит сделать.
Электрические рулонные шторы: свобода выбора, узнайте больше.
Рулонные шторы с электроприводом – элегантность и удобство, в каталоге товаров.
Электрические рулонные шторы: удобство на каждом окне, для вашего комфорта.
Электрические рулонные шторы – стиль и технология, предлагаемые с доставкой.
Рулонные шторы с электроприводом: функциональность и стиль, выбор, на который стоит обратить внимание.
Умные рулонные шторы для современного дома, носим с собой.
Обновите интерьер с рулонными шторами с электроприводом, выберите свои.
Умные рулонные шторы для вашего удобства, откройте для себя.
Электрические рулонные шторы – сочетание простоты и стиля, не упустите свой шанс.
Умные рулонные шторы – ваш идеальный выбор, покупайте у нас.
Преимущества рулонных штор с электроприводом, узнайте больше.
рулонные шторы с электроприводом рулонные шторы с электроприводом .
Современные перевозки грузов Москва-СПБ нового поколения с полным управлением процесса. Продвинутая логистика позволяет совершенствовать направления и минимизировать время транспортировки до минимума. GPS-контроль, автоматические сообщения и детальная аналитика по каждой доставке в личном кабинете. Честное формирование цен на основе алгоритмов и оперативный расчет стоимости онлайн. Переходите в эпоху умной логистики вместе с нами — начните на нашей сервисе.
металлический значок пин металлические значки на заказ
За 15 лет работы мы доставили более 100 000 заказов по направлению Москва-Петербург без единой серьезной аварии. Заказчики доверяют нас за надежность, пунктуальность и добросовестную работу без сюрпризов. Срочная транспортировка за 12 часов стала нашим правилом, а не исключением. Большие логистические корпорации поручают нам свои самые важные отправления. Станьте частью к тысячам довольных клиентов — все отзывы и кейсы на нашем портале.
Сшить римские шторы на заказ, красиво.
Хотите обновить интерьер с помощью римских штор?, сшите.
Профессиональное изготовление римских штор, с помощью.
Лучшие римские шторы на заказ, с.
Римские шторы, сшитые по вашим меркам, уникальное предложение.
Сшить римские шторы – это просто, прямо сейчас.
Заказ римских штор по индивидуальным размерам, недорого.
Изготавливаем римские шторы для любого стиля, не упустите эту возможность.
Как выбрать римские шторы на заказ? , разберитесь.
Уникальные римские шторы на заказ, по выгодной цене.
Сшить римские шторы легко, на полезные материалы.
Заказывайте римские шторы и наслаждайтесь комфортом, доступно.
Индивидуальный подход к изготовлению римских штор, индивидуальным дизайном.
Римские шторы на заказ для вашего комфорта, особым условиям.
Ваш индивидуальный проект римских штор, всегда.
Стильные римские шторы на заказ, на нашем сайте.
Заказывайте римские шторы по вашим размерам, легко.
Сшить римские шторы с учетом ваших пожеланий, качества.
сшить римские шторы на заказ сшить римские шторы на заказ .
Узнайте подробности про курсы барбера цена — доступное обучение с отличными результатами. Гибкий график и практика на моделях.
Запись на курсы барбера набирает популярность среди молодежи. Количество школ, обучающих барберов, постоянно растет. Рост популярности мужских стрижек и ухаживающих процедур объясняет интерес к таким курсам.
Программы обучения включают азы стрижки и навыки взаимодействия с клиентами. Учащиеся получают актуальные знания, которые помогут им построить карьеру в этой сфере. Они изучают различные стили и техники стрижки, а также уход за волосами и бородой.
Выпускники имеют возможность трудиться в парикмахерских или запускать собственные проекты. Месторасположение и репутация учебного заведения также играют важную роль в выборе курсов. Необходи?мо внимательно изучить отзывы о курсах, прежде чем принять решение о записи.
В итоге, подходящие курсы барбера следует подбирать в зависимости от ваших амбиций и целей. С увеличением конкуренции на рынке, приобретение качественного образования становится важным фактором. Необходимо учитывать, что достижения в этой профессии требуют непрерывного образования и практического опыта.
Оформиление дипломов ВУЗов в Москве — с печатями, подписями, приложением и возможностью архивной записи (по запросу).
Документ максимально приближен к оригиналу и проходит визуальную проверку.
Мы гарантируем, что в случае проверки документа, подозрений не возникнет.
– Конфиденциально
– Доставка 3–7 дней
– Любая специальность
Уже более 1591 клиентов воспользовались услугой — теперь ваша очередь.
Доступ по ссылке — ответим быстро, без лишних формальностей.
Наша организация предоставляет качественные услуги грузовых перевозок по маршруту Москва — Санкт-Петербург с ежедневными поездками и доставкой от 12 часов. Мы предоставляем надежную доставку любых типов отправлений благодаря новому подвижному составу и профессиональным шоферам. Предлагаем доступные цены, полное страхование товаров и возможность отслеживания в режиме реального времени. Особый подход к каждому клиенту и удобная система скидок делают нас надежным поставщиком услуг для вашего бизнеса. Полная информация и персональные коммерческие предложения доступны на нашем сайте.
Римские шторы на заказ – идеальное решение для вашего интерьера, с.
Хотите обновить интерьер с помощью римских штор?, дизайны.
Профессиональное изготовление римских штор, высококачественных материалов.
Сшить римские шторы для любого интерьера, по индивидуальному заказу.
Откройте для себя мир римских штор, не пропустите возможность.
Индивидуальное изготовление римских штор, выберите.
Качественное изготовление римских штор, всегда.
Идеальные римские шторы для вашего интерьера, вы будете довольны результатом.
Как выбрать римские шторы на заказ? , с деталями.
Римские шторы под заказ в любом стиле, приобретите.
Краткое руководство по созданию римских штор, на полезные материалы.
Заказывайте римские шторы и наслаждайтесь комфортом, доступно.
Ваши римские шторы под заказ, с.
Не откладывайте заказ римских штор, индивидуальным проектам.
Ваш индивидуальный проект римских штор, всегда.
Стильные римские шторы на заказ, в нашем магазине.
Римские шторы под заказ – это красиво, просто.
Уникальные римские шторы для вашего дома, сто процентов.
сшить римские шторы на заказ сшить римские шторы на заказ .
Сшить римские шторы на заказ, с.
Ищете идеальные римские шторы?, шторы.
Как сшить римские шторы под заказ, при.
Лучшие римские шторы на заказ, по.
Откройте для себя мир римских штор, не пропустите возможность.
Сшить римские шторы – это просто, в удобное время.
Заказ римских штор по индивидуальным размерам, всегда.
Идеальные римские шторы для вашего интерьера, не упустите эту возможность.
Полезные советы по выбору римских штор, с рекомендациями.
Римские шторы под заказ в любом стиле, приобретите.
Краткое руководство по созданию римских штор, на полезные материалы.
Заказывайте римские шторы и наслаждайтесь комфортом, доступно.
Сшите римские шторы именно так, как хотите, в.
Римские шторы на заказ для вашего комфорта, индивидуальным проектам.
Сшить римские шторы – это просто и удобно, только у нас.
Как правильно сшить римские шторы по размеру, подписывайтесь.
Сшить римские шторы в несколько кликов, просто.
Сшить римские шторы с учетом ваших пожеланий, сто процентов.
сшить римские шторы на заказ сшить римские шторы на заказ .
Римские шторы на заказ – идеальное решение для вашего интерьера, удивительно.
Ищете идеальные римские шторы?, дизайны.
Римские шторы на заказ от опытных мастеров, с.
Создайте уникальные римские шторы, высокому стандарту.
Найдите свои идеальные римские шторы, не пропустите возможность.
Индивидуальное изготовление римских штор, получите.
Заказ римских штор по индивидуальным размерам, в любое время.
Сшить римские шторы на заказ с любовью, это просто.
Полезные советы по выбору римских штор, с рекомендациями.
Как сшить римские шторы для вашего дома, с доставкой на дом.
Сшить римские шторы легко, читайте.
Сшить римские шторы с учетом всех пожеланий, просто.
Индивидуальный подход к изготовлению римских штор, по.
Не откладывайте заказ римских штор, индивидуальным проектам.
Ваш индивидуальный проект римских штор, всегда.
Изготовление римских штор под заказ, в нашем магазине.
Заказывайте римские шторы по вашим размерам, быстро.
Сшить римские шторы с учетом ваших пожеланий, соответствия.
сшить римские шторы на заказ сшить римские шторы на заказ .
Обеспечиваем оперативную транспортировку товаров между Москвой и Санкт-Петербургом всего за 12 часов! Действуем каждый день, берем любые отправления — от документов до крупногабаритных товаров. Никаких скрытых платежей, полная прозрачность процесса и документооборот по каждой отправке. Сберегайте время и деньги, доверяя свои отправления специалистам с солидным опытом. Оставьте заявку на нашем портале и получите калькуляцию стоимости в течение часа!
Погрузитесь в мир захватывающих ставок с Install 1xbet program и не упустите возможность скачать приложение прямо сейчас!
1xbet stands out as a prominent sportsbook. The platform provides numerous betting opportunities, from sporting events to various casino games.
Numerous bettors enjoy the straightforward design of the site. Thus, users can swiftly place bets and browse various sections without hassle.
Moreover, 1xbet offers competitive odds, which attract both novice and experienced bettors. The odds presented can greatly influence the profits a bettor may obtain.
Lastly, the customer support services at 1xbet are commendable. Players can reach out to support agents for assistance via various channels. This guarantees that questions or problems are resolved quickly.
Нужен надежного логиста между Москвой и Питером? Наши сотрудники ездят по этому пути каждый день и знают его как свои пять пальцев. Осознаем, что каждый отправление важен для вашего дела, поэтому подходим к нему как к своему собственному. Прозрачные тарифы без переплат, полное страхование и постоянная связь с перевозчиком. Сотрудничаем с фирмами любого размера и всегда идем навстречу. Все условия и примеры работы смотрите на нашем ресурсе.
накрутка подписчиков в телеграмме Накрутка подписчиков в Телеграмме.
Thanks for the article. Here’s more on the topic https://yarus-kkt.ru/
Как пошить римские шторы: шаг за шагом, ваш дом.
Пошив римских штор: пособие
пошить римские шторы пошить римские шторы .
Our show drones create intricate patterns and animations in the night sky — perfect for grand openings, product launches, and special moments.
The popularity of drone light shows has surged in the last few years. These extraordinary events utilize a fleet of drones to generate captivating displays. They serve as a contemporary substitute for conventional fireworks. Many event organizers are embracing this innovative technology.
One of the main advantages of drone light shows is their environmental friendliness. Unlike traditional fireworks, they don’t create toxic smoke or litter. This makes them a safer option for public events. Additionally, they can be tailored to suit different themes and occasions.
The tech behind drone light shows requires meticulous coordination and software programming. These drones are fitted with lights that can alter hues and designs. This technology allows for dynamic performances that can captivate audiences. Essentially, drone light shows embody the next wave of entertainment.
As we move forward, the opportunities for drone light shows are boundless. As technology evolves, we are likely to witness more sophisticated and astounding shows. These events will not only entertain but also leave a lasting impression on audiences. The entertainment landscape is certainly brightened by the emergence of drone light shows.
От классических до оригинальных сетов — Сакура доставка суши предложит что-то на любой вкус.
Заказ вок-блюд через интернет приобретает все большую популярность. Существует множество причин, почему вок-заказ стал любимым среди людей.
На рынке имеется огромное количество заведений, которые рады предложить вок-блюда. Каждый ресторан имеет свои особенности и уникальные блюда в меню.
Рекомендуется ознакомиться с отзывами о заведениях, прежде чем делать заказ. Это позволит выбрать только те рестораны, которые предлагают отличное качество пищи.
Следите за специальными предложениями, которые могут сделать ваш заказ более выгодным. Это отличная возможность попробовать новые блюда по более низкой цене.
Цифровые перевозки грузов Москва-Питер нового поколения с полным контролем процесса. Умная логистика позволяет совершенствовать пути и уменьшать время доставки до минимума. GPS-контроль, автоматические уведомления и подробная аналитика по каждой доставке в личном кабинете. Честное формирование цен на основе алгоритмов и оперативный расчет стоимости онлайн. Переходите в эпоху умной логистики вместе с нами — начните на нашей системе.
Узнайте, как создать римские шторы, чтобы.
Пошив римских штор: простой
пошить римские шторы пошить римские шторы .
квика манимен
аэропорт прага такси https://inotur.com/strany-sng/5896-kak-dobratsya-iz-aeroporta-pragi-v-otel-udobnye-resheniya-ot-letisteexpress.html
хотите сделать утепление https://stroika-tovar.ru/articles/gidroizolyaciya/stoimost-utepleniya-penopoliuretanom-chto-vliyaet-na-czenu.html
За 15 лет работы мы перевезли более 100 000 отправлений по направлению Москва-Петербург без единой серьезной аварии. Заказчики доверяют нас за постоянство, своевременность и честную работу без сюрпризов. Быстрая перевозка за 12 часов стала нашим стандартом, а не исключением. Крупные грузовые фирмы поручают нам свои самые важные заказы. Присоединяйтесь к тысячам довольных заказчиков — все отзывы и кейсы на нашем портале.
Узнайте, как пошить римские шторы, интерьер.
Пошив римских штор: гид
пошить римские шторы пошить римские шторы .
Как пошить римские шторы: шаг за шагом, интерьер.
Всё о римских шторах: указания
пошить римские шторы пошить римские шторы .
Наша организация предоставляет качественные услуги грузовых перевозок по трассе Москва — Санкт-Петербург с ежедневными рейсами и перевозкой от 12 часов. Мы гарантируем безопасную транспортировку любых типов отправлений благодаря обновленному автотранспорту и квалифицированным водителям. Предлагаем конкурентные тарифы, полное защиту грузов и возможность мониторинга в режиме реального времени. Персональный подход к каждому заказчику и гибкая система льгот делают нас проверенным поставщиком услуг для вашего бизнеса. Полная информация и индивидуальные коммерческие предложения доступны на нашем портале.
Пошив штор для вашего дома, в нашем руководстве.
Сшейте уникальные шторы, для вашего интерьера.
Индивидуальные шторы, как изготовить.
Способы сшить шторы, которые легко реализовать.
Пошив штор для начинающих, без сложностей.
Как выбрать ткань для штор, с вашими предпочтениями.
Стильные шторы, вашему дому.
Как украсить шторы, чтобы они выделялись.
Шторы для кухни, в уютном стиле.
Комфортные шторы для вашего уюта, на нашем сайте.
Шторы для гостиной, и освещения.
Советы по уходу за шторами, и ухоженными.
Шторы в различных стилях, по вашим предпочтениям.
Пошаговая инструкция по римским шторам, с минимальным бюджетом.
Функциональные шторы, и создания атмосферы.
Идеи для штор на люверсах, которые украсят любой интерьер.
Как выбрать шторы для детской комнаты, для комфорта и радости вашего ребенка.
Секреты идеального пошива штор, на нашем сайте.
сшить шторы сшить шторы .
Выполняем скоростную транспортировку отправлений между Москвой и СПБ всего за 12 часов! Действуем ежедневно, перевозим любые грузы — от документов до крупногабаритных товаров. Никаких скрытых платежей, полная честность процесса и документооборот по каждой доставке. Сохраняйте время и деньги, поручая свои отправления профессионалам с солидным опытом. Оставьте заявку на нашем сайте и получите калькуляцию стоимости в течение часа!
dragon casino https://casinosdragonslots.eu .
Thanks for the article. Here’s more on the topic https://fotonons.ru/
накрутка телеграм Накрутка Телеграм.
thepokies.net http://www.thepokiesnet101.com .
Thanks for the article. Here’s more on the topic https://cultureinthecity.ru/
Требуется проверенного логиста между Москвой и Санкт-Петербургом? Наши водители курсируют по этому пути каждый день и знают его как свои пять пальцев. Осознаем, что каждый отправление важен для вашего дела, поэтому работаем к нему как к своему собственному. Справедливые тарифы без завышений, полное страхование и постоянная связь с водителем. Работаем с компаниями любого размера и всегда идем навстречу. Все условия и примеры работы смотрите на нашем сайте.
Уроки по пошиву штор, вдохновение для творчества.
Соберите идеальные шторы, для вашего интерьера.
Эксклюзивные шторы, как сшить.
Идеи для пошива штор, в домашних условиях.
Пошив штор для начинающих, в нашем проекте.
Как выбрать ткань для штор, с вашими предпочтениями.
Разнообразие стилей штор, вашему дому.
Декор для штор, и поднимали настроение.
Шторы для кухни своими руками, как выбрать.
Как создать атмосферу в спальне, вдохновение для дизайна.
Как выбрать шторы для гостиной, в зависимости от вашего стиля.
Советы по уходу за шторами, и прекрасными.
Шторы в различных стилях, от классики до современности.
Все о римских шторах, с минимальным бюджетом.
Почему стоит выбрать функциональные шторы, для вашего комфорта.
Шторы на люверсах, которые легко монтируются.
Креативные идеи для штор в детской, для комфорта и радости вашего ребенка.
Лучшие советы по пошиву штор, для уверенных в своих силах.
сшить шторы сшить шторы .
Уроки по пошиву штор, в нашем блоге.
Соберите идеальные шторы, для вашего интерьера.
Шторы на заказ, как сшить.
Способы сшить шторы, которые легко реализовать.
Пошив штор для начинающих, легко и быстро.
Как выбрать ткань для штор, по вашему вкусу.
Разнообразие стилей штор, которые легко сделать.
Как украсить шторы, и радовали глаз.
Кулинарные шторы, как выбрать.
Как создать атмосферу в спальне, в руководстве.
Идеи для штор в гостиной, и особенностей.
Советы по уходу за шторами, и ухоженными.
Шторы в различных стилях, от минимализма до барокко.
Как сшить римские шторы, в вашем доме.
Функциональные шторы, для вашего уюта.
Шторы на люверсах, которые легко монтируются.
Шторы для детской, для комфорта и радости вашего ребенка.
Секреты идеального пошива штор, для уверенных в своих силах.
сшить шторы сшить шторы .
Уроки по пошиву штор, на нашем сайте.
Создайте идеальные шторы, для вашего интерьера.
Шторы на заказ, как сшить.
Идеи для пошива штор, в своем городе.
Пошив штор для начинающих, без сложностей.
Идеальные ткани для штор, и интерьеру.
Разнообразие стилей штор, вашему интерьеру.
Как украсить шторы, чтобы они выделялись.
Шторы для кухни, в уютном стиле.
Уютные шторы для спальни, пошаговая инструкция.
Как выбрать шторы для гостиной, и предпочтений.
Советы по уходу за шторами, чтобы они оставались свежими.
Шторы в различных стилях, в соответствии с модными тенденциями.
Все о римских шторах, в вашем доме.
Функциональные шторы, и защиты от солнца.
Как сшить шторы на люверсах, которые украсят любой интерьер.
Как выбрать шторы для детской комнаты, чтобы создать уютное пространство.
Лучшие советы по пошиву штор, на нашем сайте.
сшить шторы сшить шторы .
Geniş arşivde hd filimleri her zevke uygun yapımlar bulabilirsiniz. Film keyfinizi ertelemeyin.
4K’da Full HD film izle. Teknolojinin gelişmesiyle birlikte, izleyiciler artık filmleri etkileyici bir netlikte deneyimleyebiliyor. 4K filmlerin keskinliği ve detayları izleme deneyimini bambaşka bir seviyeye taşıyor.
Çeşitli platformlar 4K’da Full HD film izleme olanağı sunuyor. Bu platformlar film kalitesini artırarak keyfi en üst düzeye çıkarıyor. Netflix ve Amazon Prime gibi önde gelen servisler geniş bir 4K içerik arşivine sahip. Bu geniş seçenek yelpazesi her kesime hitap ediyor.
4K’da Full HD film keyfi için uyumlu bir cihaz şarttır. Günümüzün birçok televizyonu ve projektörü 4K çözünürlükle uyumludur. 4K içeriği sorunsuz oynatmak için cihazınızın teknik detaylarını doğrulamayı unutmayın.
Sonuç olarak, 4K’da Full HD film izlemek benzersiz bir seyir deneyimi sunar. Doğru araçlar ve sağlam yayın servisleriyle büyüleyici görselleri keşfetmeniz mümkün. Bu fırsatı kaçırmayın ve film keyfinizi yeni bir seviyeye taşıyın.
Aksiyon, dram, komedi… Aradığınız her tür filmi full izle 4k çözünürlükte sizlerle. Gerçek sinema keyfini yakalayın.
Full HD bir filmi deneyimlemek gerçekten büyüleyicidir. Teknolojinin gelişmesiyle birlikte film kalitesi büyük ölçüde arttı. Artık etkileyici görsellerin ve sürükleyici seslerin tadını çıkarabilirsiniz.
Son yıllarda 4K çözünürlüğe olan ilgi önemli ölçüde arttı. Bu yüksek çözünürlük, standart HD’ye kıyasla daha net ve ayrıntılı görüntüler sunar. Birçok sinema hayranı için 4K kalitesinde film izlemek olmazsa olmazdır.
Yayın platformlarının yaygınlaşmasıyla birlikte Full HD ve 4K içeriklere erişim daha da kolaylaştı. Film tutkunları favori yapımlarına diledikleri an ve diledikleri yerden ulaşabiliyor. Bu kolaylık, medya tüketim şeklimizi kökten değiştirdi.
4K içeriklerin yaygınlaşması, kaliteli ekranlara duyulan ihtiyacı artırıyor. İyi bir 4K TV satın almak film izleme deneyimini büyük ölçüde geliştirir. Gerçek film tutkunları için bu yatırım kesinlikle buna değer.
Современные перевозки грузов Москва-СПБ нового поколения с полным мониторингом процесса. Умная логистика позволяет оптимизировать маршруты и сокращать время перевозки до минимума. GPS-контроль, автоматические уведомления и детальная аналитика по каждой перевозке в личном кабинете. Прозрачное тарификация на основе алгоритмов и мгновенный расчет стоимости онлайн. Переходите в эпоху умной логистики вместе с нами — начните на нашей платформе.
The Pokies Australia http://www.pokies106.com .
Срочные микрозаймы https://stuff-money.ru с моментальным одобрением. Заполните заявку онлайн и получите деньги на карту уже сегодня. Надёжно, быстро, без лишней бюрократии.
Срочный микрозайм https://truckers-money.ru круглосуточно: оформите онлайн и получите деньги на карту за считаные минуты. Без звонков, без залога, без лишних вопросов.
Discover Zabljak Savin Kuk, a picturesque corner of Montenegro. Skiing, hiking, panoramic views and the cleanest air. A great choice for a relaxing and active holiday.
За 15 лет работы мы перевезли более 100 000 отправлений по трассе Москва-СПБ без единой серьезной аварии. Клиенты доверяют нас за постоянство, пунктуальность и добросовестную работу без сюрпризов. Срочная транспортировка за 12 часов стала нашим стандартом, а не исключением. Большие транспортные корпорации поручают нам свои самые важные отправления. Станьте частью к тысячам довольных клиентов — все отзывы и кейсы на нашем сайте.
Шторы на заказ: идеальное решение для вашего интерьера, подберите.
Шторы на заказ для любого интерьера, добавляет уют в ваше пространство.
Закажите шторы на заказ и обновите свой интерьер, не упустите возможность.
Шторы на заказ — сочетание качества и стиля, с учетом всех пожеланий.
Шторы под заказ — ваш идеальный интерьер, доверяйте профессионалам.
Шторы на заказ для вашего уютного дома, усилите атмосферу.
Найдите идеальные шторы, сделанные только для вас, не откладывайте на потом.
Шторы на заказ: функциональность и эстетика, измените свой интерьер навсегда.
Элегантные шторы на заказ для любого стиля, находите вдохновение.
Уникальные решения для вашего интерьера с шторами на заказ, действуйте и вдохновляйтесь.
шторы на заказ шторы на заказ .
накрутка подписчиков ютуб бесплатно Накрутка подписчиков Ютуб бесплатно.
Наша компания предоставляет надежные услуги грузоперевозок по маршруту Москва — Санкт-Петербург с ежедневными поездками и перевозкой от 12 часов. Мы обеспечиваем качественную перевозку любых типов грузов благодаря новому подвижному составу и квалифицированным перевозчикам. Предлагаем конкурентные расценки, полное покрытие грузов и возможность контроля в режиме реального времени. Индивидуальный подход к каждому партнеру и удобная система скидок делают нас ответственным партнером для вашего бизнеса. Подробная информация и специальные коммерческие предложения доступны на нашем сайте.
Создайте уникальные шторы под заказ для вашего дома, под ваши требования.
Шторы на заказ для любого интерьера, подчеркивает вашу индивидуальность.
Индивидуальные шторы: делаем ваш дом особенным, не упустите возможность.
Качественные шторы на заказ по доступной цене, по индивидуальным размерам.
Уникальные шторы, которые подчеркнут вашу индивидуальность, выбирайте лучшее.
Шторы по вашим размерам — идеальное решение, добавьте стиль.
Достаньте самовыражение через шторы на заказ, действуйте и наслаждайтесь результатом.
Индивидуальный подход к созданию штор под заказ, закажите прямо сейчас.
Элегантные шторы на заказ для любого стиля, доверяйте профессионалам.
Шторы на заказ — это легко и удобно, действуйте и вдохновляйтесь.
шторы на заказ шторы на заказ .
Индивидуальные шторы на заказ — стиль и комфорт в каждом доме, под ваши требования.
Шторы на заказ для любого интерьера, подчеркивает вашу индивидуальность.
Шторы на заказ — это просто, быстро и удобно, действуйте уже сегодня.
Качественные шторы на заказ по доступной цене, всегда в наличии.
Шторы под заказ — ваш идеальный интерьер, доверяйте профессионалам.
Шторы по вашим размерам — идеальное решение, обновите пространство.
Найдите идеальные шторы, сделанные только для вас, действуйте и наслаждайтесь результатом.
Шторы на заказ — для настоящих ценителей комфорта, измените свой интерьер навсегда.
Функциональные шторы под заказ для вашего удобства, доверяйте профессионалам.
Шторы, которые идеально впишутся в ваш дом, действуйте и вдохновляйтесь.
шторы на заказ шторы на заказ .
Услуги массаж ивантеевка — для здоровья, красоты и расслабления. Опытный специалист, удобное расположение, доступные цены.
AI generator nsfw ai generator of the new generation: artificial intelligence turns text into stylish and realistic pictures and videos.
Онлайн займы срочно https://moon-money.ru деньги за 5 минут на карту. Без справок, без звонков, без отказов. Простая заявка, моментальное решение и круглосуточная выдача.
Шторы на заказ: идеальное решение для вашего интерьера, закажите.
Индивидуальный подход к шторным решениям, добавляет уют в ваше пространство.
Индивидуальные шторы: делаем ваш дом особенным, не упустите возможность.
Качественные шторы на заказ по доступной цене, с учетом всех пожеланий.
Шторы под заказ — ваш идеальный интерьер, выбирайте лучшее.
Шторы на заказ для вашего уютного дома, обновите пространство.
Достаньте самовыражение через шторы на заказ, не откладывайте на потом.
Индивидуальный подход к созданию штор под заказ, выберите свой стиль.
Элегантные шторы на заказ для любого стиля, ознакомьтесь с нашим каталогом.
Шторы на заказ — это легко и удобно, выбирайте из множества вариантов.
шторы на заказ шторы на заказ .
Выполняем быструю транспортировку товаров между Москвой и СПБ всего за 12 часов! Работаем ежедневно, перевозим любые отправления — от документов до габаритных товаров. Никаких скрытых платежей, полная открытость процесса и отчетность по каждой перевозке. Сберегайте время и деньги, доверяя свои отправления экспертам с солидным опытом. Оставьте заявку на нашем портале и получите расчет стоимости в течение часа!
Thanks for the article. Here’s more on the topic https://imgtube.ru/
Нужен проверенного логиста между Москвой и СПБ? Наши сотрудники ездят по этому пути каждый день и знают его как свои пять пальцев. Понимаем, что каждый отправление важен для вашего дела, поэтому подходим к нему как к своему собственному. Прозрачные цены без переплат, полное покрытие и постоянная связь с курьером. Работаем с организациями любого размера и всегда идем навстречу. Все условия и примеры работы смотрите на нашем портале.
Электрошторы рулонного типа, удобство, доступные цены.
Электрошторы для комфорта, современный дизайн.
Рулонные электрошторы: советы по выбору, разнообразие моделей.
Электрошторы: преимущества рулонного типа, инновационные технологии.
Рулонные электрошторы: стиль и функциональность, разнообразие расцветок.
Электрошторы: ваш лучший выбор, доступные цены.
Рулонные электрошторы: как они работают?, идеальное решение для любой комнаты.
Как установить рулонные электрошторы, пошаговое руководство.
Электрошторы: умный дом, удобство управления.
Эстетика и функциональность электроштор, организация пространства.
Как выбрать идеальные электрошторы?, практичность и стиль.
Зачем купить рулонные электрошторы?, выбор цвета.
Создайте комфорт с рулонными электрошторами, легкость в уходе.
Электрошторы: как они меняют пространство, интерьер в стиле минимализм.
Лучшие решения для оконных штор, простота установки.
Как выбрать рулонные электрошторы?, подбор стиля.
Электрошторы: создайте атмосферу уюта, функциональность и стиль.
Как электрошторы меняют пространство, легкость в уходе.
Электрошторы: идеальный выбор для вашего дома, простой монтаж.
Электрошторы для офисов и жилых помещений, эстетика и цена.
автоматическая рулонная штора автоматическая рулонная штора .
Ваша конфиденциальность важна: мы обеспечиваем анонимное выведение из запоя в СПб. Никаких записей в официальные базы, только помощь и поддержка.
Вывод из запоя представляет собой непростую задачу, требующую тщательного подхода. Необходимо осознавать, что каждая ситуация требует индивидуального решения.
Первым шагом в процессе вывода из запоя является решение обратиться к специалисту. Часто люди пытаются справиться с запоем самостоятельно, но это может быть неэффективным.
Визит к врачу или наркологу — это ключевой момент при выводе из запоя. Специалист поможет разработать план лечения и предложит необходимые медикаменты.
Кроме того, важно окружить себя поддержкой близких людей. Они могут оказаться важным источником силы и поддержки в это тяжелое время.
Thanks for the article. Here’s more on the topic https://cultureinthecity.ru/
Современные грузоперевозки Москва-СПБ нового поколения с полным управлением процесса. Умная логистика позволяет оптимизировать направления и уменьшать время транспортировки до минимума. GPS-контроль, автоматические оповещения и подробная аналитика по каждой отправке в личном кабинете. Честное ценообразование на основе алгоритмов и мгновенный расчет стоимости онлайн. Переходите в эпоху умной логистики вместе с нами — начните на нашей системе.
AI generator ai chat nsfw of the new generation: artificial intelligence turns text into stylish and realistic pictures and videos.
ремонт стиральной машины вирпул ремонт стиральных машин hotpoint
Офисная мебель https://mkoffice.ru в Новосибирске: готовые комплекты и отдельные элементы. Широкий ассортимент, современные дизайны, доставка по городу.
UP&GO https://upandgo.ru путешествуй легко! Визы, авиабилеты и отели онлайн
Урал – настоящее сокровище для любителей пеших походов. Узнайте, что нужно учесть, отправляясь в это приключение.
Особенно понравился материал про Загадочные скалы Урала: истории и альтернативные исследования.
Ссылка ниже:
https://rustrail.ru/%d1%83%d1%80%d0%b0%d0%bb-%d0%b8-%d0%b5%d0%b3%d0%be-%d0%b7%d0%b0%d0%b3%d0%b0%d0%b4%d0%be%d1%87%d0%bd%d1%8b%d0%b5-%d1%81%d0%ba%d0%b0%d0%bb%d1%8b/
Счастливого пути и незабываемых впечатлений в походе по Уралу!
Электрошторы рулонного типа, инновации, отличное качество.
Рулонные электрошторы для вашего окна, для любого интерьера.
Что учесть при покупке электроштор?, функциональность и стиль.
Электрошторы: преимущества рулонного типа, комфорт и безопасность.
Секреты выбора рулонных электроштор, экологические материалы.
Электрошторы: ваш лучший выбор, долговечность.
Эстетика и практичность электроштор, экономия пространства.
Рулонные электрошторы на любой вкус, простой монтаж.
Современные технологии в рулонных электрошторах, автоматизация.
Эстетика и функциональность электроштор, красота и комфорт.
Как выбрать идеальные электрошторы?, практичность и стиль.
Электрошторы: простота и элегантность, функция управления.
Электрошторы для идеального освещения, легкость в уходе.
Дизайн и функциональность рулонных электроштор, выбор цвета и текстуры.
Как рулонные электрошторы улучшают интерьер, простота установки.
Как выбрать рулонные электрошторы?, разнообразие моделей.
Электрошторы: создайте атмосферу уюта, технологические преимущества.
Электрошторы для защиты от солнца, экологичные материалы.
Рулонные электрошторы для создания уюта, разнообразие стилей.
Рулонные электрошторы: ваш стильный акцент, эстетика и цена.
автоматическая рулонная штора автоматическая рулонная штора .
За 15 лет работы мы транспортировали более 100 000 отправлений по трассе Москва-Санкт-Петербург без единой серьезной аварии. Клиенты выбирают нас за надежность, точность и открытую работу без сюрпризов. Срочная транспортировка за 12 часов стала нашим нормой, а не исключением. Ведущие логистические фирмы поручают нам свои самые важные отправления. Войдите в число к тысячам довольных клиентов — все отзывы и кейсы на нашем ресурсе.
Купить рулонные электрошторы, инновации, доступные цены.
Электрошторы: идеальное решение, и стиля.
Рулонные электрошторы: советы по выбору, разнообразие моделей.
Электрошторы: преимущества рулонного типа, инновационные технологии.
Секреты выбора рулонных электроштор, разнообразие расцветок.
Рулонные электрошторы для любых окон, долговечность.
Почему выбирать рулонные электрошторы?, защита от солнечных лучей.
Электрошторы для кухни и спальни, доступные инструкции.
Электрошторы: умный дом, автоматизация.
Рулонные электрошторы: для бизнеса и дома, красота и комфорт.
Рулонные электрошторы для защиты от света, разнообразие дизайнов.
Электрошторы: простота и элегантность, доступность материалов.
Создайте комфорт с рулонными электрошторами, простота управления.
Электрошторы: как они меняют пространство, выбор цвета и текстуры.
Электрошторы для вашего стиля, разнообразие функций.
Рулонные электрошторы: ваш новый стиль, подбор стиля.
Электрошторы: создайте атмосферу уюта, функциональность и стиль.
Электрошторы для защиты от солнца, легкость в уходе.
Рулонные электрошторы для создания уюта, разнообразие стилей.
Топ-5 причин выбрать рулонные электрошторы, функциональность и комфорт.
автоматическая рулонная штора автоматическая рулонная штора .
Thanks for the article. Here is a website on the topic – https://40-ka.ru/
Купить рулонные электрошторы, в интерьере, доступные цены.
Рулонные электрошторы для вашего окна, для любого интерьера.
Что учесть при покупке электроштор?, разнообразие моделей.
Электрошторы для защиты от солнца, инновационные технологии.
Электрошторы для вашего интерьера, простота управления.
Электрошторы: ваш лучший выбор, доступные цены.
Рулонные электрошторы: как они работают?, идеальное решение для любой комнаты.
Электрошторы для кухни и спальни, простой монтаж.
Рулонные электрошторы как элемент декора, удобство управления.
Электрошторы для коммерческих помещений, долговечность эксплуатации.
Рулонные электрошторы для защиты от света, уникальные предложения.
Зачем купить рулонные электрошторы?, функция управления.
Рулонные электрошторы: ваш уютный уголок, легкость в уходе.
Рулонные электрошторы как элемент уюта, советы по оформлению.
Лучшие решения для оконных штор, разнообразие функций.
Рулонные электрошторы: ваш новый стиль, практические советы.
Как правильно выбрать рулонные электрошторы?, разнообразие расцветок.
Как электрошторы меняют пространство, экологичные материалы.
Электрошторы: идеальный выбор для вашего дома, простой монтаж.
Топ-5 причин выбрать рулонные электрошторы, эстетика и цена.
автоматическая рулонная штора автоматическая рулонная штора .
Thanks for the article. Here’s more on the topic https://cultureinthecity.ru/
ремонт бака стиральной машины стиральная машина миля ремонт
Mountain Topper https://www.lnrprecision.com transceivers from the official supplier. Compatibility with leading brands, stable supplies, original modules, fast service.
Hindi News https://tfipost.in latest news from India and the world. Politics, business, events, technology and entertainment – just the highlights of the day.
Наша организация выполняет надежные услуги грузоперевозок по трассе Москва — Питер с ежедневными рейсами и перевозкой от 12 часов. Мы обеспечиваем качественную транспортировку любых типов товаров благодаря современному автотранспорту и опытным шоферам. Предлагаем конкурентные тарифы, полное защиту грузов и возможность мониторинга в режиме реального времени. Персональный подход к каждому партнеру и удобная система бонусов делают нас ответственным исполнителем для вашего бизнеса. Подробная информация и специальные коммерческие предложения доступны на нашем портале.
New AI generator nsfw ai art of the new generation: artificial intelligence turns text into stylish and realistic image and videos.
Элегантные автоматические рулонные шторы для вашего дома, рекомендуем.
Руководство по выбору автоматических рулонных штор, ваш интерьер.
Зачем нужны автоматические рулонные шторы в вашем доме, узнайте больше.
Автоматические рулонные шторы: стиль и комфорт, покупая.
Легкость управления автоматическими рулонными шторами, нашими предложениями.
Как ухаживать за автоматическими рулонными шторами, для того чтобы.
Как автоматические рулонные шторы меняют оформление интерьера, в нашем руководстве.
Шторы, которые сами закрываются: автоматизация в вашем доме, ознакомьтесь.
Почему автоматические рулонные шторы — это удобно и стильно, изучите подробности.
Как автоматические рулонные шторы улучшают качество жизни, узнайте больше.
Автоматические рулонные шторы — удобство в каждой детали, сегодня.
Автоматические рулонные шторы: идеальное решение для светолюбителей, в нашем блоге.
Технические особенности автоматических рулонных штор, учитесь.
Дизайн и функциональность: автоматические рулонные шторы, с идеями.
Сравнение автоматических рулонных штор различных брендов, на нашем сайте.
Автоматические рулонные шторы: идеальное дополнение к вашему интерьеру, сейчас.
Энергоэффективные решения для окон: автоматические рулонные шторы, приобретите.
Советы по выбору автоматических рулонных штор для офисов, ознакомьтесь.
Выбор автоматических рулонных штор: советы от экспертов, ознакомьтесь.
Как автоматические рулонные шторы улучшают атмосферу в общественных местах, с нашим предложением.
автоматическая рулонная штора автоматическая рулонная штора .
Animal Feed https://pvslabs.com Supplements in India: Vitamins, Amino Acids, Probiotics and Premixes for Cattle, Poultry, Pigs and Pets. Increased Productivity and Health.
Обеспечиваем оперативную перевозку товаров между Москвой и СПБ всего за 12 часов! Функционируем каждый день, перевозим любые товары — от документов до крупногабаритных товаров. Никаких скрытых оплат, полная открытость процесса и отчетность по каждой отправке. Экономьте время и деньги, поручая свои отправления экспертам с большим опытом. Оставьте заявку на нашем портале и получите смету стоимости в течение часа!
Преимущества автоматических рулонных штор в интерьере, советуем.
Руководство по выбору автоматических рулонных штор, чтобы.
Почему стоит выбрать автоматические рулонные шторы, получите информацию.
Преобразите свой дом с автоматическими рулонными шторами, заказывая.
Управление автоматической рулонной шторой одним нажатием, нашими предложениями.
Как ухаживать за автоматическими рулонными шторами, поддерживать идеальное состояние.
Как автоматические рулонные шторы меняют оформление интерьера, исследуйте.
Шторы, которые сами закрываются: автоматизация в вашем доме, с отзывами пользователей.
Идеальные автоматические рулонные шторы для каждого стиля, посмотрите наш каталог.
Лучшие решения для окон — автоматические рулонные шторы, узнайте больше.
Автоматические рулонные шторы — удобство в каждой детали, сейчас.
Советы по использованию автоматических рулонных штор для оптимального освещения, узнайте.
Технические особенности автоматических рулонных штор, учитесь.
Дизайн и функциональность: автоматические рулонные шторы, получите.
Обзор популярных брендов автоматических рулонных штор, в нашем обзоре.
Современные решения для окон с автоматическими рулонными шторами, сейчас.
Энергоэффективность и автоматические рулонные шторы, узнайте подробнее.
Автоматические рулонные шторы и их преимущества для офисов, проверьте.
Выбор автоматических рулонных штор: советы от экспертов, проконсультируйтесь.
Как автоматические рулонные шторы улучшают атмосферу в общественных местах, узнайте.
автоматическая рулонная штора автоматическая рулонная штора .
Нужен ответственного перевозчика между Москвой и Санкт-Петербургом? Наши сотрудники работают по этому маршруту каждый день и знают его как свои пять пальцев. Осознаем, что каждый товар важен для вашего дела, поэтому относимся к нему как к своему собственному. Справедливые цены без накруток, полное страхование и постоянная связь с водителем. Сотрудничаем с организациями любого размера и всегда идем навстречу. Все условия и примеры работы смотрите на нашем сайте.
ремонт стиральных машин телефон ремонт стиральных машин miele
Преимущества автоматических рулонных штор в интерьере, советуем.
Руководство по выбору автоматических рулонных штор, освежить.
Почему стоит выбрать автоматические рулонные шторы, в нашем магазине.
Преобразите свой дом с автоматическими рулонными шторами, у нас.
Управление автоматической рулонной шторой одним нажатием, воспользуйтесь.
Правила ухода за автоматическими рулонными шторами, поддерживать идеальное состояние.
Автоматические рулонные шторы в интерьере: тренды 2023 года, исследуйте.
Автоматизированные рулонные шторы: что нужно знать, прочитайте.
Почему автоматические рулонные шторы — это удобно и стильно, изучите подробности.
Комфорт и уют с автоматическими рулонными шторами, проверьте.
Обновите ваш дом с помощью автоматических рулонных штор, закажите.
Автоматические рулонные шторы: идеальное решение для светолюбителей, узнайте больше.
Что нужно знать о механизме автоматических рулонных штор, познакомьтесь.
Автоматические рулонные шторы: как они меняют привычный интерьер, ознакомьтесь.
Сравнение автоматических рулонных штор различных брендов, в нашем обзоре.
Создайте стильный интерьер с автоматическими рулонными шторами, в нашем магазине.
Энергоэффективность и автоматические рулонные шторы, на нашем сайте.
Как автоматические рулонные шторы улучшают рабочее пространство, ознакомьтесь.
Где купить качественные автоматические рулонные шторы, проконсультируйтесь.
Идеальные шторы для бизнеса — автоматические рулонные шторы, узнайте.
автоматическая рулонная штора автоматическая рулонная штора .
Автоматическая рулонная штора: удобство и стиль, советуем.
Руководство по выбору автоматических рулонных штор, ваше пространство.
Зачем нужны автоматические рулонные шторы в вашем доме, узнайте.
Преобразите свой дом с автоматическими рулонными шторами, покупая.
Легкость управления автоматическими рулонными шторами, обязательно ознакомьтесь.
Как ухаживать за автоматическими рулонными шторами, для того чтобы.
Как автоматические рулонные шторы меняют оформление интерьера, в нашем блоге.
Умные рулонные шторы для современного интерьера, с советами по выбору.
Почему автоматические рулонные шторы — это удобно и стильно, узнайте прямо сейчас.
Комфорт и уют с автоматическими рулонными шторами, проверьте.
Автоматические рулонные шторы — удобство в каждой детали, получите.
Как автоматические рулонные шторы решают проблемы с освещением, в нашем блоге.
Что нужно знать о механизме автоматических рулонных штор, познакомьтесь.
Эстетика автоматических рулонных штор, получите.
Обзор популярных брендов автоматических рулонных штор, на нашем сайте.
Автоматические рулонные шторы: идеальное дополнение к вашему интерьеру, закажите.
Энергоэффективность и автоматические рулонные шторы, узнайте подробнее.
Советы по выбору автоматических рулонных штор для офисов, ознакомьтесь.
Выбор автоматических рулонных штор: советы от экспертов, проконсультируйтесь.
Как автоматические рулонные шторы улучшают атмосферу в общественных местах, узнайте.
автоматическая рулонная штора автоматическая рулонная штора .
Thanks for the article. Here’s more on the topic https://great-galaxy.ru/
Современные перевозки грузов Москва-СПБ нового поколения с полным контролем процесса. Интеллектуальная логистика позволяет совершенствовать направления и минимизировать время транспортировки до минимума. GPS-отслеживание, автоматические сообщения и подробная аналитика по каждой доставке в личном кабинете. Открытое ценообразование на основе алгоритмов и оперативный расчет стоимости онлайн. Переходите в эпоху умной логистики вместе с нами — начните на нашей платформе.
Как оформить карту иностранная банковская карта для россиян в 2025 году. Зарубежную банковскую карту можно открыть и получить удаленно онлайн с доставкой в Россию и другие страны. Карты подходят для оплаты за границей.
En sevilen filmleri sorunsuz izlemek isteyenlere türkçe dublaj full hd film izle imkanı sunuyoruz. Her film, kaliteli ses ve görüntüyle buluşarak evinize sinema atmosferi getiriyor. Hemen erişim sağlayarak favori yapımlarınızı keşfedin.
Son yıllarda yayın platformlarının yükselişi dikkat çekici oldu. Önemli bir trend, özellikle Full HD ve 4K çözünürlüklerde yüksek tanımlı içeriğe olan talebin artmasıdır. İnsanlar, netlik ve detaylara vurgu yapan etkileyici izleme deneyimleri arayışında.
1920×1080 piksel çözünürlükle Full HD filmler olağanüstü görsel kaliteyi beraberinde getirir. Daha büyük ekranlarda bu çözünürlük ön plana çıkar, izleyicilerin her detayı takdir etmesini sağlar. Buna karşılık, 4K filmler 3840×2160 piksel çözünürlükle izleme deneyimini olağanüstü hale getirir.
Yayın platformları bu trende kayıtsız kalmayarak şimdi geniş bir Full HD ve 4K film seçkisi sunuyor. Böylece, seyirciler hem yeni yapımları hem de sevilen klasik filmleri en yüksek görsel kalitede izleyebiliyor. Ek olarak, birçok platform bu yüksek tanımlı formatları vurgulayan orijinal içerikler üretmeye odaklanıyor.
Kısaca, yayın platformlarında Full HD ve 4K filmlerin artması izleyici zevklerindeki değişimi ortaya koyuyor. Teknoloji ilerledikçe, görsel medyayı tüketme şeklimizde daha fazla gelişme bekleyebiliriz. Bu trendler, film sektörü ve evde izleme alışkanlıklarının geleceğini önemli ölçüde değiştirecektir.
Thanks for the article. Here is a website on the topic – https://40-ka.ru/
Электрические рулонные шторы на окна, для вашего интерьера.
Рулонные шторы с электроприводом, современные технологии для вашего комфорта.
Автоматизация окон: рулонные шторы, в каждой детали.
Лучшая автоматизация окон, без лишних усилий.
Как выбрать электрические рулонные шторы, для улучшения комфорта.
Элегантность и технологии в рулонных шторах, по доступной цене.
Инновационные электрические рулонные шторы, для вашего дома и офиса.
Какие выбрать электрические рулонные шторы?, для вашего дома.
Технология автоматизации рулонных штор, добавляет удобства.
Лучшие электрические рулонные шторы на рынке, с первоклассным качеством.
Электрические рулонные шторы: удобство и стиль, для вашего уюта.
Электрические рулонные шторы: все, что нужно знать, в вашем доме.
Где купить рулонные шторы с электроприводом?, по лучшей цене.
Как электрические рулонные шторы изменят ваш дом, для вашего удобства.
Электрические рулонные шторы: преимущества, для улучшения качества жизни.
Как установить электрические рулонные шторы, просто и удобно.
Современные автоматические рулонные шторы, для практичного использования.
Электронные решения для коммерческих помещений, для удобства сотрудников.
Электрические шторы: экономия и комфорт, для вашего офиса.
электрические рулонные шторы на окна электрические рулонные шторы на окна .
За 15 лет работы мы транспортировали более 100 000 заказов по маршруту Москва-Петербург без единой серьезной аварии. Клиенты доверяют нас за постоянство, своевременность и добросовестную работу без сюрпризов. Быстрая перевозка за 12 часов стала нашим нормой, а не исключением. Ведущие грузовые корпорации передают нам свои самые важные грузы. Присоединяйтесь к тысячам довольных заказчиков — все отзывы и кейсы на нашем портале.
Наша организация предоставляет качественные услуги грузоперевозок по трассе Москва — СПБ с постоянными отправками и перевозкой от 12 часов. Мы предоставляем безопасную перевозку любых типов товаров благодаря новому подвижному составу и опытным шоферам. Предлагаем конкурентные расценки, полное страхование грузов и возможность мониторинга в режиме реального времени. Индивидуальный подход к каждому клиенту и гибкая система скидок делают нас надежным исполнителем для вашего бизнеса. Подробная информация и специальные коммерческие предложения доступны на нашем портале.
Автоматические рулонные шторы для вашего дома, удобство и элегантность.
Идеальное решение для современных окон, современные технологии для вашего комфорта.
Электрические шторы для умного дома, в каждом движении.
Управление рулонными шторами одним нажатием, все в ваших руках.
Как выбрать электрические рулонные шторы, для вашего интерьера.
Умные рулонные шторы: необычные решения, доступные решения для вашего дома.
Электрические шторы: комфортный выбор, доступные для любого интерьера.
Какие выбрать электрические рулонные шторы?, для стильного интерьера.
Технология автоматизации рулонных штор, облегчает вашу жизнь.
Лучшие электрические рулонные шторы на рынке, в идеальном сочетании.
Почему стоит выбрать электрические шторы, для создания неповторимого стиля.
Как выбрать электрические рулонные шторы, для вашего офиса.
Купить электрические рулонные шторы: советы, по лучшей цене.
Электрические рулонные шторы: функциональность и стиль, в лучшую сторону.
Электрические рулонные шторы: преимущества, для вашего комфорта.
Как установить электрические рулонные шторы, с соблюдением всех стандартов.
Современные автоматические рулонные шторы, для стильного оформления.
Автоматизация офисных окон: рулонные шторы, для улучшения рабочего пространства.
Обзор рулонных штор с электроприводом, для вашего интерьера.
электрические рулонные шторы на окна электрические рулонные шторы на окна .
Автоматические рулонные шторы для вашего дома, комфорт и стиль.
Идеальное решение для современных окон, качество и надежность.
Автоматизация окон: рулонные шторы, красота.
Умные решения для вашего интерьера, все в ваших руках.
Выбор рулонных штор с электроприводом, для улучшения комфорта.
Умные рулонные шторы: необычные решения, доступные решения для вашего дома.
Инновационные электрические рулонные шторы, для создания стильного пространства.
Какие выбрать электрические рулонные шторы?, для функционального пространства.
Электрические рулонные шторы: как они работают?, добавляет стиля.
Топ моделей электрических рулонных штор, для вашего комфорта.
Электрические рулонные шторы: удобство и стиль, для вашего уюта.
Обзор электрических штор для окон, для вашего офиса.
Где купить рулонные шторы с электроприводом?, с качественными материалами.
Как электрические рулонные шторы изменят ваш дом, для вашего удобства.
Электрические рулонные шторы: обзор и советы, для вашего комфорта.
Как установить электрические рулонные шторы, просто и удобно.
Современные автоматические рулонные шторы, для улучшения условий жизни.
Электрические рулонные шторы для бизнеса, для современной эстетики.
Обзор рулонных штор с электроприводом, для вашего интерьера.
электрические рулонные шторы на окна электрические рулонные шторы на окна .
Электрические рулонные шторы на окна, функциональность и современность.
Преимущества электрических рулонных штор, долговечность и простота в использовании.
Электрические шторы для умного дома, в каждом движении.
Умные решения для вашего интерьера, без лишних усилий.
Советы по выбору ролл-штор, для улучшения комфорта.
Элегантность и технологии в рулонных шторах, с гарантией качества.
Современные рулонные шторы для окон, доступные для любого интерьера.
Какие выбрать электрические рулонные шторы?, для стильного интерьера.
Электрические рулонные шторы: как они работают?, облегчает вашу жизнь.
Топ моделей электрических рулонных штор, для вашего комфорта.
Почему стоит выбрать электрические шторы, для создания неповторимого стиля.
Как выбрать электрические рулонные шторы, для вашего офиса.
Купить электрические рулонные шторы: советы, по лучшей цене.
Электронные шторы для любого интерьера, для вашего удобства.
Лучшие электрические рулонные шторы для вашего дома, для вашего комфорта.
Электрические рулонные шторы: монтаж, всегда под контролем.
Электрические рулонные шторы: идеальные решения, для улучшения условий жизни.
Электронные решения для коммерческих помещений, для улучшения рабочего пространства.
Электрические рулонные шторы: выгодные решения, для вашего дома.
электрические рулонные шторы на окна электрические рулонные шторы на окна .
Выполняем скоростную доставку отправлений между Москвой и Питером всего за 12 часов! Действуем каждый день, перевозим любые грузы — от документов до габаритных товаров. Никаких скрытых платежей, полная честность процесса и отчетность по каждой отправке. Экономьте время и деньги, передавая свои товары профессионалам с солидным опытом. Оставьте заявку на нашем ресурсе и получите калькуляцию стоимости в течение часа!
iflow камеры https://citadel-trade.ru/ .
электрокарниз двухрядный http://www.elektrokarniz90.ru/ .
рулонные шторки на окна рулонные шторки на окна .
рулонные шторы каталог цены https://www.rulonnye-shtory-s-elektroprivodom15.ru .
Thanks for the article. Here’s more on the topic https://shvejnye.ru/
Ищете проверенного перевозчика между Москвой и Санкт-Петербургом? Наши водители курсируют по этому пути каждый день и знают его как свои пять пальцев. Знаем, что каждый груз важен для вашего дела, поэтому работаем к нему как к своему собственному. Справедливые расценки без накруток, полное покрытие и постоянная связь с перевозчиком. Работаем с компаниями любого размера и всегда идем навстречу. Все условия и примеры работы смотрите на нашем портале.
Современные грузоперевозки Москва-Санкт-Петербург нового поколения с полным контролем процесса. Интеллектуальная логистика позволяет оптимизировать направления и сокращать время перевозки до минимума. GPS-отслеживание, автоматические сообщения и полная аналитика по каждой доставке в личном кабинете. Честное ценообразование на основе алгоритмов и быстрый расчет стоимости онлайн. Переходите в эпоху умной логистики вместе с нами — начните на нашей системе.
мп3 музыка скачать мп3 музыка скачать .
музыку скачать бесплатно mp3 все песни в хорошем качестве музыку скачать бесплатно mp3 все песни в хорошем качестве .
Мечтаете о просторном семейном гнезде? Найдите свой идеал среди наших готовых проектов домов, разработанных для комфорта всех поколений.
Недавно проекты домов приобрели огромную популярность среди тех, кто мечтает о собственном жилье. Определение подходящего проекта дома является решающим шагом на пути к уюту и комфорту.
Существует множество стилей и разновидностей проектов домов. Каждый человек может найти что-то подходящее для себя.
Учитывать размеры земельного участка — это первостепенная задача при выборе проекта. Анализировать климатические условия и окружение также следует при выборе проекта.
Технологический прогресс помогает в создании оригинальных и уникальных проектов домов. Каждый проект можно настроить в соответствии с требованиями клиента.
За 15 лет работы мы транспортировали более 100 000 отправлений по маршруту Москва-СПБ без единой серьезной аварии. Партнеры предпочитают нас за стабильность, точность и честную работу без сюрпризов. Быстрая перевозка за 12 часов стала нашим стандартом, а не исключением. Крупные логистические корпорации поручают нам свои самые важные заказы. Войдите в число к тысячам довольных клиентов — все отзывы и кейсы на нашем портале.
Thanks for the article. Here’s more on the topic https://great-galaxy.ru/
Мечтаете о теплом море и живописных пейзажах? Откройте для себя все прелести курортного поселка Джубга в 2025 году. Забронируйте комфортабельное жилье у моря заранее и обеспечьте себе идеальный отдых в джубге 2025.
Отдых в Джубге — отличный выбор для тех, кто ищет море и солнце. Этот курорт славится своими пляжами и живописными пейзажами.
Множество туристов приезжает сюда каждый год, чтобы насладиться местными достопримечательностями. Среди популярных мест можно выделить водопады и дольмены.
Кроме того, Джубга предлагает разнообразные развлечения для всей семьи. Здесь можно заниматься различными видами активного отдыха, включая водные виды спорта и прогулки.
Не забывайте об отдыхе на пляже — это важная часть вашего времени в Джубге. Пляжная жизнь в Джубге включает в себя купание, принятие солнечных ванн и дегустацию местной кухни в уютных кафе.
Thanks for the article. Here’s more on the topic https://shvejnye.ru/
LMC Middle School https://lmc896.org in Lower Manhattan provides a rigorous, student-centered education in a caring and inclusive atmosphere. Emphasis on critical thinking, collaboration, and community engagement.
Наша организация предоставляет профессиональные услуги грузоперевозок по трассе Москва — Санкт-Петербург с ежедневными отправками и транспортировкой от 12 часов. Мы обеспечиваем безопасную доставку любых типов товаров благодаря обновленному автопарку и опытным водителям. Предлагаем выгодные расценки, полное покрытие товаров и возможность мониторинга в режиме реального времени. Персональный подход к каждому партнеру и удобная система бонусов делают нас ответственным исполнителем для вашего бизнеса. Полная информация и специальные коммерческие предложения доступны на нашем портале.
I like the helpful info you provide in your articles. I’ll bookmark your blog and check again here frequently. I am quite sure I’ll learn lots of new stuff right here! Good luck for the next!
Выполняем оперативную транспортировку грузов между Москвой и СПБ всего за 12 часов! Функционируем каждый день, перевозим любые товары — от документов до крупногабаритных товаров. Никаких скрытых оплат, полная честность процесса и отчетность по каждой отправке. Экономьте время и деньги, передавая свои товары профессионалам с многолетним опытом. Оставьте заявку на нашем портале и получите калькуляцию стоимости в течение часа!
Нужен ответственного транспортировщика между Москвой и СПБ? Наши сотрудники работают по этому пути каждый день и знают его как свои пять пальцев. Понимаем, что каждый груз важен для вашего дела, поэтому работаем к нему как к своему собственному. Прозрачные расценки без переплат, полное страхование и постоянная связь с курьером. Работаем с компаниями любого размера и всегда идем навстречу. Все условия и примеры работы смотрите на нашем сайте.
Сшить римские шторы на заказ, доступной цене.
Хотите обновить интерьер с помощью римских штор?, сшите.
Как сшить римские шторы под заказ, с помощью.
Сшить римские шторы для любого интерьера, в.
Римские шторы, сшитые по вашим меркам, заказать онлайн.
Ваши мечты о римских шторах сбываются, выберите.
Сшите идеальные римские шторы для вашего дома, в любое время.
Идеальные римские шторы для вашего интерьера, это просто.
Полезные советы по выбору римских штор, с нашим ассортиментом.
Уникальные римские шторы на заказ, по нашим лучшим ценам.
Краткое руководство по созданию римских штор, читайте.
Заказывайте римские шторы и наслаждайтесь комфортом, недорого.
Индивидуальный подход к изготовлению римских штор, индивидуальным дизайном.
Римские шторы на заказ для вашего комфорта, доступным ценам.
Ваш индивидуальный проект римских штор, всегда.
Как правильно сшить римские шторы по размеру, в нашем магазине.
Римские шторы под заказ – это красиво, быстро.
Сшить римские шторы с учетом ваших пожеланий, доставки.
сшить римские шторы на заказ сшить римские шторы на заказ .
скачать музыку мп3 скачать музыку мп3 .
Сравните стоимость разных вариантов размещения и сезонов. Наш сайт поможет найти лучшую абхазия отдых цены.
Абхазия предлагает чудесные условия для отдыха и незабываемые впечатления. Сосновые леса, горные вершины и ласковый Черное море завораживают гостей.
Многочисленные туристы выбирают Абхазию как идеальное место для отдыха и развлечений. Здесь можно не только отдохнуть на пляже, но и заняться активными видами спорта.
Выбор жилья в Абхазии впечатляет: от уютных гостевых домов до современных гостиниц. Гастрономическая культура Абхазии порадует даже самых искушённых гурманов.
Отдых в Абхазии позволит вам забыть о повседневной рутине и насладиться моментом. Абхазия ждёт вас с открытыми объятиями и множеством новых впечатлений.
Современные грузоперевозки Москва-СПБ нового поколения с полным мониторингом процесса. Умная логистика позволяет улучшать направления и минимизировать время транспортировки до минимума. GPS-отслеживание, автоматические сообщения и детальная аналитика по каждой отправке в личном кабинете. Прозрачное формирование цен на основе алгоритмов и мгновенный расчет стоимости онлайн. Переходите в эпоху умной логистики вместе с нами — начните на нашей сервисе.
Сшить римские шторы на заказ, просто.
Нужны римские шторы?, заказывайте.
Профессиональное изготовление римских штор, гарантией качества.
Сшить римские шторы для любого интерьера, доступной цене.
Найдите свои идеальные римские шторы, по.
Индивидуальное изготовление римских штор, получите.
Качественное изготовление римских штор, недорого.
Сшить римские шторы на заказ с любовью, это просто.
Полезные советы по выбору римских штор, разберитесь.
Римские шторы под заказ в любом стиле, приобретите.
Сшить римские шторы легко, на наш блог.
Сшить римские шторы с учетом всех пожеланий, просто.
Индивидуальный подход к изготовлению римских штор, гарантией качества.
Римские шторы на заказ для вашего комфорта, при.
Ваш индивидуальный проект римских штор, по индивидуальным расчетам.
Стильные римские шторы на заказ, заказывайте.
Сшить римские шторы в несколько кликов, легко.
Римские шторы, сделанные на заказ, соответствия.
сшить римские шторы на заказ сшить римские шторы на заказ .
песню скачать бесплатно песню скачать бесплатно .
Сшить римские шторы на заказ, красиво.
Хотите обновить интерьер с помощью римских штор?, дизайны.
Римские шторы на заказ от опытных мастеров, высококачественных материалов.
Лучшие римские шторы на заказ, высокому стандарту.
Римские шторы, сшитые по вашим меркам, по.
Ваши мечты о римских шторах сбываются, в удобное время.
Заказ римских штор по индивидуальным размерам, всегда.
Сшить римские шторы на заказ с любовью, вы будете довольны результатом.
Как выбрать римские шторы на заказ? , разберитесь.
Уникальные римские шторы на заказ, узнайте.
Сшить римские шторы легко, на полезные материалы.
Заказывайте римские шторы и наслаждайтесь комфортом, просто.
Сшите римские шторы именно так, как хотите, в.
Не откладывайте заказ римских штор, при.
Ваш индивидуальный проект римских штор, всегда.
Изготовление римских штор под заказ, на нашем сайте.
Заказывайте римские шторы по вашим размерам, быстро.
Сшить римские шторы с учетом ваших пожеланий, качества.
сшить римские шторы на заказ сшить римские шторы на заказ .
За 15 лет работы мы транспортировали более 100 000 заказов по трассе Москва-Санкт-Петербург без единой серьезной аварии. Заказчики доверяют нас за стабильность, пунктуальность и добросовестную работу без сюрпризов. Срочная транспортировка за 12 часов стала нашим стандартом, а не исключением. Крупные транспортные корпорации поручают нам свои самые важные отправления. Войдите в число к тысячам довольных клиентов — все отзывы и кейсы на нашем сайте.
Thanks for the article. Here’s more on the topic https://shvejnye.ru/
Изготовление римских штор по индивидуальным размерам, великолепно.
Хотите обновить интерьер с помощью римских штор?, наши.
Как сшить римские шторы под заказ, высококачественных материалов.
Сшить римские шторы для любого интерьера, с.
Откройте для себя мир римских штор, на.
Сшить римские шторы – это просто, прямо сейчас.
Заказ римских штор по индивидуальным размерам, всегда.
Идеальные римские шторы для вашего интерьера, это просто.
Римские шторы, сшитые на заказ, как выбрать?, посмотрите.
Римские шторы под заказ в любом стиле, приобретите.
Краткое руководство по созданию римских штор, на полезные материалы.
Заказывайте римские шторы и наслаждайтесь комфортом, недорого.
Индивидуальный подход к изготовлению римских штор, подбору тканей.
Ваши идеальные римские шторы ждут вас, особым условиям.
Ваш индивидуальный проект римских штор, всегда.
Как правильно сшить римские шторы по размеру, в интернет-магазине.
Римские шторы под заказ – это красиво, просто.
Сшить римские шторы с учетом ваших пожеланий, с гарантией.
сшить римские шторы на заказ сшить римские шторы на заказ .
Правильно выбранный экран для проектора — залог комфортного просмотра и профессиональной презентации. Найдите свою идеальную модель у нас экран для проектора.
Экран для проектора — это ключевой компонент, обеспечивающий высокое качество изображения. Верный выбор экрана может значительно улучшить качество отображаемой информации.
Существует множество разновидностей экранов, включая мобильные, фиксированные и настенные. Каждый из этих типов имеет свои уникальные характеристики и достоинства.
При выборе экрана важно учитывать размеры помещения и тип проектора. Оптимальные размеры экрана зависят от расстояния от него до зрителей.
Чтобы обеспечить лучшее восприятие картинки, нужно обращать внимание на уровень освещения. Если освещение достаточно яркое, лучше использовать экран с матовой поверхностью.
Thanks for the article. Here’s more on the topic https://voenoboz.ru/
Создание римских штор своими руками, ваш дом.
Как сделать римские шторы: , Вашему дому.
Как сшить римские шторы: советы, что.
Создание римских штор: что нужно знать
пошить римские шторы пошить римские шторы .
Thanks for the article. Here’s more on the topic https://voenoboz.ru/
Thanks for the article. Here’s more on the topic https://shvejnye.ru/
Узнайте, как пошить римские шторы, украсить.
Пошив римских штор: пособие
пошить римские шторы пошить римские шторы .
Агентство контекстной рекламы https://kontekst-dlya-prodazh.ru настройка Яндекс.Директ и Google Ads под ключ. Привлекаем клиентов, оптимизируем бюджеты, повышаем конверсии.
Узнайте, как сделать римские шторы, украсить.
Как сделать римские шторы: подробное описание
пошить римские шторы пошить римские шторы .
Продвижение сайтов https://optimizaciya-i-prodvizhenie.ru в Google и Яндекс — только «белое» SEO. Улучшаем видимость, позиции и трафик. Аудит, стратегия, тексты, ссылки.
Как пошить римские шторы: шаг за шагом, украсить.
Всё о римских шторах: указания
пошить римские шторы пошить римские шторы .
Инженерная сантехника https://vodazone.ru в Москве — всё для отопления, водоснабжения и канализации. Надёжные бренды, опт и розница, консультации, самовывоз и доставка по городу.
Шины и диски https://tssz.ru для любого авто: легковые, внедорожники, коммерческий транспорт. Зимние, летние, всесезонные — большой выбор, доставка, подбор по марке автомобиля.
LEBO Coffee https://lebo.ru натуральный кофе премиум-качества. Зерновой, молотый, в капсулах. Богатый вкус, аромат и свежая обжарка. Для дома, офиса и кофеен.
Gymnastics Hall of Fame https://usghof.org Biographies of Great Athletes Who Influenced the Sport. A detailed look at gymnastics equipment, from bars to mats.
создать сайт через нейросеть создать сайт нейросетью онлайн
Thanks for the article. Here’s more on the topic https://voenoboz.ru/
Thanks for the article. Here is a website on the topic – https://kanunnikovao.ru/
UP X — обзор официальной платформы Ап Икс
Сегодня абсолютно каждый житель Российской Федерации может сыграть в увлекательные игровые автоматы, и при этом не покидая собственное жилище. Выбирая подобный формат онлайн развлечений, игрокам следует осознавать, что это не способ обогащения, а возможность получить яркие эмоции и незабываемые впечатления, внести разнообразие в повседневную жизнь.
https://mymcu.ru/
Thanks for the article. Here’s more on the topic https://voenoboz.ru/
Thanks for the article. Here is a website on the topic – https://kanunnikovao.ru/
экскаватор аренда сутки http://www.arenda-ehkskavatora-1.ru .
металлические пины на заказ http://znacki-na-zakaz.ru .
прогнозы футбольных матчей https://kompyuternye-prognozy-na-futbol1.ru .
Thanks for the article. Here’s more on the topic https://kaizen-tmz.ru/
Shipment
Partnering with Cargo Bolt for Worldwide Logistics Excellence
In today’s fast-paced and interconnected world, streamlined transport and logistics play a crucial role for the success of any business. Cargo Bolt offers comprehensive and expert logistics support, providing end-to-end services for global cargo handling and delivery.
With a presence in over 20 countries and an extensive international network of partners and agents, Cargo Bolt is committed to delivering high-quality logistics services designed specifically for each customer.
Comprehensive Freight Services
Cargo Bolt specializes in numerous modes of freight transport and logistics support, ensuring flexibility, speed, and reliability:
Ocean Freight Forwarding
Ocean freight plays an essential part in international commerce and logistics. Cargo Bolt offers complete sea freight management systems, including boxed cargo transport, route planning, customs clearance, and documentation — all designed to ensure hassle-free cross-border transport.
Road Freight Forwarding
Road transport remains a vital component of modern logistics, especially for regional and last-mile deliveries. We provide affordable yet fast land-based shipping solutions, with options that suit multiple load types, trip lengths, and dispatch windows.
Worldwide Transport & Ground Transport
Whether it’s local deliveries or cross-border shipments, our ground transportation services offer adaptable and trustworthy solutions for any freight type. From lightweight items to bulk consignments, we ensure your goods reach their destination safely and efficiently.
лучшие клиники адрес клиники
general hospital Bar hospital
Пляжный сезон открыт, а отдых в абхазии цена делает поездку особенно привлекательной — не упустите момент забронировать жильё заранее.
Многие предпочитают отдыхать в Абхазии, так как это невероятное направление. Пейзажи Абхазии поражают своей красотой и разнообразием.
Курорты Абхазии находятся на берегу Черного моря и привлекают многих отдыхающих. Для туристов доступны разнообразные варианты размещения: от гостиниц до частных домов.
Уникальные природные чудеса Абхазии приятно удивляют отдыхающих. Горные пейзажи, живописные озера и величественные водопады манят туристов.
Любители вкусной еды найдут в Абхазии множество интересных блюд. Кулинарные традиции Абхазии отличаются уникальным сочетанием вкусов и свежестью продуктов.
La compañía de espectáculos de drones ofrece soluciones visuales sorprendentes, fusionando arte digital, diseño escénico y vuelo automatizado. Una forma inolvidable de marcar un hito en tu evento corporativo o celebración familiar.
Los espectáculos de drones se han vuelto muy populares en la actualidad. Estos eventos combinan tecnología, arte y entretenimiento. Las exhibiciones de drones son cada vez más comunes en festivales y celebraciones.
Los drones equipados con luces generan figuras fascinantes en el firmamento. Las audiencias suelen quedar asombradas por la combinación de luces y coreografías.
Muchos organizadores optan por contratar compañías especializadas para estos eventos. Estas empresas cuentan con pilotos capacitados y equipos de última generación.
La seguridad es un aspecto crucial en estos espectáculos. Se implementan protocolos rigurosos para garantizar la protección de los asistentes. El futuro de los espectáculos de drones es prometedor, con innovaciones constantes.
mostbet şifrə unutmuşam mostbet şifrə unutmuşam
Оформиление дипломов ВУЗов по всей Украине — с печатями, подписями, приложением и возможностью архивной записи (по запросу).
Документ максимально приближен к оригиналу и проходит визуальную проверку.
Мы гарантируем, что в случае проверки документа, подозрений не возникнет.
– Конфиденциально
– Доставка 3–7 дней
– Любая специальность
Уже более 2721 клиентов воспользовались услугой — теперь ваша очередь.
Сайт компании — ответим быстро, без лишних формальностей.
Покупка дипломов ВУЗов по всей Украине — с печатями, подписями, приложением и возможностью архивной записи (по запросу).
Документ максимально приближен к оригиналу и проходит визуальную проверку.
Мы даем гарантию, что в случае проверки документа, подозрений не возникнет.
– Конфиденциально
– Доставка 3–7 дней
– Любая специальность
Уже более 3758 клиентов воспользовались услугой — теперь ваша очередь.
Купить диплом с занесением — ответим быстро, без лишних формальностей.
Thanks for the article. Here’s more on the topic https://adventime.ru/
Уроки по пошиву штор, вдохновение для творчества.
Создайте идеальные шторы, с помощью нашего гида.
Шторы на заказ, для вашего стиля.
Идеи для пошива штор, в своем городе.
Уроки для новичков по пошиву штор, в нашем блоге.
Идеальные ткани для штор, и потребностям.
Модные тренды в пошиве штор, вашему интерьеру.
Как украсить шторы, и поднимали настроение.
Кулинарные шторы, в уютном стиле.
Уютные шторы для спальни, идеи по пошиву.
Идеи для штор в гостиной, по вашему вкусу.
Как ухаживать за шторами, и прекрасными.
Как выбрать стиль для штор, для любого интерьера.
Пошаговая инструкция по римским шторам, с легко доступным материалом.
Почему стоит выбрать функциональные шторы, для вашего уюта.
Идеи для штор на люверсах, которые подходят для любого окна.
Креативные идеи для штор в детской, для комфорта и радости вашего ребенка.
Лучшие советы по пошиву штор, на нашем сайте.
сшить шторы сшить шторы .
Наша наркологическая клиника в СПб оснащена современным оборудованием для диагностики и терапии. Обеспечиваем безопасное и комфортное лечение.
Клиника наркологии предоставляет услуги по лечению зависимостей и реабилитации. Здесь работают квалифицированные специалисты, готовые помочь каждому пациенту.
Одной из главных задач клиники является диагностика и лечение алкогольной и наркотической зависимости. Лечение осуществляется с использованием сочетания медикаментозной терапии и психологической поддержки.
Психологическая поддержка играет ключевую роль в процессе восстановления. Поддержка психологов позволяет пациентам лучше понимать свои проблемы и находить пути выхода из ситуации.
Каждый пациент проходит реабилитацию в своем темпе, что позволяет избежать стрессовых ситуаций. Важно помнить, что процесс выздоровления требует времени, но результаты оправдают усилия.
Виртуальные номера для Telegram https://basolinovoip.com создавайте аккаунты без SIM-карты. Регистрация за минуту, широкий выбор стран, удобная оплата. Идеально для анонимности, работы и продвижения.
Как сшить шторы своими руками, в нашем руководстве.
Сшейте уникальные шторы, для вашего дизайна.
Эксклюзивные шторы, как создать.
Техника пошива штор, которые легко реализовать.
Пошив штор для начинающих, просто и доступно.
Выбор тканей для штор, в соответствии с вашим стилем.
Стильные шторы, которые добавят шарм.
Советы по декорированию штор, чтобы они привлекали внимание.
Кулинарные шторы, как оформить.
Комфортные шторы для вашего уюта, в руководстве.
Шторы для гостиной, и особенностей.
Как ухаживать за шторами, чтобы они выглядели как новые.
Это ваши идеальные шторы, на любой вкус.
Все о римских шторах, для вашего окна.
Преимущества функциональных штор, для вашего стиля.
Шторы на люверсах, которые подходят для любого окна.
Как выбрать шторы для детской комнаты, для комфорта и радости вашего ребенка.
Как сшить шторы без усилий, для уверенных в своих силах.
сшить шторы сшить шторы .
Odjeca i aksesoari za hotele damast po sistemu kljuc u ruke: uniforme za sobarice, recepcionere, SPA ogrtaci, papuce, peskiri. Isporuke direktno od proizvodaca, stampa logotipa, jedinstveni stil.
Как сшить шторы своими руками, вдохновение для творчества.
Соберите идеальные шторы, для вашего интерьера.
Шторы на заказ, для любого интерьера.
Техника пошива штор, которые подойдут каждому.
Пошив штор для начинающих, без сложностей.
Выбор тканей для штор, по вашему вкусу.
Разнообразие стилей штор, вашему дому.
Как украсить шторы, и радовали глаз.
Шторы для кухни, как оформить.
Уютные шторы для спальни, в нашем блоге.
Идеи для штор в гостиной, по вашему вкусу.
Советы по уходу за шторами, чтобы они выглядели как новые.
Как выбрать стиль для штор, для любого интерьера.
Все о римских шторах, для вашего интерьера.
Почему стоит выбрать функциональные шторы, и создания атмосферы.
Как сшить шторы на люверсах, которые легко монтируются.
Креативные идеи для штор в детской, чтобы создать уютное пространство.
Как сшить шторы без усилий, от опытных мастеров.
сшить шторы сшить шторы .
Покупка дипломов ВУЗов В киеве — с печатями, подписями, приложением и возможностью архивной записи (по запросу).
Документ максимально приближен к оригиналу и проходит визуальную проверку.
Мы даем гарантию, что в случае проверки документа, подозрений не возникнет.
– Конфиденциально
– Доставка 3–7 дней
– Любая специальность
Уже более 4508 клиентов воспользовались услугой — теперь ваша очередь.
Мы поможем — ответим быстро, без лишних формальностей.
Уроки по пошиву штор, в нашем руководстве.
Создайте идеальные шторы, для вашего дизайна.
Индивидуальные шторы, для вашего дома.
Способы сшить шторы, которые легко реализовать.
Секреты для новичков, в нашем проекте.
Выбор тканей для штор, в соответствии с вашим стилем.
Модные тренды в пошиве штор, вашему пространству.
Декор для штор, чтобы они привлекали внимание.
Шторы для кухни, в классическом исполнении.
Как создать атмосферу в спальне, вдохновение для дизайна.
Как выбрать шторы для гостиной, и особенностей.
Уход за вашими шторами, чтобы они выглядели как новые.
Шторы в различных стилях, на любой вкус.
Как сшить римские шторы, с минимальным бюджетом.
Преимущества функциональных штор, для вашего стиля.
Идеи для штор на люверсах, которые украсят любой интерьер.
Как выбрать шторы для детской комнаты, чтобы создать уютное пространство.
Секреты идеального пошива штор, на нашем сайте.
сшить шторы сшить шторы .
Мы предлагаем оформление дипломов ВУЗов по всей Украине — с печатями, подписями, приложением и возможностью архивной записи (по запросу).
Документ максимально приближен к оригиналу и проходит визуальную проверку.
Мы гарантируем, что в случае проверки документа, подозрений не возникнет.
– Конфиденциально
– Доставка 3–7 дней
– Любая специальность
Уже более 2656 клиентов воспользовались услугой — теперь ваша очередь.
Купить диплом о высшем образовании Украины — ответим быстро, без лишних формальностей.
Thanks for the article. Here’s more on the topic https://adventime.ru/
Шторы на заказ: идеальное решение для вашего интерьера, закажите.
Шторы на заказ для любого интерьера, открывает новые горизонты.
Индивидуальные шторы: делаем ваш дом особенным, не упустите возможность.
Качественные шторы на заказ по доступной цене, с учетом всех пожеланий.
Создайте уют с помощью штор на заказ, выбирайте лучшее.
Шторы на заказ для вашего уютного дома, добавьте стиль.
Шторы на заказ: когда каждое окно в вашем доме особенное, действуйте и наслаждайтесь результатом.
Шторы на заказ: функциональность и эстетика, выберите свой стиль.
Элегантные шторы на заказ для любого стиля, находите вдохновение.
Шторы на заказ — это легко и удобно, выбирайте из множества вариантов.
шторы на заказ шторы на заказ .
профессиональные прогнозы на спорт https://kompyuternye-prognozy-na-futbol3.ru .
прогнозы на хоккей лайв luchshie-prognozy-na-khokkej.ru .
Шторы на заказ: идеальное решение для вашего интерьера, под ваши требования.
Шторы на заказ для любого интерьера, добавляет уют в ваше пространство.
Индивидуальные шторы: делаем ваш дом особенным, не стесняйтесь.
Качественные шторы на заказ по доступной цене, всегда в наличии.
Уникальные шторы, которые подчеркнут вашу индивидуальность, позвольте нам порадовать вас.
Индивидуальные шторы на заказ от лучших дизайнеров, обновите пространство.
Достаньте самовыражение через шторы на заказ, решайте прямо сейчас.
Индивидуальный подход к созданию штор под заказ, закажите прямо сейчас.
Элегантные шторы на заказ для любого стиля, ознакомьтесь с нашим каталогом.
Уникальные решения для вашего интерьера с шторами на заказ, действуйте и вдохновляйтесь.
шторы на заказ шторы на заказ .
суши на дом барнаул доставка суши барнаул
Wallet Address Checker Online
Blockchain Address Scanner
Use a top-rated wallet address checker online to scan your crypto wallet for risks like illicit activity, blacklisted assets, or compromised addresses . Stay ahead of exchange freezes and avoid losing access to your assets. Verified by crypto experts worldwide — check now.
Хирургические услуги онкооперации: диагностика, операции, восстановление. Современная клиника, лицензированные специалисты, помощь туристам и резидентам.
Создайте уникальные шторы под заказ для вашего дома, цвет.
Индивидуальный подход к шторным решениям, добавляет уют в ваше пространство.
Закажите шторы на заказ и обновите свой интерьер, не упустите возможность.
Идеальные шторы на заказ для любого бюджета, с учетом всех пожеланий.
Шторы под заказ — ваш идеальный интерьер, выбирайте лучшее.
Шторы на заказ для вашего уютного дома, обновите пространство.
Достаньте самовыражение через шторы на заказ, не откладывайте на потом.
Шторы на заказ: функциональность и эстетика, закажите прямо сейчас.
Функциональные шторы под заказ для вашего удобства, ознакомьтесь с нашим каталогом.
Уникальные решения для вашего интерьера с шторами на заказ, выбирайте из множества вариантов.
шторы на заказ шторы на заказ .
Индивидуальные шторы на заказ — стиль и комфорт в каждом доме, подберите.
Индивидуальный подход к шторным решениям, добавляет уют в ваше пространство.
Закажите шторы на заказ и обновите свой интерьер, действуйте уже сегодня.
Идеальные шторы на заказ для любого бюджета, по индивидуальным размерам.
Шторы под заказ — ваш идеальный интерьер, доверяйте профессионалам.
Шторы по вашим размерам — идеальное решение, добавьте стиль.
Найдите идеальные шторы, сделанные только для вас, решайте прямо сейчас.
Индивидуальный подход к созданию штор под заказ, выберите свой стиль.
Шторы на заказ для создания уникального образа, ознакомьтесь с нашим каталогом.
Шторы на заказ — это легко и удобно, выбирайте из множества вариантов.
шторы на заказ шторы на заказ .
Магазин брендовых кроссовок https://kicksvibe.ru Nike, Adidas, New Balance, Puma и другие. 100% оригинал, новые коллекции, быстрая доставка, удобная оплата. Стильно, комфортно, доступно!
суши недорого барнаул суши барнаул каталог
Купить рулонные электрошторы, удобство, отличное качество.
Электрошторы: идеальное решение, в каждом доме.
Что учесть при покупке электроштор?, разнообразие моделей.
Электрошторы: преимущества рулонного типа, долговечность и практичность.
Электрошторы для вашего интерьера, простота управления.
Рулонные электрошторы для любых окон, доступные цены.
Почему выбирать рулонные электрошторы?, экономия пространства.
Рулонные электрошторы на любой вкус, пошаговое руководство.
Рулонные электрошторы как элемент декора, интеллектуальные решения.
Электрошторы для коммерческих помещений, красота и комфорт.
Рулонные электрошторы для защиты от света, практичность и стиль.
Рулонные электрошторы для современного интерьера, функция управления.
Электрошторы для идеального освещения, простота управления.
Рулонные электрошторы как элемент уюта, интерьер в стиле минимализм.
Лучшие решения для оконных штор, доступные цены.
Электрошторы: идеальное решение для окон, практические советы.
Электрошторы: создайте атмосферу уюта, разнообразие расцветок.
Рулонные электрошторы: ваш надежный помощник, варианты управления.
Эстетика и уход за рулонными электрошторами, разнообразие стилей.
Электрошторы для офисов и жилых помещений, современные технологии.
автоматическая рулонная штора автоматическая рулонная штора .
Электрошторы рулонного типа, стиль, отличное качество.
Рулонные электрошторы для вашего окна, экономия энергии.
Рулонные электрошторы: советы по выбору, качество материалов.
Электрошторы для защиты от солнца, комфорт и безопасность.
Секреты выбора рулонных электроштор, экологические материалы.
Комфорт с рулонными электрошторами, долговечность.
Эстетика и практичность электроштор, идеальное решение для любой комнаты.
Как установить рулонные электрошторы, простой монтаж.
Современные технологии в рулонных электрошторах, удобство управления.
Электрошторы для коммерческих помещений, красота и комфорт.
Как выбрать идеальные электрошторы?, практичность и стиль.
Рулонные электрошторы для современного интерьера, выбор цвета.
Создайте комфорт с рулонными электрошторами, легкость в уходе.
Электрошторы: как они меняют пространство, выбор цвета и текстуры.
Электрошторы для вашего стиля, доступные цены.
Как выбрать рулонные электрошторы?, разнообразие моделей.
Электрошторы: создайте атмосферу уюта, разнообразие расцветок.
Рулонные электрошторы: ваш надежный помощник, варианты управления.
Эстетика и уход за рулонными электрошторами, простой монтаж.
Топ-5 причин выбрать рулонные электрошторы, эстетика и цена.
автоматическая рулонная штора автоматическая рулонная штора .
Электрошторы рулонного типа, удобство, доступные цены.
Электрошторы для комфорта, экономия энергии.
Что учесть при покупке электроштор?, качество материалов.
Электрошторы: преимущества рулонного типа, инновационные технологии.
Секреты выбора рулонных электроштор, простота управления.
Комфорт с рулонными электрошторами, доступные цены.
Почему выбирать рулонные электрошторы?, экономия пространства.
Как установить рулонные электрошторы, доступные инструкции.
Рулонные электрошторы как элемент декора, интеллектуальные решения.
Электрошторы для коммерческих помещений, долговечность эксплуатации.
Как выбрать идеальные электрошторы?, практичность и стиль.
Рулонные электрошторы для современного интерьера, функция управления.
Электрошторы для идеального освещения, легкость в уходе.
Дизайн и функциональность рулонных электроштор, интерьер в стиле минимализм.
Лучшие решения для оконных штор, доступные цены.
Рулонные электрошторы: ваш новый стиль, практические советы.
Электрошторы: создайте атмосферу уюта, функциональность и стиль.
Электрошторы для защиты от солнца, варианты управления.
Эстетика и уход за рулонными электрошторами, разнообразие стилей.
Электрошторы для офисов и жилых помещений, современные технологии.
автоматическая рулонная штора автоматическая рулонная штора .
Рулонные электрошторы на заказ, в офисе, современные технологии.
Электрошторы: идеальное решение, простота в использовании.
Рулонные электрошторы: советы по выбору, функциональность и стиль.
Электрошторы для защиты от солнца, инновационные технологии.
Электрошторы для вашего интерьера, простота управления.
Рулонные электрошторы для любых окон, доступные цены.
Эстетика и практичность электроштор, экономия пространства.
Электрошторы для кухни и спальни, доступные инструкции.
Электрошторы: умный дом, интеллектуальные решения.
Рулонные электрошторы: для бизнеса и дома, организация пространства.
Как выбрать идеальные электрошторы?, практичность и стиль.
Рулонные электрошторы для современного интерьера, функция управления.
Создайте комфорт с рулонными электрошторами, простота управления.
Рулонные электрошторы как элемент уюта, интерьер в стиле минимализм.
Как рулонные электрошторы улучшают интерьер, простота установки.
Как выбрать рулонные электрошторы?, практические советы.
Как правильно выбрать рулонные электрошторы?, функциональность и стиль.
Рулонные электрошторы: ваш надежный помощник, легкость в уходе.
Эстетика и уход за рулонными электрошторами, разнообразие стилей.
Рулонные электрошторы: ваш стильный акцент, современные технологии.
автоматическая рулонная штора автоматическая рулонная штора .
Wallet Address Checker Online
Crypto Wallet Validator
Use a reliable wallet address checker online to scan your crypto wallet for risks like regulatory flags, theft incidents, or underground network leaks. Stay ahead of exchange freezes and avoid losing access to your assets. Fast, secure, and trusted by thousands — check now.
Преимущества автоматических рулонных штор в интерьере, подробнее узнать.
Как выбрать автоматическую рулонную штору, обновить.
Почему стоит выбрать автоматические рулонные шторы, узнайте.
Автоматические рулонные шторы: стиль и комфорт, заказывая.
Управление автоматической рулонной шторой одним нажатием, обязательно ознакомьтесь.
Как ухаживать за автоматическими рулонными шторами, для.
Автоматические рулонные шторы в интерьере: тренды 2023 года, познакомьтесь.
Умные рулонные шторы для современного интерьера, с советами по выбору.
Идеальные автоматические рулонные шторы для каждого стиля, узнайте прямо сейчас.
Как автоматические рулонные шторы улучшают качество жизни, ознакомьтесь.
Современные автоматические рулонные шторы для стильного интерьера, получите.
Как автоматические рулонные шторы решают проблемы с освещением, узнайте больше.
Что нужно знать о механизме автоматических рулонных штор, с детальным обзором.
Эстетика автоматических рулонных штор, с примерами.
Как выбрать лучший бренд автоматических рулонных штор, узнайте.
Создайте стильный интерьер с автоматическими рулонными шторами, сейчас.
Энергоэффективные решения для окон: автоматические рулонные шторы, в нашем каталоге.
Автоматические рулонные шторы и их преимущества для офисов, в нашем блоге.
Как выбрать идеальные автоматические рулонные шторы, с нашими специалистами.
Идеальные шторы для бизнеса — автоматические рулонные шторы, познакомьтесь.
автоматическая рулонная штора автоматическая рулонная штора .
Chicken Road: What Gamblers Are Saying
Chicken Road stands out as a gambling game with arcade vibes, attracting users with its easytograsp gameplay, high RTP (98%), and distinctive cashout system. We’ve collected honest feedback from actual players to see if it lives up to expectations.
What Players Like
A lot of gamers appreciate how Chicken Road combines fast gameplay with simple controls. The ability to cash out at any time adds a strategic twist, while the high RTP makes it feel fairer than traditional slots. The demo mode is a hit with beginners, allowing players to test the game riskfree. The game earns extra points for its mobile compatibility, running seamlessly on both new and older devices.
Melissa R., AU: “Unexpectedly enjoyable and balanced! The ability to cash out brings a layer of strategy.”
Nathan K., UK: “The retro arcade vibe feels invigorating. Plus, it works perfectly on my tablet.”
Players also enjoy the colorful, nostalgic design, which feels both fun and engaging.
Areas for Improvement
Despite its strengths, Chicken Road isn’t without flaws. A number of users feel the gameplay becomes monotonous and lacks complexity. Others mention slow customer support and limited features. One frequent criticism is deceptive marketing, as people thought it was a pure arcade game rather than a gambling platform.
Tom B., US: “Fun at first, but it gets repetitive after a few days.”
Sam T., UK: “Promoted as entertainment, yet it turns out to be a gambling product.”
Strengths and Weaknesses
Positive Aspects
Straightforward, actionpacked mechanics
An RTP of 98% guarantees a fair experience
Demo mode for riskfree learning
Seamless operation on smartphones and tablets
Disadvantages
It might feel too predictable over time
Lack of diversity and additional options
Delayed responses from support teams
Deceptive advertising
Conclusion
Thanks to its transparency, high RTP, and userfriendliness, Chicken Road makes a mark. Perfect for relaxed gaming sessions or newcomers to online betting. That said, its focus on chance and limited depth might not satisfy all players. For the best experience, play on official, licensed platforms.
Rating: 4/5
A balanced blend of fun and fairness, with potential for enhancement.
игровые русские казино список казино
Thanks for the article. Here’s more on the topic https://yarus-kkt.ru/
Элегантные автоматические рулонные шторы для вашего дома, советуем.
Топ-5 советов по выбору автоматических рулонных штор, обновить.
Почему стоит выбрать автоматические рулонные шторы, узнайте больше.
Автоматические рулонные шторы: стиль и комфорт, у проверенных специалистов.
Легкость управления автоматическими рулонными шторами, нашими услугами.
Как ухаживать за автоматическими рулонными шторами, для того чтобы.
Автоматические рулонные шторы в интерьере: тренды 2023 года, в нашем руководстве.
Умные рулонные шторы для современного интерьера, узнайте.
Автоматические рулонные шторы: сочетание функциональности и дизайна, посмотрите наш каталог.
Лучшие решения для окон — автоматические рулонные шторы, в нашем магазине.
Обновите ваш дом с помощью автоматических рулонных штор, выберите.
Автоматические рулонные шторы: идеальное решение для светолюбителей, в нашем блоге.
Технологии автоматических рулонных штор: как это работает, познакомьтесь.
Дизайн и функциональность: автоматические рулонные шторы, с идеями.
Как выбрать лучший бренд автоматических рулонных штор, узнайте.
Современные решения для окон с автоматическими рулонными шторами, выберите.
Энергоэффективность и автоматические рулонные шторы, изучите.
Советы по выбору автоматических рулонных штор для офисов, на нашем сайте.
Выбор автоматических рулонных штор: советы от экспертов, ознакомьтесь.
Автоматические рулонные шторы для гостиниц и ресторанов, узнайте.
автоматическая рулонная штора автоматическая рулонная штора .
Автоматическая рулонная штора: удобство и стиль, рекомендуем.
Как выбрать автоматическую рулонную штору, чтобы.
Зачем нужны автоматические рулонные шторы в вашем доме, на нашем сайте.
Преобразите свой дом с автоматическими рулонными шторами, в нашем магазине.
Управление автоматической рулонной шторой одним нажатием, не упустите.
Правила ухода за автоматическими рулонными шторами, они служили долго.
Автоматические рулонные шторы в интерьере: тренды 2023 года, в нашем блоге.
Умные рулонные шторы для современного интерьера, узнайте.
Почему автоматические рулонные шторы — это удобно и стильно, изучите подробности.
Комфорт и уют с автоматическими рулонными шторами, в нашем магазине.
Автоматические рулонные шторы — удобство в каждой детали, у нас.
Советы по использованию автоматических рулонных штор для оптимального освещения, в нашем руководстве.
Технические особенности автоматических рулонных штор, с нашим руководством.
Эстетика автоматических рулонных штор, ознакомьтесь.
Как выбрать лучший бренд автоматических рулонных штор, узнайте.
Создайте стильный интерьер с автоматическими рулонными шторами, сейчас.
Энергоэффективные решения для окон: автоматические рулонные шторы, изучите.
Автоматические рулонные шторы и их преимущества для офисов, ознакомьтесь.
Где купить качественные автоматические рулонные шторы, с нашими специалистами.
Как автоматические рулонные шторы улучшают атмосферу в общественных местах, в нашем каталоге.
автоматическая рулонная штора автоматическая рулонная штора .
Thanks for the article. Here’s more on the topic https://orenbash.ru/
Thanks for the article. Here’s more on the topic https://mehelper.ru/
Преимущества автоматических рулонных штор в интерьере, предлагаем.
Как выбрать автоматическую рулонную штору, освежить.
Почему стоит выбрать автоматические рулонные шторы, получите информацию.
Преобразите свой дом с автоматическими рулонными шторами, у проверенных специалистов.
Преимущества умного управления рулонными шторами, не упустите.
Как ухаживать за автоматическими рулонными шторами, поддерживать идеальное состояние.
Модные идеи с автоматическими рулонными шторами, в нашем руководстве.
Умные рулонные шторы для современного интерьера, прочитайте.
Автоматические рулонные шторы: сочетание функциональности и дизайна, узнайте прямо сейчас.
Как автоматические рулонные шторы улучшают качество жизни, ознакомьтесь.
Обновите ваш дом с помощью автоматических рулонных штор, получите.
Автоматические рулонные шторы: идеальное решение для светолюбителей, в нашем блоге.
Технические особенности автоматических рулонных штор, с нашим руководством.
Эстетика автоматических рулонных штор, с новинками.
Сравнение автоматических рулонных штор различных брендов, изучите.
Создайте стильный интерьер с автоматическими рулонными шторами, выберите.
Энергоэффективность и автоматические рулонные шторы, приобретите.
Советы по выбору автоматических рулонных штор для офисов, в нашем каталоге.
Где купить качественные автоматические рулонные шторы, с нашим каталогом.
Автоматические рулонные шторы для гостиниц и ресторанов, изучите.
автоматическая рулонная штора автоматическая рулонная штора .
Thanks for the article. Here is a website on the topic – https://kanunnikovao.ru/
Пляжный сезон 2025 в Архипо-Осиповке обещает быть насыщенным. Подберите тур или составьте индивидуальную программу. Подробности об организации отдых в архипо осиповке 2025 на нашем ресурсе.
Отдых в Архипо-Осиповке — отличный выбор для любителей природы. Отдых в этом курортном поселке привлекает туристов своим мягким климатом и великолепными видами.
Пляжи этого курорта известны своим чистым песком и спокойными водами. Купание и водные развлечения делают отдых здесь незабываемым.
В этом курортном поселке можно найти различные варианты жилья на любой вкус и бюджет. От комфортабельных отелей до уютных гостевых домов — выбор за вами.
Кроме того, Архипо-Осиповка известна своим разнообразным досугом. Прогулки по набережной, экскурсии и местные фестивали — все это создаст незабываемые впечатления.
Thanks for the article. Here’s more on the topic https://mehelper.ru/
Thanks for the article. Here’s more on the topic https://orenbash.ru/
Электрические рулонные шторы на окна, в одном решении.
Рулонные шторы с электроприводом, качество и надежность.
Автоматизация окон: рулонные шторы, стиль.
Управление рулонными шторами одним нажатием, все в ваших руках.
Как выбрать электрические рулонные шторы, для улучшения комфорта.
Электрические рулонные шторы: стиль и технологии, с гарантией качества.
Инновационные электрические рулонные шторы, для создания стильного пространства.
Лучшие модели электрических рулонных штор, для вашего дома.
Простота использования рулонных штор, добавляет стиля.
Топ моделей электрических рулонных штор, с первоклассным качеством.
Почему стоит выбрать электрические шторы, для вашего интерьера.
Электрические рулонные шторы: все, что нужно знать, для вашего офиса.
Где купить рулонные шторы с электроприводом?, с качественными материалами.
Как электрические рулонные шторы изменят ваш дом, в лучшую сторону.
Лучшие электрические рулонные шторы для вашего дома, для вашего интерьера.
Установка рулонных штор: пошаговая инструкция, просто и удобно.
Электрические рулонные шторы: идеальные решения, для стильного оформления.
Автоматизация офисных окон: рулонные шторы, для улучшения рабочего пространства.
Обзор рулонных штор с электроприводом, для вашего офиса.
электрические рулонные шторы на окна электрические рулонные шторы на окна .
айфон про +в кредит https://kupit-ajfon-cs.ru .